Overexposure latitude or: how to cheat your way to perfect film photography

By Hamish Gill

Film photography is often regarded as more difficult than digital. A large percentage of this likely comes down to the lack of the ability to check results in those first seconds after the button has been pressed. The result of this is that it’s harder to diagnose problems, especially problems with exposure, specifically if you’re unsure of what poor exposure looks like in the end results.

The interesting thing about negative film photography is that poor exposure doesn’t always result in a poor outcome. In fact, with some films, a touch of overexposure not only doesn’t do any harm, but it can actually help ensure good results.

It is from this fact that the oft-repeated mantras of “expose for the shadows”, “shoot half box speed” and “err on the side of overexposure” come from – all of these mantras point toward some degree of over exposure!

There is good reason for this too, it is in fact underexposure that is the main cause of slightly shitty looking murky results. Aiming for some degree of overexposure is a great way to avoid that problem – especially when you’re new to film photography.

Christmas 2014
Horrible underexposure – suffered around xmas 2014 when trying to abuse underexposure latitude as part of a bid to get more depth of field. Horrible. I kept the photo though as it was Connie’s first outing on her bike. If your photos look like this – then this post is definitely for you!

But to what degree is over exposure of negative film ok? Well, the answer to that question is as deep as it is long, and as such is way beyond my desire (or knowledge) to cover in its entirety. What I do want to talk about is my personal experiences of overexposure of film, how I’ve used that experience to completely remove the problem of accidental underexposure and murky unattractive photos. Finally, I also want to make the point that I made it so easy for myself that it felt like cheating. So much so that I am now purposefully making it harder for myself – which ain’t a bad problem to have!

Before I get into this, let me just point out that this article assumes you are shooting film and either digitally scanning your negatives or having them scanned by a lab. This is what I do, and it is within the scope of that practice that I am writing.

I also want to emphasise the point that this isn’t a post about best practice – this is a post about what many photographers would consider cheating. “Perfect” exposure will always result in the best results. This is more about getting closer to the best results without necessarily being a technically perfect photographer. It is also worth noting that this doesn’t work with all film. The films I talk about within, it does; beyond that, it’s up to you to experiment…

My perfectly exposed (looking) photos

First I want to share two interesting facts about my negative film photography. The first is that in the last year I have used a light meter less than I have before. The second is that in the last year I have taken fewer accidentally underexposed film photos than I have ever before – in fact 9 rolls out of 10 I don’t get a single murky underexposed frame on a roll at all, and when I do, it’s not unexpected.

As an example, I recently went out taking photos with a friend. He’s a good photographer, he knows what he’s doing and was shooting with his super-duper-top-flight-Canon autoexposure film camera. I had my Leica M-A, a meterless manual camera. Every single one of my photos came out perfectly, whereas at least a couple of his results were murky from underexposure. So what? I’m saying I’m a better judge of light than a very expensive camera, right? No, not at all! What I’m actually saying is that at that point in time I was just a bit better at cheating with my Leica M-A than my mate was with his fancy-pants Canon.

Wilces Cider
Portra 400, developed and scanned by AG

The reality is, if you looked at my mates negatives alone you would judge him a much better photographer than me. All 36 of his frames would have been fairly consistent in their density. That is to say that if you held the negatives up to the light they would look evenly exposed across the roll. Yes he suffered a couple of thin, slightly underexposed negatives that resulted in a murky scan. But this was likely because the light he was photographing tricked the meter of his camera into slightly overestimating the amount of light. But that was just a couple of frames. Overall, his negatives would have been pretty accurately exposed, and more importantly – even taking into account the couple of slightly under shots – they would have been fairly evenly exposed across the extent of the film.

My negatives on the other hand varied wildly in their density. Some were quite close to accurately exposed, but many were massively overexposed, very dense, thick, dark negatives. There’s very good reason for this too. Whilst he was changing his settings on a shot by shot basis, I hardly ever changed my settings with regard to the light. In fact, almost regardless of light, indoors, in shade or outside I just shot my camera at pretty much the settings I fancied, only taking the minimum of care. Yet despite this, the outcome was that the scanned negatives look pretty damn good. They look like they were all exposed accurately, when actually the exposure varied a great deal.

The reason for this is quite simple. Firstly the huge overexposure latitude of the film I chose to shoot gave me massive room for error. Secondly, I know that any “mistakes” I make in exposure will be compensated for when the film is scanned. And thirdly, through experimentation, I now have the experience and understanding of the length, breadth and width of the room for error the combination of latitude and mistake-compensation the scanner gives me to know what I can get away with in what light. Let me explain…

Choice of film

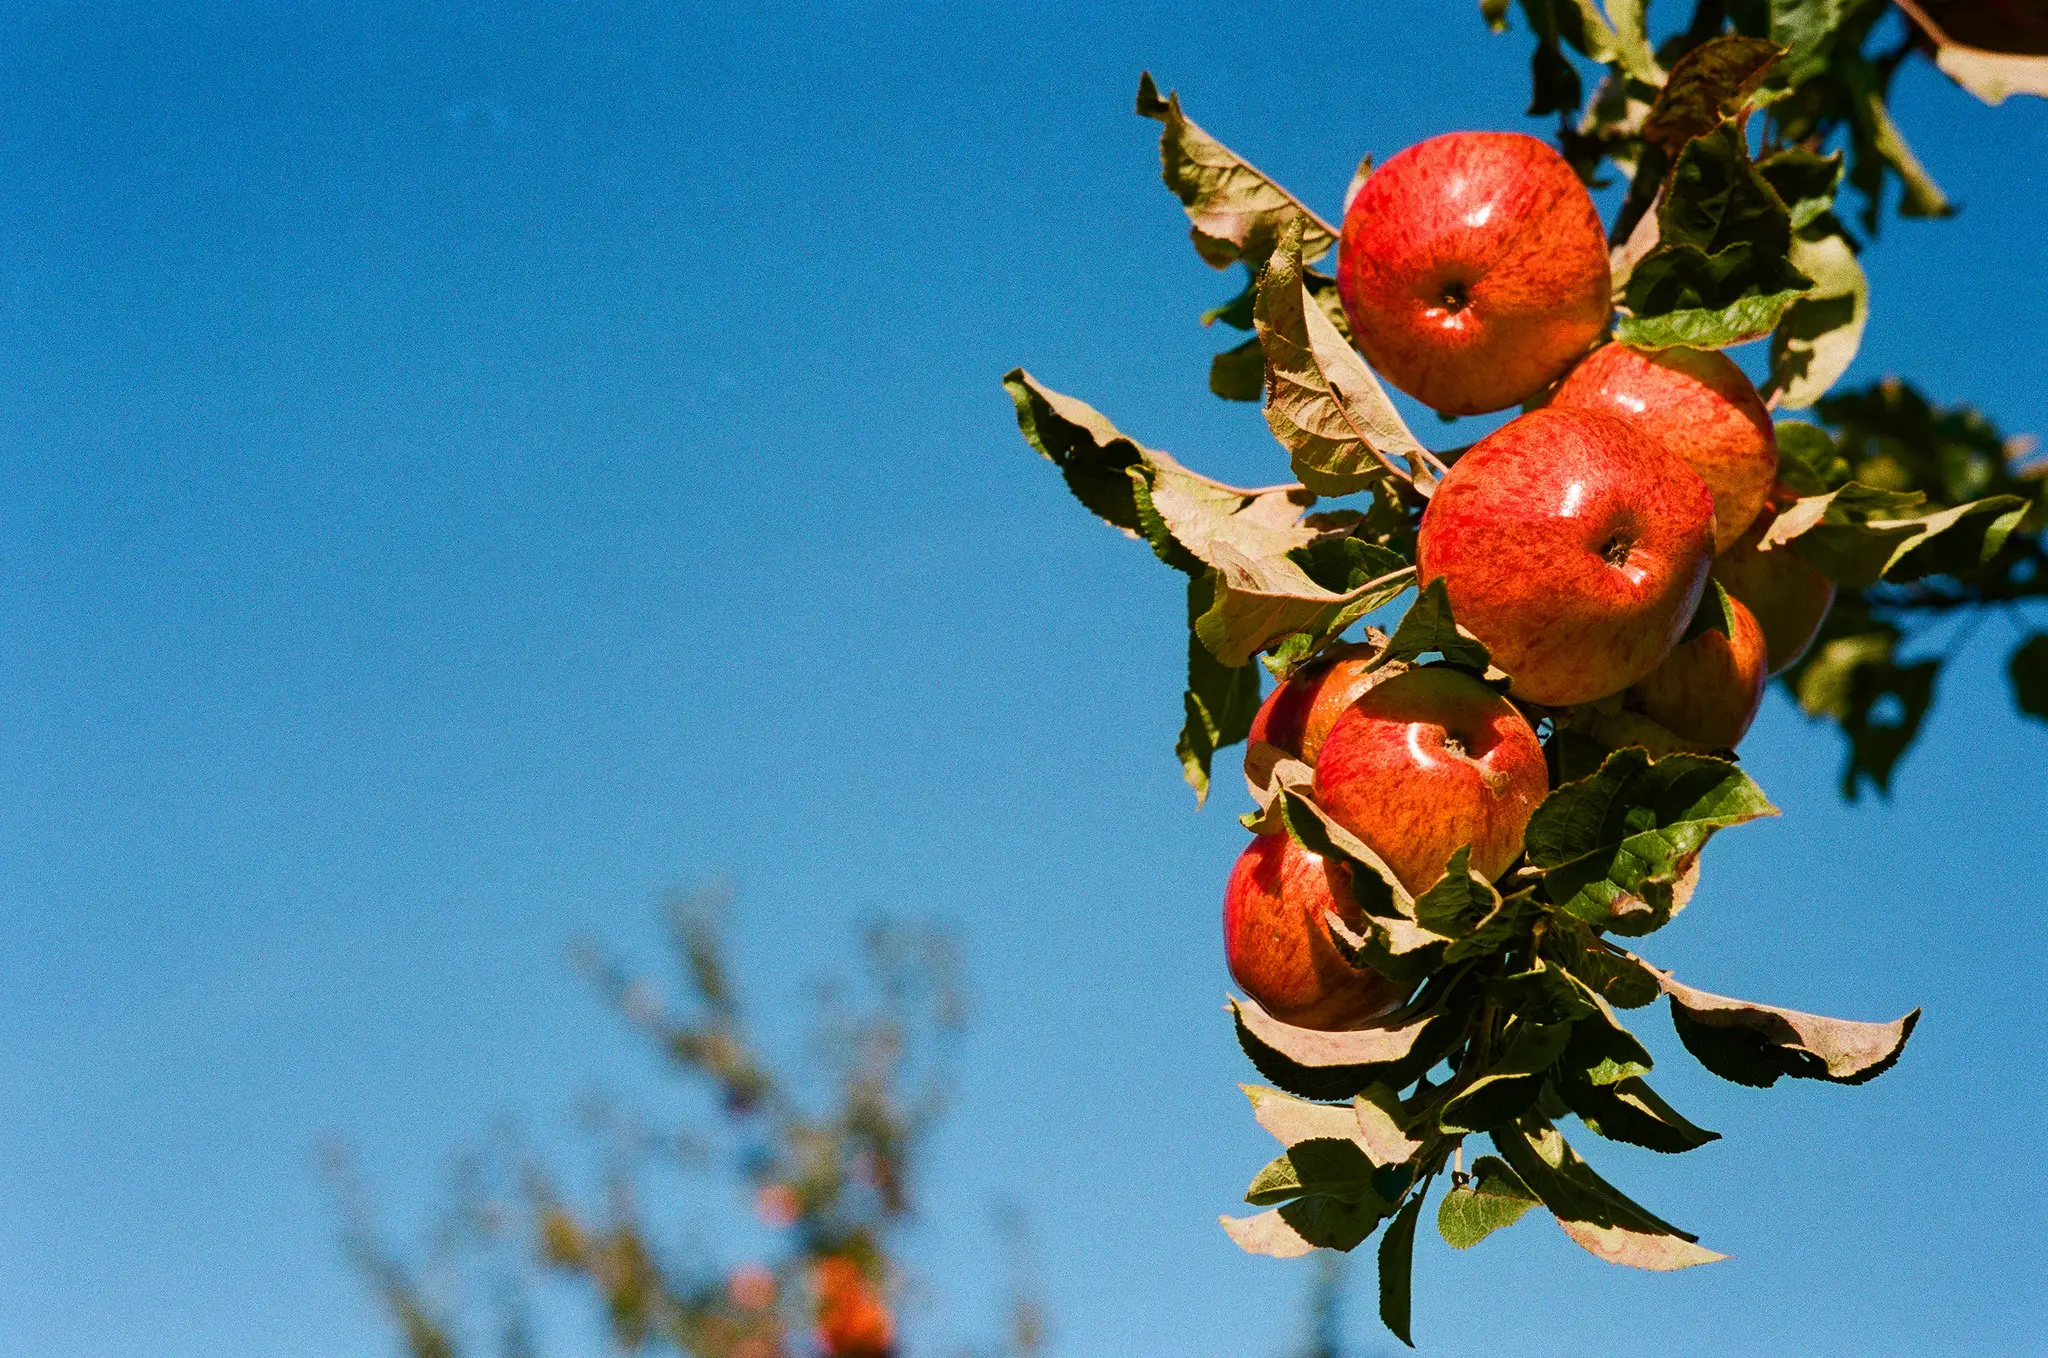
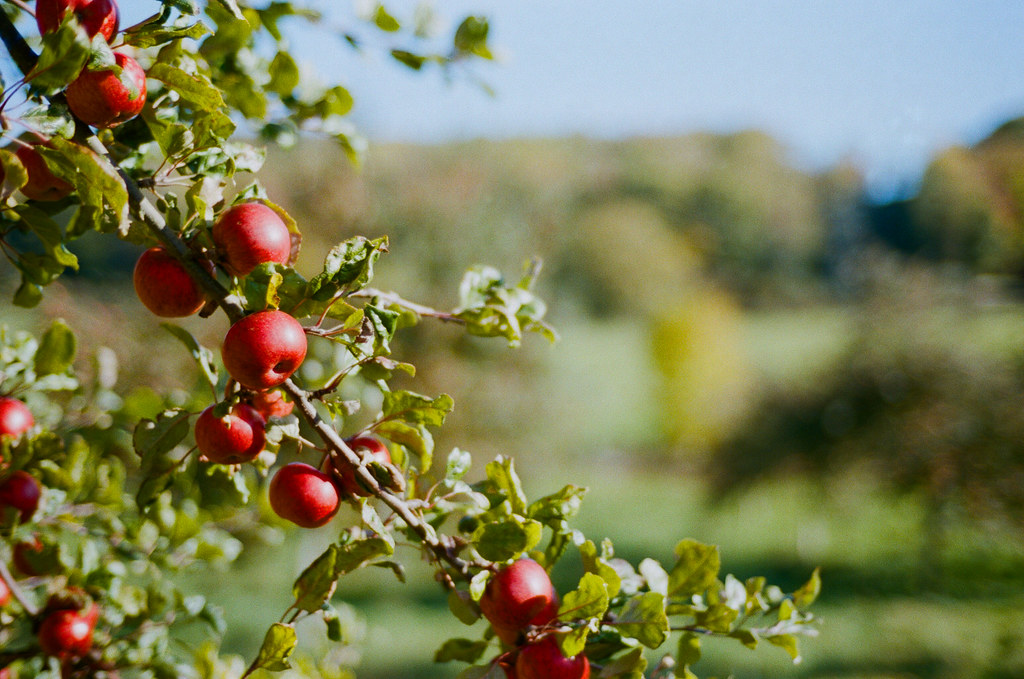
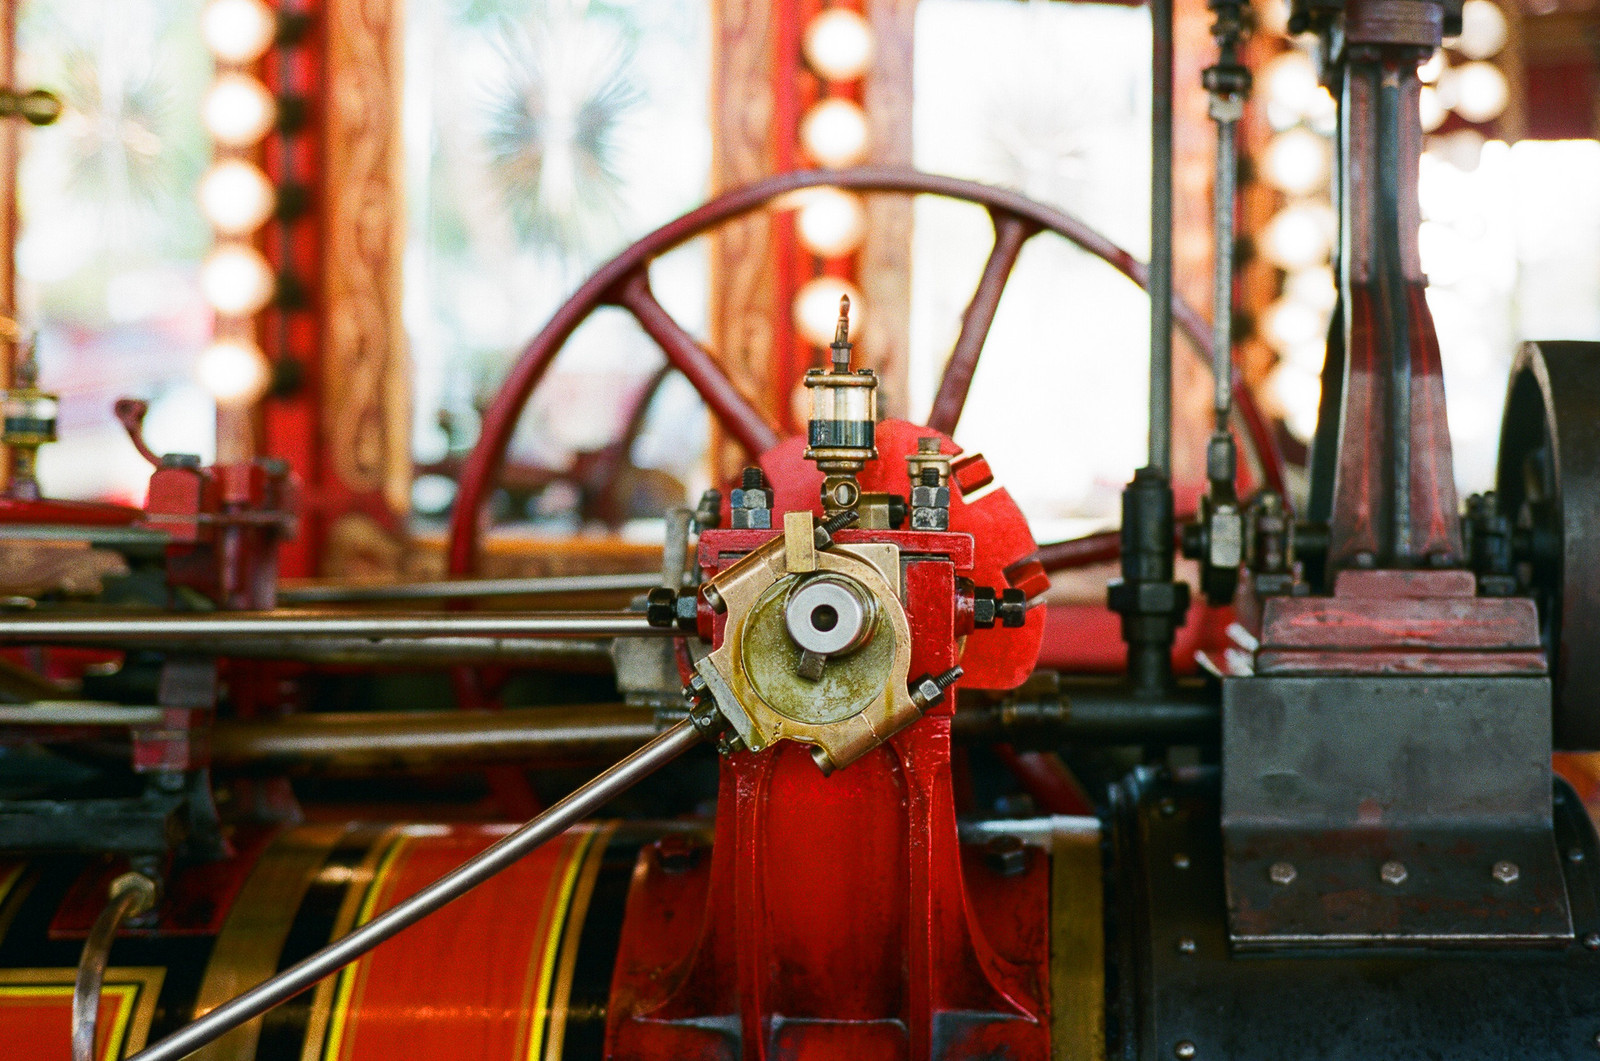
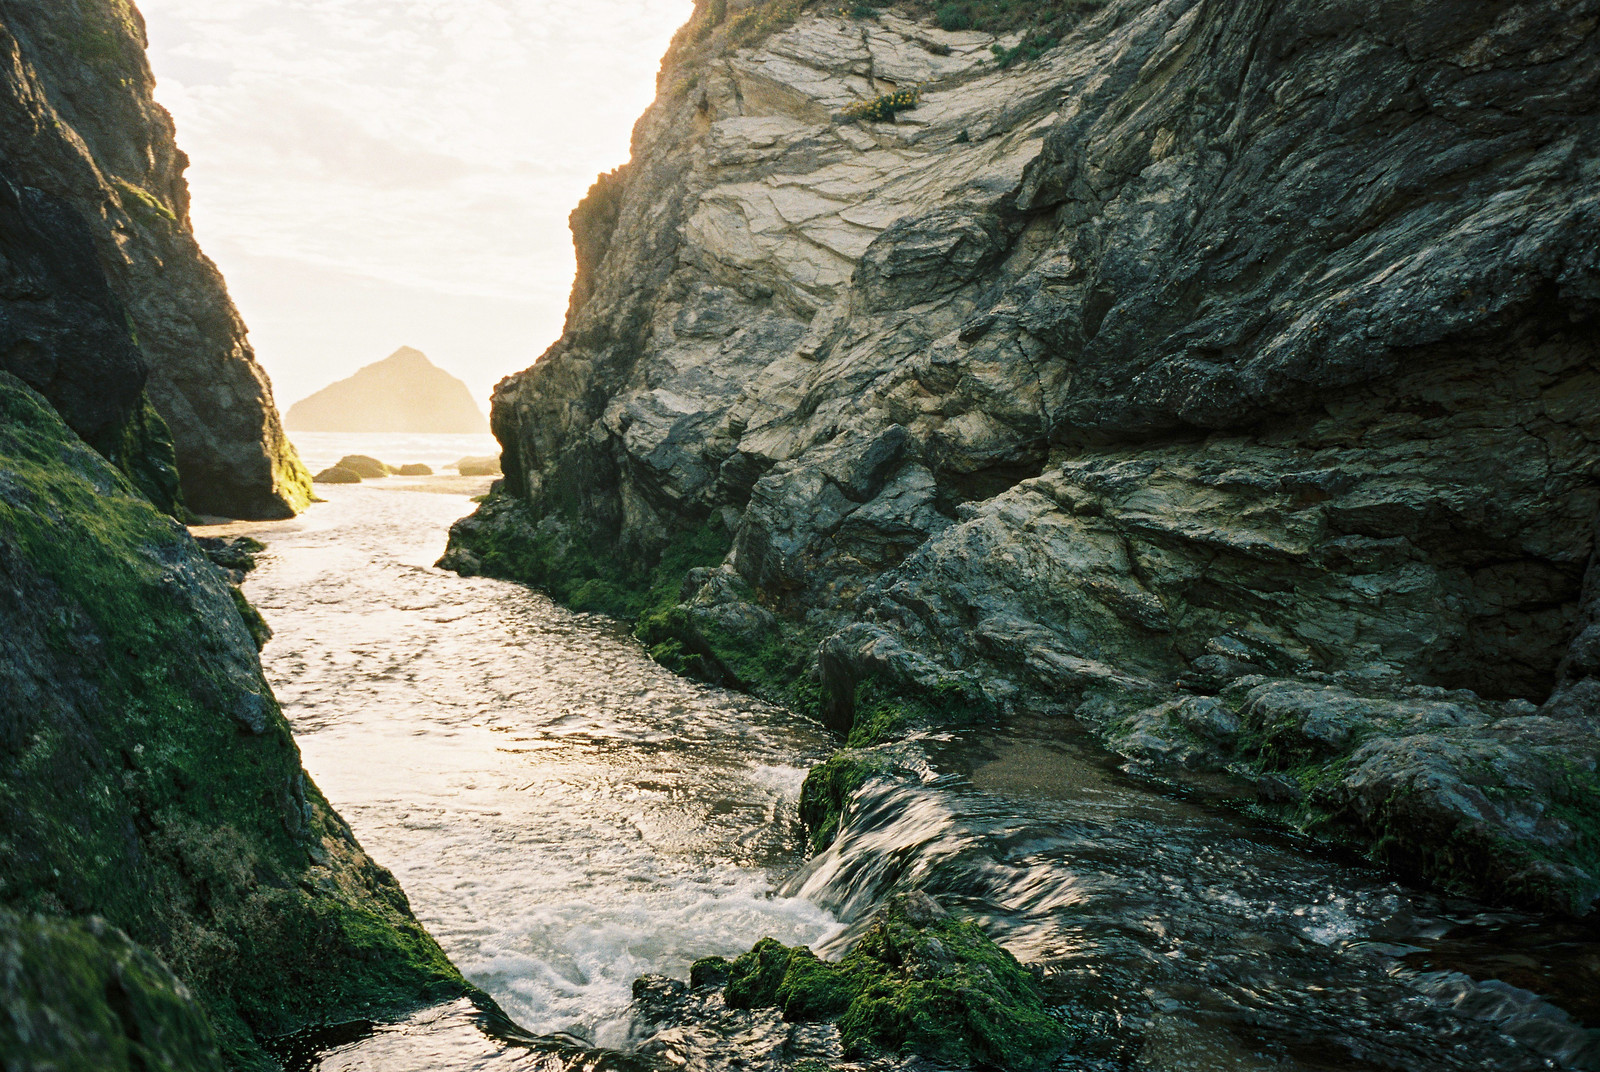
The films I choose to shoot are Portra 400 and Ilford HP5+. I shoot these films primarily because I like the look of the results. Additionally to this though, I shoot them because they’re incredibly forgiving. Portra 400 is especially impressive as not only does it allow lots of overexposure, it does it without introducing too much in the way of undesirable changes in colours. It’s no exaggeration to say that I have had useable photos shooting Portra 400 overexposed by what I’d guess was about 9 stops. This photo was shot at f/1.5 at 1/60th of a second in bright sunlight (I know it’s not perfect, but I’ll come to that in a mo).

Wilces Cider

Overexposure latitude – it’s not a myth!

I’d been told this sort of overexposure was ok with Portra 400 a few times, but it wasn’t until I tried it for myself that I really believed it. It just doesn’t seem to make sense that it would be possible to overexpose to this sort of degree and still get a perfectly usable photo. If you tried this with a digital camera the out of camera shot would be white. You might – if you shot RAW with a really fancy modern digital camera – be able to pull something back, but I’d bet it wouldn’t be much good.

Yet with the likes of Portra 400 this is abundantly possible. The reasons for this are its very broad overexposure latitude and the simple way negative film works. In very much layman’s terms (because that’s about the most of it I understand) the more light that hits the negative – albeit to an ever decreasing degree – the more chemical reaction occurs in the film’s emulsion. The more the chemical reaction occurs the thicker, or more dense, the negative gets. Hold a developed overexposed negative up to the light and it will look darker than a normally exposed one. The darker the negative the more the chemicals have reacted to the light. Inversely, very underexposed developed negatives will have areas which are completely clear. Where the negative is clear, no chemical reaction has occurred.

The importance of avoiding underexposure

This is of course why it’s so important to avoid underexposure, and ultimately the basis of where all the aforementioned mantras come from. In an underexposed negative there is less or indeed no chemical reaction, and where there is no chemical reaction there is no picture to scan.

Density correction in the scan

The next step is extracting that picture from the negative. Negative film is, of course, negative, so where the negative is highly exposed it is dark, but the end result of that part of the photo will be light once it has been inverted into a positive image. With films with as broad a latitude as Portra 400, to get a positive photo out of a highly exposed, very dark or dense negative you simply need to shine a brighter light through it. The more dense, the brighter the light required.

With Portra 400, it almost doesn’t matter how overexposed or dense the negative is, it is still theoretically possible to obtain a potentially usable image. Taking image quality concerns out of the equation for a second, it’s quite safe to say that as long as the chemical reaction has happened, there will be a picture on the negative. Inversely of course – as mentioned – where there is no chemical reaction there is no picture. You can’t shine less light through something that’s completely clear and expect to see a picture if there’s no picture to be seen.

This variation in brightness of light is what happens when my massively varied negatives go through a scanner. The really thick dense overexposed photos get a bright light shone through them, and the “better” exposed ones get a less bright light shone through them. This process is called density correction and is what results in all of my wildly differently exposed negatives all looking evenly exposed in the final scanned images.

Understanding of the room for manoeuvre

What’s important in this process is having a good idea of the scale of the room for error. The size of the room for error is – at least for the sake of this post – determined by the exposure latitude of the film and the capability and quality of the scanner used to scan the negatives. As mentioned I use Portra 400 film. Alongside the use of this film I use a commercial Noritsu scanner. Up until recently I was outsourcing my scanning, though since I’ve just bought a Noritsu of my own, I shall soon be scanning my own negatives. That said, regardless of by whom and where my negatives are scanned, through experimentation I have found the limitations of the scanner and film.

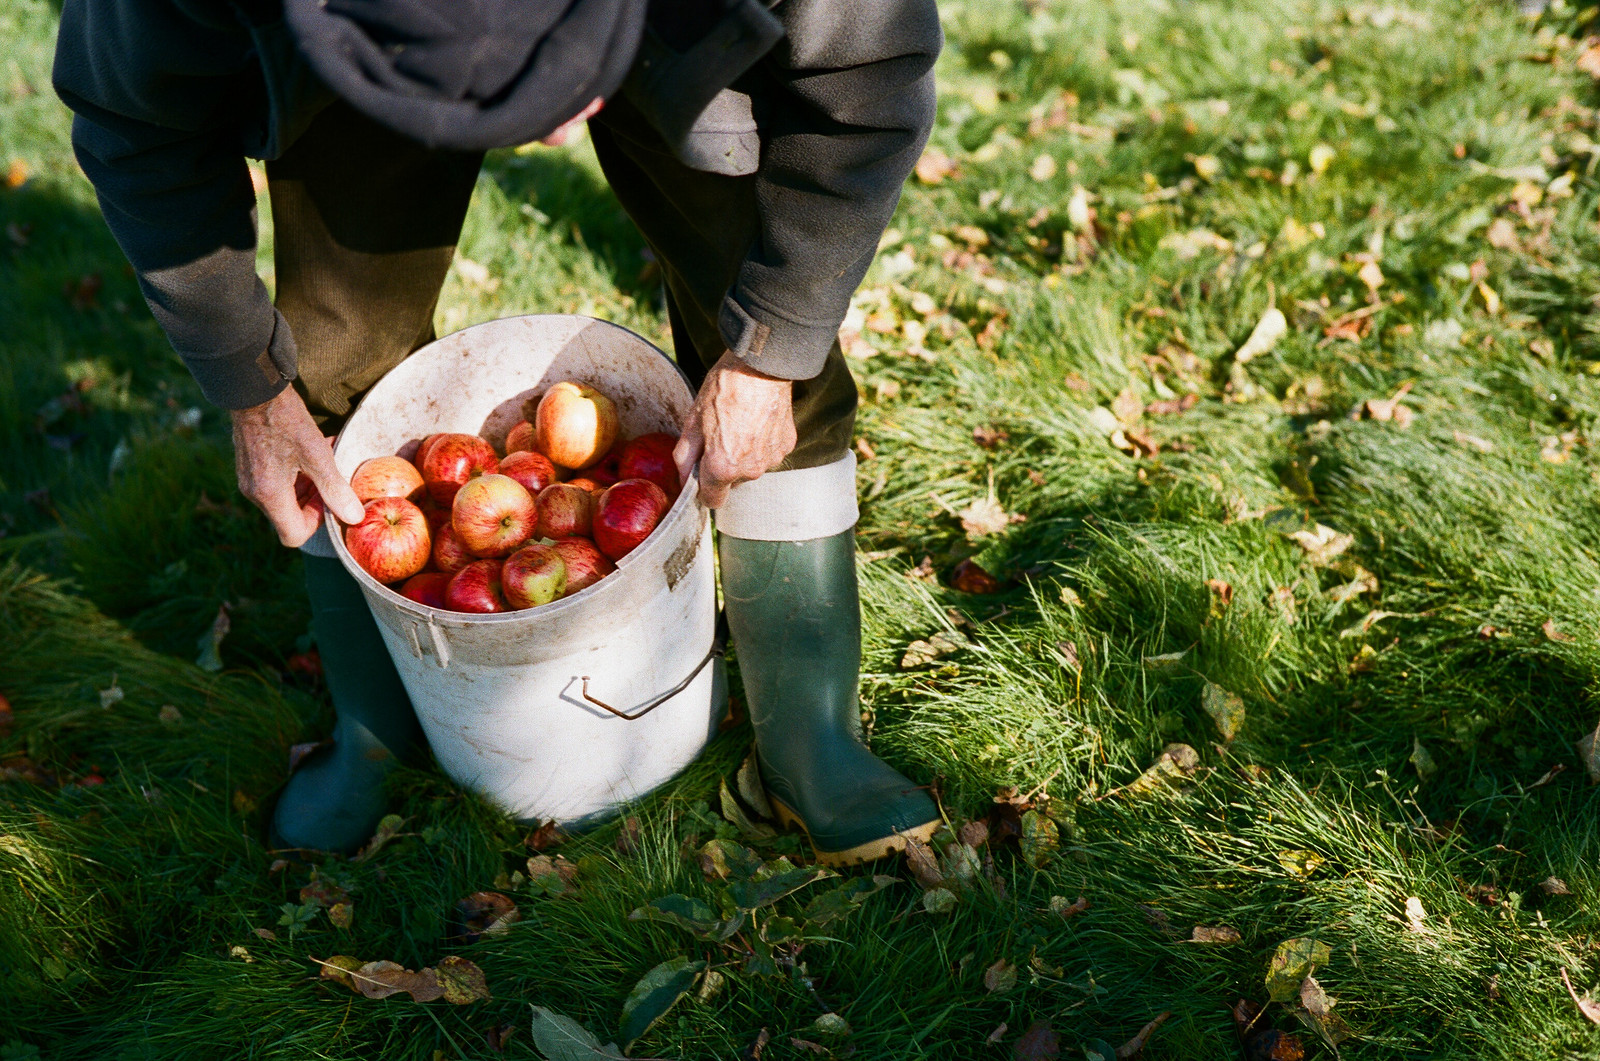
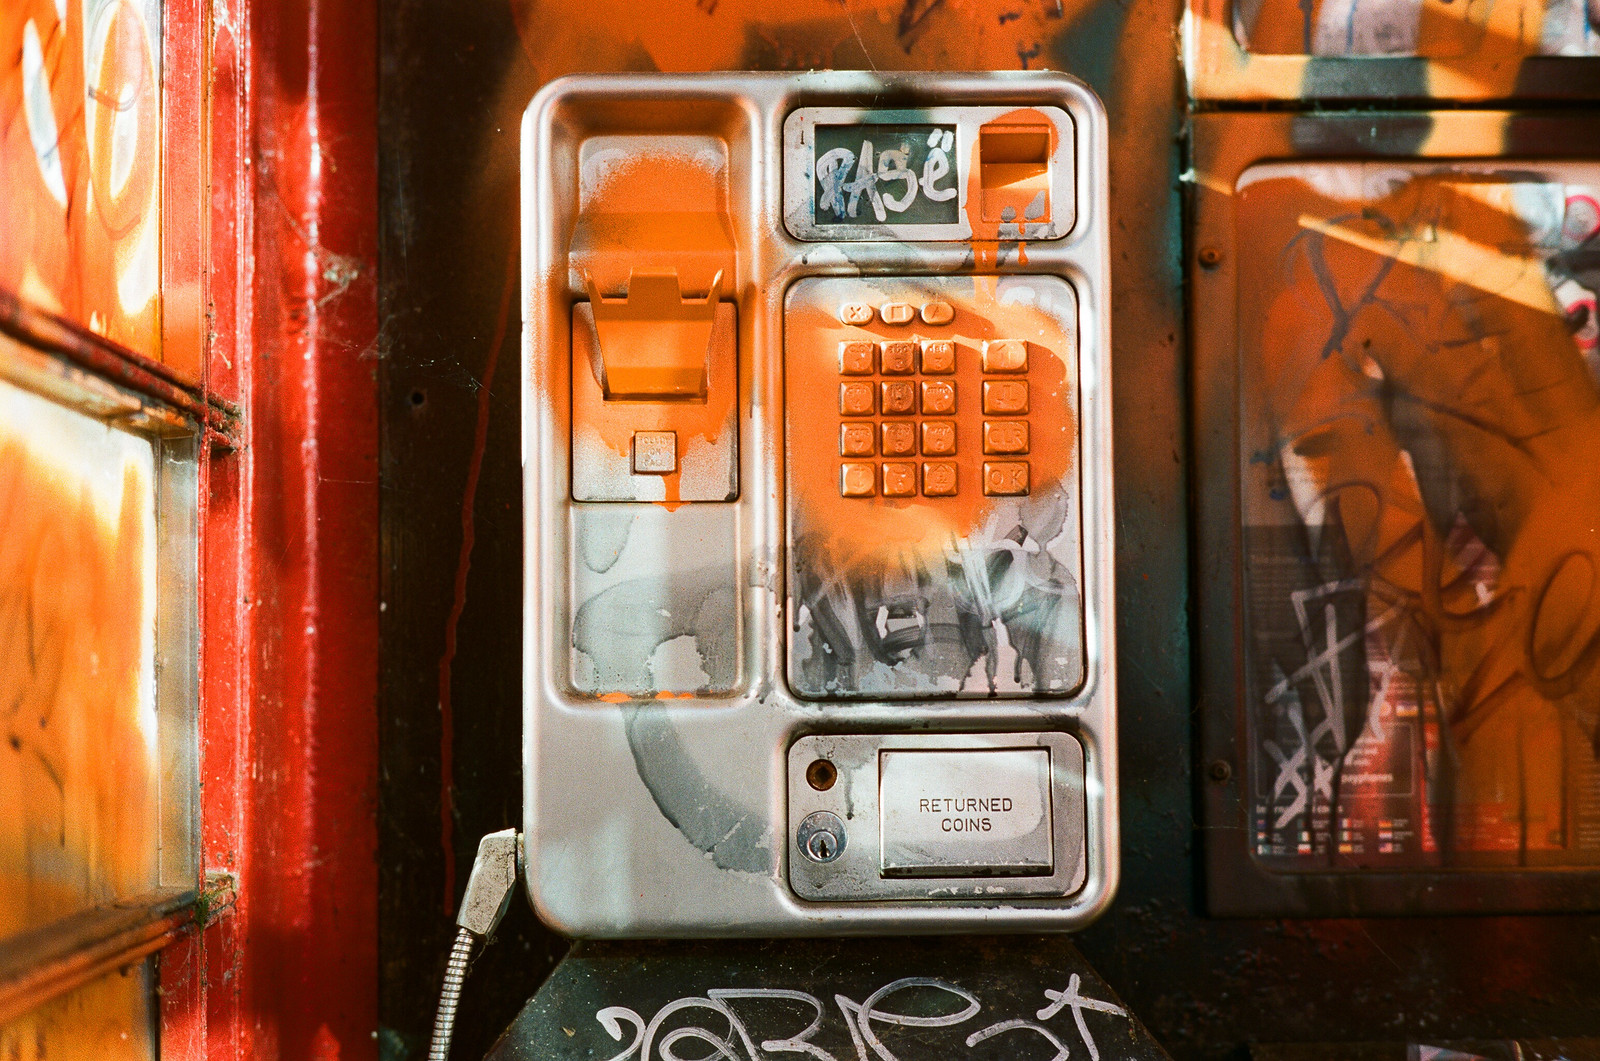
At the overexposure end of the scale, please refer again to my very overexposed photo above. As you will see, it doesn’t quite have the colour contrast and brightness of some of the other photos I took on that same day. (Such as the image at the top, or this next one)

Wilces Cider

I can’t find another example – I don’t publish or indeed keep many of my experiments – but over time I’ve exposed a few negatives like this and found this drop in contrast always there. What I determined is that what I was seeing in images like this was either the technical limitation of the scanner or the film. I’m not sure which, but actually in practice, it doesn’t really matter what causes the limitation. What matters is that within the film and scanner I’d chosen, I found the upper limit for overexposure before my photos start coming back lacking a bit of contrast. Actually in practise I decided that my absolute limit should be around 7 stops of overexposure – I mean how much overexposure does one really need…?

I then based my underexposure limit on where I found the line between a murky and non-murky photo coming back. In practice I found that if I underexposed by any more than about 1 stop, I risked getting murky scans. That 1 stop plus my other 7 gives me a maximum of 8 stops of room for error, which if you think about, is huge!

Practical implications

The practical implications of this are obvious. For a start, it puts an end to all that nonsense about the 1/1000 max shutter speed of a Leica film camera being an issue. It also helps with compact and more basic cameras that have even slower maximum speeds. My Voigtlander Vito B has a top speed of 1/200. But this isn’t limited to older film cameras. Cameras like the Konica Hexar AF for example only have top speeds of 1/250th. This is often stated as a disadvantage or limitation, but really – at least in terms of exposure – this can be solved with what I’m talking about in this post.

It also opens up the possibility of more easily shooting narrow depth of field or slower shutter speed photography in brighter light without the use of any neutral density filters. Which if like me you have some sort of built in hatred of filters, is definitely a bonus!

More than this though it allows – should you choose to embrace it – a very simple approach to shooting some types of negative film. My anecdotal tale of going up against a mates all-singling-all-dancing Canon was not a one off. In fact more often than not over the last year I have abused the latitude of my film in this way. Really – I’m almost ashamed to say – just because it makes life profoundly easier. In fact as I alluded to at the beginning of the post I’d go as far to say that I’ve become a little lazy (more on that later).

Back to my 8 stops room for error for a moment. Taking in to account that there is only 7 stops difference between f/1.4 and f/16. This means that using the sunny 16 rule as a starting point, on a bright sunny day if I set my hypothetical camera to 1/400 with 400iso film I should need to set the aperture to f/16. In practice because of my room for error I could actually take photos at f/1.4 in the same bright sunshine and still get a photo that – once density is corrected in the scan – looks like it was normally exposed. Of course this is a little extreme, but the fact that it’s possible certainly open up a certain level of freedom within your shooting disciplines.

Leica M-A, 50mm ZM Sonnar, Fuji 400h
Fuji 400h developed and scanned by AG

Achieving this for yourself

The beauty of all this is that unlike most of my posts where I’m extolling the virtues of x-camera or y-lens – or something else that can involve considerable investment on your part – in this case the only investment I’m recommending is in film and time. You don’t even need to change the film you shoot, or even the scanner you use.

Yes, you could go out and buy a load of Portra 400 and get it Noritsu scanned by AG or Richard Photo Lab or Mein film lab or whoever else has a Noritsu. If you don’t give them instructions to the contrary, shoot your Portra 400 photos within that 8 stop range and your photos will likely come back density corrected to look like normally exposed photos.

But why follow my path? I’ve chosen the path I have as I just happen to like what overexposed Porta 400 looks like when it’s Noritsu scanned specifically by AG. You might not. That being the case, you just need to experiment with the film/films that you do like. Try overexposing. Shoot a film a different levels of under and overexposure and see what results come back when you either send your scans off or try and scan them yourselves.

I’ve found that Portra 400 gets more colour-contrasty when it’s overexposed. Colours become more vibrant and in my mind very pretty, especially with a Noritsu scanner which in itself natively produces warmer more contrasty results.

Leica M5 & 50mm 1.5 Sonnar
Portra 400 overexposed, developed and scanned by AG

Fuji 400h seems to get less vibrant, and actually in my experience doesn’t give such broad room for manoeuvre. These are both professional grade films, but there are stacks of consumer films that will likely give a vast range of different outcomes.

Zeiss Ikon and 50mm Sonnar
Fuji 400h, a smidge over exposed, developed and scanned by AG

The point I’m trying to make is that experimentation and finding what film and level of overexposure right for you is key. Most would recommend as a general rule keeping it within about 3-4 stops of overexposure. I say they are probably right, but really, what harm is there in experimenting?

Beyond that, it’s just a case of finding a scanner, or someone to scan your negatives in a way that you like the look of. As a general rule, cheap mini lab scanners can’t cope as well with over exposure. The same can be said for cheap home scanners. But go to a pro lab or buy a good scanner and you should find your room for error in exposure increases.

The problems with density correction

Of course all of this does bring up the question of how to under or overexpose your photo for effect. What if you want your photo to be really bright or indeed really low key? If density correction always returns a negative film photo to the point of looking normally exposed, how do you either under or overexpose on purpose and see the result in your photos?

Quite simply this comes down to your chosen approach to scanning. If you scan at home, you can choose the exposure of the scan in the process of scanning yourself – this is of course the main virtue of home scanning touted by those who do it (it’s also my main motivation for buying my own Noritsu, but that’s story for another day).

Engineering
A 5×4 photo shot with HP5 – Home scanned

The problem with sending your photos away for develop and scan is that you’re effectively leaving the decision about what each frame should look like in the hands of the computer or person operating the scanner. This basically puts a big chunk of your creative process into the hands of someone or something else. This is something that many people find a hard pill to swallow, despite the fact the getting your negs scanned professionally almost always results, objectively speaking, in high quality images. Fortunately, there are a few ways to retain that creative control.

Obtaining a “look” from a lab

To make things slightly more complicated, different pro labs seem to have different looks, not to mention different scanners. Some will tell you about how they try to capture the native look of the film, some will tell you they can make your photos look pretty much how you want them to look, and some like AG will just send you scans that they have deemed look right with little input from you. None of these ways is necessarily right or wrong, but again, there are plenty of companies to try, its just a case of experimenting and finding what suits you best. What is consistent to all pro labs is that they will all tell you that for best results from you negative film to aim for some level of overexposure. From that point its just a case of finding the lab that makes your photos look how you want them to look!

Retaining creative control when using a lab

There are a few possible solutions to the problem of having someone else scan your film. The first is as simple as having a good relationship with the company you use. Talk to them, tell them your expectations and desires from your scans – some companies will be more accommodating to this than other. Some companies actually offer it as a service. UK film lab and Richard photo lab come to mind as two companies that offer a custom service that maps your desires to their process on an ongoing basis. There are many photographers that are quite vocal in their praise of such services.

Cornwall 2015 - day 3
Portra 400, about a stop over, developed and scanned by UK Film lab

But actually it doesn’t need to be as complicated or in depth as that. Some other companies like Carmencita offer simpler approach. As part of the ordering process with them, you make some basic specifications about colour, contrast and brightness which they work to when they process your film.

There is a third, and in my opinion even more simple approach to outsourced scanning. Or at least there is an approach that I’ve found suits me best. What I’ve found is that if I have my scans returned to me in TIFF format they give me just enough room to adjust the exposure to taste in post. TIFF files have per-pixel data, they are not compressed like JPEG files where the compression allocates single colours to whole areas of adjoining pixels. What this means is that within reason, your TIFF files can be adjusted to taste in your own post process software without too much degradation to the image.

Leica M-A, 50mm Sonnar, HP5 pushed 2 stops
A similar frame to the one above – processed by AG then tweaked at home

What’s important here is that once again there are options. Whichever path suits you best will come down to your own experimentation. Try having a conversation with a company like UK Film Lab, try using the Carmencita ordering system, and try using someone like AG to get your scans back as TIFF files so you can process them a bit if you feel the need. It’s your photography, you have to make it work for you in a way that feels most comfortable to you!

Caveat emptor

Before I conclude this post, I just want to touch on something I’ve mentioned a couple of times in the post: my laziness. In practice, just because you can shoot Portra at EI 1.6 doesn’t mean you should.

Many would also argue that shooting film like this is shooting it well outside of how it is designed to be used. In many people’s opinion, shooting like this results in technically worse image quality. I am sure they are right too – but really, if you are happy with the results shooting this way, who’s to argue with you??

That being said, this massive room for manoeuvre can – as it has in me on more than one occasion – led to laziness. Not needing to think about anything other than framing, focusing and setting the aperture to suit is a wonderful thing, but after the novelty wears off it’s hard to avoid the feeling that one is somehow cheating. This sense of feeling like I’m cheating has on occasion led me to feel less fulfilled by the process, and feeling less fulfilled by photography is something that I feel quite strongly about avoiding.

This is exactly why I have spent the last year also trying to find myself a light meter that works to subtly rein me in a bit without impacting too much on the speed I am able to work – I’ve now found one, in fact it was finding a light meter that suited me that inspired this post – but more on that another day.

What I’ve found is that I’ve got to a point in my film photography where I feel like I’ve learned the rules. I’ve then learned how to break the rules with some pretty outrageous abuse of latitude. I’m now learning to get the same consistently good results as quickly as I have been, but without taking the abuse of the latitude so far – the journey never ends does it?!

So to conclude

Fundamentally, all this should be about advancing your skills and quality of photography – and despite the title of this post – not about finding a way to cheat or bluff your way to good results. With the right film and scanning process you can abuse the hell out of the latitude, and actually it’s a lot of fun doing it as part of the process of learning to obtain great results more consistently. But ultimately it shouldn’t be about the abuse of latitude, it should be about the well considered good use of it instead.

Ultimately, some negative film has lot of overexposure latitude, you’ll either be well aware of this and be in on the trick, or you won’t. If you’re not, you really must give this sort of experimentation a go. It will help you understand the properties of negative film better, open up some creative possibilities and methods of shooting that give a sense of freedom like little other. But more than anything else – as it has in me – it should help you find a path to consistently better results in your negative film photography.

Cheers for reading,

Hamish

Some interesting links:

Film stock overexposure comparisons – UK Film Lab
A scanner comparison – Carmencita

Share this post:

Find more similar content on 35mmc

Use the tags below to search for more posts on related topics:

Contribute to 35mmc for an ad-free experience.

There are two ways to contribute to 35mmc and experience it without the adverts:

Paid Subscription – £2.99 per month and you’ll never see an advert again! (Free 3-day trial).

Subscribe here.

Content contributor – become a part of the world’s biggest film and alternative photography community blog. All our Contributors have an ad-free experience for life.

Sign up here.

About The Author

By Hamish Gill
I started taking photos at the age of 9. Since then I've taken photos for a hobby, sold cameras for a living, and for a little more than decade I've been a professional photographer and, of course, weekly contributor to 35mmc.
View Profile

Comments

Learning the basics of color print film photography – James Li on Overexposure latitude or: how to cheat your way to perfect film photography

Comment posted: 06/01/2023

[…] To really get your exposures right, you can use the Zone System to make sure that all areas of the image you care about will be exposed for adequately. This seems like a good intro: https://www.35mmc.com/02/05/2016/overexposure-latitude/#Density_correction_in_the_scan […]
Reply

Leave a Reply

Your email address will not be published. Required fields are marked *

Understanding Shutter Speed, Aperture, Film Speed (ISO) & The Relationship Between Them - 35mmc on Overexposure latitude or: how to cheat your way to perfect film photography

Comment posted: 25/02/2019

[…] provides a shortcut (cheat) to better results when shooting film – I wrote about this here. Just beware, cheating that much can and does lead to inconsistency in your results which can make […]
Reply

Leave a Reply

Your email address will not be published. Required fields are marked *

Francis on Overexposure latitude or: how to cheat your way to perfect film photography

Comment posted: 16/06/2018

Just discovered this post. Very useful. Thank you. Have recently bought an AGFA Billy 1 which only has B, 1/25s, 1/50s, 1/200s. Had been wondering the best way to approach film selection and exposure for mostly hand-held shooting. I guess if I have Portra 400 or HP5 sunny 16 will work well at 1/200. And if it's FP4 I can keep it at 1/200 and make it a sunny 11 baseline and maybe push it one stop when developing. BTW here's a YouTube clip illustrating the latitude of Portra. https://www.youtube.com/watch?v=T3OIzjhu9eo
Reply

Leave a Reply

Your email address will not be published. Required fields are marked *

RicD on Overexposure latitude or: how to cheat your way to perfect film photography

Comment posted: 14/05/2018

Very good and interesting article. Here is some of my thoughts on exposures: In other blogs I have read that film manufactures list the ISO for mimum light, thus over exposing may be a consideration. One of the issues folks may not realize is our older film cameras are spring and gear operated, over time the shutter speed can be off by a large margin. Also leaving the shutter cocked will lessen the tension ability of those springs. All that to say, have a CLA on the film camera, make sure the shutter speeds are as they indicate on the dial. If we do not know if the shutter is accurate, we will not be working with true values. A few of my cameras (50 and more years old) their shutter speeds were actually one or more stops slower, never faster. After the CLA I saw a difference in negitive density. Shutter testers can be purchased online. If you see your shutter is off then a tech should make the repairs, or compensate from there, now you are working from accurate values. You mentioned light meters, my two are the Sekonic L-358 and the Lumu that plugs into the iPhone headphone jack. Yes, the Lumu is as accurate as the L-358, and very small. In use the Lumu is too futzy. Connect it to the iPhone headphone jack, turn on the iPhone, open the Lumu app, take readings. The Sekonic, turn it on take a reading. Down side of the L-358 is its size in the pocket, that is where the Lumu wins. The Sekonic can be used onehanded, the getting the Lumu ready requires two hands. To effectively use the lumu on site it is best to leave it connected to the iPhone and the iPhone set to not turn off, otherwise when you need to use the Lumu you will need to login to the iPhone. The process of getting to the Lumu app is slow, the L-358 it is consideribly quicker. On a side note: in your article there are misspellings, i.e. there a few you that should be your or you’re, same with the word to, that should be too. Very much I appreciate your article and the folks that responed with their input. Thank you
Reply

Leave a Reply

Your email address will not be published. Required fields are marked *

Hamish Gill replied:

Comment posted: 14/05/2018

Some good points there, Ric, especially about my spelling! ;) Have you tried the later Lumu that plugs into the lightning port - many of the speed issues solved! It's very good! have a read of my review here

Reply

Leave a Reply

Your email address will not be published. Required fields are marked *

RicD replied:

Comment posted: 14/05/2018

Hi Hamish, Thank you for the link to your Lumu Power review, it is quite impressive. Though I have not tried the Lumu Power their reviews are quite glowing. For the original Lumu I was part of the Kickstarter program and did some beta testing of their app same as you did. As with you I am very positively impressed with all the folks I communicated with. Though I would like to purchase a Lumu Power, my Sekonic L-358 fits my needs. My shooting is 99% film thus when needed I do have a 80A filter balancing daylight film to tungsten, and a FL-D filter for daylight film used with fluorescent lights. My L-358 is old, but it remains powerful thus I am unable to justify the expense for the Lumu Power. Also, one handed pull out the L-358, measure the light be it flash or ambient put it away. Have you noticed on the Lumu app the aperture, shutter, and ISO, each go different ways. Want to increase the ISO click right, increase shutter speed click left, Increase f/stop number click right. There needs to be consistency, yes I have often mentioned this to Lumu. The app for the iPad is only in portrait mode. Many of us use our iPads in a keyboard placing the it in landscape mode. Again, I have suggested for adding auto rotate to the iPad app. Their notes app, I want to keep track of each frame; not designed for that. My solution is use Apple Notes. All that said I do like my Lumu. When I do use it, it becomes quite a conversation starter. When my L-358 bites the dust I definitely would purchase the Lumu Power, not a bulky other brand.

Reply

Leave a Reply

Your email address will not be published. Required fields are marked *

zoran vaskic on Overexposure latitude or: how to cheat your way to perfect film photography

Comment posted: 07/05/2018

Thanks, I'm excited to see what the next few months brings. I've really tried to buckle in and down on film/photo theory lately to understand things that have been mysteries to me, and some of the knowledge I've run acrosss seems really helpful. I recognize though that without trying to put theory into practice and then making inevitable mistakes, and then also not giving in to discouragement when that happens, but rather taking the position of persistent/consistent plugging, headway can be made. I know thats true for photography like it is for everything else. Having thought about it some, I think photography, or anything else for that matter, is not the issue, but we ourselves can be bound with issues, and then its hard to concentrate, hard to learn, and ultimately find satisfaction in the endeavors we choose. I've felt that way for some time about things having observed myself when I feel good about me and also when I dont feel good about me or whats happening in my life. I've noticed in these two states thats there is a vast world of difference in the ability to absorb information and to also implement information practically....and successfully....with persistence of course. I found, accidentally, this quote a few days ago, and I thought it to be very true. I know this is straying into philosophy and one wonders, how does it connect to overexposing colour film? But I think it does, maybe someone will read and see, yeah, it may connect to overexposing colour film after all..... " There is only you and your camera. The limitations in your photography are in yourself, for what we see is what we are." Ernest Haas Some people will brush this off. I happen to believe its very true though and not just 'deep' jargon with no connection to reality. Things in life...photography....are not hard, but rather the things we deal with internally sometimes overwhelm us, and then we dont have the energy, the wherewithal to handle photography or much else in life. But if we say, this is too hard, that is too hard....photography is too hard....I think its actually a mistaken and misleading assessment.
Reply

Leave a Reply

Your email address will not be published. Required fields are marked *

Hamish Gill replied:

Comment posted: 07/05/2018

Thanks Zoran - you're right it just needs to be learned. The more you learn the more there is to learn, but the right attitude toward that process will get anyone a long way! Sounds like you have just the attitude needed!

Reply

Leave a Reply

Your email address will not be published. Required fields are marked *

zoran vaskic on Overexposure latitude or: how to cheat your way to perfect film photography

Comment posted: 05/05/2018

Great post. Today I began to shoot my 2nd roll of film in the past 17 or so years in the aperture priority or almost auto exposure Om-10. A couple of years ago I shot a roll in my Yashica t-4, but still havent developed . Todays roll really felt like my first roll during all this time. I was nervous even though it was aperture priority. Maybe I had good reason to be as after 6 or 7 shots I heard a horrible sound when trying to advance the film. Even my unschooled film ears knew what that meant. You have to be kidding, I thought to myself. Ended up having to yank it, and when I later labelled the canister I named it 'nightmare productions'. But of course my big concern in venturing into film apart from creative composition, is exposure. Your article is a big help. A couple of years ago I wasnt interested enough to want understand the point you are making here Hamish. But today I wanted to understand and you made a great, simple, informative point. Point taken and thanks again. I've finally made plans for purchase of home developing supplies, a competent (so to speak relatively speaking) scanner, and a new computer unit. Decided it was time to act. When i got drawn back into photography three years ago I never knew film would draw me though I've been slow to respond. The whole photography thing began from a recognition of a love of still images, especially colour in my case though I appreciate the amazing black and white people that people create. Theres a lot to wade thru to try to understand getting into photography let alone film photography for a novice. But your overposure explanation is already making me feel a whole lot better about my prospects. I plan to definitely implement it in practice.
Reply

Leave a Reply

Your email address will not be published. Required fields are marked *

Hamish Gill replied:

Comment posted: 05/05/2018

Hi Zoran, glad to be of help! Good luck, and let me know how you get on!

Reply

Leave a Reply

Your email address will not be published. Required fields are marked *

Nick on Overexposure latitude or: how to cheat your way to perfect film photography

Comment posted: 13/06/2017

Such a useful post this Hamish. I'm sure it saved me from getting my first roll of film back as an undexposed 'fail'. Should be mandatory reading for anyone shooting their first roll of film!
Reply

Leave a Reply

Your email address will not be published. Required fields are marked *

Hamish Gill replied:

Comment posted: 13/06/2017

Glad to be of help - nothing replaces proper metering, but this makes life so much easier :)

Reply

Leave a Reply

Your email address will not be published. Required fields are marked *

Neil Woodman on Overexposure latitude or: how to cheat your way to perfect film photography

Comment posted: 12/06/2017

Just wanted to say thanks for this article. I've been overexposing my film now for a few months and I'm so pleased with the results I'm getting back from the lab. Like other people who had commented I wish I'd have known this before.
Reply

Leave a Reply

Your email address will not be published. Required fields are marked *

Tina Kino on Overexposure latitude or: how to cheat your way to perfect film photography

Comment posted: 04/11/2016

Very nice writeup, thank you!
Reply

Leave a Reply

Your email address will not be published. Required fields are marked *

Hamish Gill replied:

Comment posted: 04/11/2016

No problem :)

Reply

Leave a Reply

Your email address will not be published. Required fields are marked *

Michael on Overexposure latitude or: how to cheat your way to perfect film photography

Comment posted: 15/09/2016

Hamish, How are you liking your Noritsu scanner? Which model did you get? I'm in the market for one as consumer grade scanners I'm having difficulty with and love scans I get from the lab with the Noritsu. Did you have to get any special software for it, or did it come with it? I'm having a terribly difficult time finding good information on the internet with people who have Noritsu scanners at home. Thanks! Mike
Reply

Leave a Reply

Your email address will not be published. Required fields are marked *

Hamish Gill replied:

Comment posted: 15/09/2016

Hi Mike, I am having a world of problems with mine - fortunately I have a path to getting it fixed. For the moment I am still using AG. My shit aside, I know of a lot of people who are having much more success than me - the best source of info I know of is the Noritsu facebook group I started. There are a few on there with a lot more knowledge than me. In terms of software, there are a few options the most easy is photoshop and twain drivers - these should come with a second hand unit, but if they don't someone on the group might be able to help you out

Reply

Leave a Reply

Your email address will not be published. Required fields are marked *

Michael replied:

Comment posted: 15/09/2016

Thanks so much for getting back to me. There is a unit on eBay that comes with that driver that I have my eye on. I'm not on Facebook but asked to join under my wife account, Sarah. Looking forward to learning more about it :)

Reply

Leave a Reply

Your email address will not be published. Required fields are marked *

Terry B on Overexposure latitude or: how to cheat your way to perfect film photography

Comment posted: 12/09/2016

Neil, don't despair. Work on getting a decent negative, expose as per the nominal ISO rating and develop carefully, maintaining developer temperature at the standard 20C/68F throughout. Depending upon the ambient temperature, you may find having the developer a degree or two above the norm as this will cool immediately it is put into the tank. Initially, I'd suggest using a one-shot (use once, throw away) liquid developer that only requires diluting 1:9, and do ensure you get the mix correct. Using some of the fancy developers that have high dilutions makes it more difficult to gain consistency until you're versed in using them. As you do your own scanning, have you ever considered that there is the possibility that your scanner could be contributing to the issues you are having with grain? I have two scanners, an old Minolta Dimage Elite Scan II, of 2001 vintage, and a Canon 9000F flatbed that can scan film up to 5x4. The old Minolta is a dedicated 35mm film scanner and produces visibly sharper results, but at the expense of grain. The Canon produces almost grain free results but, in comparison, produces noticeably softer results with 35mm. For a reason I can't fathom, the Canon performs much better with medium format negs. In Lightroom, do you have a grain reduction function? This may help.
Reply

Leave a Reply

Your email address will not be published. Required fields are marked *

Neil Woodman on Overexposure latitude or: how to cheat your way to perfect film photography

Comment posted: 01/09/2016

So if I'm shooting Ilford Delta 400 should I set my meter to 200? Or is this approach more for colour film?
Reply

Leave a Reply

Your email address will not be published. Required fields are marked *

Hamish Gill replied:

Comment posted: 01/09/2016

In the contact of this article it's not about "should", it's about "try it and see", and "you probably can". In short, it most likely won't hurt, and might even give you slightly better shadow detail. In practice it will depend on how you meter etc. If I were you though, I'd give hp5 a go, it's much easier to work with if you are interested in experimenting based on the contents of this post

Reply

Leave a Reply

Your email address will not be published. Required fields are marked *

Terry B replied:

Comment posted: 01/09/2016

Neil, in simple terms, yes. Setting your meter, hand-held or TTL in camera, to a lower ISO value than that of the film you use will result in over exposure. Just the 1 stop you propose here, going from 400 to 200, will, as Hamish has pointed out, give you slightly improved shadow detail, and is not too much as to make the neg too dense to print the highlights. And if you don't like HP5, then the Pressman's favourite, Tri-X, is well worth a try. It's almost bullet proof when it comes to messing it around with different ISO values. If you develop it yourself, D76 or ID11 are ideal. These developers from Kodak and Ilford are identical, by the way.

Reply

Leave a Reply

Your email address will not be published. Required fields are marked *

Neil Woodman replied:

Comment posted: 01/09/2016

Thanks Terry - great advice and thanks also Hamish. I've got some hp5 but in 120 not 35mm. Now I've got an M2 (Hamish - your articles are costing me a fortune :D) I wanted to try overexposing as I was under exposing before and developing myself using Ilford DD-X then Ilfosol. I got incredibly grainy results though which considering I was shooting Delta 100, I never could figure out why. Maybe this is where I've been going wrong. I tried a roll of tri-x once stand developed in rodinal and it came out awful! I'd love to use it as people rave about both the film and the developer but that experience put me off sadly. I had some great results with neopan but it's expensive and I found the Ilford film easier to load onto the reels for some reason.

Reply

Leave a Reply

Your email address will not be published. Required fields are marked *

Terry B replied:

Comment posted: 01/09/2016

Neil, all I can say is that if you tried Tri-X and it came out awful, then something was clearly wrong with what you were doing or using or, dare I say, your photographic technique at the time? But don't despair, we've all been there and done it at some time. I don't know anything about Ilford DD-X or Ilfosol, but Ilford are targeting Ilfosol as a fine grain developer, particularly suited to FP4 and Delta 100 and therefore I can't understand why you say you had incredibly grainy results using it with Delta 100. If you can't get fine grain with this combination, then something would seem to be seriously amiss with your technique. What ISO did you rate the film at? I don't know if you are a dyed in the wool film user, or relatively new to it, but I can't help pass on some comments made by Victor Blackman, a famous Fleet Street press photographer working on the Daily Express in the 1950's and 60's and who also had a column in the Amateur Photographer in the 60's and 70's. I was just doing some light reading of is book, My Way with a Camera, and in the section on film and developer choice he advises budding photographers to stick with one general film, with perhaps a second one for special circumstances, and to standardise with one developer and consistency of development. But before getting to this stage, he suggests experimenting with different film/developer combinations so the photographer gets to know a combination that suits him, and importantly, he will know how his chosen film/developer will respond to changing circumstances when a photo was taken. The point is, if in seeking nirvana you keep changing film types and developers before you fully understand what each is capable of in tandem, you may never be happy with the results. I know what works for me, because decades ago I, like most hobby photographers who did their own d&p, would have gone through this process. And repeatability is key - it leads to consistency. This is particularly important with the small 35mm negative. It can't be abused to anywhere near the same degree as can roll film. So correct exposure with normal development, or decidedly incorrect exposure but with the appropriate compensation during development, are key. Timing of development is important, and temperatures of the developer should be maintained to the recommended level, and stop bath, if used, and the final washing too, although this can be allowed to drop over a short period to allow the emulsion to gradually adjust to the drop. Apologies if this is teaching you to suck eggs, but if you are relatively new to film processing, you are coming to it at a time when film is not in general use and you won't find it discussed in photo mags any more.

Reply

Leave a Reply

Your email address will not be published. Required fields are marked *

Neil Woodman replied:

Comment posted: 01/09/2016

Thanks for taking the time out to write that Terry. I did quite a lot of film development but haven't for around three years just because of really not being inspired. I ended up settling with delta 100 and Ilfosol but I'd shoot it at 200 and adjust the dev time accordingly. The results were grainy I must admit which is why I started shooting medium format at the same speed as there was obviously less grain! Reading about overexposure on here leads me to think I was wrong to shoot it at 200. Maybe I should try D-76. This will make you laugh, I was boiling water and leaving it overnight to use with developing in the same bucket I used to do water changes in my aquarium, which had a sand substrate. I wondered why I kept getting scratches on my negatives!

Reply

Leave a Reply

Your email address will not be published. Required fields are marked *

Terry B replied:

Comment posted: 01/09/2016

Hmm, yes, I can see why you'd get scratched negatives, but I bet the beach shots of the family on holiday at the seaside looked great. Under-exposure and push processing to compensate does lead to an increase in grain AND contrast, and the visual impact has a lot to do with a particular film's latitude to such treatment. I suspect it was the double whammy of added grain and contrast that you found objectionable. In my own experience I found that the problem was greater with slow to medium speed films than it was with my choice of fast film, Tri-X, and I put this down to a number of reasons. Generally speaking, the slower the film speed, the more contrast a film has and a film like Panatomic X, for example, needs processing very carefully to avoid excessive contrast, and so it responds badly to push processing. By comparison Tri-X, with its large grain structure, can handle push processing better. Getting back to your Delta100/Ilfosol combination, look at it this way, you have already carried out one piece of advice from Victor Blackman and you've discovered this doesn't work for you when rating the film at 200 ISO. So yes, try it at its nominal speed of 100 and see how that looks, and if you don't like the result, then clearly this is not a film/developer combination that will ever work for you. (But see below about choice of enlarger.) Every photographer has his/her own preferred combination of film/developer and their choice won't necessarily be yours. In my case, especially for 120 and 5x4 it was Ilford FP4/Aculux. When I wanted the faster speed of Tri-X, from 35mm to 5x4 it was always D-76. Aculux worked quite well with it, but I just loved the extra punch that came with D-76 processing. At the risk of waffling on (Hamish is aware I can have a tendency for this) do you do your own enlarging? If so, have you ever considered that there could be a potential problem with your choice of enlarger? And it has to do with the light source. The most powerful source is a true condenser, but these units whilst providing the sharpest image, also accentuate grain and contrast. Fitted with an opal diffuser, though, the contrast and grain can be reduced, and the condenser provides overall even illumination. Then there is the cold cathode head, which will mostly be found in large format 5x4 enlargers. This provides a soft overall level of illumination that minimises the effect of grain and contrast, and to a degree dust on the negative. What does all this mean in practical terms? Well, if you have a negative developed for a high gamma (contrast) which is normal for a cold cathode enlarger, if you use this neg in a true condenser enlarger, you will have contrast that is almost unmanageable to print properly, even using Multigrade paper. Conversely, a low gamma negative which is best for enlarging in a true condenser enlarger, will be very flat and lacking contrast if used with a cold cathode head. The different gamma is obtained by reference to the spec for the developer/film combination and following the guidelines for the gamma you need for your enlarger type.

Reply

Leave a Reply

Your email address will not be published. Required fields are marked *

Neil Woodman replied:

Comment posted: 01/09/2016

Thanks Sir, waffle away I appreciate it - it's about learning and gaining knowledge and experience for me, I don't think you can ever rest on your laurels with photography. I don't have an enlarger no it is a case of scanning in my negatives and then working with them in Lightroom - mainly for dust removal which can get somewhat maddening. I'd love to ramp up and get an enlarger and printing setup and that is something I'd want to aim towards doing in the future to be honest, if at all. If I get something I think worth actually printing I'd be more inclined to do it but those shots are few and far between for me!

Reply

Leave a Reply

Your email address will not be published. Required fields are marked *

Nuno Cruz on Overexposure latitude or: how to cheat your way to perfect film photography

Comment posted: 21/05/2016

This knowledge is pure gold to me, I wish I knew this a year ago. Thanks a lot for this article, now let's get the bit technical. Do all noritsu scanners have the density correction capabilities? Which model did you acquire and why?
Reply

Leave a Reply

Your email address will not be published. Required fields are marked *

Hamish Gill replied:

Comment posted: 21/05/2016

I'm pretty certain all scanners density correct - what varies is the extent to which they are capable. If you want technical try here - http://www.filmscanner.info/en/Dichte.html As for my choice - I wanted on of the current range (ls600, ls1100 or ls1800). I couldn't afford an 1800, even second hand - so it came down to which of the 1100 and 600 appeared first on the second hand market

Reply

Leave a Reply

Your email address will not be published. Required fields are marked *

Nuno Cruz replied:

Comment posted: 21/05/2016

Right so, and what has been your experience, using it, so far?

Reply

Leave a Reply

Your email address will not be published. Required fields are marked *

Hamish replied:

Comment posted: 21/05/2016

I've not had it working yet - I need to buy the latest software and haven't had the spare cash. I'll be posting my thoughts when I do though!

Reply

Leave a Reply

Your email address will not be published. Required fields are marked *

KJ Vogelius on Overexposure latitude or: how to cheat your way to perfect film photography

Comment posted: 12/05/2016

I've known about colour film being forgiving towards over exposure for a while, but nine stops.... wow! Great write up as usual Hamish!
Reply

Leave a Reply

Your email address will not be published. Required fields are marked *

Terry B replied:

Comment posted: 12/05/2016

And they make cheap sunglasses or ND filters! :D)

Reply

Leave a Reply

Your email address will not be published. Required fields are marked *

Ant Lockyer on Overexposure latitude or: how to cheat your way to perfect film photography

Comment posted: 07/05/2016

So now you have a light meter that works with your process are you going to go to chromes to make it all a bit more difficult again?
Reply

Leave a Reply

Your email address will not be published. Required fields are marked *

Hamish Gill replied:

Comment posted: 07/05/2016

Maybe, the idea of shooting reversal is one of the reasons I find myself indecisive about whether on not to keep a metered M mount camera. But to be honest, if I really felt the need to shoot reversal, I'd probably just buy a camera with an evaluative meter. For the most part I shoot digital that way, so I reckon that's how I go. I'm just not sure I'd find it as fun...

Reply

Leave a Reply

Your email address will not be published. Required fields are marked *

Ant Lockyer replied:

Comment posted: 07/05/2016

I think you could have exactly the same digital and film workflow but the fact that you can't look at the image or the histogram makes it a different experience, especially when you don't have more than a stop of latitude. I wish I could find a meter I can use quickly with my Hassy, I sold my big Sekonic and have used a difital SLR to meter with a few times but it jsut means the Hasselblad doesn't get used and I'm using a Electro 35, nice lens, ok meter but I still prefer 6x6.

Reply

Leave a Reply

Your email address will not be published. Required fields are marked *

ehpem on Overexposure latitude or: how to cheat your way to perfect film photography

Comment posted: 06/05/2016

This was a very interesting read. I would be interested also in your thoughts on Ilford XP2 - I know the literature that comes with that film rates it at 400ISO, but says it can be shot between 50 and 800 with standard c41 processing. I like the results I get from it, but have mostly shot it at box speed. UK Film labs have a couple of useful blogs about overexposure with numerous examples at different /- EV values from Portra 160, 400 and 800, Fuji 400H and Tri-X 400. This link shows the various posts http://ukfilmlab.com/?s=exposure test
Reply

Leave a Reply

Your email address will not be published. Required fields are marked *

Eddy on Overexposure latitude or: how to cheat your way to perfect film photography

Comment posted: 05/05/2016

Ah Hamish, what a great article. I'm pretty sure it will add more pleasure and satisfaction to many people's photography. I think its fascinating how the marriage of digital and film is evolving in front of us. I've been back in the film game for a couple of years now and it's only in the last few months that I've realised what a game changer digital scanning can be. When I spent a bit of time in the darkroom back in the day we were looking for consistent exposure across shots mainly to create a useable contact sheet straight from the whole roll of negatives. It was pretty easy to adjust for exposure 'errors' across the roll and when enlarging a single frame later but not on a frame by frame basis for contacts. Hard to stress how important those little contact prints were in the old days :) With density correction happening on each frame with a good scanner exposure consistency is kind of irrelevant (within reason) - what a great example of a technical change enabling a behaviour change! While I don't have the cash to experiment too wildly with such an expensive film, your article has given me confidence to be bolder more often and to err even more on the side of light. I have some Portra 400 ready to load for the weekend - will give it 3 stops instead of the usual 1 and see what happens. Thanks again
Reply

Leave a Reply

Your email address will not be published. Required fields are marked *

Hamish Gill replied:

Comment posted: 05/05/2016

Hi Eddy, thanks for the comment, very interesting, and really as much as I could hope for in terms of response. I was quite keen to not be prescriptive or impose any "rules" for how to shoot, but rather encourage a bit more confidence. So if that is what has happened in you, I am very pleased! You will have to let me know how you get on!

Reply

Leave a Reply

Your email address will not be published. Required fields are marked *

Leo on Overexposure latitude or: how to cheat your way to perfect film photography

Comment posted: 04/05/2016

Hi Hamish, Thank you for the excellent advice. I shot two rolls of Portra 400 metered at 200 and will see what happens. By the way, how would you overexpose pushed film, say HP5 400 to 1600 during daylight? Thanks!
Reply

Leave a Reply

Your email address will not be published. Required fields are marked *

Hamish Gill replied:

Comment posted: 04/05/2016

Pushing/pulling your film conventionally involves two processes. The first is exposing at a different exposure index to what is on the box, the second is developing that film to compensate for that different level of exposure. If you shoot a roll of HP5 at ei1600, my guess is that you would be shooting in lower light, in which case the chance of overexposure in minimal. That being said, I shoot all of my HP5 at ei1600 and then push 2 stops. I do this because I like to shoot it in lower light, but also because don't find any issue when I shoot some of a roll in day light. What I am effectively doing in that instance is underexposing some of the roll and then shooting some of it at either box speed, or in fact overexposing in the same way as I mention above with portra 400. Because HP5 is pretty bulletproof in the same way Portra is, my push development compensates for the underexposure, and the latitude compensates for my overexposure. Hope that makes sense ... ? Give it a go!

Reply

Leave a Reply

Your email address will not be published. Required fields are marked *

Nick Thompson on Overexposure latitude or: how to cheat your way to perfect film photography

Comment posted: 04/05/2016

If I want to overexpose, should I alter the iso say from 400 to 200 in the camera and then tell the lab that I've pulled the film. If not should I keep the film at 400 and adjust the exposure manually with the shutter speed to get the equivalent 1 stop? Thanks Nick
Reply

Leave a Reply

Your email address will not be published. Required fields are marked *

Hamish Gill replied:

Comment posted: 04/05/2016

You don't need to tell the lab anything - I am just talking about overexposure with development at normal times. You can overexpose how you like functionally, but an easy way is indeed to set your email to a lower exposure index than stated on the box. So if the box says 400, set to 200 for 1 stop over exposure. Alternatively you can just meter differently. So for example you might instead meter for a darker part of the scene. I would suggest the former to start with, but working towards the later in the long run has made more sense to me.

Reply

Leave a Reply

Your email address will not be published. Required fields are marked *

Cheyenne Morrison on Overexposure latitude or: how to cheat your way to perfect film photography

Comment posted: 04/05/2016

Back in the "olden days" each box of film came with a little Sunny 16 guide in pictures inside when you ripped it open. I had a Minolta and we would put this in the back of the film door as a guide to refer to easily. Here is a good one .... http://bit.ly/26Rfb0T
Reply

Leave a Reply

Your email address will not be published. Required fields are marked *

Martin Hugh Henley on Overexposure latitude or: how to cheat your way to perfect film photography

Comment posted: 03/05/2016

Excellent writeup, Hamish. Coming from a digital background I initially worried like hell about overexposure. Then I got bloody sick of using a light meter, especially as I shoot models which doesn't lend itself to too much pfaffing around, & went down the road of the high-quality point & shoots with auto-all. Exposure was generally good, being about 1/3 stop underexposure. Still, I was happy-ish. Yet something niggled me: the "pop" was missing. But, damn, it is a hard habit to break to err on the side of fairly extreme over-exposure, given my aforementioned digital upbringing, especially as shooting people can lead to slow shutter shake. But, I know I must go down this path & am confident my Epson V700 will take all exposure adjustments well within its stride when scanning. Thanks again! A related question for everyone: Is Portra 800 shot at iso400 preferable to Portra 400 shot at iso400?
Reply

Leave a Reply

Your email address will not be published. Required fields are marked *

Hamish Gill replied:

Comment posted: 03/05/2016

I have no idea about the v700, but I'd definitely encourage you to try it and find out! Shoot a roll to silly levels and find that boundary. You'll know it when you see it and once its found, you have your room for error. As to your question. I haven't shot 800, but I suspect the answer would be "different" rather than "preferable". Give it a go!

Reply

Leave a Reply

Your email address will not be published. Required fields are marked *

Martin Hugh Henley replied:

Comment posted: 03/05/2016

Sure, I'll give it a go! Re. my "Is Portra 800 shot at iso400 preferable to Portra 400 shot at iso400?" question - this could also apply to an ISO200 film shot at ISO100, vs. an ISO100 film shot at ISO100. For sure I'll experiment, but your article started me thinking about the chemical process involved in "overexposure" vs. "correct exposure". Probably the most interesting will be Portra800 @ iso400, vs. Portra400 @ iso400 - I'm very curious to see whether overexposing the Portra800 by 1-stop will result in a comparatively "thicker" negative" & reduced grain than the Portra400 @ iso400. Thankfully I have 2 Yashica T3s & a willing mannequin - so it will be easy to try this out ;) I'll keep you posted!

Reply

Leave a Reply

Your email address will not be published. Required fields are marked *

Ric Capucho on Overexposure latitude or: how to cheat your way to perfect film photography

Comment posted: 03/05/2016

Well done, Hamish, writing up what many of us have started to suspect: film latitude gives yer, erm, shed loads of latitude. When I first got my Leica M6 I well remember chasing the exposure arrows around the viewfinder, and worrying if I'd got it just so. Coupled with the focus chasing I used to do, I missed shot after shot. Daft really, in hindsight. Now an f/8 and be there kind of chap. More recently, when my (first, an SE) Rollei 35 arrived, I shot off 2-3 rolls before realising I'd totally ignored the light meter, and just did my own thing. Snowy days, overcast and misty, ISO 400 film (HP5 ) so it got the f/8 and 1/125 treatment... and all was well. Recently, using the replacement 35S I did something similar, and shot off two rolls walking through shadowy/bright streets, and never changing the exposure even once. Sod it. All shots were useable, which leaves me with a thought: About time I returned to the streets with my M6. Hyperfocus, and exposure set exactly and only once by smelling the air, and I reckon the experience will be very different. Can concentrate on pointing the camera in the right direction and pressing the shutter. Ric
Reply

Leave a Reply

Your email address will not be published. Required fields are marked *

Hamish Gill replied:

Comment posted: 03/05/2016

Thanks Ric, "Can concentrate on pointing the camera in the right direction and pressing the shutter." That is a big pull to all this. Tangentially, this is actually why I really like a point & shoot once in a while. Recoding the DX on portra down to ei100 and snapping away is a real joy!

Reply

Leave a Reply

Your email address will not be published. Required fields are marked *

Ken Hindle-May on Overexposure latitude or: how to cheat your way to perfect film photography

Comment posted: 03/05/2016

It's funny that the distinctive look favoured by currently 'on trend' digital photographers seems to be an attempt to emulate underexposed colour film. I had a look at how they do it and one of they key steps is throwing a magenta layer over the top of everything at about 15% opacity to get that hazy look you've got in the underexposed shot. I might have to give overexposure a try. A couple of months ago I spotted a rather lovely Yashica Lynx 5000 at a tabletop sale and immediately fell in love with the look, feel and build of the thing. Unfortunately, a dicky light meter meant I've been forced to use a handheld meter while shooting and to be perfectly honest, I hate it. I've benefitted from being 'slowed down' by film, but this is a step too far. If I can just take one reading when I take the Lynx out of the bag, dial in a 2-3 stops of overexposure and then get going then it might be worth keeping after all. I might have to experiment with Superia 400 to see how much overexposure that will take, as it's cheaper than Portra and in my experience, a bit less sensetive in terms of storage. I've had good results with it in my Holga even on days that are really too sunny for 400 film.
Reply

Leave a Reply

Your email address will not be published. Required fields are marked *

Ken Hindle-May replied:

Comment posted: 03/05/2016

Dammit, there was another point I meant to make here, which is that it's all well and good saying overexpose everything but with the quality of light typically available to me in the North of England there's only so far you can go in that direction before your shutter speed is too low to give sharp pictures. Few things annoy me more than missing out on a good shot because of camera shake, so I tend to err on the side of caution and keep the shutter speed high wherever I can.

Reply

Leave a Reply

Your email address will not be published. Required fields are marked *

Hamish Gill replied:

Comment posted: 03/05/2016

Let me know how you get on. It's more grainy than Portra, and more "fuji", but its a nice film in my experience. Kodak 400 ultra max is another one I keep meaning to try ... I'm just suckered into portra now :)

Reply

Leave a Reply

Your email address will not be published. Required fields are marked *

Hamish Gill replied:

Comment posted: 03/05/2016

Shoot wide open... 1/125th at f/2 is still gonna overexpose, even oop north ;)

Reply

Leave a Reply

Your email address will not be published. Required fields are marked *

Frank Lehnen on Overexposure latitude or: how to cheat your way to perfect film photography

Comment posted: 03/05/2016

Exacltly right! I noticed this also with the Lomo and Olympus XA2 which are quite limited when it comes to fast shutter times. As I like HP5 and Portra 400 too I often found myself in harsh sunlight, wondering about my exposure. Well the negatives are dense, but the scans come out very well. Of course with those cameras I don't really have the choice concerning exposure...
Reply

Leave a Reply

Your email address will not be published. Required fields are marked *

Hamish Gill replied:

Comment posted: 03/05/2016

Designed in times of less prevalent "high speed" film ... thankfully, its not an issue now :)

Reply

Leave a Reply

Your email address will not be published. Required fields are marked *

kievm on Overexposure latitude or: how to cheat your way to perfect film photography

Comment posted: 03/05/2016

Timely write-up, wondering if you have tried scanning an "over-exposed " roll in pakon F135 . It scan in minutes a complete roll, how much detail will be lost ?
Reply

Leave a Reply

Your email address will not be published. Required fields are marked *

Hamish Gill replied:

Comment posted: 03/05/2016

I've not tried the Pakon - I was seriously considering one when I bought the Noritsu. I have heard very good things about them. There is a facebook group - maybe join and ask them there?

Reply

Leave a Reply

Your email address will not be published. Required fields are marked *

Robert Pavich replied:

Comment posted: 03/05/2016

I have a Pakon and it does just fine with these bullet proof negs! I've been overexposing ever since I saw the Johnny Patience post Hamish referenced. BTW: this was a good post too, very informative and beautiful pictures.

Reply

Leave a Reply

Your email address will not be published. Required fields are marked *

walker on Overexposure latitude or: how to cheat your way to perfect film photography

Comment posted: 02/05/2016

Thanks for such a great write up!
Reply

Leave a Reply

Your email address will not be published. Required fields are marked *

Hamish Gill replied:

Comment posted: 02/05/2016

No problem :)

Reply

Leave a Reply

Your email address will not be published. Required fields are marked *

Marco C on Overexposure latitude or: how to cheat your way to perfect film photography

Comment posted: 02/05/2016

Scanning at home I find quite difficult to deal with overexposed negatives as they seem to lack contrast. And this happened especially with portra400! I should find a way to force my old scanner to do some sort of density correction, or buy some white leds and do it manually ;-)
Reply

Leave a Reply

Your email address will not be published. Required fields are marked *

Hamish Gill replied:

Comment posted: 02/05/2016

Yeah, my apples shot a 9 stops over is the way it is, I'm pretty sure, because of the lack of guts of the scanner at that extreme. I was hoping someone might confirm, and to a point I think you have. A butt load of LEDs and something to diffuse might just work you know!! This is if you can convince the scanner to work with its lid open...

Reply

Leave a Reply

Your email address will not be published. Required fields are marked *

Terry B replied:

Comment posted: 02/05/2016

Marco, of course they will lose contrast, and dynamic range as well. It is not for nothing that film manufacturers quote an ISO setting for their films. Ask yourself, what do they know about their films that users don't? Whilst film is indeed far more forgiving with overexposure, there is still a limit to what it can accommodate. As exposure is increased above the base ISO, the tone curve becomes flattened as the shadow detail is now brought up relative to the rest of the exposure curve. Shadow information is now being exposed as though it were in the middle of the tone curve. Et voila! now one ends up with no proper shadow rendition at all. There will become a measurable point at which the highlight handling capability of the emulsion becomes saturated, (digital highlight clipping), but before this point is reached, the dynamic range is gradually being eroded and one ends up with a virtually unprintable negative, and a difficult one to scan as it will be so dense. But even the highest quality scan can't bring back lost detail. Over the greater proportion of a film's tonal curve it is quite linear, but at the extremes, the highlights and shadow areas are not. Up to a point, over or underexposing is simply moving the exposure along the tonal curve to achieve the desired result. Underexposing colour negative film isn't anywhere near as viable as b/w, though, and results in the colour shifts, such as the magenta cast in Hamish's example shot of his daughter on her bike, which is quite normal. As well as losing density in underexposing, the colour response of the colour layers is non-linear and results in unpredictable results, and which are difficult to impossible to correct at the printing stage. These colour shifts are a kind of reciprocity failure, and which in b/w emulsions is overcome simply by increasing the exposure normally indicated by a meter. And your scanner won't help. Home scanners struggle with Dmax, and one is highly unlikely to find anything over 4.0 for home use. IMO, over-exposing unnecessarily is simply wasting the films ability to record fine detail and colour properly. Used with caution and understanding, though, it avoids the pitfall of potential under-exposure in colour negative film, and which is worse. Today, few use reversal colour film, but if you buy one to try, don't under any circumstances follow the comments in this blog. You will be surprised at how much just 1 stop of overexposure will ruin it. Reversal film has a very limited exposure latitude, but a far wider dynamic range than negative film. Unintentional overexposure was the bane of the reversal film user, and most would set their meters to 1/3 or 1/2 stop faster ISO setting to give a corresponding degree of underexposure. This is one area where digital sensors and film behave almost the same.

Reply

Leave a Reply

Your email address will not be published. Required fields are marked *

Aukje on Overexposure latitude or: how to cheat your way to perfect film photography

Comment posted: 02/05/2016

Great article. I can relate to the cheating, I also feel like I'm cheating when I shoot with the Riva Panorama. I think it has to do with the fact that I was raised with the dogma that you have to work hard, anything that comes easy doesn't count. But for a non-professional photographer all that should count is how much I enjoy it, right? My current go-to approach is aim for 2 stops overexposure, which seems to be close to the middle of your suggested exposure range.
Reply

Leave a Reply

Your email address will not be published. Required fields are marked *

Hamish Gill replied:

Comment posted: 02/05/2016

Right! Very right! That was a big part of my intended subtext! Professional or amateur, if your not enjoying it you're losing! 2 stops over is a very fair approach. When I shoot with my spot meter, that's exactly what I do, without fail.

Reply

Leave a Reply

Your email address will not be published. Required fields are marked *

Vernon L Szalacha on Overexposure latitude or: how to cheat your way to perfect film photography

Comment posted: 02/05/2016

Hamish, excellent article. I do have a question about the post processing aspect. When shooting Portra 400, with a roll that has varying degrees of overexposure, is it best adjust the scan for each negative and tweak it slightly on the computer or scan the whole roll and deal with the TIFFs later?
Reply

Leave a Reply

Your email address will not be published. Required fields are marked *

Hamish Gill replied:

Comment posted: 02/05/2016

Ideally the first option. TIFFs give some movement, but certainly not enough to cope with the sort of range I'm talking about in the post.

Reply

Leave a Reply

Your email address will not be published. Required fields are marked *

Leo Shy replied:

Comment posted: 02/05/2016

Hamish, Thank you for sharing this technique. I have a follow up question about the consistency of the colour of the Portra with varying exposure. Also, it would be nice if you can share some overexposed B&W results too.

Reply

Leave a Reply

Your email address will not be published. Required fields are marked *

Hamish Gill replied:

Comment posted: 02/05/2016

The general rule seems to be to keep within about 3 stops over to prevent colour shifts - though generally, I find Portra to have greater colour contrast when it is overexposed. I have a post about Ilford HP5 brewing - keep an eye out

Reply

Leave a Reply

Your email address will not be published. Required fields are marked *

JKLPHOTO on Overexposure latitude or: how to cheat your way to perfect film photography

Comment posted: 02/05/2016

Great addition to my recent post on proper exposure Hamish. Can't wait to see how you get along with your Noritsu. My bet is it'll make you appreciate the services of a pro lab even more, although being fully responsible for your craft does bring a certain satisfaction. Fully learning how a film will react in different kinds of light and knowing which emulsion will yield the desired result was certainly an important skill in the past. Regarding color film (or colour if you prefer) Portra does seem to love "overexposure", although I would say exposing for shadow detail is just proper technique (since it is a negative film). Pro labs always advised us against "gross overexposure" for two reasons: color-crossover and extended print times. The latter was mostly a production-speed issue as a "bullet-proof" negatives take much longer to print. Since they were both density correcting as well as color correcting, gross overexposure could lead to some funky color crossover, especially in shadows. What are your thoughts/experiences with exposing B&W films? Do you use the same process?
Reply

Leave a Reply

Your email address will not be published. Required fields are marked *

Hamish Gill replied:

Comment posted: 02/05/2016

I have a strong feeling you are very correct with respect to your first few sentences ... Time will tell, I'm still to get the thing working (though there is a light at the end of the tunnel). That's interesting about how this transfers into the "past". I simply have no experience of the subject of printing colour to speak on the subject. As for black and white film, I treat it even worse. HP5 gets pushed to 1600 as a matter of course now. This lets me shoot it in lower light indoors, but I've found shooting it in daylight no problem. The other day I shot half a roll as if I was overexposing at ie400. It was only when I got the camera out indoors did I remember what I'd done. I still pushed it, and still got perfectly fine results.

Reply

Leave a Reply

Your email address will not be published. Required fields are marked *

Bill replied:

Comment posted: 02/05/2016

"Can’t wait to see how you get along with your Noritsu. My bet is it’ll make you appreciate the services of a pro lab even more. . ." In my experience it's been the opposite. I put much more effort into getting my scans exactly the way I want them then then my area's last remaining pro-lab. They might have been scanning professionally since I was in middle school, but to them my photos are just another job and "good enough" is good enough for them. They get everything scanned much faster than I could, even if I were doing it carelessly, but I get much better results when scanning myself.

Reply

Leave a Reply

Your email address will not be published. Required fields are marked *

Hamish Gill replied:

Comment posted: 02/05/2016

I am often happy with the "good enough" as it quite often give me the room I need to get what I want. But its hard to avoid that feeling of "how much better could this be if I did it myself" - time will tell Thanks Bill

Reply

Leave a Reply

Your email address will not be published. Required fields are marked *

Grace replied:

Comment posted: 02/05/2016

That's not too bad, Hamish. I tend to push XX to 1600, HP5 to 3200 and 3200 to 12800. I've been increasingly following your rule though. I've shot a lot of Vista, since it's so cheap for practicing with. But for the last few months I've treated it as ISO 50 or ISO 100 film rather than the 200 it's advertised as. I've had much better results since.

Reply

Leave a Reply

Your email address will not be published. Required fields are marked *

David Askins-Gast on Overexposure latitude or: how to cheat your way to perfect film photography

Comment posted: 02/05/2016

I had my light meter unkowinly set at three stops over exposed for a couple years, I never noticed cause I never got any bad exposures. Now I know I was doing it right.
Reply

Leave a Reply

Your email address will not be published. Required fields are marked *

Hamish Gill replied:

Comment posted: 02/05/2016

haha, is that true?

Reply

Leave a Reply

Your email address will not be published. Required fields are marked *

David Askins-Gast replied:

Comment posted: 02/05/2016

Yeah, I use an iPhone light meter where the exposure comp is in a separate window, so I never noticed it. I guess somehow it decided to set it to overexpose. It made me wonder when it was going to get brighter than sunny 5.6!

Reply

Leave a Reply

Your email address will not be published. Required fields are marked *

Hamish Gill replied:

Comment posted: 02/05/2016

That's awesome

Reply

Leave a Reply

Your email address will not be published. Required fields are marked *

Terry B on Overexposure latitude or: how to cheat your way to perfect film photography

Comment posted: 02/05/2016

Colour negative film is so forgiving of exposure, but unlike b/w film, is not amenable to some correction at the development stage, so it is indeed fortunate that it can be abused, so long as one errs on the side of overexposure. But if one wants colour accuracy and the greatest tonal range, it is best not to overdo it.
Reply

Leave a Reply

Your email address will not be published. Required fields are marked *

Stephen on Overexposure latitude or: how to cheat your way to perfect film photography

Comment posted: 02/05/2016

Doh...! I wish you had made this post a week ago Hamish... I have been using an M2 for the past year, I have tried various light meters, including the MR (which I couldn't read... old eyes), the Lumu (too much messing around), and a couple of iPhone apps, the best one being Pocket Light Meter (Nuwaste). Nevertheless, I was still getting too many poor results, so I thought I would go for the built in jobby... I have bought an M6 on Saturday morning. I did go for the .85 viewfinder, so all is not lost, and it is an M6, so it can be used without a battery... But imagine if had bought an MP, or worse an M7, when what I really needed was this most valuable and very late lesson in film latitude. The answer seems to be, learn the sunny 16 rule and then overexpose righteously. OK I'll give it a go. :) As far as processing goes, I have always processed my own black and white and in the last couple of months, having been badly disappointed by the performance of the labs that I chose... Mentioned in an earlier comment... no names no pack drill. I have discovered that colour processing is even easier than black and white. I scan with a Nikon Super Coolscan 4000ED with its own software, and an old PowerMac Quad with Leopard. Incidentally, there is a great portrait photographer and latterly film director called Anton Corbijn... He has been saying for years that he never goes faster than 1/30 and he prefers 1/15, in order to get movement, so he must have been doing what you are suggesting, just not explaining it in the same way. He makes good films too! Anyway thanks for the lesson, even if it is a little bit late, what's another camera between friends?
Reply

Leave a Reply

Your email address will not be published. Required fields are marked *

Hamish Gill replied:

Comment posted: 02/05/2016

Funnily enough, I did start a post ages ago called "the sunny 8 rule". I'm sure you can guess the gist. The problem was, it just felt like I was imposing more rules. There are so many post about shooting at half box speed, or exposing for the shadows, it just felt like another one of those. This post, hopefully is less about the rules, and more about opening up the possibility of breaking them a bit. Even your M6 will have you trip over if you dont take into account the need to avoid underexposure. Point it at the sky, and it will meter the ground under. As you will read in my post about the choice of meter I've gone for, I ended up just pointing my m7 at things I thought would slightly overexpose the frame, rather than actually using to meter as I used to. Good luck! Oh and, two Leicas is better than a bird in a bush... Or something like that... ;)

Reply

Leave a Reply

Your email address will not be published. Required fields are marked *

Jacob Firsel replied:

Comment posted: 02/05/2016

Hi Hamish, I really enjoyed this. May I ask what light meter you use?

Reply

Leave a Reply

Your email address will not be published. Required fields are marked *

Hamish Gill replied:

Comment posted: 02/05/2016

A Pentax digital spot meter for 54, and a lumu the rest of the time :)

Reply

Leave a Reply

Your email address will not be published. Required fields are marked *

Leave a Comment

Leave a Reply

Your email address will not be published. Required fields are marked *