Scanning from the emulsion; getting the most out of a flatbed scanner – By David Narbecki

By David Narbecki

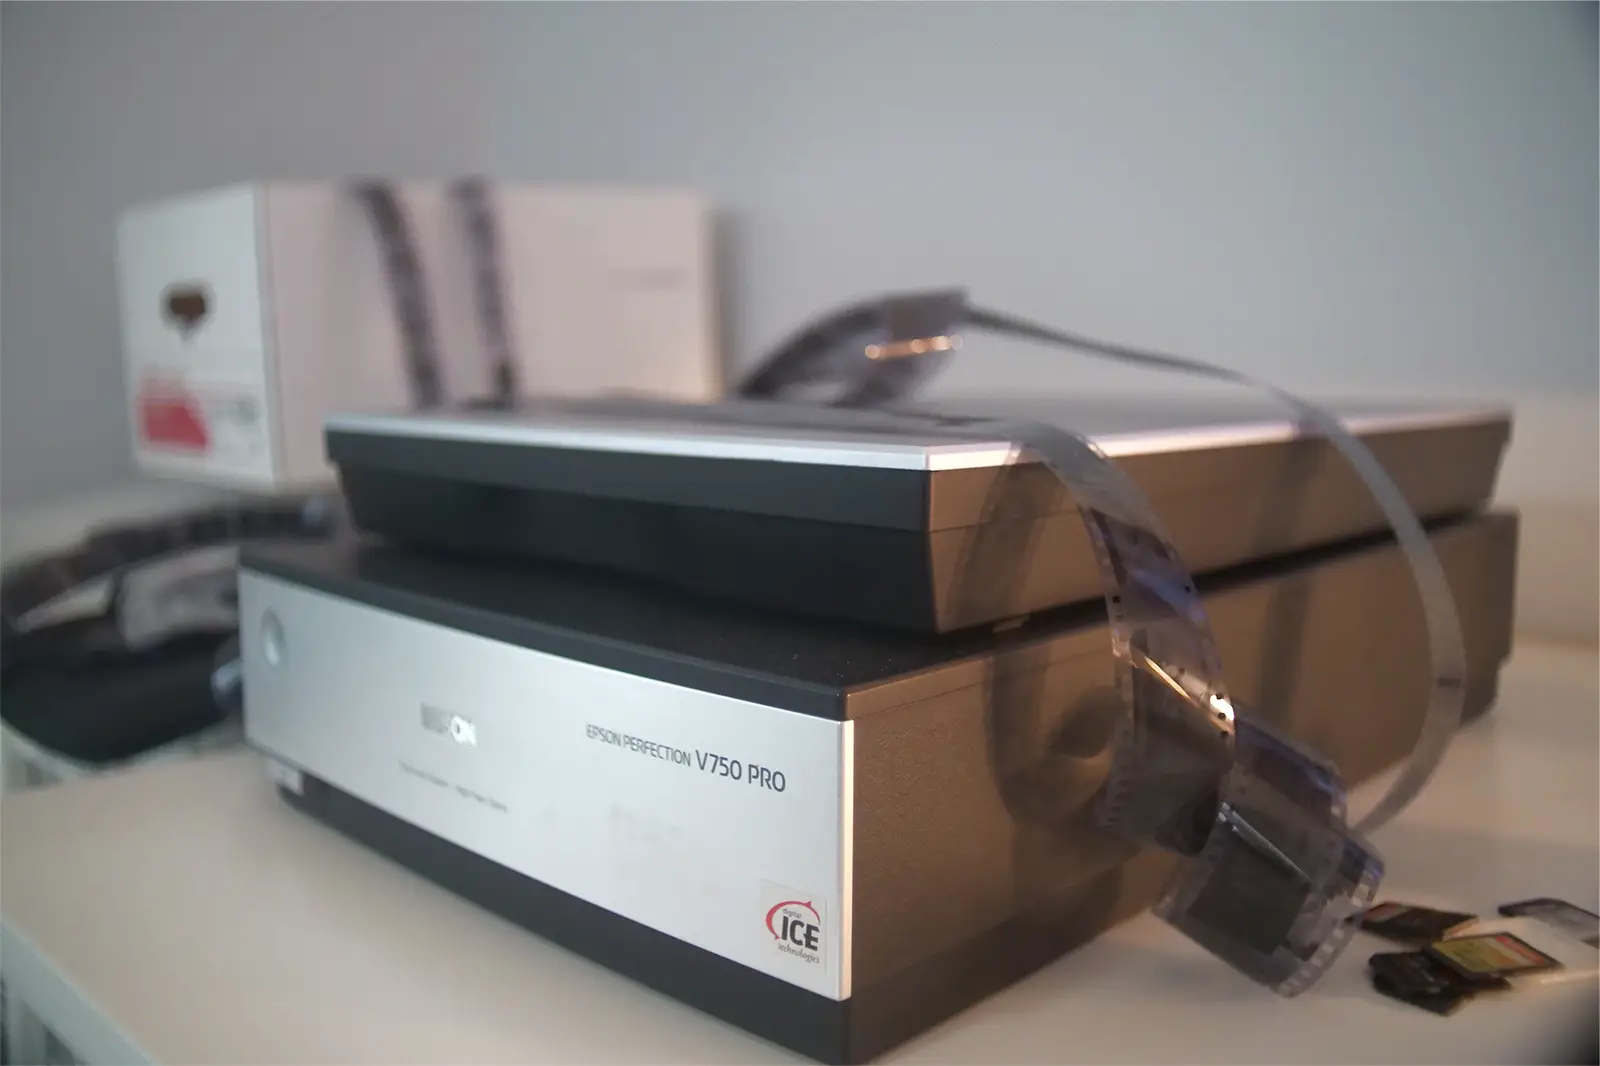
I was asked recently my opinions around what I think is the best way to scan a large collection of slides? I replied by suggesting that they should have a lab scan it and not to bother with home scanning. This answer comes from my 4 years of mostly unsatisfactory home scanning experience, and the very specific way in which I display my photographs.

Like the photographers of the 1960s, I choose to print beyond the full frame and have a black border around my photographs. This is a relatively simple process when printing in the darkroom, you can simply shave down a negative holder until it reveals more than the full frame of a photograph. For scanning though, it is a much more difficult process with pleasing results either being very expensive or time-consuming. In my 4 years of scanning at home, I have used various flatbed scanners and a Pakon f135. The Pakon, while delivering excellent colors and detail, cannot scan beyond the full frame and will often leave hairline scratches on my negatives.

The Pakon can scan beyond the full frame on 3 sides but unfortunately one side will always be cropped.

When it comes to flatbed scanners, dealing with the flimsy negative holders is always an aggravating experience. Good results can take hours of re-positioning and re-scanning negatives. Due to the hardware limitations of the film holders or the scanners, I was often forced to scan a cropped image.

In my quest to scan beyond the full frame, I modified negative holders by cutting and shaving the sides hoping to reveal more of the frame. With this process I did manage to scan past the black borders but it became an even more gruelling process, having to re-seat negatives several times to get a decent scan. This is a frustrating process, so I kept searching for a better solution.

Attempts to scan full frame on the Epson v750 pro with modified holders. Part of the holders would often appear in the scans or cause a reflection. If the holders protruded into the images I would have to re-position the negative and it became a frustrating process. Images are direct scans.
Epson v750 pro scans of color negatives with the modified film holders. I feel these are a good representation of typical color negative scans from a flatbed.

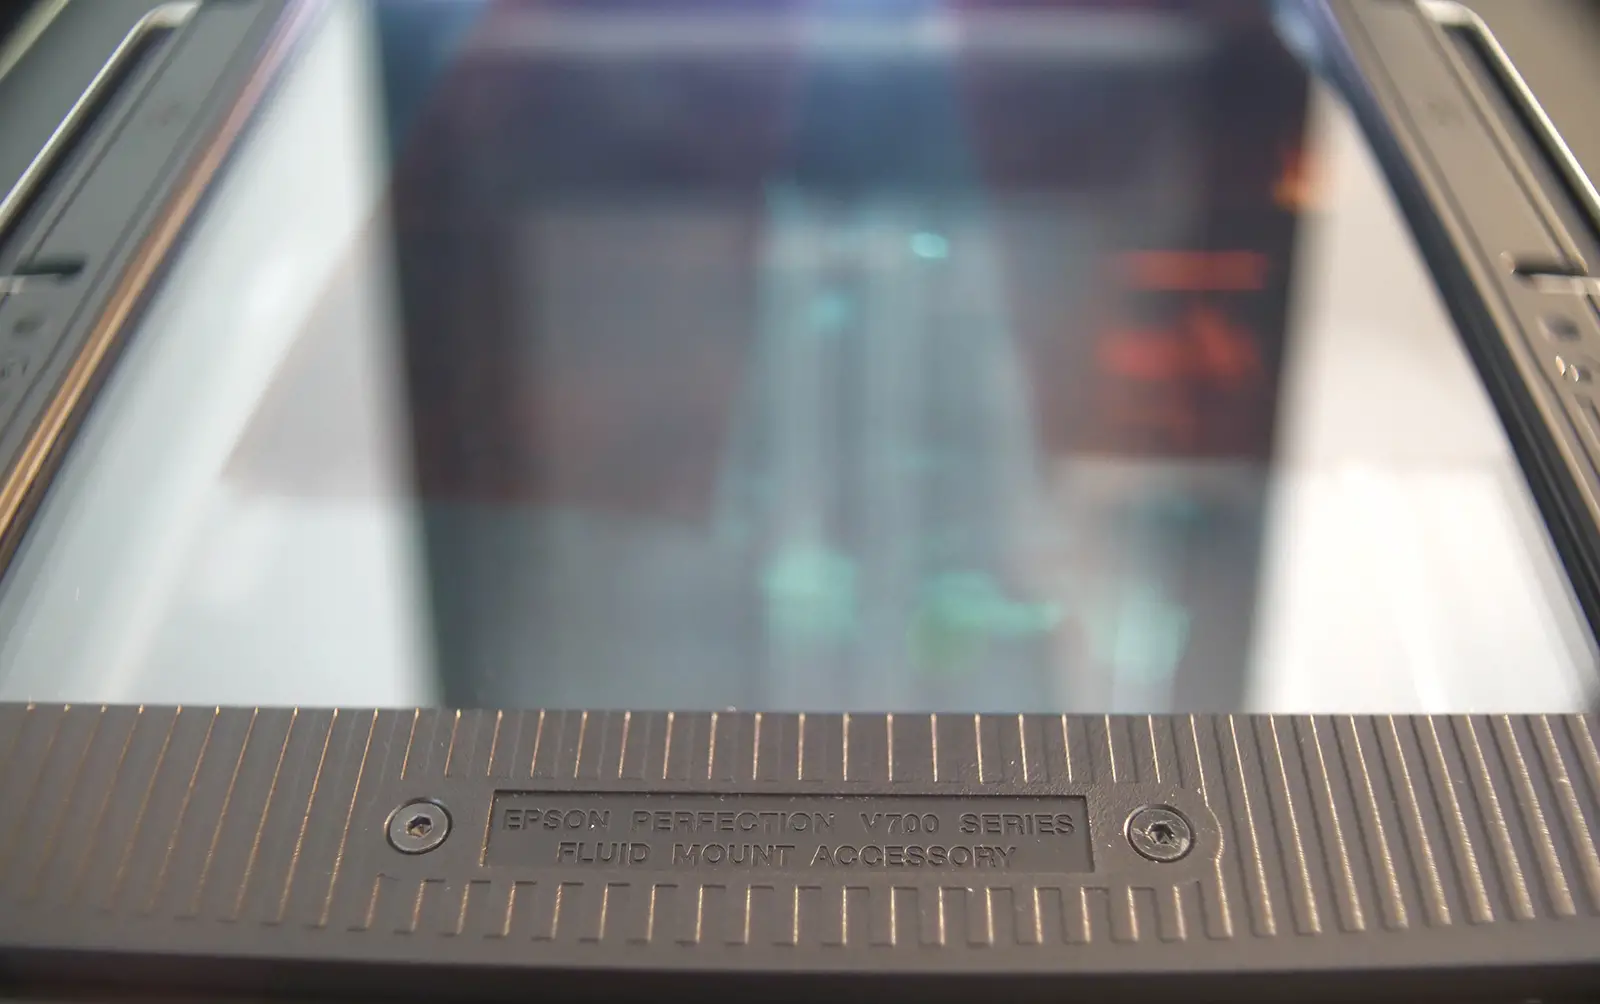
Unfortunately, the terminology for this process is not set in stone. Reading other articles some people call it “full frame” others call it “natural black border” others might say they “scan to the sprockets”. This being the case, it is difficult to find information on scanning in this manner. My solution at first was to use the glass provided with my Epson v750 pro (provided for wet scanning).

Placing the negative with the safety film base (shiny side) directly onto the scanning surface with the glass on top was in theory an easy way to get the full frame. However, this resulted in newton rings on most scans. This would be acceptable for the web, but I wanted archival scans of my negatives. Wet scanning was also considered, but I was looking for a solution that would not take up most if not all of a day devoted to scanning.

Specialty glass that was included with my Epson v750 pro. Apparently it is not anti newton glass, but helps reduce newton rings according to Epson.

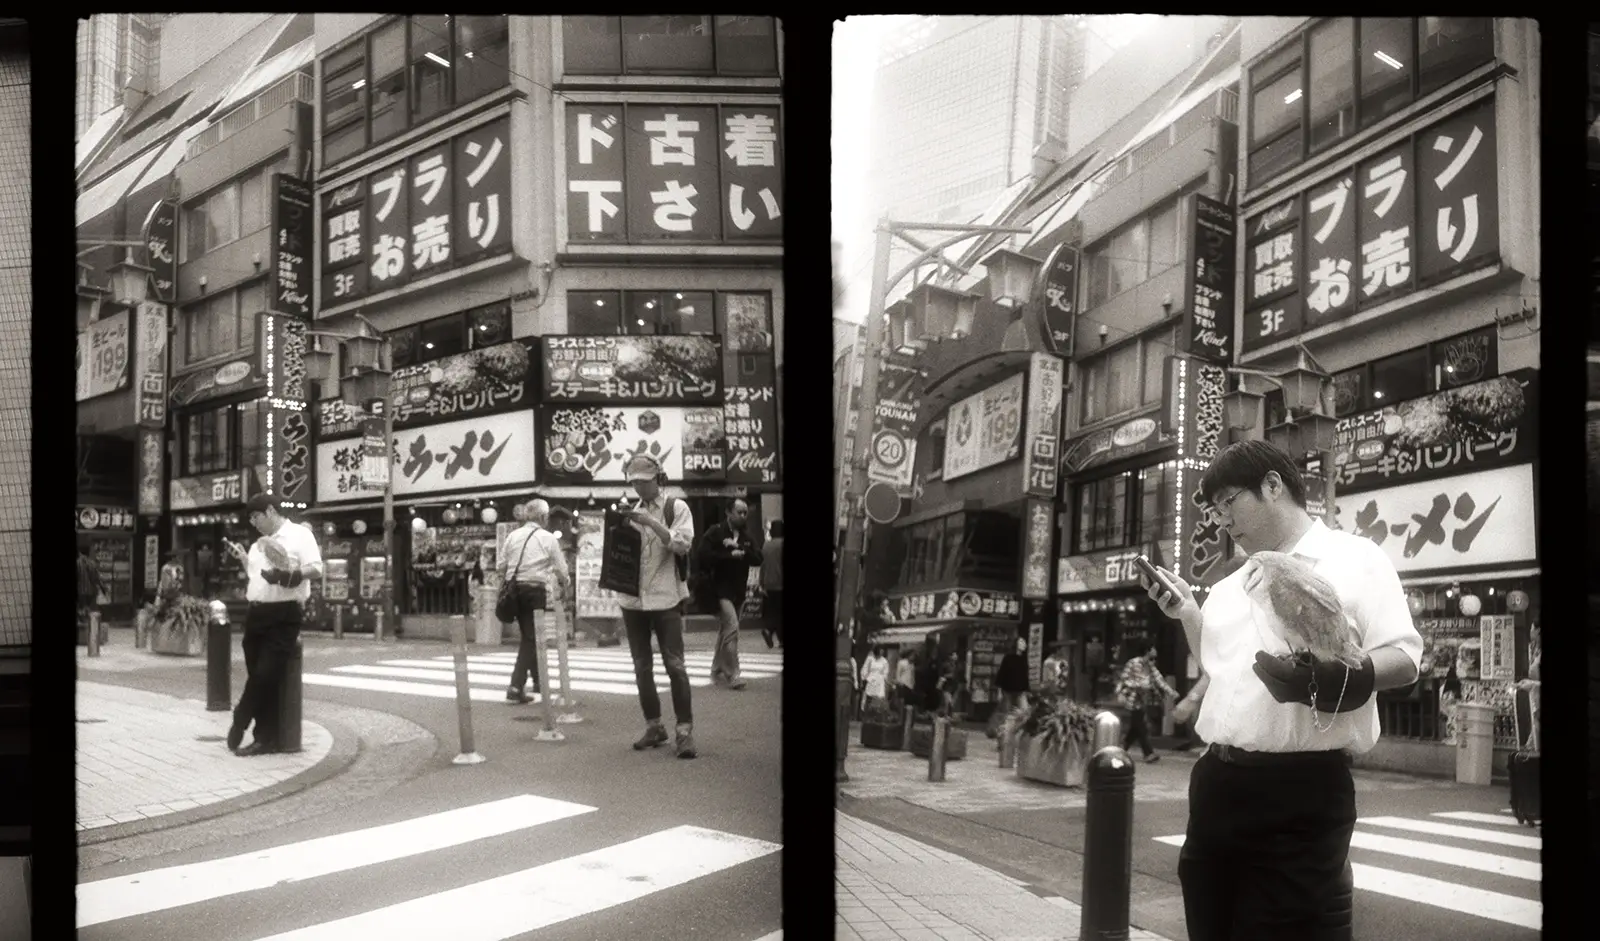
By chance, with a very thin negative I accidentally placed the emulsion side (matte side) directly on the scanning surface with the glass on top. To my surprise there were no newton rings. I repeated the process with various negatives and found that by having the emulsion directly on the glass it greatly reduced or outright eliminated newton rings, while delivering results that are closer to a darkroom print. Normally, scanning with a flatbed, images can be muddy and soft with grain less pronounced. Darkroom prints, on the other hand, retain the beauty of natural grain as well as sharp detail.

Comparison between un-edited flatbed scans. Left side being the emulsion side down and right side scanned with unmodified Epson negative holders.
Close up comparison
Another comparison of unedited scans
Anyone who has scanned with a flatbed should be familiar with the image on the right. When zoomed out it might not be apparent, but when scanning with film holders quality takes a hit. Especially in the small details.

It is a very simple process and does not take any more time than conventional flatbed scanning. I feel that this method delivers more natural photos in both black and white as well as color. The only extra procedure is to flip the image horizontally to compensate for placing the negative upside down on the scanning surface.

Left most image, original scan from Epson v750 pro scanning with emulsion side down. Right most image, original scan from Pakon f135. Middle image is an edited Epson scan attempting to match the Pakon scan.
Same comparison as the previous image. When it comes to color film it is difficult to match the Pakon. The Epson does retain a lot of shadow and highlight detail, so it provides a good image to work with. In my experience scanning from the emulsion results in better colors than using the film holders.

I have not tested this process on every scanner or type of glass. It should work with a scanner+software configuration that have an “advanced mode” and can focus on something placed directly on the scanning surface. If your scanner does not come with specialty glass, using 4×5 anti newton negative carrier glass should do the trick.

The Epson v750 pro has worked for me with the provided glass. My photography professor can attest to this process working well with 4×5 negative carrier glass and a Canoscan 9000f.

Tutorial:

  • Place the emulsion (matte side of the film) directly on the scanning surface
  • Place anti newton glass directly on top of the negative and close the scanner (take care when using glass not provided from the manufacturer, or that is not fitted for your scanner)
  • Using your scanners advanced mode, pre-scan the entire scanning surface
  • Manually select the entire frame and scan to your desired resolution and settings
  • In Photoshop or Lightroom flip the image horizontally

While researching for this topic I found an old forum post on a similar subject here

In the end, I’ve found scanning from the emulsion to be the best compromise of time and quality. When scanning 4×5 I still occasionally get newton rings, so it is not perfect. If you still get newton rings I have found that repositioning the negative can solve this. I will try some proper anti newton glass on my Epson when I get the chance.

I hope this can provide some help for anyone trying to scan full frame, affordably and reasonably, with a flatbed scanner.

My blog
Portfolio site
Instagram

Share this post:

Find more similar content on 35mmc

Use the tags below to search for more posts on related topics:

Contribute to 35mmc for an ad-free experience.

There are two ways to contribute to 35mmc and experience it without the adverts:

Paid Subscription – £2.99 per month and you’ll never see an advert again! (Free 3-day trial).

Subscribe here.

Content contributor – become a part of the world’s biggest film and alternative photography community blog. All our Contributors have an ad-free experience for life.

Sign up here.

About The Author

By David Narbecki
The majority of my work is street photography and usually taken in or around Tokyo.
View Profile

Comments

James on Scanning from the emulsion; getting the most out of a flatbed scanner – By David Narbecki

Comment posted: 06/09/2018

Strikes a chord. Scanning bothers me more than anything else in the photography world (by a factor of a thousand).
Reply

Leave a Reply

Your email address will not be published. Required fields are marked *

David Narbecki replied:

Comment posted: 06/09/2018

Thank you for the comment! Scanning and cataloging photos has always been my least favorite part of photography so I understand that sentiment... Ive found that this method is a good balance of time and satisfactory results! I hope you'll try this method out next time you scan!

Reply

Leave a Reply

Your email address will not be published. Required fields are marked *

Ken Hindle-May on Scanning from the emulsion; getting the most out of a flatbed scanner – By David Narbecki

Comment posted: 07/09/2018

Fascinating read for those of us who home scan. I took to scanning from the emulsion side a while back, but with holders, because it seemed to give slightly better results and didn't make rings if the film was floppy enough to touch the glass. ANR glass is quite expensive for what it is, though, and I wonder if it's actually necessary. Logically, any material that's non-gloss and lets through a lot of light should do the job - it doesn't come between the scan head and the negative, so there's no image quality issue provided it's not blocking too much light. With that in mind, I've just ordered an A4-sized sheet of frosted perspex as an experiment. It may or may not work, but it'll cost less than £5 to find out, whereas a sheet of ANR that size would cost a few hundred.
Reply

Leave a Reply

Your email address will not be published. Required fields are marked *

David Narbecki replied:

Comment posted: 07/09/2018

Sorry for the late reply and thank you for the comment! I'm glad to hear other people are scanning from the emulsion, it does seem to give the best results in general. As for the glass, the epson provided scanning glass apparently isn't ANR glass, but the results were still impressive. My professor already had ANR glass from negative carriers and it worked just as well if not better. I would guess that any high quality glass would give pleasing results! Let me know if the glass you ordered worked and how the scans came out! thank you!

Reply

Leave a Reply

Your email address will not be published. Required fields are marked *

Ken Hindle-May replied:

Comment posted: 07/09/2018

I thought I'd better give an update on how this worked. In short, it didn't. At least not very well. The frosted perspex let the light through well enough, but must scatter it quite a bit in doing so. I got the sprockets and everything, but the actual photos came out with an overall milky haze, as if through cataracts. After that, I had a try with a piece of clear perspex but unfortunately there was still a bit too much scattering to make it a viable option over the OEM negative holders. Still, at least it cost less than £10 to find that out and I've also realised that the slight 'bloomy' quality I get in pictures with large bright areas is probably down to light scattering. I may get an MF-sized piece of ANR glass for about £30, but I think long term I need to set aside the cash for a V700/750/800 and wet mount.

Reply

Leave a Reply

Your email address will not be published. Required fields are marked *

Terry B on Scanning from the emulsion; getting the most out of a flatbed scanner – By David Narbecki

Comment posted: 09/09/2018

David, I've sometimes wondered about this. After all, in traditional photographic printing, either by direct contact or enlarging, the negative is placed emulsion side down. So why do/did scanner manufacturers suggest we do the opposite when scanning? The light source is still above the film, but strikes the emulsion layer first, such that the scanner head has to scan through the film base. However minute, surely this must impact on image quality?

I'm going to try scanning the emulsion layer to see if I can detect a difference with my Canoscan 9950F and, out of interest, I'll see if it makes any difference with my dedicated 35mm film scanner. I'm hoping the difference, if any, in my set-up won't be too bothersome. I'd hate to re-do years of scanning! :D)

As for your second issue, that of black borders, I wonder if I'm missing something here. Applied to film printing, getting a black border may be no more of a matter than of using an adjustable negative holder set to slightly wider than the image format; this is how I did it.

But with scanning, I don't see why you would wish to scan beyond the frame to get black borders, especially when this facility is readily available via software. This avoids trimming film holders and juggling the position of the film to achieve even borders. One can set the width of the black border, even setting different dimensions in the horizontal and vertical, and set for this border to enclose the image.
Reply

Leave a Reply

Your email address will not be published. Required fields are marked *

David Narbecki replied:

Comment posted: 09/09/2018

Thank you for the comment and sorry for the late reply! I really appreciate the comment as it brought to light something I hadn't considered. It never crossed my mind that in contact prints and enlarging the negative would be emulsion side down. I suppose it is just second nature at this point, but I have to thank you for mentioning it! I'm not sure why most scanners instruct the users to place the glossy protective layer down (possibly just a convenient way to have a photograph ready to print without flipping the image etc?), but the protective layer definitely leads to newton-rings and possibly an image that is less true to the original negative. Even the Pakon scans from the glossy side...albeit with great results. Please give it a try and let me know what you think! I am currently in the process of re-scanning many years of photographs (that I had already re-scanned after purchasing the Pakon...), so I understand that sentiment, but for me it is worth it. To answer your second question, the black boards are the main reason I began experimenting with alternative scanning methods. For me the black boarders are not necessarily an aesthetic decision, but rather to show the photograph in its original, un-cropped, state. I primarily do street photography and tampering with a photo is found upon. Since digital cameras don't provide a "black border" as it were, it is difficult to tell if someone cropped the photo or not. In this way, I feel it is a unique aspect exclusive to film photography. It may seem a bit overboard for most people but being able to show that the photograph has not been cropped is maybe a point of pride for me. Of course you could still dodge and burn or make alterations and most people would not be able to tell, but with a natural black boarder there is no denying that the frame is exactly as shot. The photographers who influenced me, as well as my mentor, are strongly against cropping and/or print with the black boarders themselves. It is something that may have fallen out of favor for street photography recently, but for me it is very important. Also, in a case where I were not able to talk about a photograph of mine, the black boarders would hopefully convey my belief in not cropping. Unfortunately it is not a common way to print photographs so most scanners do not account for someone wanting to go beyond the full frame. As I print with the boarders in the darkroom, I wanted to scan my photos in the same way for archival purposes as well as publishing purposes. I hope that helps answer your question and I hope it doesn't come off as elitist, but for me there is nothing better than a black and white photograph with that black boarder haha Thank you very much for the comment!

Reply

Leave a Reply

Your email address will not be published. Required fields are marked *

Terry B replied:

Comment posted: 09/09/2018

David, thanks for your reply and detailed explanation why you print/scan with black borders. I understand why now, and fully appreciate this. In fact, it touches upon a comment I made in a post about the "decisive moment" on another site. Your application of black borders for your street photography will totally dispel any belief that your "decisive moments" may have been manipulated by cropping out extraneous matter. There is a famous image captured by Munkácsi in which three boys are splashing around in a river. This image is often associated with the idea of the decisive moment. But, many years ago I read that he had, in fact, taken a number of shots, and the famous one is indeed a crop of one of them. This revelation totally undermined my belief in the decisive moment; and this wasn't helped by a series of HC-B's images in which he was shown to pose the subject and then HC-B selected the one he wanted. Despite my somewhat jaundiced view of the decisive moment, after all, we all have our own decisive moments every time we take a shot, there are images where the photographer has exercised much skill and anticipation in getting truly memorable images. My absolute favourite is Willi Ronis' "Le Petit Parisien", an image with so much joie de vivre that it never fails to bring a broad smile to my face every time I see it. This is a decisive moment image if ever I saw one!

Reply

Leave a Reply

Your email address will not be published. Required fields are marked *

canon printer error 5200 on Scanning from the emulsion; getting the most out of a flatbed scanner – By David Narbecki

Comment posted: 31/07/2019

This is really a great topic you discussed. I really don't have any knowledge about it but I learn and gather some knowledge about the topic though I am not using a scanner like this. However, I am using a Canon printer for scanning for a few years and it's working properly.
Reply

Leave a Reply

Your email address will not be published. Required fields are marked *

David Narbecki replied:

Comment posted: 31/07/2019

Thank you very much! I'm always trying to find a way to scan my images at the highest quality possible so I hope this could help! Are you scanning negatives on the Canon scanner? You might be able to use this technique if you are!

Reply

Leave a Reply

Your email address will not be published. Required fields are marked *

canon printer troubleshooting on Scanning from the emulsion; getting the most out of a flatbed scanner – By David Narbecki

Comment posted: 20/11/2019

This is actually an extraordinary subject you talked about. I truly don't have any information about it yet I learn and assemble some information about the theme however I am not utilizing a scanner like this. In any case, I am utilizing a Canon printer for examining for a couple of years and it's working appropriately.
Reply

Leave a Reply

Your email address will not be published. Required fields are marked *

Recommended reading : Down the Road on Scanning from the emulsion; getting the most out of a flatbed scanner – By David Narbecki

Comment posted: 05/03/2020

[…] If you scan your own negatives, David Narbecki (writing for 35mmc) says to just skip the film holders for best performance. Read Scanning From the Emulsion: Getting the Most out of a Flatbed Scanner […]
Reply

Leave a Reply

Your email address will not be published. Required fields are marked *

jeremy north on Scanning from the emulsion; getting the most out of a flatbed scanner – By David Narbecki

Comment posted: 22/05/2020

This is a really good article David. I feel the need to revisit my scanner. I even have that fluid mount glass for my v750
Reply

Leave a Reply

Your email address will not be published. Required fields are marked *

David Narbecki replied:

Comment posted: 22/05/2020

Thank you! I'm still trying to a way to best replicate the image quality of a darkroom print. Scanning in this way has helped a lot but I do wonder what removing glass from the equation would do. I had a change to purchase a flextight scanner but it didn't pan out haha

Reply

Leave a Reply

Your email address will not be published. Required fields are marked *

Leave a Comment

Leave a Reply

Your email address will not be published. Required fields are marked *