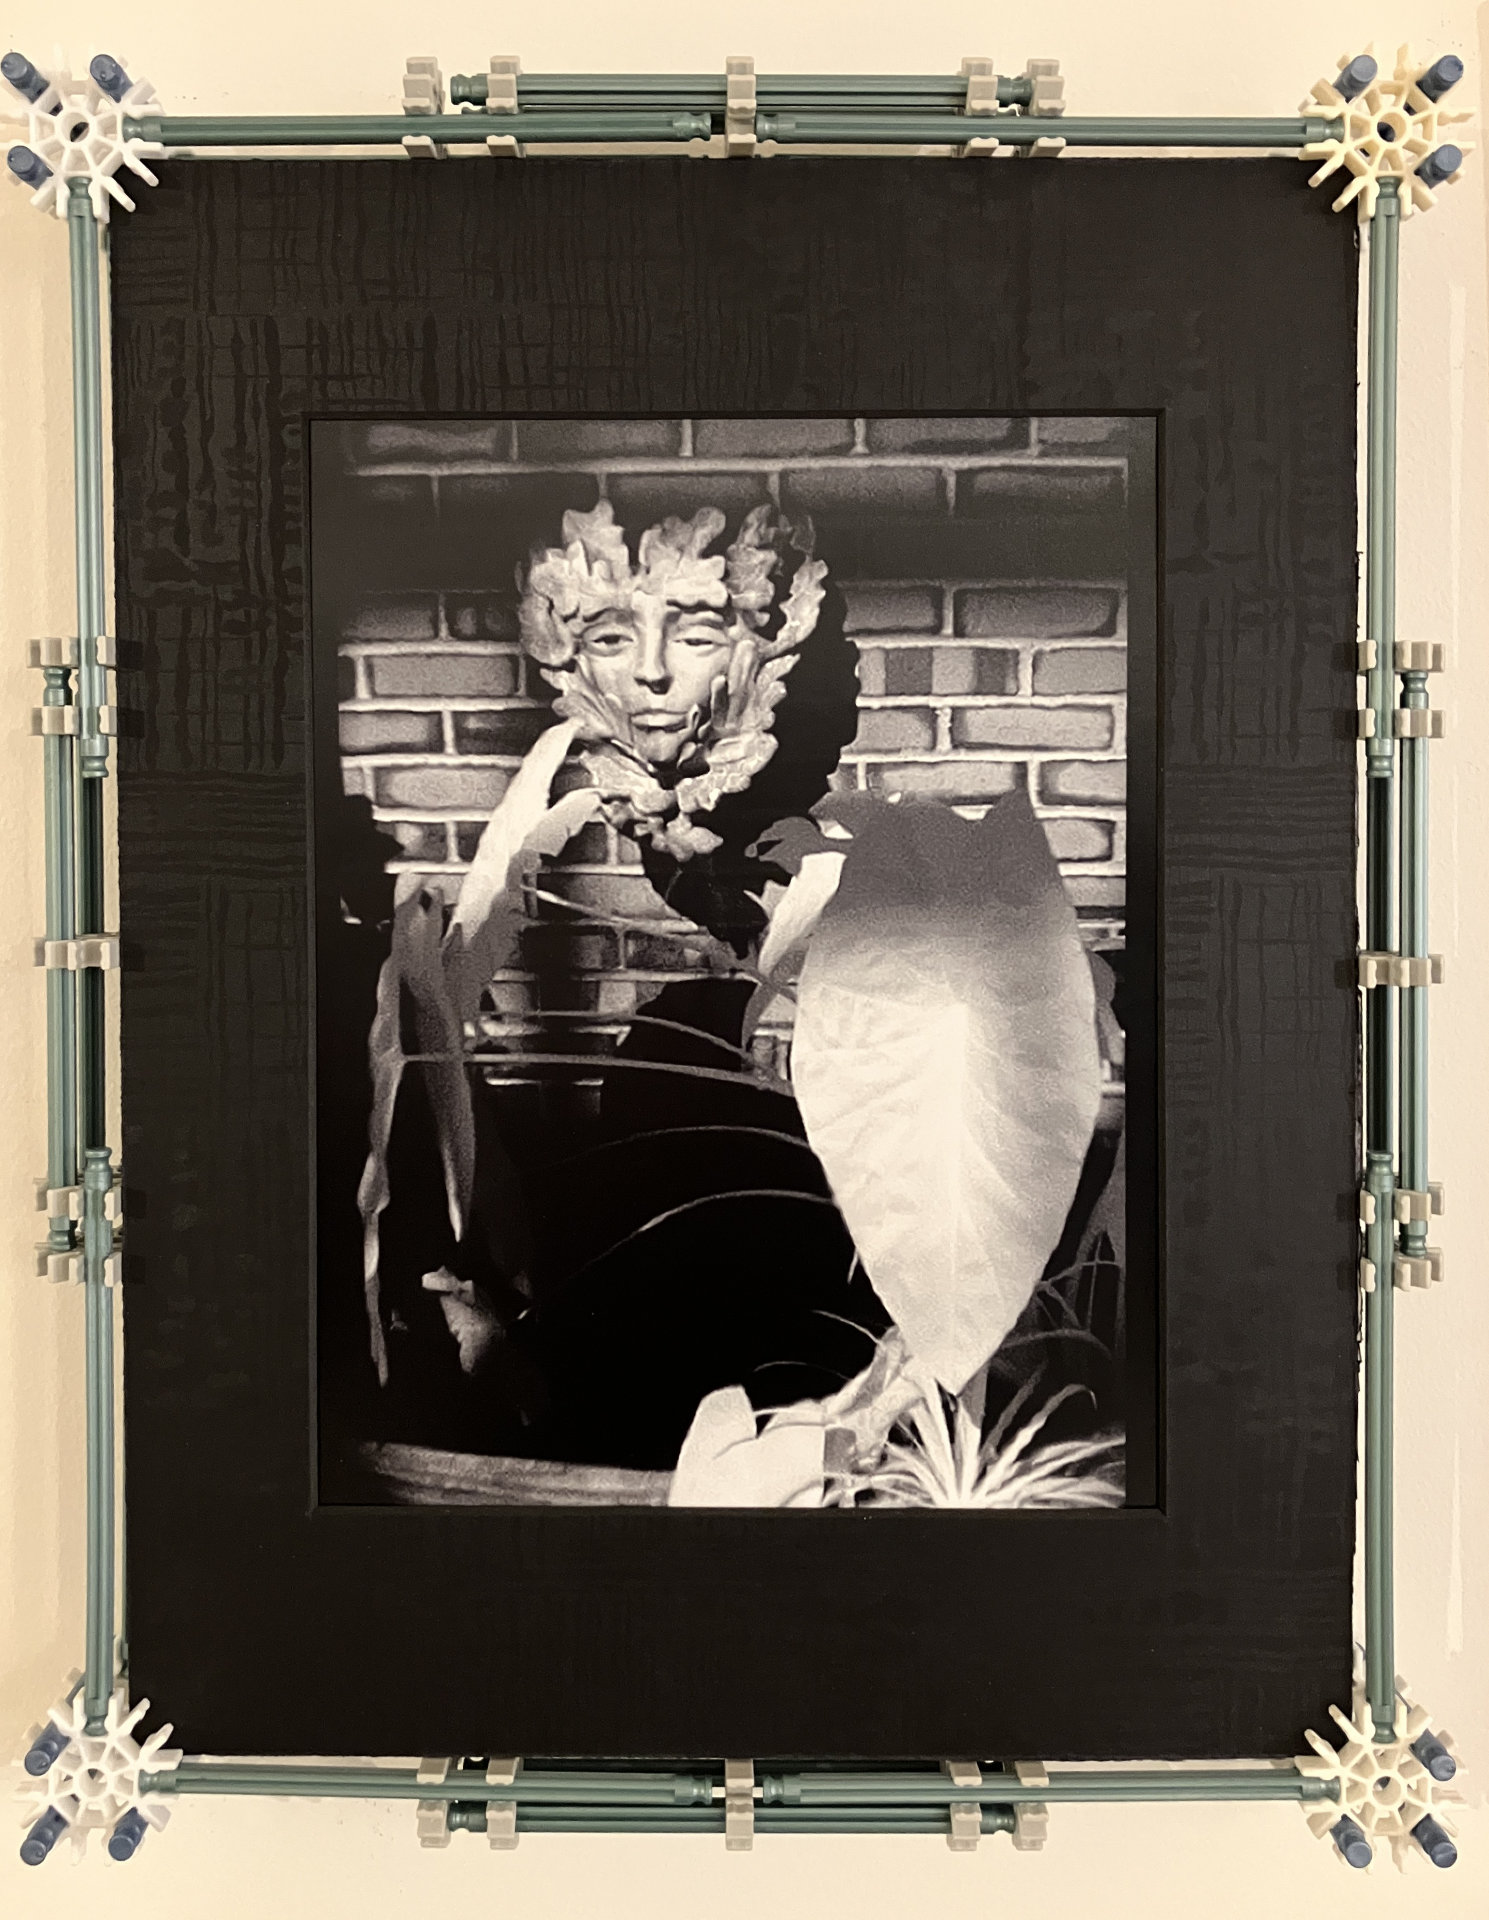
Yes really! Have you ever wanted a picture frame that is easily adjusted across a range of photo/art sizes? One that can even form itself to non-standard aspect ratios? If so, read on!
This idea has been in the works for quite some time because I’m not a woodworker, and couldn’t conceive of any other way to build such a beast. More problematic, I wanted the frame to expand and contract to fit its contents without any of its internal bits poking beyond the frame’s sides or corners. All “workings” had to remain within the frame’s horizontal and vertical sides. Not a trivial restraint!
I finally found something I could use when a local teacher friend shared photos of his student engineering competition. Their challenge was to use the K’Nex building system to make the longest bridge that supported a stack of books. K’Nex is arguably the second most popular “construction kit” after Legos… but they’re totally different systems.
Realizing that K’Nex pieces could “do” my frames, I started picking up used kits and pieces for cheap at yard sales and thrift stores. One can also buy pieces online, or if your kids already have K’Nex, maybe they’d let you borrow pieces if you let them help! This would be a simple, useful STEM or STEAM educational project for families, kids, school art/photo classes and… yes… photographers.
As you can see in the above photo, these frames look a bit “Jetsons.” But I love their airy contemporary minimalism.
Bits and Pieces
Here’s what you’ll need to build this article’s frame:
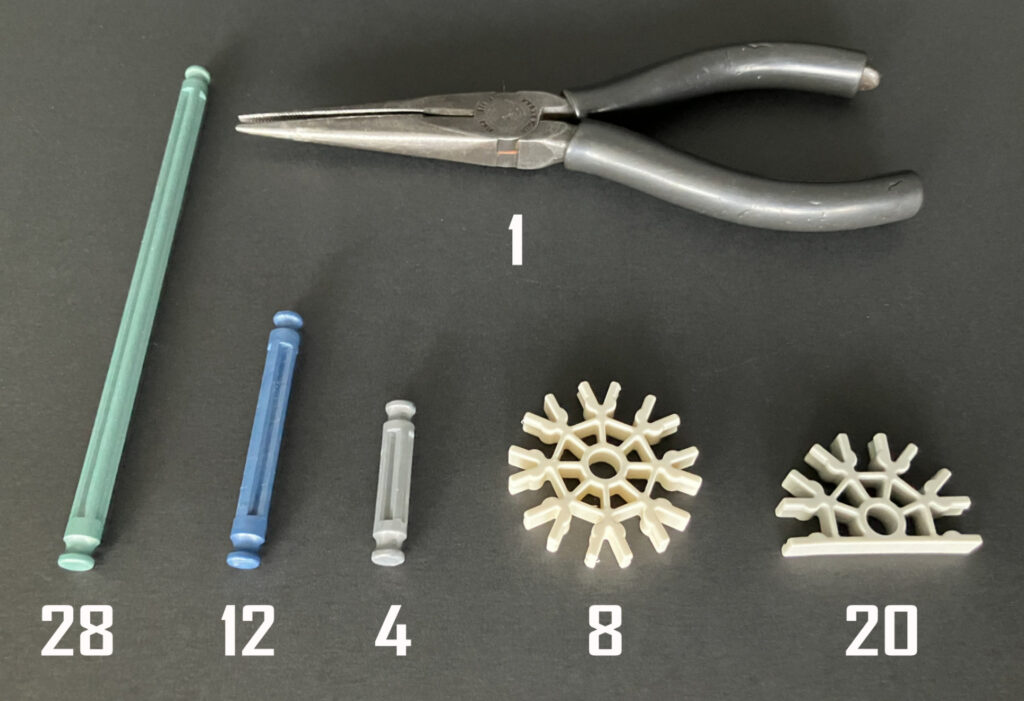 Specifically:
- 1 pair of needle-nose pliers (EXTREMELY helpful for assembly and disassembly)
- 28 light-green 5-inch rods
- 12 light-blue 2 1/8-inch rods
- 4 gray 1-inch rods
- 8 white 8-slot (“snowflake”) connectors
- 20 gray semi-circular 5-slot connectors
NOTE: K’Nex pieces come in different colors, but I chose these grays and pastels because they wouldn’t distract too much from the opening image. You can use any colors you like.
Since K’Nex rods also come in several lengths, one can make frames that cover different art-size ranges. The TOTAL number of parts will be the same for small, medium or large frames. This article’s frame is a “medium-range” model, which in the opening image, is holding one of my early 8×10 digital-infrared photos with its 11×14-inch mat and backing board. (I did not include its glass due to reflections.) But this medium frame handles any square or rectangular piece with sides ranging from 10 7/8 to 14 7/8 inches.
The Build
These frames use a “sliding rail system.” To keep this write-up to a manageable length, the following photos provide all the info that kids (or adults) who already use K’Nex will need. But the system is easy and fun to learn, and once needed bits are collected, the actual build takes just minutes:
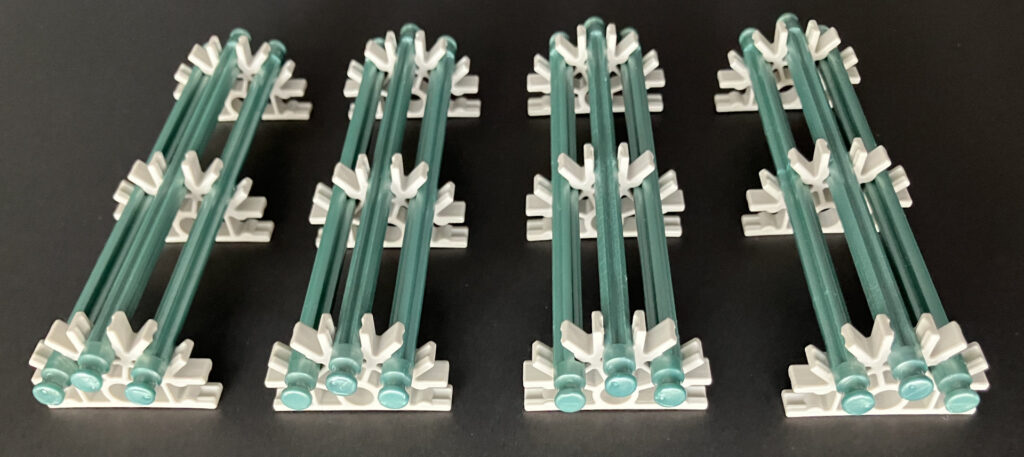
- Build 4 Central Rail Guides for the frame’s sides:
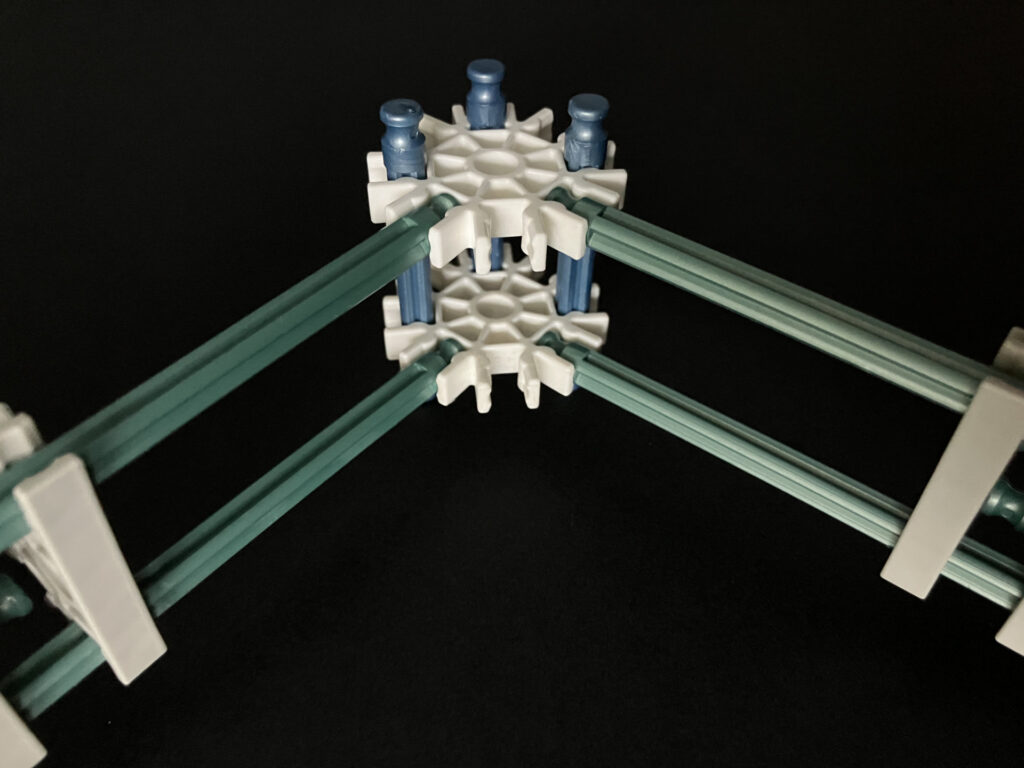
 Build 4 frame Corner Hubs (art nestles into the “corners” defined by the blue rods):
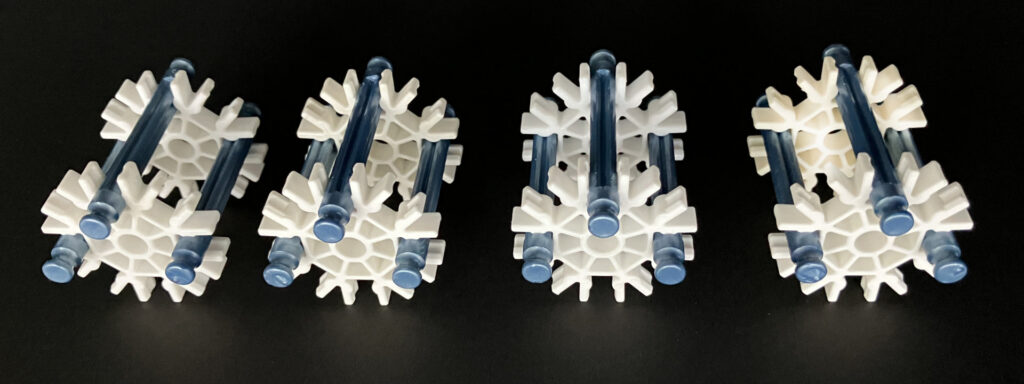 Build 8 Rail Bridges (which connect the Corner Hubs to the Central Rail Guides). NOTE: After finishing the frame, the connectors in the photo below can remain centered (as shown) or slid against the Central Rail Guides (a look I like) or the Corner Hubs. But, if you build a frame using the K’Nex system’s longest (7 1/2-inch) rods instead of the ones used here, sliding the connectors up to the framed object’s corners will help keep the frame sides from “bowing”:
 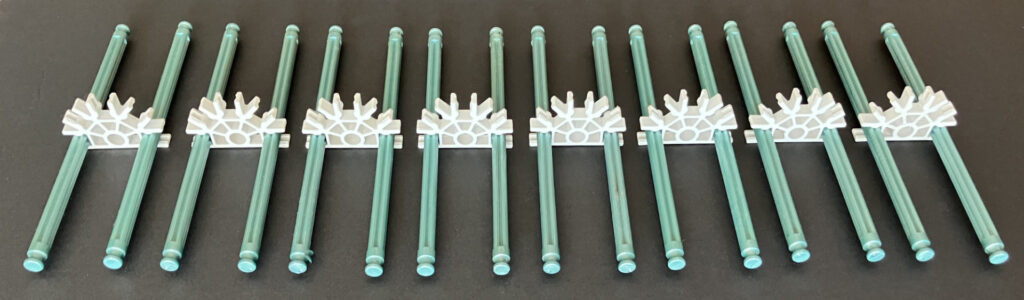 Snap the Rail Bridges into the Central Rail Guides as shown below. TOP: Rails fully shortened. BOTTOM: Rails fully extended. This simple, uncomplicated approach makes it easy to independently resize the frame vertically and horizontally:
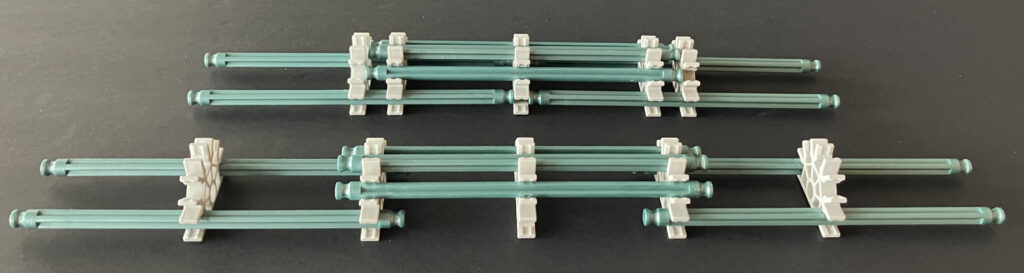
- Then snap the free ends of the Rail Bridges into the Corner Hubs like this (note how the blue rods are positioned to “define” the corners):
 Here’s the assembled frame (in its smallest configuration):
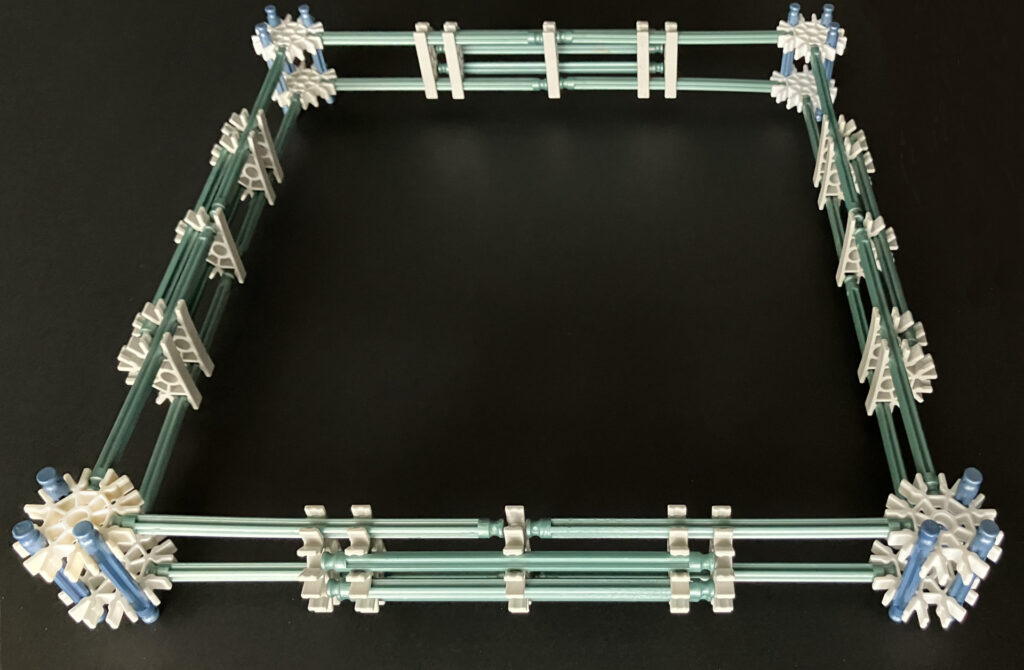 To insert your photo/art, fully expand the frame in all directions, lay it on a flat surface and place your piece upside down in the middle:
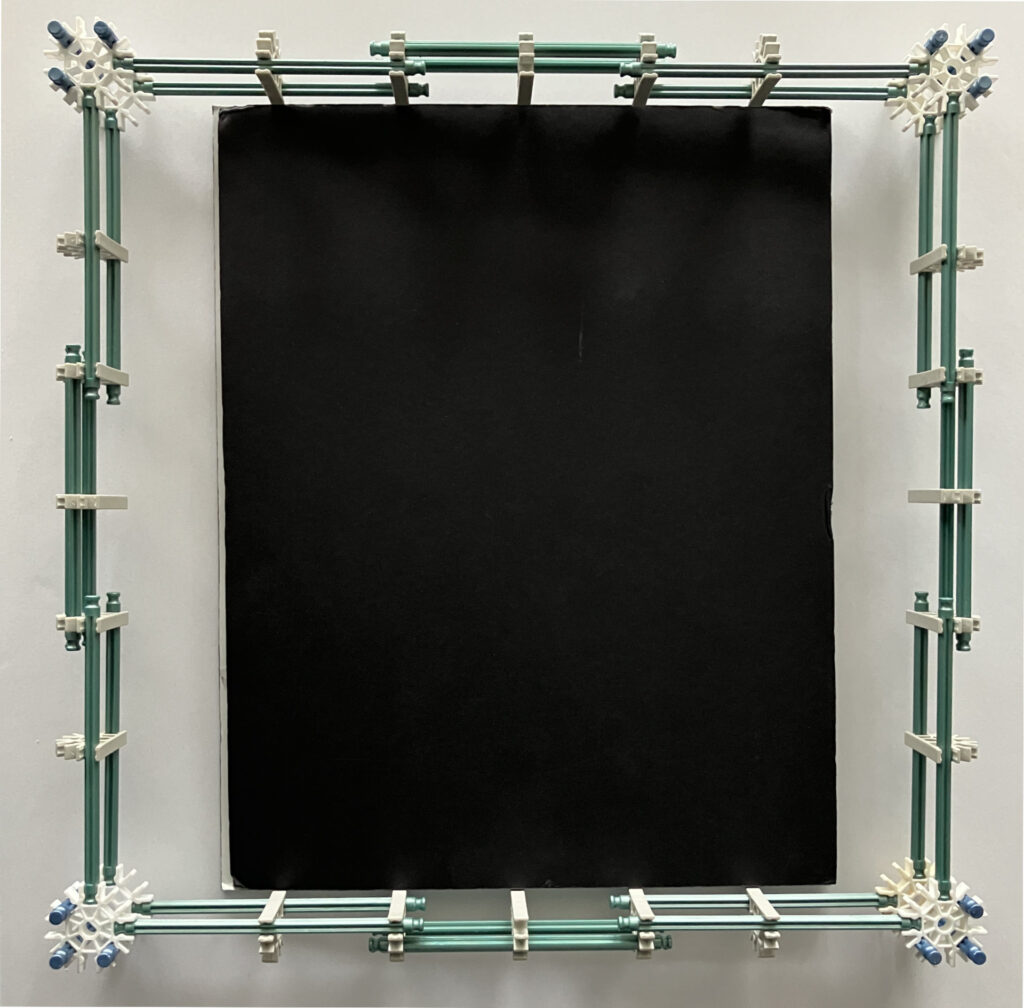 Gradually squeeze the frame inward around the piece until all four if its corners are trapped in the frame corners as shown below (with corners of the art resting on the lower “snowflake” connectors):
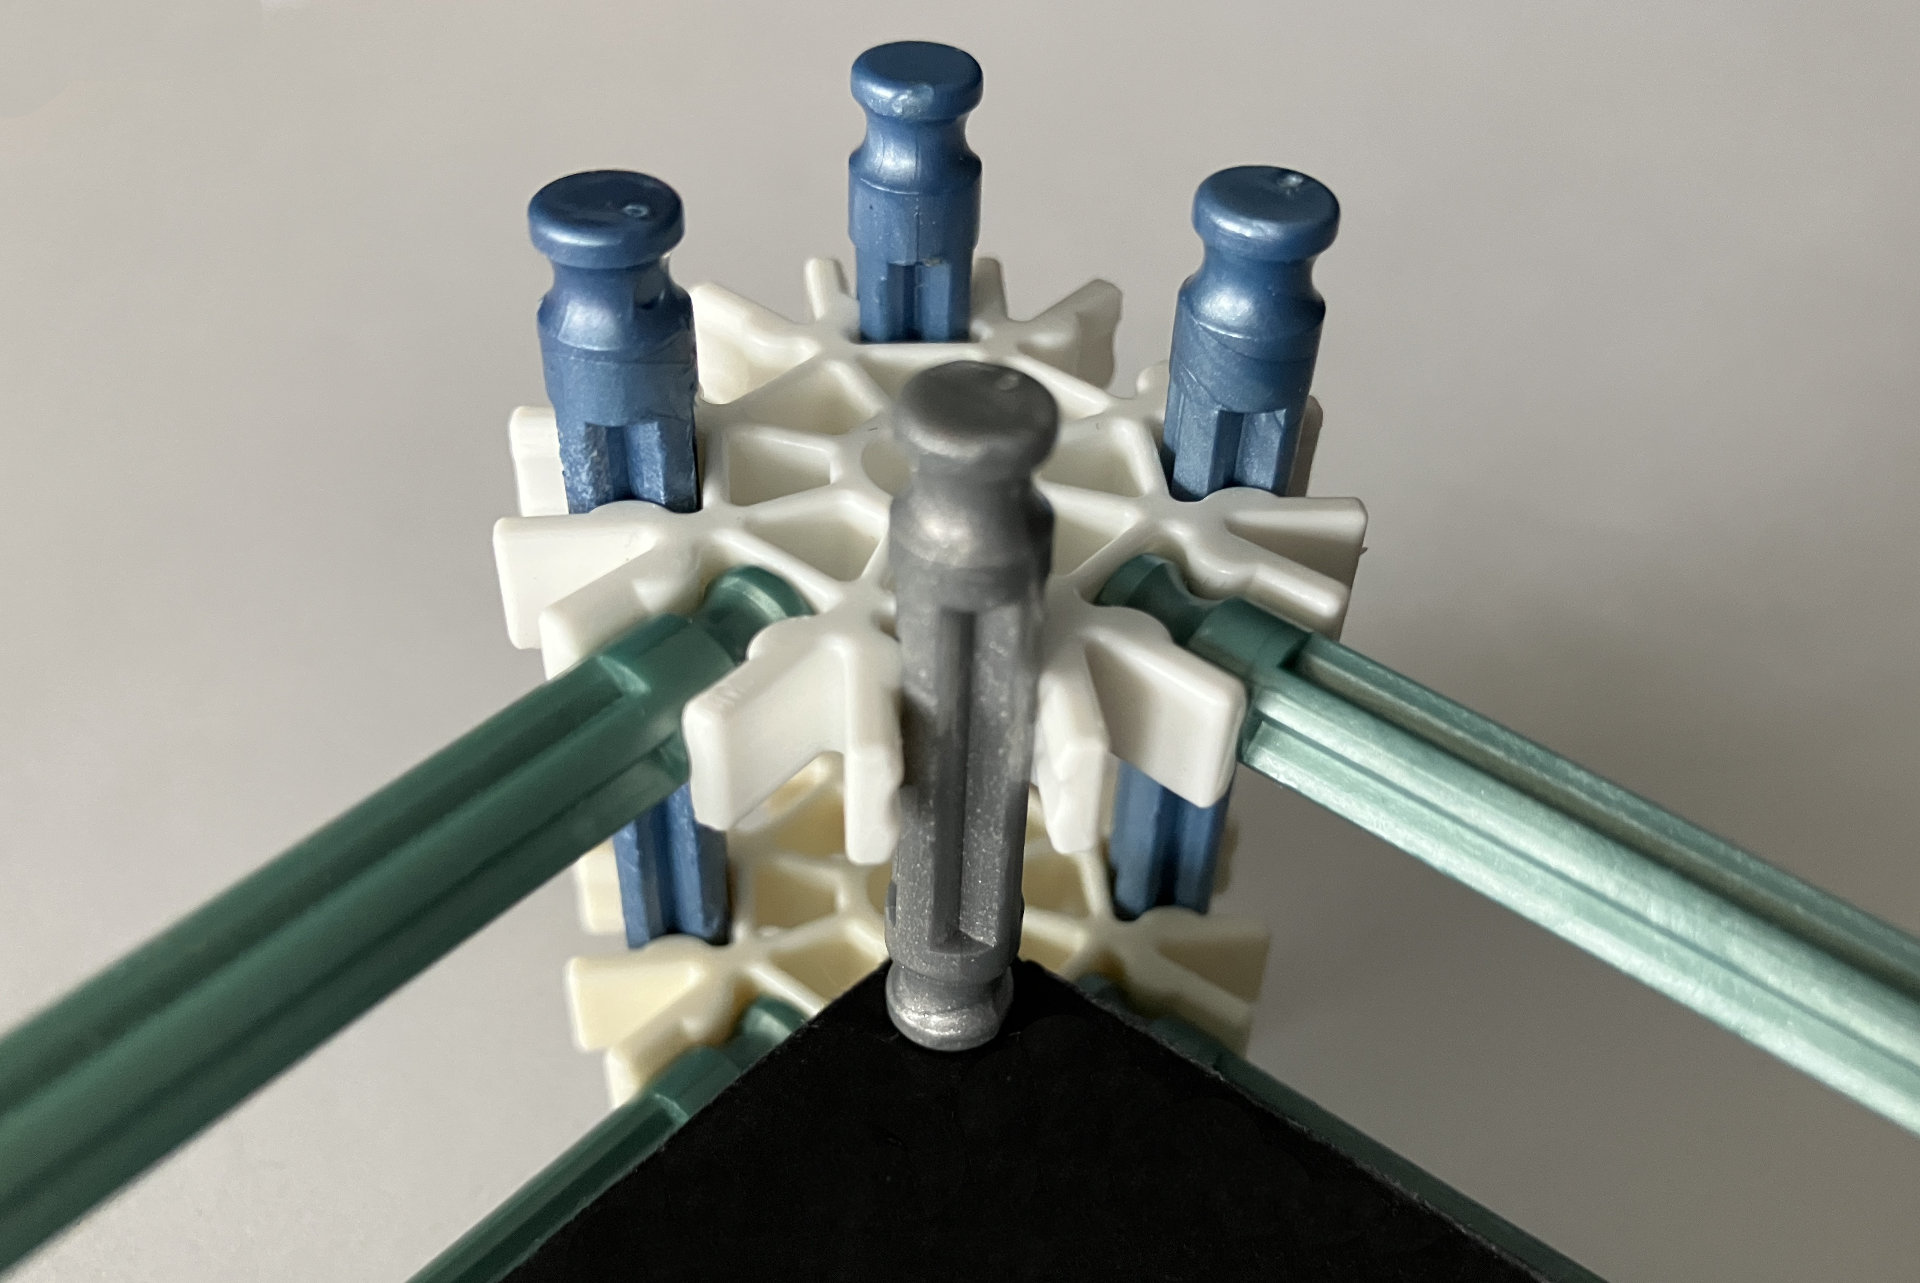
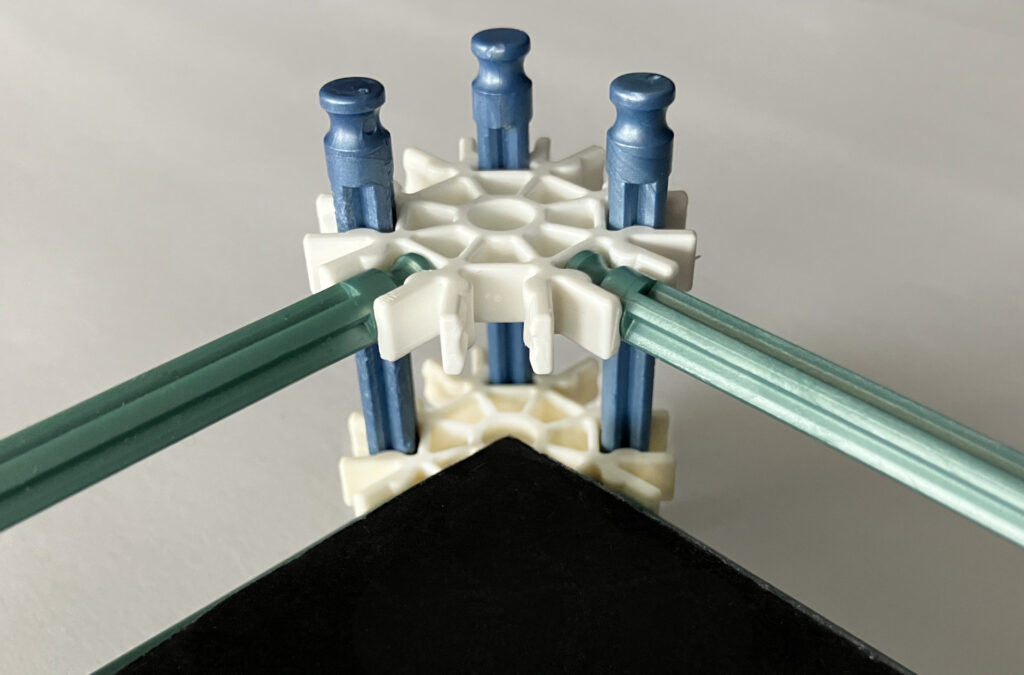 Now, snap a 1-inch rod (gray here) into each Corner Hub and slide it down to lock the art in place (needle-nose pliers are almost necessary here):
You now have two options for hanging the frame.
Getting it on the Wall
The best holes for picture wire are the fixed, unmoving, ones at the ends of the Central Rail Guides that are nearest the top of the frame, as shown in the following photo (the frame top here runs down along the photo’s right edge). TIP: When you do this, use a length of wire about twice the width of the frame at its smallest size. This will let you use the same wire if the frame is later expanded to its full width for a different photo:
 NOTE: A great advantage of this frame is that the space behind the art keeps wall nails from touching it, and allows the frame to hang flat against the wall.
But a second hanging approach actually eliminates the need for wire! It also keeps the frame from tilting out-of-level once it’s on the wall. For this method:
- Measure the exact distance between the centers of the center holes of the top two Corner Hubs.
- Using a level, mark two dots on the wall that are “on level” and separated by that distance.
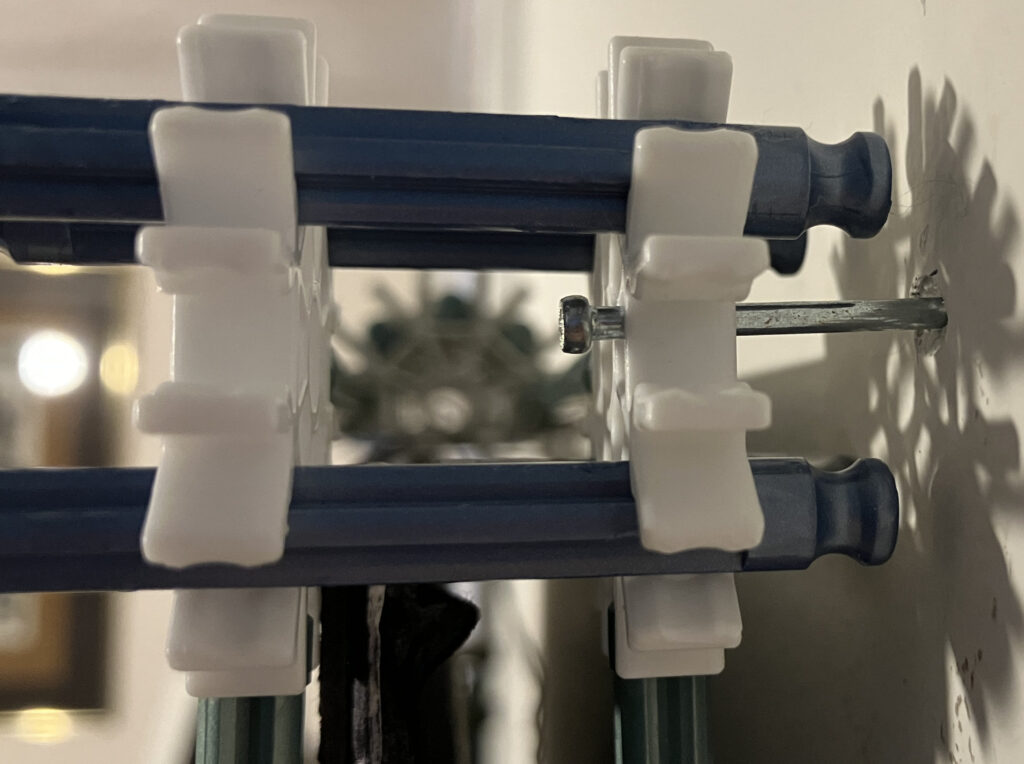
- Hammer long, thin nails straight into the dots (leaving at least a half-inch of nail visible in front of the wall).
- Slip the top Corner Hubs’ central holes over the nails (as shown here):
Colorful Customizations
Below, the same frame is done in red, yellow and black, but other colors are available (options vary with the pieces):
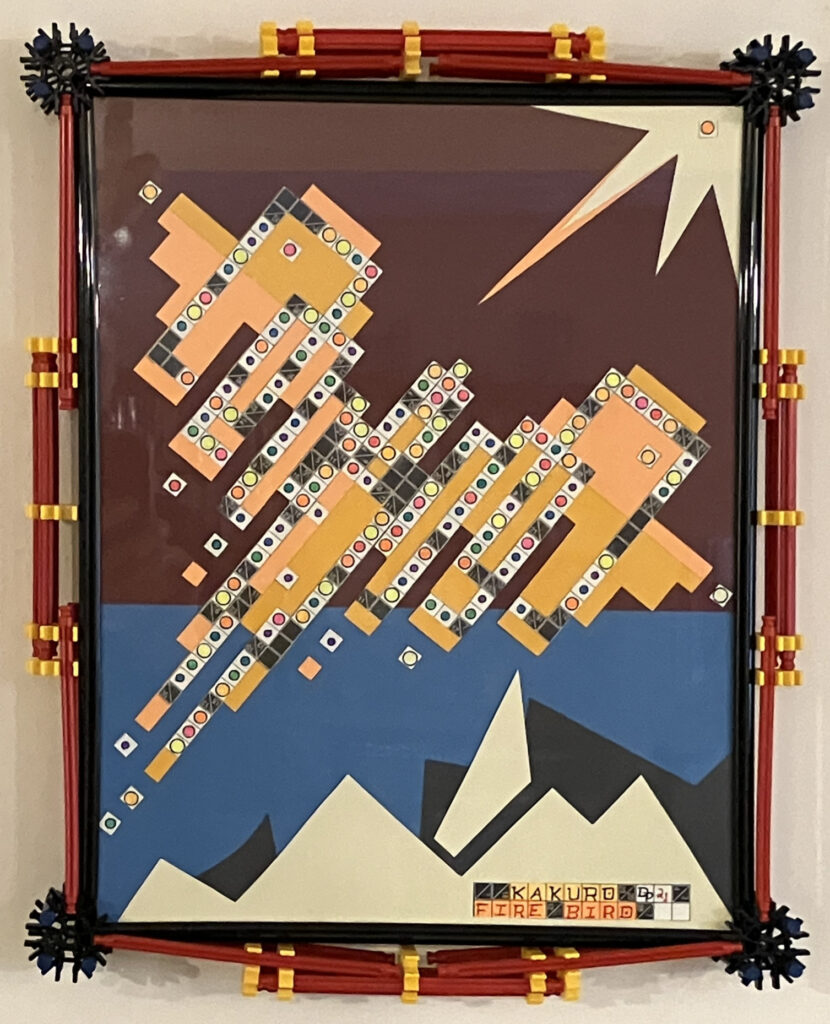
Called “Kakuro Fire Bird,” this collage was made from construction paper and mathematically color-coded Kakuro number puzzles. Here, it’s still behind glass in its original 11 3/8 x14 3/8 x 5/8-inch black craft-store frame. I did this to show: (1) That the K’Nex frame can handle thicker things, like the craft-store frame, and (2) That the frame is flexible enough to “bow” a bit if its contents are a smidge too big (in this case, vertically). I actually think the colors and the curved top and bottom are a nice look for this subject (but the bow will go away when I remove the craft-store frame and insert just the art and glass).
And here’s another colorful piece that I switched into the same frame. This time, it’s a 12 1/4 x12 1/4-inch boxed set of three opera LPs! (Since the box is 5/8-inch thick, I didn’t need to use 1-inch rods to “lock” it in place.):
 TIP: The frame held the empty box nicely. But when I returned the records to the box, the piece was heavy enough to pull the frame open vertically. I fixed this with a second yellow connector at each end of the Central Rail Guides (as shown above). Their added resistance to gravity’s pull worked. For even heavier pieces, more connectors can be added.
Overall, I don’t think I could have bought a better frame design and color scheme for this Asian-themed art!
Some Technical Bits
The assembled frame– especially in its largest sizes– may feel lightweight and flimsy. But when art is inserted, it makes everything more rigid.
In this system, design changes are easy. For instance:
- This article’s frame handles pieces up to about 3/4-inch thick. But if one replaces the 2 1/8-inch rods in the Corner Hubs with the next longer K’Nex rods (3 3/8-inches), the frame can then handle even the thickest canvas prints.
- And while the rails in this “medium-range” example were 5-inch rods, if one substitutes the longest K’Nex rods (7 1/2-inches), the frame then works with art ranging from 16 5/8 to 21 1/4 inches per side! This would easily handle 16×20 matted prints without “bowing.” One may need, however, to add a few more connectors to the Central-Rail-Guide ends before they’d support a 16 x 20 sheet of glass! But compared with the weight of wood or metal 16×20 frames themselves, the K’Nex frame’s 0.5 ounces makes hanging art a lot easier.
As mentioned earlier, when you first hang something in the frame, use a length of wire about twice as long as the frame’s smallest width. Then, you can hang any pieces within the frame’s size range — whether horizontal or vertical– without rotating the frame or changing its wiring points.You’ll only need to re-twist the wire through the existing holes. This saves a LOT of time when changing frame contents (especially when compared against the time to change art with traditional frames). For instance, I swapped the art for this article’s final two photos in under 30 seconds.
So if you or your kids ever need a fun (and useful) rainy-day project, give this a try!
–Dave Powell is a Westford, Mass., writer and avid amateur photographer.
Share this post:


Comments
Martin Siegel on Continuously Resizable DIY Photo Frames? Really?
Comment posted: 08/04/2026