
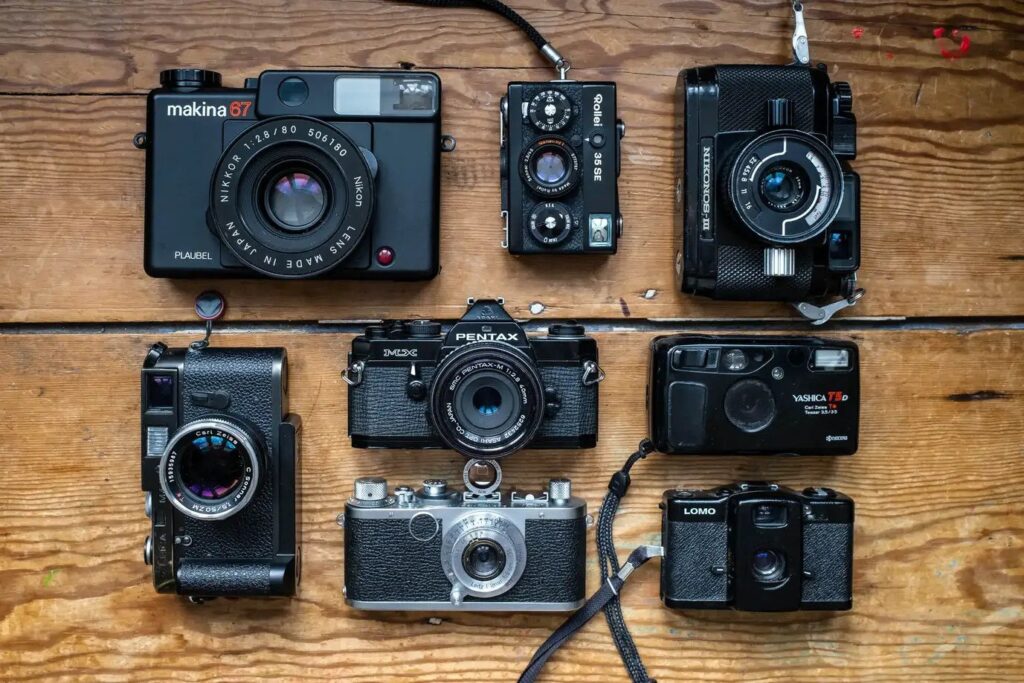
I’ve been disappearing down a 16mm wide rabbit hole recently. It all began with buying a Minolta 16 II on a whim (it was shiny …) from Soper Photographic, Plymouth, UK in Plymouth, as an extension to my interest in all things sub-miniature. Since then, the descent into the depths has continued, and I now have quite a selection of 16mm cameras to choose from.

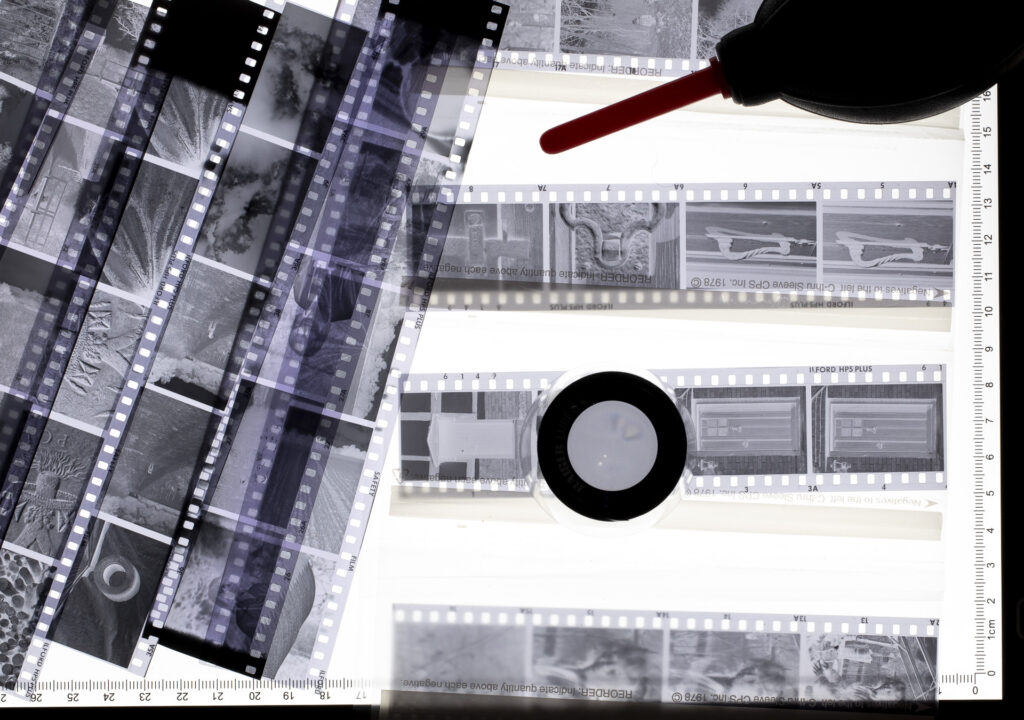
It so happens that 110 cassettes also take 16mm wide film, so there’s a separate 110 rabbit hole I’m exploring as well. Part of the challenge (some would say fun …) of sub-miniature is to extract as much as you can from impossibly small negatives. By way of example, here are strips of negs from 35mm, 16mm/110, and, for the truly masochistic, Minox.

This graphic goes into a bit more detail, showing the relative sizes of the negs, drawn to scale. Some call 110 (13 x 17mm) a ‘quarter-frame’ format, so the original 16mm (10 x 14mm) negative is even smaller. And Minox (8 x 11mm) is smaller still.

The effect of having such a small negative can be mitigated to a certain extent by picking a camera with a decent lens, choosing a fine-grained film (unless, of course, you like grain!), and careful development.
16mm film was always intended to be user-reloadable, as this page from the Minolta 16 user manual from the late 1950s shows. Compared to the fiendishly fiddly Minox cassettes, 16mm cassettes are relatively easy to load.

However, 110 cartridges, introduced by Kodak in 1972, were glued shut (plastic welded, actually) and labs typically would twist the cassette until it cracked open, allowing the film to be extracted for processing. Trying to open one with a view to trying to load fresh film in it involves a highly hazardous operation to split the seams with a scalpel or craft knife, trying not to sever any fingers in the process. A solution to this dangerous practice is, however, in development, so watch this space …
Back to 16mm … choosing a suitable emulsion is the first step to getting decent images from the tiny negatives. My go-to black and white film is the same as I use for Minox – Adox HR-50, but I’ve also had good results from Ilford Delta 100 Pro. I’ll be slitting various films down to 16mm to carry on the quest for the perfect sub-miniature reload film.
Although 16mm was a relatively short-lived film format, forced out of the market by a more convenient format, established manufacturers such as Mamiya, Minolta, and Rollei embraced it, producing some lovely little cameras with great lenses.


To digress for a moment – although the film itself was nominally 16mm wide, there the commonality ended. Some manufacturers went with un-perforated film, others had a single row of perforations, while a few had double – 110 was different again. This was all down to the film transport mechanism, which varied by model.
And the cassette design varied too.

Early Mamiya 16mm cameras had individual brass cassettes, one for the feed side and one for the take-up, and it was the take-up side that engaged with the film advance mechanism, pulling the film across the shutter gate. They later went for a single plastic unit with a thin bridge between the two sides, as per the established Minox design. Minolta went straight for the single plastic type, but with different dimensions to Mamiya. Rollei went for a conventional single cassette approach which required a rewind mechanism to be built into the camera’s small chassis, and the Soviet Kiev 30 (a direct copy of the Minolta 16 II, made in Ukraine) was different again, close to the Minolta dimensions, but not identical – the Minolta cassette will fit in the Kiev, but not the other way round.
It’s easy to see, therefore, why the simplicity of Kodak’s 110 drop-in cartridge was so appealing. 110 films could also be handled by every high street photographic lab, while the special handling needed for 16mm made it more niche, and therefore costly.
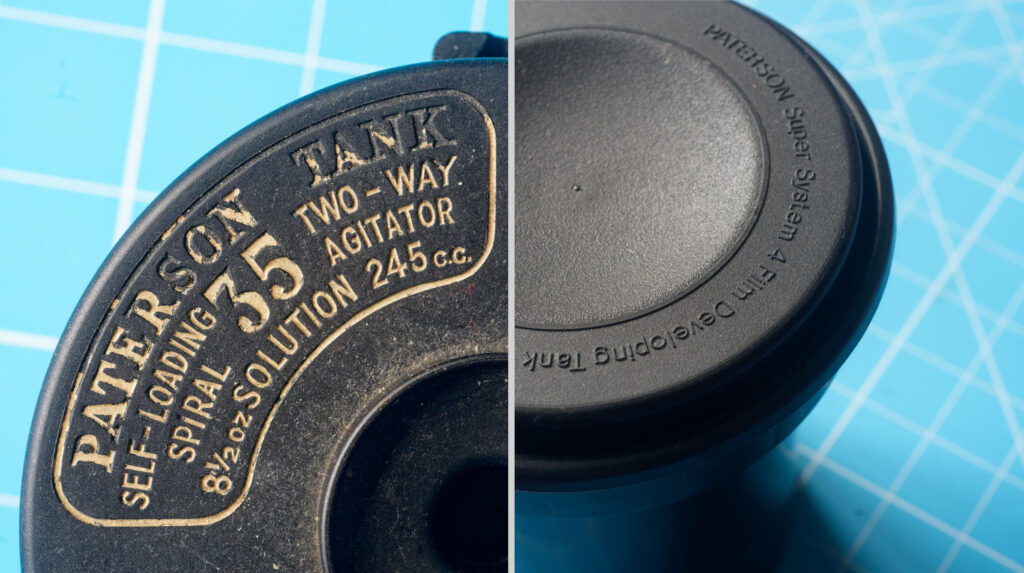
The final step is to get the films developed. The reels that come with modern home developing tanks (Paterson, AP, Jobo etc) don’t go as small as 16mm, so I had to buy a 1960s vintage Paterson Universal 3 tank which contains a single reel. So, I was resigned to developing one film at a time in a sixty-year-old, slightly leaky, plastic tank.

That was until those top chaps from Ausgeknipst in Würzburg, Germany came to the rescue.
Ausgeknipst came to my attention when I was looking for accessories for some of my more obscure cameras – they design, and 3D print, a bewildering range of products that will keep any analogue photography fanatic satisfied! They sent me four of their Ausgeknipst 16mm/110 developing spirals to test in my Paterson Super System 4 tank (which will also fit the AP tank), and they do a version that fit Jobo tanks too. I’ve bought quite a few 3D printed accessories since I’ve been a born-again film photographer, but these Ausgeknipst reels are some of the best finished products I’ve come across. They twist together and come apart better than many of the injection moulded reels I have, and the films were so easy to load, as we’ll see …
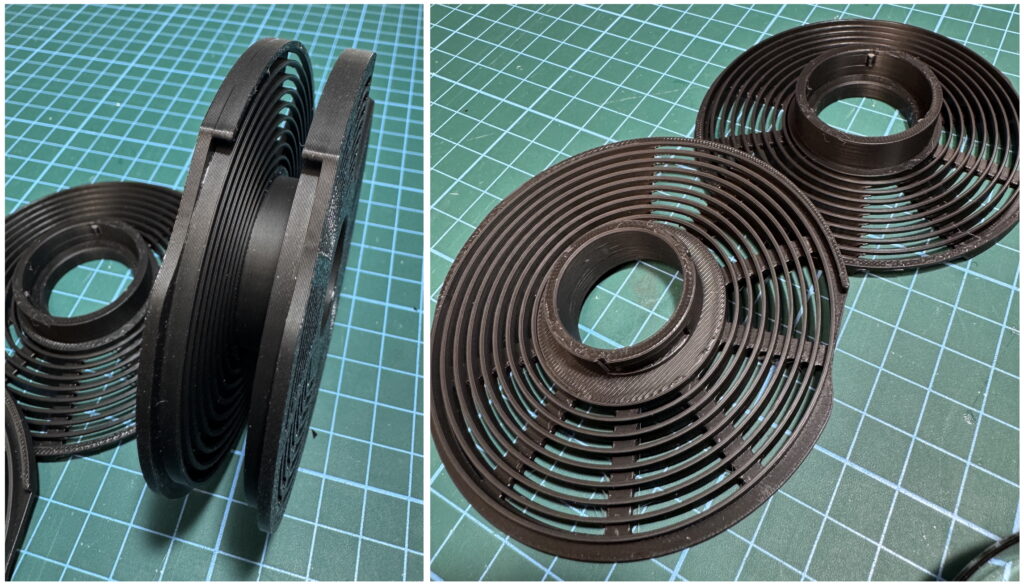
One great advantage of these Ausgeknipst reels is that you can fit up to four of them onto the spigot from a standard two-35mm-reel Paterson tank. If you’re feeling bold, you can get two 16mm/110 films onto each reel, so that’s eight films per tank!


So, how to go about loading these marvellous reels?

Removing the film from the cassettes has to be done in total darkness, of course. Although it’s sensible to tape the film compartments shut when handling and loading them into cameras, they come apart very easily to develop, and you’re left with eighteen or so inches of film snaking around on your bench. To help handle the film in the dark, I’ve made myself a little gizmo from a cut-down 35mm film canister. I cut a vertical slot in the side and lined it with photographer’s gaffer tape. Roll the film up holding the edges, feed the end through the slot, and then pop the lid on. It now handles a bit like a 35mm cassette and reduces the risk of damaging the delicate film emulsion as you load it onto the reel.

As with 35mm film, it helps to trim the corners off the end of the film. Whilst this can be done in the light on 35mm, I’ve yet to find a solution for trimming 16mm/110 in total darkness without risking permanent damage to your fingertips. A pair of toenail scissors (!) proved to be just as hazardous as scissors … the quest continues.

The Ausgeknipst reels work like conventional developing reels, albeit without the ball bearings, which can sometimes be more trouble than they’re worth. They use the same shuffle loading motion, and gentle alternating pressure from your thumbs on each side as you rotate the reels is enough to smoothly feed the film into the spirals. The ‘gates’ at the start of the spirals are very smooth, and the outer edge of each reel has a useful indentation where your thumb naturally sits. Ausgeknipst are looking at putting a small pip or mark just above the gates to help orientate the reel in the dark.

With the film safely inside the loading ‘cassette’ (or snaking around on your bench … your choice), insert the trimmed end into the spiral between the gates – the ‘cassette’ will stop it from twisting as it unravels.

Then, with your thumbs resting in the indentations on the outer rim of the reels, gently press the film into the recess in the rim and rotate the reel back and forth, alternating the pressure on each side. This ‘shuffling’ will gently pull the film out of the ‘cassette’ and feed it into the spiral. The ‘cassette’ will fall away at the end of the film, and a couple more shuffles and the whole of the film is safely in the grooves of the spiral. You can then pop the reel onto the tank’s spigot and move onto the next film.
Ausgeknipst say it’s possible to fit two whole 16mm/110 films into one of the reels. I would probably try to splice the two films together with a small piece of tape (again, in the dark) to reduce the risk of them overlapping in the grooves and not developing properly, but the concept of developing eight films per tank load is attractive.
As with all these things, it helps to practice with a length of spare film – your local lab should let you have films that came out blank to practice with.
When it comes to the developing, proceed as with any other film. I found that for a Paterson tank, a single reel requires 160ml of liquid to completely cover it, but then just 120ml for each additional reel (therefore, 1 reel – 160ml, 2 reels – 280ml, 3 reels – 400ml, and 4 reels – 520ml). Obviously if you mix other formats with the 16mm/110 reels, you need to fill accordingly – I found that two 16mm films and one 35mm film needed the full 600ml. Jobo, AP, or other tanks will need slightly different quantities.
Once developed, removing the films from the reels is really easy – a small amount of backwards rotation unlocks the two halves with a satisfying ‘click’ (much less force than is needed for an injection moulded reel) and the film can be lifted out and hung up to dry. The reels can then be washed and dried as normal.
These reels from Ausgeknipst were a joy to use and make home-developing 16mm/110 films so much easier, with much less chance of mucking it up! I am looking forward to seeing what other magic those Würzburg wizards can conjure.
For more information on the Ausgeknipst 16mm/110 developing reels, click Ausgeknipst 16mm/110 developing reel for Paterson and Jobo tanks.
For more information on the author, visit www.andrewlong.info/photography, and www.andrewlong.info where you can see his books on Cold War history.
You can also find him on Facebook, Instagram, LinkedIn, Flickr.
Share this post:


Comments
Gerard on Ausgeknipst Reels – Developing 16mm (or 110) in the Paterson tank
Comment posted: 28/06/2025
I too developed my B&W films myself. A Spanish brand it was, can't remember the name at the moment.
I made 13x18 prints myself, which were - technically, at least - pretty good. Yeah, they were a bit grainy, about as grainy as a 24x30 print shot on Tri-X, so no worries.
Unfortunately, it broke down beyond repair, but I have still very good memories, both on paper and in my mind
Thank for sharing your adventures using this tiny cameras and mini films.
Comment posted: 28/06/2025
Comment posted: 28/06/2025
Comment posted: 28/06/2025
Gerard on Ausgeknipst Reels – Developing 16mm (or 110) in the Paterson tank
Comment posted: 28/06/2025
suddenly I remembered the name of the Spanish B&W 110 film cassette: Neropan.
Eric Lorenz on Ausgeknipst Reels – Developing 16mm (or 110) in the Paterson tank
Comment posted: 28/06/2025
Otherwise you're left to send off to a lab somewhere else- where at this time of the summer can be stressful for your films.
Comment posted: 28/06/2025
Zheng Li on Ausgeknipst Reels – Developing 16mm (or 110) in the Paterson tank
Comment posted: 28/06/2025
At least now I have one more potential reel candidate to try out.
On another topic, all the 16mm film holders for scanners are quite fiddly too. Especially if the film is not perfectly flat. Other than using digital cameras and macro lens, do you recommend any scanning holders?
Comment posted: 28/06/2025
Gary Smith on Ausgeknipst Reels – Developing 16mm (or 110) in the Paterson tank
Comment posted: 28/06/2025
Thanks for your article (although I doubt that I'll ever develop film that narrow in the time remaining).
Comment posted: 28/06/2025
JA on Ausgeknipst Reels – Developing 16mm (or 110) in the Paterson tank
Comment posted: 28/06/2025
Comment posted: 28/06/2025
Comment posted: 28/06/2025
Comment posted: 28/06/2025
Comment posted: 28/06/2025
Comment posted: 28/06/2025
Comment posted: 28/06/2025
Chris on Ausgeknipst Reels – Developing 16mm (or 110) in the Paterson tank
Comment posted: 28/06/2025
Comment posted: 28/06/2025
Marco Andrés on Ausgeknipst Reels – Developing 16mm (or 110) in the Paterson tank
Comment posted: 29/06/2025
110 developing reel
Have 3d printed this stl file of a 110/16mm developing reel:
https://www.printables.com/model/136957-pa-110-a-11016mm-film-development-reel-v2-paterson
The reel seems similar to the one from Ausgeknipst. Used it to develop b/w Lomography film for Rollei A110 images.
https://www.35mmc.com/24/05/2024/5-frames-testing-two-rollei-a110-cameras/
Loading 16mm film onto the reel is really easy [compared to two others tested]. Have to agree with the developer’s statement:
« Improvements include shorter film ribs, twist-locking, and anti-crawl-back ridge! »
110 reloadable cartridge
Ausgeknipst also makes a reloadable 3d printed 110 cartridge. Presumably your next piece will describe that particular reloadable cartridge in use.
Tried 3d printing one 110 cartridge. Bottom line – proved problematic to print and use.
In contrast a newer one [updated 2025 05 12], also on Printables. is much easier to print, load and use with setting with higher speed [ISO 400] film..
https://www.printables.com/model/1294190-110-film-cartridge/files
Fits together quite well, printing without supports but with a 2 layer raft and a 10mm outer brim.
Unfortunately it does not have a proper 13mm x 17mm frame for the image. Could as the developer suggests, add « flocking tape to the entrance of each spool ».
Requires remixing: to change the notch to lower speed film [ISO 100] and to accommodate a frame. Will report back later.
Comment posted: 29/06/2025
Comment posted: 29/06/2025
Ibraar Hussain on Ausgeknipst Reels – Developing 16mm (or 110) in the Paterson tank
Comment posted: 29/06/2025
Makes me want to dabble
The 50ies cassette loading instructions seems quite straight forward!
Some of those 16mm miniature cameras are works of art
Comment posted: 29/06/2025
Comment posted: 29/06/2025
Vlad @ausgeknipst.de on Ausgeknipst Reels – Developing 16mm (or 110) in the Paterson tank
Comment posted: 30/06/2025
Bob Janes on Ausgeknipst Reels – Developing 16mm (or 110) in the Paterson tank
Comment posted: 12/03/2026