This is a short piece that describes how I designed and made a gadget to solve a need to attach and simultaneously use two cold shoes on a Leica M3 when only one exists. And how I got myself into that situation in the first place.
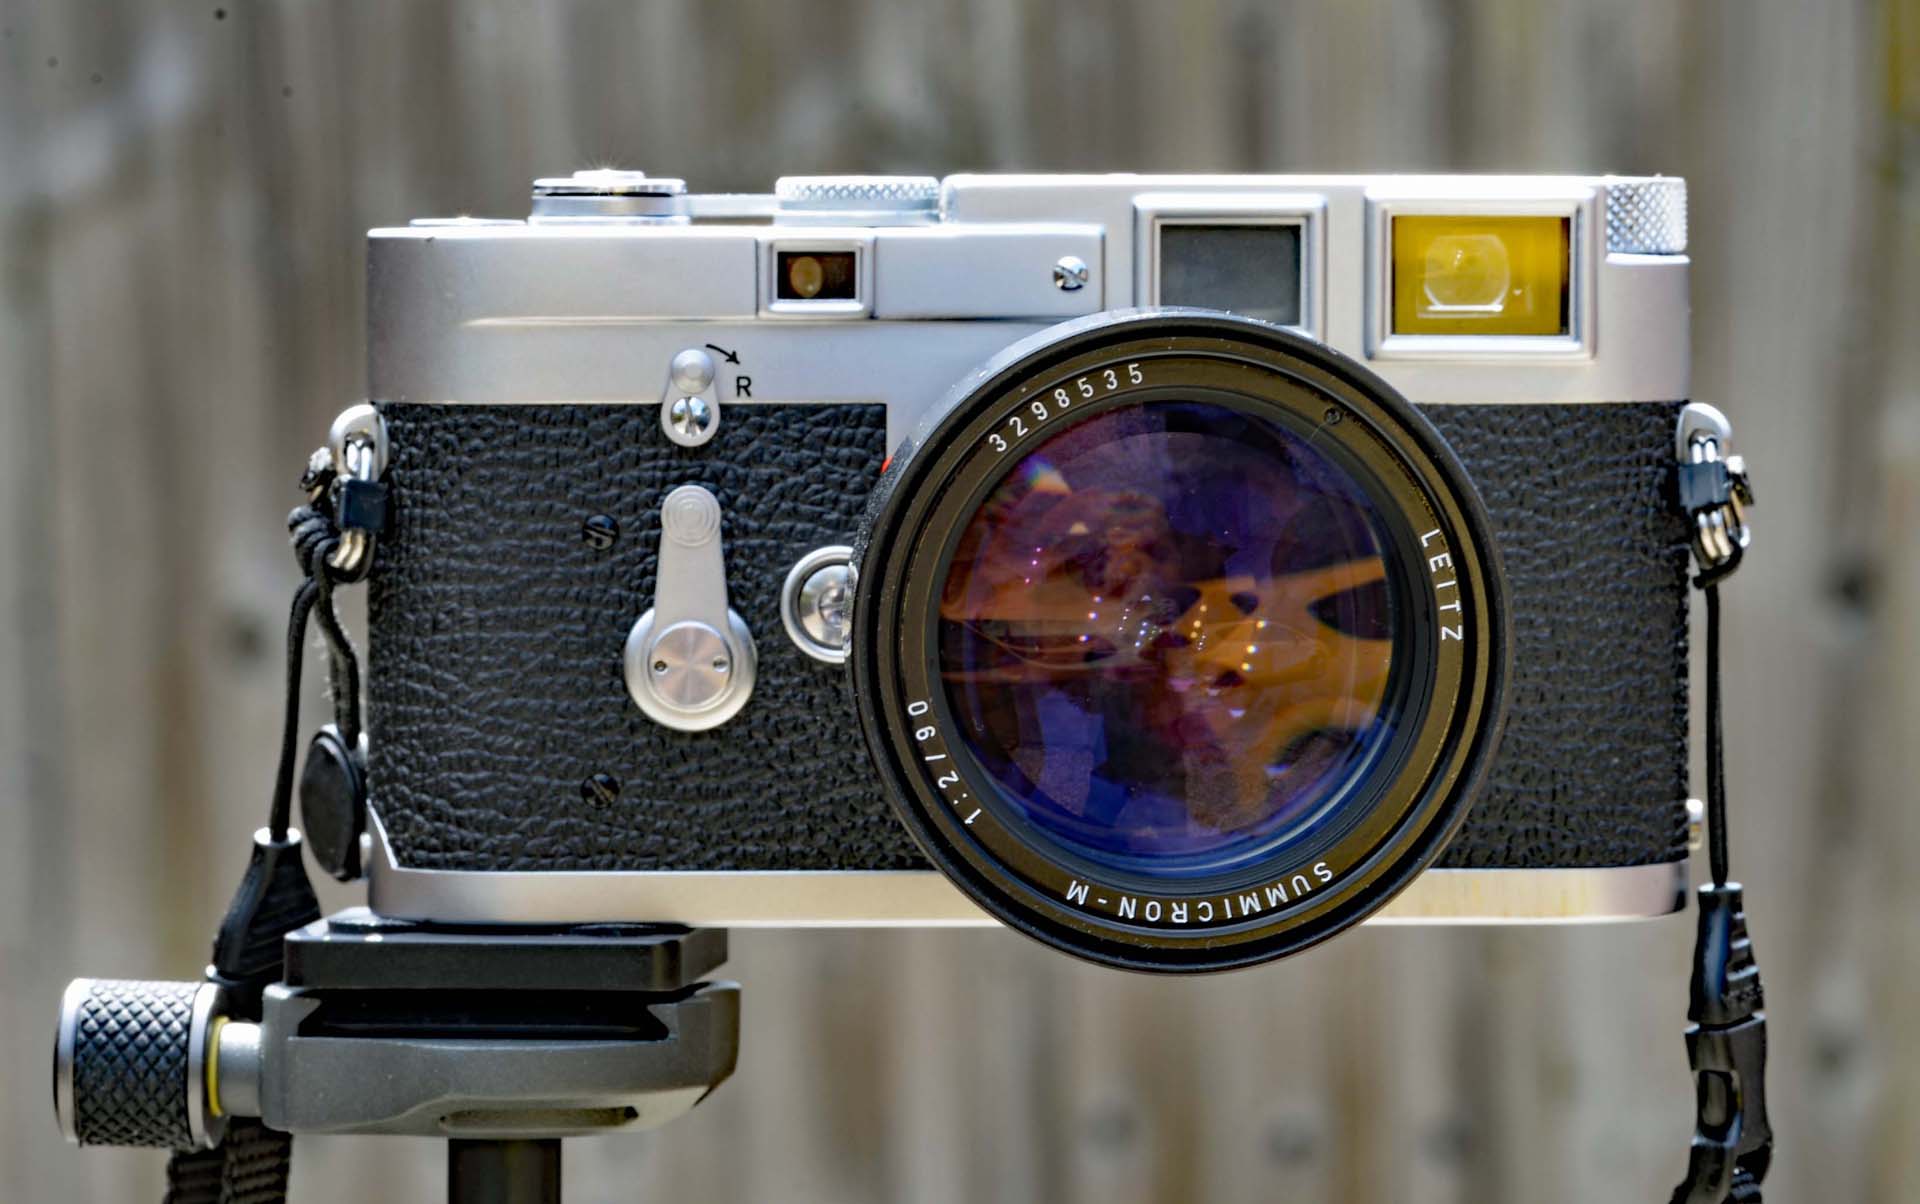
I have an M3. There I’ve said it. I acquired it about a year ago. A lovely camera to use and hold. Lightweight, quiet and discreet. An Icon. Is it a creation of the Gods?
In the ancient world mortals believed that only the Gods could create perfection. To that end, for anything mortals created they always ensured a ‘mistake’ was built into it. If you’re able to find someplace a complete Roman mosaic floor you will find somewhere on an edge or corner a deliberate mistake. How does this philosophy work itself out on an M3?
The film loading mechanism! Ugh!! What an awful time consuming faff and fiddle that is. What were they thinking of? Clearly not an inspiration of the Gods. Just mortals who seem to have lost the plot particularly when you compare film loading mechanisms in competitor’s offerings of the same era from Germany and Japan. Fast and easy.
So no, the M3 is not a creation of the Gods.
Essentially the M3 is (ignoring the film loading mechanism) a superbly German no-frills, interchangeable lens, purely mechanical rangefinder camera. No built-in light metering or anything fancy like that. The viewfinder is bright framed for 50mm, 90 mm and 135mm lenses. It can be used for 35mm lenses whereby the extreme edges of the viewfinder (outside of the 50 mm bright frame) approximates to the field of view of a 35mm lens.
Leitz made a number of clip-on accessories which extended the cameras utility. Some to do with viewfinders. Such as the 35mm “spectacles”. Also in its day Leitz produced a light meter arrangement that slid into the flash cold shoe and coupled up with the shutter speed adjustment wheel.
Whilst no longer produced by Leitz, there is a company called Capix based in Northamptonshire who produces a range of M3 camera accessories under the brand name of Keks. One of which is a digital re-imagining of the original aforementioned Leitz light meter. Of course there are other modern options for attaching a light meter to an M3.
One of which is the Sekonic Twinmate. A small analogue handheld light meter that comfortably fits in the hand and easily slips into a pocket. It can be fitted onto a camera’s hot/cold shoe via an optional foot on its underside. When placed on an M3 it really does dominate and looks rather out of place. Then there are the small digital cube style light meters that slide into a hot / cold shoe.
They have a screen on top that provides an exposure reading. And a dial and button or two to activate and operator it. There are a number offerings available. One of which is in the Keks range and then there is the AstrHori. I have an AstrHori mounted on my M3. Whilst looking proportionate and discreet all is not perfection.
The first problem is that it obscures the shutter speed index mark, even with the mounting foot located to the left-hand side of the device (when viewed from the front). It still overhangs the index mark a little. So positively setting the shutter speed is not something that can be done more or less instantaneously. Of course this visual obstruction might not be the case with other similar devices. But I haven’t tried any to find out.
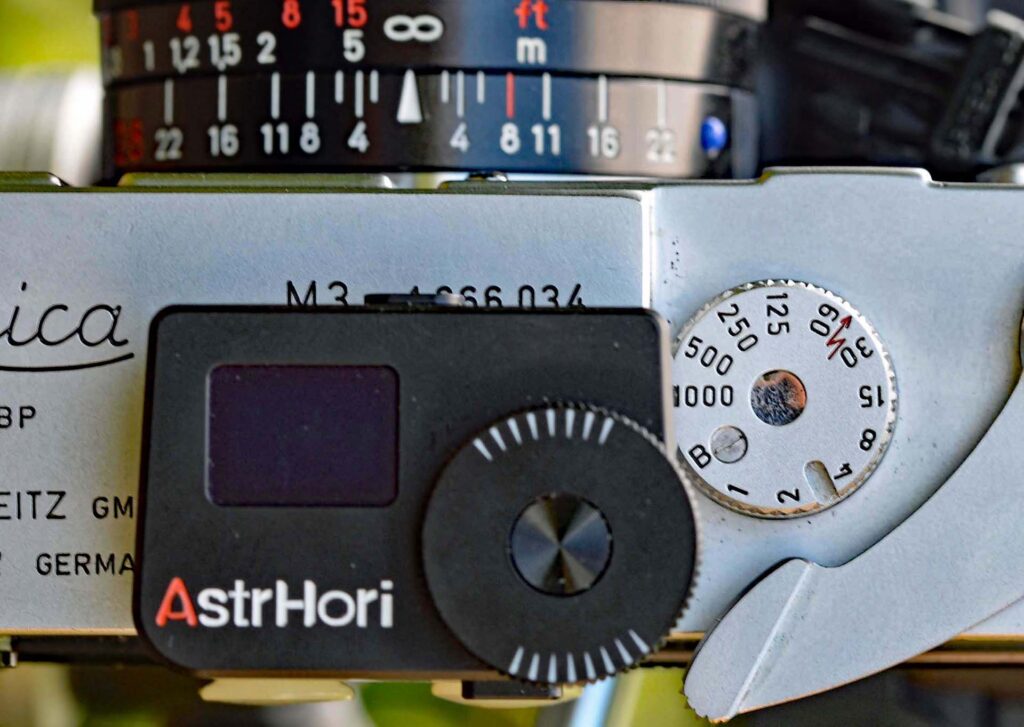
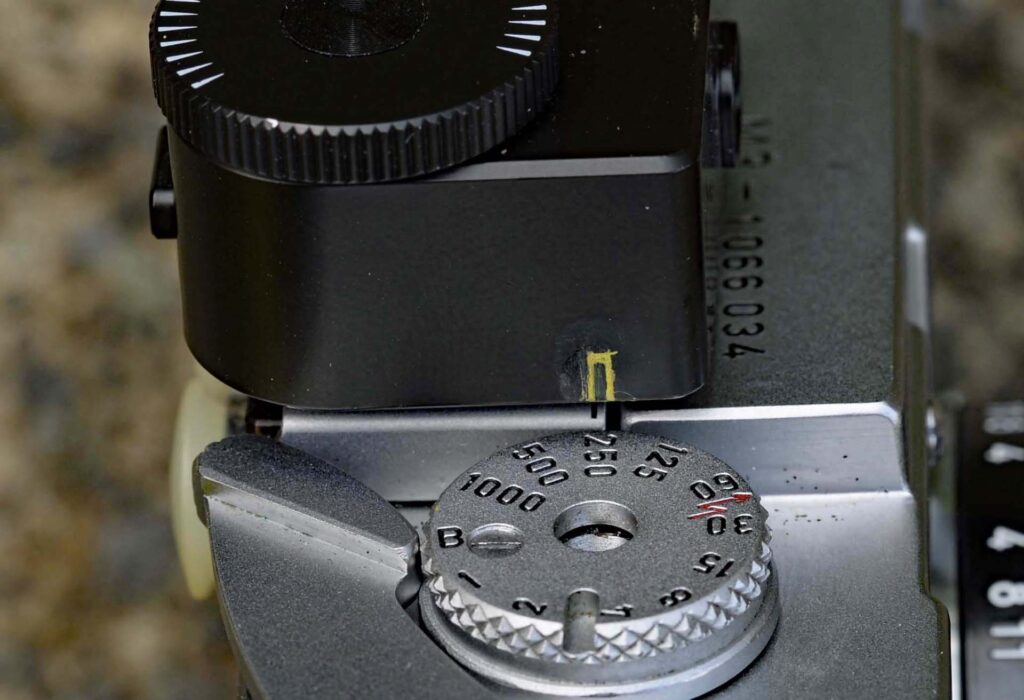
My solution to overcome the problem was to etch and yellow paint index marks on the body of the AstraHori. Restores the ability to positively set the shutter speed more or less instantaneously.
Setting up the AstrHori is a bit of a faff. It has to be done via one button using sequences of timed pushes and holds. Once that is over and done with daily use is really quite easy. One push to switch it on. Another to set the light meter in motion and a third quick jab to freeze the reading. The reading can be quite jittery particularly when compared to other light meters, be they analogue handheld or built into a digital camera.
The problem appears to be due to the fact that the viewing angle of the light sensor is a bit on the narrow side. Take a reading of a subject scene with most light meters (spot meters excepted) and move the light meter / camera around a little bit by just a few degrees up, down, left or right there is very little variation in the reading. Do likewise with the AstrHori and you can get anything up to a one-stop variation in reading.
To overcome this, I use the following methodology. Frame and focus the shot. If the principal subject of interest is not in the middle of the frame, then move the camera until it is. Activate the AstrHori.
Whilst looking through the viewfinder ensure the subject of interest or perhaps critical area of shadow is in the centre of the viewfinder. If you don’t do this, you are liable to be metering negative space / background or some other unwanted attribute.
Positively hold the camera with your right hand in the normal manner. move your thumb or index finger to the button on the back of the light meter and give it a quick jab to lock the reading. Don’t worry your face doesn’t get in the way of your thumb or finger.
Note and transfer the shutter speed and aperture readings to the camera. Reframe for the intended composition and click.
Turning to viewfinders. I mentioned earlier that the native viewfinder will only be usable in terms of full framing for lenses of focal length greater than 35mm. Leitz used to and still do make their own auxiliary viewfinders to accommodate lenses of shorter focal lengths. Obviously, the older ones are now only available as expensive rarities on the second hand market. The current M series shoe mounted optical Leica Universal Viewfinder covers focal lengths of 16-18-21-24-28mm and costs an eye watering £800.00.
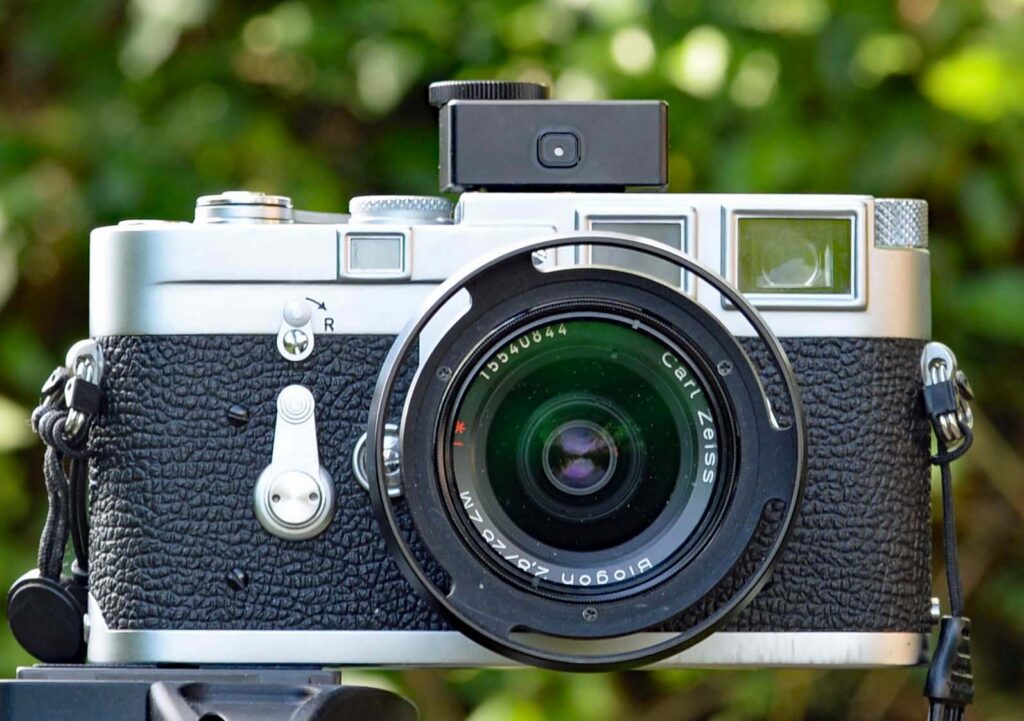
I have a 28mm lens. To overcome the limitations of the native viewfinder and save on costs I purchased a TTArtisan 28mm auxiliary viewfinder which slots into the cold shoe. It’s very good and very bright. It sits reasonably discreetly on top of the camera and costs £50.
There is no bright line frame within the viewfinder. The total image from top-to-bottom, edge-to-edge of the viewfinder is it. 28mm no more no less. Although there is some barrel distortion at the vertical edges. But in the grand scheme of things it is of little consequence.
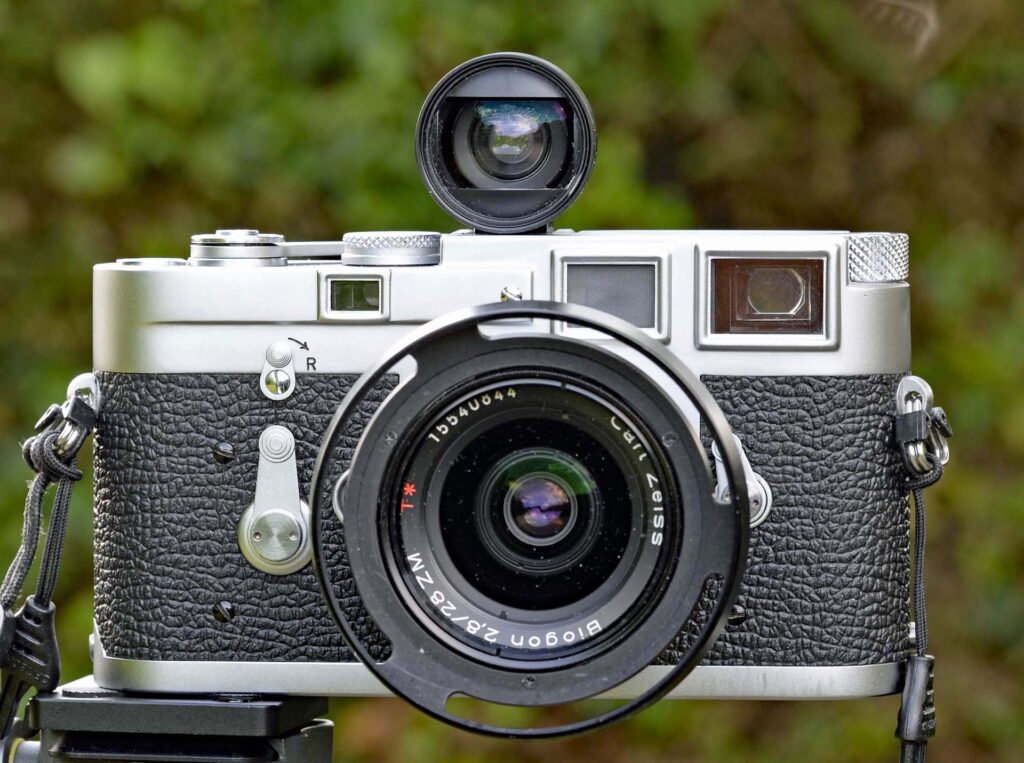
As there is only one cold shoe then there is a problem. And that is with the 28mm viewfinder in place you can’t have the light meter in place at the same time. And vice-versa. Therefore, two cold shoes are needed.
I solved the problem by making a gadget that slots into the existing cold shoe whilst at the same time mounting two cold shoes of its own. The next set of three pictures shows the gadget that I made.
The component parts are: i) aluminium plate 70 mm long, 22 mm wide and 2 mm thick. ii) 2 good quality auxiliary cold shoes from Amazon and iii) a compatible cold shoe foot that originally started life as the optional mounting foot from the Sekonic Twinmate light meter.
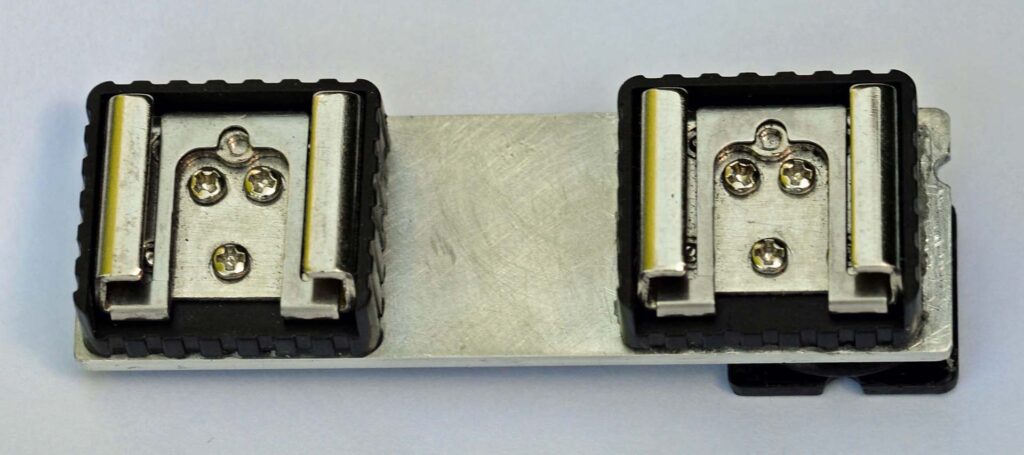
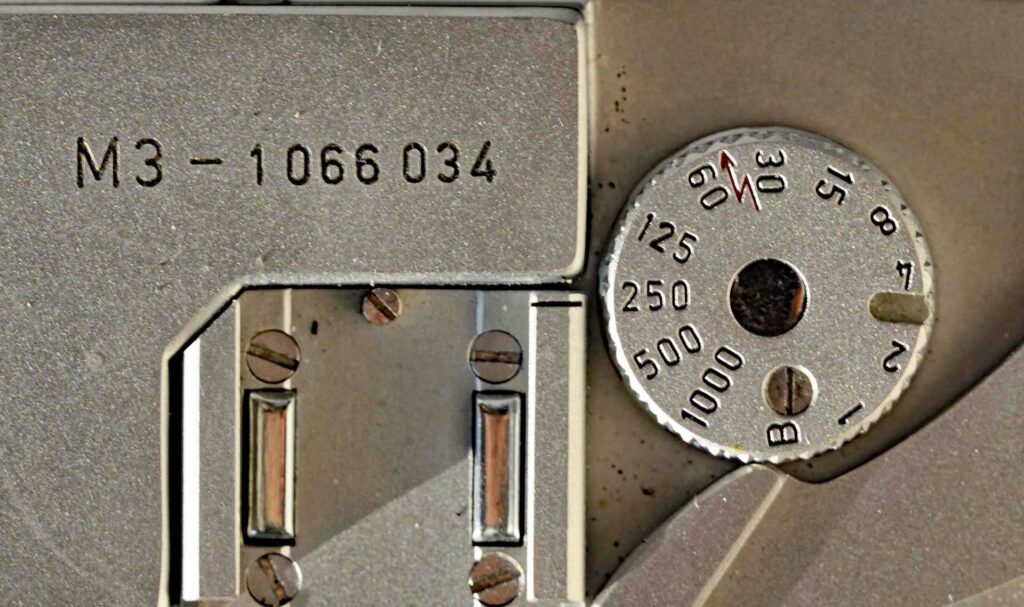
Note the semicircular 1.5 mm deep by 3 m wide cut out at the top of the right-hand edge of the plate. This is to ensure that the shutter speed index mark on the top of the camera is visible.
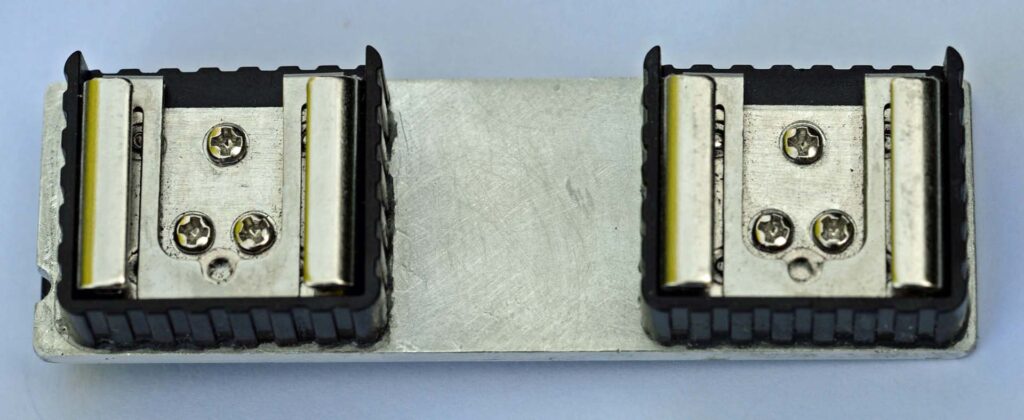
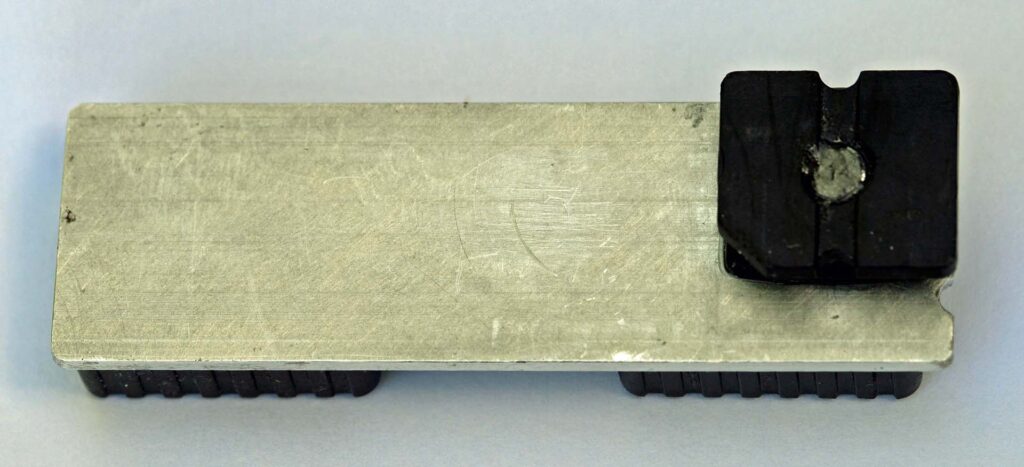
Again note the semicircular cut out. At the lower right-hand edge of the plate this time.
I reduced the overall height of the auxiliary flash shoes by several millimetres. I just cut and filed them down to size. I did likewise with the mounting foot. Otherwise, the whole thing was going to look far too clunky. The shoes and foot were glued in place using a two-part epoxy adhesive (Araldite) and taking considerable care to ensure they were square and aligned.
In order to ensure that the shutter speed setting index mark could be seen I set the shoe for the light meter slightly to the left of where the camera’s native shoe is. And cut a semicircular notch into the edge of the plate so that the index mark can be seen.

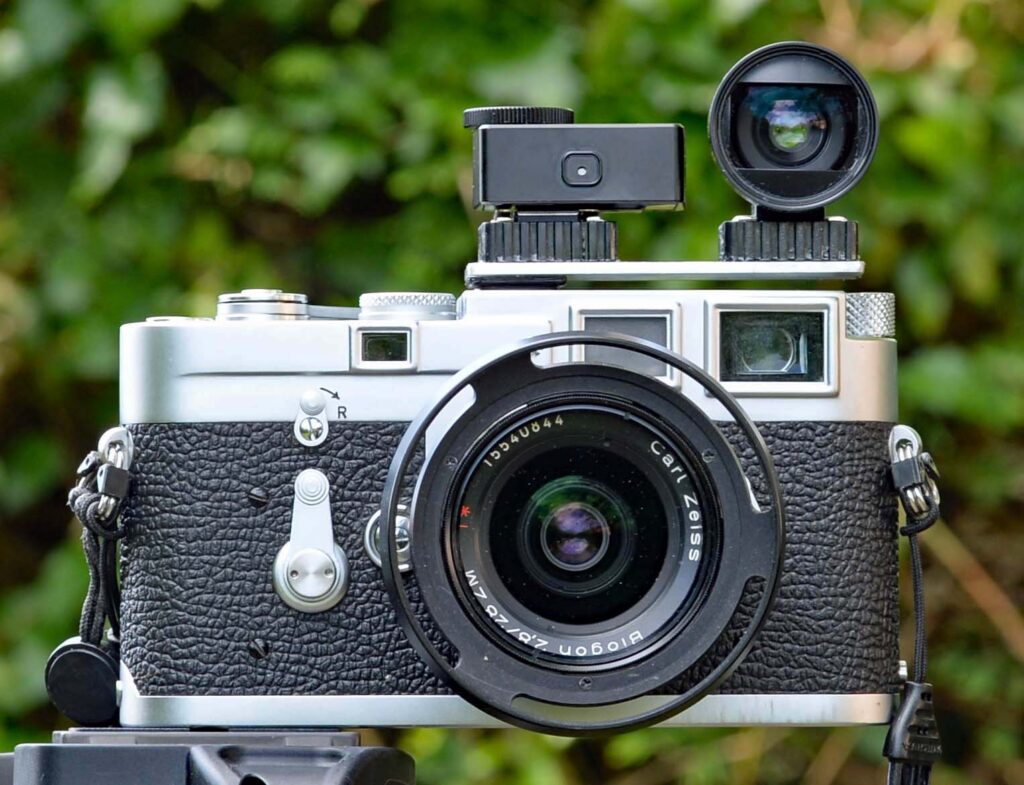
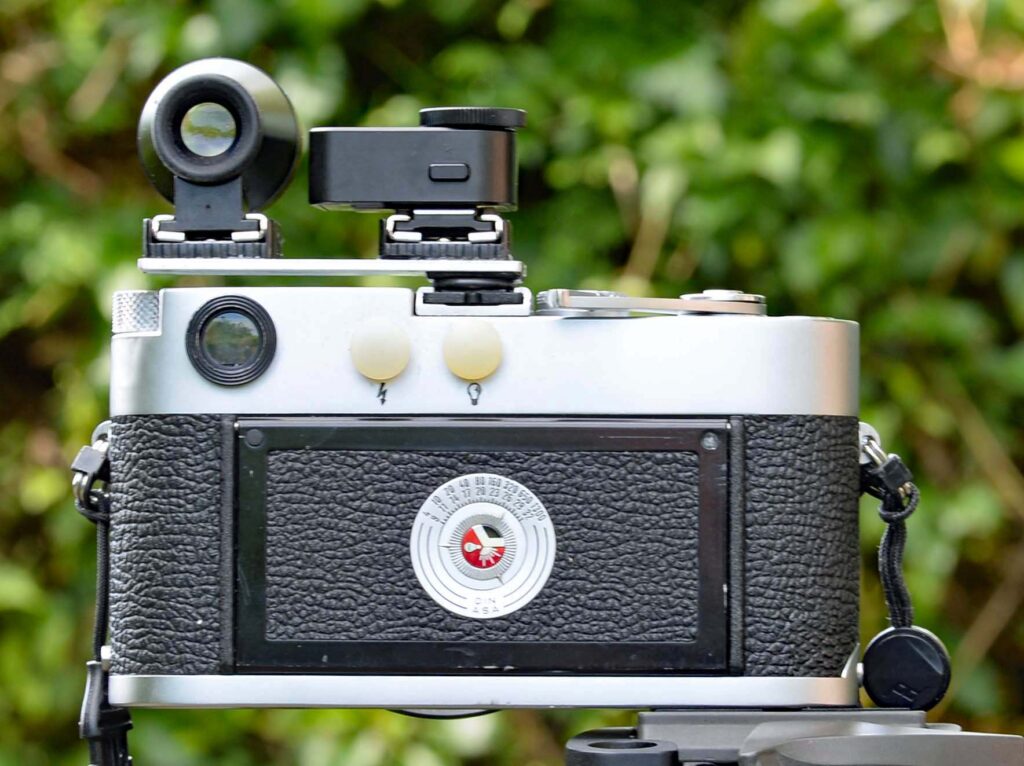
The final two photographs show the finished article in place complete with light meter and viewfinder. The viewfinder works very well in its new position. Much more ergonomic than when mounted centrally on the camera. Just a matter of making a small movement to transfer one’s eye between the camera’s rangefinder viewfinder and auxiliary finder rather than having to move your head across the camera.
Yes, it looks slightly clunky compared to the individual items mounted on the camera’s native shoe. I probably could have taken another millimetre of the height of the auxiliary shoes. If I had machined the whole thing out of a block of aluminium I could have reduced the gap between the top plate of the camera and the underside of the bar by a millimetre if not two. Thus reducing it from its current 4 mm. Flash shoes could be made to a lower profile thus taking about another 3 mm off. Overall reducing the height of the complete assembly by about 5 mm. The weight of the finished bar is 140 gms / 4.9 oz.
In some respects, I guess it looks a bit militaristic and alien. For Star Trek fans I am reminded of the instructions The Borg would give their victims before they were assimilated. In this case I parody for the benefit of my photographic subjects. “Prepare to be snapped! Resistance is futile”
The camera and lens used for the close-up photography was a Nikon Df with Sigma 105mm 1:2.8 DG Macro HSM. Resultant photos cropped and tweaked in Photoshop.
Share this post:


Comments
Gary Smith on Two Cold Shoes for an M3
Comment posted: 30/07/2025
However, if the Gods in Wetzler had wanted you to have 2 cold shoes on the M3, they would have put them there.
Clearly sacrilege!
Comment posted: 30/07/2025
Comment posted: 30/07/2025
Thomas Wolstenholme on Two Cold Shoes for an M3
Comment posted: 30/07/2025
Comment posted: 30/07/2025
Philippe on Two Cold Shoes for an M3
Comment posted: 30/07/2025
Comment posted: 30/07/2025
David Kieltyka on Two Cold Shoes for an M3
Comment posted: 30/07/2025
Comment posted: 30/07/2025
Doug Anderson on Two Cold Shoes for an M3
Comment posted: 30/07/2025
My solution for my LTM Leicas is the Leitz CTOOM flash bracket. I put an auxiliary viewfinder in the camera cold shoe and my Voigtländer VC Meter II light meter in the cold shoe of the flash bracket. The flash bracket makes a very good left hand grip that helps me hold the camera steady at low shutter speeds and the operating button on the meter is right under my left thumb.
Comment posted: 30/07/2025
Scott Ferguson on Two Cold Shoes for an M3
Comment posted: 30/07/2025
Nice bit of ingenuity there to make your M3 more suited to your personal needs as a shooter! I also shoot with an M3 and love using external viewfinders, even when I'm shooting with a 50mm. I don't worry too much about how my setup looks compared to how the eventual photos look. Most of my accessories are vintage Leitz with the chrome finish, which tends to look a bit "50's engineer on vacation" compared to the sleeker look of more contemporary Leica gear, all in fashionable black that a proper influencer might be seen with. I have a 1.4 x magnifier on the viewfinder window to help me focus more accurately, and then switch to the very bright external finder for whatever lens I'm using. I do like using a meter, but my favorite is a somewhat bulky Pentax Spotmeter, which allows me to be quite granular about what part of the frame I'm exposing for. If I had a wish to ask of the photography gods, it would be for a compact, affordable, optical spot meter -- if that existed, I might be tempted to add a 2nd cold shoe!
Happy shooting!
Comment posted: 30/07/2025
Adrian Riu on Two Cold Shoes for an M3
Comment posted: 31/07/2025
Comment posted: 31/07/2025
Geoff Chaplin on Two Cold Shoes for an M3
Comment posted: 31/07/2025
Comment posted: 31/07/2025
Alexander Seidler on Two Cold Shoes for an M3
Comment posted: 01/08/2025
Comment posted: 01/08/2025
Eric Winnert on Two Cold Shoes for an M3
Comment posted: 01/08/2025
Comment posted: 01/08/2025