I’m not the most avid slide film shooter. I find that the results look quite similar to digital output (only with less dynamic range) at which point I might as well shoot digital. But there is one thing that I absolutely love about slide film – looking at the film itself after it’s been developed. There’s something very soothing about seeing the photos as they are right there on the film. No need to invert any colors. No need to remove any orange color casts.
That’s the only reason why I got a few expired rolls of Kodak Ektachrome EPP 100 film from the eee of bay. That and…my justification that “it’s a good deal”. That and…my F.A.S (cousin of G.A.S only instead of Gear it’s Film).
I have never developed slide film at home. For the rare times that I have shot it – I sent it to the lab. That’s also what I did after I shot the first roll of my newly acquired film. It proved that film is still usable which was questionable because it expired in 2005. Film itself was discontinued in 2009. Ektachrome you can get now is not EPP 100. Luckily the seller hadn’t lied about the film being properly stored.
I have nothing against film development labs. They do amazing work and it’s great to support them. I just don’t live close to one so it’s both time consuming to get it to the lab and also quite costly. Also it’s a lot more boring than doing it myself.
Slide film is normally developed with the E-6 process. I already develop both B&W and C-41 film at home but I don’t have any E-6 chemicals. I could buy E-6 chemicals but because I don’t shoot a lot of slide film it would expire before it’s fully used and I don’t like not using things to their full potential.
Processing film in C-41 chemicals ( which is called cross-processing ) is also an option but I’m not the biggest fan of the results that it gives. It also removes the main enjoyment I have from slide film – looking at the developed film and seeing positives.
Seems like I’m out of luck then? Not quite. I had read that it’s possible to develop slide film in a weird process where both B&W and C-41 chemicals are used and the end result is film with positives so I decided to try it.
I “researched the internet” to find as many examples as I could about this and whilst there are not many I did find some common points which allowed me to nail down the whole process with the chemicals and items I already had at home.
Development Process
Here’s the process I followed:
- Shoot the film as normal. All requirements of careful light metering still apply. That being said – the examples you’ll see later were shot on a camera without a light meter. And the only light meter I occasionally used was the light meter app on the phone. I can’t recommend that you do the same but it has mostly worked out fine for me.
- Spool the film onto the reel as normal and put it in your development tank. If you have multiple reels – keep one dry. If you have metal reels – use those. You’ll find out why later.
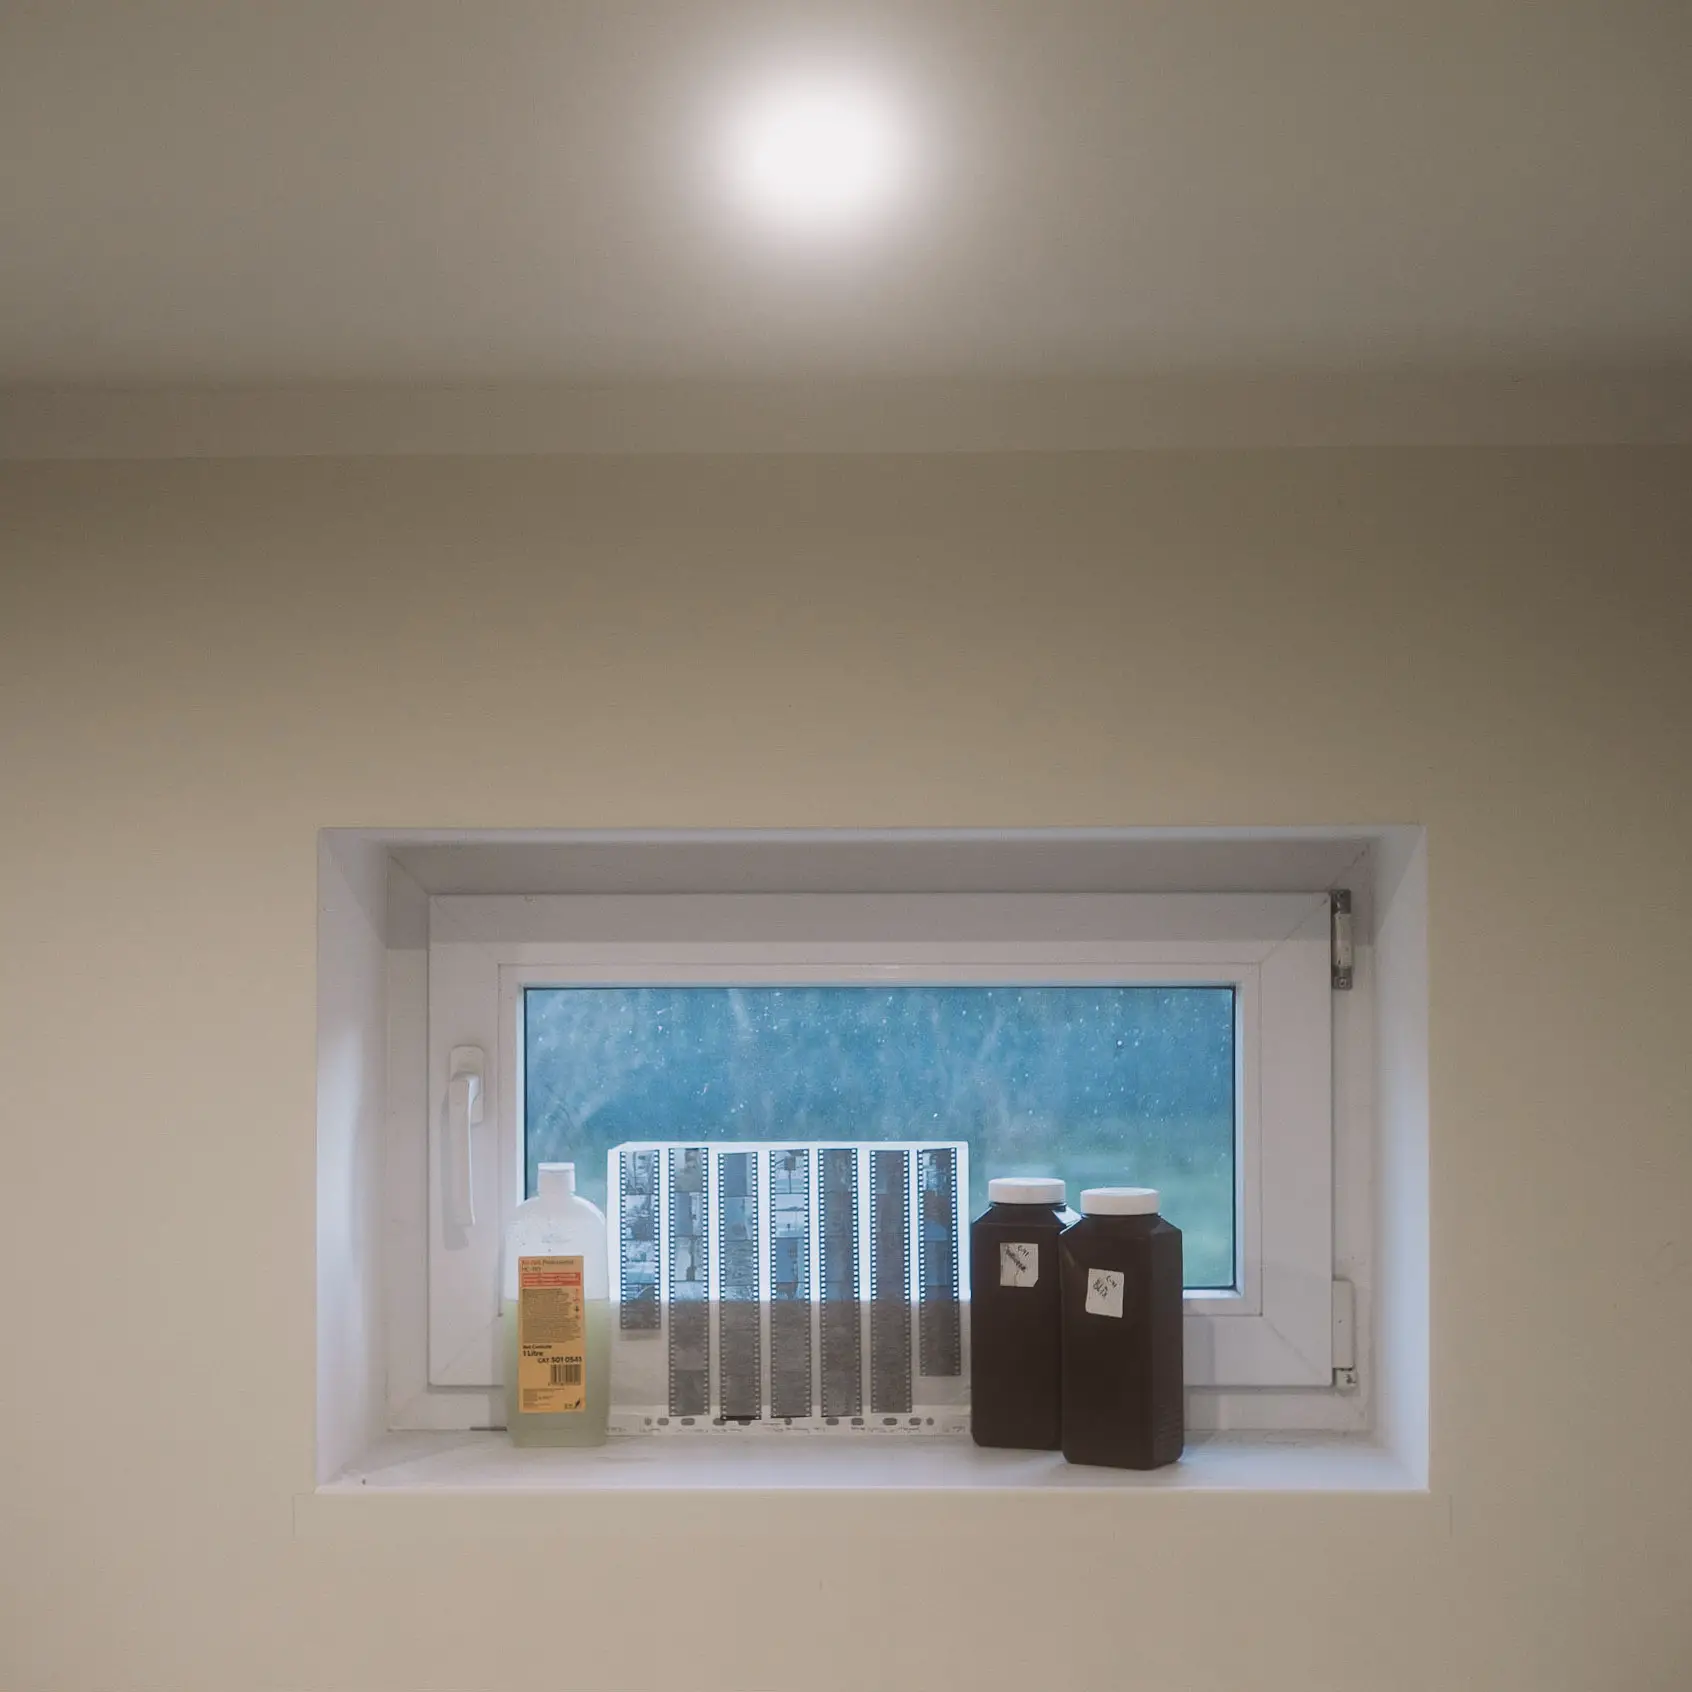
- Get the chemicals:
- B&W film developer. I used Kodak HC-110 because it was the main developer used by other people attempting the same thing…and also it’s the main B&W developer that I use. You can use a different one but development times will likely be different so unless you want to experiment – stick with HC-110.
- C-41 kit. Kit that isn’t expired or overly exhausted works best. It doesn’t matter whether you have bleach and fixer separate or together as blix. I used a Tetenal Colortec C-41 kit that was about 80% exhausted. Ideally your kit is less exhausted. You’ll find out why later.
- Prepare the HC-110 working solution using dilution A ( 1:15 ) to mix up your required volume of developer.
- Heat all chemicals to the C-41 development temperature as described by your C-41 kit. Even HC-110 working solution. It will likely be around 39 °C ( ~ 102 °F ). Try to keep this temperature consistent. I used 38 °C ( ~100 °F ) and it probably varied a bit during the whole process as I don’t have a consistent way of maintaining the temperature. If you can – do it in a more consistent way. If you can’t – not a huge issue but you might get some color casts depending on how variable your temperature is.
- Presoak the film and preheat the tank to the same temperature. 2 minutes should be enough.
- Pour the water out and replace it with the HC-110 working solution. Might seem weird to develop with HC-110 in such a high temperature but don’t worry – slide film likes heat. Develop it for 6 minutes and 30 seconds. You can use your preferred agitation method but I used inversion agitation. 10 inversions at the start then 4 at the start of every minute.
- Pour HC-110 out and wash the film as you would after you finish B&W development but keep temperature the same. Pour all the water out at the end. Now for the scary part.
- Turn off the lights. It doesn’t have to be completely dark but most importantly try to keep colored light out. Now take the film out. Might seem like a weird thing to do but trust me!
- You need to expose the film to natural light. If you use colored light ( like tungsten ) then final positives may have a color cast. I used torch light from my phone. I’m not sure if it’s completely natural but it didn’t seem to introduce any major color casts. I exposed the film for roughly 2 – 3 minutes where I slowly moved the torch light pretty close to the film across the whole length. It won’t be easy to overdue this step so it’s better to do it for slightly longer rather than not too much. You should also be able to see some images on the film. It should look like a slightly milky and quite dense black and white negative. As long as you can see pictures you should be fine. If you don’t see any pictures you should worry and it’s highly likely that not much will come out at the end.
- Now you need to get the film back onto the reel. If you use plastic reels like me then you will likely curse a bit whilst doing this because it’s quite difficult to spool wet film onto plastic reel – even when you can see what you’re doing. This is where I used the second dry reel to make my life slightly easier. I did it without too many troubles but I definitely had to help with my gloved fingers to get all the film onto the reel. If you have metal reels it should be easier. I’ve been told that if you do this under water with plastic reels then it’s easier but I have not tried this myself.
- Preheat / presoak the film and tank back to the chemical temperature. 2 minutes should be enough once again. Pour the water out at the end. Now we’ll do the C-41 process with a few small tweaks.
- First the C-41 developer goes in. Develop it for the recommended time described in your C-41 kit and add extra time as if you’re doing a one stop push. Typically it will be around 30 extra seconds. If your kit is expired or quite exhausted change it to 45 seconds. For agitation I inverted the first 10 seconds and then twice every 30 seconds.
- Out goes the developer and give the film a quick wash. Mostly just water in and out. Keep the temperature consistent.
- In goes the blix. Double the time that your C-41 kit says. For example if it says 4 minutes – blix for 8. Your kit will likely have different blix times depending on how exhausted the kit is. In my case I would’ve had to normally blix for 15 minutes so after doubling I had to do it for 30 minutes…which is quite long. For agitation I typically use the same process as for C-41 developer but I didn’t really want to do it for 30 minutes so instead I did 10 inversions at the start and then a few inversions every few minutes. Not very scientific but it worked for me. If instead of a blix you have separate bleach and fixer – still follow times from C-41 kit but double them both.
- Now we return to normal C-41 processing so wash the film thoroughly and then stabilize if your C-41 kit comes with a stabilizer. No tweaks are needed for these steps.
- You’re done. Take the film out and hopefully you will see amazing positives in easy 17 steps!
As you can see – it’s quite a lengthy process. Because of the extra blix time the whole process took more than an hour for me which is definitely quite an endurance requiring process. I wouldn’t want to do it every week or even month. It’s not so bad to do from time to time though.
Thoughts On Resulting Positives
You will see the pictures in just a few moments but in general – I like the results. Because I can compare the results with a lab developed film I think I can provide relatively decent conclusions but they are in no way scientific as both films were not shot in the same conditions or even the same camera / lens combo.
Personally I didn’t notice any major color casts. If the shot was slightly underexposed it had a stronger blue cast but that is quite typical of slide films in general. Saturation and contrast didn’t seem to be impacted much if at all. It’s maybe a tad less saturated than the normal E-6 process but very minimally – EPP 100 is not a super saturated film anyway.
The biggest and probably only difference I noticed was the grain. I think it’s slightly grainier when using this process. Slide film is typically quite grain free but I can definitely see a bit of grain in my developed films. It’s not a huge amount of grain ( less than Kodak Gold 200 for example ) but if you like a super clean look then you might be slightly bothered by it.
Photo Examples
I have developed two rolls this way – pictures seen below are from the latest roll. They were taken with Leica M3 and Summicron-M 90mm f2 pre-asph lens. Positives were scanned with Reflecta ProScan 10T using Silverfast 8 software. Conditions outside were slightly cold – about -20 °C ( -4 °F ) cold.
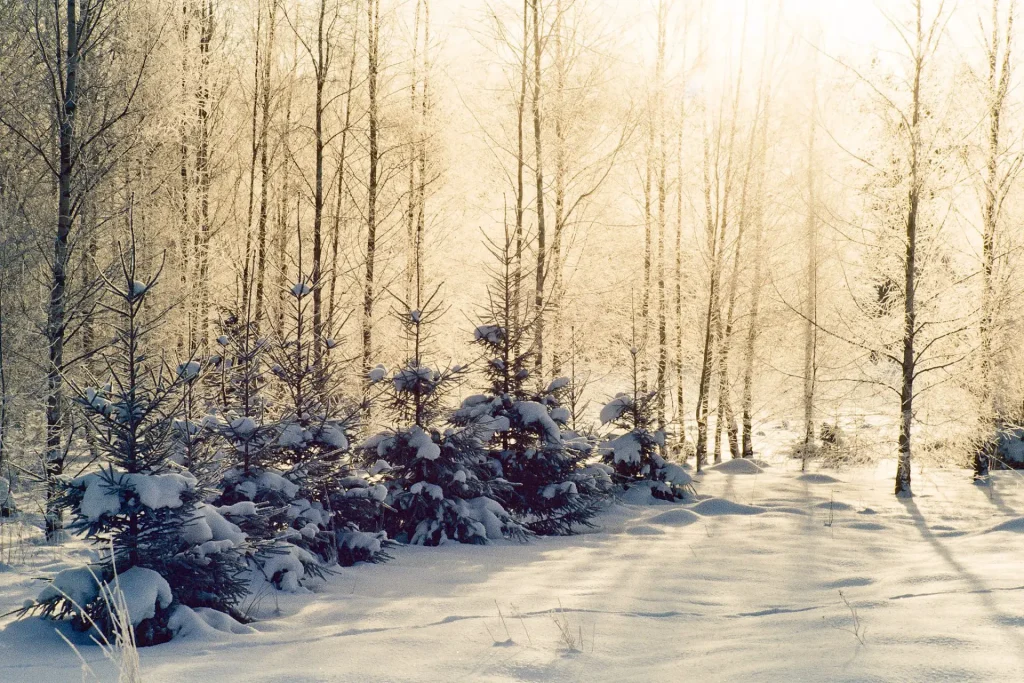
First shot was taken during my weekend shop travels. Sun was out and I liked how it was hitting this church and the surrounding trees. It’s a very high contrast scene and I’m quite surprised on how well it’s handled by a slide film which isn’t known for it’s dynamic range capabilities. Sure the sky is pretty blown in places but there’s still detail and also the church front is perfectly resolvable.

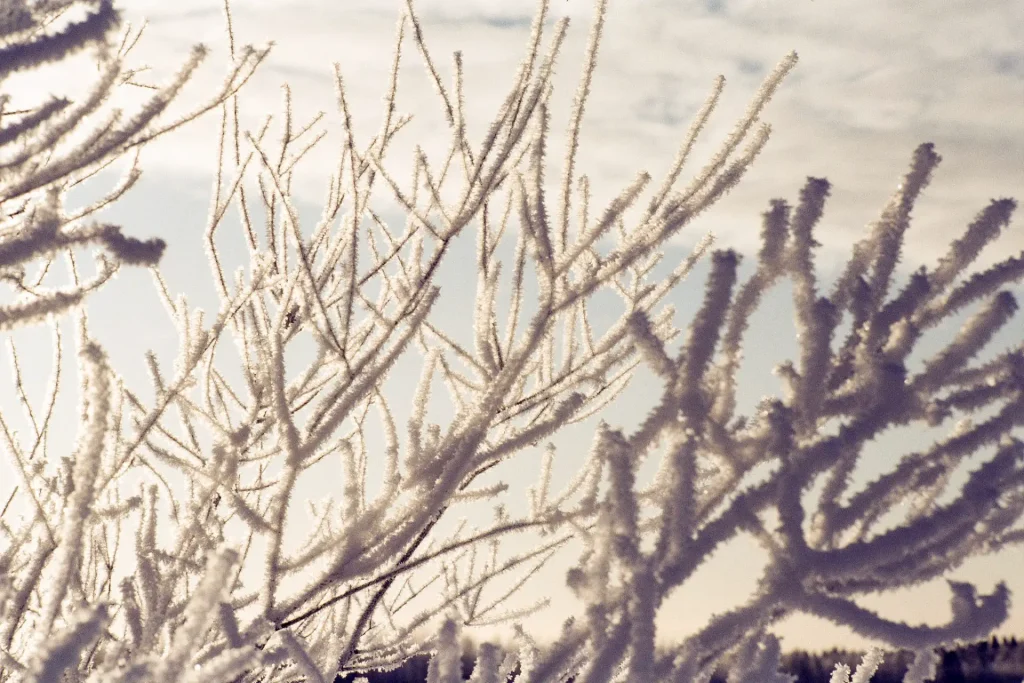
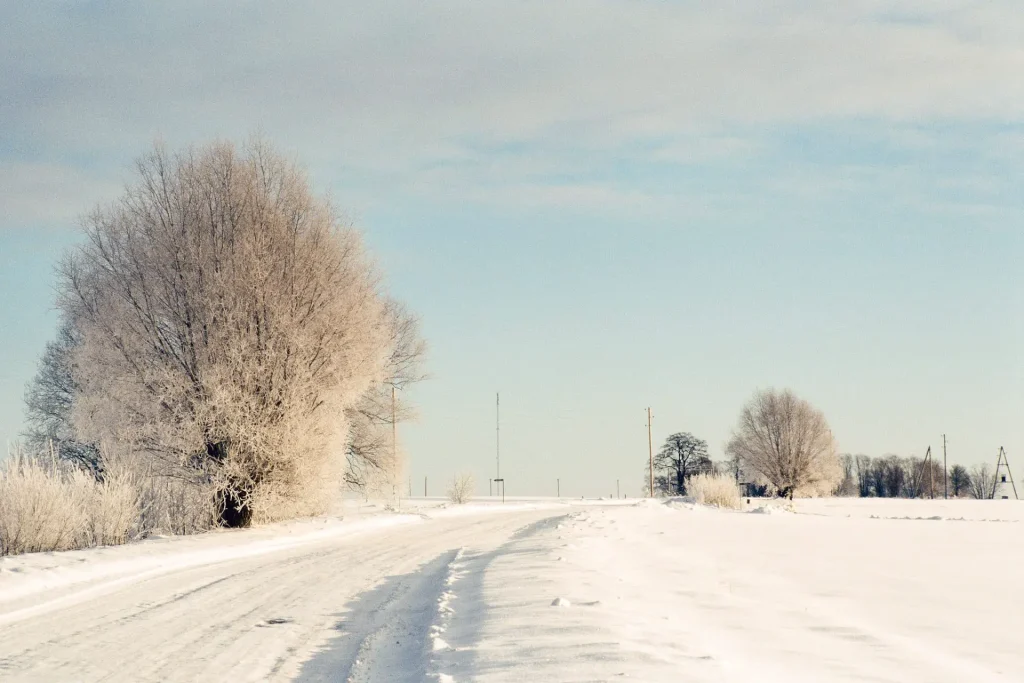
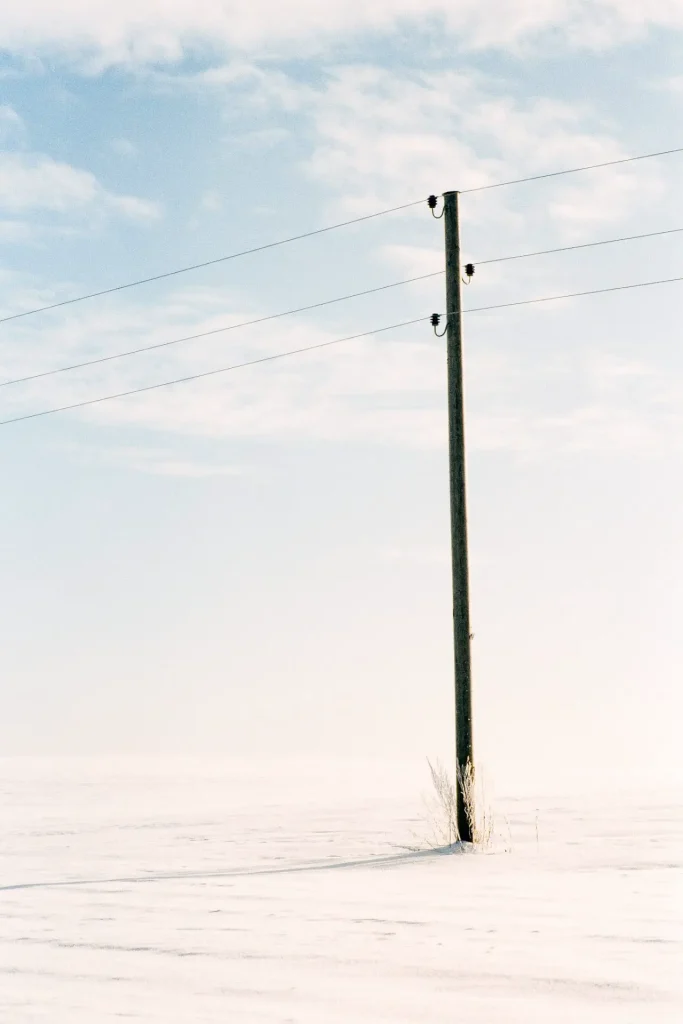
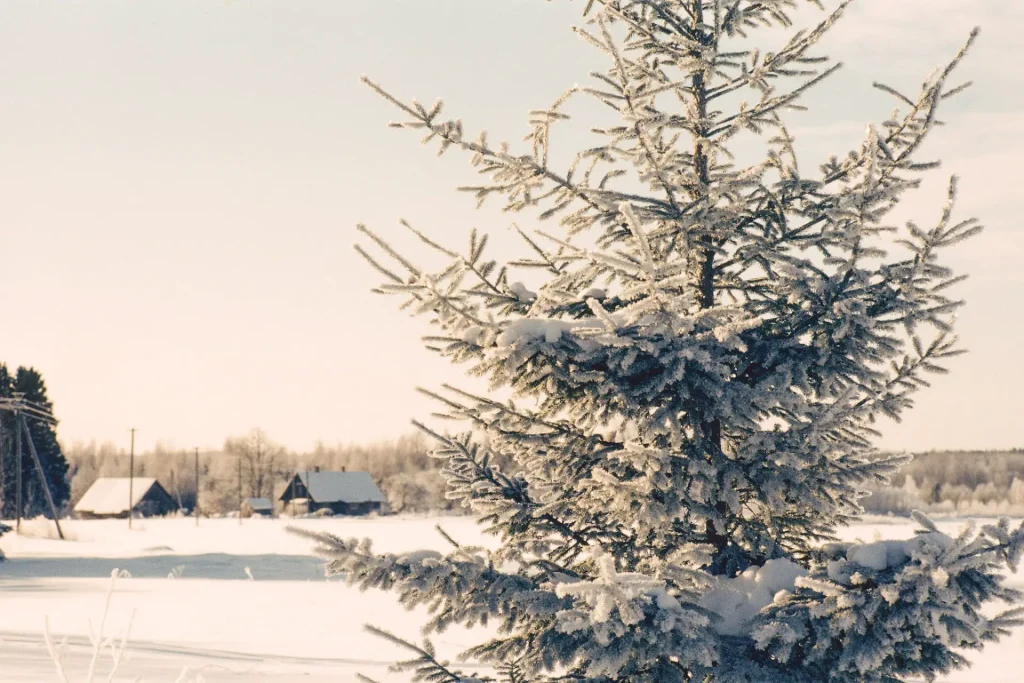
Next few shots are from a small photo walk one morning around the area where I live. It was particularly cold that morning but the sun was shining again and sunlight playing with the frost was looking quite amazing ( at least in real life ).
From scene perspective this photo is similar to the previous one because once again there is high contrast which is handled very well by the poor slide film that is both expired and processed in a way that it wasn’t expecting.
If you’re wondering why trees have a weird glow around them in these pictures then the next photo should help answering that. Most trees are covered by this “frost growth” ( I’m not sure how you call it – both in my native language and english ) which forms if temperatures fall below roughly -20 °C ( humidity will also likely play a part ). In sunlight this renders a pretty glow.
This photo has a slight magenta cast. Slight underexposure is the likely culprit.
Not only trees get the frost treatment. Post boxes are subjected to it as well. For some reason I really like how the red color gets rendered in this photo.

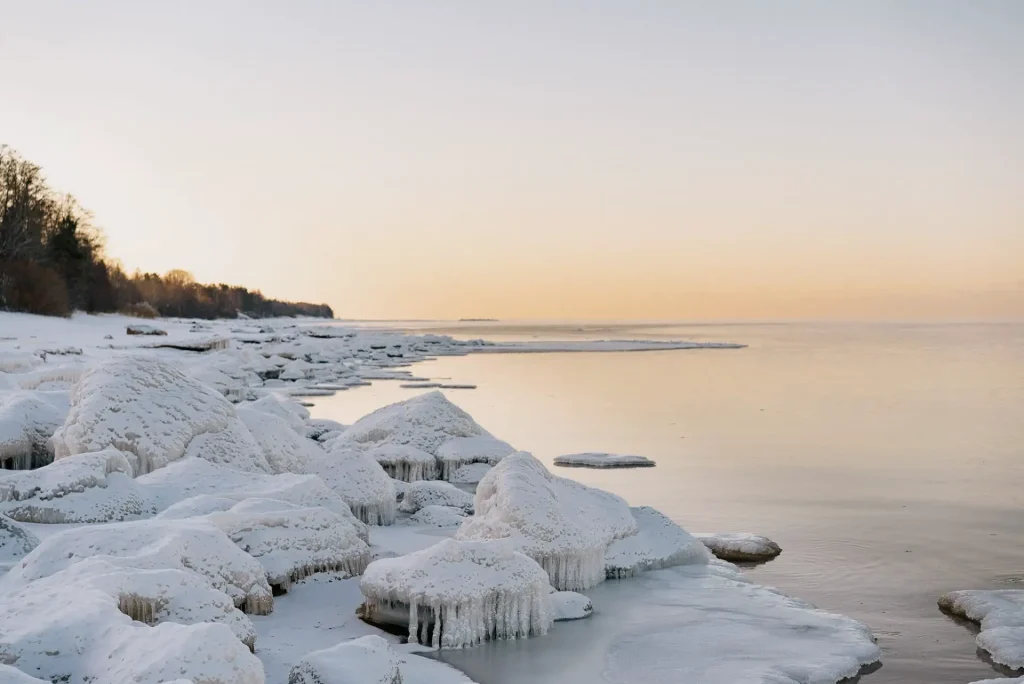
Next and last shot was taken on a different morning where I decided to drive to beach to investigate the coldness there. I mentioned before that I shot on Leica M3 which doesn’t have a light meter so to occasionally meter light I used a light meter app from my phone.
Well this time I also had a digital camera with me so I decided to just meter from that. Stupid mistake – never trust digital things! Well…it wasn’t really the digital cameras fault – I had just forgotten that I always have an almost -1 EV set on most digital cameras. This meant that I underexposed all shots by about a stop…on a slide film. It didn’t handle it well. Not sure if the development process worsened the results or not but all shots from this morning had a weird blue / magenta / purple cast. And obvious underexposure.
Here’s one of the shots that still kind of works but still displays the color cast.

I did try to fix the colors in post but it wasn’t super trivial and some of my fixes increased the already visible grain so I mostly left it as is. I kind of like the purple tint on this photo.
If you wanted to see how light really looked that morning – here’s a photo taken on a digital camera. The same one that caused my underexposure mishap.
Ending Statement
I hope this piqued some interest even if you dislike slide film. I would say that it’s a nice way to develop a rare roll of slide film if you already have B&W and C-41 chemicals. If you have E-6 chemicals then I don’t see any reason to use this process as you can only get equal or worse results.
Keep in mind that different slide films may show some issues when developed using this process. I’ve read that new Ektachrome has a pretty strong color cast when developed this way. Fujifilm Provia might be another good film to try this process on.
I keep calling this process the “this process”. I don’t know if there is an official name but if there isn’t I would like to propose a really catchy name that will surely catch on – e-b&w-41-6™. Spread it around!
If you enjoyed reading this wall of text. I have my own blog where I write from time to time and I would appreciate it if you had a look – you might find some other walls made from text. I also sometimes post on Instagram, but I’m not the biggest fan of it.
Have a great day and experiment!
Share this post:


Comments
Bob Janes on How To Reverse Process Slide Film Without E-6 Chemicals – By Rolands Atvars
Comment posted: 02/04/2021
Comment posted: 02/04/2021
Richard Parkin on How To Reverse Process Slide Film Without E-6 Chemicals – By Rolands Atvars
Comment posted: 02/04/2021
Somewhat OT but I used to reversal develop ordinary negative monochrome film with basic chemicals back in the 1960s which was cheaper than buying the then widely available Agfa Dia Direct which which I think included the processing so was naturally rather expensive and was also Avery slow film.
Comment posted: 02/04/2021
Comment posted: 02/04/2021
Jamie W on How To Reverse Process Slide Film Without E-6 Chemicals – By Rolands Atvars
Comment posted: 03/04/2021
Comment posted: 03/04/2021
Patrick Abe on How To Reverse Process Slide Film Without E-6 Chemicals – By Rolands Atvars
Comment posted: 03/04/2021
The other "let's try it and see what happens" thing to do was to process Ektachrome in C-22 color negative chemicals to create "high contrast, unmasked color negatives." Then Ektachrome Process E6 came along, and home film processors had to raise temperatures to triple-digit figures, which mainly benefited color processing labs.
Do your slides look like Anscochrome? Or does it look like Agfacolor CT? Keep experimenting, you have nothing to lose but "boiler plate" images.;)
cisco on How To Reverse Process Slide Film Without E-6 Chemicals – By Rolands Atvars
Comment posted: 10/08/2021
pedro suarez on How To Reverse Process Slide Film Without E-6 Chemicals – By Rolands Atvars
Comment posted: 09/06/2024