This post may be useful for newcomers to twin-lens reflex (TLR) cameras who wish to extend the capabilities of their classic machines. It describes some TLR accessories that I find useful (I have no relationship, except as a customer, with the manufacturers mentioned). I own two TLRs: a Rolleiflex 3.5F (type I, manufactured in 1964) and a Minolta Autocord (type RV2, manufactured in 1960). The Rolleiflex was conceived as a system comprised of fixed-lens cameras with moderately wide, normal or short telephoto lenses, complemented by many accessories, such as focal length converters, close-up lenses, dedicated filters, glass plate backs, interchangeable finders, underwater housings, among others.
Although Rollei (and successors) are no longer in business, and no TLR has been manufactured in a decade (with the notable exception of instant film cameras) many of the old accessories are still available second-hand, and a few manufacturers make new accessories that are either designed for TLRs, or can be adapted for use with these cameras.
Lens-mounted accessories
The Rolleiflex was so dominant that several other TLR manufacturers employed the Rollei bayonet mounts for attaching filters, hoods, close-up lenses, etc. to the front of their cameras. These came in three sizes Bay(onet) I, II, and III, for lenses with different front element diameters. The Autocord and the Rolleiflex 3.5F have Bay I and II attachments, respectively (most Rolleiflex cameras with the f/2.8 taking lenses use Bay III accessories, and the wide-angle cameras use Bay IV). Other than filters and lens hoods, perhaps the most common accessories for these cameras are the Rolleinar close-up lenses, which were produced in three magnifications (and three bayonet sizes), and which each consist of a taking lens, and a lens to tilt the image projected by the viewing lens. The latter does not correct for parallax, but improves frameline accuracy. The Rolleinars are well-corrected optically, but to completely solve the issue of parallax, a different accessory, the Paramender or the Paradjuster (manufactured by Mamiya and Minolta, respectively, for their TLR cameras) would be needed. These are only practical when the camera is on a tripod.
Tripod attachment
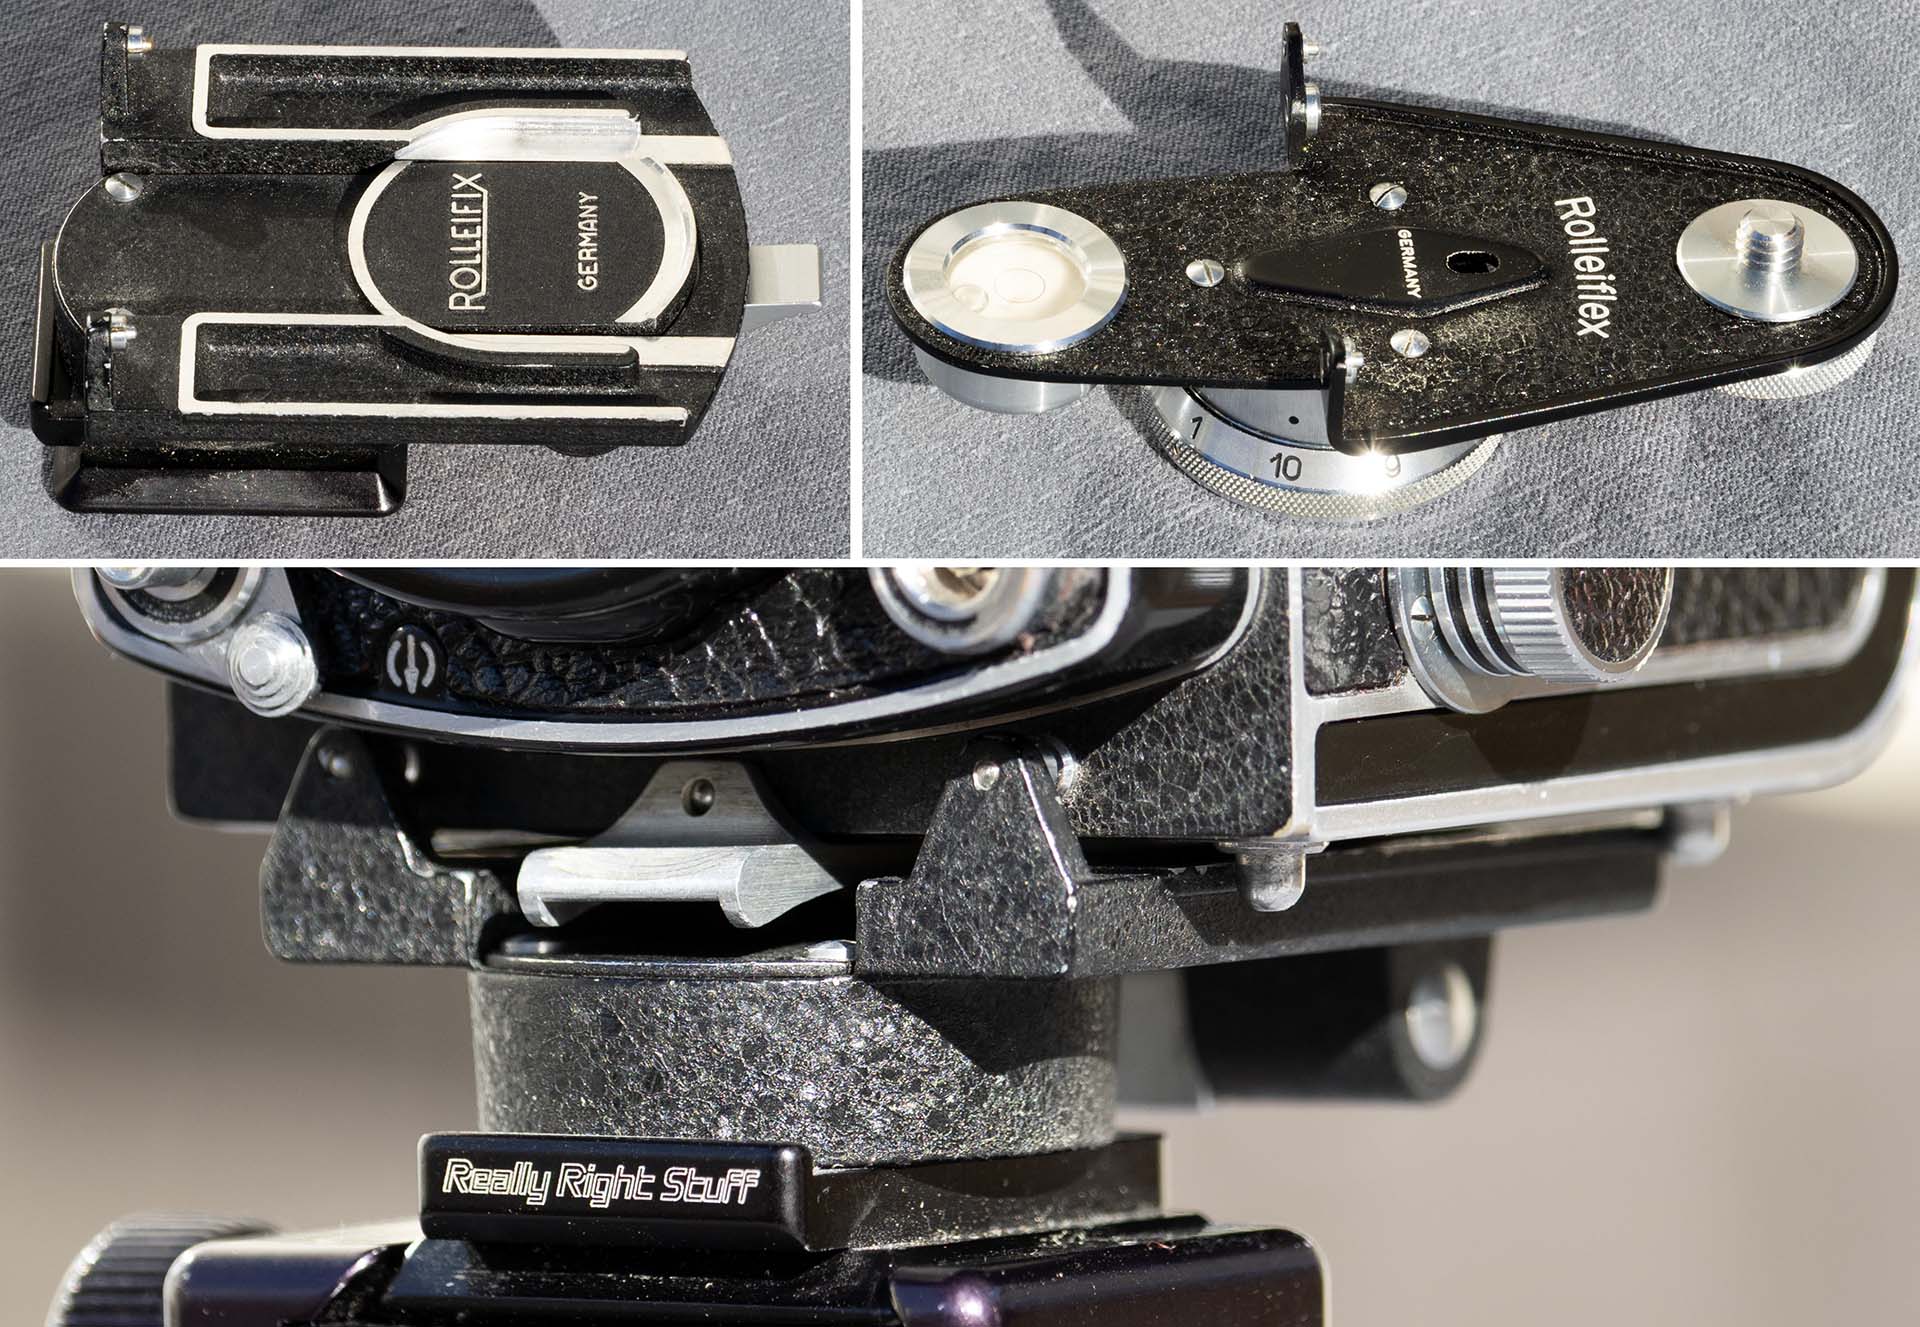
So, attach the camera to a tripod. The Rolleiflex and the Autocord have standard 3/8 or 1/4 threaded sockets at their bottoms, respectively. For the Rolleiflex, this is deceptive, because the film chamber door of the camera, to which the socket is attached, is made of thin metal, and will be damaged if any substantial torque is put on it. To avoid this, and to provide a way to rapidly mount the cameras, Rollei marketed the ‘Rolleifix’ quick release, which transmits some of the weight of the camera to its solid bottom front element (not the delicate front standard).
My Rolleifix is permanently attached to an Arca-style plate through its own 3/8 thread, allowing quick mounting of the camera onto a short tripod (short, to facilitate viewing from above). The Rolleifix is often fairly expensive; sometimes, it is more economical to purchase a modest condition Rollei pistol grip, and salvage the included Rolleifix with which it attaches to the camera.
When Minolta designed the Autocord, it made several improvements on the Rolleiflex, and one of them was to reinforce the area around the tripod socket. This, and the fact that the camera is lighter, makes direct attachment to a tripod acceptable. I equipped my Autocord with a 1.5″ square bidirectional Arca-style plate (one with two set screws from Hejnar Photo) for rapid mounting and dismounting. Both Rollei and Minolta made panorama heads (see here for a masterclass), which attach to the cameras in a manner similar to that of the Rolleifix.
Accessory shoes
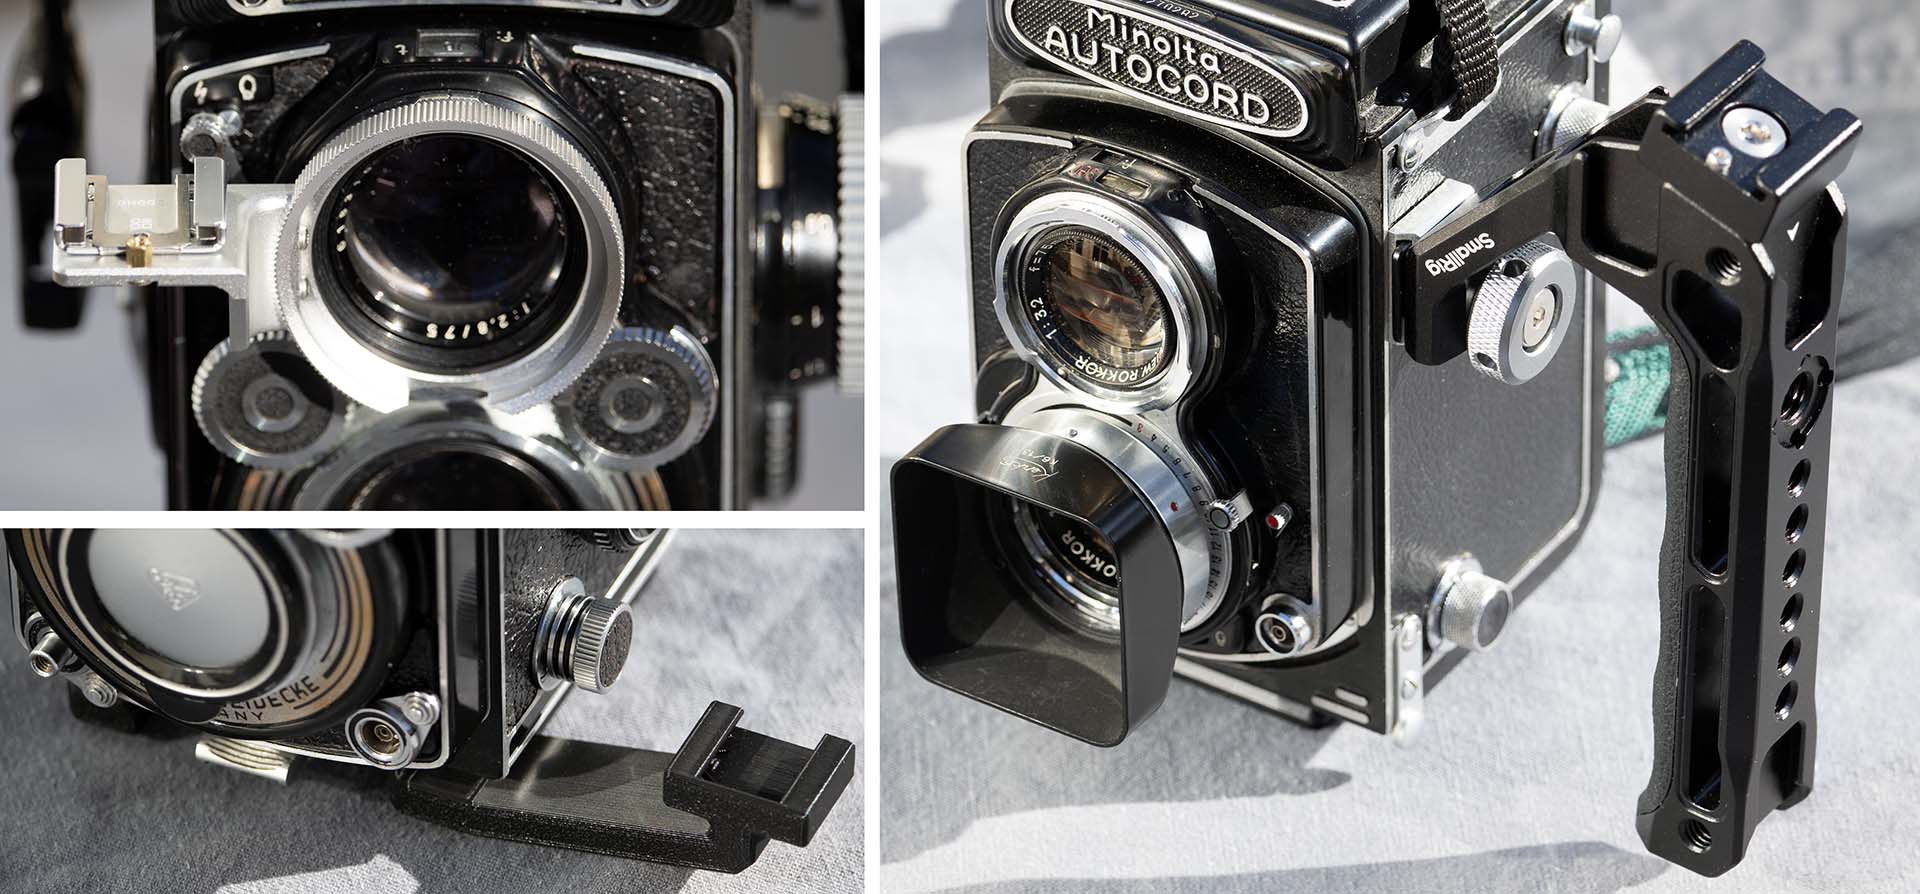
Many photo accessories are designed to mount on cameras using the near-ubiquitous cold shoe. Near-ubiquitous, because Rolleiflex cameras before the 1987 GX models (which have a hot shoe) did not have this type of mount. I own several small cold shoe-compatible light meters that I like to mount on my 35 mm cameras, and to attach these to the Rolleiflex, I have two accessories. The first is a cold shoe that extends from the Bay II attachment of the viewing lens. The one I own (manufactured by DOOMO Design) has a cutout at the bottom so as to not interfere with mounting of accessories on the taking lens. Unfortunately, because it is designed to be used on the right side of the camera (from photographer’s perspective), it tends to disengage from the bayonet when weighted (accessories come off when rotated counter-clockwise). I have found that small light meters (such as the DOOMO Meter S, and the Gossen Digisix ) will mostly stay put, and if the camera is also equipped with a lens hood on the taking lens, even if the shoe mount detaches, it will not fall off the camera.
The second cold-shoe attachment I use on the Rolleiflex is 3D-printed by Ausgeknipst. It is a square plate that covers the bottom of the camera and from which an arm with a horizontal cold-shoe protrudes to the left. The first one I bought covered the film chamber latch at the bottom of the camera, so that the adapter had to be removed (by unscrewing it from the tripod socket) for each film change. I contacted the manufacturer about this shortcoming, and they immediately sent me an improved version with a cutout, at no additional charge. That’s great customer service. The Ausgeknipst shoe is robust, and also a great way to attach a (small) flash to the Rolleiflex. Its only shortcoming is that it has to be removed for the camera to go on a tripod. Maybe the inventive people at that company can come up with a version that attaches to a Rolleifix.
The Minolta Autocord has a cold shoe mounted vertically on the left side of the camera (since the top is taken up by the finder). Thus, one can mount accessories directly onto it. However, I prefer the screens on my light meters to point up, so I can read them without having to rotate the camera from the taking position. For this, I use a shoe-mounted grip (Smallrig “Top Handle 3764”) that has its own cold-shoe on top. Because on the Autocord the photographer’s right hand is responsible for focus, film advance and shutter release, dedicating the left hand to just holding the camera (and changing the lens aperture) is practical (on the Rolleiflex, focus is done by the left hand, while the right advances film and releases the shutter; hence the Rolleiflex pistol grip that attaches to the bottom and has its own shutter release).
Information on many other accessories for TLRs is available elsewhere, but I hope this introduction inspires some to go out and make photographs, which I think is the whole point. Happy shooting!
Share this post:


Comments
Paul Quellin on Attaching accessories to TLRs
Comment posted: 10/02/2026
Comment posted: 10/02/2026
Jeffery Luhn on Attaching accessories to TLRs
Comment posted: 10/02/2026
Your posting is helpful. It reminds me to get a lens shade for my TLRs. Two Rolleicords, Mamiya C33, Yashica D. I'm pretty sure the same shade will work on everything except the C33.
My first 'grown up' camera was a Rolleiflex 3.5, when I was 16 in 1968, when I got a job shooting for the Oakland (Calif) Tribune. I cannot remember what happened to that camera. I've owned many TLRs since then because they are such great performers and fun to shoot. Real people pleasers when street shooting. My current favorite Rolleicord was a gift and I put $350 into refurbishing it. It is so nice!!!
Keep posting about TLRs!! You are appreciated!
Comment posted: 10/02/2026