A couple of weeks ago, the CAMERADACTYL Mongoose was launched on Kickstarter – it is a product designed to automate and speed up the process of digitisation of 35mm film with a digital camera. It’s a funny looking box of tricks, that’s for sure – but is it any good?
I am one of Ethan’s chosen ones – in short, alongside the dubious pleasure of having long FaceTime chats with him (that’s a joke – I love the guy). I also get to try some of his new products before most people get their hands on them. The CAMERADACTLY Mongoose being one of those products. For the last week, I have been tinkering with it, working out how it works, finding flaws (the one I have is a beta), finding out that Ethan has already fixed the flaws before I have even noticed them (mine got stuck at the Parcel Force delivery office so by the time I had it the other beta testers had found most of the issues), and generally getting under the skin of the thing.
The Problem
I don’t think anyone who has ever tried digitising 35mm film with a digital camera would ever go as far to say that it is a quick and easy process. That said, both the software and hardware that aids the process has been improving over the last few years. In the realms of software, Negative Lab Pro and Grain2Pixel are making things a lot easier, and in terms of hardware products like pixl-latr at one end of the cost spectrum and Negative Supply at the other, are making the physical activity of it easier. But, until the CAMERADACTYL Mongoose came along, the process was very much a hands-on manual process.
The Mongoose solution
The CAMERADACTYL Mongoose was designed by Ethan to both speed up the process and – at least depending on the mode you use it in – automate the process too. It does this by automatically feeding the film so each frame lines up underneath the camera, at which point it then triggers the camera’s shutter and advances to the next frame.
All of the above happens in its “automatic mode” which is the focus of this review. It also has a “fast mode” and a mode than allows you to manually advance the film. The fast mode is only very slightly faster and uses less of the technology in the CAMERADACTYL Mongoose so I figured it wasn’t worth going into any detail on. The manual mode just allows you to manually progress the film and trigger the camera. Still useful to be fair – especially for stitching panoramic frames. But to my mind, the real genius is in the automatic mode which detects frame edges itself so it can be long to work its magic with very little human interaction – at least beyond the initial setup.
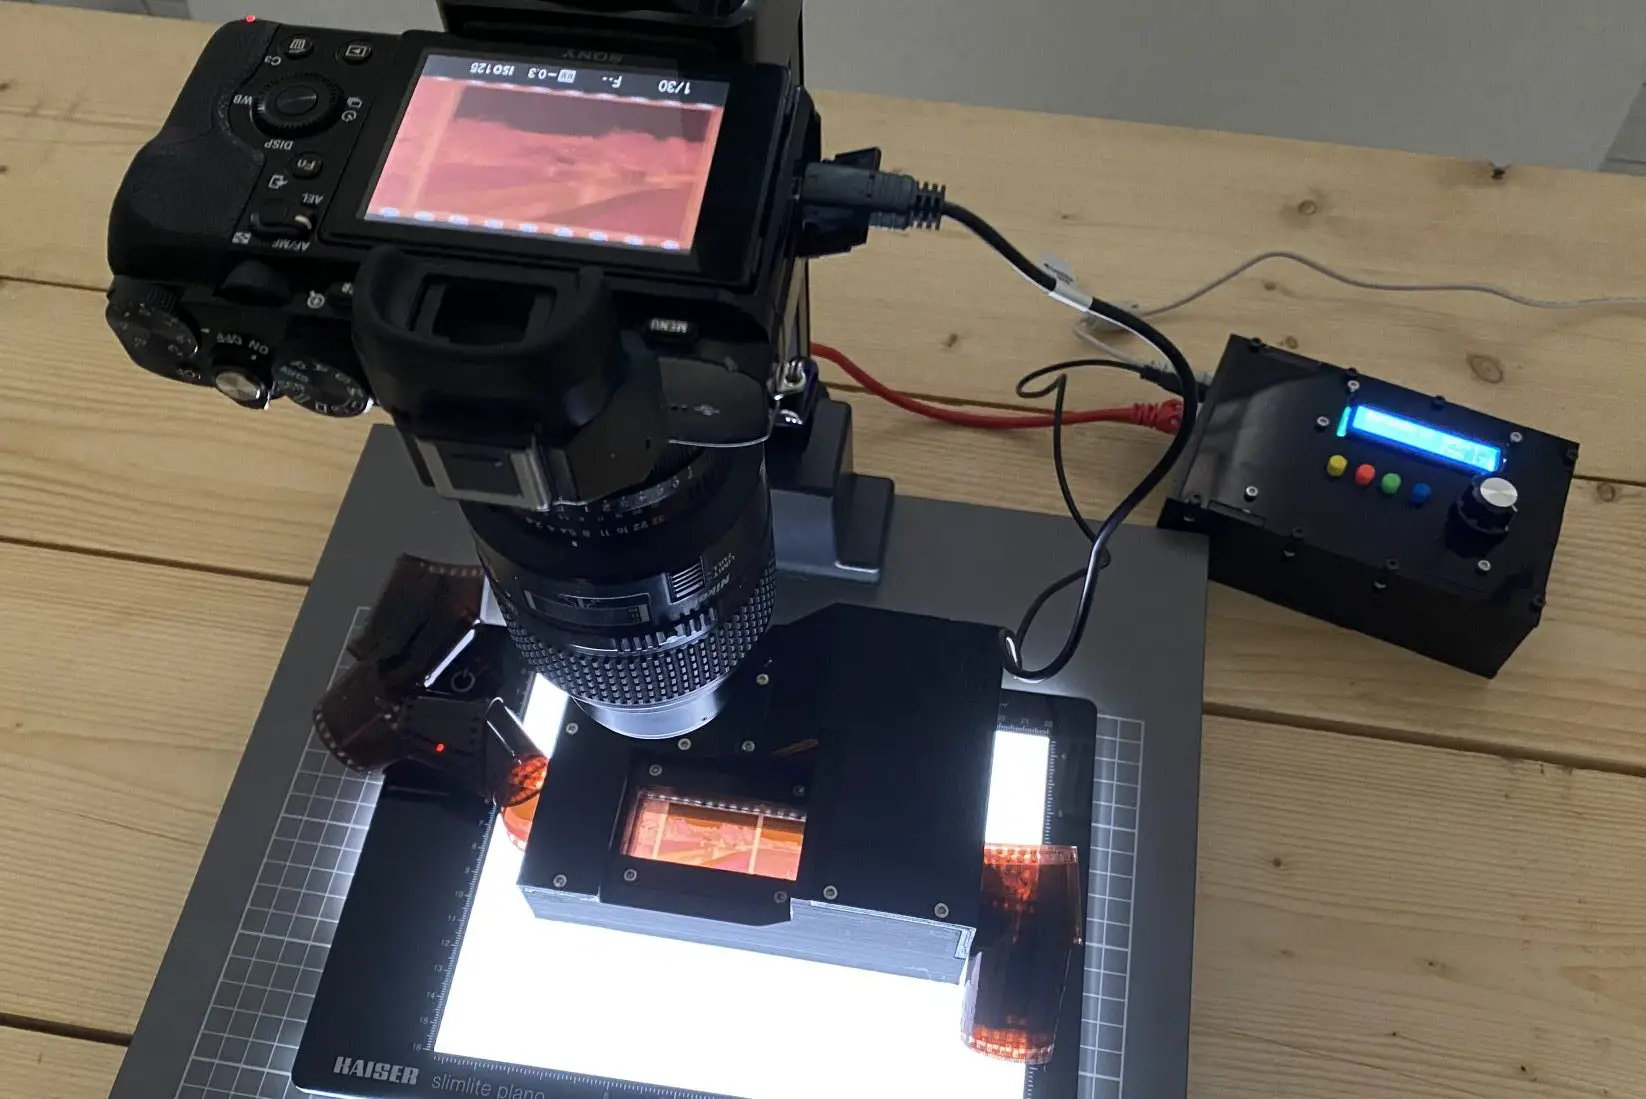
The CAMERADACTYL Mongoose
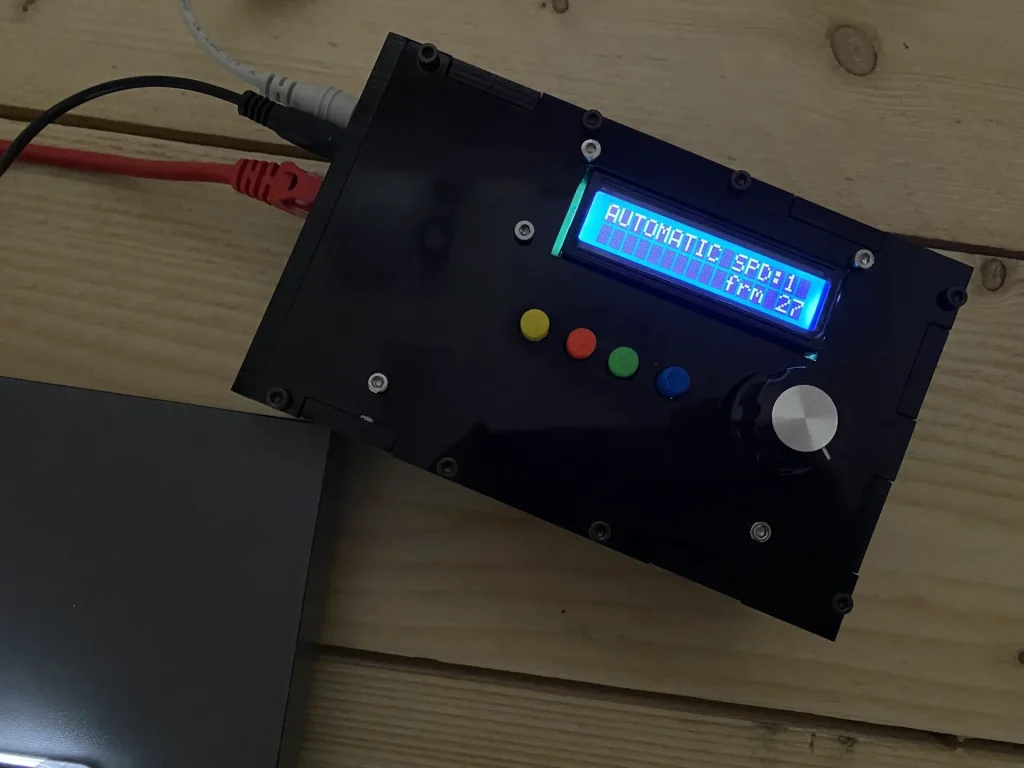
The CAMERADACTYL Mongoose is made of two boxes, a control unit with 4 buttons, an OLED screen, 4 connector ports, a power socket and a jack socket for connecting the camera trigger. This box – my one at least – is made of laser cut acrylic.
This control unit is connected to the separate motorised film advancing via port 1 on the side of the unit. What the other ports do is currently a mystery – knowing Ethan, whatever they do, it will be somewhere between genius and bat-crap crazy.
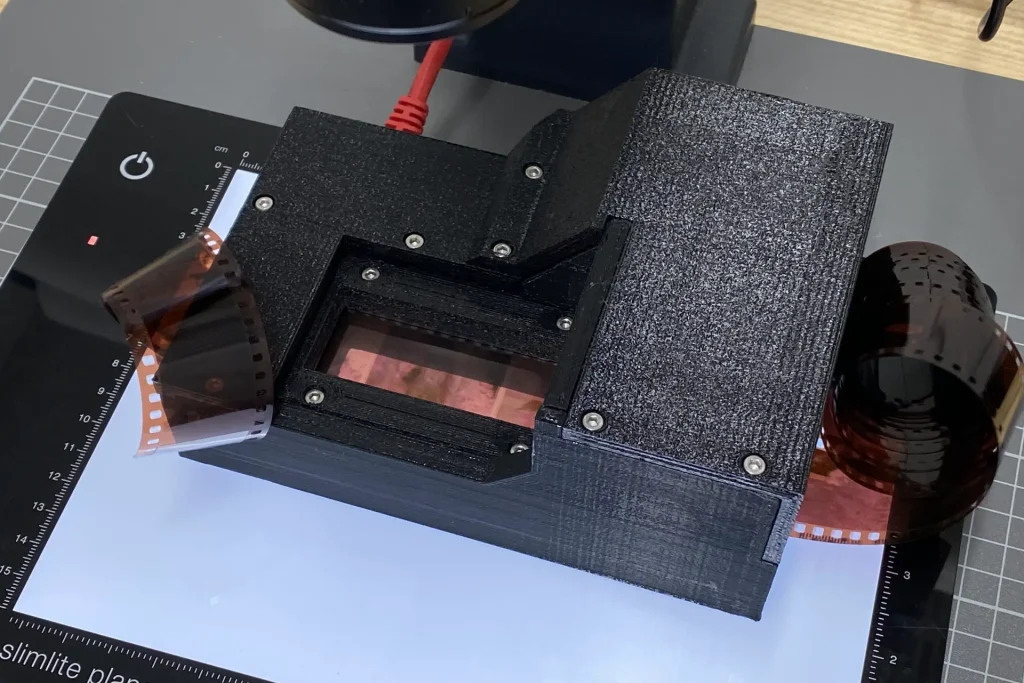
The film advancing unit is a 3D printed box with a hole through the middle and a slit to feed the film all the way through it. The film is slotted into the squatter end of the unit by the leader end so it can catch on to the motor mechanism in the taller end of the unit.
Set up process
I must admit, I felt a little overwhelmed by the setup process. My gut feeling before receiving the CAMERADACTYL Mongoose was that is was going to be fairly easy to use. It is. But it just takes a little bit of time to get your head around exactly how the thing works.
The setup process involves configuring it for three variables: film density, the sensitivity of the camera’s shutter trigger, and the length of time the CAMERADACTYL Mongoose pauses on each frame.
The film density setting allows the CAMERADACTYL Mongoose to even be used with very thin (underexposed) film. In short, you can use this setting to increase or decrease its sensitivity to frame edges depending on how well the film is exposed. Ethan suggests that the default 50/100 should be about right for most film, though I had more success lowering the number to 25/100.
The shutter trigger setup effectively allows you to set how long in milliseconds the CAMERADACTYL Mongoose press the shutter button. According to Ethan some cameras need a longer press than others, and some will fire twice if the press is too long. As such this feature is useful for configuring the CAMERADACTYL Mongoose to your specific camera.
The third setting configures the length of time the CAMERADACTYL Mongoose pauses whilst the camera takes the photo. As with the camera trigger setting this is set in milliseconds. The idea is, if you have a high powered light source, you’ll be using a shorter shutter speed and so the CAMERADACTYL Mongoose won’t need to pause on each frame for so long. A lower powered light and you might have a longer shutter speed so you would need a longer pause for the camera to do its bit. I spent a little bit of time trying to work out my fraction of a second frame time in milliseconds, then just set it to 1000 milliseconds figuring I wasn’t going to lose sleep over it taking ever so slightly longer to digitise my whole roll of film.
Loading the film
Once these initial setup processes have been undertaken, in theory at least, they shouldn’t need tinkering with often. The next bit is loading the film. Ethan is a very technical-minded person, and his instruction manual demonstrates that quite well. Despite my best efforts, I had to read the bit about loading the film and getting the CAMERADACTYL Mongoose ready in automatic mode a good few times. I chatted a bit to Ethan about this and he tells me that he has changed how the user interface works to make it more simple since my beta version, so I won’t go into too much detail here.
The gist is that to prepare the CAMERADACTYL Mongoose for its process of film digitisation, you have to let it do a short process of assessing the film, then you have to manually wind the film into the unit to line the frame up with the camera, then finally you have to wind the film back out again slightly before finally pressing go. For all that I found this to make me go cross eyed initially, after a few goes I had the process nailed.
The digitisation process
Once the film is loaded, the final thing to do is press the red-for-go button and watch the CAMERADACTYL Mongoose jump into life. It is quite a spectacle too. The first thing you’ll notice is likely the noise it makes. I’m not even going to attempt to make excuses for it, this thing is noisy. When we first had it set up at work, the racket it made on the thin desk we had it first sat on was just too much in a shared office environment. In the end, we had to move the copy stand onto a thicker desk in another room further away from where other people were working. On a more solid surface, the noise was quite well damped, and in fact, when I asked people in the next room they said they hardly noticed it, so perhaps it’s one of those noises that just sounds louder than it is…?
Noise aside, the CAMERADACTYL Mongoose is about as impressive as it could be. There are a couple of beta issues with mine such as the film gate not being wide enough at the bottom for it to be used with a 50mm lens – I used a 105mm which solved this issue, but Ethan has fixed it now anyway.
Apparently the frame edge reader slit is too wide in mine too – this means that sometimes it under-shot the film advance by a few mm. Again, this is something that Ethan tells me is now fixed. Again, it wasn’t an issue – I just framed slightly wider, then cropped.
But for all the noise, and the slight setup hurdles, once it we were going, we were really going – it buzzed and whirred its way through my whole roll of film in no time at all! Less than 90 seconds, I’d estimate.
Results
For the sake of my testing, I used the same film strips over and over again. The main thing here is that the film is held flat. And it is! The images are nice and sharp across the frame for every frame on the roll. I also didn’t find any sign of any scratches, despite running the film through a whole number of times, and it just curling out of the CAMERADACTYL Mongoose onto the desk.
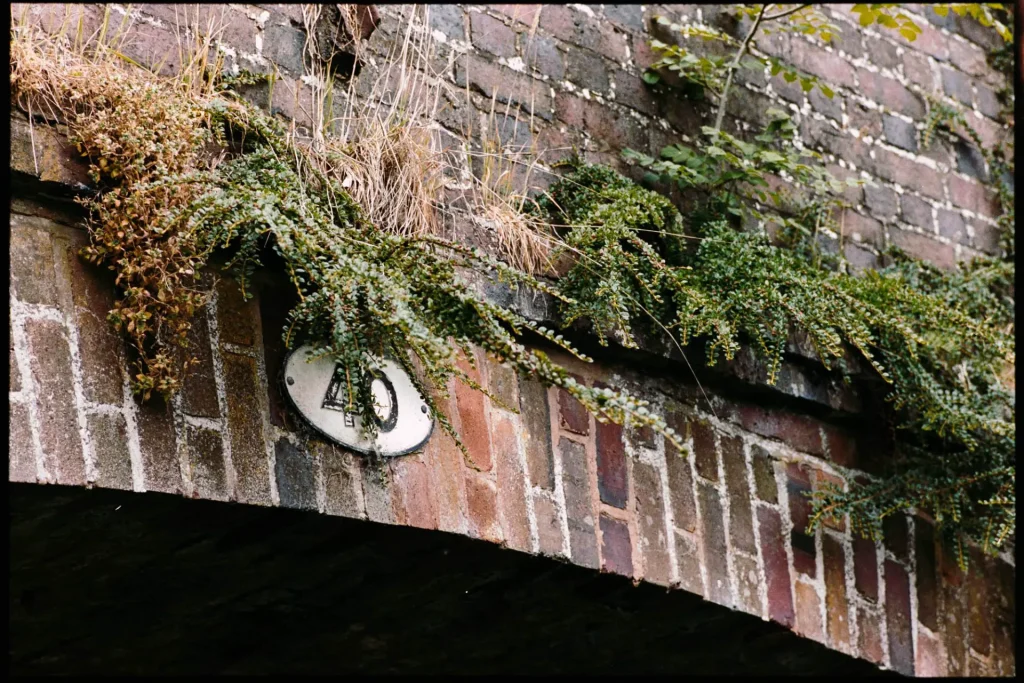
I also tried it with some fairly thin-in-places B&W film – it had no issue finding the frame edges.

Final thoughts
For all the little quirks that have come with using a beta unit, and the minor set up hurdles that I didn’t really expect, I have been very impressed with the CAMERADACTYL Mongoose! It might look a little rough around the edges, but look past that and what you find is a product that really has a lot going for it – especially for those (like me) who find the process of digitising 35mm film quite a bit more than tedious. Good work Ethan – as always, impressed with your weird and wonderful creation!
There is still time to back the CAMERADACTYL Mongoose on Kickstarter here
Share this post:


Comments
Martin on CAMERADACTYL Mongoose – Automation for you 35mm Digitisation Workflow
Comment posted: 12/10/2020
Marc Wick on CAMERADACTYL Mongoose – Automation for you 35mm Digitisation Workflow
Comment posted: 12/10/2020
MIchael J on CAMERADACTYL Mongoose – Automation for you 35mm Digitisation Workflow
Comment posted: 13/10/2020
On which subject, that last shot with the Scotch-bottle-boxes is a cracker. Love it.
Brian Nicholls on CAMERADACTYL Mongoose – Automation for you 35mm Digitisation Workflow
Comment posted: 15/10/2020
Peter Brixey on CAMERADACTYL Mongoose – Automation for you 35mm Digitisation Workflow
Comment posted: 24/01/2023
Here is a list of the parts I used.
42MP SONY ALPHA A7r II which I already owned.
Nikon PB-5 Bellows with PS-5 Copier from B&H, $149 for the two.
Nikon 55mm f/3.5 Micro-NIKKOR from Pasco Camera Exchange, $69.95
Sony to Nikon Lens Adapter from Pasco Camera Exchange, Free
Bolt VM-210 Flexible Macro Light from B&H, $39.95
I found I do not need to use the Bolt Macro as I have more than enough ambient light in my workshop. The assembly sits nicely on my benchtop desktop. I use a wired remote to operate the camera shutter and I view the shots on a 24-inch wall-mounted monitor connected to the camera.
I wish I could post a picture of the whole assembly. I got so good at it that after sorting the slides into stacks on a lightbox, I could scan one slide a second.
The gear will scan B&W and colour negs in strips too.