A 35mm compact camera lens conversion – Part 1.5 – (Still) Choosing the lens

By Hamish Gill

Just a little update to the compact camera lens conversion project. If you haven’t read the first part of the project, you can read it here.

As it turns out, the Ricoh ff90 lens isn’t something that Miyazaki can modify. Chinese (or perhaps Japanese) whispers a little bit here, but what Bellamy reported back to me is that something to do with the front element of the lens being part of the body of the camera means that it can’t be modified.

After the poll I did in the last post and my gut feeling telling me that the Ricoh was the lens to go for, it’s a little bit of a shame. But, where one door closes, another one opens.

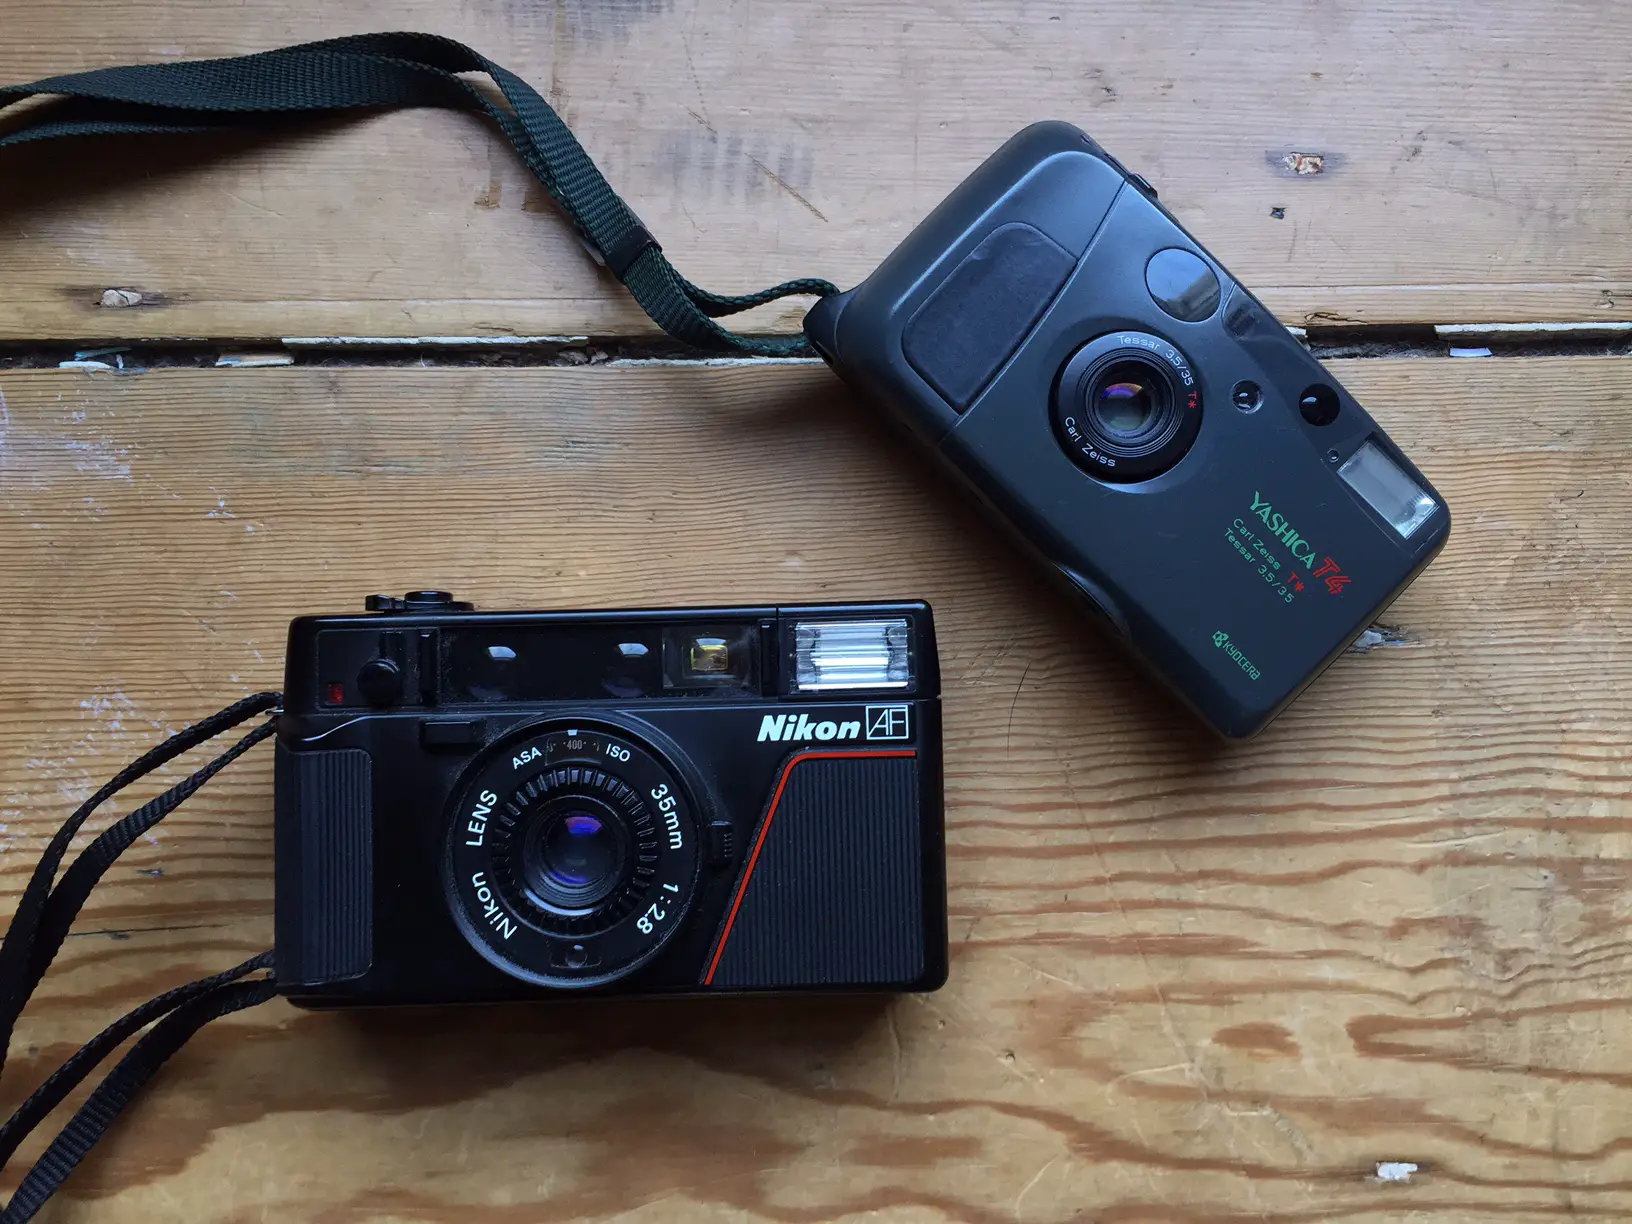
I’ll be posting a review of my Nikon L35AF in the next week or so (I’ve written most of it, just waiting for a film to come back from the D&P). Over the course of writing the review the Nikon became more and more frustrating. Not because it isn’t a really nice camera, but just because it’s broken. Fortunately, it was useable enough to shoot a whole roll, unfortunately it’s days as a useable camera are, if not over, significantly limited. This combined with Andrej’s comments on the previous post about is home brew modified Nikon L35 lens got me thinking, maybe it should be the choice camera for a donor lens.

I asked Bellamy about the Nikon lens and he responded by saying as far as he knew, it was indeed a lens that could be modded, but it would need to be sent to Miyazaki for confirmation on that. So, next week, assuming I like the photos I get back from it, off to Japan the Nikon goes.

This time though, to save any further too and fro, I am also going to send in the Yashica T4. Just in case the Nikon can’t be done, that will become my fall back.

In the spirit of the first post, and the poll I posted asking which out of the Ricoh and Yashica you would have modded, I’d like to now know which out of the Nikon and Yashica you would go for.

Answers via the poll, and feel free to add further comment below!

[poll id=”5″]

Share this post:

Find more similar content on 35mmc

Use the tags below to search for more posts on related topics:

Contribute to 35mmc for an ad-free experience.

There are two ways to contribute to 35mmc and experience it without the adverts:

Paid Subscription – £2.99 per month and you’ll never see an advert again! (Free 3-day trial).

Subscribe here.

Content contributor – become a part of the world’s biggest film and alternative photography community blog. All our Contributors have an ad-free experience for life.

Sign up here.

About The Author

By Hamish Gill
I started taking photos at the age of 9. Since then I've taken photos for a hobby, sold cameras for a living, and for a little more than decade I've been a professional photographer and, of course, weekly contributor to 35mmc.
View Profile

Comments

Kevin Stone on A 35mm compact camera lens conversion – Part 1.5 – (Still) Choosing the lens

Comment posted: 19/03/2016

I may have an idea as to a nice substitute for the Rikenon 35mm 2.8 lens. Iv'e recently acquired a Ricoh FF-1s, looks to have the same (or similar) 35mm 2.8 rikenon lens. (I highly recommend You try and review this camera ;). ) It is a barn-door folding lens (has its own barrel) also it has scale focus on the front ring and aperture control from the rear ring. looks quite possible to use this whole lens assembly. cheers
Reply

Leave a Reply

Your email address will not be published. Required fields are marked *

Hamish Gill replied:

Comment posted: 19/03/2016

Thanks Kevin, good thinking! I've added it to my list...

Reply

Leave a Reply

Your email address will not be published. Required fields are marked *

Filmosaur on A 35mm compact camera lens conversion – Part 1.5 – (Still) Choosing the lens

Comment posted: 18/01/2016

This little piece helped me settle on the Nikon for my hack: http://www.nikkor.com/story/0033/ - I do love a Sonnar-formula lens, and this is the only 35mm focal length version I'm aware of. It's a super-simple mount too, with all the optical elements in a single block that moves as a unit. Converting it, especially to a mount that has a separate helicoid, should be no problem. - I can understand the allure of the Tessar, but it does seem a little barbaric to rip it out of a working T4.... -
Reply

Leave a Reply

Your email address will not be published. Required fields are marked *

Hamish Gill replied:

Comment posted: 18/01/2016

Yes, by complete coincidence, whilst trying to find out more about the Nikon I commented on a post on JHC, the person who wrote the post got in touch with me to share that exact link. This was just after I'd sent the Ricoh, and just as I was discovering the Nikon was faulty, it didn't take long to come to the right conclusion. Fingers crossed, but I think we have a winner!

Reply

Leave a Reply

Your email address will not be published. Required fields are marked *

jeremy north on A 35mm compact camera lens conversion – Part 1.5 – (Still) Choosing the lens

Comment posted: 17/01/2016

Why not try a medium format lens instead? Think of the resolution.
Reply

Leave a Reply

Your email address will not be published. Required fields are marked *

Hamish Gill replied:

Comment posted: 17/01/2016

The main goal is to achieve something tiny

Reply

Leave a Reply

Your email address will not be published. Required fields are marked *

Ray Yee on A 35mm compact camera lens conversion – Part 1.5 – (Still) Choosing the lens

Comment posted: 17/01/2016

Hi Hamish, If you decide to go down the T4 conversion route, which I have, do yourself a favour and do the following. 1) Gently pry off the bezel with the words "Tessar 3.4/35" there are 3 plastic tabs holding this onto the focusing mechanism 2) After removing the bezel, you will reveal 3 screws which hold the entire lens onto the focusing mechanism. Remove the 3 screws and that's it! Should you later decide to replace the lens onto the camera, just reattach it with the 3 screws and pop the bezel back on and you'll have a fully functioning T4. Seriously, it's that easy. I mounted my lens block onto a 3D printed adapter which mates to a Leica M close focus adapter for my A7. The adapter itself has a slip on fixed aperture plate. It's fine without an aperture but I find the edges a little too soft compared to the really sharp center so I made a series of aperture plates to provide f5.6/8/11 which I swap out. It makes an excellent pancake lens and I'd highly recommend you trying it. For more details, examples of shots taken with the lens or if you want a copy of my adapter for free, just contact me. It's the least I can do to repay you for your excellent lessons on testing lenses. I've also converted a 29mm Trioplan from a Welta Penti and currently converting a Leica AF-C1, a Olympus Trip 35 and a Nikon LiteTouch AF600. (N.B. All cameras were DOA) Cheers Ray
Reply

Leave a Reply

Your email address will not be published. Required fields are marked *

Hamish Gill replied:

Comment posted: 17/01/2016

Hi Ray, awesome! Thanks for getting in touch, I'm going to email you now :)

Reply

Leave a Reply

Your email address will not be published. Required fields are marked *

Dexter replied:

Comment posted: 17/01/2016

Would be really interesting to see some of the conversions that you've done & the results!

Reply

Leave a Reply

Your email address will not be published. Required fields are marked *

Claudio replied:

Comment posted: 17/01/2016

Hi Ray, I have a half broken Yashica T4 and I'd be interested in a conversion for Leica. The process you described seems to be easy enough to try by myself. Would you consider to share your 3D model in a file I can use with a 3D printer? It would be great... let me know what you think :) Thanks, Claudio

Reply

Leave a Reply

Your email address will not be published. Required fields are marked *

Ray Yee replied:

Comment posted: 17/01/2016

Hi Dexter, Thanks for the interest, as with Hamish, my foray into lens modding came about because I wanted something small and light to be able to carry around and there are no pancake lenses available for the Sony A7 series. The 3D printed adapter and 3.5/35 Tessar weighs in at around 70g. The (wide open) results, which I will eventually get around to sharing, was really sharp in the center but soft at the edges and has slight astigmatism but has that pleasing IQ which makes up for these deficiencies. Adding an aperture helps. Anyway, this has set me on the route to produce a series of "compact camera primes", from my research on which compact film cameras had good lenses and limited to my budget (sorry, no Contax T2/3s, even broken ones are expensive). It is my intention to share these later. Please note that I only ever use unrepairable cameras.

Reply

Leave a Reply

Your email address will not be published. Required fields are marked *

Ray Yee replied:

Comment posted: 17/01/2016

Hi Claudio, I'm more than happy to share my files but please be aware, I have built them specifically to be used on a M Mount Close Focus Adapter mounted to my Sony A7RII. If you are planning to use it on a non Sony E Mount camera you may have to modify the file to your requirements. It is, a very basic model so you should have no trouble to do so. You can download the file here: https://www.dropbox.com/s/5t6zsh7acje2uzi/tessar_and_aperture.zip?dl=0 Let me know how you get on with it. Cheers

Reply

Leave a Reply

Your email address will not be published. Required fields are marked *

Claudio replied:

Comment posted: 17/01/2016

That's great Ray, thank you very much! :) I will use it on Leica M's, so the mount should be quite the same. Will do some tests. I'll keep you posted, thank you again! Cheers

Reply

Leave a Reply

Your email address will not be published. Required fields are marked *

Claudio replied:

Comment posted: 17/01/2016

Hey Ray, Cannot reply to the last comment, anyway thank you to point it out, all good points. Will experiment with it since the Yashica is compromised, and like you said the lens could be put back to the body. If you feel like you want to share your email or social handle, you can contact me through my website (should be linked in the name). I would like to credit you for the files you gave me once I try it out :)

Reply

Leave a Reply

Your email address will not be published. Required fields are marked *

Claudio replied:

Comment posted: 17/01/2016

Hi Ray, Thank you for your info. I waited to see if I could recover the Yashica, but since it doesn't work properly I removed the lens. I could remove it, and I'm printing your model, and will test it on these days :) I will let you know ;) Thanks!

Reply

Leave a Reply

Your email address will not be published. Required fields are marked *

Claudio replied:

Comment posted: 17/01/2016

Hey Ray, I put the lens on the M body cap, you can see here https://twitter.com/gomboli/status/706949910562742273 It doesn't focus fo infinity though, with the f11 aperture piece, do you think I should edit the body cap file to be longer?

Reply

Leave a Reply

Your email address will not be published. Required fields are marked *

Ray Yee replied:

Comment posted: 17/01/2016

Hi Claudio, If you're using it on an M mount, you the lens will be fixed at infinity, as the way I would focus the lens on my camera is to use a close up adapter to act as the focusing mechanism. Also, please note that it isn't rangefinder coupled so if you're using it on a film Leica, you won't have the appropriate frame lines for composing. The lens is meant to be fitted to the inside of the cap, you'll need to drill 3 small holes to attach it to the mount. The included aperture is calibrated to f11, if you want a larger aperture then modify the one I sent you and you'll be able to make any size aperture you like. You can ask me questions if you like but I may not be able to answer them immediately. Cheers

Reply

Leave a Reply

Your email address will not be published. Required fields are marked *

Ray replied:

Comment posted: 17/01/2016

Hi Claudio, Please be careful when you remove the bezel from your T4, the plastic tabs that hold it on is very flimsy and prone to breaking. Happy to help you out if I can but I'm setting up my on site and blog at the moment so, for the time being, please contact me via Hamish's site.

Reply

Leave a Reply

Your email address will not be published. Required fields are marked *

Hamish Gill replied:

Comment posted: 17/01/2016

It will need to be shorter, rather than longer. make the adjustment with paper/card shims first then use those as the measure for the adjustment I'm going to do a post about this myself soon... :)

Reply

Leave a Reply

Your email address will not be published. Required fields are marked *

Claudio replied:

Comment posted: 17/01/2016

Cool! Looking forward to the post :) Might write something as well :D So I had left the screws in, and this affected the position of the lens. The aperture piece also affects the focus because pushes further away the lens. Quite close to the final setup though, try and error! :)

Reply

Leave a Reply

Your email address will not be published. Required fields are marked *

Ray Yee replied:

Comment posted: 17/01/2016

Hi Guys, I'm sorry that you are finding that it focuses short of infinity. If you let me know how much you need to shim, I'll make the adjustments and update you guys. I'm not sure how much it needs to be shimmed by, it works well on my A7 and I do not (currently) have an M mount camera. It's an easy adjustment though and I would be glad to make it as soon as I get the opportunity - probably around Easter. I can edit the aperture as well. Just out of curiosity, is the mount loose on your camera?

Reply

Leave a Reply

Your email address will not be published. Required fields are marked *

Claudio replied:

Comment posted: 17/01/2016

Hi Ray, After several tests I realised that the lens was focusing past infinity, so needed to be a bit further away from the sensor. Now I screwed the lens directly on the cap and it seems better (I had used Sugru), even if the distance is not perfect yet. I could find the right distance with keeping it with hands, and it was very sharp, but once I put it in it's a bit off again. Probably not because of the 3D model, but the printed mount is not perfect. Anyway when mounted in the body I don't think it's loose, and stays on the place quite firmly. I printed another aperture with slimming down the inner part since I think it was pushing the lens a bit. It's quite close to be on focus, just not there yet :) I'm planning to change the 3D model mount from M to a LTM one, and then use the LTM to M adapter I have. In this way I could turn the lens in the LTM screw to focus it closer or further away. Not sure it'll work, let's see! Thank you! Claudio

Reply

Leave a Reply

Your email address will not be published. Required fields are marked *

Hamish Gill replied:

Comment posted: 17/01/2016

For me it works quite will as is - with the aperture in I get a reasonable depth of field for snaps. As is it focuses to about 6 meters... Ray, do you want to make a post about the lens adapter if I publish mine about extracting the lens...? That way this interesting convo could evolve in a more logical place

Reply

Leave a Reply

Your email address will not be published. Required fields are marked *

Ray Yee replied:

Comment posted: 17/01/2016

Hi Hamish, work's a bit of a beast at the moment. Will ease off after Easter and I'll get around to it then, I'm currently bidding on a T4 so if I get it, there'll be a video of it as well as direction, wish me luck!

Reply

Leave a Reply

Your email address will not be published. Required fields are marked *

Hamish Gill replied:

Comment posted: 17/01/2016

good luck! :)

Reply

Leave a Reply

Your email address will not be published. Required fields are marked *

Andrew on A 35mm compact camera lens conversion – Part 1.5 – (Still) Choosing the lens

Comment posted: 17/01/2016

Sacrilege it may be to destroy a working T4, that lens is great, and the ability to use it properly with manual control is intriguing.
Reply

Leave a Reply

Your email address will not be published. Required fields are marked *

Dominik Mrzyk on A 35mm compact camera lens conversion – Part 1.5 – (Still) Choosing the lens

Comment posted: 17/01/2016

I have a non-working Canon AF 35 ML (40/1,9), it can be yours if you would like to get this lens converted. I'd be good to clean it a bit, but I guess it can be easily done.
Reply

Leave a Reply

Your email address will not be published. Required fields are marked *

Hamish Gill replied:

Comment posted: 17/01/2016

It wouldn't fit in the mount he uses I don't think. Though funnily enough I was just thinking about this lens as one that could be fun to modify. Maybe you should try it yourself...?

Reply

Leave a Reply

Your email address will not be published. Required fields are marked *

Dominik Mrzyk replied:

Comment posted: 17/01/2016

Well I've been thinking about this, but I couldn't even open the camera, the screws are soooo tight. :<

Reply

Leave a Reply

Your email address will not be published. Required fields are marked *

Hamish Gill replied:

Comment posted: 17/01/2016

If it's duff, you could drill the screws out?

Reply

Leave a Reply

Your email address will not be published. Required fields are marked *

Leave a Comment

Leave a Reply

Your email address will not be published. Required fields are marked *