
Over the last few years I have been fascinated by the amazing story of Afghan Box Cameras. If you are not familiar with them, Afghan Box Cameras are a category of “instant” camera that was popular in Afghanistan from the 50s until the early 2000’s. Folks like Lukas Birk and Sean Foley and others spent a lot of time in the early 2010’s documenting the last vestiges of a an entire photographic industry built around these low-cost home-made/DIY instant box cameras. If you haven’t heard of this before, you should absolutely check out some of the amazing details about these cameras at sites like Afghan Box Camera and Box Camera Now. To summarize briefly, an Instant Box Camera is an ingenious type of camera that allows you to produce a positive image rapidly, on regular photographic paper, with only a few chemicals and a simple lens.
Like many others, I had toyed with the idea of building one for a while. They are VERY simple cameras, and plans are available, so many folks have successfully built versions of these cameras. I was recently re-reading some of the various forum posts and discussions about them and brainstorming a potential build using hardware I might have on hand already. Simultaneously, I was also thinking about checking in with my buddy at VSSoutlet, a local used camera shop here in Philadelphia, to see if he had any super beat up large format cameras, available for cheap, that might make a fun restoration project to follow on from the Seneca 6 I had rebuilt previously. And then I spotted a camera that had just been added to their listings that was both: a super beat up instant box camera?!??
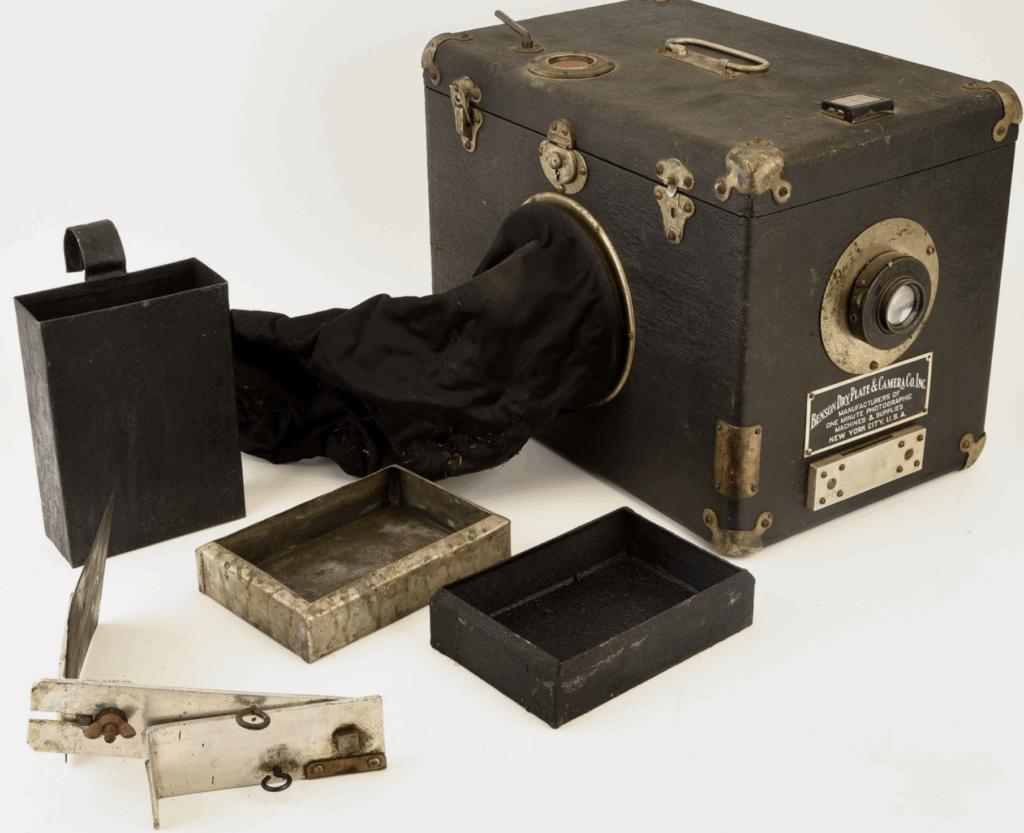
The camera was in fairly rough shape, and the price was very reasonable, so I thought this might be a really fun project and picked it up. But I knew almost nothing about it, so I started trying to learn about the Benson Dry Plate Camera Co. and their Instant Street Cameras, and was surprised at how little information I could find online. The company was founded before World War I, and produced dry plates and cameras through the 50s. They specialized in making cameras for commercial street photographers to be able to shoot and sell “instant” photography. Over the course of several decades, Benson produced several types of instant street camera, responding to changes in technology and the needs of professional street photographers. As far as I can tell, this camera was likely produced in the early 1920s. Decades before the Afghan Box Cameras became popular.
I knew about Afghan Box Cameras, but I’d had no idea that the history of instant box cameras went back so much further. There just isnt that much information available online about these types of cameras or their history! At least part of that is a problem of nomenclature. As others have noted, these types of cameras go by many names: Afghan Box Camera, Instant Box Camera, Instant Street Camera, Lambe-lambe, Cuban Polaroid, Kamera-e-faoree, Camera Minutera, etc. And much of the community around these cameras seems to be siloed into different groups depending on the use of any one of these names. It can also be hard to find info about these earliest instant box cameras because searches for them are so swamped by other more recent or much more popular systems with similar descriptions: Instant cameras, Box Cameras, etc.
Features
This camera is an Instant Box Camera from the Benson Dry Plate Camera Co. It does not appear to have a model name. Benson did produce a few named models like the “Victor” and the “One Minute Street Camera”, but this camera does not seem to have a model name. It is hard to find much information online about how many other street cameras were being made that had these same set of features, but what is remarkable (to me) is how many of the details of the later Afghan Box Cameras are present on this much earlier commercially-made camera. If you read this lovely guide to building a box camera, you will notice an uncanny similarity between the Benson and the cameras built in Afghanistan decades later:
- Box Camera – OK, it’s a box. Not remarkable. But it’s a BIG box, and it is has a hinged and light proof lid on top to access all of the internal bits for setup. The size is really dictated by the size of the film and the space necessary for two chemical baths at the bottom!
- Internal Focusing – Inside the box are two rails that support a sliding platform containing the ground glass and the platform for mounting your film/paper. The gg is viewed by opening a door at the rear to look inside. In most of the Afghan box cameras a single rod extends out the back to slide the GG platform. On this benson, there are two rods connected to the gg that are connected outside. The gg platform can also rotate so that this camera can shoot landscape format images, though it is REALLY intended for vertical portraits.
- Focus memory – Afghan box cameras use some kind of clip to mark the focus so that the gg can be drawn out of the way to load the paper before each shot and then returned to the previously selected focus position. The Benson camera has a custom made brass marker that can be tightened at the critical focus location.
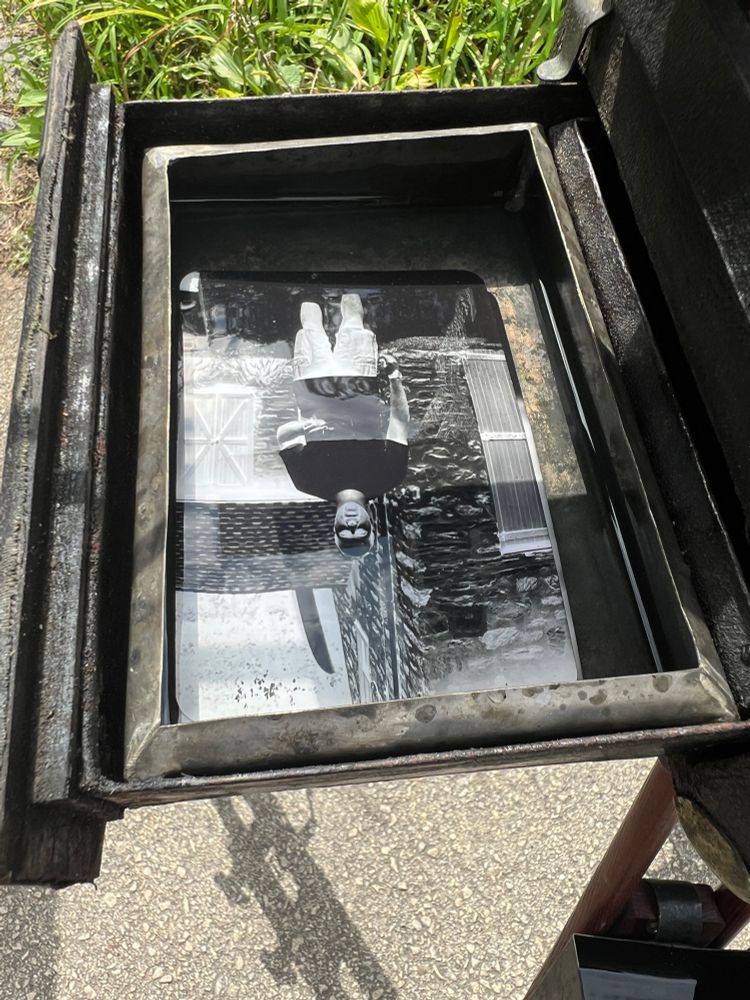
- Trays – Like the later Afghan box cameras, this camera has space for two trays inside, laid side to side. These are filled with Dev and Fixer. This is unlike many of the other similar cameras from roughly the same time period, that may only have had a single tray (often below the camera) for a dry-tintype monobath, like the “wonder” developer produced by the Chicago Ferrotype company. Unlike many other later cameras, the trays sit in a removable drawer. Once the image has been fixed sufficiently, the drawer can be slid out the back of the camera to retrieve the image quickly.
- Peep Hole – There is a red window on top of the camera, with a mechanical shutter. There is also a second inset door in the back that also has a red window. When both are opened, red light comes in the rear window and the development can be observed through the upper peephole. This is a feature that seems to be always found on the later box cameras. It is certainly convenient but with a fast acting paper developer, seems often unnecessary.
- Cloth-covered Arm Hole – A huge hole in the side of the box, reminiscent of one arm hole from a dark bag, that lets the photographer pass their hand into the box to load the camera and then process the image.
- Paper storage – A small box, just bigger than the max image size, at the front of the box. Photographic paper is loaded up in here. It has a spring-closed top so that it does not open unnecessarily. It is light tight so that when the box is opened for loading the trays or focusing the gg, the paper is not exposed.
- Copy stand – Other similar cameras, like the later Victor camera from Benson, or the Mandel Brothers cameras like the Mandel-ette, used a direct positive process to produce a positive dry tintype in one chemical monobath step. But this Benson uses the double step process also found in the later box-cameras – The initial image is recorded as a negative on photographic paper. Once the negative has been rinsed, though, it can be mounted on a copy stand and a second exposure is made to create a positive. The camera comes with a copy stand that mounts to the front of the camera for this purpose. It can swing out of the way so that it need not be removed for each new exposure. The copy stand, focal length, and box size all work together so that the correct focus position for the copy stand is the very back of the travel of the gg (this can be fine tuned via a set screw). There is no need to focus for the copy stand, just slide the gg all the way back and you are ready to go!
- Drying Rack/Display Area – On the flat side of the box (opposite the arm hole) there are 2 rails that provide a space to slide in images as they come out of the camera. These were used as advertisements of the work of the photographer. This feature is found on nearly every instant box camera.
- External rinse bucket – The camera came with a small external tank that can be hooked onto the tripod, filled with water, and used to rinse negatives and positives before placing them on the drying rack.
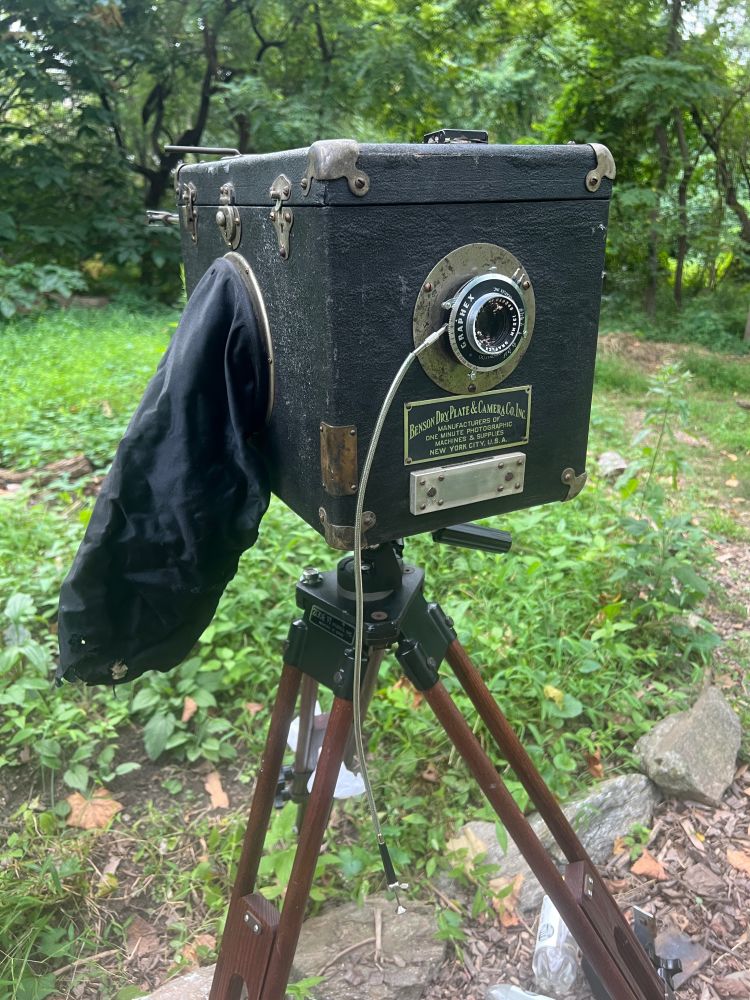
Lens
The original lens on this camera was a Steinheil-Munchen Teronar Double Anastigmat 135 lens mounted on a very old Wollensak Gammax shutter that appears to have the older US aperture markings. This lens and shutter combo cleaned up reasonably nicely, but it is slow and the speeds are suspect. For testing, I have swapped in the 135mm lens/shutter from my pre-anniversary Speed Graphic which is a direct replacement. It screws right onto the existing mount on the camera and since it is the same focal length, it is in the ballpark for making the positives in the second step! To make a positive, the internal focusing slide is pulled all the way to the rear of the camera which should be the right distance to focus on the copy stand when it is in place. Since there is a slight variation in this distance, though, it is very helpful that there is an adjustment on the copy stand itself to fine tune the focus. This means, once it is adjusted, you can just slide the focus lever all the way back and you are definitely in focus for the copy stand. It does not need to be carefully adjusted for each shot!
Testing
As soon as I got this I wanted to shoot it immediately and try out the positive printing process! This is the very first exposure I made: in my darkroom, in the mirror. This was with the original Teronar lens on a paper negative, so it had to be a really long exposure! This was shot “wide open”, at US aperture 8 which is f11, for 24 seconds on ISO 6 paper. To keep myself still for 24s I was propping my head against the camera (on a tripod) and I was starting and ending the exposure by switching on and off the overhead light with my hand out of frame!
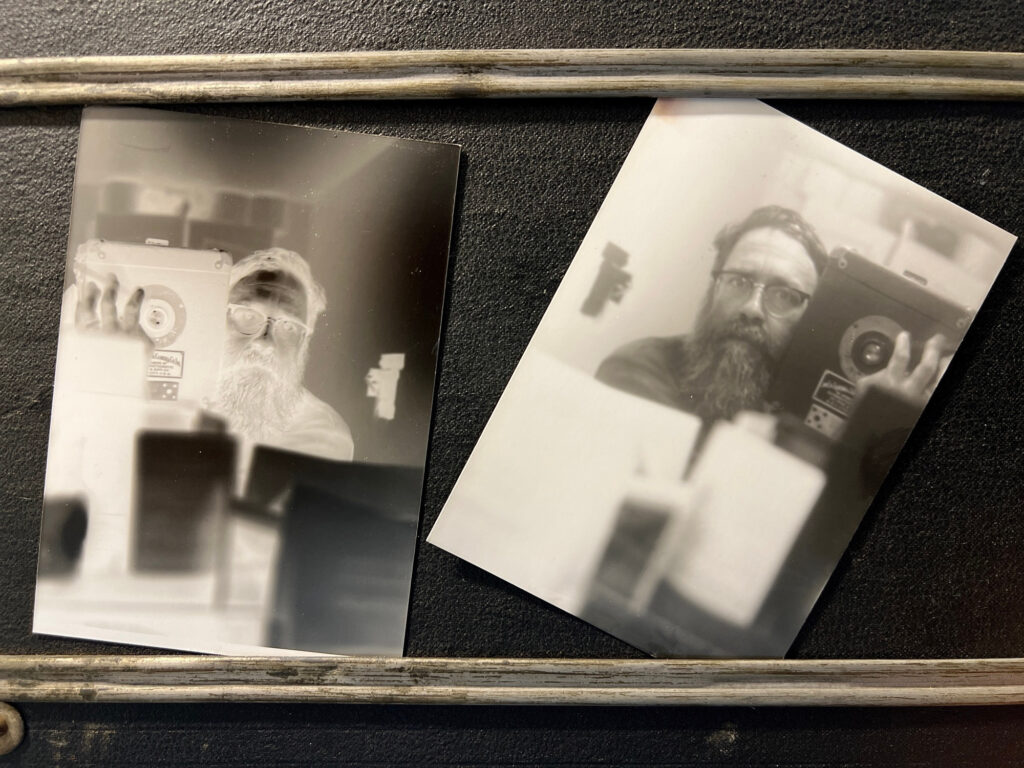
I was astonished by this first result. It was pretty straightforward to focus using the rear door, and pretty easy to make the positive using the copy stand and room lighting. The positive was a 2min exposure at f11!
I made several more tests in my basement, using flash lighting and a picture of paper negatives and homemade dry tintypes:
My next step was to take the camera out into the world and try to operate it for real! This proved more difficult than I was expecting. I went to a local historic site and set up the camera and asked passers-by if they would let me take their photo using a weird historic process. On the one hand, this was good fun, as I ended up chatting with a bunch of folks about the camera. On the other hand, it was only partially successful as a test of the system. I ran into problems with keeping all the steps straight, and problems with light leaks, and problems with contrast! I only got 1 almost-successful shot with a nice gentleman who was thrilled with the outcome.
The most important lesson I learned here was how I have to be even more slow and deliberate with this process than with regular large format shooting, because there are SO many steps to get a final positive!:
- Pre-load the camera with photographic paper in the interior storage box
- Pack small bottles of Dev, Fixer, and Water
- Setup the camera: put on tripod, pour dev and fix into the trays, close the box
- Compose the shot (direct the person where you want them!)
- Open the shutter and open up the aperture all the way
- Open the rear door and focus, set the focus marker at the appropriate location!
- Close rear door
- Close the shutter
- Meter the subject
- Set the shutter speed and aperture
- Pull the focus all the way back so the paper can be accessed
- Reach into the camera through the cloth sleeve, pull a piece of paper from the box and place on the film plane, close box and remove hand
- Return the focus to the marked spot! (I have forgotten this step SO many times!!!!)
- Make the exposure!
- Reach into the camera, pull the paper and drop it into the developer tray
- Open the rear RED light door (not the full door), and then open the top red viewfinder window to look in and monitor development!
- When paper has developed sufficiently, reach inside and transfer to fixer
- When paper is fixed slide open the drawer and remove the negative to the external water bath!
- When negative has been washed, setup the copy stand and place the wet negative on it (using the water to hold it against the stand!)
- Pull the focus all the way to the back so that it is automatically focused on the copy stand
- Reach in and retrieve another piece of paper from the box and place it in the film plane
- Remove hand and meter for the negative on the copy stand
- Set aperture and exposure using metered info
- Expose the positive
- Reach in and remove the paper and place it in the developer tray
- Monitor the development
- Move to fixer
- Open drawer when fix is complete
- Place positive in water bath
- Hang to dry
That is a staggering number of steps! Remarkably, it CAN be done (from start to finish) in under 5 minutes. BUT, it is also SO easy to make a mistake on almost any one of these steps and ruin the process! I cant tell you how many times I have failed at #11. There is some sticking point in my head, that I can never remember to move the focus BACK to the pre-marked spot after moving it out of focus to access the film storage and place the paper on the film plane. The result is that at #16, when you pull the drawer out, you realize the image was entirely out of focus!
The other take away message I came to ,with a bunch of outdoor tests, was the fact that, although I often get nice results with paper negatives scanned and inverted in LightRoom (using Negative Lab Pro), I was often getting excessive contrast with the 2-step reversal process with this camera. I wondered if this was because I was using regular multigrade RC paper for both steps. So before more tests I ordered some graded paper from Ultrafine with the hope that a grade 2 paper might help tame the contrast. I could, alternatively, have messed with pre-flashing or used a contrast filter, but this seemed easier.
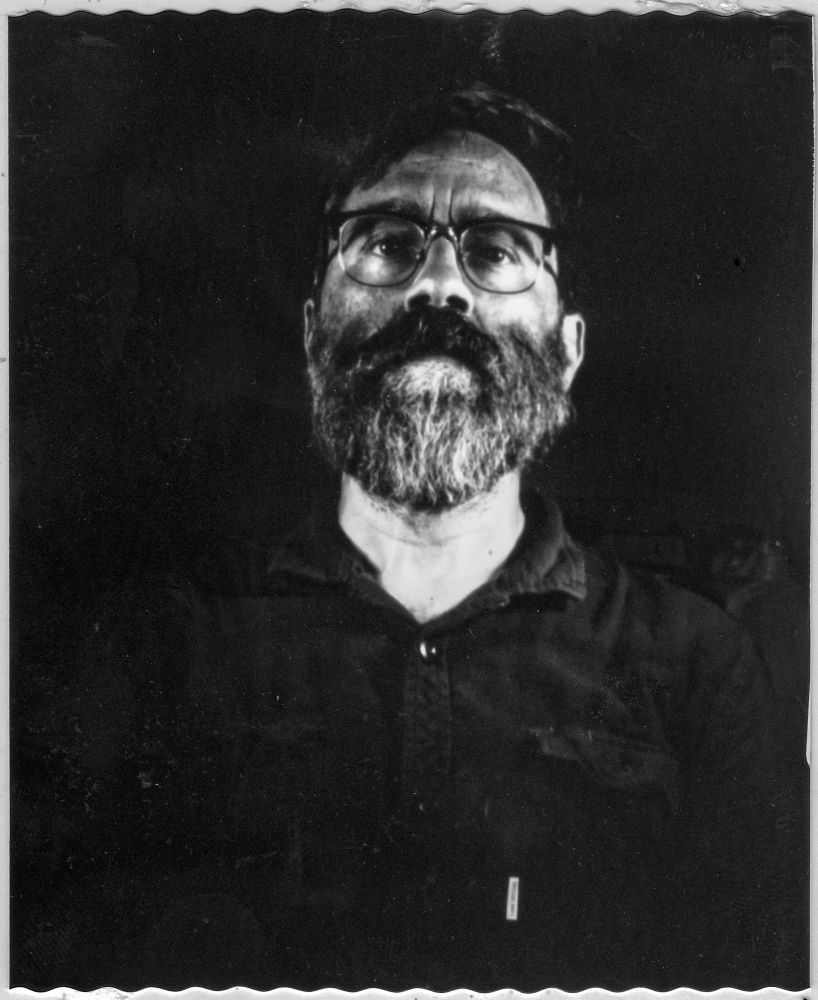
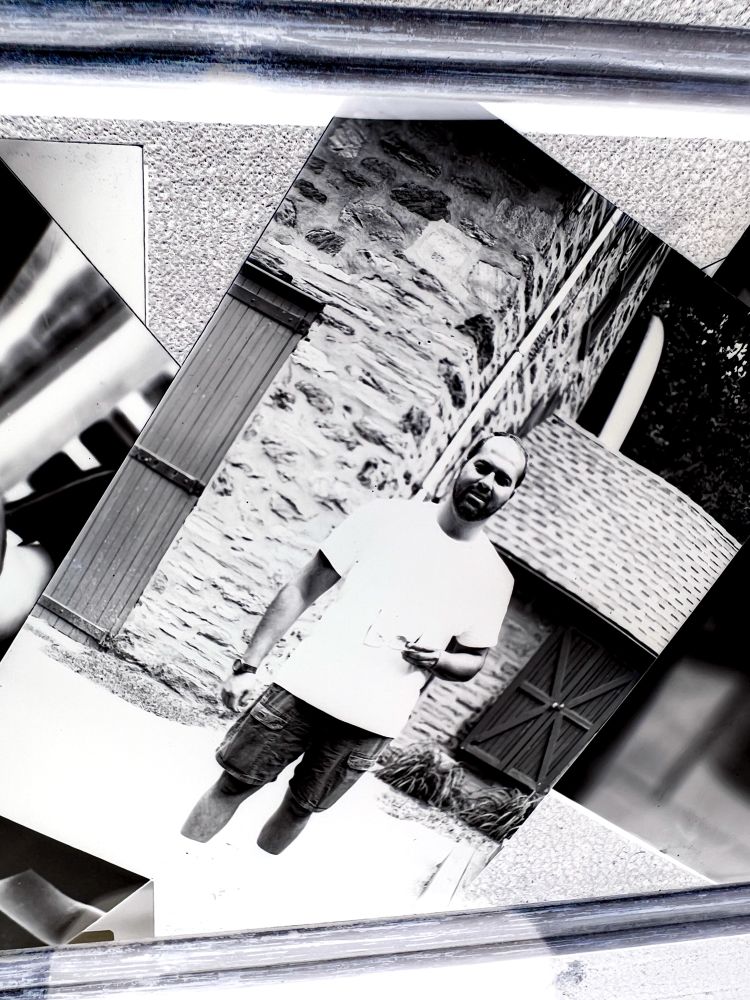
My first test shots with grade 2 paper seemed to confirm my hopes. I shot portraits of my daughter in evening shade and she shot portraits of me, and they came out great. Here is the portrait she shot of me!

Final Tests
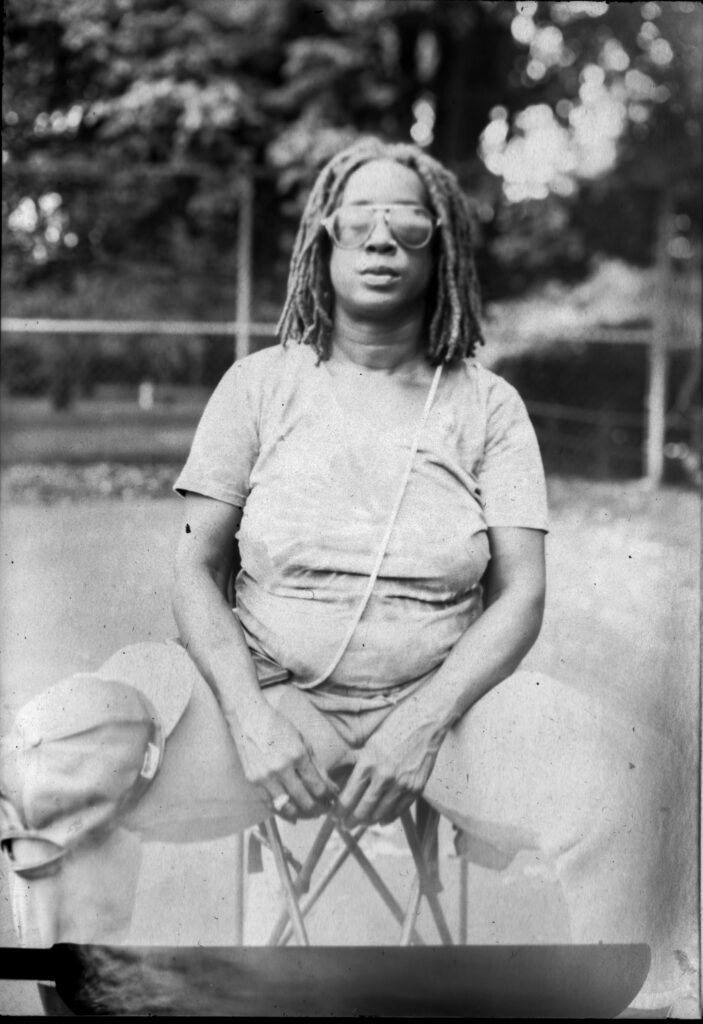
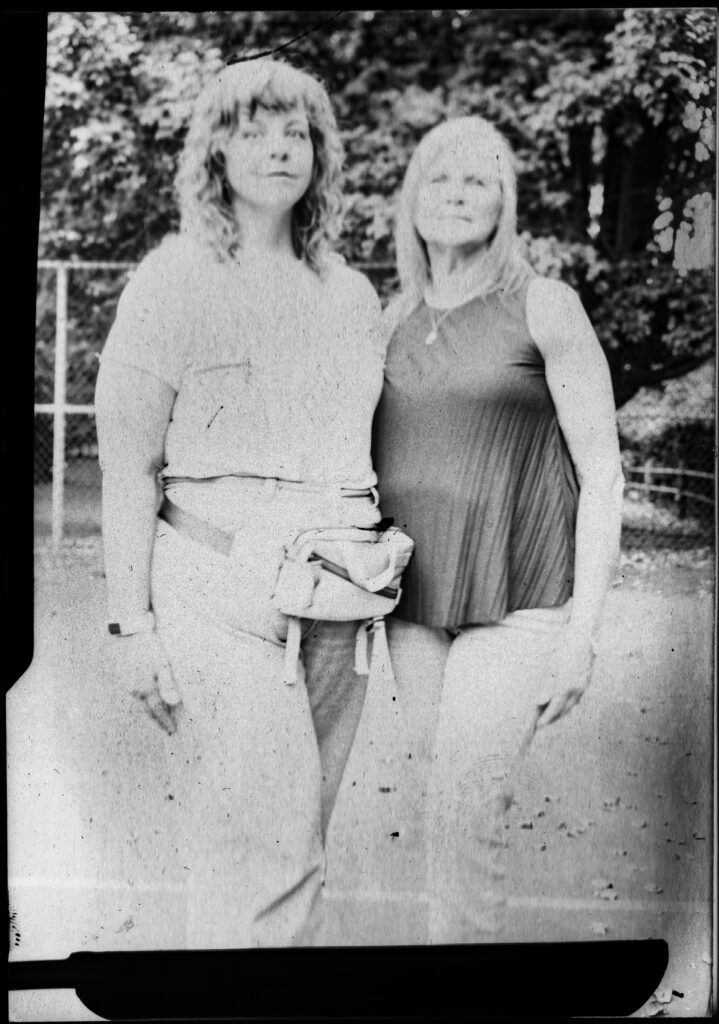
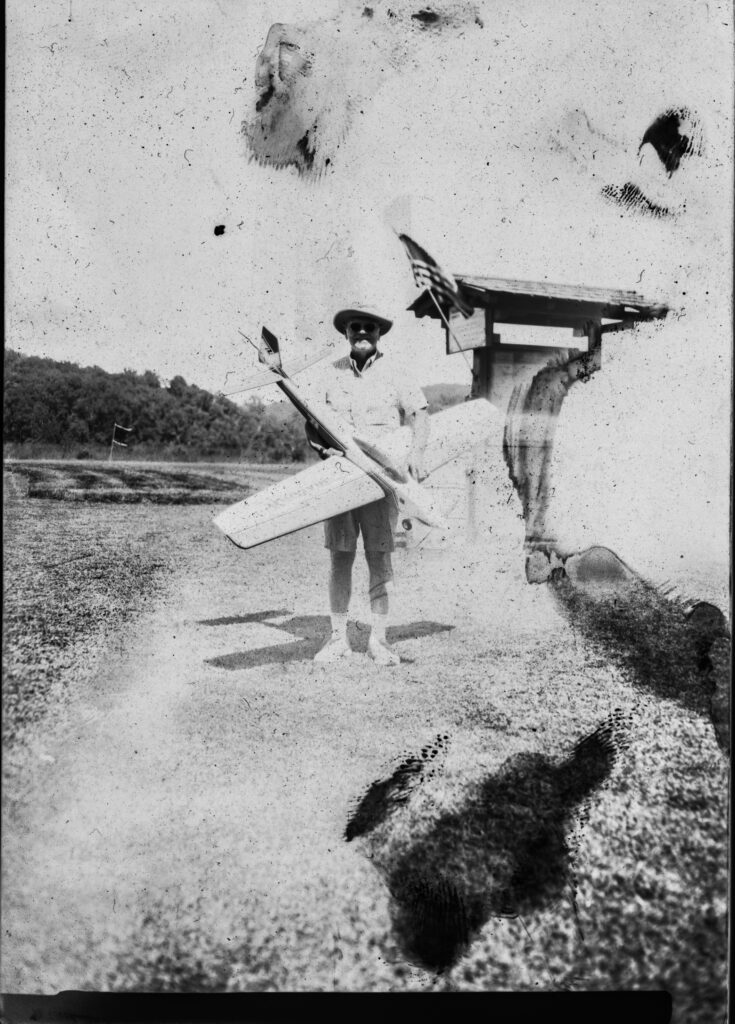
I finally felt like I was ready to try the camera the way I hoped to use it: by taking it to public events and offering to make real “instant” portraits. I have now brought the camera to 3 events, culminating in the most recent, where I set up a booth at a local art fair and made free portraits for anyone interested.
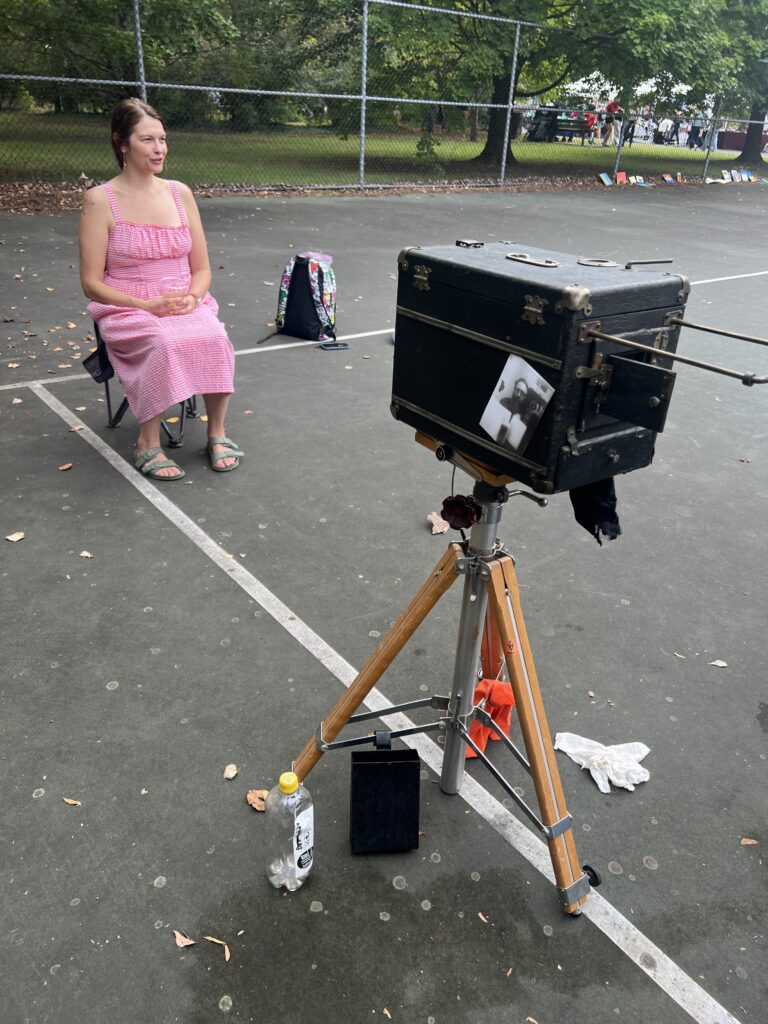
The events have been extremely fun. Ive made some very successful prints for people, and Ive had a good share of failures. Ive been very clear with people that they are helping me work out the workflow to use this camera out in the world! Ive had a lot of great conversations with folks about photography, and darkrooms, and the history of film. At the art fair, folks were thrilled to get these “instant” but very real and very old-timey photos made while they waited. At some points I had a long line of people waiting to get their photo taken. I also had the help of my daughter who very much enjoyed the whole process.
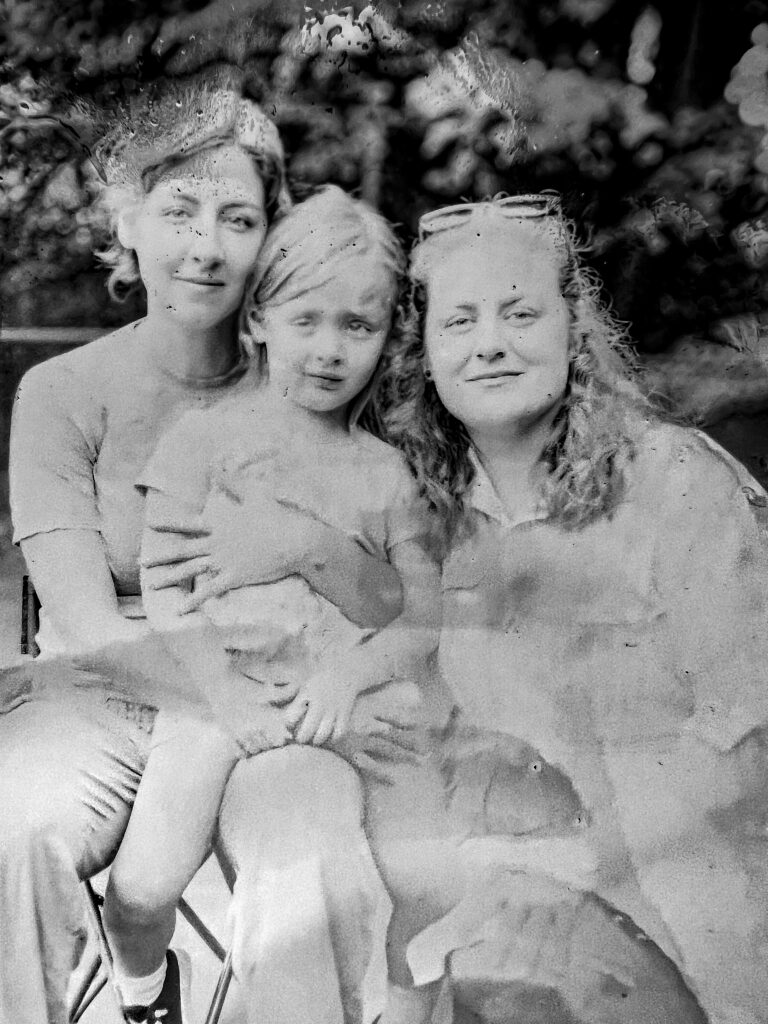
I did give away all the positive prints, (and many of the negatives to people who asked for them) but here are a selection of photos from these events! Almost all are imperfect in a variety of ways. It is easy to damage the paper in the processing, and hard to get the whole process completed quickly and with only 1 negative and 1 positive! Some of these are from quick cell phone scans of the negative or positives while I was making the pictures. But, regardless of the outcome, the process was always fun for everyone involved. Im looking forward to finding more excuses to shoot people with this amazing piece of photographic history!
Share this post:


Comments
Stephen Hanka on Benson Dry Plate Co. Street Camera – Adventures with Instant Street Photography
Comment posted: 27/12/2025
Michael on Benson Dry Plate Co. Street Camera – Adventures with Instant Street Photography
Comment posted: 27/12/2025
Comment posted: 27/12/2025
Brashtown Czar on Benson Dry Plate Co. Street Camera – Adventures with Instant Street Photography
Comment posted: 27/12/2025
Comment posted: 27/12/2025
Charles Young on Benson Dry Plate Co. Street Camera – Adventures with Instant Street Photography
Comment posted: 27/12/2025
Sounds like a great way to meet people at street fairs! I will pass on making my own "box" camera!
Chuck
Comment posted: 27/12/2025
Jeffery Luhn on Benson Dry Plate Co. Street Camera – Adventures with Instant Street Photography
Comment posted: 27/12/2025
Jeffery
Comment posted: 27/12/2025
M on Benson Dry Plate Co. Street Camera – Adventures with Instant Street Photography
Comment posted: 27/12/2025
Comment posted: 27/12/2025