
I like to watch. Sunlight sifting through leaves, the ever-changing sky, my sleeping cat. And people. When shopping in the mall, waiting for the train, lecturing my students, I often start making stories about the strangers around me. Who are they? What are they thinking right now? What are their dreams and hopes?
As a photographer, now amateur, professional in the eighties, I started thinking about doing a project exploring this. Maybe I could do a series of portraits of unknown people, in, for them, typical situations and places, in addition, perhaps get them to tell something personal about themselves? Commonly, these kinds of pictures are referred to as “environmental portraits”.
The first idea was to approach people in large malls, explain the project, get their permission and consent, take their picture, and ask them what they were thinking of right there and then when I approached them. By second thought, it seemed too problematic; too many unknown parameters, too chaotic, too many refusals.
The idea lay dormant for some years, and emerged again early this year, when daily life slowly became normal again after the pandemic. For various reasons, I got more time to do what I like the most, make pictures, preferably on film, and interact with like-minded people. I discussed the idea with friends, online and in real life, photographers and others, and pieces were starting to fall in place. One thing came abundantly clear to me: Such a project calls for serious preparations. Tools, techniques, and workflows need to be reviewed, and my rusty skills need to be honed.
In the next sections I will tell you a few things about the planning process, which I hope will be helpful and interesting for others in the same situation, or better, all of you.
The Subjects
I want to work with a heterogeneous group, regarding age, gender, occupation, ethnicity, and cultural background. I will not invite underage persons (in Norway, under 18), since this would include getting the parents’ permissions and other. Each subject will sign a statement of consent, also permitting the material to be used in a certain way. I was thinking of making the selection myself, but to ensure the picking process to be as random as possible, each subject will be encouraged to invite another person, as different from her/him as possible, a bit like a relay race. And I will encourage them to collaborate, with choosing the venue, the posing, and even offer them a bulb release so they can make the exposure whenever they want. I like to see my role as a facilitator, not a director.
The Sitting
It soon became clear to me that what I was planning had a lot of things in common with a traditional portrait sitting, in the studio of a photographer or an artist, a situation I am well familiar with, having worked as a professional for most of the eighties. What I am looking for is a fairly controlled setting, indoors or outdoors, where the objects and myself can gain mutual trust and understanding in a short time. Obviously, the person needs to be prepared, having been told the basics about the project and the sitting in advance. An important part of the project is that I will ask each participant to write two short notes, one on their best memory, and the other about their private wishes, dreams, and plans (generic “world peace”-type notes will be discouraged).
The Camera
At first, I was considering using a vanilla DSLR, but then decided on the analog 4”x5” format. Some large format cameras are designed for hand-held usage (as the KW Patent Etui), however, using a tripod would better the odds for good results.

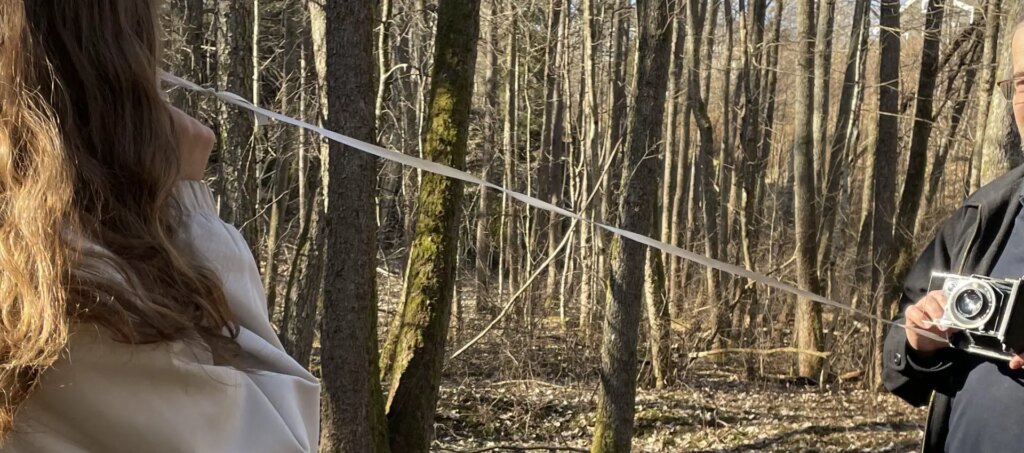
Focusing might be a challenge, so I decided to use what I call the “ribbon method”. I preset the distance, make a mark on the folding bed, attach a ribbon to the camera with a key ring in the end. When the subjects put the finger in the ring and hold it close to the eye nearest to the camera, then the focus should be right. It works surprisingly well and takes some strain away from the shooting. The bonus is that most subjects find this amusing and make them relax even more.
Large format work is indeed slow and fiddly, I will get no more than 4 or 6 exposures per sitting, and lots of things can go wrong. However, I think the big and strange camera will offer a more formal and serious atmosphere, and I, and several of my friends, have experienced that people get excited and in a good mood when you are rigging such ancient equipment, they want to look at image on the ground glass, surprised by the picture being upside down and mirrored, and ask all kinds of questions.
I remember unpacking my newly acquired Graflex Crown Graphics, which I most likely will use in the this project, some 12 years ago, with my son and daughter (5 and 9) watching. I opened the camera and extended the bellows, when my son asked what was natural for him: “But where is the ON-button?”.
The Lens
The natural choices for portraits are moderate telephoto lenses, often in the range 1.5x to 2x the focal length of the normal lens. For the 4×5 format, this translates to 210 – 300mm, but since the field of depth is relatively smaller with larger formats, many are using lenses closer to 150mm. Moreover, in environmental portraits, too long focal lengths will yield a too blurred background, and a hint of the surroundings is important in this project.
Another aspect to consider, is the characteristics of the lens, is it sharp, contrasty, or perhaps a bit soft? Is the bokeh pleasant, that is, is the unsharpness in foreground and background rendered to your liking?
Finally, very few of us can choose freely from a large variety of lenses, we must use what we have, or acquire or borrow. I started with a 135mm Heliar from a Voigtländer Bergheil for the 9×12 format, corresponding to around 45mm on the 135 format. The Heliar lenses are well corrected, sharp, with fairly good contrast, even on wide apertures. IMHO, the resulting images resemble the ones taken with the Skopar/Tessar/Xenar/Optar/Solinar types. Some think the Heliars are a bit hyped, being sort of cult lenses. However, I find the bokeh quite nice. But, in this project, I’m looking for an even more vintage/soft effect.
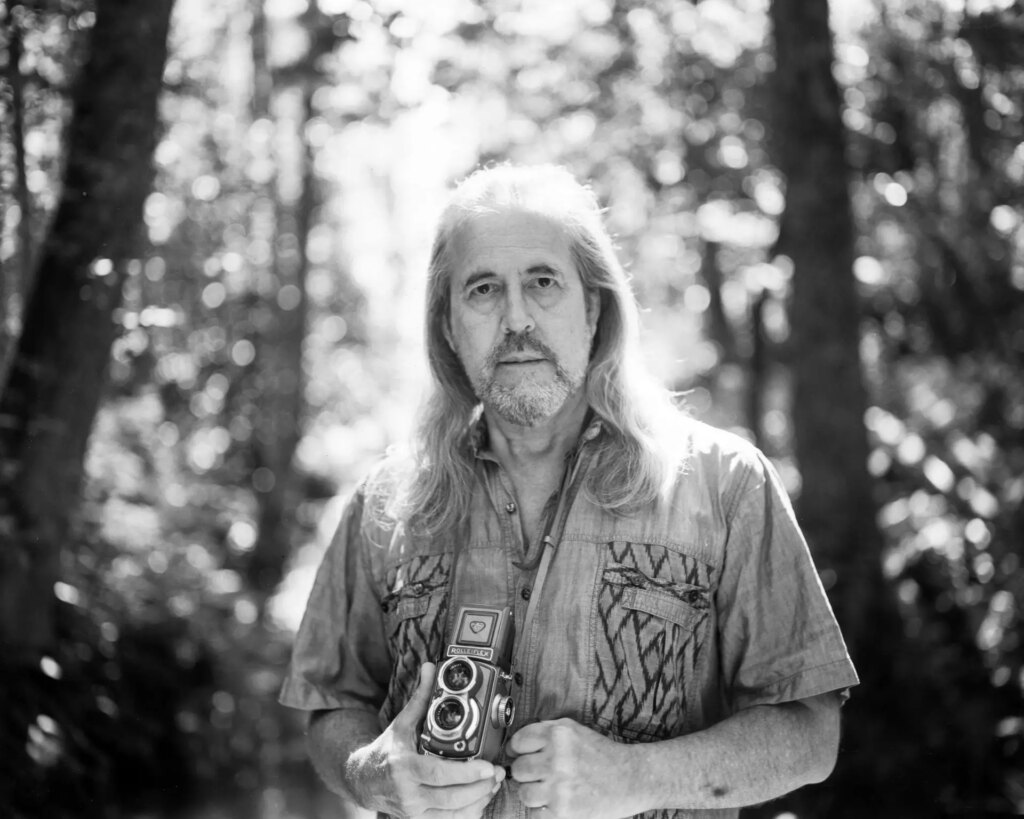
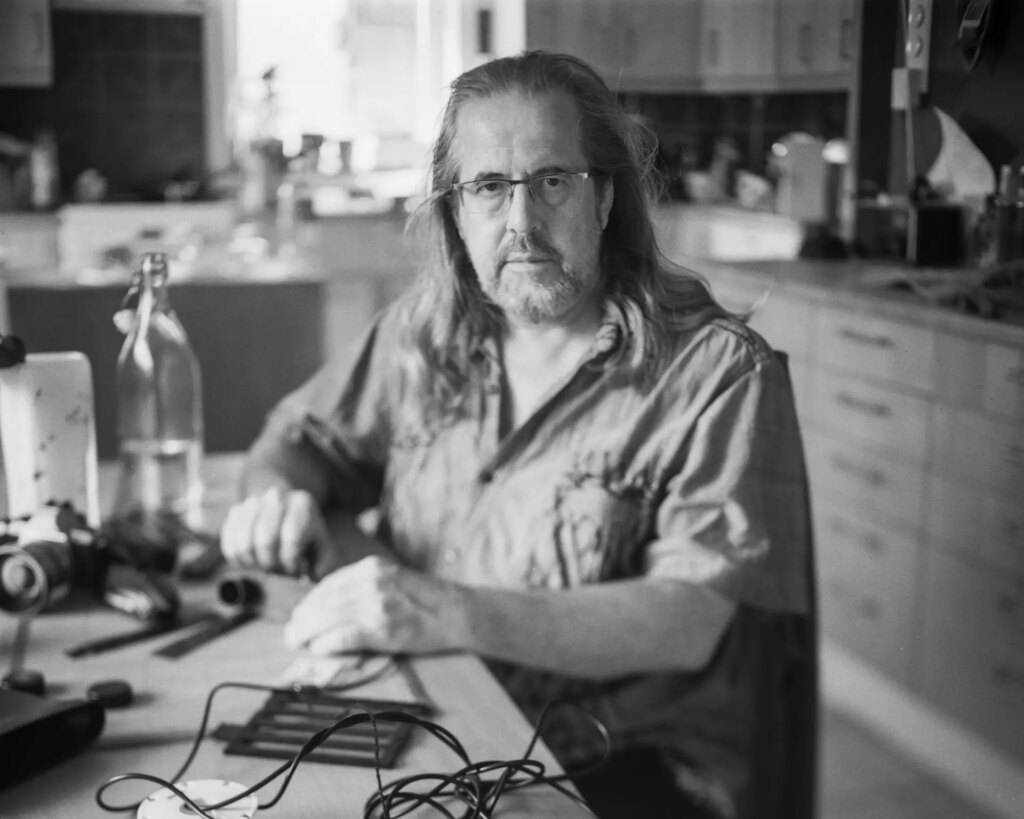
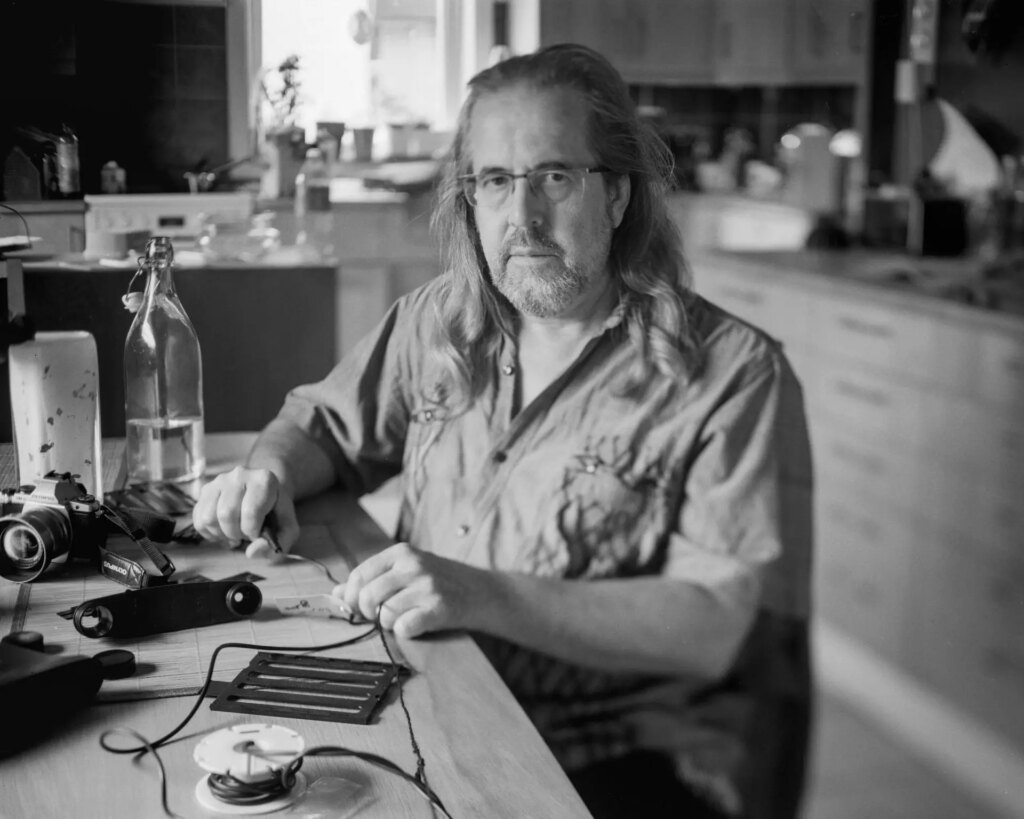
The next lens out, a Fujinon-SF 180mm, is a proper soft-focus lens, particularly designed for vintage looking portraits, like the ones made in the 20s/30s/40s/50s. The Fujinon-SFs come with a “light sink”, a perforated disk to be placed on or in the lens, to yield a quite characteristic effect, quite similar to the legendary Imagon lenses. The effect is most pronounced with a wide-open aperture, and is reduced when stopping down, and eventually disappears. Without the disk, the effect is more moderate. However, the disk turns sparkling highlights into tiny “sunflowers”, as in the following picture. For me, the effect is too artificial.
Removing the disk yields a more natural effect, in my eyes, as seen in the next self-portrait. It looks soft like a vintage portrait. By closer examination, it is not soft in an unsharp sense, but rather with a certain glow.
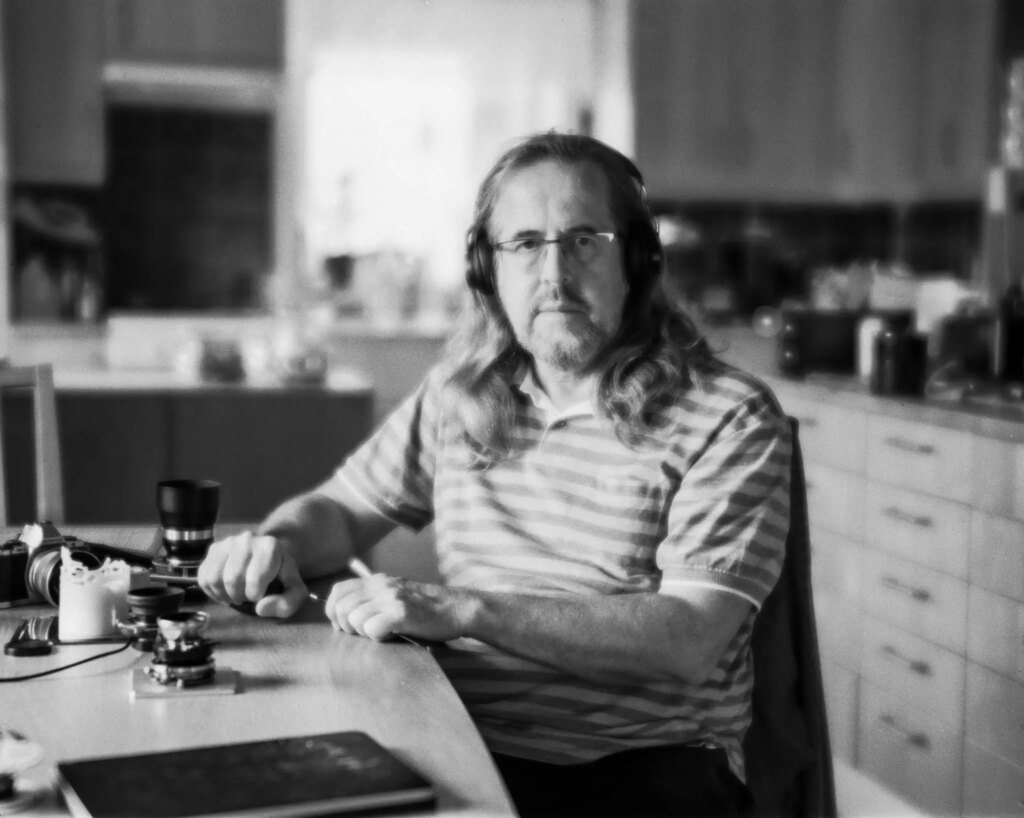
By closing the aperture one step to f:8, the soft focus practically disappears, and is not very different from the Heliar.
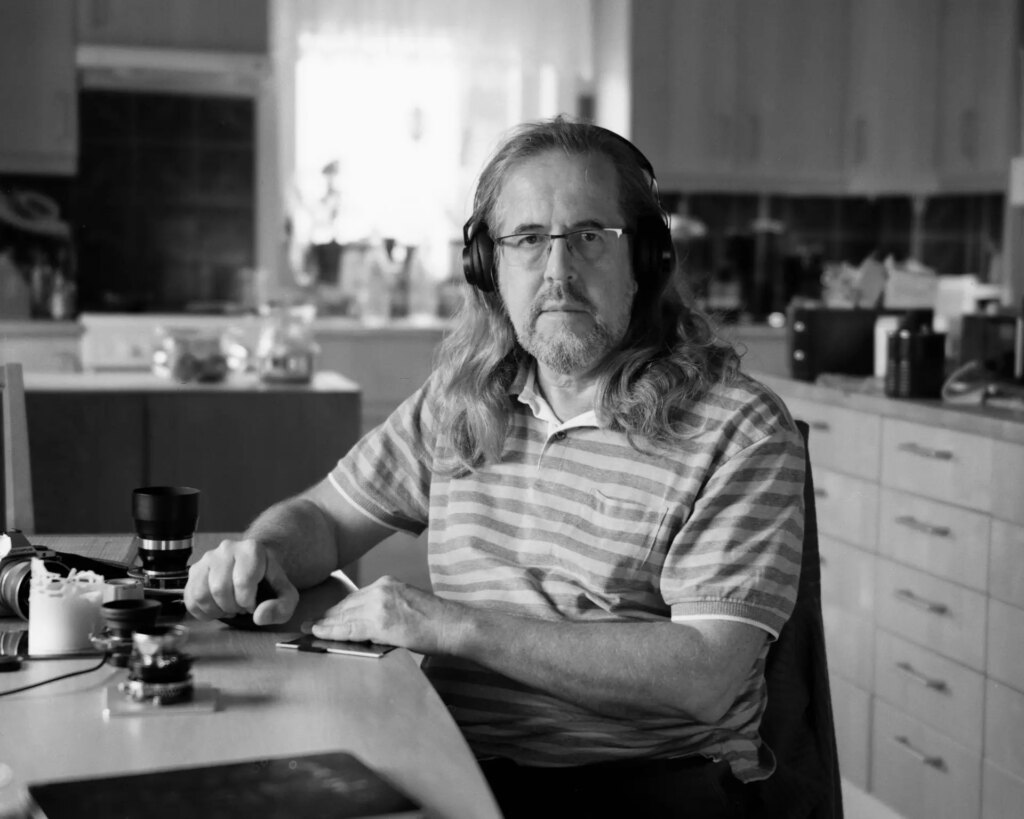
For me, there was one more option. I borrowed a 135mm Rapid Aplanat from a Zeiss plate camera from the 1920’s. The Aplanats (Steinheil) and the Rectilinears (Dallmeyer) are designed as 4 lenses/two groups in a symmetrical setup, and was perhaps the most used lens formula from the first patent (Dallmeyer, 1866) and well into the 1930’s. It is a well corrected lens which produces sharp images, also fully open, and it turned out that it performed approximately as the Heliar.
However, the symmetric design allows for some modifications. So, inspired by the people reversing front elements of Helios lenses and the like, producing insanely swirly bokehs, I reversed the front element, and voila, I got something close to what I want. The center and the face are rendered fairly sharp, bit width a glow, resembling the Fujinon-SF, and the corners turn sort of sketch-like.

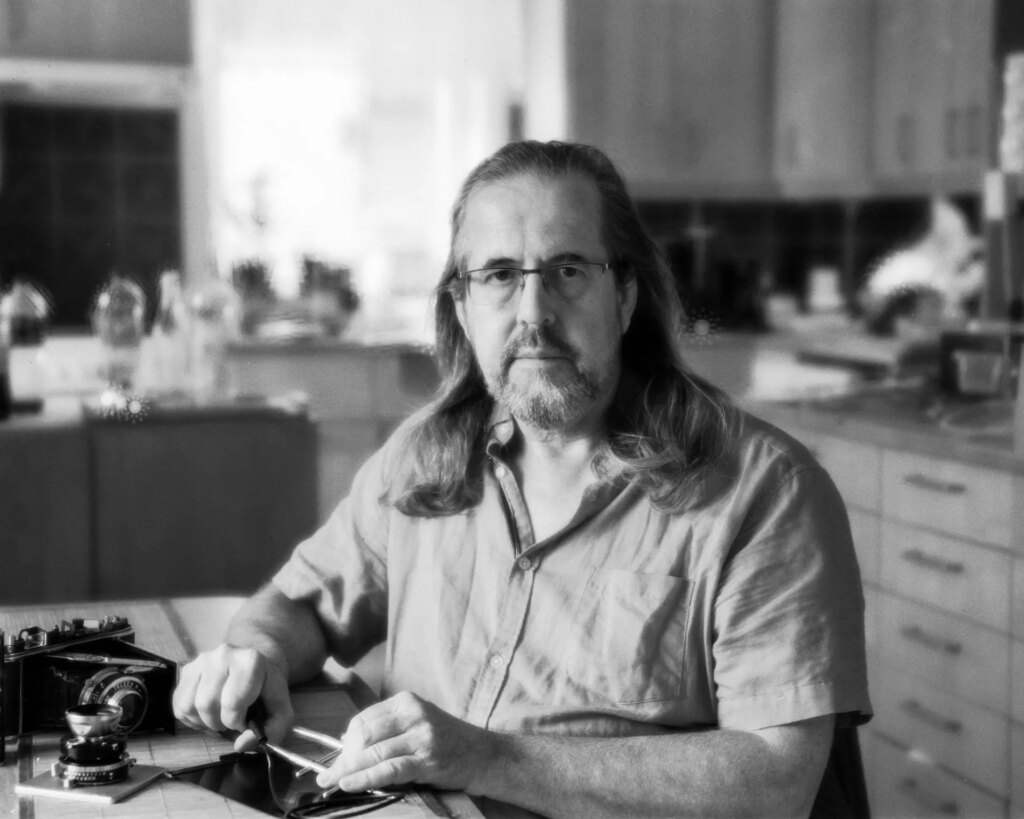
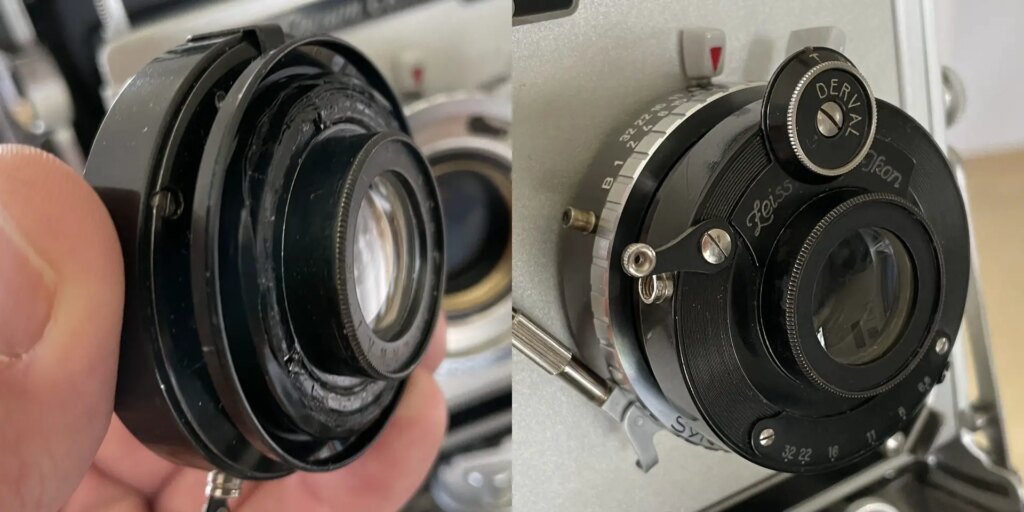
Unfortunately, the lens was set in a Derval Dial Set shutter, a little tired, thus leaving me with only two working speeds, 1/50 and 1/25. I am planning for a wide variety of light conditions, from basements to sunny beaches. It would mean a lot of hassle with pushing/pulling film and juggling filters. Not ideal. OK, I removed the glass from a Synchro Compur shutter in good shape, since the rear mount of the Aplanat was slightly smaller than the front mount and would possibly fit in some way. Then, I proudly present one of my best hacks: with some electrical tape and cotton string, I managed to pad the rear of the Aplanat and pressed it gently on the Compur, and it really fits, no slack, no risk of falling out. I must say I surprised myself.
The Movements
Using large format cameras provides us with a secret weapon, which gives us some unique advantages, the camera movements. With shifting/rising/tilting/swinging the rear and front standards, we can control two key aspects: Perspective and focus plane. These modifications are mainly used when shooting landscapes, architecture, and cityscapes. However, they may also be used in portraits. I went on exploring these options.
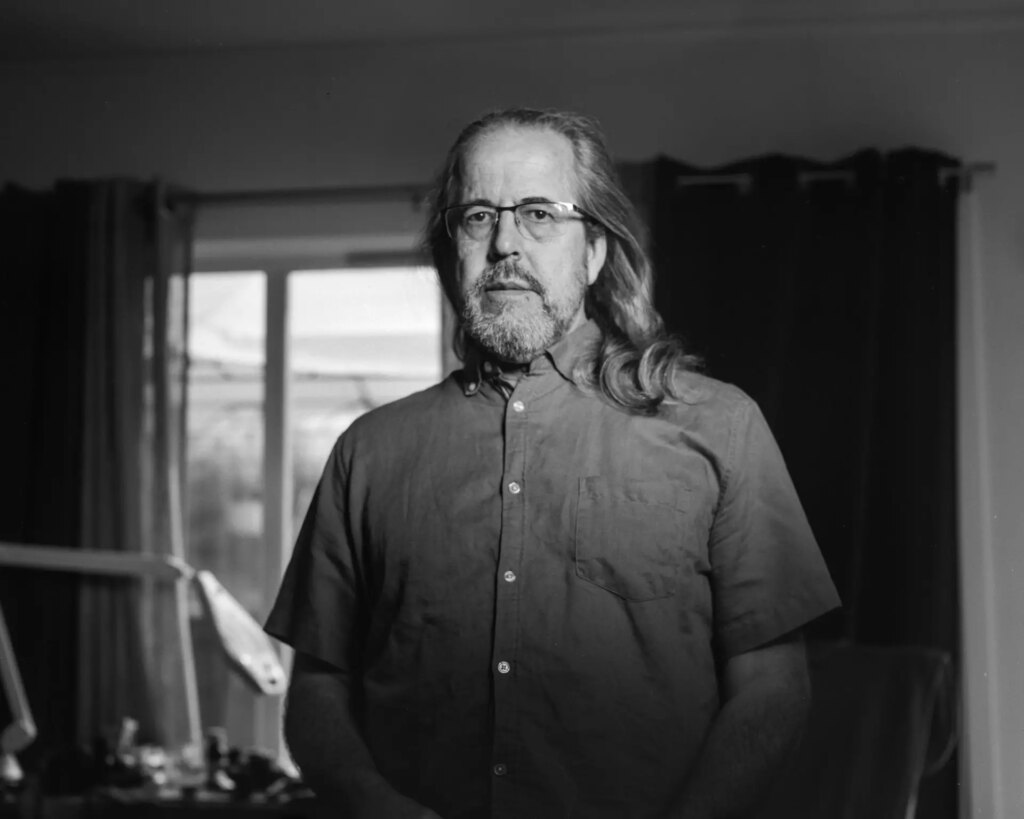
In the first self-portrait, the idea is to skew the focus plane to be parallel with an imaginary vertical plane through both eyes. This is done by swinging the front standard in the right direction (the intuitive one). If we are lucky, both eyes will be sharp even if the face is at some angle, and not looking straight at you (I was a bit unlucky, the focus is a bit in front of the eyes, but I hope it serves as an example). Beware that the skewed focus plan indeed affects foreground and background.
In the next picture, I have done the opposite. The front standard is swung the other way, thus making the vertical focal plane going only through one eye. Again, this can be clearly seen in the foreground and background.

In the third picture I have tilted the front standard forward, with no swing. In this way, the focus plane is tilted forward, making things in the foreground sharp while maintaining a sharp background, sort of. This technique is particularly useful in landscape scenes. Some are also using it for portraits, you could for instance take a full figure portrait with only the face in focus.
We may of course combine these settings, which I have done in the last picture…perhaps you can figure out which movements I have used?
All pictures are taken with a Heliar 135mm wide open on f:4.5. I have not applied rear movements, as they mainly affect perspective, and that is rarely something to look for in portraiture.
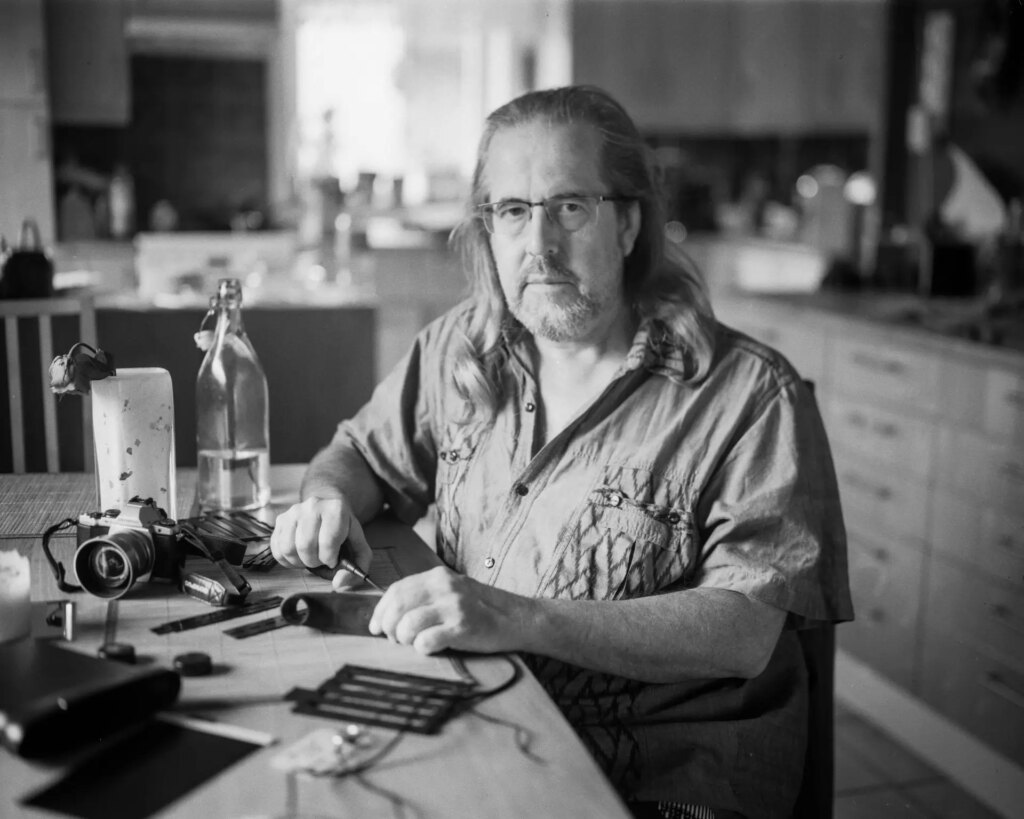
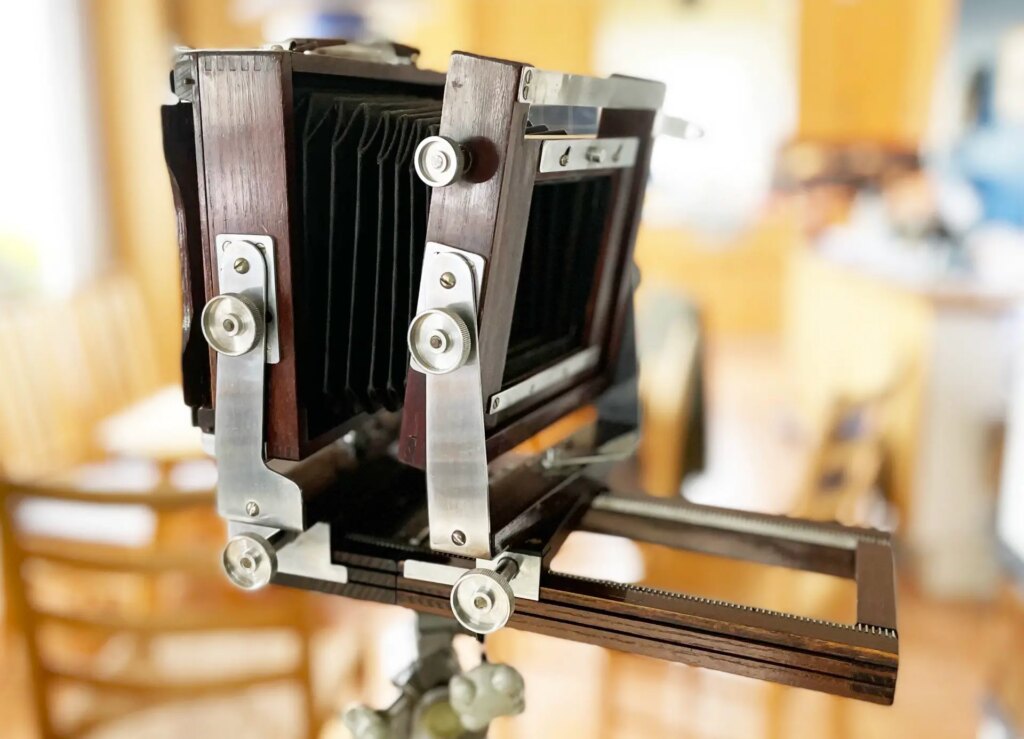
Some large format cameras have limited movement options. For instance, my Graflex Crown Graphic has only front rise and forward tilt. I had to bring my old Szabad view camera back to life (made in Sweden in January 1948, varnished oak and stainless steel) to make these pictures. It served as a decoration in my studio back in the eighties. The last picture shows the camera before making the last self-portrait.
Despite these interesting movement effects, I doubt I will apply them in this project. A major drawback is that they make focusing more challenging, and the ribbon method would be of little use.
The Light
I early envisioned using light to enhance the face by making it lighter than the background. The easiest way to achieve this is using a flash with a spotlight modifier. You adjust the flash intensity to the desired aperture value, and then choose a shutter value that would make the background darker. This was another reason to choose large format, where the lenses most often have a central leaf shutter, allowing flash synchronization with shorter times than 1/60 second.
However, I discarded this approach for two reasons. Firstly, the effect was in my opinion a bit gloomy, and secondly, the light became a bit too harsh, despite using a beauty dish with a honeycomb modifier. So, I decided on natural light, and optionally a foldable reflector to lighten up shadows. In addition, I consider a set of small LED lights to make the background more interesting…we’ll see.
The Film
I am going to use old fashioned film emulsions, like the Fomapan brand, and Ilford HP4 and FP5. For development I looked for a one-shot type, which makes results more consistent. I also wanted a developer that works well with traditional film types, and allows for easy and flexible contrast control, and lastly, permits pulling and pushing with good results. My choice was a Rodinal type, the Adonal from Agfa. Having two film speeds, ISO 100 and 400, I effectively can shoot with speeds from ISO 25 to 1600, without any loss of quality. Rodinal developers yield high contour sharpness and a distinct grain, but with 4×5 grain isn’t really an issue, and, on the other hand, for me a little grain is just fine.
The Start
I had to make it simple for me, so the first person I asked was my daughter. I used the modified Aplanat, the light came from the window, and a foldable reflector made the dark part of her face lighter.
She felt the most difficult part of the sitting was the notes she was asked to write down, in particular she felt it tricky to write about her best memory. She gave me some valuable suggestions on how to phrase the questions in order to make it as easy as possible for the subjects.
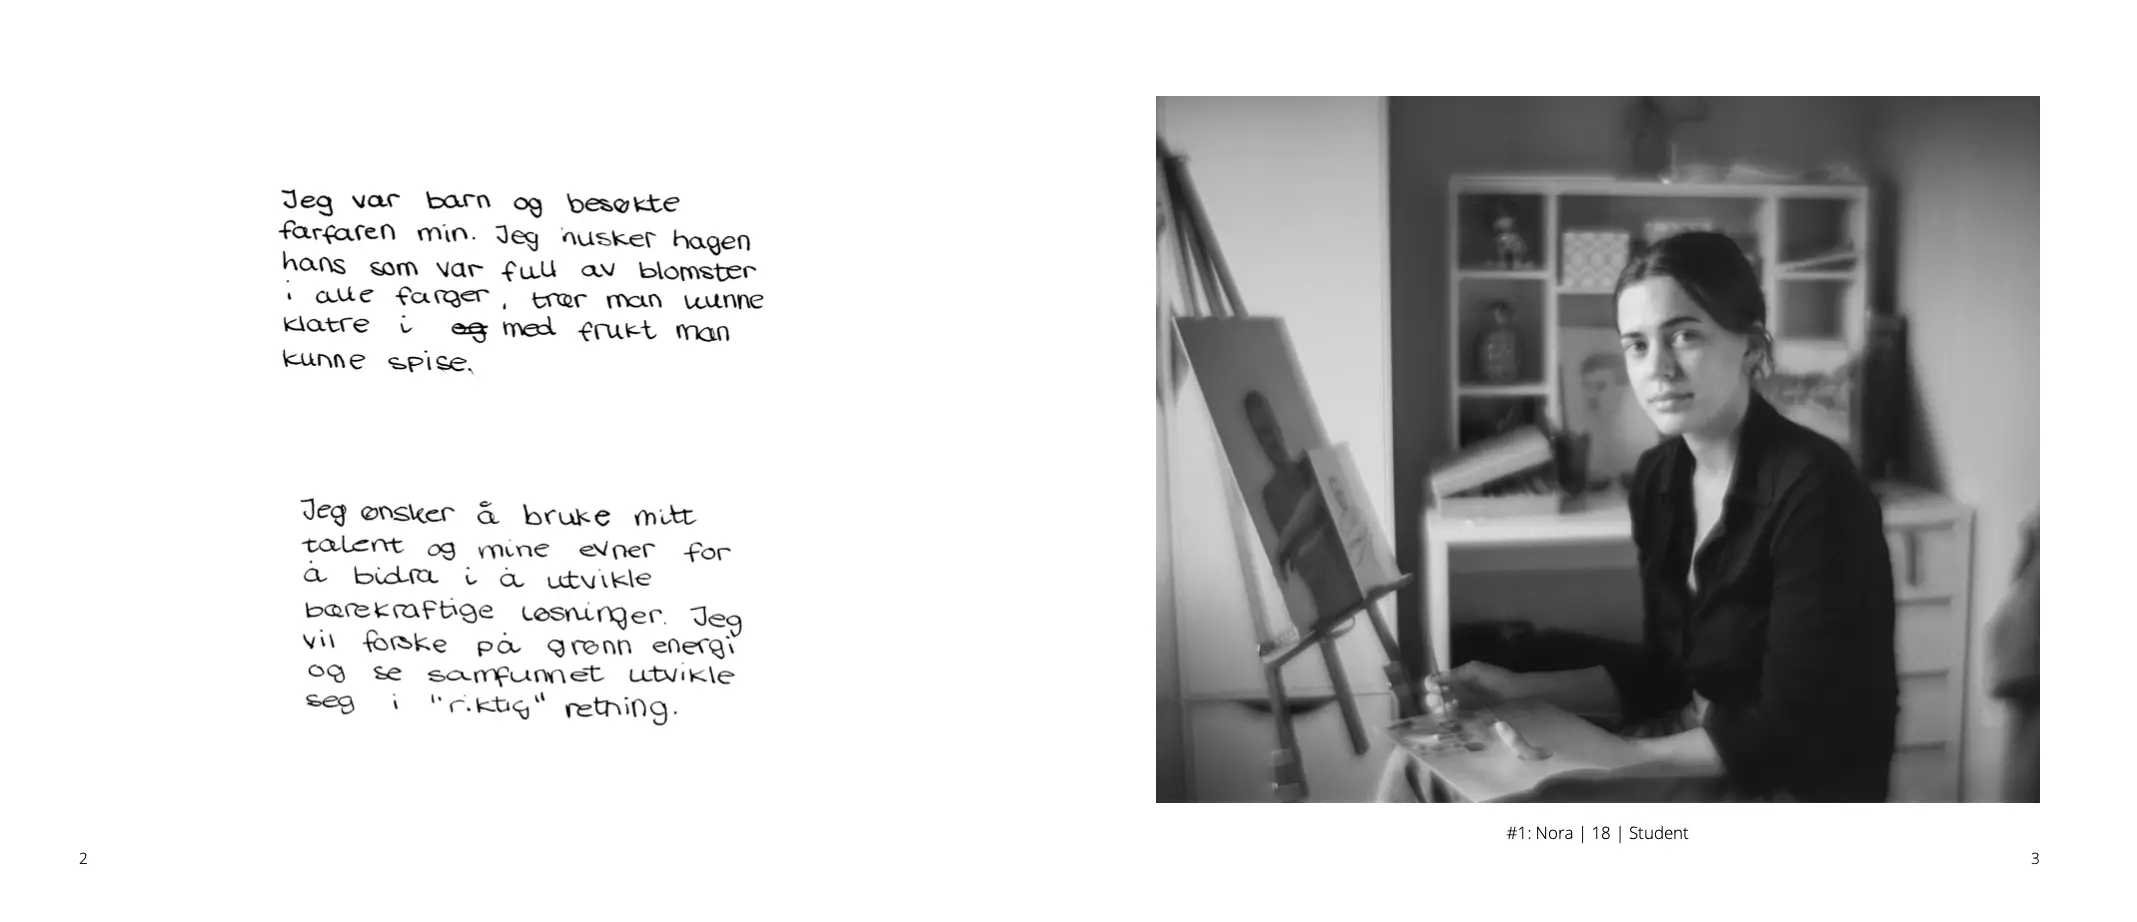
Her best memory goes like this, translated:
I was a kid visiting my grandfather. I remember his garden, full of flowers in all colors, trees you could climb, with fruit to eat.
And her wishes for the future:
I wish to use my talent and skills to contribute to development of sustainable solutions. I want to do research on green energy, and watch society evolve in the “right” direction.
And my wish?
To be able to carry through the project, publish a book and have a small exhibition. And that the project will give the participants a good experience, and perhaps learn to know themselves a little bit better. Finally, I hope the same for the potential audience.
Share this post:


Comments
sonny rosenberg on Planning of a Project: Large Format Portraits in the Wild – By Gunnar Misund
Comment posted: 30/06/2022
Thank you!
Comment posted: 30/06/2022
Art Meripol on Planning of a Project: Large Format Portraits in the Wild – By Gunnar Misund
Comment posted: 30/06/2022
Comment posted: 30/06/2022
Comment posted: 30/06/2022
Comment posted: 30/06/2022
Martin on Planning of a Project: Large Format Portraits in the Wild – By Gunnar Misund
Comment posted: 01/07/2022
Comment posted: 01/07/2022
Torleif Husebø on Planning of a Project: Large Format Portraits in the Wild – By Gunnar Misund
Comment posted: 01/07/2022
Fin og grundig artikkel. Lykke til med prosjektet ditt.
Comment posted: 01/07/2022
Christian on Planning of a Project: Large Format Portraits in the Wild – By Gunnar Misund
Comment posted: 07/07/2022
great article! Very informative how you go about planning a project. I've also started to get into 4x5. I was wondering how you achieved to get so good focus with your 4x5 in your slef portraits. I really struggle and haven't found a proper technique yet. Any help would be greatly appreciated.
Comment posted: 07/07/2022