The purpose of this post is to get the reader a full picture on The Zone System explaining step by step the way it works. Since most tutorials I have come across with were too short or the authors explained for themselves how the zone system works I decided to continuously explain each action taken, so every choice is followed by a logical explanation.
The Zone System is the method for getting the most detail in both shadows and highlights.
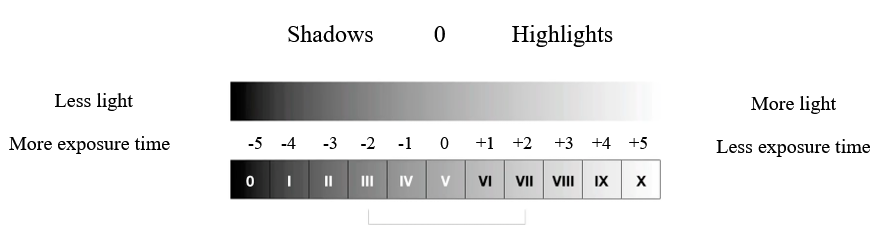
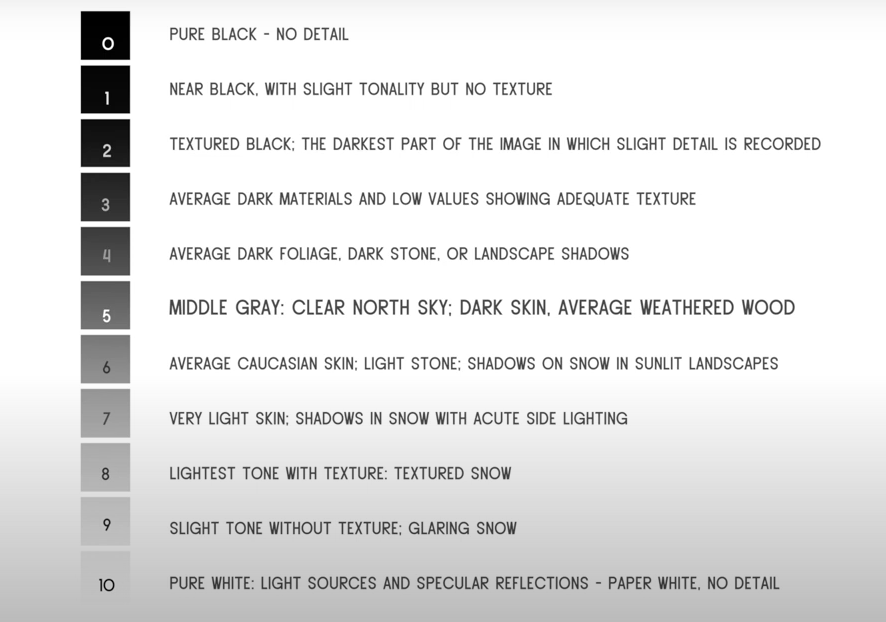
Zone System – as defined by Ansel Adams and Fred Archer – consists of 10 zones numbered from 0 to X, 0 corresponding to pure black, X corresponding to pure white. Zone V corresponds to middle gray.
Since I want lots of detail in both shadows and highlights, Zone 0, Zone I, and Zone X have to be excluded. Some professionals consider that only Zone II to Zone VIII should be taken into account for the best results when possible. Keep in mind that each zone is 1 stop difference from the precedent – Fig. 1 and 2.
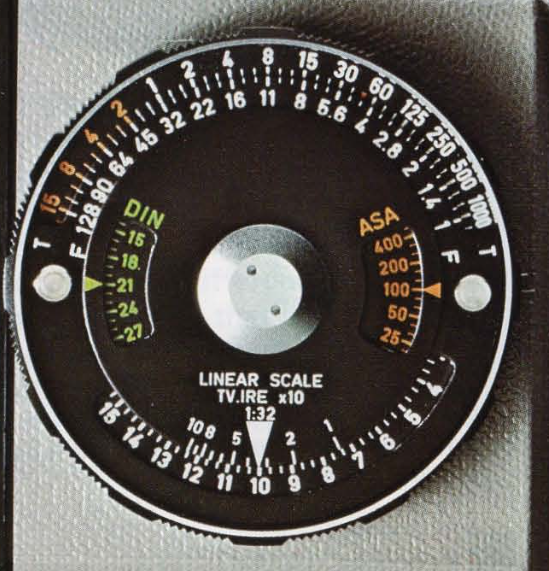
Any exposure you measure with any spotmeter will show the exposure for the middle gray (18%) which is Zone V. For this experiment I used an Asahi Pentax Spotmeter V capable of accurate metering and contrast balance at a considerable separation from the subject (reflective mode). Its metering angle of 1° is equivalent to the field of vision of a 35mm SLR with a super-telephoto lens of 2000mm and therefore, only the spots of interest can be measured with a high degree accuracy.
The spotmeter technical specifications are:
- silicon photo diode (SPD), EV1 -19, ASA 6-6400 / DIN 9-39
- aperture f1-f128, shutter speeds 1/4000 sec. – 4 mins.
- scales are marked in 1/3rd f-stop increments.
- Operating range is from about 1.5m to infinity – fixed focal length.
- Focusing to about 1m is possible by screwing the eyepiece out as far as it will go.
If I spot-meter on a shadow area the whole picture will be overexposed and the highlight info is lost. If I spot-meter on a highlight area the whole picture will be underexposed and the shadow info is lost.
Below I followed the Ryan Park’s procedure for the zone assignments:
- I determined the parts of the scene that comprised the darkest shadows / darkest spot and brightest highlights / brightest spot that I want to see a detail in. Everything darker or brighter than this will show up as black or white.
- I took the EV reading of both the darkest shadows that should still have some detail and the lightest highlights and I subtracted EV shadows from the EV highlights obtaining the stops in between them.
- Based on a description of the Adams’ zones – Fig. 2 – I decided that the metered darkest shadow area to belong to Zone Il – textured black (slight detail) – since Zone 0 – pure black and Zone I – near black show no detail respectively no texture.
- Zone X showing no detail has to be avoided.
- I found the corresponding exposure time for Zone V by arranging all the 4 readings according to description given by Ansel Adams – Fig. 2.
- Again, the zones I wanted to work with were Zone II to Zone VIII / Zone IX.
Therefore, I measured the exposure in 4 different spots:
- one spot in the shadow area – the darkest spot
- one spot in the highlight area – the brightest spot (the sky)
- one subject 1 (the main subject) another subject
- subject 2 (the mid ground or any other subject)
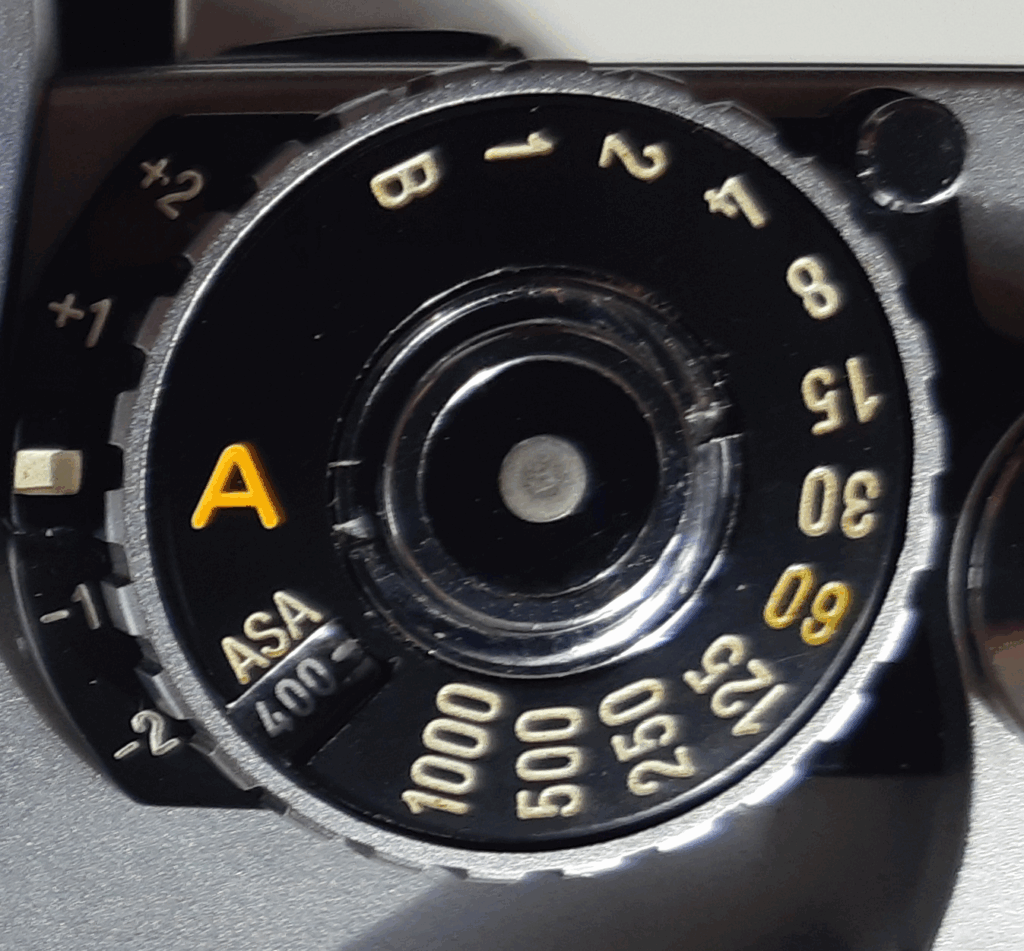
Each exposure value EV measured with the Asahi Pentax Spotmeter V at 100 ASA and f/8 can be correlated with its exposure time using the dial – Fig. 4
Note: in the following illustrations, DEV = DeltaEV = Difference between EV values.
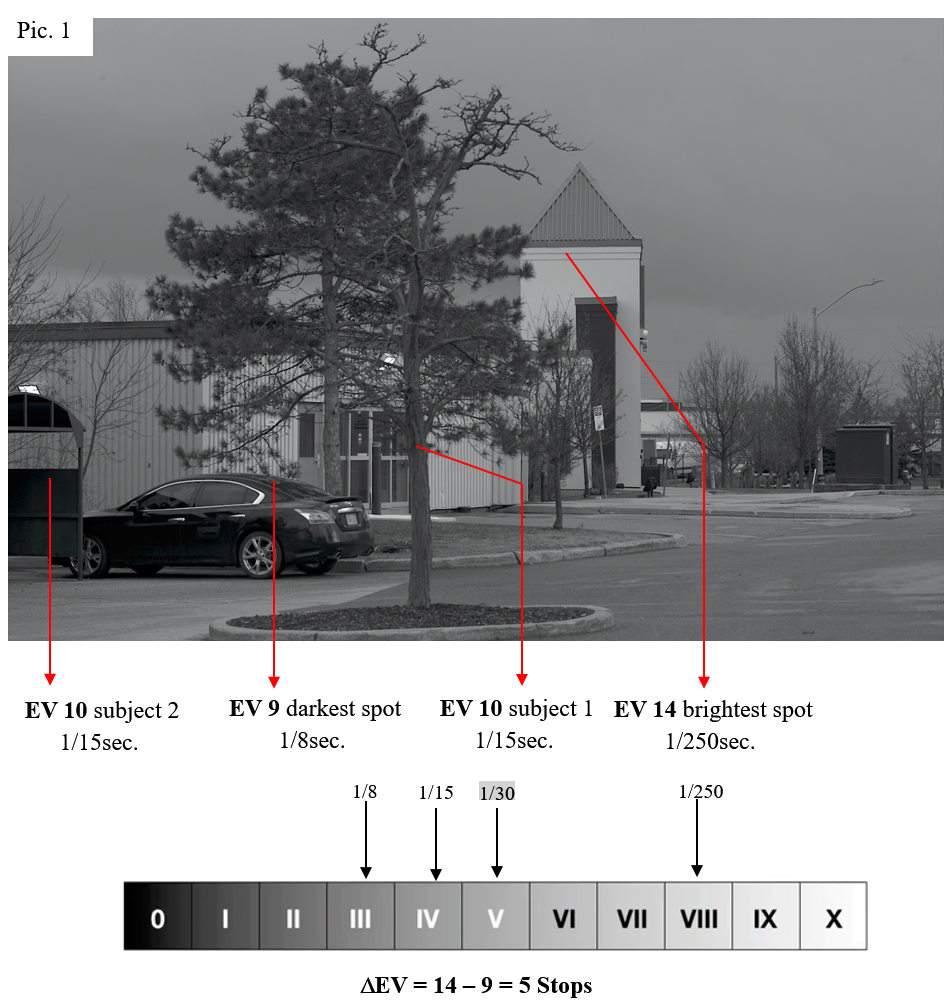
1st Assignment Pic. 1 – 100 ASA at f 8
If the darkest spot EV9 1/8 sec. is assigned to Zone III, the brightest spot EV14, 1/250 sec. is assigned to Zone VIII since DEV = 5Stops, subject 2 EV10, 1/15 sec. is assigned to Zone IV along with subject 1 EV10, 1/15 sec. then, the exposure time for Zone V is 1/30 sec. The reason I placed the dark spot EV9, 1/8 sec. in Zone III is that of getting more detail in shadow than in Zone II. Below I explain why.
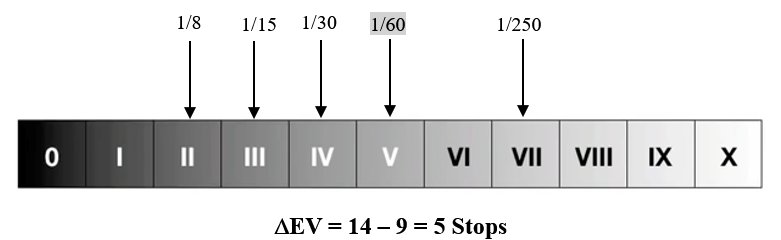
2nd Assignment Pic. 1 – 100 ASA at f 8
If the darkest spot EV9, 1/8 sec. is assigned to Zone II, the brightest spot EV14, 1/250 sec. is assigned to Zone VII since DEV = 5Stops, subject 2 EV10, 1/15 sec. is assigned to Zone III along subject 1 EV10, 1/15 sec. now, the exposure time for Zone V is 1/60 sec. The reason I placed the dark spot EV9, 1/8 sec. in Zone III is that of getting more detail in shadow. Placing the darkest spot EV9, 1/8 sec. in Zone II, the exposure time for Zone V would be 1/60sec. instead of 1/30sec. which means less light, less detail in shadow.
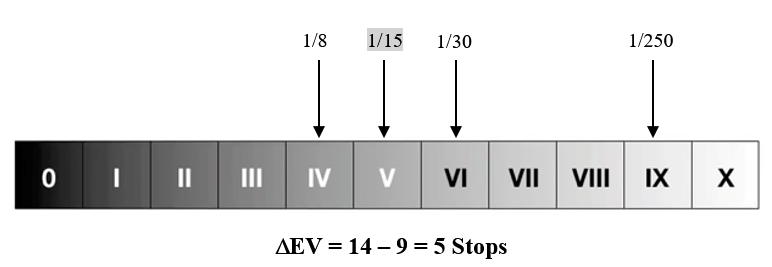
3rd Assignment Pic.1 – 100 ASA at f 8
According to Bruce Barnbaum, shadows should be placed in Zone IV since Zone IV is not located on the toe but on the “straight-line” portion of the HD curve. Pic. 1 If the darkest spot EV9, 1/8 sec. is assigned to Zone IV, the brightest spot EV14, 1/250 sec. is assigned to Zone IX since DEV = 5Stops, subject 2 EV10, 1/15 sec. is assigned to Zone V along with subject 1 EV10, 1/15 sec. then, the exposure time for Zone V is 1/15 sec. Placing the darkest spot EV9, 1/8 sec. in Zone IV, the exposure time for Zone V would be 1/15sec. instead of 1/60sec. or 1/30sec. which means more light of the two therefore, more detail in shadow.
Final choice: I have to now decide which assignment should I follow:
2nd Assignment should be excluded since Zone II records slight detail. If I decide for 3rd Assignment with overexposed highlights (in Zone IX), 1st Assignment falls in what is wide accepted, but I think that Bruce Barnbaum (placing shadows in Zone IV) and Craig Pindell (placing shadows on Zone III1/2) should be listened. Here, the advantage of working with sheet film is evident.
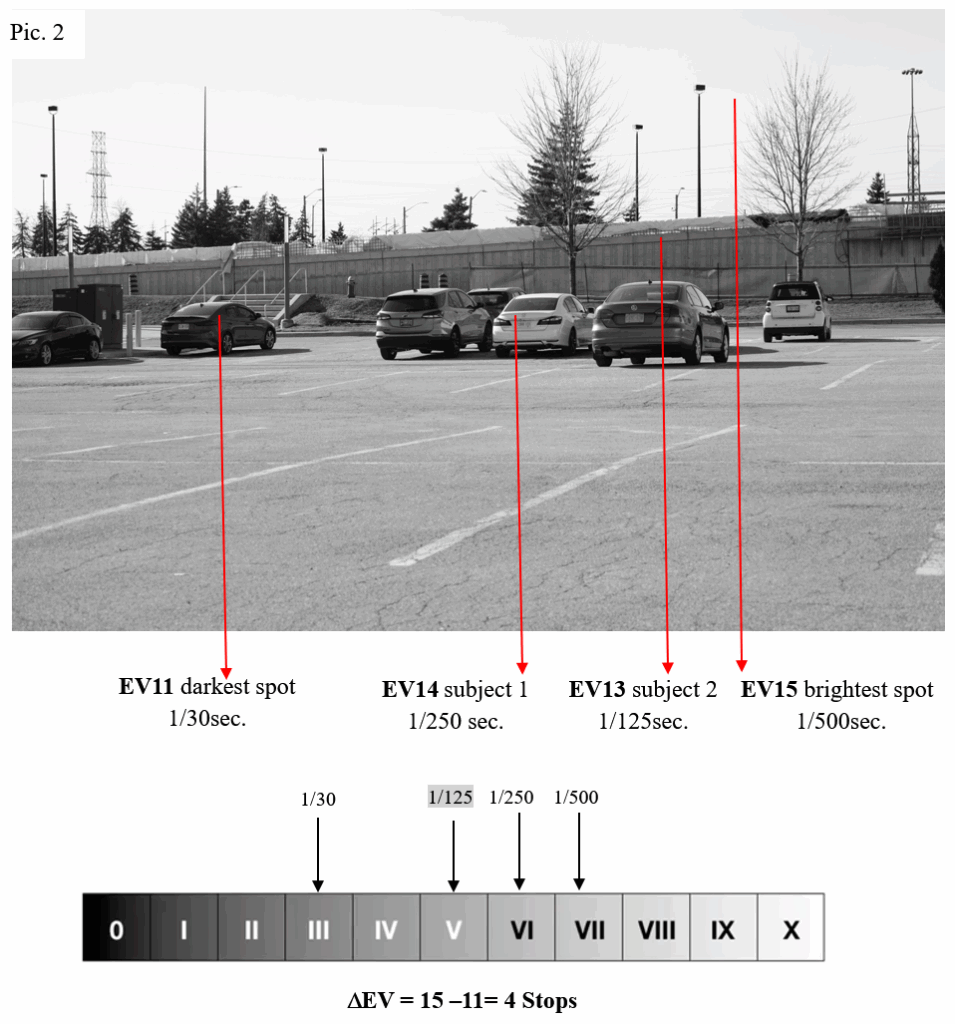
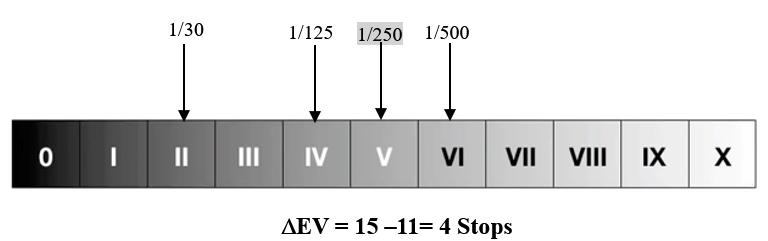
1st Assignment Pic. 2 –100 ASA at f 8
If the darkest spot EV11, 1/30 sec. is assigned to Zone III since it has adequate texture, the brightest spot EV15, 1/500 sec. is assigned to Zone VII, – according to DEV = 4Stops. The subject 1 EV14, 1/250 sec. is assigned to Zone VI, and subject 2 EV13, 1/125 sec. is assigned to Zone V, then the exposure time for Zone V is 1/125 sec. If I assign the darkest spot EV11, 1/30 sec. to Zone II then the exposure time for the ZONE V will decrease accordingly which means less detail in shadows. Below the detailed explanation follows.
2nd Assignment Pic. 2 – 100 ASA at f 8
If the darkest spot EV11, 1/30 sec. is assigned to Zone II, the brightest spot EV15, 1/500 sec. is assigned to Zone VI since DEV = 4Stops, subject 1 EV14, 1/250 sec. is assigned to Zone V, and subject 2 EV13, 1/125 sec. is assigned to Zone IV then, the exposure time for Zone V is now 1/250 sec. Placing the darkest spot EV9, 1/30 sec. in Zone II, the exposure time for Zone V would be 1/250sec. instead of 1/125sec. which means less light, less detail in shadow. If I want more detail in shadows, I have to assign the darkest spot to Zone IV. According to Bruce Barnbaum shadows should be placed in Zone IV since Zone IV is located on the “straight-line” portion of the HD curve which shows a better separation of the details.
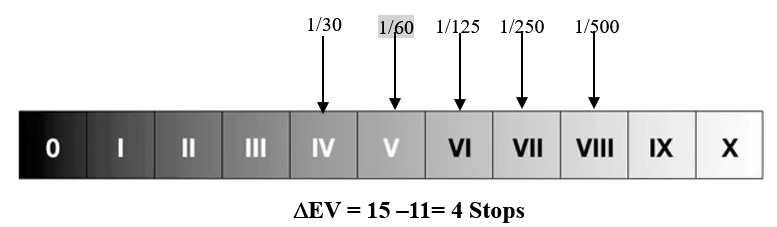
3rd Assignment Pic. 2 – 100 ASA at f 8
If the darkest spot EV11, 1/30 sec. is assigned to Zone IV, the brightest spot EV15, 1/500 sec. is assigned to Zone VIII since the DEV = 4Stops, subject 1 EV14, 1/250 sec. is assigned to Zone VII, and subject 2 EV13, 1/125 sec. is assigned to Zone VI, then the exposure time for Zone V is 1/60 sec. Therefore, this is the preferred choice assignment since now Zone V gets a 1/60 sec. exposure time which is the longest exposure time therefore, more light for the shadows means more detail comparing it to 1/125 sec. – 1st choice and to 1/250 sec. – 2nd choice.
Final choice: I have now to decide which assignment should I follow:
2nd Assignment should be excluded since Zone II records slight detail. Both 1st Assignment and 3rd Assignment are OK. Personally, I would opt for the 3rd Assignment since I follow Craig Pindell and Bruce Barnbaum advice – shadows are to be placed in Zone III1/2 or Zone IV.
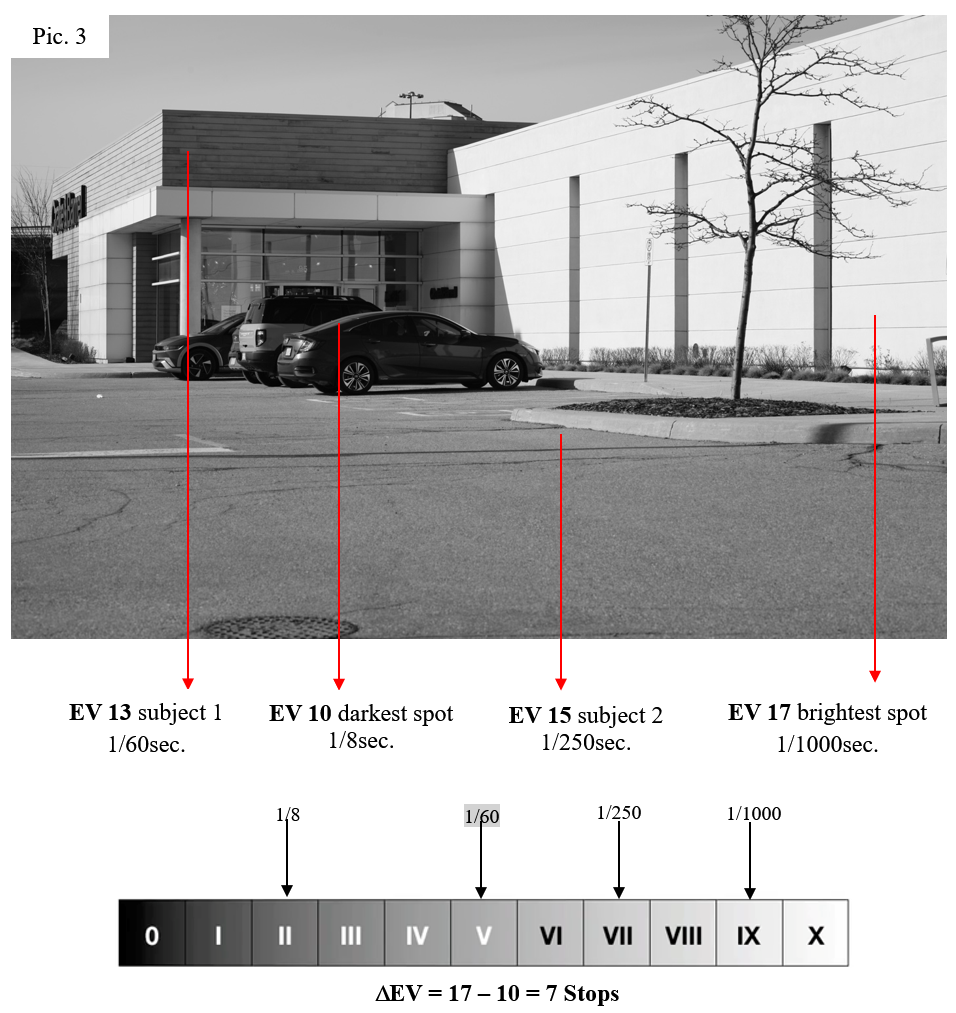
1st Assignment Pic. 3 – 100 ASA at f 8
If the darkest spot EV10, 1/8 sec. is assigned to Zone II since it has slight tonality then, the brightest spot EV17, 1/1000 sec. is assigned to Zone IX since it has no texture and DEV=7Stops. Subject 1 EV13, 1/60 sec. is assigned to Zone V, and subject 2 EV15, 1/250 sec. is assigned to Zone VII then, the exposure time for Zone V is 1/60 sec. If I place the dark spot EV10, 1/8 sec. to Zone III, I will get more detail on shadows because the exposure time for Zone V will increase accordingly to 1/30sec. Explanation follows below.
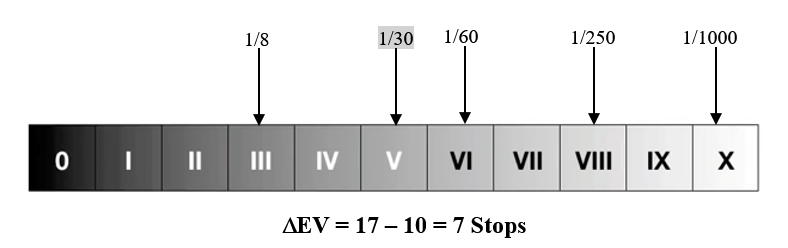
2nd Assignment Pic. 3 – 100 ASA at f 8
If the darkest spot EV10, 1/8 sec. is assigned to Zone III, the brightest spot EV17, 1/1000 sec. is assigned to Zone X i.e. pure white according to DEV = 7 Stops. Subject 1 EV13, 1/60 sec. is assigned to Zone VI, and subject 2 EV15, 1/250 sec. is assigned to Zone VIII then, the exposure time for Zone V is 1/60 sec. If I place the dark spot EV10, 1/8 sec. to Zone III, I will get more detail on shadows because the exposure time for Zone V is now 1/30sec. Because the separation DEV = 7Stops is to be kept the same, the brightest spot EV17, 1/1000 sec. is now placed on Zone X which is pure white and it is mandatory to be excluded since it is featureless. Since I want to place the highlights in Zone VIII an underdevelopment should be applied which means less development time i.e. a -2 development.
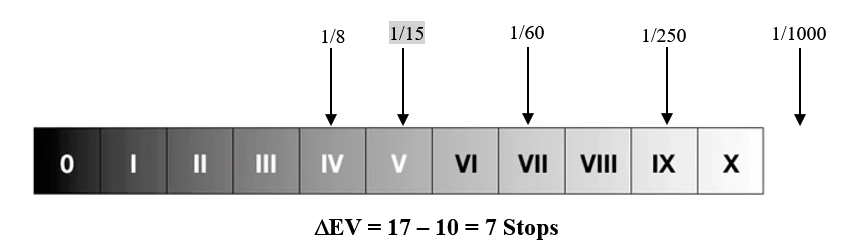
3rd Assignment Pic. 3 – 100 ASA at f 8
If the darkest spot EV10, 1/8 sec. is assigned to Zone IV since I need detail in shadows, the brightest spot EV17, 1/1000 sec. would be assigned to Zone XI which does not exist being located in a totally pure white -blown out area. EV13, 1/60 sec. is assigned to Zone VII, and subject 2 EV15, 1/500 sec. is assigned to Zone IX then, the exposure time for Zone V is 1/15 sec. In order to get detail in highlight I have to apply a less development time i.e. a -3 development.
Final choice: I have now to decide which assignment should I follow:
Both 1st Assignment and 2nd Assignment are to be excluded since I want maximum detail in shadows. Personally, I would opt for the 3rd Assignment with a – 3 development correction since I follow Craig Pindell and Bruce Barnbaum advice – shadows are to be placed in Zone III1/2 or Zone IV.
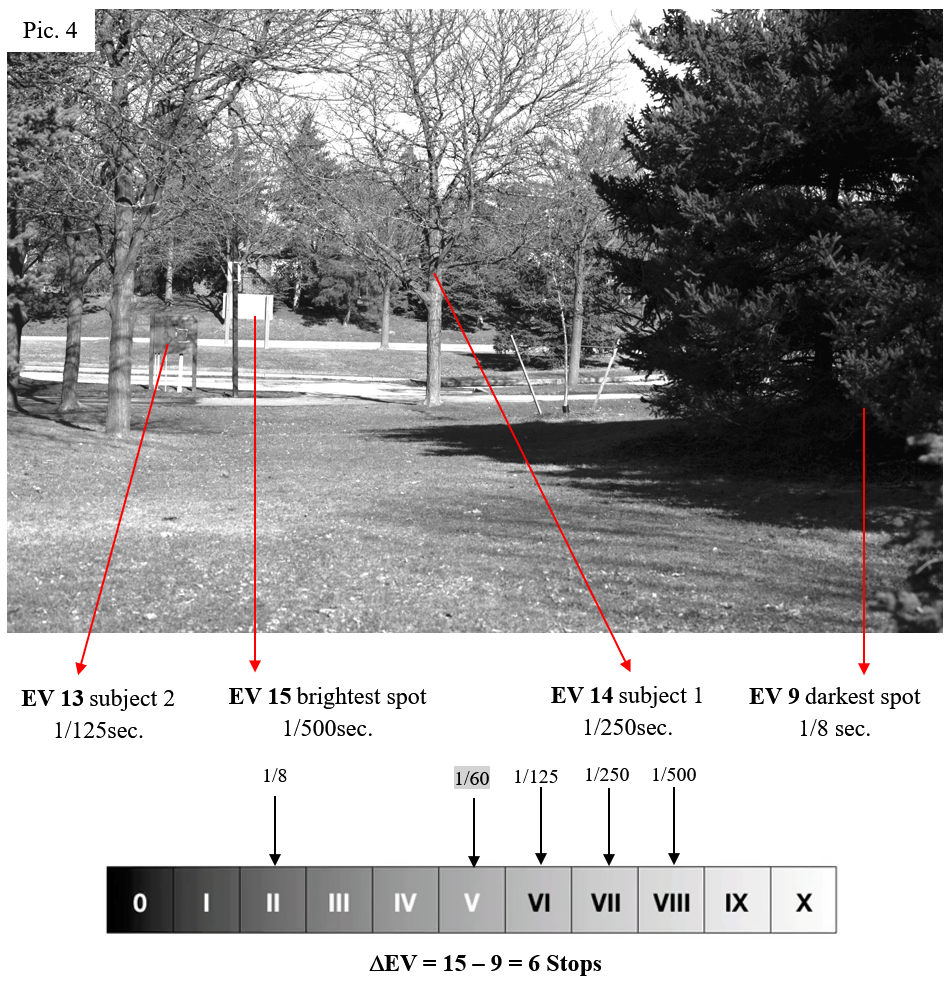
1st Assignment Pic. 4 – 100 ASA at f 8
If the darkest spot EV9, 1/8 sec. is assigned to Zone II since it has slight detail, the brightest spot EV15, 1/500 sec. is assigned to Zone VIII – light grey objects and texture – taking into account the separation in between the dark spot and the brightest spot is DEV=6Stops. Subject 2 EV13, 1/125 sec. is assigned to Zone VI, and subject 1 EV14, 1/250 sec. is assigned to Zone VII, then the exposure time for Zone V is 1/60 sec. Moving the darkest spot EV9, 1/8 sec. to Zone III would allow an exposure time of 1/30 sec. for the Zone V which means more light. Now the brightest spot would move to Zone IX a zone with no texture that should be avoided. Craig Pindell recommends placing shadows in Zone III1/2 and Bruce Barnbaum recommends placing shadows in landscape photography in Zone IV therefore, due to the 6Stop difference between the darkest spot and the brightest spot the latter will be placed in Zone X which is pure white. Below I explain the steps I follow.
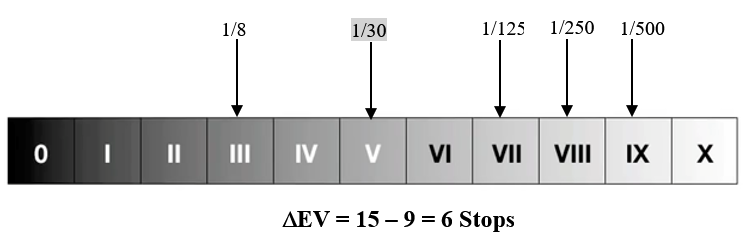
2nd Assignment Pic. 4 – 100 ASA at f 8
If the darkest spot EV9, 1/8 sec. is assigned to Zone III since it has adequate texture, the brightest spot EV15, 1/500 sec. is assigned to Zone IX – light grey objects and texture – taking into account the separation in between the dark spot and the brightest spot is DEV= 6Stops. Subject 2 EV13, 1/125 sec. is assigned to Zone VI, and subject 1 EV14, 1/250 sec. is assigned to Zone VII, then the exposure time for Zone V is 1/30 sec. Moving the darkest spot EV9, 1/8 sec. to Zone III would allow an exposure time of 1/30 sec. for the Zone V which means more light. As the brightest is now assigned to Zone IX which means slight tone without texture, and in order avoid overexposed highlights i.e. Zone IX, I have to place highlights in Zone VIII therefore an underdevelopment should be applied which means less development time i.e. a -1 development.
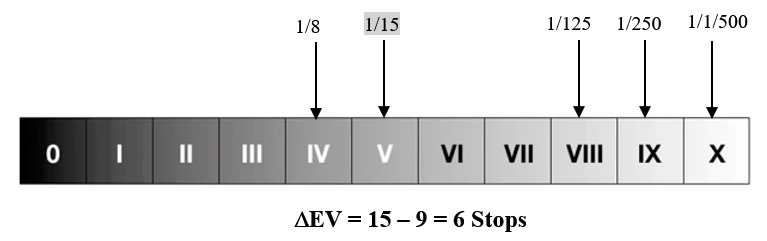
3rd Assignment Pic. 4 – 100 ASA at f 8
If the darkest spot EV9, 1/8 sec. is assigned to Zone IV since the brightest spot EV15, 1/500 sec. is assigned to Zone X i.e. pure white with no detail, taking into account the separation in between the dark spot and the brightest spot is DEV=6Stops. Subject 2 EV13, 1/125 sec. is assigned to Zone VII, and subject 1 EV14, 1/250 sec. is assigned to Zone VIII, then the exposure time for Zone V is 1/15 sec. In order to avoid overexposed highlights i.e. Zone X, I have to place highlights in Zone VIII then, an underdevelopment should be applied which means less time i.e. a -2 development.
Final choice: I have now to decide which assignment should I follow:
1st Assignment should be excluded since Zone II records slight detail. Both 2nd Assignment and 3rd Assignment are OK. Personally, I would opt for the 3rd Assignment since I follow Craig Pindell and Bruce Barnbaum advice – shadows are to be placed in Zone III1/2 or Zone IV.
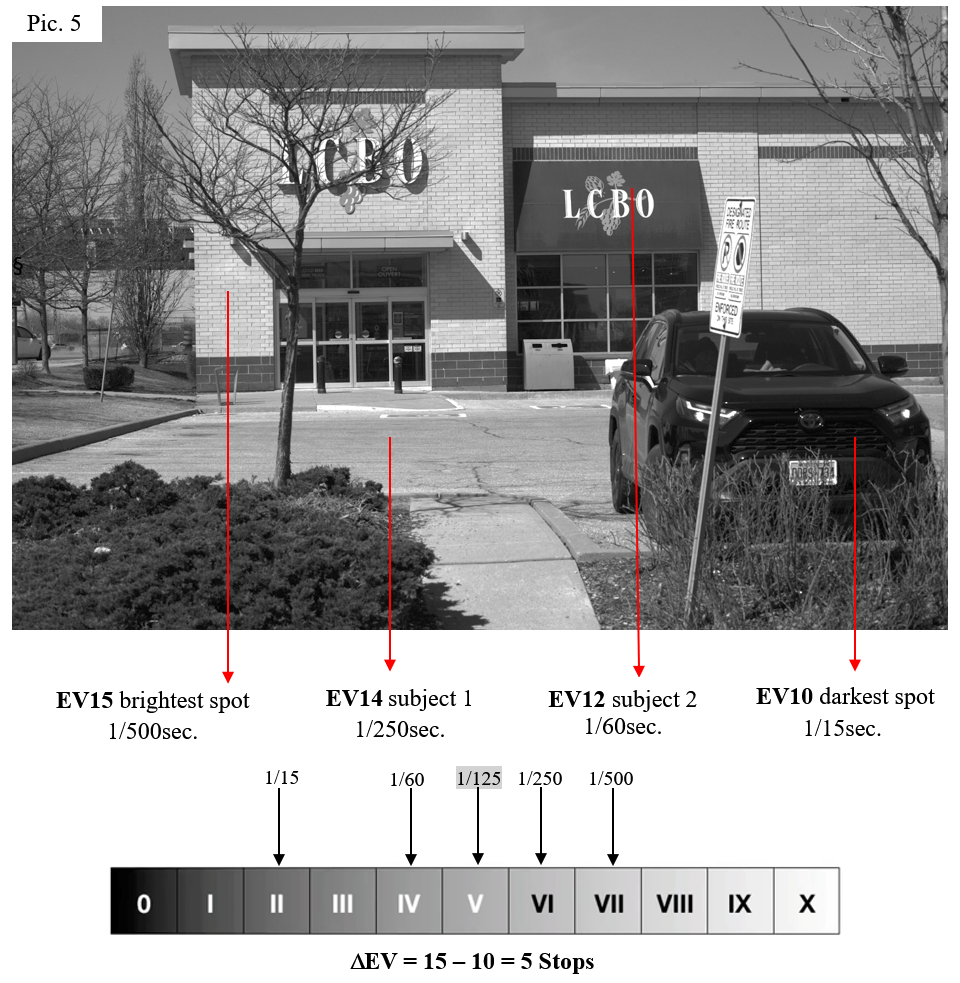
1st Assignment Pic. 5 – 100 ASA at f 8
If the darkest spot EV10, 1/15 sec. is assigned to Zone II – textured black – then, the brightest spot EV15, 1/500 sec. is assigned to Zone VII i.e. light grey objects and texture, taking into account the separation in between the darkest spot and the brightest spot is DEV=5Stops. Subject 2 EV12, 1/60 sec. is assigned to Zone IV, and subject 1 EV14, 1/250 sec. is assigned to Zone VI, then the exposure time for Zone V is 1/125 sec.
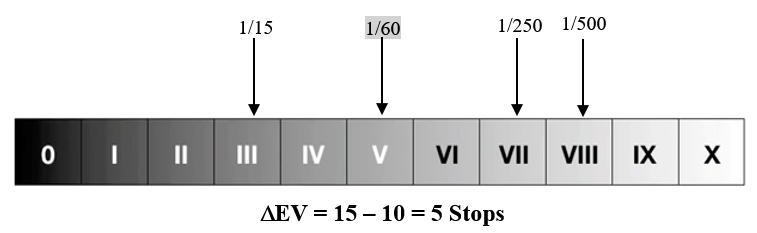
2nd Assignment Pic. 5 – 100 ASA at f 8
If I place the darkest spot EV10, 1/15 sec. in Zone III then, the brightest spot EV15, 1/500 sec. goes to Zone VIII since DEV=5Stops. Subject 2 EV12, 1/60 sec. is assigned to Zone V, and subject 1 EV14, 1/250 sec. is assigned to Zone VII then, the exposure for the Zone V is now 1/60sec. i.e. more detail in shadows comparing to 1/125sec. Placing shadows in Zone III means more detail since 1/60 sec. > 1/125 sec.
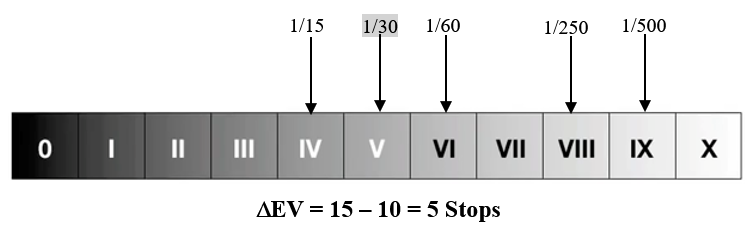
3rd Assignment Pic. 5 – 100 ASA at f 8
If the darkest spot EV10, 1/15 sec. is assigned to Zone IV then, the brightest spot EV15, 1/500 sec. is assigned to Zone IX and taking into account the separation in between the darkest spot and the brightest spot is DEV=5Stops. Subject 2 EV12, 1/60 sec. is assigned to Zone VI, and subject 1 EV14, 1/250 sec. is assigned to Zone VIII, then, the exposure time for Zone V is 1/30 sec. As the brightest spot is now assigned to Zone IX which means slight tone without texture, and in order avoid overexposed highlights i.e. Zone IX, I have to place highlights in Zone VIII therefore an underdevelopment should be applied which means less development time i.e. a -1 development.
Final choice: I have now to decide which assignment should I follow:
1st Assignment should be excluded since Zone II records slight detail. Both 2nd Assignment and 3rd Assignment are OK. Personally, I would opt for the 3rd Assignment since I want more detail in shadows I follow Craig Pindell and Bruce Barnbaum advice – shadows are to be placed in Zone III1/2 or Zone IV.
Summary
- Evaluating a scene using a spotmeter which works in reflected mode is mandatory. Maximum details in shadows are always sought. Details in highlights can be mastered during development. In landscape photography the detail is even more important in both shadows and highlights.
- Any spotmeter assigns all the exposure time values to middle gray i.e. Zone V so this is why one has to mandatory take the picture at the exposure time given for Zone V even though this exposure time is not among the exposure time values one measures.
- Assignments to Zone 0, Zone I, and Zone X should be excluded.
- I always start with the assignment of the darkest point. DEV = EVhighlights – EVshadows is a constant and should always be kept constant. DEV gives the position of highlights that depends on the position of shadows.
- Maximum detail in shadows can be obtained by placing shadows in Zone III ½ (Craig Pindell) or Zone IV (Bruce Barnbaum)
- The zone system was developed for sheet film so for small format is sometimes difficult.
- I always keep in mind that I want to get the most detail in shadows since with the highlights I can play with during developing.
Conclusion
I am here quoting Craig Pindell the fine art photographer whom I appreciate the most:
One thing I found helpful when I was trying to learn, and understand, the Zone system is the axiom “Expose for the shadows, Develop for the highlights.” I see many people trying to find a way to expose the film to find a happy medium between shadow exposure detail and highlight detail, and they end up disappointed on both counts.
The exposure may prioritize the shadows, and then film development should be altered to place the highlight on the desired Zone. This is the way the system was designed and how it performs best.
It should be remembered, however, that most film will actually record up to @Zone XV. While photographic paper will not print this extreme range, digital scanning can be adjusted to be able to make a digital print with these values, and many photographers no longer make silver prints, so digital output is their concern. For these photographers, the most critical application of the Zone system is to properly meter and expose for the shadows, and let the rest of the scene fall where it may.
Acknowledgement
I am extremely grateful to Craig Pindell who read the manuscript. He gives us the most concise way the Zone System works.
You can find Craig’s work on his Blog
References:
[1] Ted Forbes, The Zone System Explained – youtube.com
[2] Ryan Park, How to Measure Exposure for Film Photography – The Zone System (Ansel Adams) – youtube.com
[3] Bruce Barnbaum, Placing shadows on Zone IV – youtube.com
[4] Pentax Spotmeter V, ASAHI OPTICAL CO., LTD. C.P.G. 895, Tokyo 100-91, JAPAN
[5] Craig Pindell, Photographic Light Meters and Metering for Success
[6] Craig Pindell, The Zone System for Small Format
[7] Craig Pindell correspondence with the author
Share this post:


Comments
Andrew on Assignment of Exposures using Ansel Adams’ Zone System
Comment posted: 19/10/2025
I’m sorry- that probably makes me a bit of a traitor!
In my defence though, I mostly use old lenses on my modern digital bodies. Nothing beats my old Takumar 28mm f3.5 or my old Yashinon 135mm f2.8 or 50mm f1.7- all 3 are fantastic on a Sony A7….
Comment posted: 19/10/2025
Marco Andrés on Assignment of Exposures using Ansel Adams’ Zone System
Comment posted: 19/10/2025
When encountering the Zone System years ago, formed the opinion that it was unnecessarily complex. Now with the luxury of time, have determined that it was developed for a specific use – for view-cameras with sheet film, emulsions and reflective light meters that Ansel Adams used and for the « scenes », primarily landscapes.
Adams favoured emulsions that could achieve the high contrast and tonal range he wanted [Super XX, discontinued in 1992 - see curve in https://www.photrio.com/forum/threads/kodak-super-xx.201293/].
As for placing, the zones of interest range from the entire range [0 to 10], dynamic range [1 - 9] and the tonal range [zones with texture – 2 to 8. The question becomes where to place the zones in the scene. It depends on the intent. That’s when it becomes murky.
Then there is a difference between the negative and the « print ». The negative definitely has a wider dynamic range than the « print ». Presumably Adams wanted to maximise the amount of information in the negative [dynamic range} to enable him to create a print with the desired tonal range.
For « street » the Zone system is impractical. It is even impractical for portraiture where incident readings are favoured.
Finally, photography is both an art and a science.
Comment posted: 19/10/2025
Geoff Chaplin on Assignment of Exposures using Ansel Adams’ Zone System
Comment posted: 20/10/2025
Looking at the printing stage photographic paper can show around 7-8 stops, digital monitors probably morre. Going beyond this results start to become unnatural (though maybe interesting or useful)
Again as Andrew says digital has changed the game. Is 'the fine print' the goal nowadays?
Comment posted: 20/10/2025
Marcus Gunaratnam on Assignment of Exposures using Ansel Adams’ Zone System
Comment posted: 20/10/2025
Comment posted: 20/10/2025
Jeffery Luhn on Assignment of Exposures using Ansel Adams’ Zone System
Comment posted: 20/10/2025
I admire your commitment to the zone system. That was quite an article. Really good work.
I was a devotee to the ZS and used it for sheet film work in the field, but found it unnecessary for studio work where I could control the scene brightness range. It did have value when shooting color film, especially transparency films with narrow latitude. Of course push and pull of color films isn't possible, so the only value of the ZS is to place the important highlights into a reasonable zone and let the shadows go dark, or even black. That's more previsualization than zone system.
I taught the ZS at several colleges back in the 1980s, but only 5% of students could develop a working knowledge of such a complex system. It's a lot of work from start to finish, including the printing aspect. Of course it's not feasible for roll film unless you're going to devote a whole roll to similarly lit scenes, or cut the film into sections and develop them at different times. With this in mind, I chose to teach a simplified system that involved overexposure and under exposure of no more than three stops in either direction. It also involved using compensating developers with weak concentrations and long developing times when decreased contrast is required. I didn't develop this system myself. I learned it from Ansel Adams. Not in a book or a lecture hall, but face to face in a week long workshop in Yosemite Valley in 1974. It was rare for him to do a workshop because he had issues with gout, so I was lucky to be in one of his last ones in Yosemite.
It may be hard for us to accept Ansel espousing anything but the strict zone system, but he had realized that most people could not read and memorize the detailed approach written in his books, The Camera, The Negative and The Print. So as the group of students walked around Yosemite Valley visiting some of Ansel's favorite places, he'd look at the scenes, squint, and say something like, "This is a contrasty scene. I'd expose for the shadows and develop for the highlights. Take an incident reading and bracket, starting by overexposing by three stops. Don't bother shooting any underexposures. Pull your processing by 30%"
That was it. He would often refer to his painstaking approach to taking his iconic photographs in high contrast scenes, but didn't ever go into detail. It was more of a nostalgia thing. He was tired of seeing 'people's eyes glaze over.' That's how he put it. I don't blame him. It's so much work teaching people a system in a few meetings that took him decades to fully master and document. Just being around him was memorable.
These days I follow that approach with my black and white. Staying in that three-stop framework and using Pyro PMK, Rodinal 1:50, or HC-110 at 1:64 with minimum agitation, I never have a negative I can't print. Sure I have to burn and dodge, but so did Ansel. Of course none of this applies to digital cameras because using the high dynamic range feature makes no scene out of range.
In closing, I'd say the zone system is just for a tiny percentage of dedicated film enthusiasts. It's like studying the care and feeding of horses to get your drivers license. But I certainly appreciate Cristian presenting the system and keeping the flame burning.
Comment posted: 20/10/2025
Comment posted: 20/10/2025
Ibraar Hussain on Assignment of Exposures using Ansel Adams’ Zone System
Comment posted: 20/10/2025
I use the zone system - for my own aesthetic I am always keen to have everything from 0 to X in my photos
Comment posted: 20/10/2025
Comment posted: 20/10/2025
Tim Bradshaw on Assignment of Exposures using Ansel Adams’ Zone System
Comment posted: 20/10/2025
Comment posted: 20/10/2025