For me, the print has always been the goal of photography. A few years ago I discovered alternative process printing and, after trying a handful of historical processes, settled on cyanotype. My cyanotypes have been shown in galleries and have been accepted by many juried competitions. While I never tired of making “blue prints,” I gradually began to miss color. Can color be added to cyanotype? Toning would seem to be an option, but toning merely replaces blue with a shade of brown or black. I wanted real color. But I’m getting ahead of myself.
The cyanotype process
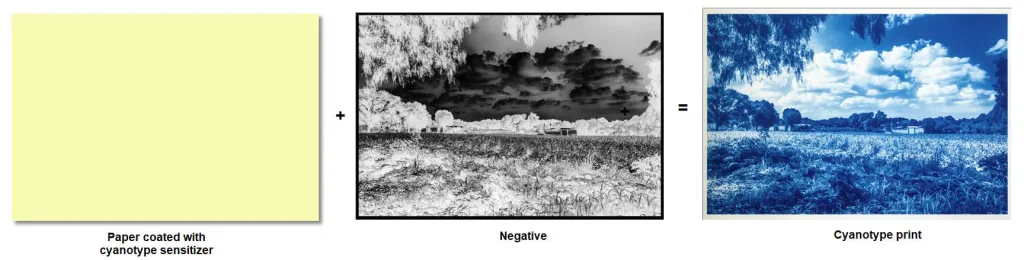
For readers who may be unfamiliar with cyanotype, here’s a short introduction. The process was invented in 1842 by the English scientist Sir John Herschel. Paper is coated with organic salts of iron that are sensitive to ultraviolet light. The sensitized paper is overlaid with a negative, placed in a contact print frame, and exposed to a UV light source. During exposure, the print develops a distinctive Prussian blue color in proportion to the amount of exposure received (see Figure 1).
While analog negatives can be used, modern cyanotypes are just as often made with digital negatives. You can make a digital negative from either a film scan or a digital photo. Simply open the image in Photoshop, convert it to black and white, invert it, and print it on an inkjet transparency film like Pictorico or Fixxons. I print my digital negatives on Pictorico using an Epson P400 printer.
Cyanotype is a so-called “printing out” process. This means that the image appears during exposure. Wet processing serves only to clear the unexposed sensitizer, with no chemical developer required. Cyanotype is the simplest alternative printing process. It is often said of cyanotype that “it takes minutes to learn but a lifetime to master.”
Cyanotype is the only alternative process that prints with a “real” color and not some shade of black or brown. Which leads me back to the subject of this article: coloring cyanotypes. I thought: Wouldn’t it be great if I could add some color to my cyanotype prints? Perhaps increase color contrast by adding complementary colors like red, and orange? Or increase color harmony by adding analogous colors like yellow and green?
Hand-coloring cyanotype prints with color pencils
My first idea was to try hand-coloring cyanotype prints with color pencils. Unfortunately the areas of a cyanotype print that I would have liked to color were often already blue, and coloring over blue seldom gave a satisfactory result. I would show you examples of these early attempts at coloring, but they all ended up in the trash.
A breakthrough came when I read a book by photographer Laurie Klein, Hand Coloring Black and White Photography. Klein hand-colors black and white inkjet prints made from infrared photos. Infrared photos lend themselves to coloring because objects that reflect infrared light come out white in the print. For example, tree leaves come out white, allowing you to color them green.
Hand-coloring cyanotype prints made from infrared photos
I had my old Sony A6000 converted to infrared by Lifepixel. An infrared conversion entails replacing the camera’s internal cut filter (which prevents infrared light from reaching the sensor) with a filter that blocks visible light and allows infrared to pass. Once I got over the novelty of seeing the world in infrared, I got down to work on my coloring project. I took infrared digital photos, used them to make digital negatives, made cyanotype prints from the negatives, and hand-colored the prints.
Once again, I don’t have any examples of this process to show because none of them were worth keeping. My poor artistic skills were partly to blame. But as I labored, it occurred to me that color could be obtained much more easily from a duplicate color photograph of the same scene. And so I sent my Sony A6000 back to Lifepixel for a second conversion, this time to “full spectrum.” A full spectrum conversion makes the camera capable of capturing photos in either visible light or infrared, simply by switching external filters. Hamish Gill has written about full spectrum conversion elsewhere on this site.
The two-photo process
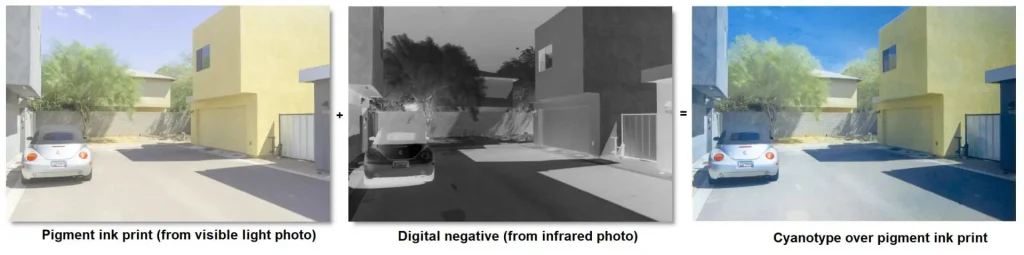
Capture now involved taking two photos from a single tripod setup, one in visible light and one in infrared. I mentioned earlier that I make my digital negatives on an Epson P400 printer. I have a second P400 that I use for making color prints. I made a color inkjet print from the color photo on one printer and a digital negative from the infrared photo on the other printer. I coated the inkjet print with cyanotype sensitizer, carefully registered the negative over the inkjet print, and exposed. The process is shown in here:
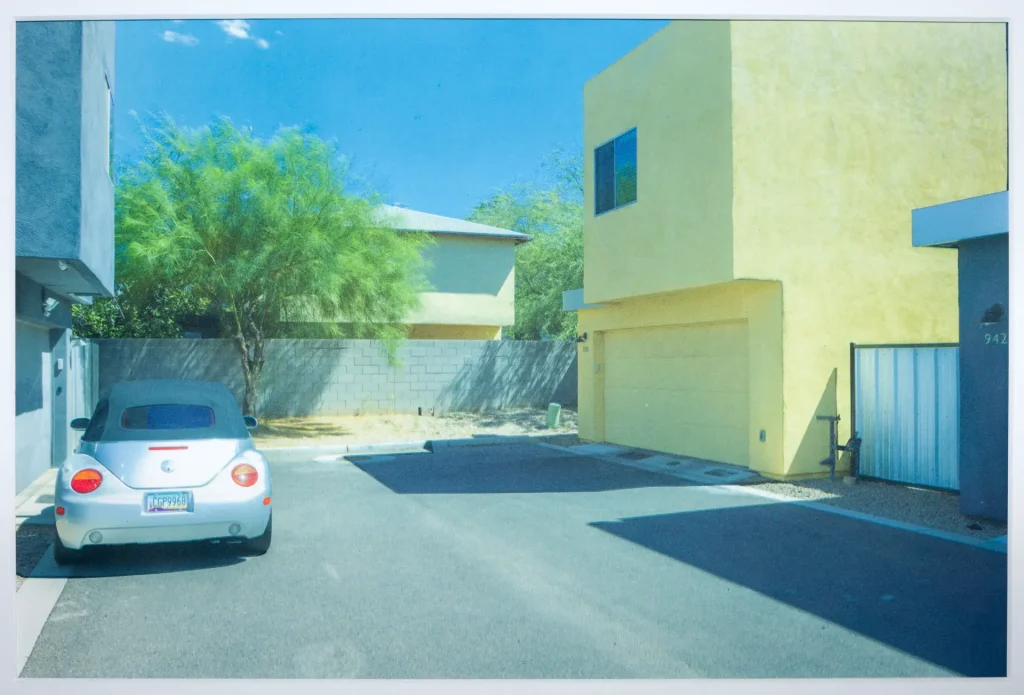
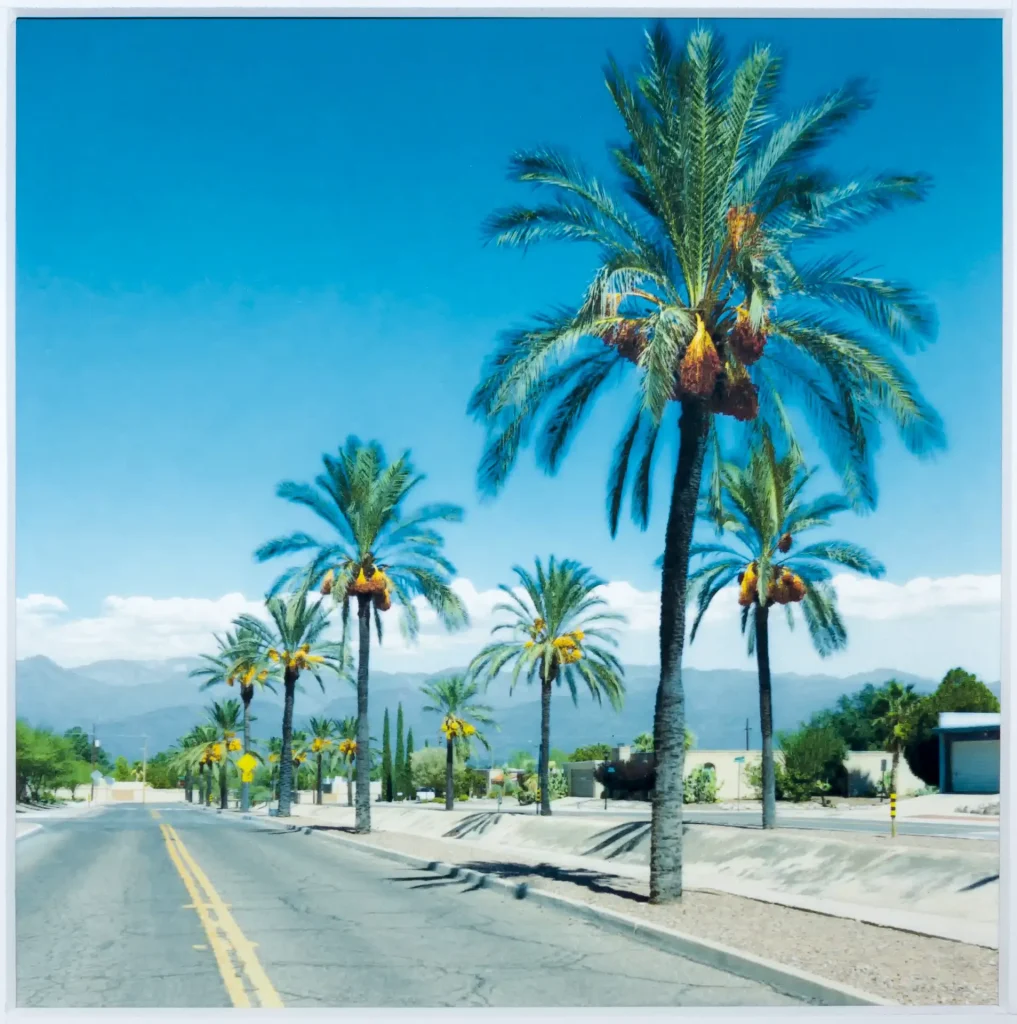
The two-photo process produced some interesting results, but capture was tedious and error-prone. In the 30 seconds or so that it took to switch filters and adjust exposure, clouds moved and tree branches waved in the wind (you can see this in the white fringe at the top of the tree at the end of the street above. This limited me to shooting static subjects under the sweltering mid-day sun, when infrared is most intense. Park Moderne is a series of architectural prints I made during the summer of 2019 at six different modern housing developments in my home town of Tucson Arizona. Here two of the prints from that series.

Why I abandoned the two-photo process
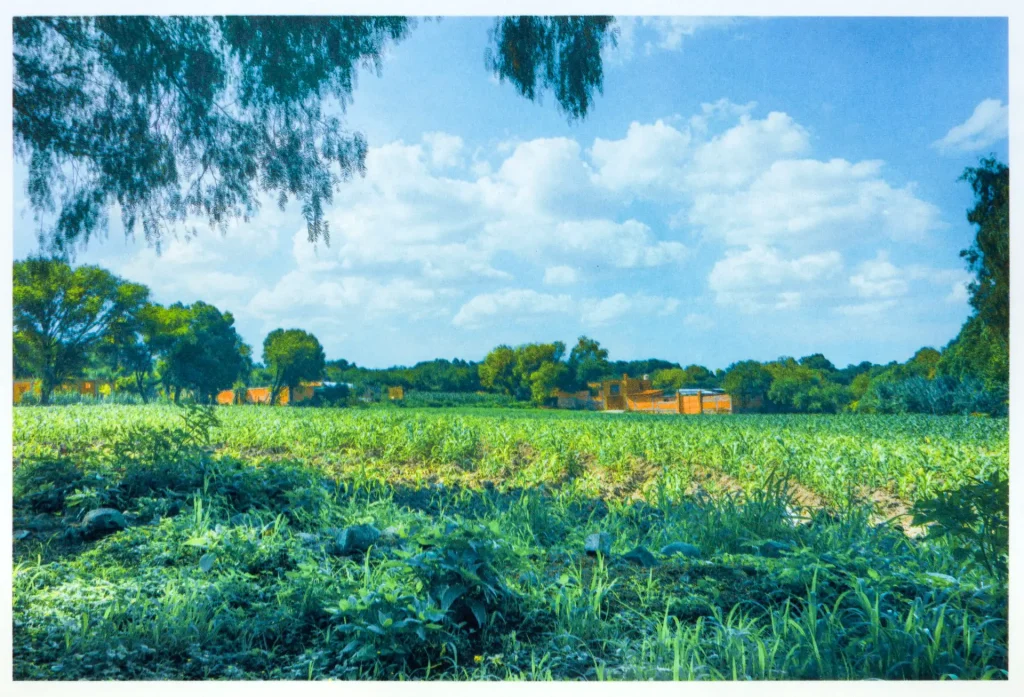
Subjects that reflect infrared come out nearly white in an infrared photo. When the image is inverted to make the negative, white becomes black and acts as a mask during exposure. The colors of subjects that are highly masked pass through the process with little if any change to their color. For example, In Figure 2, you can see that the process has barely changed the color of the tree leaves. You can see this to a somewhat lesser extent in the side of the yellow garage facing the viewer. Because it is in direct sunlight, it is heavily masked, allowing its original yellow color to pass through the process with only a slight addition of blue.
Subjects lying in shade, on the other hand, do not reflect infrared, nor do subjects that absorb infrared, such as wood, brick, stone, glass, and water. As a result, these subjects are not masked by the negative and receive a heavy dose of blue. For example, look at the shadows cast by the two buildings and the car in Figure 2. They are virtually unmasked and therefore come out deep blue in the final print.
The net effect is an overall increase in color contrast. While the resulting prints can be interesting and sometimes even beautiful, they do not always reflect my intention as an artist. With infrared, the sun controls blending. I wanted that control for myself. With control over blending, I would be able to achieve either greater color contrast or greater color harmony, depending on my mood and/or the mood suggested by the scene.
A breakthrough came when I realized that the color print and the digital negative could be derived from the same underlying digital color image. It seems like such an obvious solution today that I wonder why it took me so long to think of it. I have produced all of my recent prints using this process.
The single-photo process
Here is an outline of the single-photo process: I take a normal (not infrared) digital color photo. I open the image in Photoshop and make some relatively simple color adjustments: I lighten the image by about 50%, boost the saturation of colors that I want to emphasize and desaturate undesirable colors such as blues (I want all blues to be shades of Prussian blue). The color group will eventually be used to make the color print.
Next comes the mask group. In this group, I combine several kinds of masks, including saturation and luminosity masks. The mask group controls how the cyanotype blends with other colors. The mask group will eventually be used to make the digital negative. The mask group is the heart of the process. An entire article could be devoted to it.
A final layer group allows me to soft proof the print using icc profiles for both color and cyanotype. A complete layer stack is shown in Figure 3.
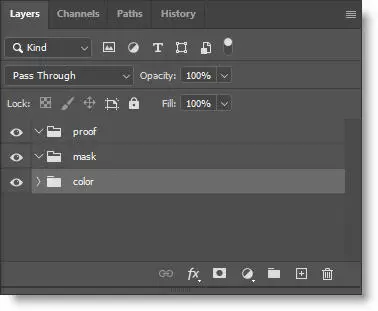
A typical Photoshop document can easily have 30 layers. Building the layer stack is an iterative process. Based on the soft proof image on my screen, I make adjustments in the color or the mask group, but a change to either group requires rebuilding the groups above it in the layer stack. To save time, I do all of the building (and rebuilding) with Photoshop actions. From the final document, I export two files: one for the color print and one for the digital negative. Despite my ability to soft proof, I usually make three or more test prints before I get the color balance right.
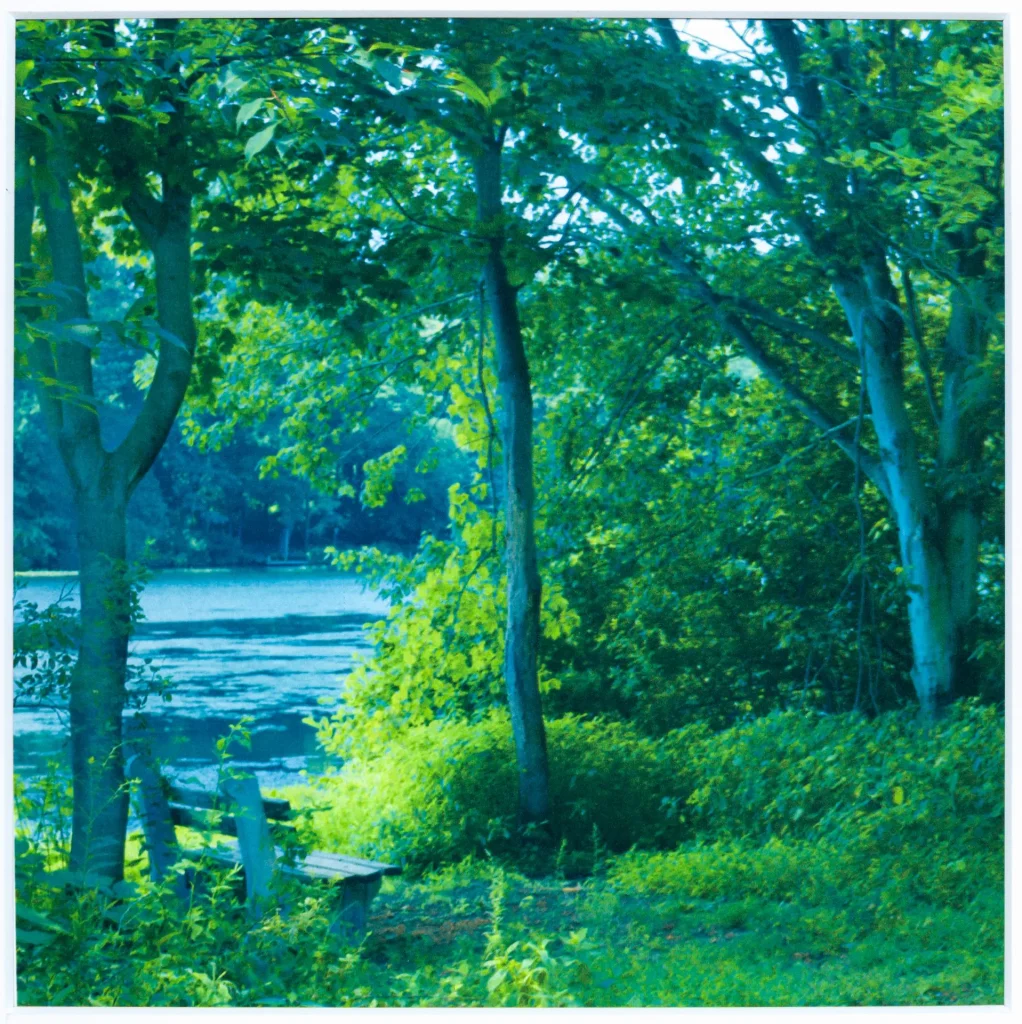
With this process, I can make prints that run the gamut from strong color contrast to strong color harmony. Figure 4 is an example of a print in which the blue has been blended in almost equal amounts with the yellows and greens of the color print, producing a strong sense of color harmony. The image on the left side of Figure 4 shows the color print before overprinting. The image in the middle shows what a cyanotype print would look like if I were to print it from the digital negative on plain paper. Of course I don’t actually do that; instead, I sensitize the color print and expose it through the digital negative. The rightmost image is the final print. You can see that the original colors and the blue from cyanotype contribute almost equally to the final print. Blue has blended everywhere except in the brightest and most saturated colors, drawing the eye toward the focal point of the scene. I was able to control all of this by fine-tuning the mask.
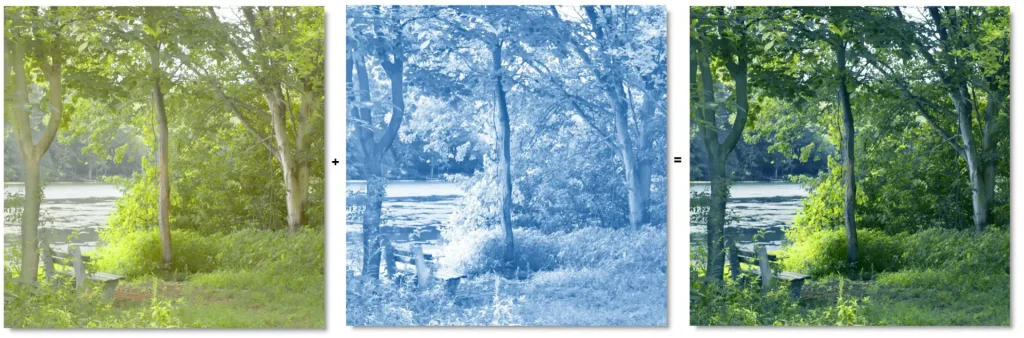
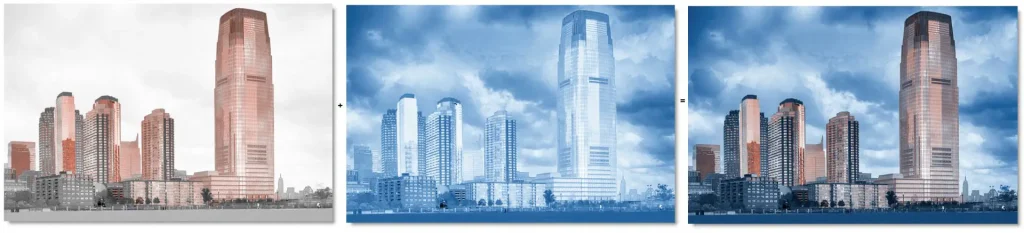
Figure 5 shows an example at the opposite extreme: one with strong color contrast. I adjusted the mask so that very little blue blended with the orange highlights of the buildings. Again, the middle print is imaginary; it shows what a cyanotype print would look like if I printed it from the digital negative on plain paper.
Some technical details: I have two Epson P400 printers. One is dedicated to making digital negatives with Piezography ink. I calibrate my digital negatives using PiezoDN software and print them on Pictorico Ultra OHP using QuadToneRIP. The other P400 is used for making color prints. It is an unmodified Epson printer that uses Epson Ultrachrome ink and prints with the standard Epson printer driver. I make the color prints on Arches Platine 145 gsm watercolor paper. I use New Cyanotype chemistry, an improved version of the 1842 formula developed by Mike Ware in 1995. I expose in a UV exposure unit with fifteen black light fluorescent bulbs. People are often surprised to hear that you can make a color pigment print on non-inkjet paper and wash it for thirty minutes without substantial fading. You can! I do it all the time.
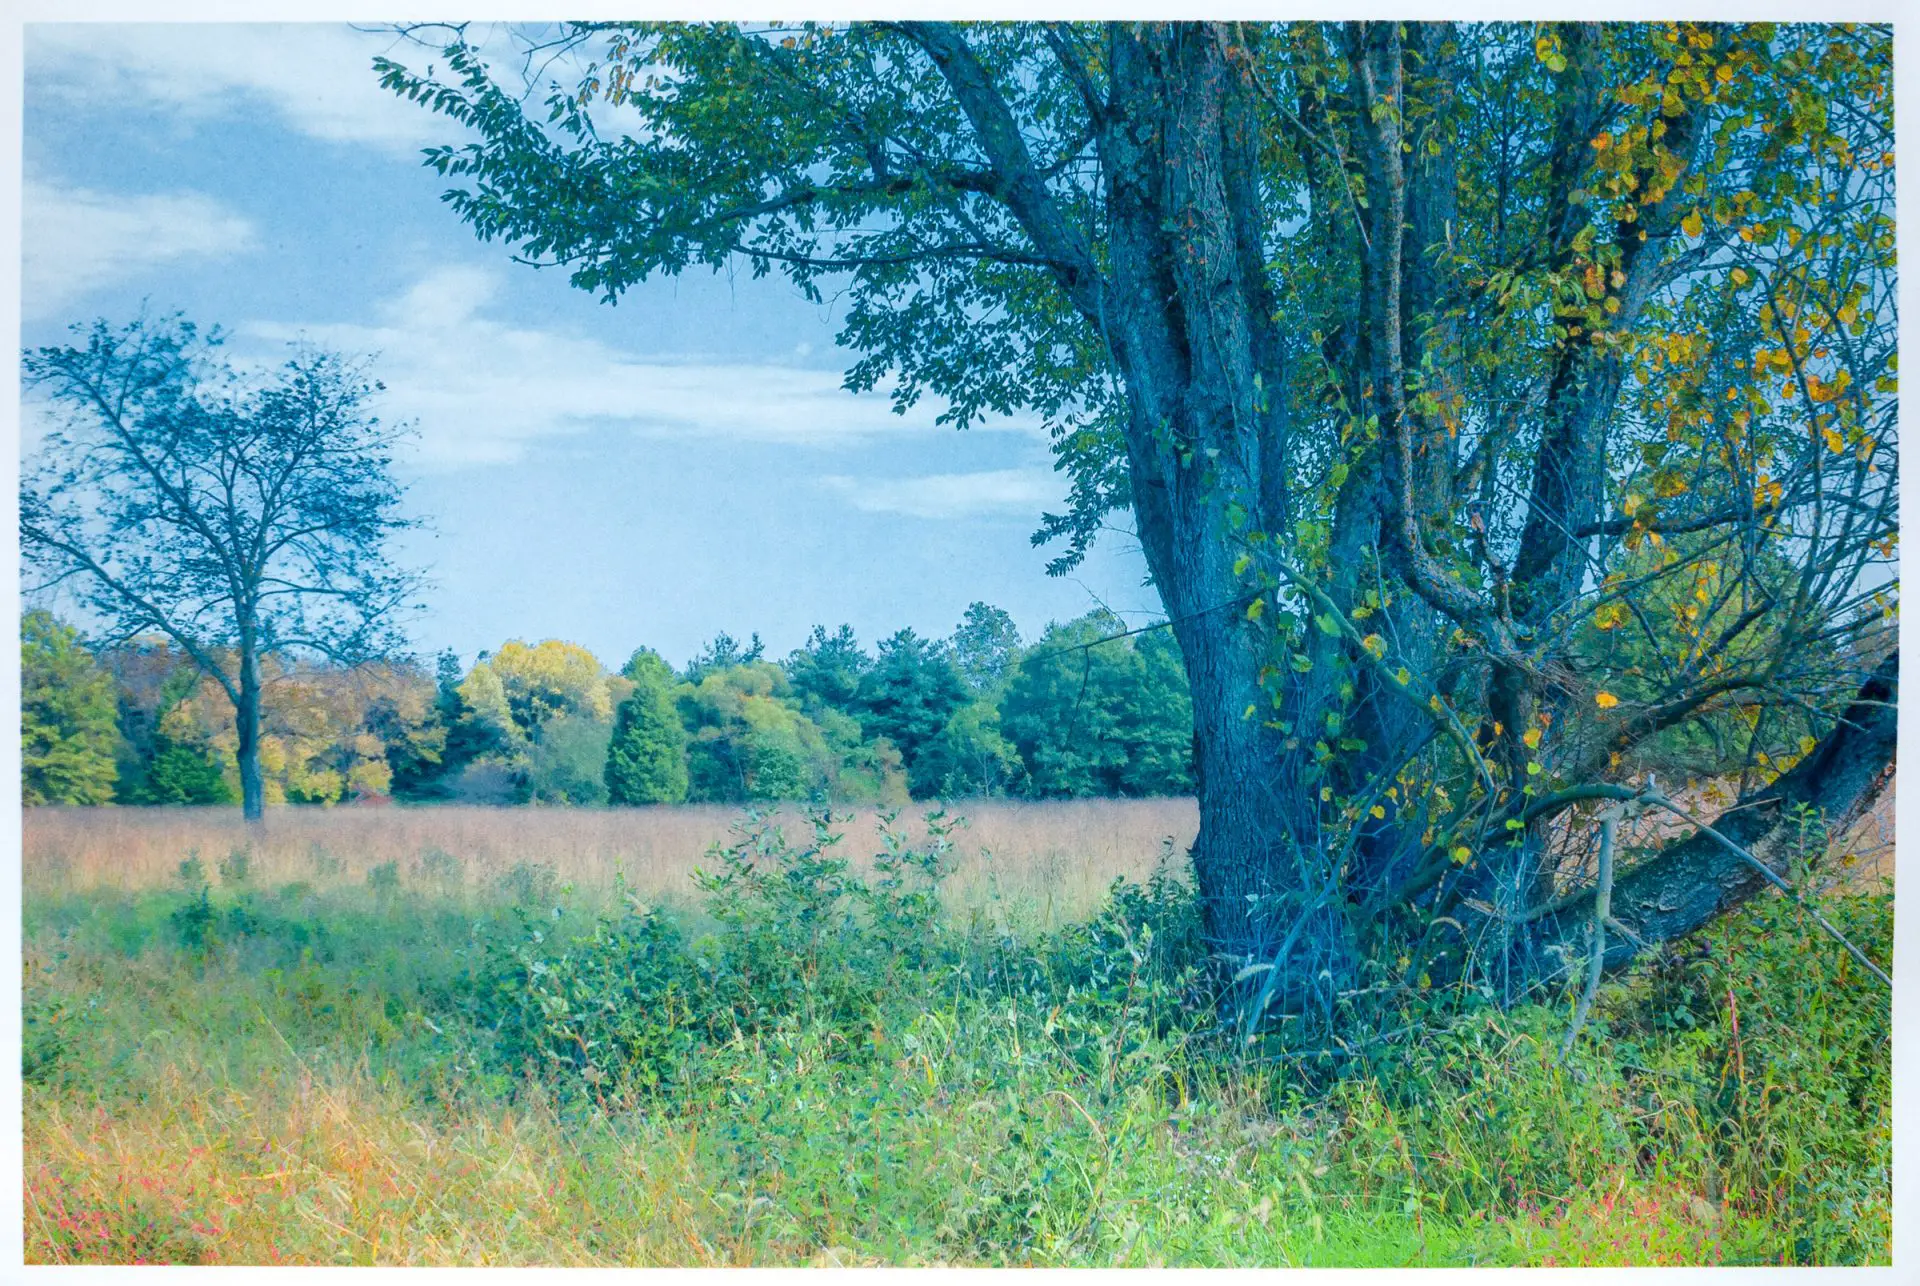
I recently completed a series which I call Studies in Color Harmony. Since I have been unable to go out with my camera during the pandemic, the series consists entirely of landscapes from my Lightroom photo archive. All of the landscapes share a similar yellow/green palette. The addition of blue creates a color scheme with four cool analogous colors: yellow, yellow-green, green-blue, and blue. Slight misregistration gives the prints a dreamy, painterly look. See examples below.

People who see my work often comment about how calm restful my prints make them feel. They’re the ideal prints for a pandemic.
Share this post:


Comments
Matthias Rabiller on Adding Color to Cyanotype – By John Isner
Comment posted: 03/09/2020
Comment posted: 03/09/2020
John Driggers on Adding Color to Cyanotype – By John Isner
Comment posted: 03/09/2020
The text and photos were each, their own manner, very satisfying.
Thank you.
John Isner on Adding Color to Cyanotype – By John Isner
Comment posted: 03/09/2020
Alden on Adding Color to Cyanotype – By John Isner
Comment posted: 04/09/2020
Comment posted: 04/09/2020