I gave a talk on this subject at The Photography Show 2026 at the NEC and thought readers of 35mmc might enjoy a cut down version of the talk. SuperPanos are a technique I have been playing with on my TYCH camera for a number of years now and without fail have produced interesting results for me.
I’m going to outline what a SuperPano is, Cameras which can be used to create them, films that work well for SuperPanos and finally how best to scan your images. I’ve got some examples to share, although for the extra images I used in the talk I only had permission from the photographers to use them in the talk.
What is a SuperPano?
It is a made up word, a portmanteau of “mash-up” of 2 words. Superimposed and Panorama. In short it is an image combining both of these techniques. You are probably all familiar with multiple exposure images. Quite a common technique in both analogue and digital photography. I prefer to do these in camera rather than resorting to photoshop techniques.
This technique represents the superimposed part of a superpano.
What makes these images different to a single exposure image is the complexity they offer the viewer. Your brain has to put in extra effort to understand what the image is showing you.
Some of you may have tried window frame panoramas, especially if you own a half frame camera. Exactly as you would imagine this is a panoramic photograph taken on a continuous strip of film where each frame follows on one from the other. The resulting effect when presented exactly as it appears on the film is that of looking through a window frame.

I like to do this technique handheld, letting go of the precision and perfection and accepting a slightly disjointed look.
So what happens when you combine all these techniques together, superimposing a panoramic image with a window frame style?
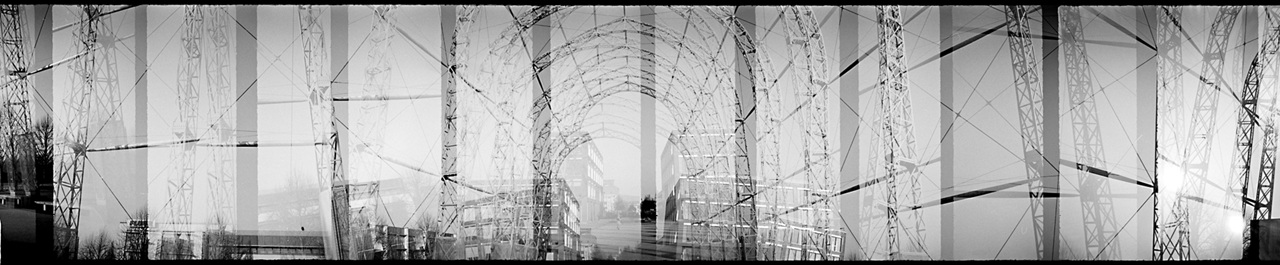
This is the first kind of SupePano I experienced when one of our customers shared his image with me. My execution is not quite as striking as his, but hopefully you get the idea. Multiple exposures are overlapped as you execute a panoramic image. In this case a local landmark provides the visual interest. A bit of imprecision adds just enough confusion to the image that you have to work at interpreting it.
Cameras for SuperPanos
You need a camera that allows both multiple exposure an partial frame advance. In theory most manual cameras should allow this, but in practice it can be very tricky.
Trying to effect a partial wind whilst holding down rewind buttons is not easy. Using a traditional SLR can be a real challenge as you need to understand how the camera film advance mechanism works to be successful. The plethora of 3D printed cameras might seem to tick all the right boxes, but you probably want one with optical glass (rather than a pinhole) otherwise the process of creating a SuperPano will be very long!
You really need a camera that supports multiple exposures AND gives you complete control of film winding (i.e no interlock between indexing and shutter release)
Indexing means when you take a picture the camera forces you to advance the film and won’t allow another shot to be taken until the film is in position for the next frame.
Which cameras would I recommend? Obviously our own TYCH cameras are a great option. HOLGA, Lomography, 3D printed and Vintage 120 cameras can also work well. You do however need to be careful with vintage 120 cameras that they do not have a shutter / film advance interlock. Having a camera with an indication of how far you have advanced the frame can be an advantage. A camera that clicks as you advance like the Lomography Diana F+ can help. The number of clicks for each frame can vary across the roll. The TYCH cameras have a ¼ frame marker hidden on the frame indicator wheel, specifically to help with partial overlaps. For vintage cameras you are going to have to work out how far each turn of the wind knob advances the film, adding some markings with tape can help!
Film Choice for SuperPanos
Negative films, Colour negatives tend to work well as the colour in the image can help viewer identify the subject more easily. Black and white works fantastically, but a clear subjects with high contrast helps the viewer interpret the image.
Slide film generally doesn’t work so well as it doesn’t have enough dynamic range to handle the inevitable areas of under or over exposure. Ilford HP5 Plus, Kodak Tri-X 400, Kodak Portra 400, Gold, Ultramax, Fuji 400, Lomography Colour Negative are all great film options for SuperPanos
That doesn’t mean you shouldn’t try other films, it just adds to the challenge.
Making a SuperPano
There a few different techniques for making your superpano images. The simplest approach is staying in one spot, take images from left to right with partial advancing of the film in between each exposure. Deciding on overlap in advance (precise, variable or at specific points in the panorama), and being confident you know how to achieve that overlap with your camera.
Do you need to underexpose? This generally depends on how many layers to intend to add to your picture. Lots of layers of exposure benefit from underexposure, otherwise your negatives can become too dense.
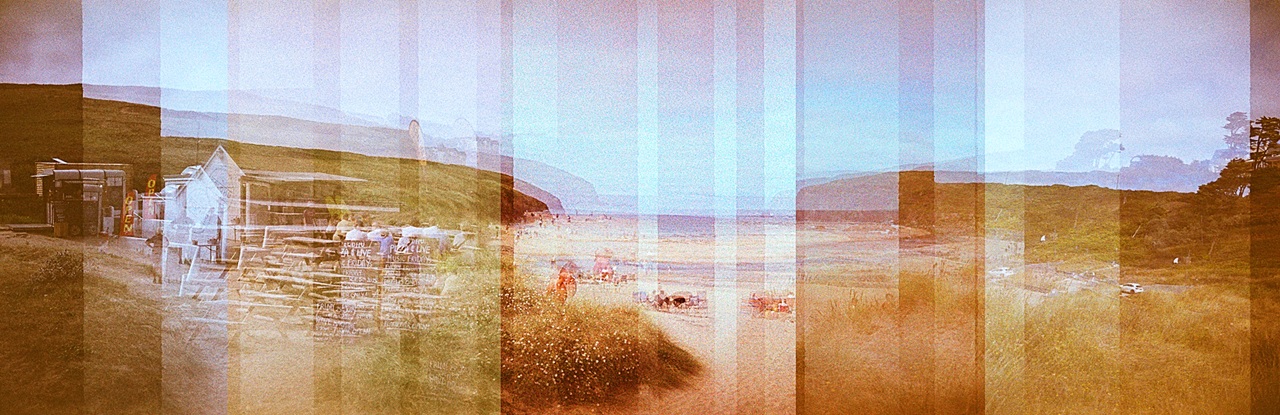
A different approach is Creating a story panorama. This works incredibly well, especially if you can have a central subject. It needs more planning to make sure your final image is balanced. I created this example on my local high street, telling the story of the different shops that I use on a regular basis.

Scanning SuperPanos
Most labs will scan individual frames. Automatic machines can miss frames or scan with fixed gaps in between frames missing parts of your panorama. Whilst I have managed to successfully reconstruct lab scanned panoramas it is rarely easy.
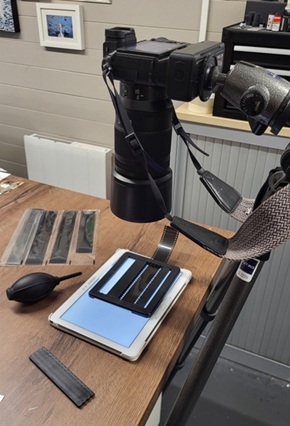
This means that scanning at home is often a favoured option. Digital camera scans may need stitching in photoshop, unless you can accept lower resolution images. The image below shows the setup I use for home scanning my black and white superpanos. A tablet as a light source combined with a pixl-latr to hold the film flat – oh and a good macro lens on my Nikon Z6
Flatbed scanners are the best approach. If you have a flatbed scanner, maybe an Epson you are all set. Just be aware, negatives can be more dense than a correctly exposed image. This can be a real problem with colour negative, so if your style is lots of layering you will need to underexpose your images to get easy to scan results.
The example above was so dense I was unable to scan successfully at home. Thankfully the lab scan was more than good enough to piece together a pleasing result in photoshop.
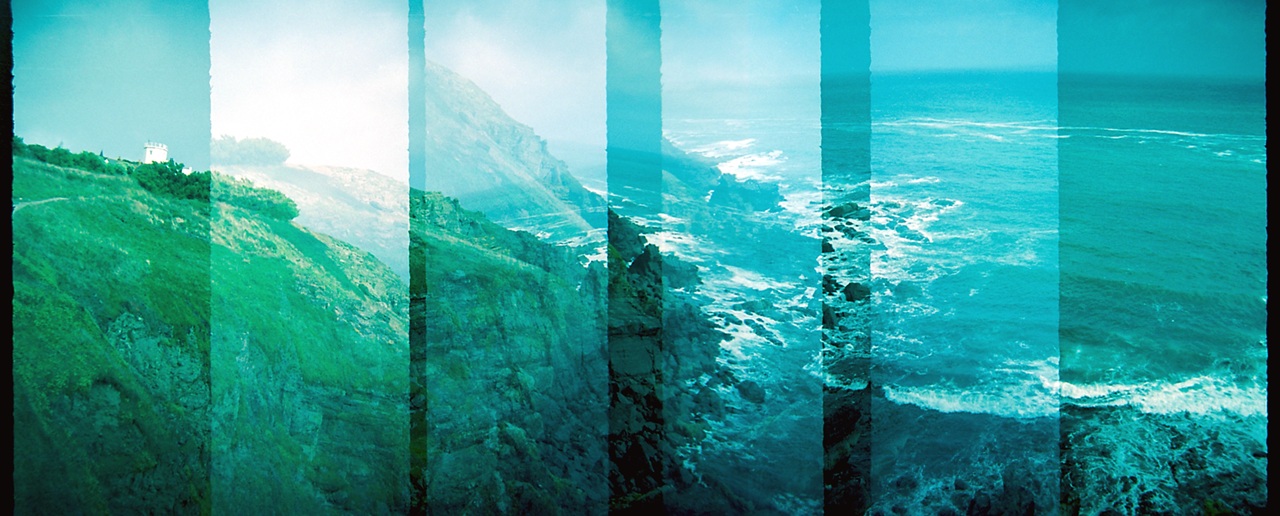
To finish up here are a couple of examples taken with TYCH cameras that hopefully will inspire you to try the technique yourself. For this image at Lizard Point in Cornwall, I wanted to capture the way my sense of vertigo affected the view for me, so I decided to tilt my frames at different angles whilst making this image.
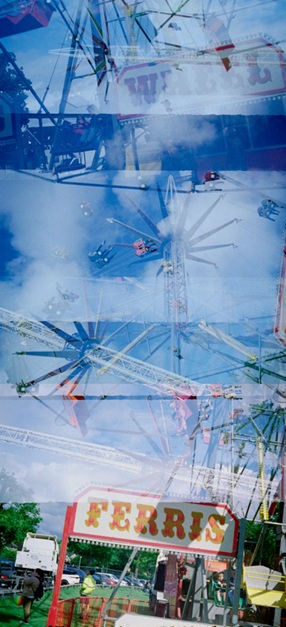
This example was more of an accident. I dad intended to create a SuperPano of all the rides at the fair. The results for the whole image were a bit disappointing. As is often the case with this technique, the accidents can be better than the intentional images. The start of my panora turned vertical made a great image.
Share this post:


Comments
Sneakerzoom on SuperPanos – a creative photography technique just right for film
Comment posted: 03/05/2026
Comment posted: 03/05/2026
Bill Brown on SuperPanos – a creative photography technique just right for film
Comment posted: 03/05/2026
Jeffery Luhn on SuperPanos – a creative photography technique just right for film
Comment posted: 08/05/2026
This is a very interesting approach to panorama. The overlapping frames make a very intriguing impression. I'm going to play with this!
Jeffery Luhn