Minolta 16 MG sub-miniature camera.

By Tony Warren

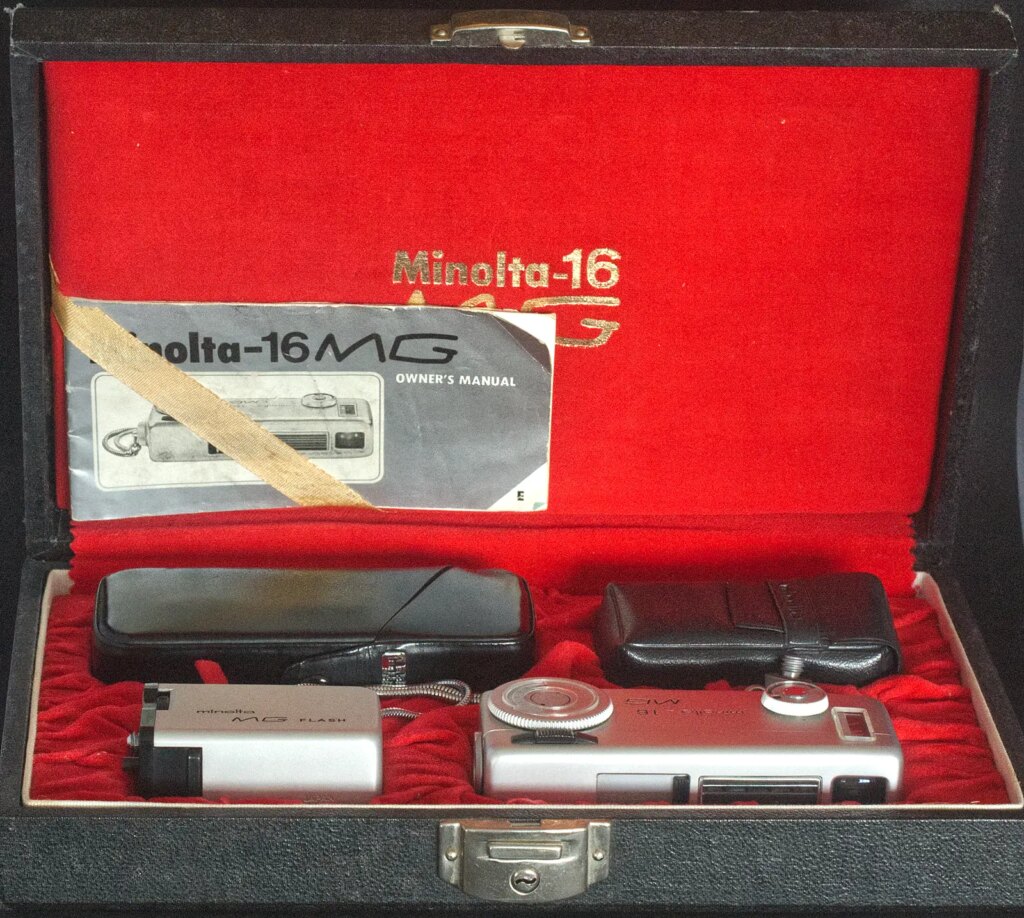
I bought this Minolta 16 camera when I prematurely thought my efforts with 110 to use the film slitter I had made had hit the buffers. It has turned out to be something of a curate’s egg, i.e. good in parts, but, I must say, good in most parts at that. As a product of a major Japanese manufacturer it is a very well made camera that oozes quality in its construction and materials. Solid and precise, and coming in a neat presentation set of camera, bulb flash, filters and cases.

It sits somewhere near the end of a series of 16mm sub-miniatures produced by Minolta between 1955 and 1972 before 110 became so dominant in this size, subsequently replacing 16mm for most manufacturers.

Camera outfit in presentation box.

The range began with the Konan, which had the initial form factor and frame size of 11x14mm that influenced many other manufacturers of the type that used double perforated cine film. The MG was introduced in 1966, before 110 came on the scene in 1972. The next version, the 16 MG-S had an enlarged frame size of 12x17mm, requiring single perforation, ’Super 16’ film to make room for the larger frame size in place of the film used previously. 110 also used a single perforation but placed it between frames to use 13mm of the film’s width. My modified Minolta 460Tx uses the full 13.5 mm
film opening in comparison.

The camera

Meyer cell and exposure setting control.

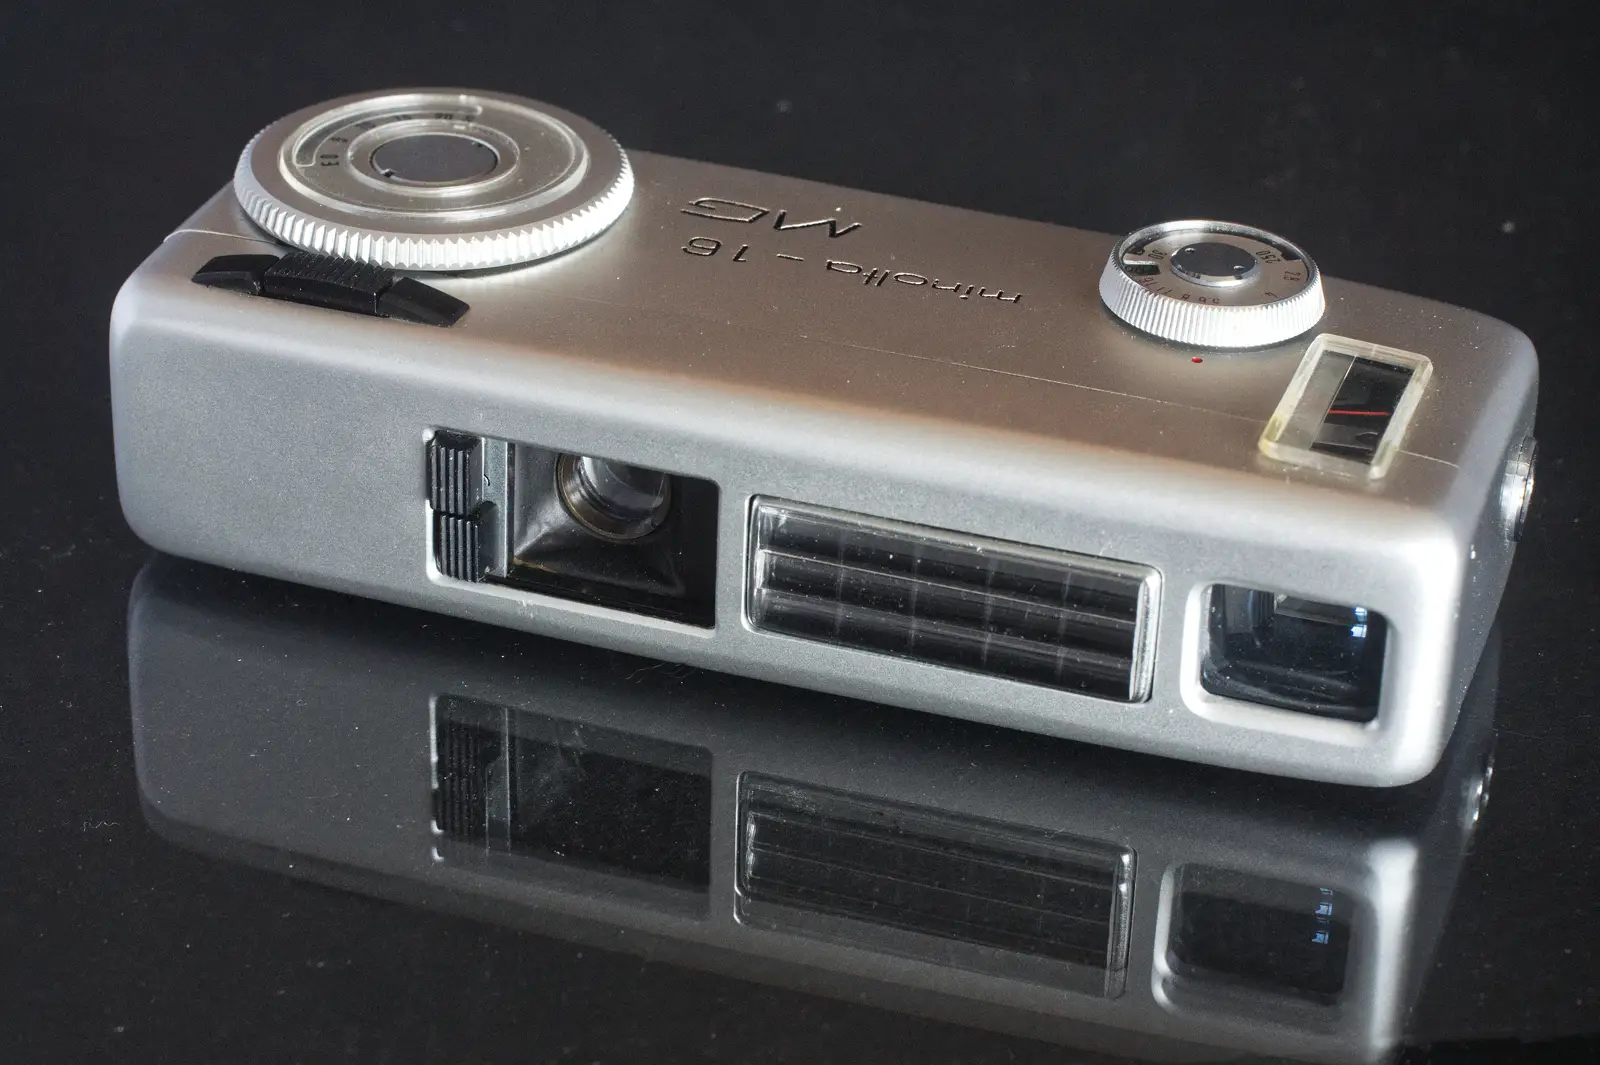
The Minolta 16’s design is aimed at simple operation in a very compact package imposing some compromises to meet both the size and use objectives.

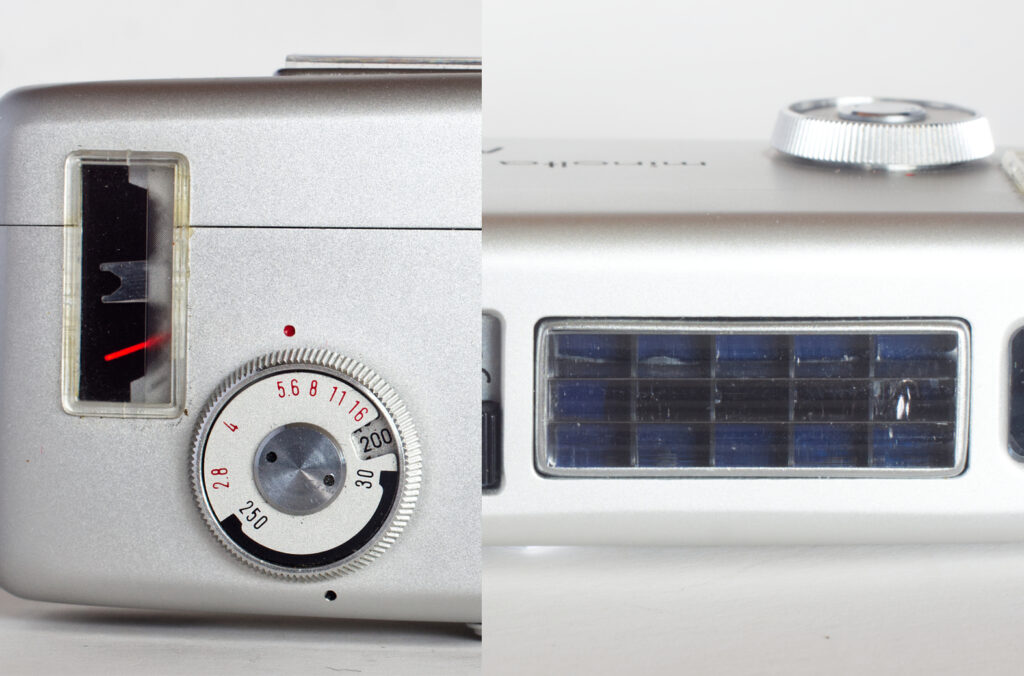
After loading film, the first thing to do is to set the film speed on the meter. This is definitely not intuitive and an example of combining controls to save space. It is done by rotating the meter setting knob past its stop at each end of its travel which moves the setting up or down depending on whether it is being turned clockwise or anti-clockwise.

With the film speed set, the built in, coupled, match needle selenium meter controls a programmed exposure sequence from 1/30 at f2.8 to 1/250 at f16. The aperture sequence goes from f2.8 to f5.6 matched to 1/30 to 1/250 shutter speed steps and then closes down from f8 to f16 all at 1/250.

This arrangement neatly combines all three settings for exposure control into a single knob.

Optically the Minolta 16 is of the best quality with a 4 element Rokkor lens of 20mm focal length. This is quite a bit wider than most for this format which tend to be around 23 or 24mm, quite a jump at this image size. The lens is fixed focus at approximately 4m/13ft and is provided with a sliding close up lens with focus set at 1.2m/4ft, eliminating the need for another control.

Lens, lens cover, close-up lens and exposure counter.

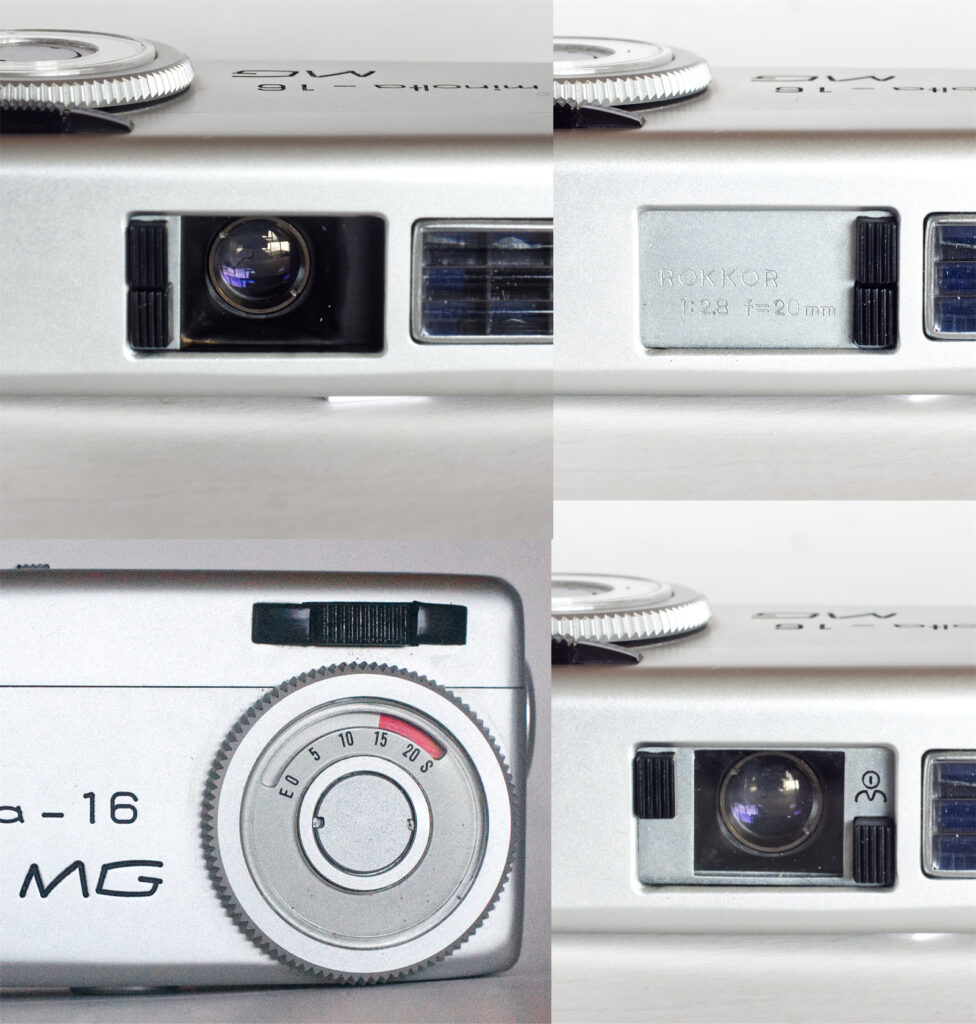
A lens cover locks and unlocks the release and slides above the close up lens. A red warning appears in the finder when the close up lens is in place or the lens cover is closed.

Film wind is by a convenient wheel that falls under the right thumb, taking 1/3 of a turn per frame. The counter is re-setting and counts backwards from 20 with a red strip gradually appearing showing how much film has been used.

Very simple viewfinder, extract from manual.

The Minolta 16 finder is very simple and clear with a bright frame with parallax marks for close ups and the warning flag. I have no difficulty seeing the whole frame wearing glasses. It defeated my usual iPhone shot and an extract from the manual is shown.

Filter fitting and filters provided.

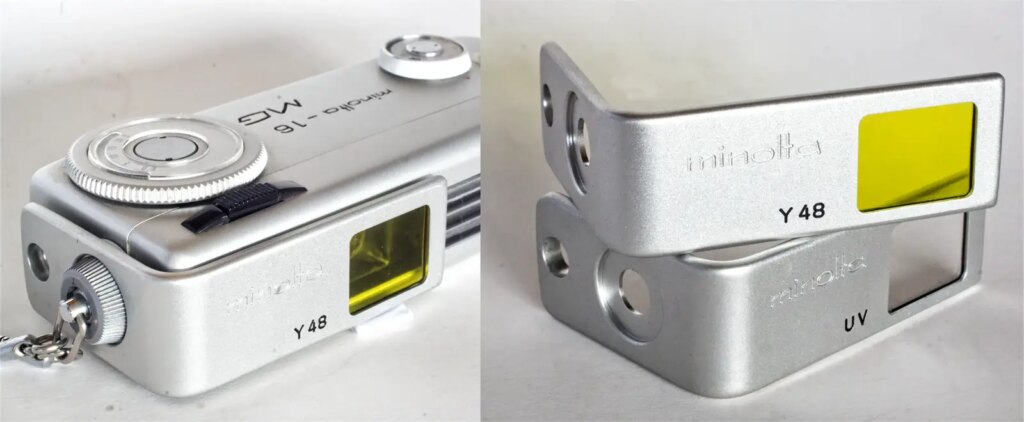
Filters can be fitted by detaching the carrying cord and fitting the filter under its screw fitting, an uncharacteristically complex feature. Two filters were available, a yellow and a UV. Unfortunately, they block both the close up lens and the lens cover when fitted, and the film speed must be manually altered to compensate for the yellow filter, all very out of character.

Electronic flash connected via standard co-axial plug.
Bulb flash unit included with outfit and pack of AG-1B bulbs.

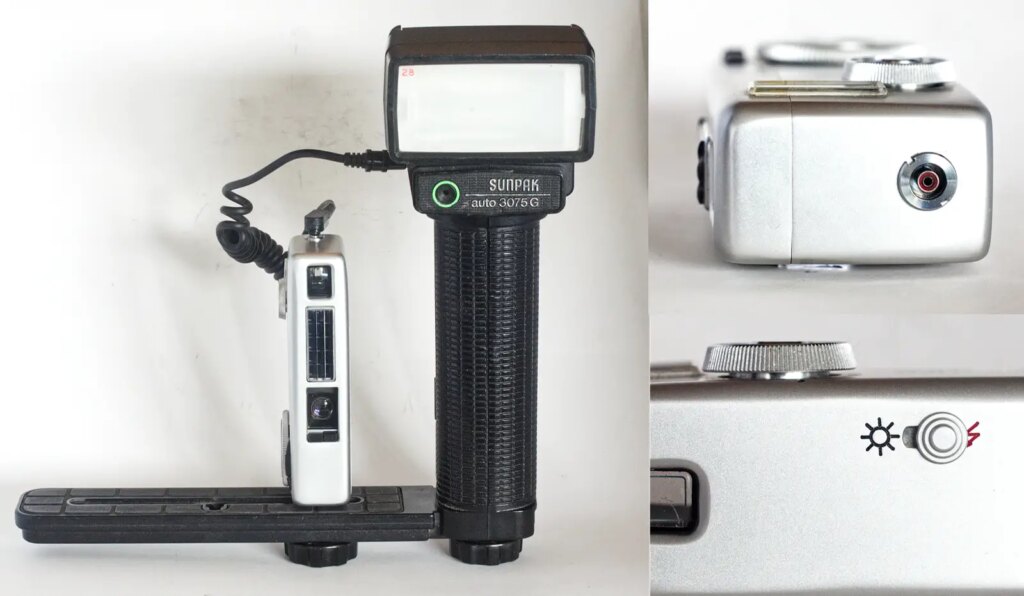
The dedicated accessory bulb flash gun fits on the end of the body in the same way as the filters, automatically making contact and taking AG-1 or -1B type bulbs. A sliding setting when using flash sets the shutter to 1/30 and sync to X. A standard co-axial plug is provided on the opposite end to the bulb flash mount but there is no way to attach a seperate flash unit. The only flash unit I have to fit it to is a relatively huge Sunpak 3075G with the camera perched somewhat incongruously on the flash bar secured by the camera’s carrying chain/filter attachment’s standard 1/4’ tripod thread. One of those accessory flash bars that were once common would be more manageable with a smaller flash unit.

Cassette location and cover door.

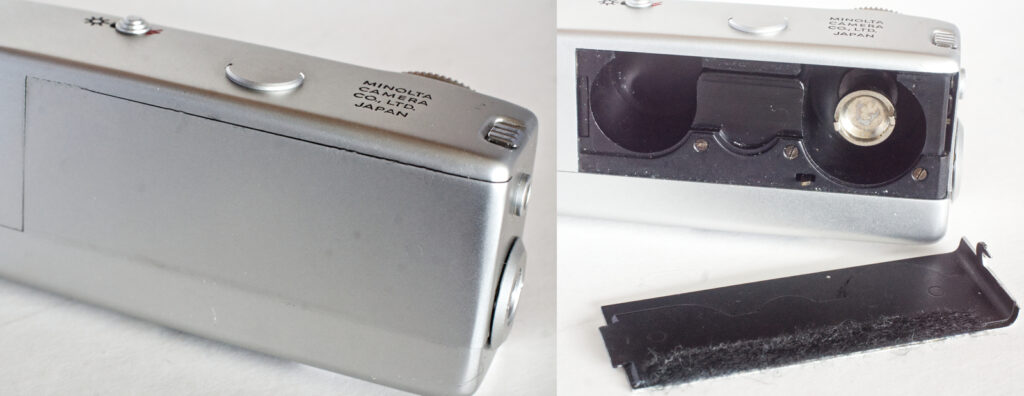
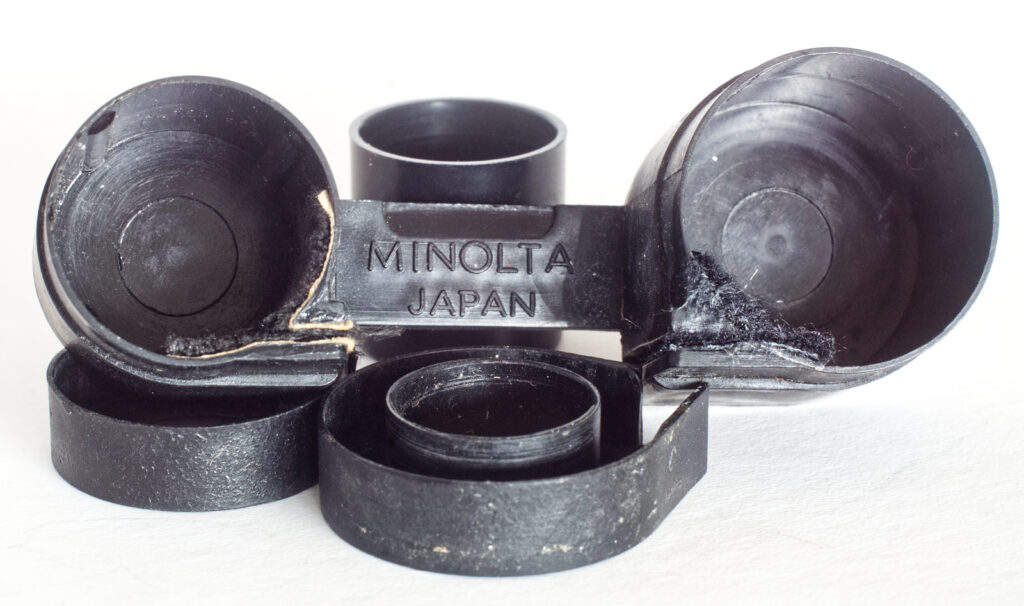
Film cassettes are loaded/unloaded through a large door in the base, released with a sliding catch in the end panel. This needs care when operated. The cover is not attached in any way to the body and being on the base, will drop away on release if unrestrained so it is advisable to hold the camera on your palm or placed on a level surface when doing this.

Fortunately, the film cassette is quite a snug fit and is unlikely to follow the lid if the latter part gets away from you. The lid has a light trap strip which I had to replace. An easy job with a strip of self-adhesive felt. To replace the light trapping in the cassettes is a less simple task, however.

The film cassettes

Sub-miniature film was usually one of the cine gauges, no doubt making manufacture and processing easier. It came in a variety of cassettes and cartridges, but, apart from 110, the Minolta version came closest to being a standard for 16mm. It would fit a number of manufacturers cameras and being in one piece is arguably one of the simplest to use. It can be re-used just as most could be, with pre-packaged film available at the time or using strips of cine film to be loaded in the darkroom, in addition to ready loaded, new cassettes. The user manual gives instructions on how to load one which is not too difficult .

Cassettes - original Minolta top, modern 3-D printed version below.
Cassettes – original Minolta top, modern 3-D printed version below.
Instruction for loading cassette from manual.
Light trapping in original cassette. Original on left, my rather less refined addition on right.

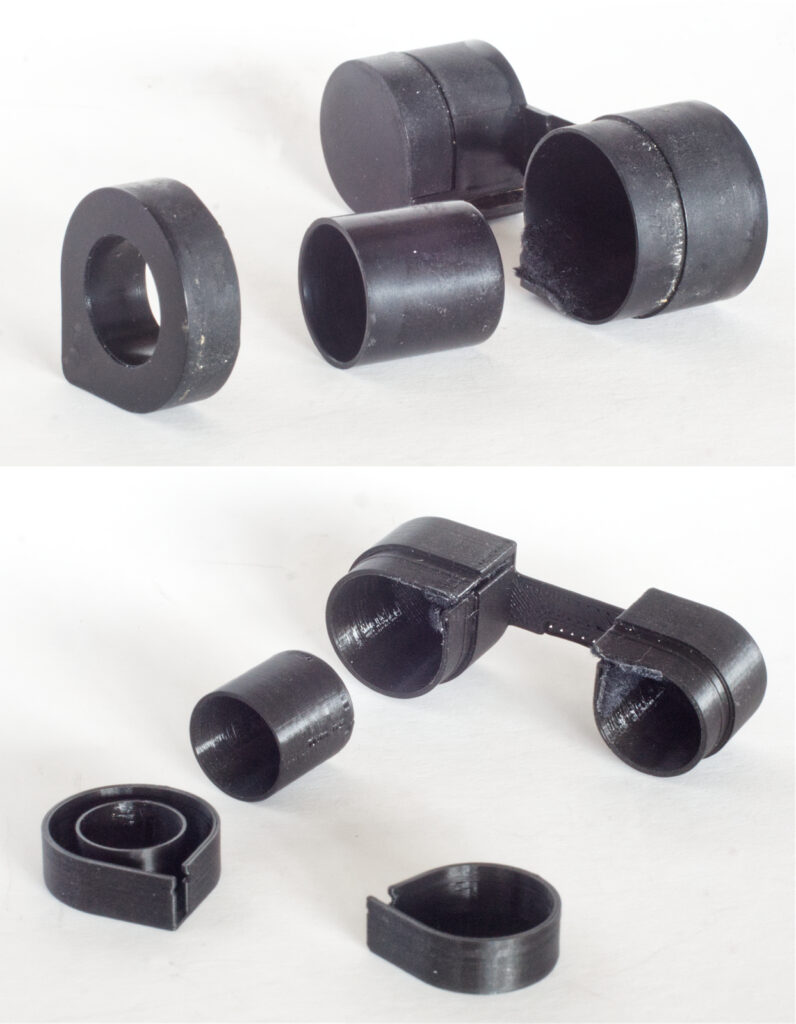
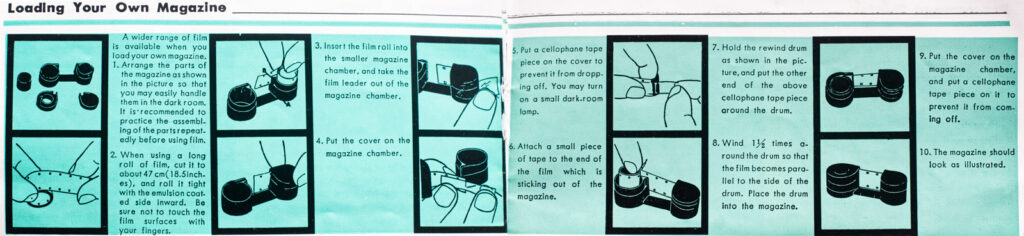
An original cassette came with the Minolta 16 and I bought a further 3D-printed version off eBay which is nicely made and a good fit. It doesn’t come with light trapping, however, but there is room for this to be fitted to make loading and unloading less of a hassle. Quite an intricate operation depending on your dexterity I would say but worth the effort. The original cassette also needed light trap repair, one piece having been lost.

Detail of drive dog connection to cassette.

Being in one piece, the cassette is easy to load into the camera. The only thing to watch is that the drive dog engages properly and may need a little nudge on the film wind to seat it.

Handling and use

Holding the camera as shown n the manual.

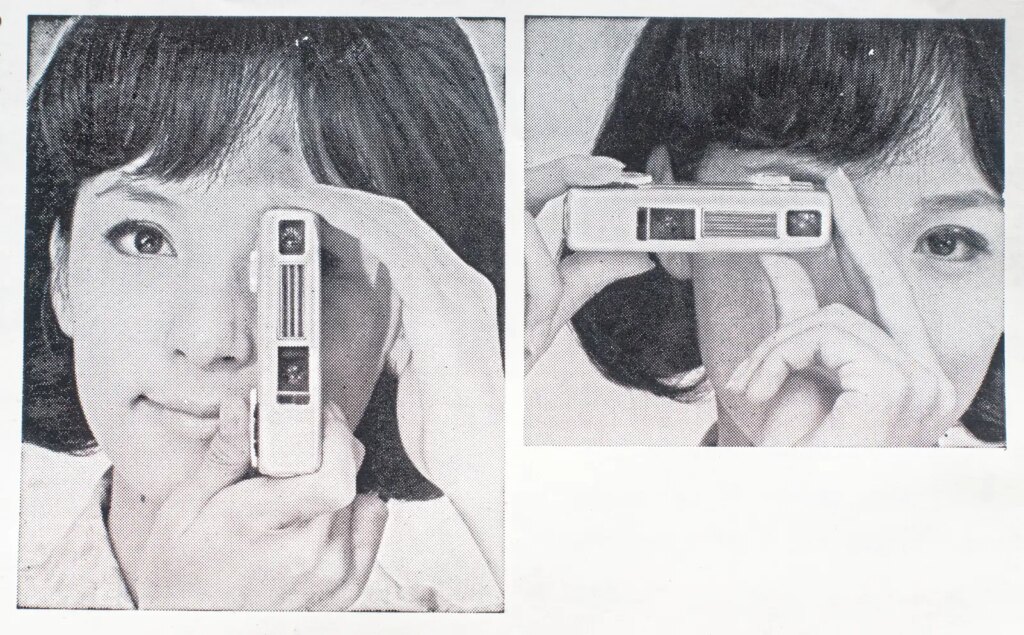
The handling and convenient size of these tiny cameras are what has really sold me on them. Rather like using binoculars to hold in landscape format. Portrait orientation needs more care as it is very easy to get a finger or part of the cord in front of the lens.

The Minolta 16 is a very light camera of course but the release is equally light and positive permitting a very smooth release helped by the shoulders either side of the release itself.

The exposure meter works well on my example but exposure can be set manually if the meter has died.

It is very easy to use and basically just requires the meter to be set before taking a photo. In good light results will generally be good but in weaker lighting focus becomes a factor when the optimum focus points are best aimed for.

Results too are a mixed bag but overall they are not bad from such small negatives. Grain has to be your friend in many cases and closer subjects in good light containing plenty of detail are to be preferred for best results.

Overall, this is a great camera to use apart from the minor limitations of fixed focus and programmed exposure control. The last model in the range, the 16 QT, answered the focus issue with a focussing Rokkor lens of 3-elements, and the filter fitting was also more workable. Exposure became shutter priority auto, albeit against two speeds only, 1/30 and 1/250. This gave a little more control and I guess allowed for manual setting if necessary. Frame size was also increased to 14 x 17 mm. One to watch out for.
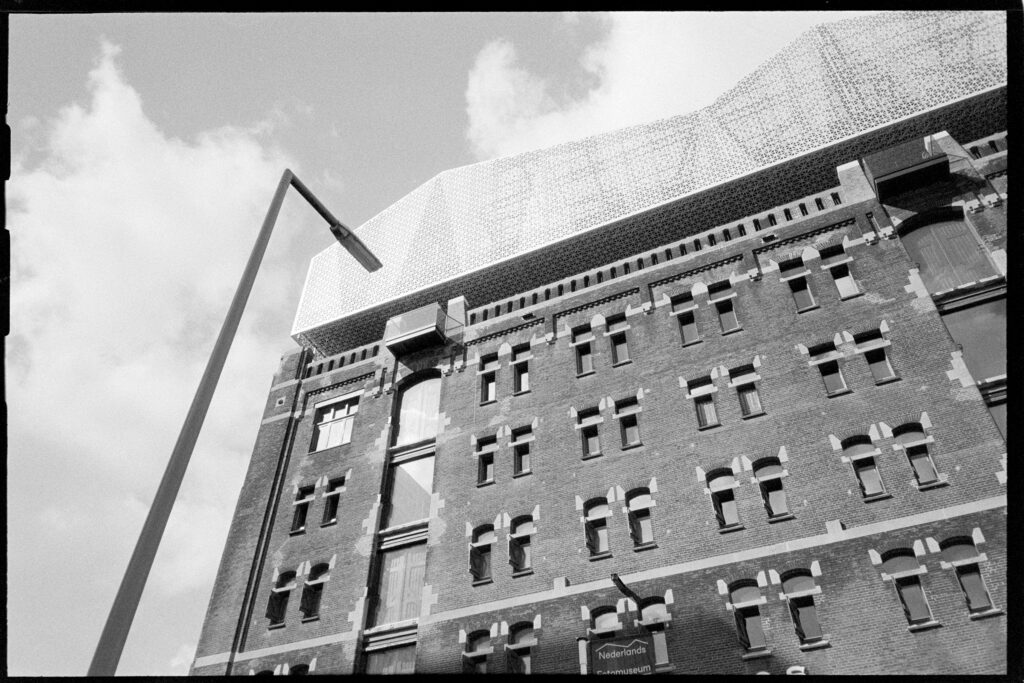
Examples

FP4+ in good light.
FP4+ in good light.
FP4+ in good light.
FP4+ in good light.
Indoor shot at close focus setting on FP4+
Dull weather shot of Southern Man bronze at entrance to Dunedin airport on Superpan.
Dull weather shot of apron at Dunedin airport on Superpan.
Waiting for their flight at Dunedin airport. Quite weak light on Superpan.
Some fine detail on Superpan.
Comparison between frames from MG at left and modified 460Tx at right.

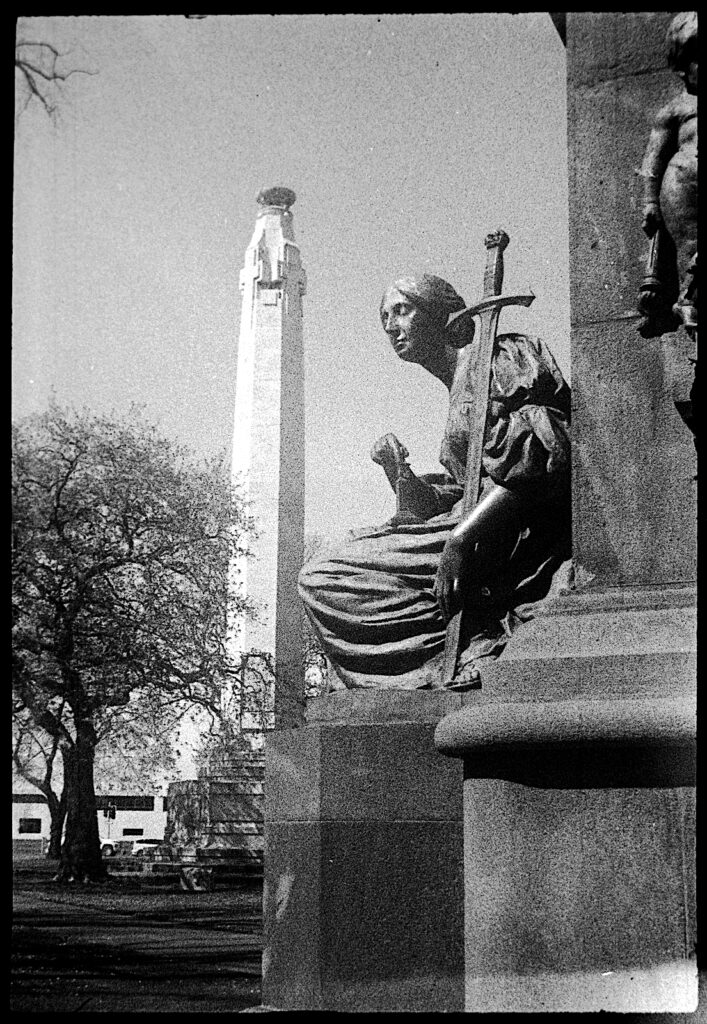
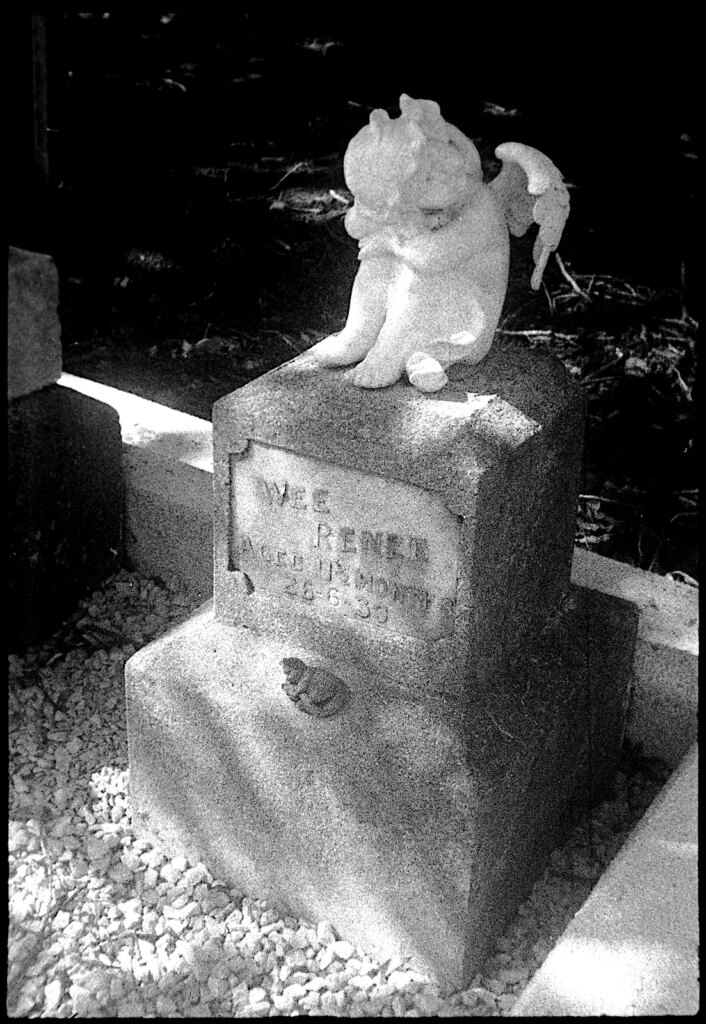
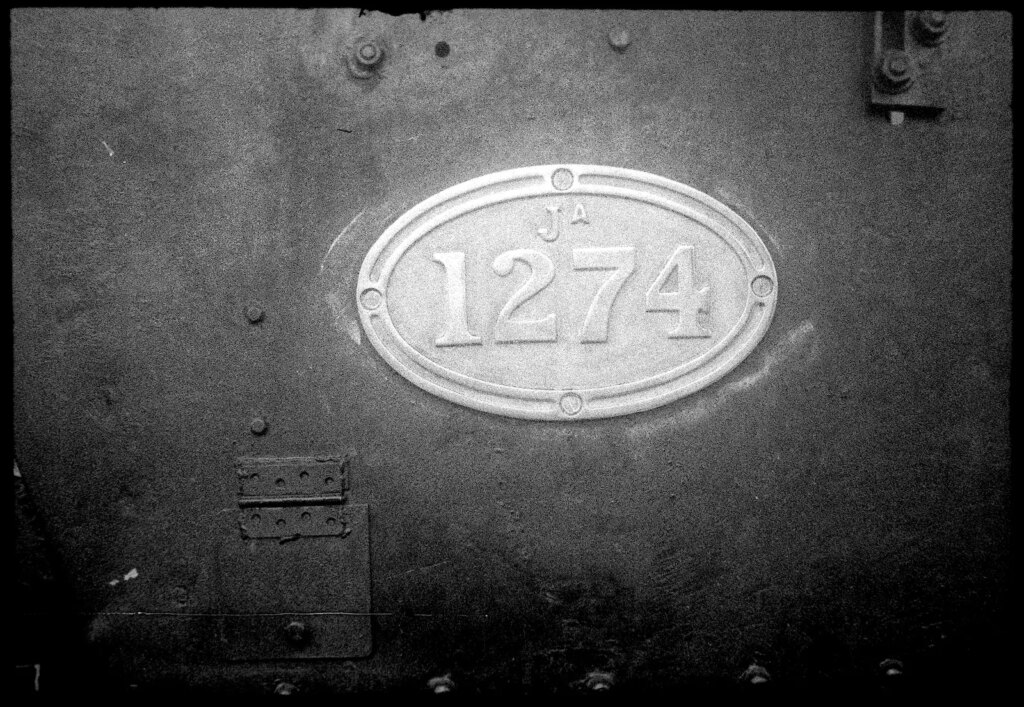
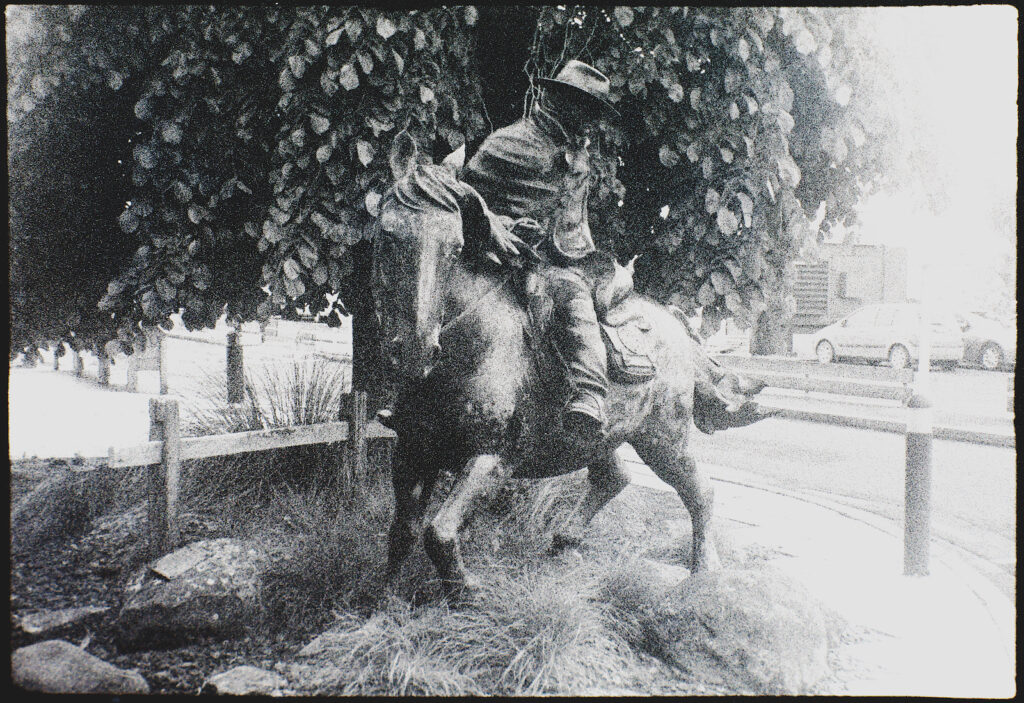
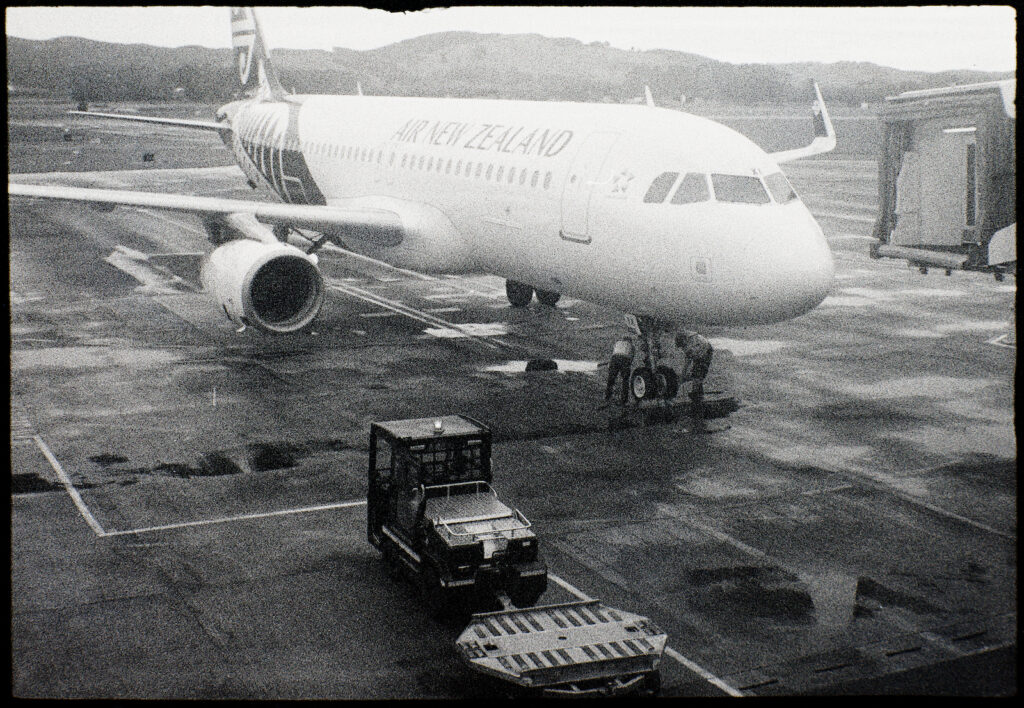
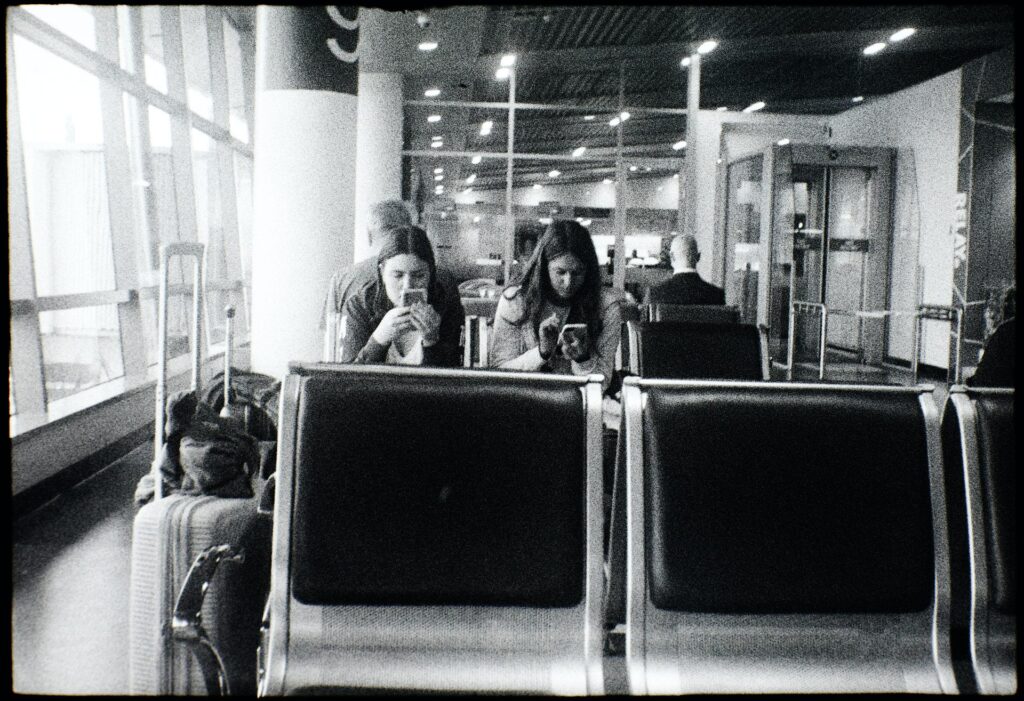
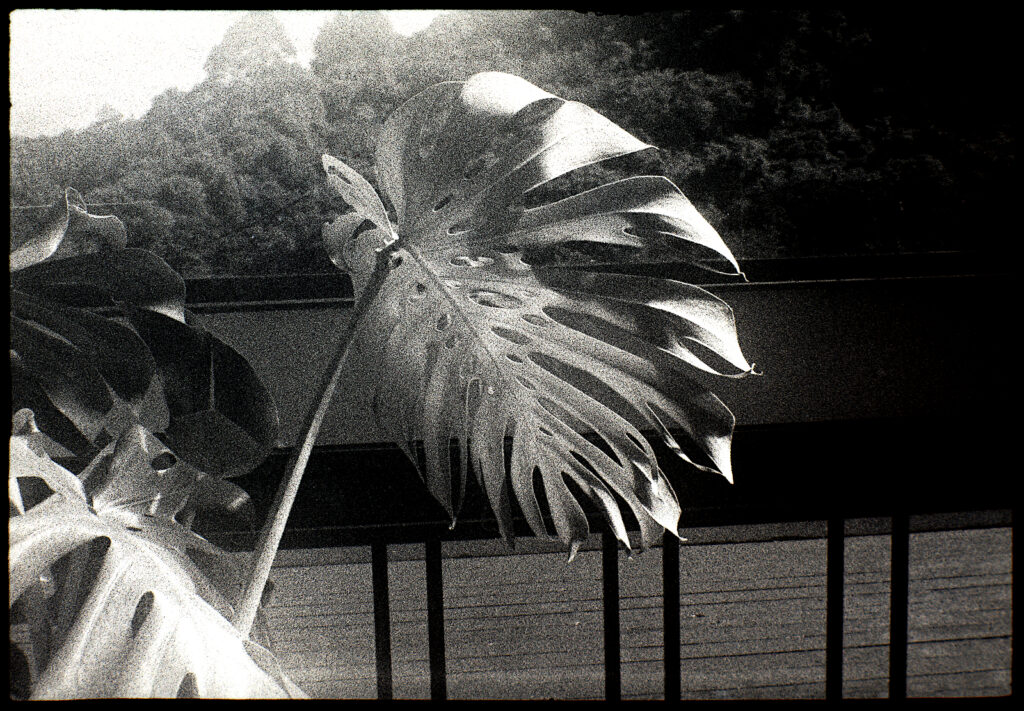
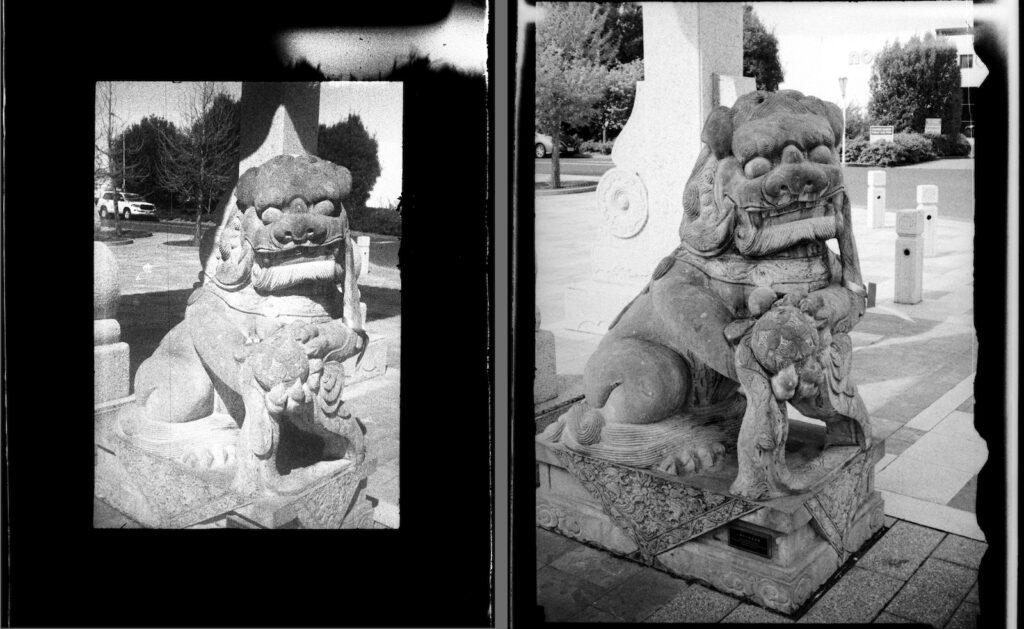
These examples are taken on Ilford FP4+ and Rollei Superpan monochrome films all processed in Rodinal at different dilutions. 1:50 seems to be a good choice in general. FP4+ has the finer grain and seems to be better for this format. Superpan has more ‘bite’ but works better with the modified 110 camera.

In conclusion

I think I must confess to a little disappointment with the very well made and sophisticated Minolta 16. No doubt, for me, it suffers from comparison to the modified 110 I also use which produces a negative of 19 x 13.5mm, more or less a quarter 35mm frame. The 14 x 11mm real estate of the MG is not much more than half this which shows itself in the grain. If my fruitless attempt to make a film perforator had been successful, it would probably have gone to a new home instead of my unmodified 460Tx. As it is, I will probably be using it with FP4+ and trying it with colour negative when I can get hold of Cinestill’s 2-bath C41 kit. All grist to the mill.

Share this post:

Find more similar content on 35mmc

Use the tags below to search for more posts on related topics:

Contribute to 35mmc for an ad-free experience.

There are two ways to contribute to 35mmc and experience it without the adverts:

Paid Subscription – £2.99 per month and you’ll never see an advert again! (Free 3-day trial).

Subscribe here.

Content contributor – become a part of the world’s biggest film and alternative photography community blog. All our Contributors have an ad-free experience for life.

Sign up here.

About The Author

By Tony Warren
In my 60 or so years of serious involvement in photography I have seen the demise of the viewfinder, the rise of the SLR and the eclipse of them all with the meteoric development of the digital camera. Through it all, however, and above all else, the image is what it is all about so I now use film alongside digital. Whatever is the most appropriate or practical. My contributions will hopefully be useful for anyone interested in using film and also how a died-in-the-wool antique like me is continuing his life-long addiction in the digital age, using both platforms. The major benefit of an extended retirement is that I can spend most of my time nowadays with photography and writing about it.
View Profile

Comments

Bob Janes on Minolta 16 MG sub-miniature camera.

Comment posted: 08/03/2024

I agree that the 16MG is a rather nicely made little instrument that unfortunately falls a little short as a practical camera - For me a focussing lens would make a lot of difference - but the only camera to get a zone focus lens in the series was the 16 QT.
Reply

Leave a Reply

Your email address will not be published. Required fields are marked *

Tony Warren replied:

Comment posted: 08/03/2024

Very much so Bob and the reason I am using my modified Minolta 110 in preference.

Reply

Leave a Reply

Your email address will not be published. Required fields are marked *

Ibraar Hussain on Minolta 16 MG sub-miniature camera.

Comment posted: 08/03/2024

Really enjoyed this information packed article - and the camera is simply beautiful
And the photos are very very very nice - lovely tones texture and general look. Thank you
Reply

Leave a Reply

Your email address will not be published. Required fields are marked *

Tony Warren replied:

Comment posted: 08/03/2024

Thank you Ibraar, I appreciate that. And yes it is a very good example of industrial design from the period when cameras were beginning to evolve from the basic physical forms earlier designs had tended to impose (e.g. leice, Rollei etc.). Manufacturing techniques were improving to allow that also.

Reply

Leave a Reply

Your email address will not be published. Required fields are marked *

Paul Quellin on Minolta 16 MG sub-miniature camera.

Comment posted: 08/03/2024

A really detailed and informative article Tony, I enjoyed reading it. Seems almost as though this camera was as much an engineering exercise as anything. It all looks great in the original case though and I love the look of it on the bracket, dwarfed by the Sunpak flash. I think it is terrific that people like yourself are taking the time to put all sorts of film cameras through their paces... we all learn from it. Thanks.
Reply

Leave a Reply

Your email address will not be published. Required fields are marked *

Tony Warren replied:

Comment posted: 08/03/2024

Thank you Paul. I think you are correct that this was part of a process of development. Some of the details like the filters were improved no end on the later models. Glad you found it informative because through having the chance to rediscover these little bits of history I do too.

Reply

Leave a Reply

Your email address will not be published. Required fields are marked *

Jim Scheffler on Minolta 16 MG sub-miniature camera.

Comment posted: 08/03/2024

Excellent, well illustrated article about a neat little camera from the past. When I served in Vietnam in 1968, I bought a Minolta-16 from a fellow GI. Came in a nice soft leather case and had a set of filters. I used it quite a bit before selling it when my tour ended. The results were about what one would expect from the tiny negative and the less than expert processing available, but it was very pocketable and handy. I later amassed a modest collection of sub-mini cameras, including Rollei and Minox products which I still have. Thanks for bringing back some great memories!
Reply

Leave a Reply

Your email address will not be published. Required fields are marked *

Tony Warren replied:

Comment posted: 08/03/2024

Thank you Jim and what memories. I can experience these cameras nowadays but to have such contemporary experiences to draw on is awe inspiring. Thank you again for the comments. Regards, Tony.

Reply

Leave a Reply

Your email address will not be published. Required fields are marked *

Gary Smith on Minolta 16 MG sub-miniature camera.

Comment posted: 08/03/2024

The original kit is amazing: camera, flash unit, filters all in a box with a clasp and a book! Those were the days!! I was hoping to see an example shot of a document detail but perhaps this model was never intended to be a "spy" camera.
Reply

Leave a Reply

Your email address will not be published. Required fields are marked *

Tony Warren replied:

Comment posted: 08/03/2024

Thanks Gary. The red plush lined box reminded me of my Hohner Chromonica harmonica that came in a neat leather faced box with red lining way back in the day. As for the 'spy' function, unfortunately it wouldn't focus close enough for that.

Reply

Leave a Reply

Your email address will not be published. Required fields are marked *

Jon Fernandes on Minolta 16 MG sub-miniature camera.

Comment posted: 09/03/2024

I have also acquired quite a collection of subminature cameras over the years. In the Minolta 16 series I now have two Minolta 16 II's, 16MG like yours, and two MG-S's and QT's. The latter two have a larger size negative and are easier to get quality images. Might I suggest Delta 100 or XP2 Super ( processed as B&W at home as labs to handle the 16mm film are virtually non-existant ). For me the grain is significantly better. I split my film with a cutter from CameraHack which you can use in daylight ( I have no association with them ) and recently I have printed a dual 35mm splitter on my 3D printer which must be used in a darkroom or change bag - I get a 16mm and 9mm strip, the latter for my Minox cameras. There is also a 16mm development reel for Patterson or Jobo development tanks that can be 3D printed by yourself or purchased from the designer of the 3D model. With care results are very acceptable and often better than 110 film. My adventures with 110 film continue as well - in the process is my first home colour development with Tiger 200.
Reply

Leave a Reply

Your email address will not be published. Required fields are marked *

Tony Warren replied:

Comment posted: 09/03/2024

Thank you Jon. You have an impressive collection there and the QT as I mentioned is one I would consider at some point. It may have developed further but for 110. Your journey through obtaining film and processing is very like my own. My earlier posts tell the tale, the film splitter I made from an old 120 folder body and the spiral from a spare half of a Johnsons spiral. Film wise I have used Rollei Superpan 200 and FP4+ for both the MG and my 110 Minolta. Tiger is a good film, again I have written about it earlier, and I am considering slitting some C41 to process myself in a trade kit. I would be interested to learn what you are using and how it turns out. It is a fascinating if challenging format indeed.

Reply

Leave a Reply

Your email address will not be published. Required fields are marked *

Orrin Heath on Minolta 16 MG sub-miniature camera.

Comment posted: 11/03/2024

I got a Minolta 16 II a couple years ago. I've used it a handful of times. My biggest problem has been getting the film to stick to the take up chamber. Like the tape comes off and I am not advancing the film. Besides that issue, I have enjoyed using the camera. Nice and pocketable.
Reply

Leave a Reply

Your email address will not be published. Required fields are marked *

Tony Warren replied:

Comment posted: 11/03/2024

Hi Orin. The manual recommends wrapping the film a couple of turns onto the tale up drum as well as taping the end. I do this and have never had a problem. Your 16II is even more compact and pocketable than the MG. Cheers.

Reply

Leave a Reply

Your email address will not be published. Required fields are marked *

Leave a Comment

Leave a Reply

Your email address will not be published. Required fields are marked *