Flashes are versatile gadgets, and with gels and modifiers, you can even get an even wider range of effects. But what if you want to get even more creative? The Godox AK-R21 projection attachment attaches to a flash or strobe, allowing you to project images and patterns onto your scene. In this article, I’ve reviewed the Godox AK-R21 projection attachment and Godox AK-S slide set. I’ve tried to give a sense of what they can do, how well they do it, and different ways you can use them (including a couple of DIY modifications).
Review notes
Godox kindly sent us the AK-R21 projection attachment and AK-S slide set for review, but I was not paid for this review, nor do we have affiliate links. As always, my goal in this review is to be honest and objective.
The photos in this article were shot with a Fuji X-E4 camera and various lenses (if you want more details about the gear, just ask me in comments). The Godox AK-R21 was mounted on an off-camera Godox AD100 Pro flash, triggered with a Godox XPro II TTL wireless flash trigger (I will also review these two products in the next month or so).

What’s in the box
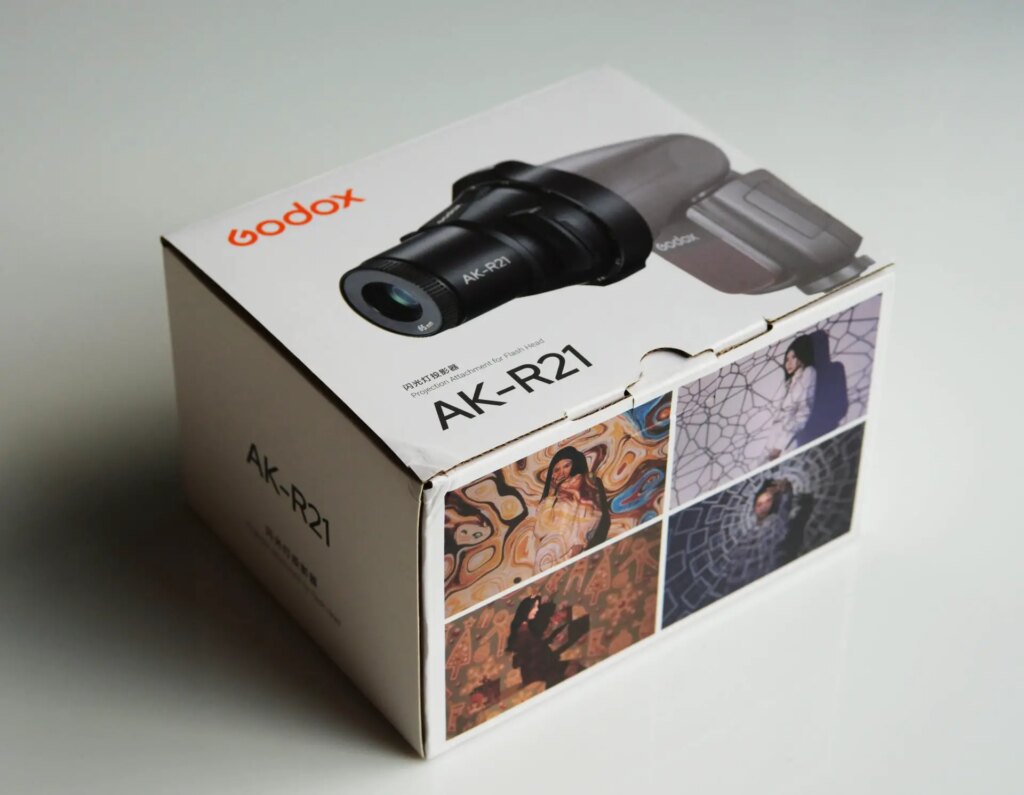
The Godox AK-R21 projection attachment ships in a well-made cardboard box with foam padding inside.
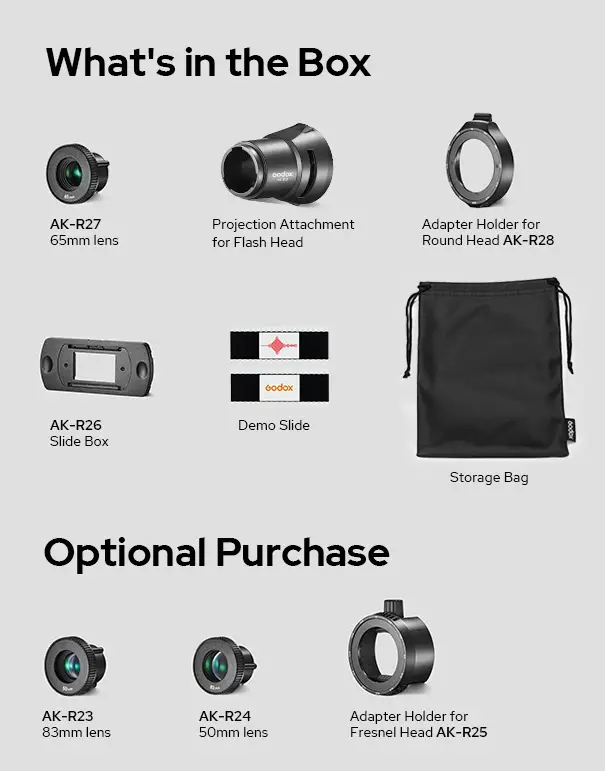
The projection attachment has four main parts:
- the ring-shaped AK-R28 adapter holder which attaches to your round-head flash
- the projection attachment which clips onto the holder
- the AK-R27 65mm lens which makes the projection
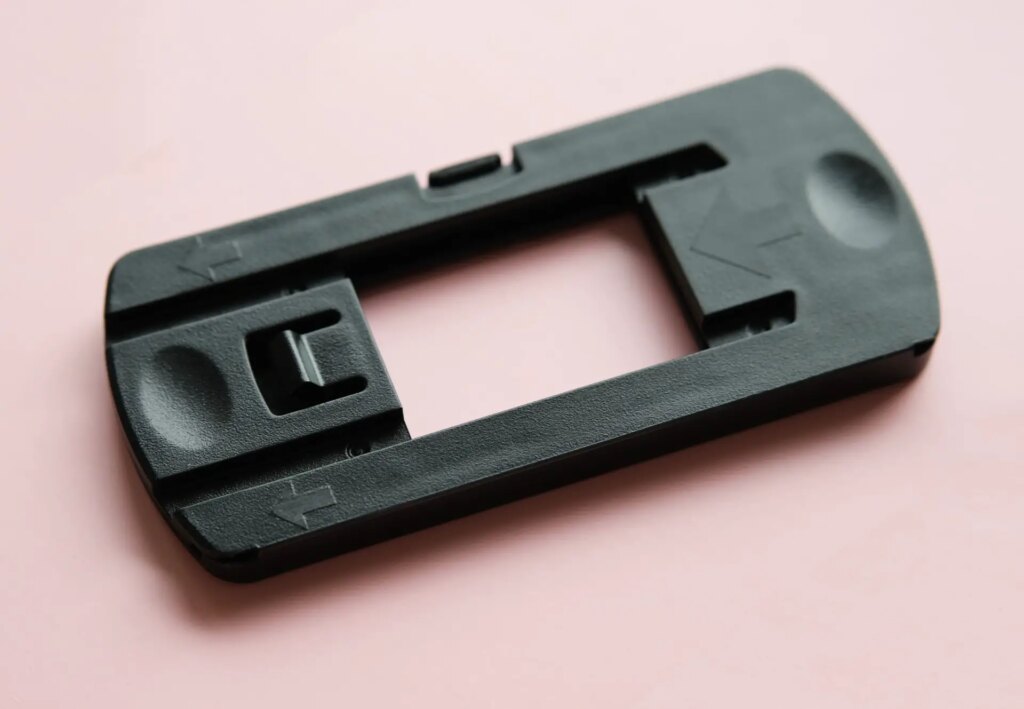
- the AK-R26 slide box which holds transparencies – the images that you want to project.
The box also includes:
- a carry bag
- two demo slides
- an instruction manual.
The carry bag is handy for protection, because the projection attachment doesn’t come with a lens-cap.
The two included slides are a geometric pattern and the Godox logo – useful for testing and focus, but not much else. To get the most out of the AK-R21, Godox clearly intends that you buy the AK-S slide set as well.
The instruction manual, in English and Mandarin, is rudimentary (as is often the case with Godox). I generally prefer manuals over video, but in this case I would recommend the YouTube tutorial by Godox or the more detailed one by StrobePro.
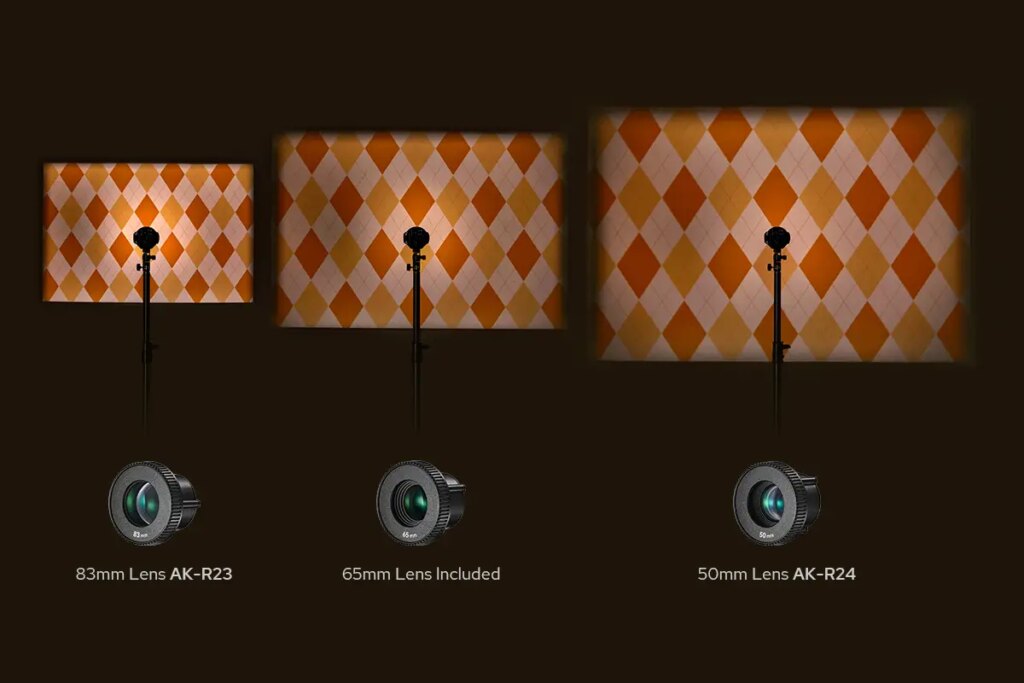
As you can see from the image above, there are a few additional items you can purchase. The included AK-R28 adapter is for round-head flashes like the Godox AD100 Pro (which is what I used for this review). If you want to use the projection attachment with a rectangular-head flash (e.g. the Godox TT685), you need to get the optional AK-R25 adapter holder.
The included lens has a focal length of 65mm. The optional 50mm and 83mm lenses allow you to project a similar-sized image from closer up and further away. I haven’t tested the other two lenses, but the image below (from Godox) gives you an idea.
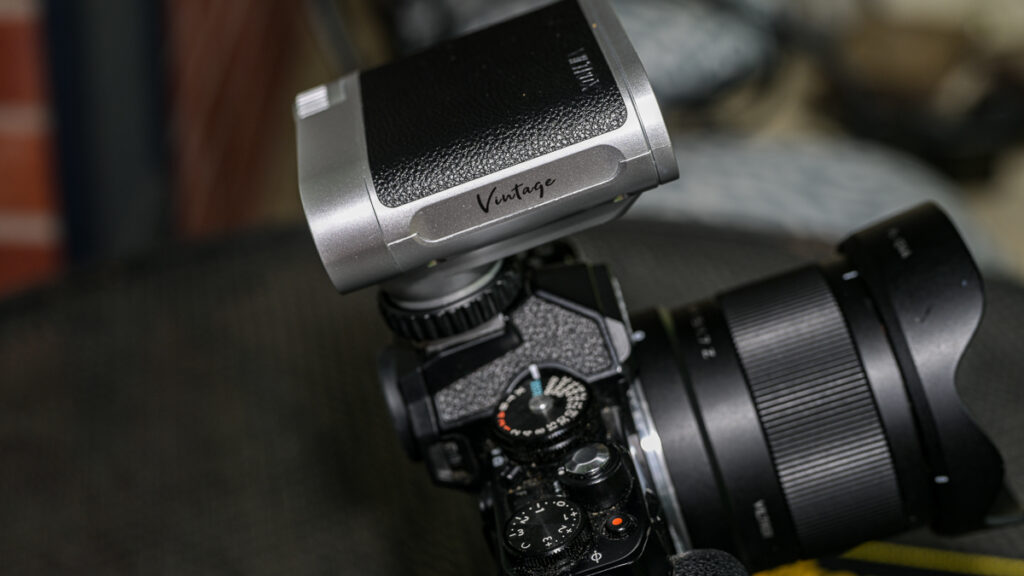
The Godox AK-R21 in use
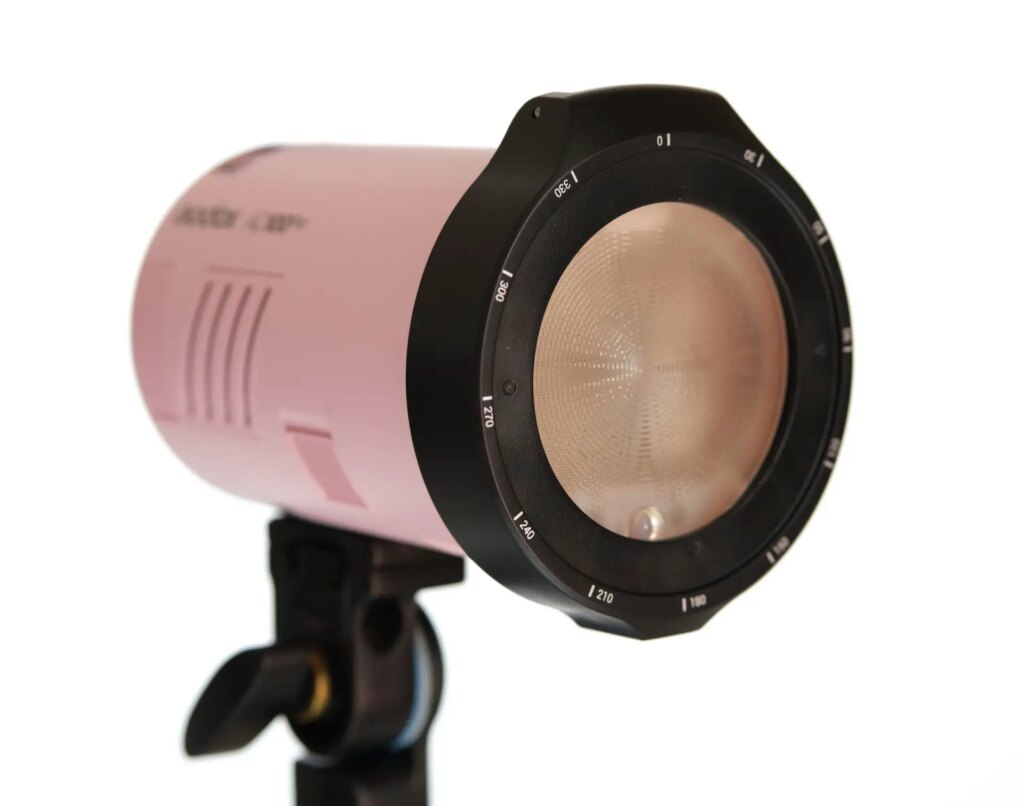
The Godox AK-R21 projection attachment is made of plastic, but considering the price ($89 or £89) the build quality is pretty good. The first piece to mount onto your round-head flash is the AK-R28 holder (above). For a rectangular-head flash, as I mentioned, you would need the optional AK-R25 adapter.
I found you have to press the adapter quite hard to get it on the flash – hard enough that when I first tried, I was starting to worry I might break it. I had to watch a couple of videos to make sure I wasn’t missing something. But that is indeed the way: you snap it on, and then use the top clip to secure it. It works (and my fears about breaking it were clearly unfounded), but a slightly easier or looser mount would have been more convenient for sure.
The adapter ring is pure plastic, so while it obviously works with the AK-R21 projection attachment which it’s designed for, it can’t take AK-R1 magnetic accessories like the dome diffuser or snoot. You would have to take the adapter off and attach them directly to the flash.
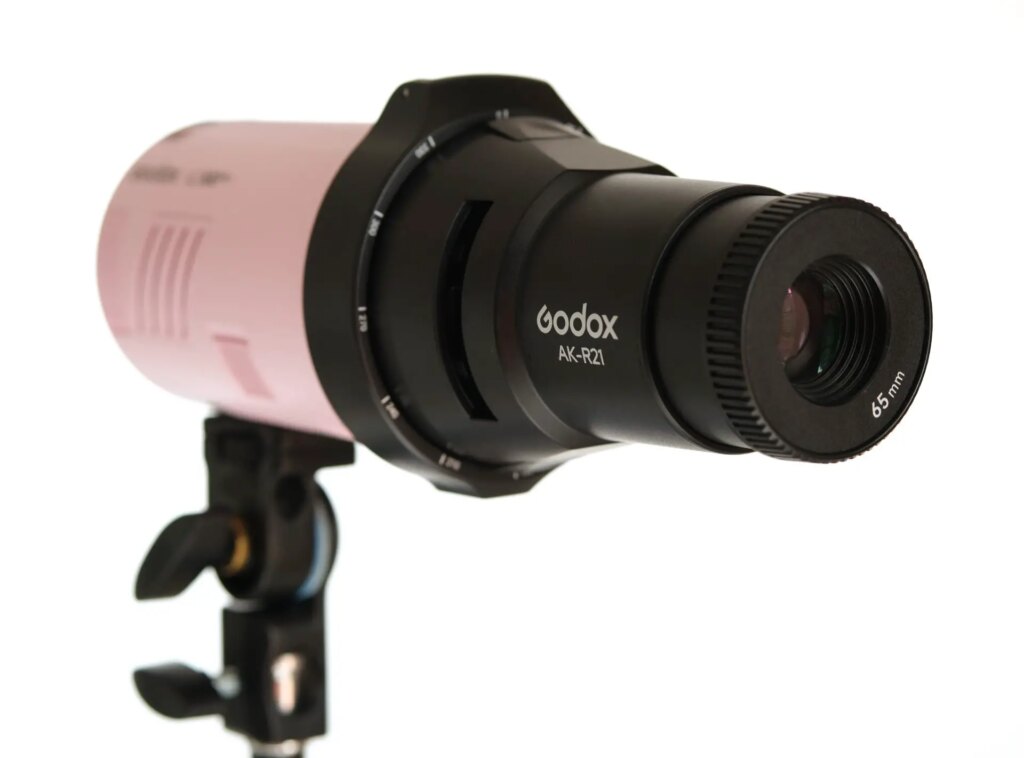
The next piece to go on is the projection attachment itself, along with the lens. The lens is detachable, but since I only have the 65mm, I always keep it on. The projection attachment also uses clips, but these are much easier to use – no complaints at all.
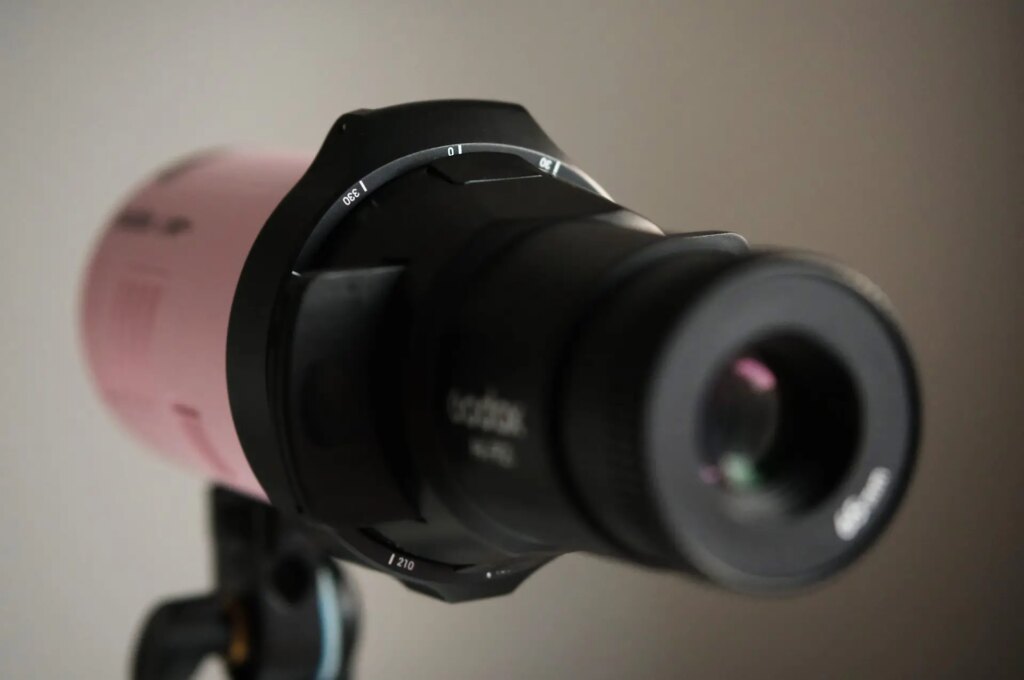
The device has a vertical slot (visible above, just behind the Godox logo). This is where the AK-R26 slide holder slots in. The holder, as you can see below, has arrows indicating how to insert it. I would prefer if Godox had these markings in white, which I would think is easy enough to do; that would make them far easier to see in a dark studio.
The adapter ring remains fixed to the flash, but the projection attachment can be rotated 360°, which of course rotates the projected image. The markings, which you can see in the image below, are a helpful reference.
The projected image
When using the Godox AK-R21 projection attachment with flashes which have a zoom feature (like the Godox AD100 Pro which I used for this review), Godox recommends setting them to the maximum zoom value (85mm in my case).
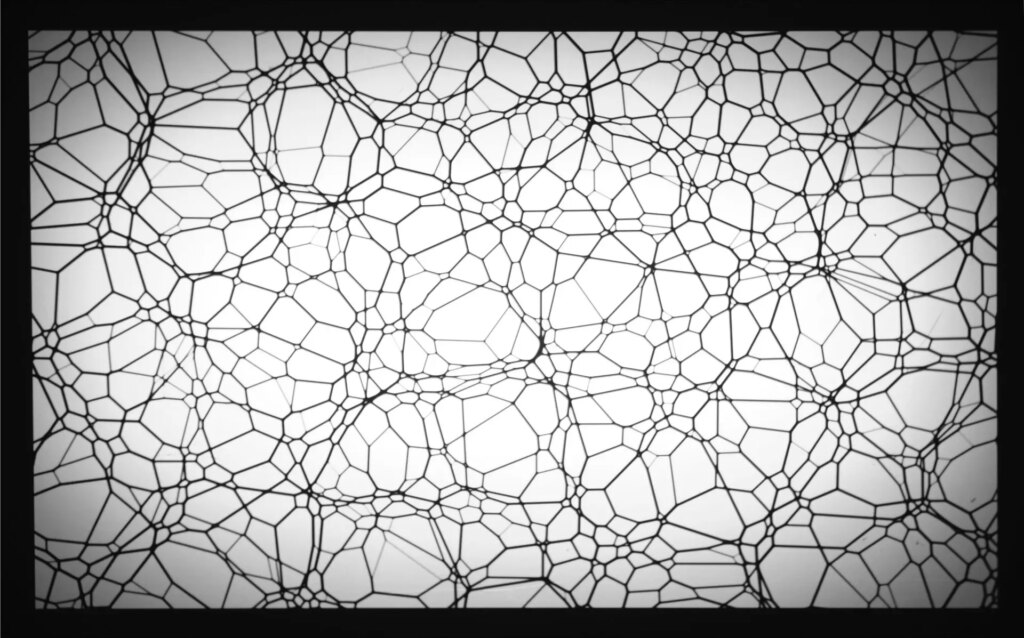
The projected image has an aspect ratio of approximately 3:2, similar to 35mm film or a full-frame sensor. There is a bit of vignetting in the corners, as you can see in the photo below where I projected one of the slides onto a white wall. In practice, this is not too noticeable.
As for the image size, I found that the AK-R21 has a similar “angle of view” to my 50mm lens (I use an APS-C sensor Fuji X-E4 camera, so that’s 75mm in full-frame terms). In other words, if I place my camera close to the flash and point them at the same surface, the projected image approximately fills the frame. When you move it further away, you get a larger (but also dimmer) image.
Of course, the size of the projected image also depends on the projection lens. As I mentioned, I have only tried the default 65mm (not the optional 50mm or 83mm lenses). Ideally, this (i.e. size of the projected image as a function of distance) is information which Godox should provide on the product page.
For the projected image to be in focus, you need to focus the lens, which you do simply by twisting it. Focusing is easier if you set the flash to strobe (aka multi) mode, firing off a series of, say, 10 flashes in quick succession as you try and bring the projected image into focus.
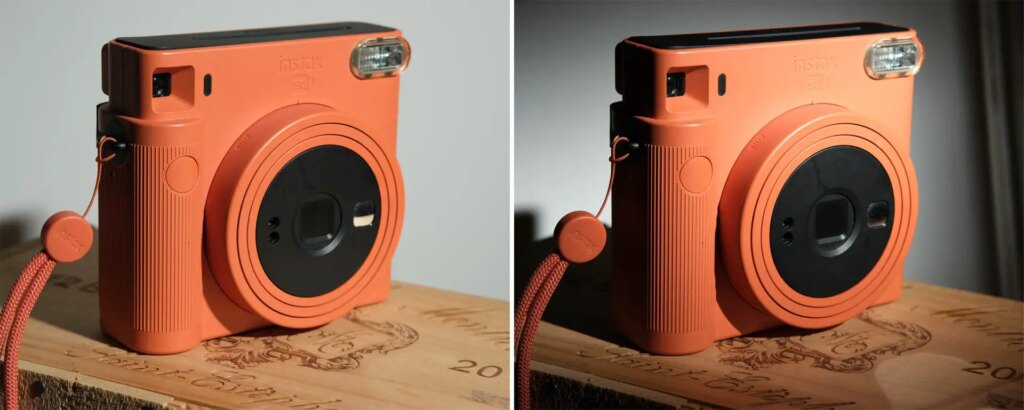
Alternatively, you can use the modeling light, which is a continuous light. But then you need a pretty powerful modeling light, or a pretty dark studio (ideally both). This is because the projection lens – even without any transparencies – cuts over 2 stops of light.
How do I know? In the two photos below, the camera settings were identical – ISO 160, f/8 and 1/180 sec, which killed the ambient light, ensuring that the exposure came entirely from the flash.
The image on the left is lit with the Godox AD100 Pro (85mm zoom setting, no modifiers). The one on the right is lit with the same flash, at the same distance, with the AK-R21 attached (but with no slides in the holder). With the latter, I had to dial up the flash power by 2⅓ stops to match the unmodified flash exposure.
For the photos in this article, I used camera settings in the neighbourhood of ISO 160, f/8 and 1/180 sec (the sync speed on my Fuji X-E4). This was just enough to kill the ambient light, namely an Ikea stand lamp in my living room. In other words, these exposure settings ensured that the image, without flash, would be just a dark frame. This gave me full control over the lighting, which comes only from the flash.
However, with these settings, I mostly found myself using the flash at or close to full power. And the further away you move it, the more power you need (there is no escape from the inverse square law). Admittedly the Godox AD100 Pro, which I was using, is one of the less powerful round-head flashes. But the need to crank it up to (near) maximum power means longer recycle times, and more limited ability to shoot in burst mode. Killing the ambient is also harder in brighter conditions, or if you want to position the flash far away.
In a typical studio, the reduced flash power shouldn’t be a problem – you can always dim the ambient lights or switch them off altogether. And as you’ll see from later examples, I’ve also used the AK-R21 “on location” at night. But it’s something to bear in mind, as the reduction in flash power was more than I had anticipated.
7 ways to use the Godox AK-R21
The Godox AK-R21 projection attachment is after all a creative tool, so now that the technical stuff is out of the way, let’s focus on the more creative side.
In the course of experimenting with the AK-R21 for over a month – and with lots of help from obliging friends – I tried out a few different ways to use it.
Both subject and background
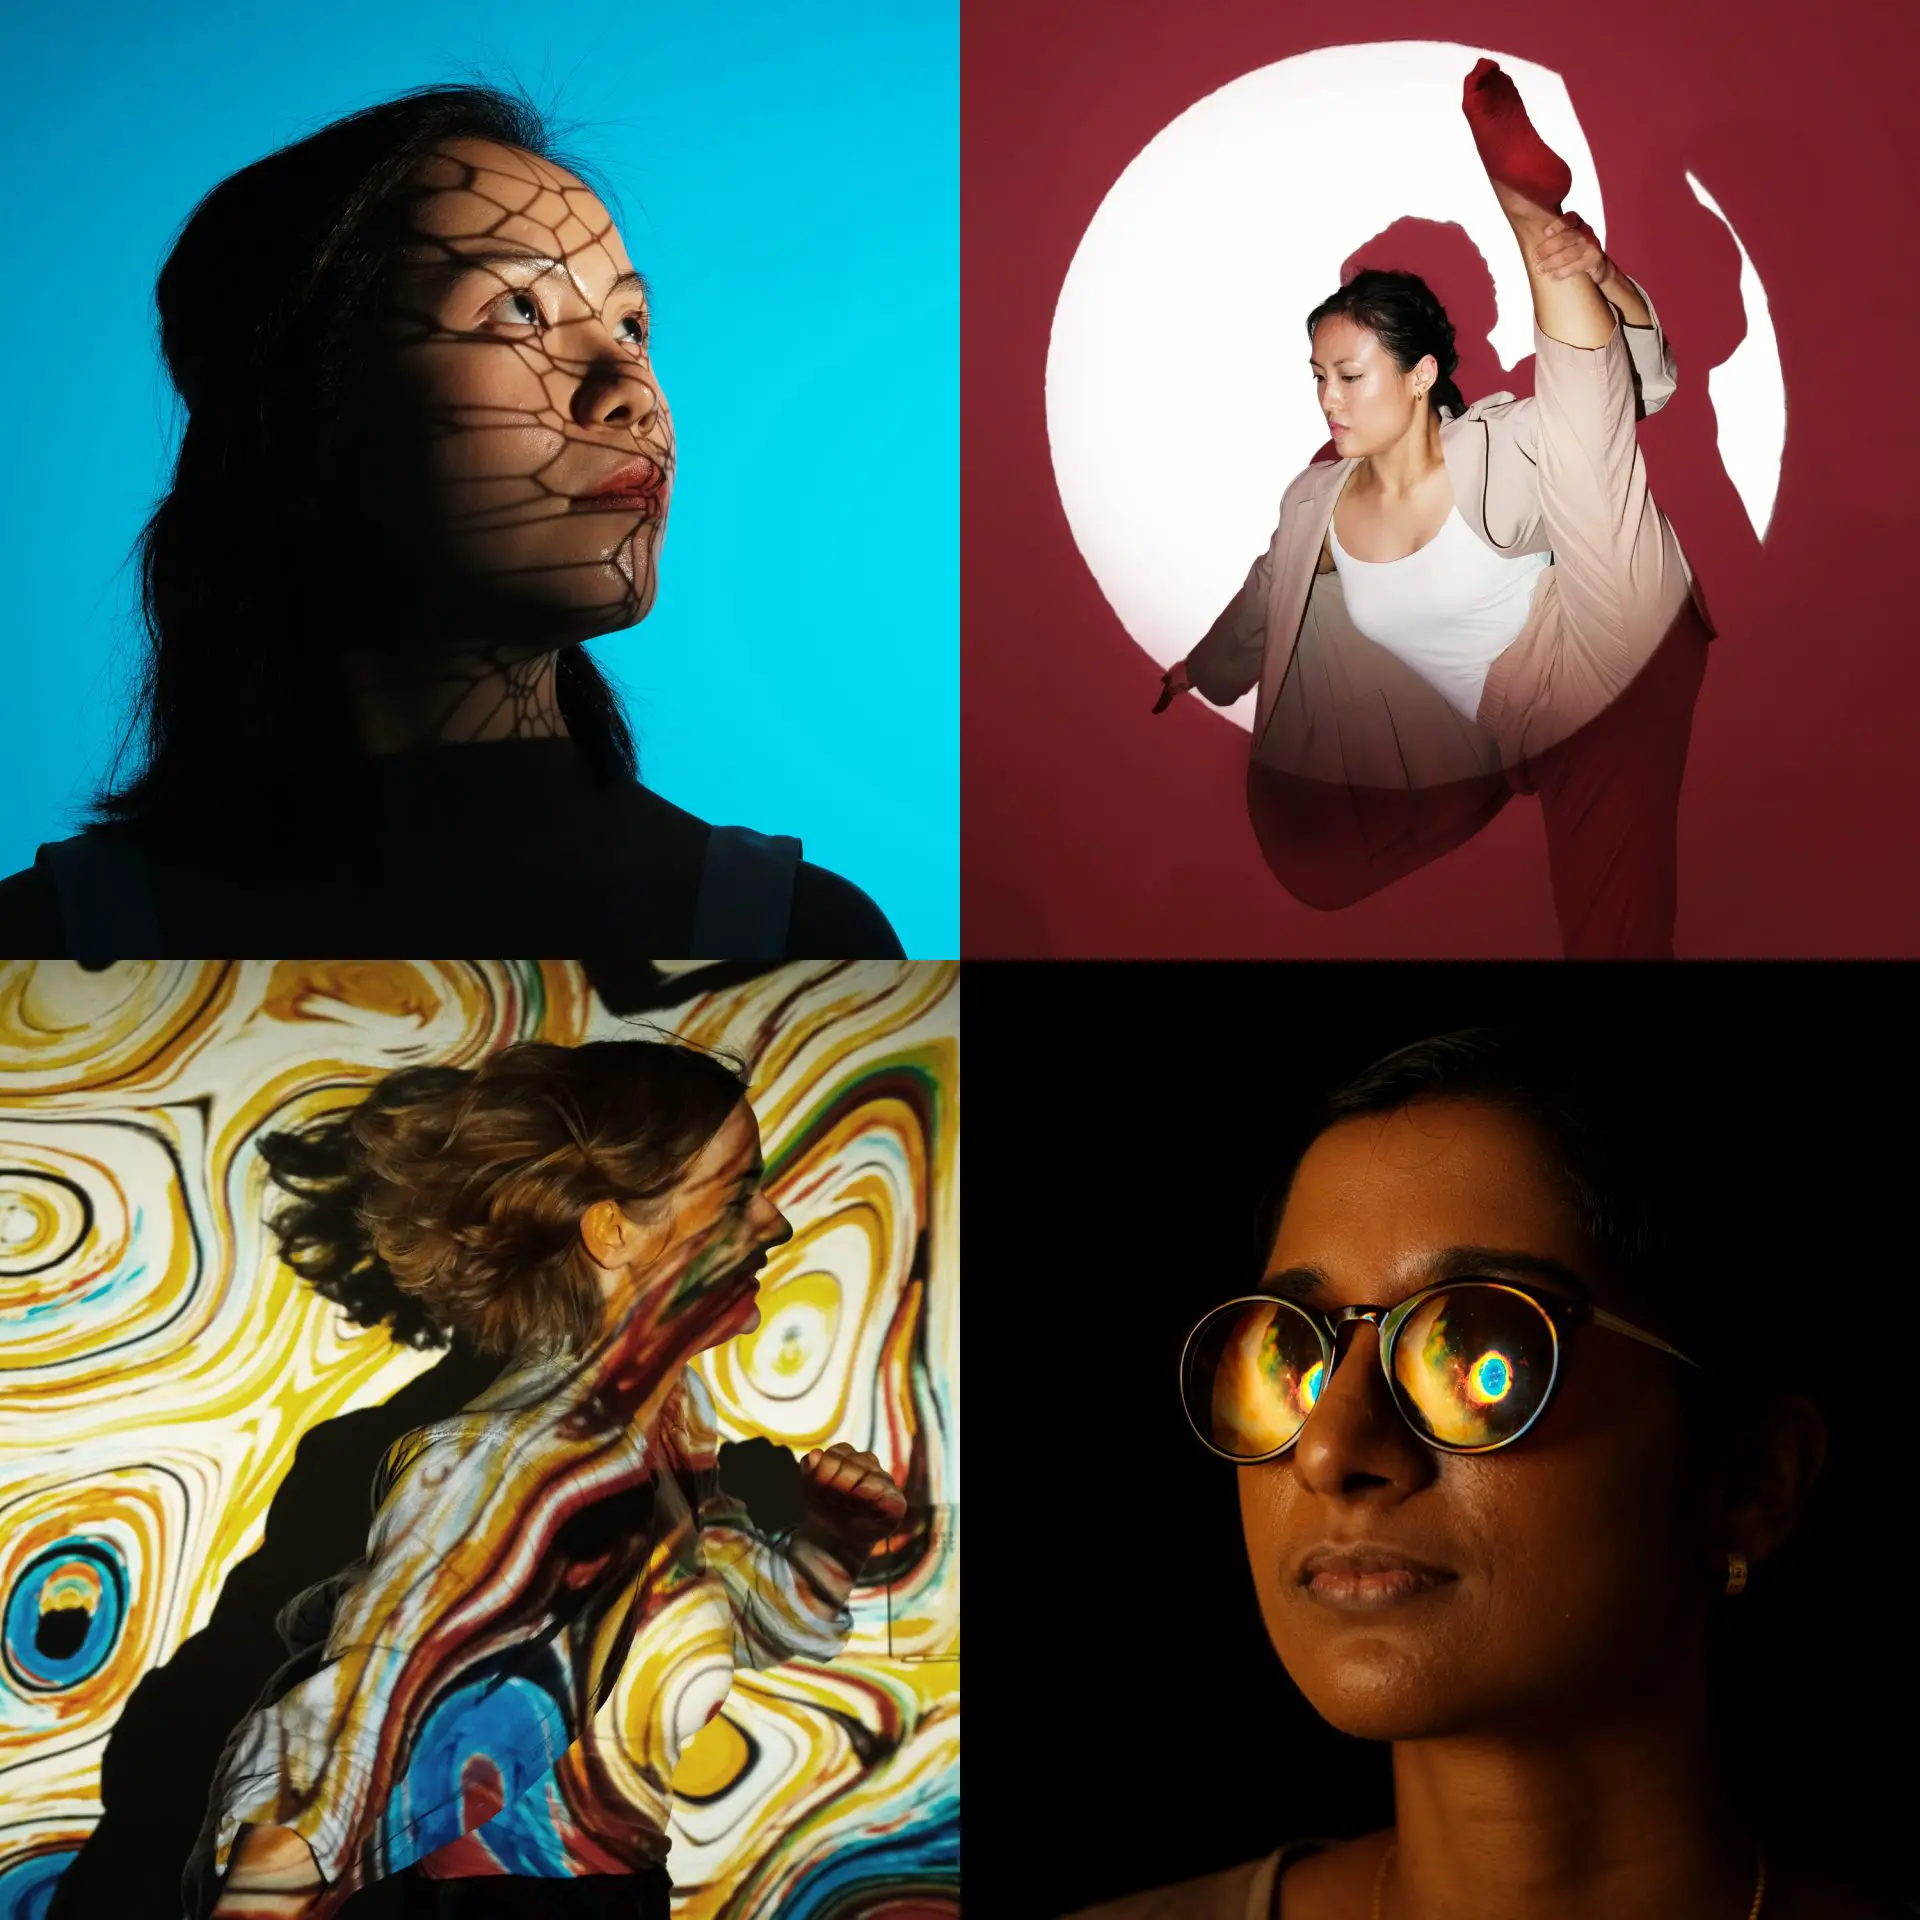
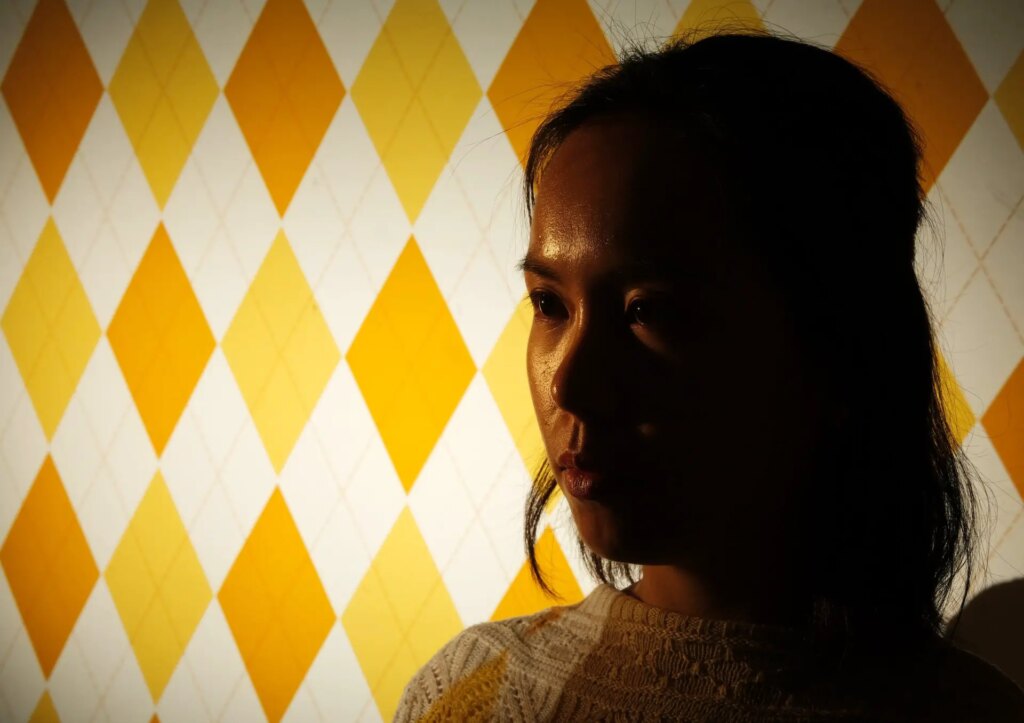
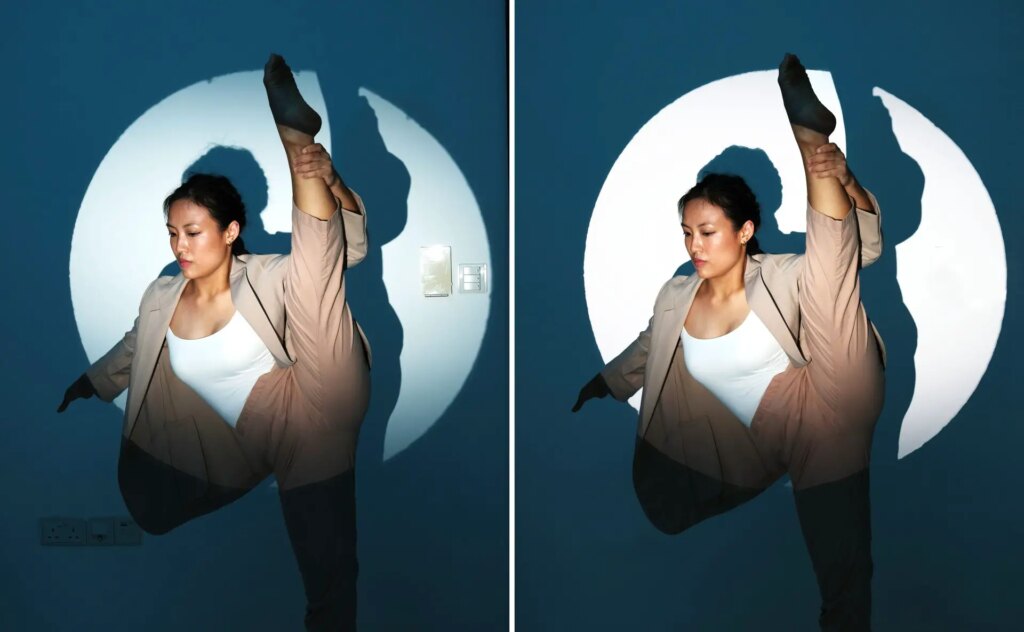
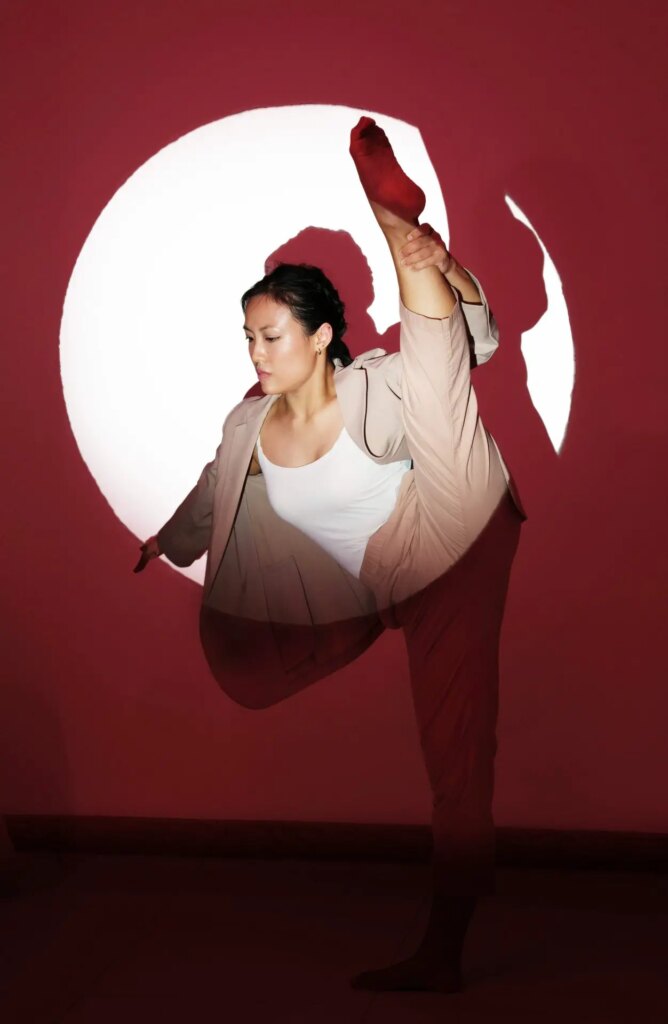
The simplest and most obvious way is to project on both the subject and the background. The image looks different depending on what part of the projected image falls on your subject.
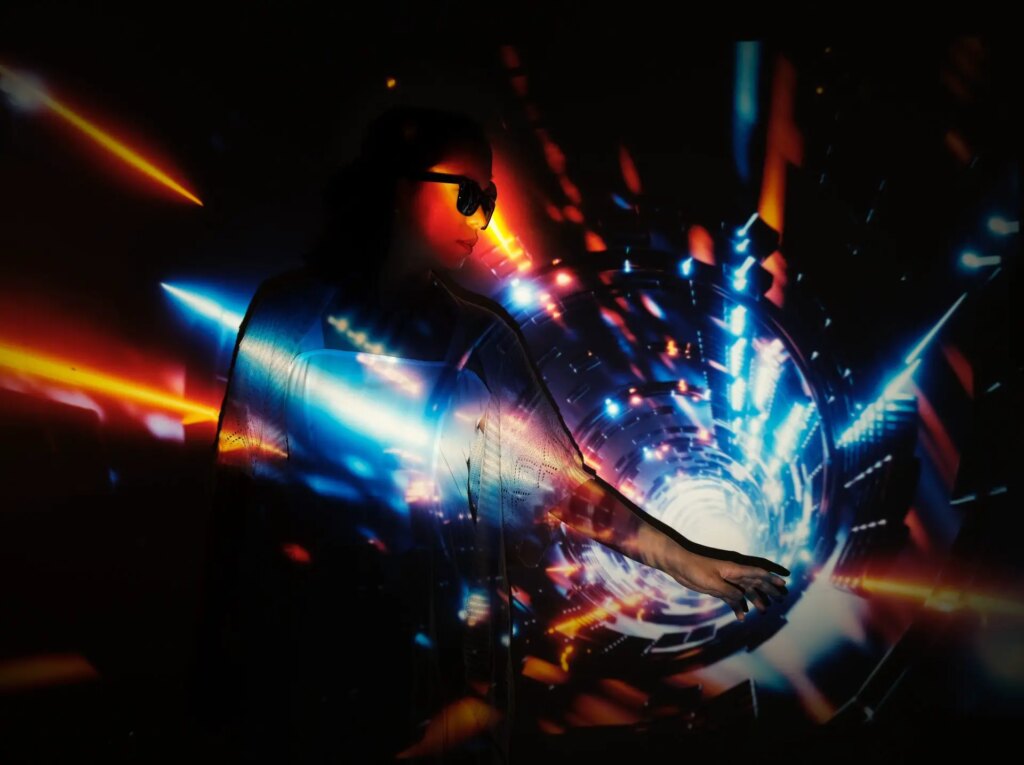
By changing the position of your flash, you can control the size of the image. As I mentioned, you can also rotate the projection attachment. A third, perhaps less obvious option is to deliberately defocus the image. The two photos below use the same slide, but in the second, the projection is out of focus.
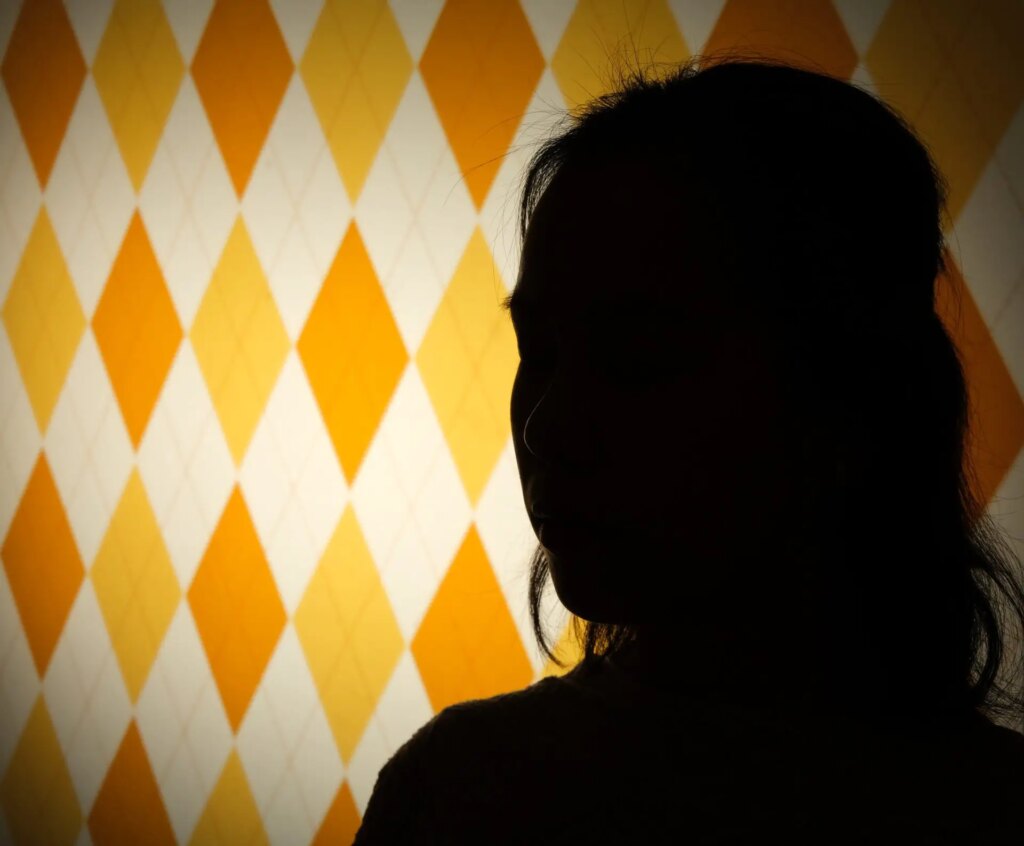
Background only
A second way to use the Godox AK-R21 is to project on the background only. You might need to experiment a bit with how you position your camera, flash and subject, to make sure the image is projected on the background and not on your subject. In the first image below, Pearl’s face is completely unlit. In the second, I used a second off-camera flash, with an orange gel, to add a bit of light.
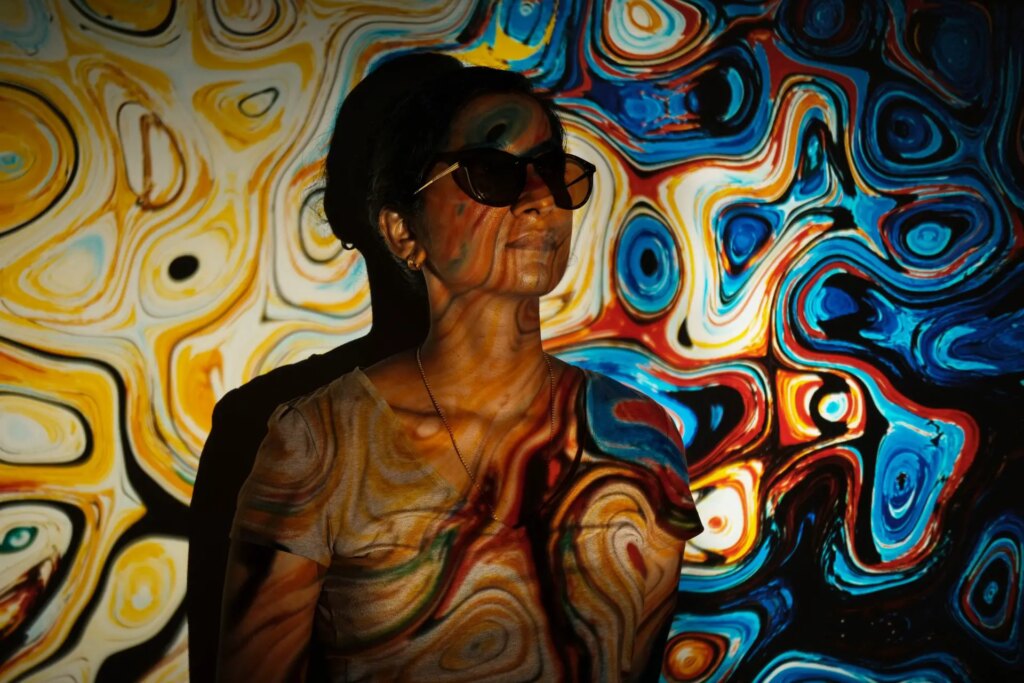
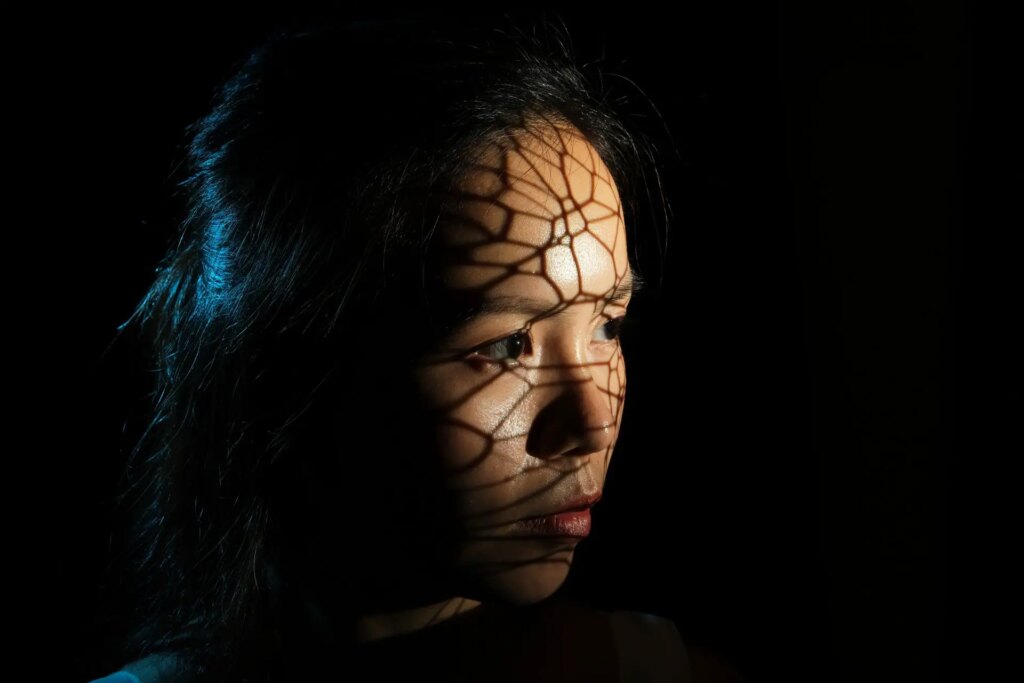
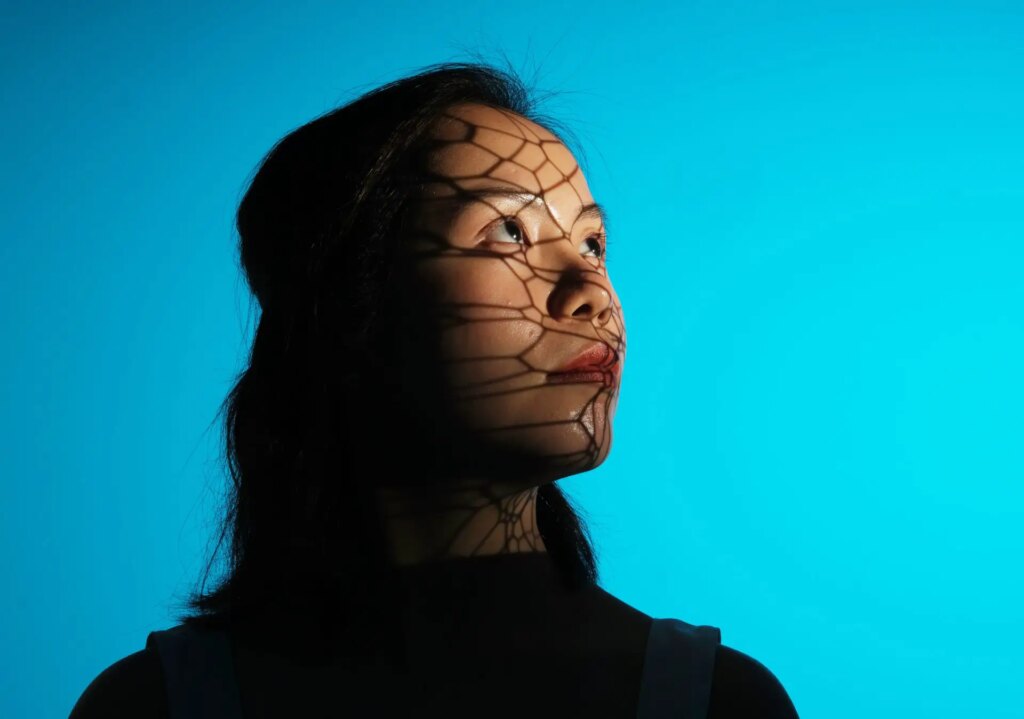
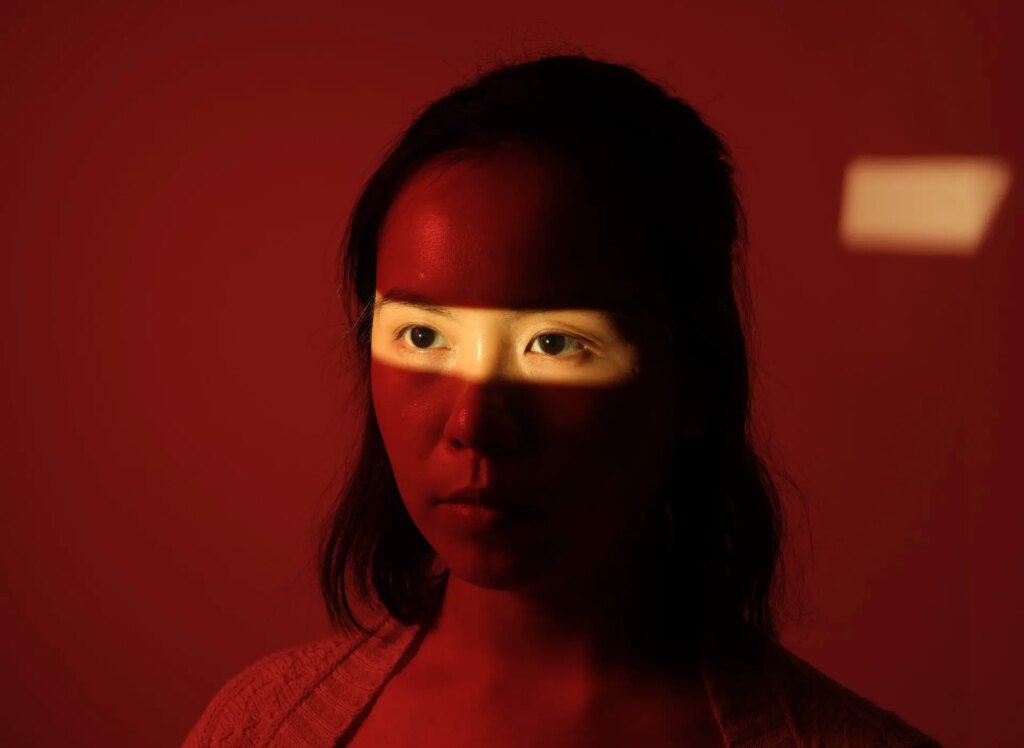
Subject only
A third way – you’ve probably guessed it already – is to project on the subject only. The slide I used for the two photos below is the same one as I used for the earlier vignette test. This time, I projected it from camera right, directly onto Pearl’s face.
I used a second off-camera flash, with blue gel, as a hair light in the first photo, and as a background light in the second.
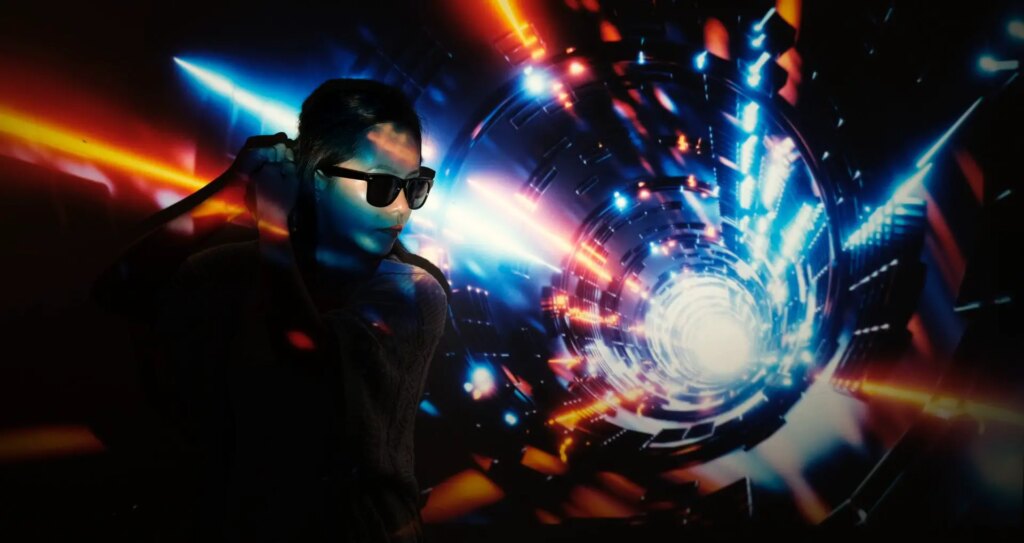
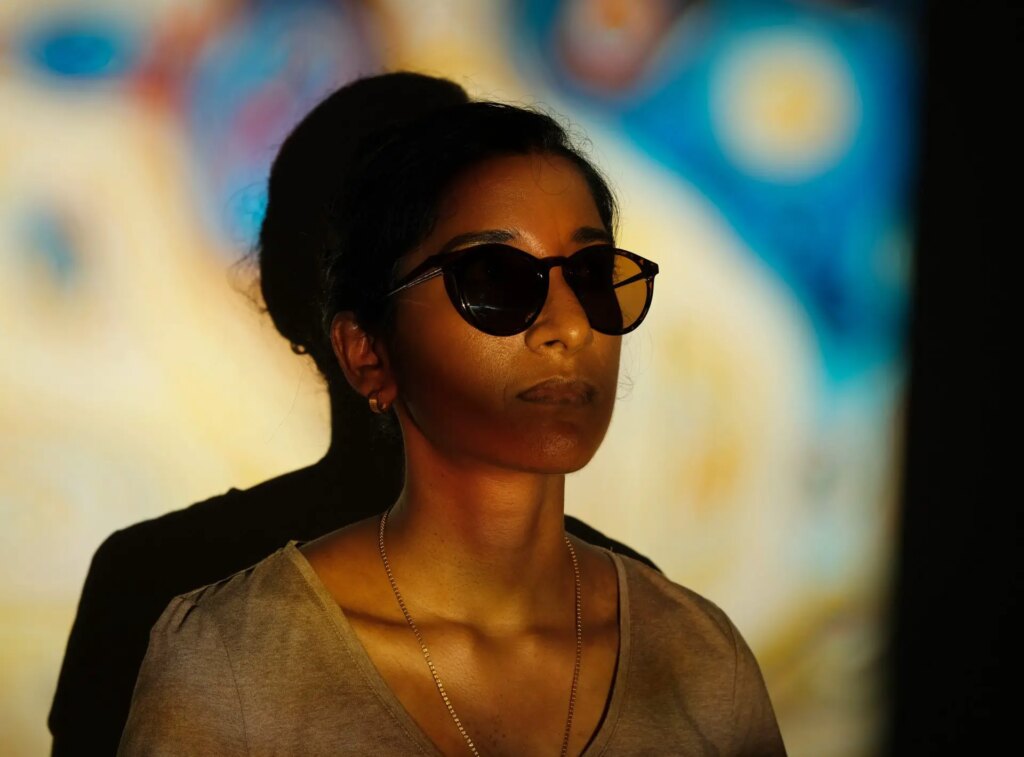
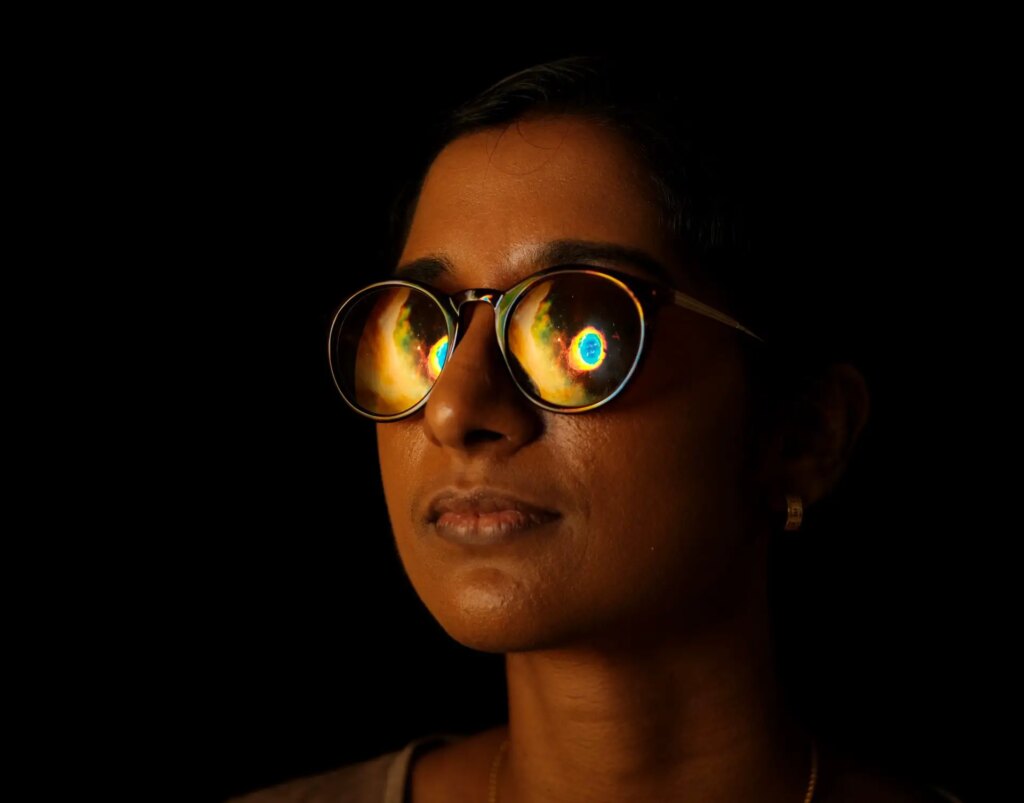
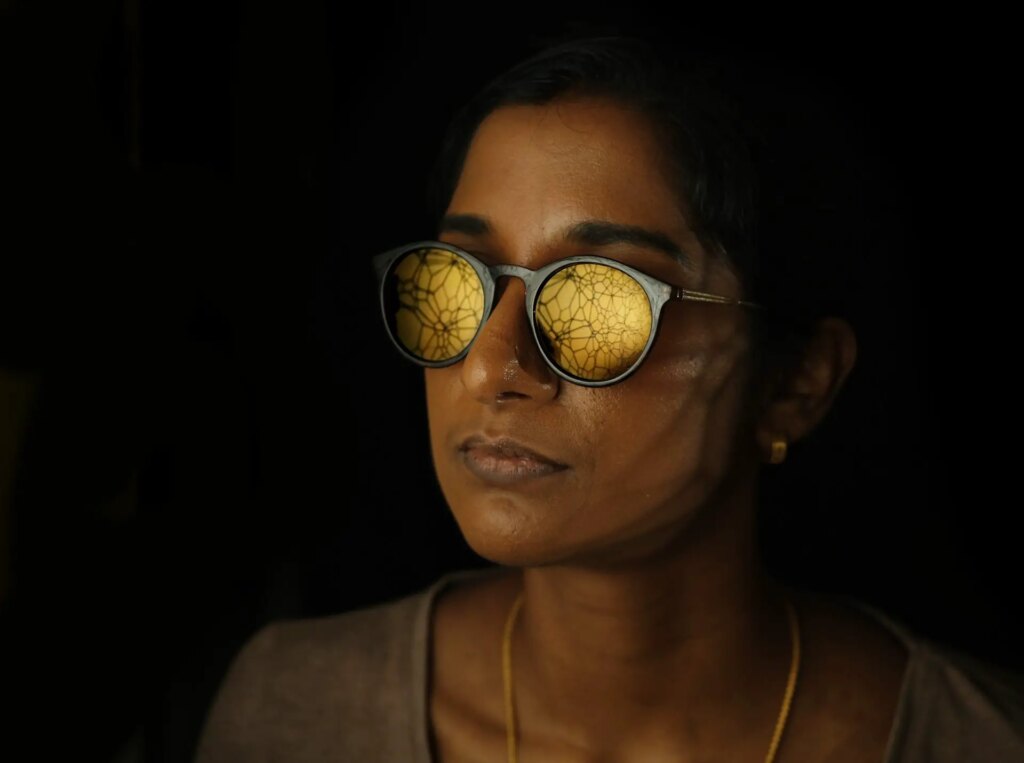
In reflection
It occurred to me that I could photograph not just the projected image itself, but also its reflection. In the photos below, the flash was on camera right, projecting onto a white wall on camera left. The diffuse reflection from the projected image lit up my friend Arya’s face, while the image itself was reflected in her sunglasses.
Custom slides
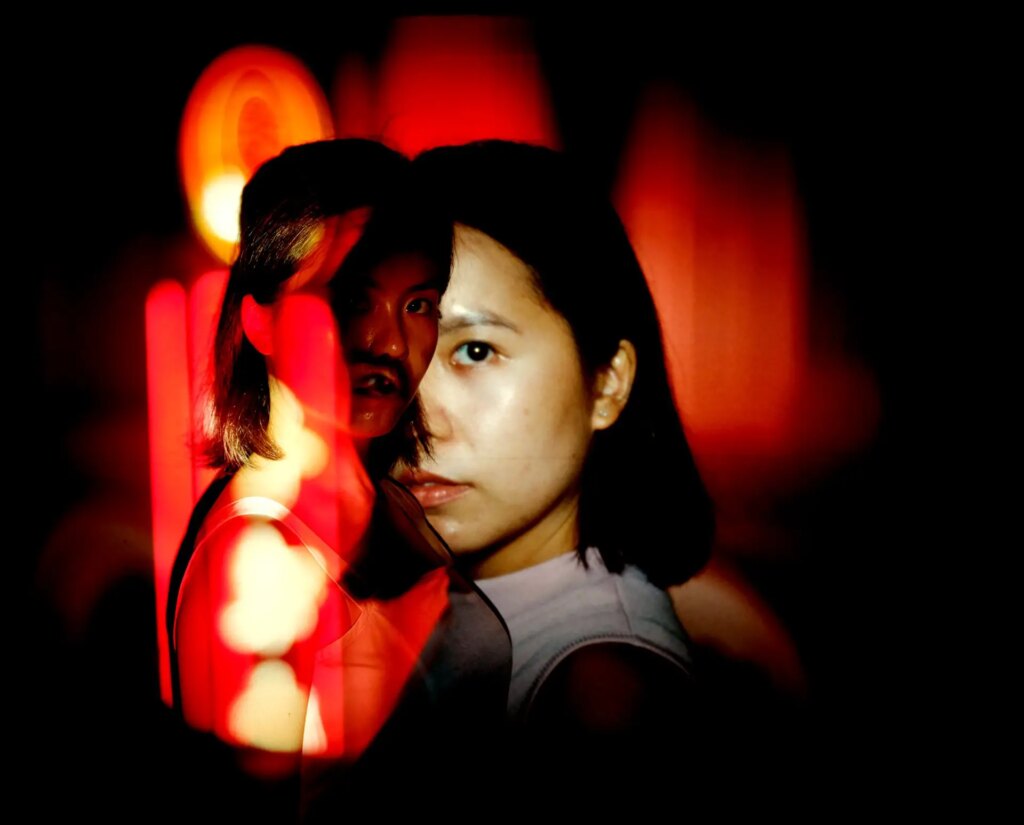
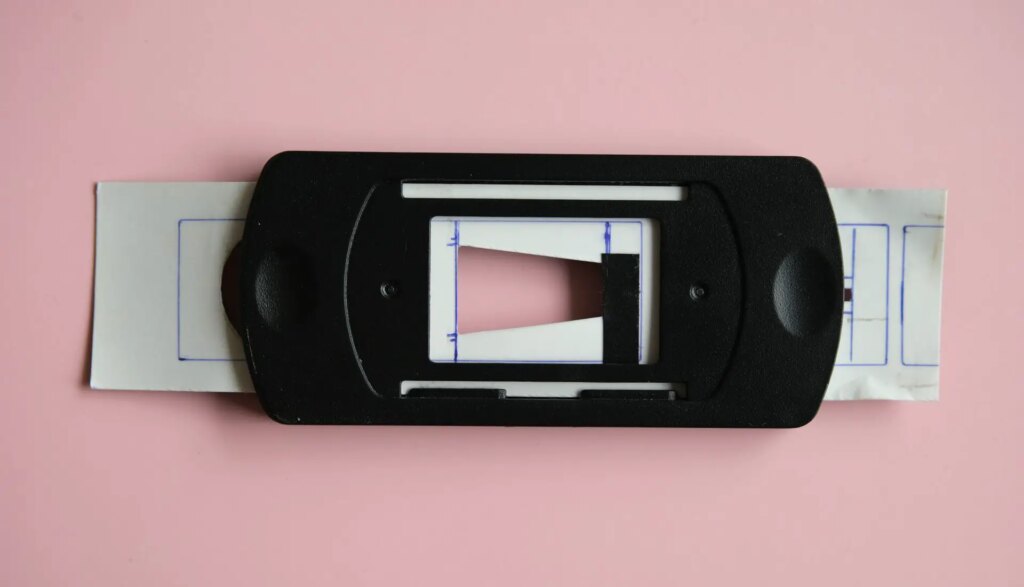
The slide holder that comes with the Godox AK-R21 has approximately the same dimensions as a 35mm frame. This opens up the possibility of using not just the Godox AK-S slides, but also custom slides shot on 35mm slide film. Alternatively, I suppose you could print 36×24mm images on acetate sheets and use them in the slide holder.
I didn’t take any photos specifically for this purpose, but I happened to have some older photos of Pearl shot on slide film (Fuji Velvia 50). In fact, these were for an earlier review of the Godox Lux Senior and Junior flashes.
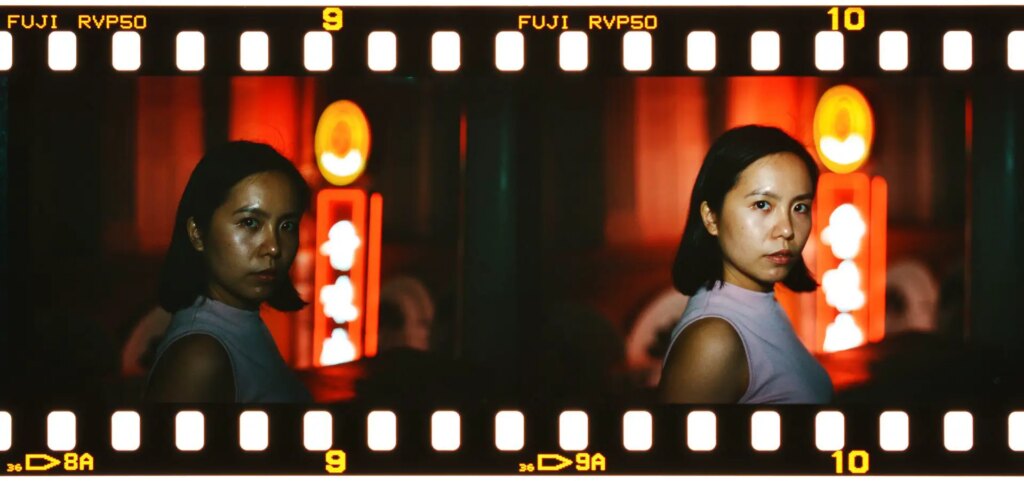
For the next two photos, I simply loaded one of these slides in the holder and projected it onto a wall, with Pearl herself standing in front.

Homemade custom inserts
The previous experiment shows you’re not just limited to the Godox AK-S slides. In fact, you’re not limited to slides at all. I made the inserts below from (a) an ice-tea can (I like how it says “Recycle me”), and (b) glossy paper (Ilford photo paper for darkroom printing, to be precise).
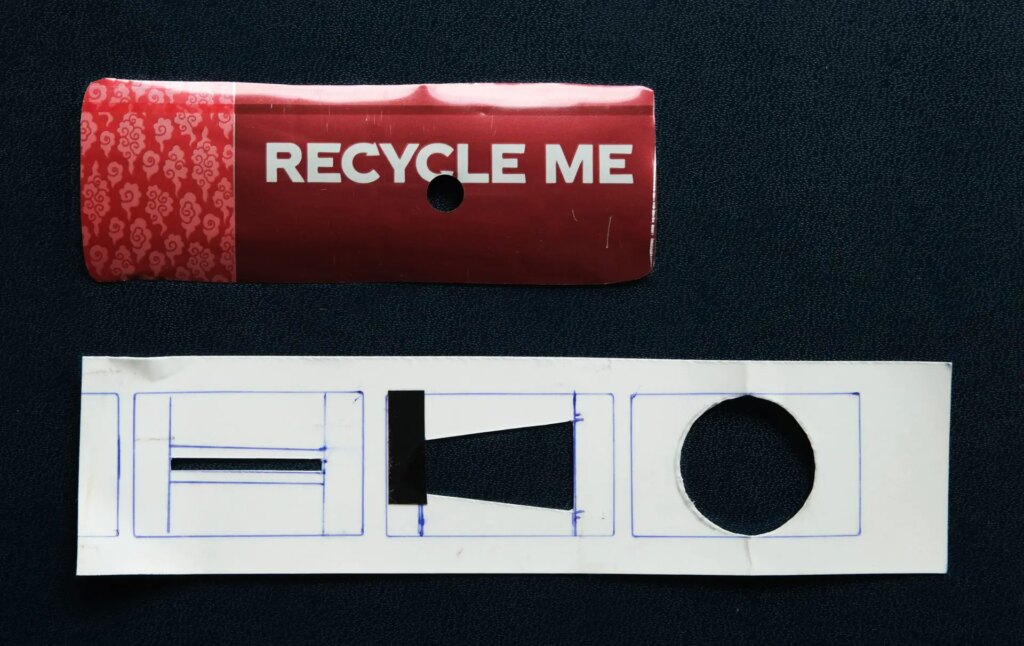
I used a hole-puncher for the ice-tea can, which creates a neat, round circle. I also wanted a bigger circle, so I cut one in the paper. But that one is not as clean.
The next photo shows how I load my paper insert in the slide holder (just the same as loading one of the Godox AK-S slides).
The idea, of course, was to project shapes (as opposed to images and patterns, which is what you get with the Godox AK-S slides). I found it works surprisingly well.
The photo below shows my setup, just using a white wall in my living-room. The pink flash on the left is the Godox AD100 Pro with AK-R21 projection attachment. The second flash is a Godox TT600 with a $5 umbrella diffuser, and some free colour gels that came with the flash.
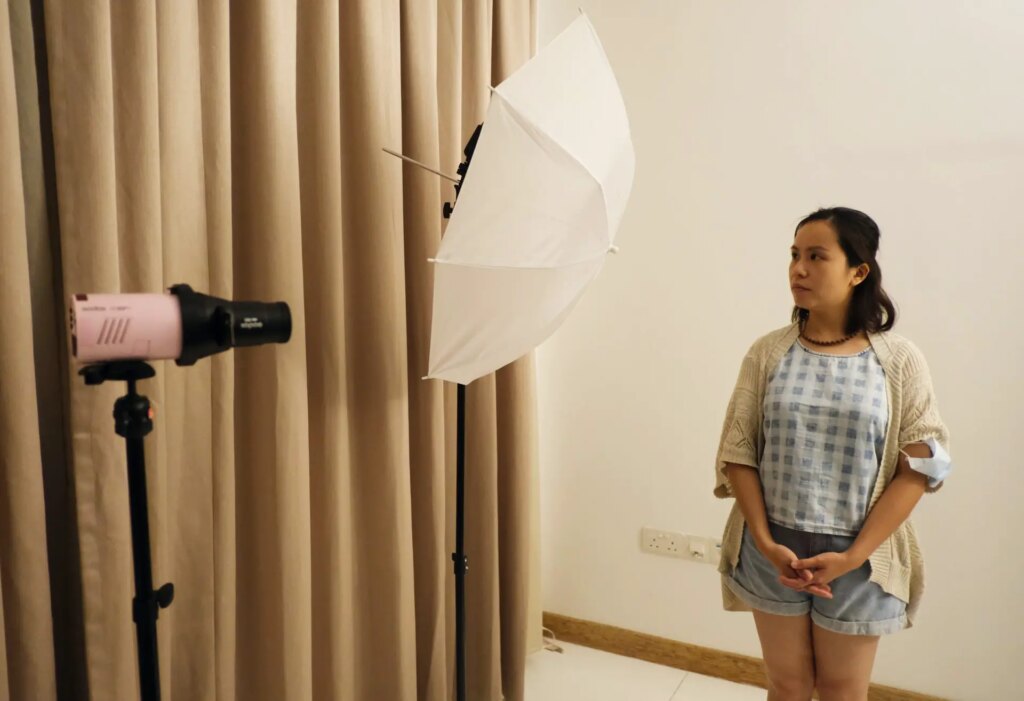
I used the Godox AK-R21 with homemade inserts to project shapes directly onto Pearl, and the second flash (gelled) to create a wash of colour.
In the first photo below, part of the light-strip also spilled onto the wall behind. It would have been easy enough to reposition the light or fix it in post, but I liked the effect.

Next up, for a dance photoshoot with my friend Olivia, I used the circular insert to fake a spotlight effect.
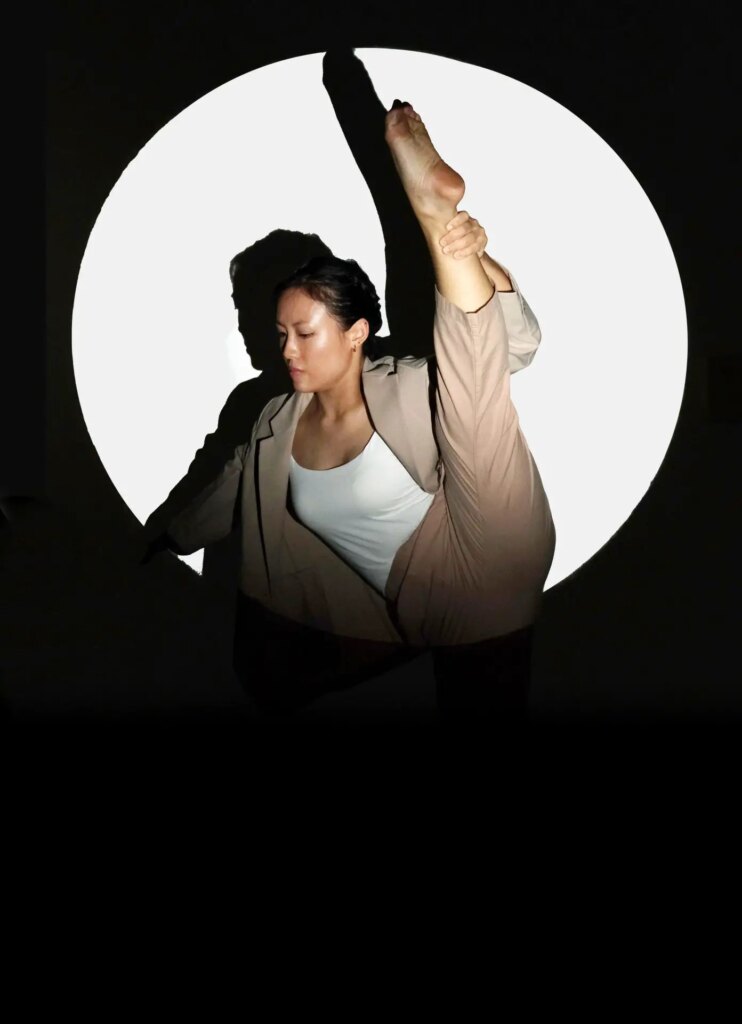
The photo above used a single light. For the one below, I added a second flash (with a blue gel) bounced off the ceiling to add some colour.
Below-left, you see the unedited photo (just slightly cropped). There are some imperfections – ragged edges because the projection magnifies any flaws in my homemade insert, and the blue light slightly bled onto the spotlight. But these are easily fixed in Photoshop (below-right). I also got rid of the light switches – this is the price you pay when you do photoshoots in your living-room as opposed to an actual studio.
On location
In advertising the AK-R21, one of the the taglines that Godox uses is “The World Is Your Studio.” The previous photos were all shot in my living room, which also serves as my makeshift studio. But I also wanted to try the AK-R21 “on location”. The projection attachment is compact and light, so along with the similarly compact Godox AD100 Pro, carrying it around is not a problem. The main limitation comes from what I mentioned earlier – the fact that the projection attachment effectively reduces the flash power, which makes it harder to kill or even subdue the ambient.
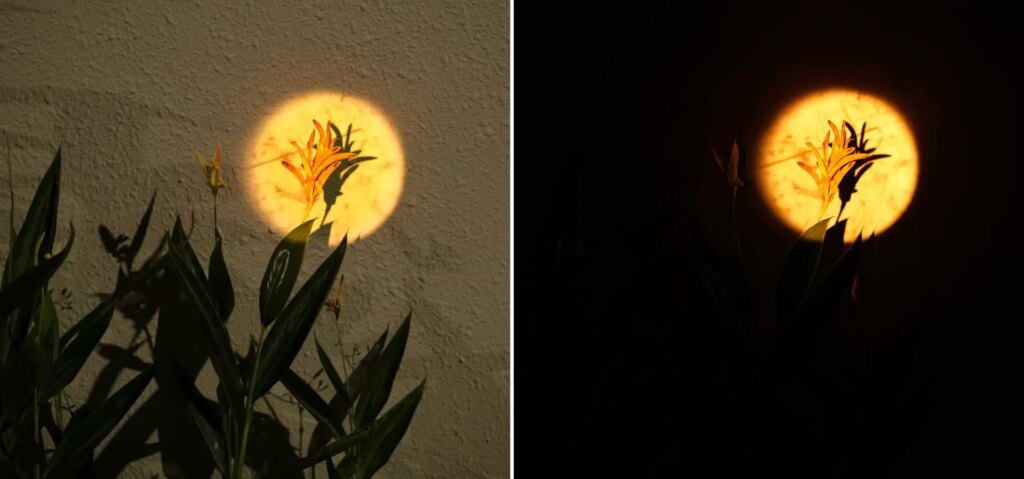
But at nighttime, it was bright enough to kill the ambient light from streetlamps.
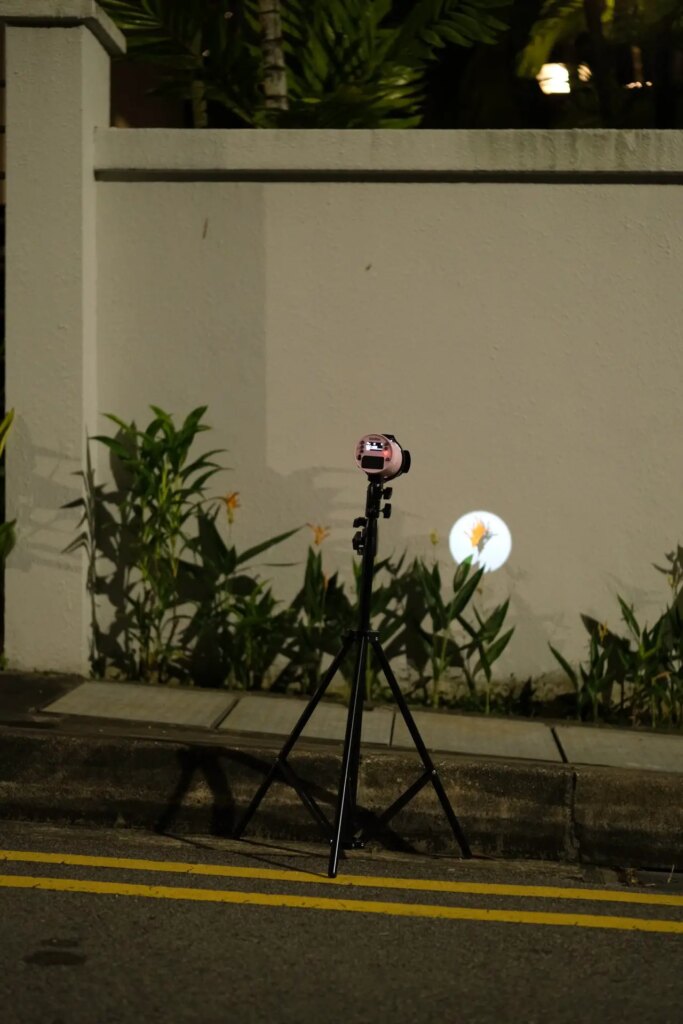
As you can probably tell, I’m using my homemade insert for the spotlight effect. In the photo above, I chose a longer shutter speed to show the set-up. But by increasing the shutter speed, I was able to kill the ambient, even though the flash was at less than full power (around 1/16, if I’m not mistaken):
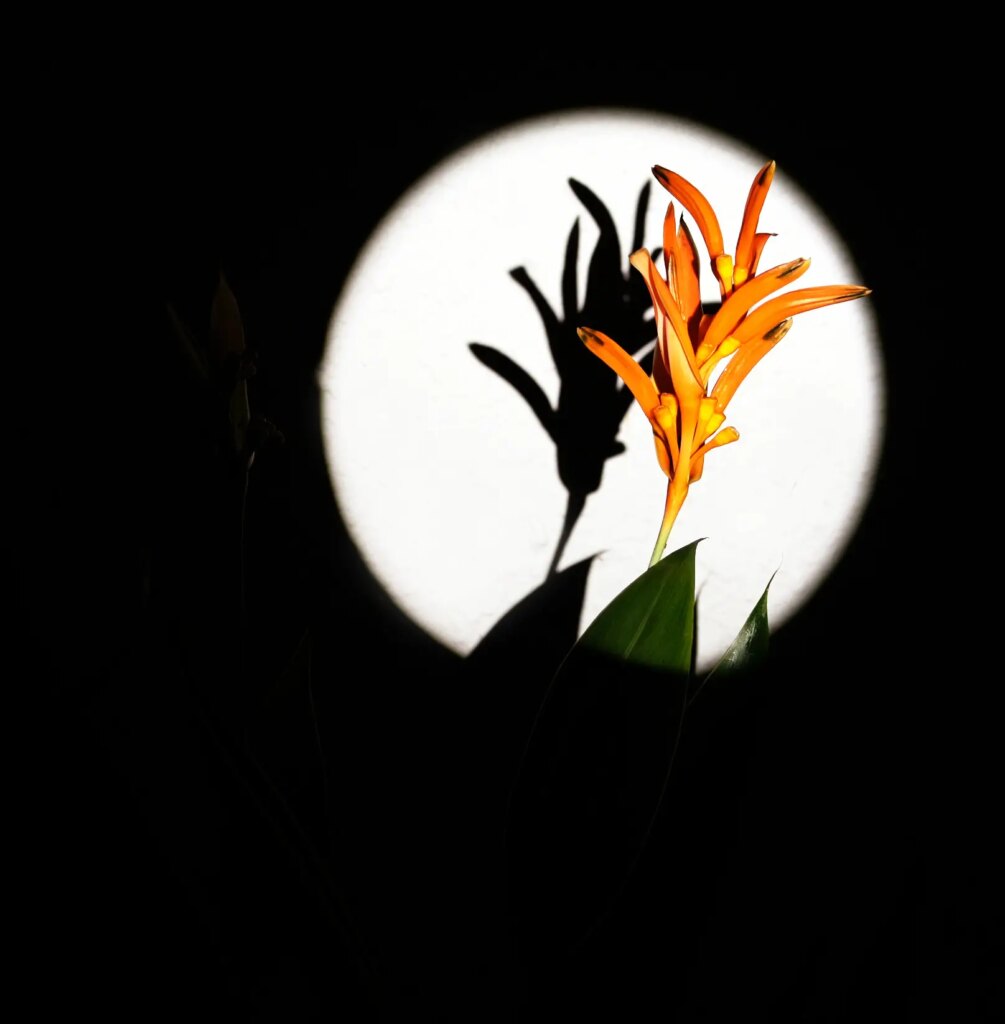
I also experimented with sticking a piece of orange plastic over the hole in my homemade insert, thus making it a coloured spotlight. A longer shutter speed (below left) allowed me to incorporate some of the ambient light, while a faster shutter speed (below right) kills the ambient and focuses our attention wholly on the spotlight.
Slides
So far, I’ve mostly talked about the projection attachment in general; now I’d like to focus more on the Godox AK-S slide set.
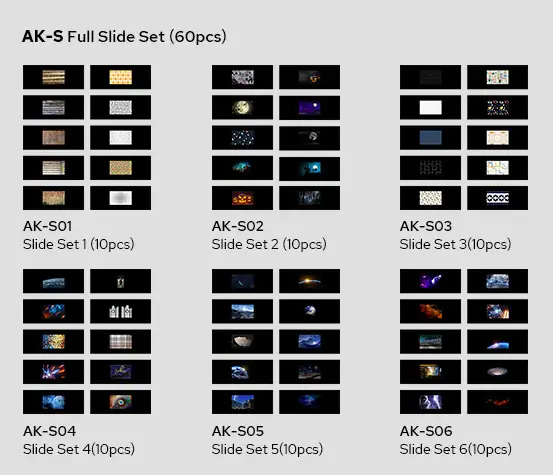
At the time of writing, there are 6 sets of 10 slides each ($9.90 per set), or you can purchase all 60 slides together ($44.90 on B&H or Adorama). What I’m reviewing is the AK-S full slide set (60 pieces).
I like the Godox AK-R21; I think it’s cleverly designed and reasonably priced. The AK-S slide set is not bad, but I think Godox could do better.
First off, I found a lot of the slides to be thematically not very diverse (over 20 slides have a space or sci-fi theme, and one whole set is themed around Halloween). My friend, who studies ocean acidification, complained that there are no water-themed slides. She was joking I think, but water – or nature in general – does seem like an obvious and potentially-popular theme which, for whatever reason, has gone unrepresented.
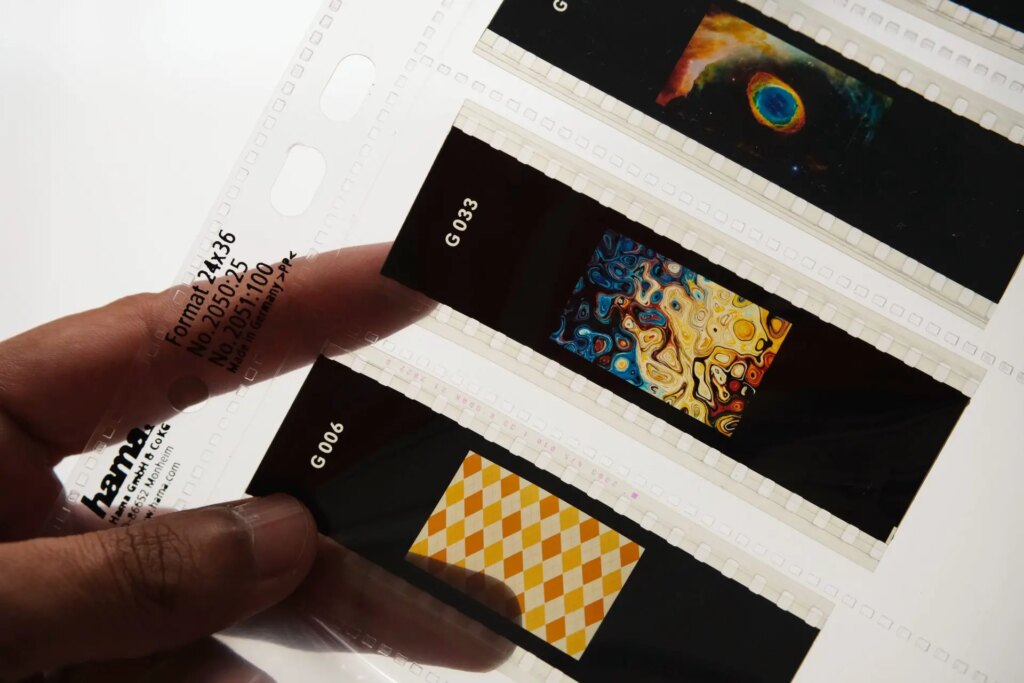
60 slides sounds like a lot, but when I consider the ones I actually like, the number is not that high. In a lot of Godox AK-R21 reviews (including my own), and even in their own marketing materials, you’ll see the same few slides show up. For instance the artsy one with blobs of colour, which I used to demonstrate in-focus and out-of-focus projections, is an obvious favourite. In fact, the popular slides only serve to emphasise how good the AK-S slide set could have been.
Besides patterns, Godox could include simple shapes, like the inserts that I made for myself. Godox already have these for another projection kit (for the S30 LED light), so I’m surprised they didn’t include them as an option for the AK-R21. In some ways, I find simple shapes such as circles, windows or leafy shadows are more versatile than images and patterns.
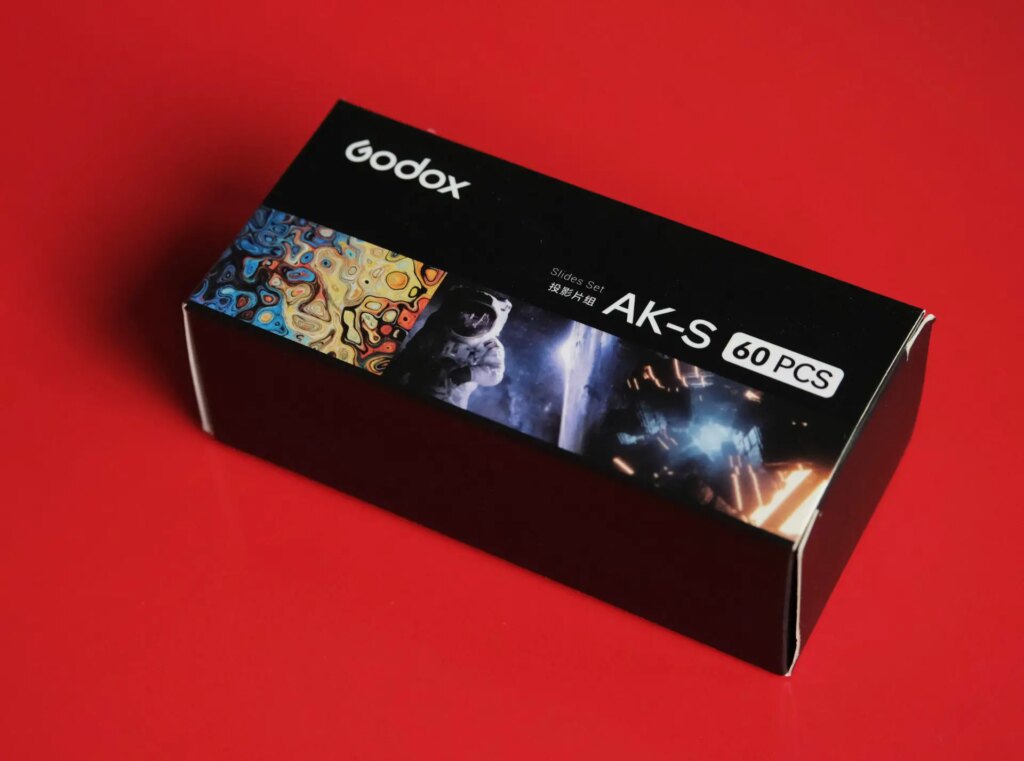
Secondly, I think the packaging could be better. On the outside, it’s all good – you have a cute little cardboard box containing the slides.
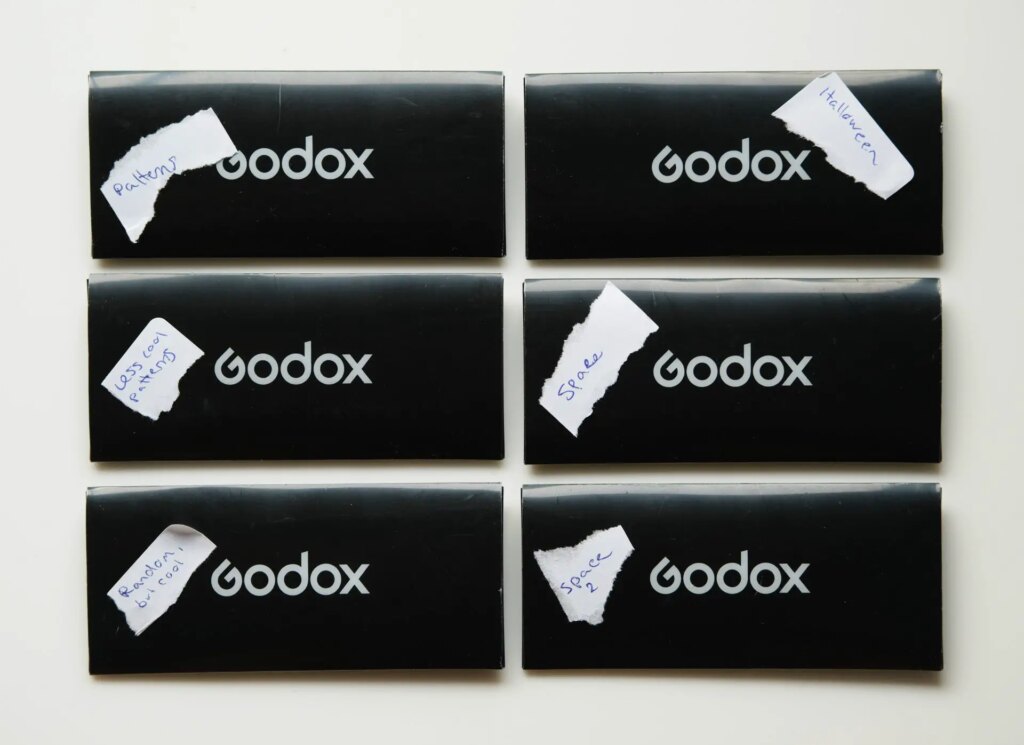
Inside, there are six identical black envelopes, which makes it hard to find the slides you need. My friends, who were helping me with my tests, stuck identification labels on them. Godox could do something similar, or even print little thumbnails on each envelope, to save us the trouble.
The contents of one such envelope are shown below. There’s a little plastic pouch (top right) which contains the slides. The pouch is a bit annoying to use, because the slide edges tend to catch on the plastic. There’s also a piece of paper with printed thumbnails (bottom left) and of course the slides themselves (bottom right).
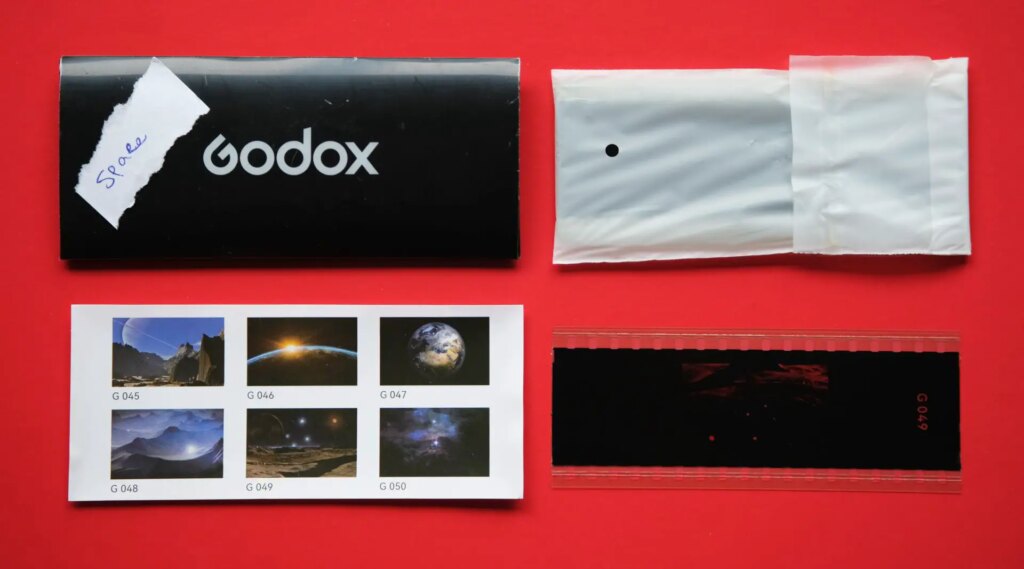
The thumbnails are helpful, but like I said, it would make sense to put them on the envelope itself. Godox has reproductions on their website, which helps potential buyers see what they are getting. If you really want, I guess you could print those off and stick them on your envelopes.
As it stands, fiddling with the envelopes in a dimly-lit studio, trying to find a particular slide, is no fun at all. So before a photoshoot, I insert the slides that I’m planning to use in a 35mm negative storage sleeve.
To be fair, the Godox AK-S slide set is a relatively new product, and it’s still early days. The issues which I highlighted all seem fixable. I hope Godox improves the packaging, and even more importantly, releases more (and better) slides, which I’m sure would make the AK-R21 even more attractive to photographers. Some of us would probably even be ready to pay a bit more for limited edition slides and patterns designed by independent artists.
Final thoughts
Overall, I think the Godox AK-R21 projection attachment is a cleverly-designed and reasonably-priced accessory which can really expand your creative lighting options. It’s small, light-weight and – with the exception of a couple of minor niggles which I highlighted earlier in this post – it’s easy to use.
What’s more, it’s fun to use, and this is a quality which shouldn’t be underestimated. I tried it out with various friends, and we always had a good time choosing the slides, mixing and matching colours, and being surprised (and sometimes amazed) by the results.
The AK-S slide set has a few gems, but I for one would welcome better packaging and more importantly, greater variety. Hopefully Godox will release more slide packs soon. Meanwhile, if you really want, you can, as I explained earlier, take matters into your own hands. In fact, if you’re the DIY crafty type, making your own slides and inserts may be almost as much fun as using them.
If you like experimenting with lighting effects – and especially if you are into creative portraits, fashion or product photography – the Godox AK-R21 projection attachment may well be a fun and inspiring addition to your toolkit.
The AK-R21 projection attachment is available, among other places, through B&H and Adorama in the US, and Essential Photo in the UK (these are not affiliate links; I’ve included them just for convenience).
Lastly, I’d like to thank Godox for sending us the review copies, and my friends Anne, Arya, Olivia and Pearl, for helping me test them. For more of my work – with and without flash – feel free to check out my Instagram.
Share this post:


Comments
No comments found