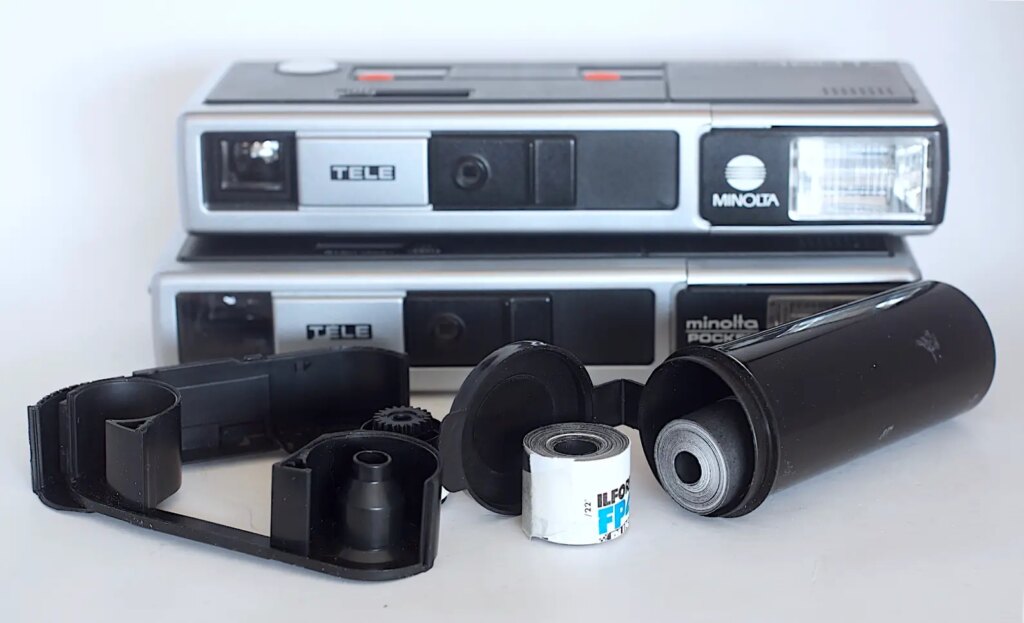
This has turned out, somewhat abruptly, to be the final chapter in my investigation into 110 and reusing the cartridges. Unfortunately, it also led to the demise of my original Minolta 460 Tx camera and a change of direction for my foray into sub-miniature photography.
Having discovered how to accommodate 16mm stock for processing and how to retain for re-use intact cartridges from commercial films I have shot, I also found that the camera is able to produce a larger negative than the proscribed proportions dictated by commercial 110 format films, requiring 16mm film without the preprinted frames. Unperforated film will also need the camera to be modified to allow the shutter to release.
I decided to try to make a device to slit 120 size film to provide strips 16mm wide for use in the rescued cartridges.
So how best to do this?
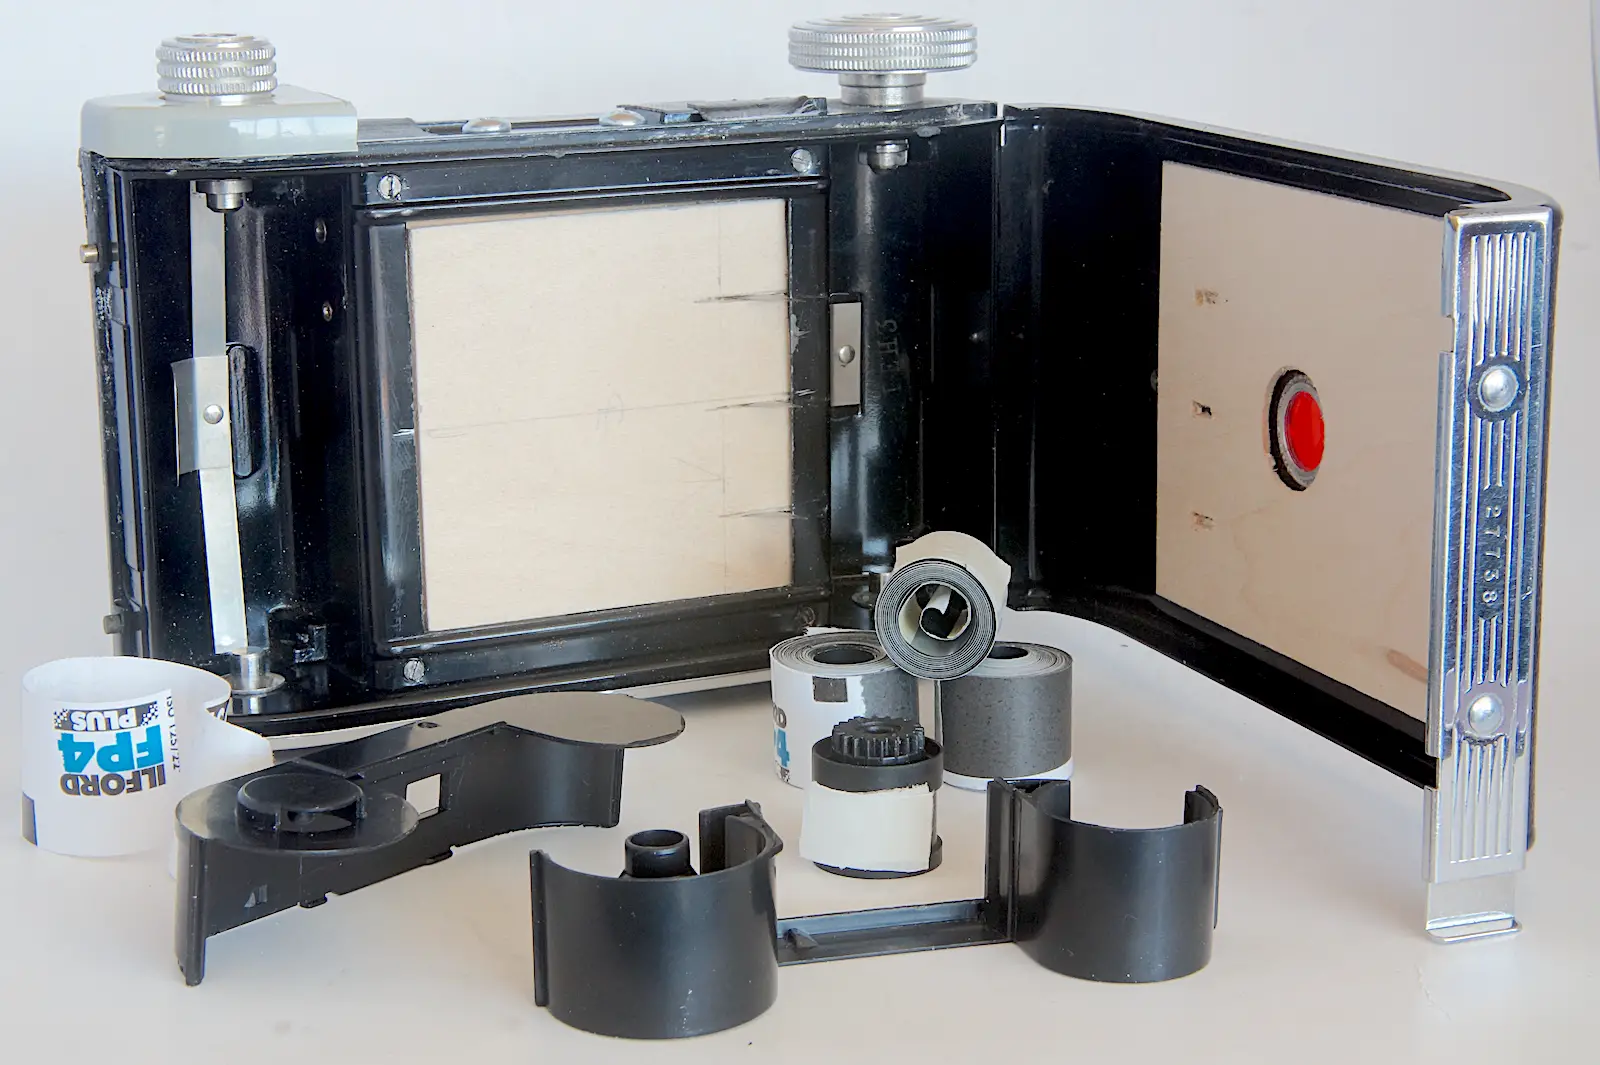
Researching the web turned up several possibilities, both ready made and DIY. One solution was similar to what I had in mind for the 120 Kodak 66 II body I have but was designed to produce a 127 width from 120. The camera body I have had been badly damaged at some point, the front section completely beyond repair, and which I had used initially for pinhole work but was now available for further re-purposing.
My main objective was to produce a slitter that could be operated in the light, utilising the winding mechanism of the old camera to avoid handling the film itself. A ready made or simpler version would save a lot of time if you want to go that way when eBay and subclub web sites among others are worth a look. Alternatively, a web search will reveal various DIY versions including a very ingenious one on the Lomography site that simply uses a matchbox and a couple of scalpel blades to slit a 35mm film down to 16mm.
My version.
The basic materials I used were:
- An old 120 folder body (one with rollers at each end of the image opening would be better than mine to ensure the film is kept as flat as possible as it passes over the blades – see below).
- Wood for the cutting block insert.

- Sharp blades such as craft knife or scalpel blades. (Snap-off blades can be used but only when there is no risk of the film snagging, hence the comment about rollers above. If the camera body doesn’t have rollers to ensure the film stays flat, the film can sag and snag onto the lower edge of the blade. This locks up the transport and prevents further advance. More pressure simply tears the paper.)
- Sharp tools, various nuts, bolts and screws, felt, tape and adhesives.
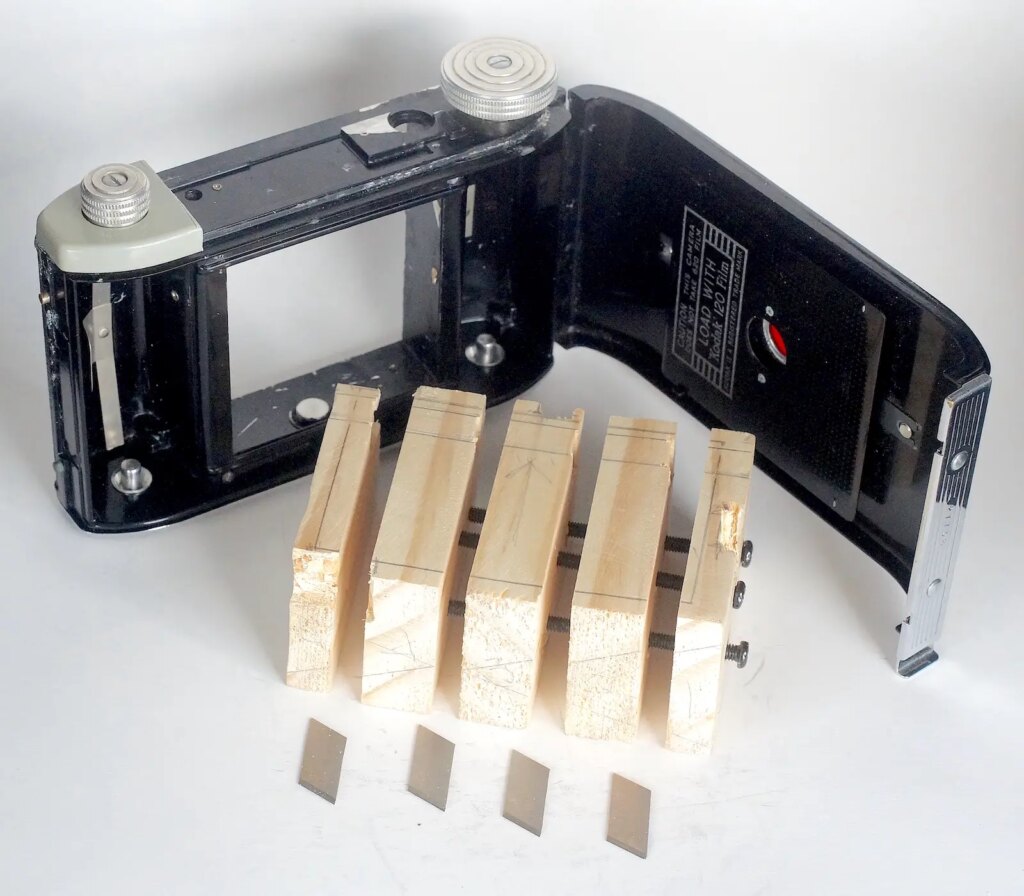
I initially adopted the “sandwich” approach with four snap-off blades to produce three 16mm strips but subsequently found that an alternative “two block” version with three scalpel blades blades set in angled saw cuts works better with the camera body I had available. The wastage was similar but in one strip rather than two.
This approach has the advantage of making angling and fitting of the blades less tricky. I have included a sketch I worked up for my camera body for the second version. It could be adapted to other bodies.
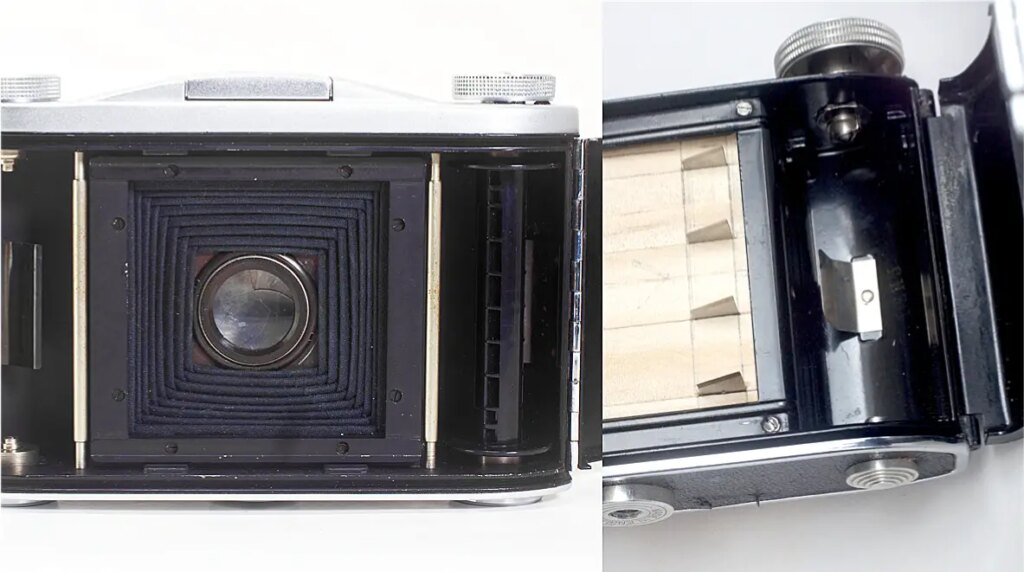
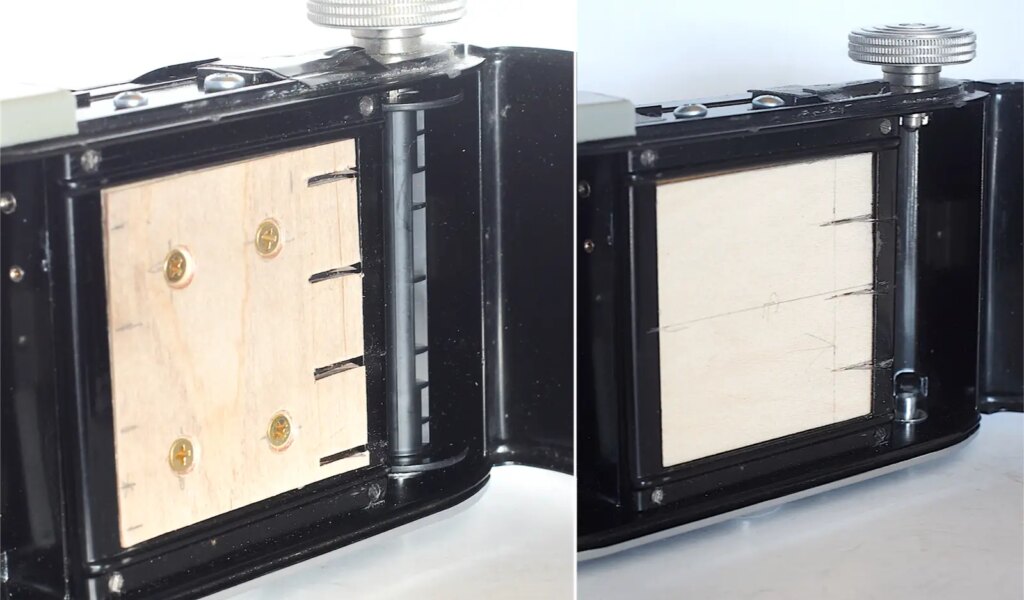
It is a good idea to house the ends of the blades in slots in the pressure plate or, as shown in the feature image, replacing it with thin ply.
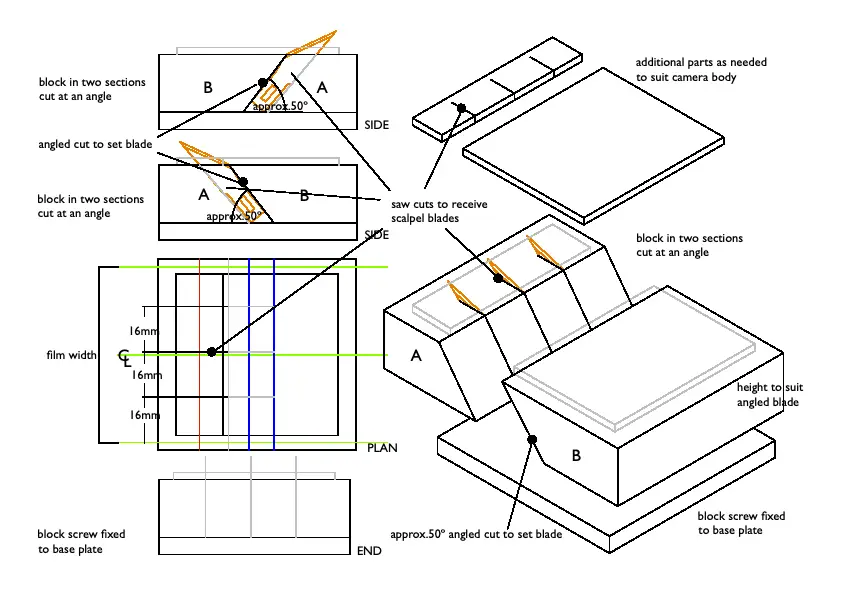
My razor saw produces a width of cut that matches the scalpel blade very closely and holds it in place without adhesive. This does need the cut to be very accurate, however, so I opened it out with a hacksaw and fixed the blade with a rapid action epoxy adhesive. This allows fine adjustment as the adhesive sets but makes replacing the blades more difficult.
The hardest part is to get the rather small and fiddly component parts the correct size and fit. A lot of sanding is involved or a friendly cabinet maker might help out here to produce the most accurate components. 3-D printing is another option I imagine if that is available to you. One of the commercial versions I found uses this method and fits into a standard 120 8-on camera.
Slitting the film.
After several failures I eventually produced three lengths of useable FP4+ from a roll of 120.
I would recommend winding slowly and smoothly, stopping winding just before the end of the backing paper is reached. Taping the end of the backing intact retains some control when it comes to separating the lengths of film in the dark.
The blades do tend to pick up traces of the adhesive from the tape fixing the film to the backing so it is a good idea to clean them off after each film with solvent to avoid problems subsequently.
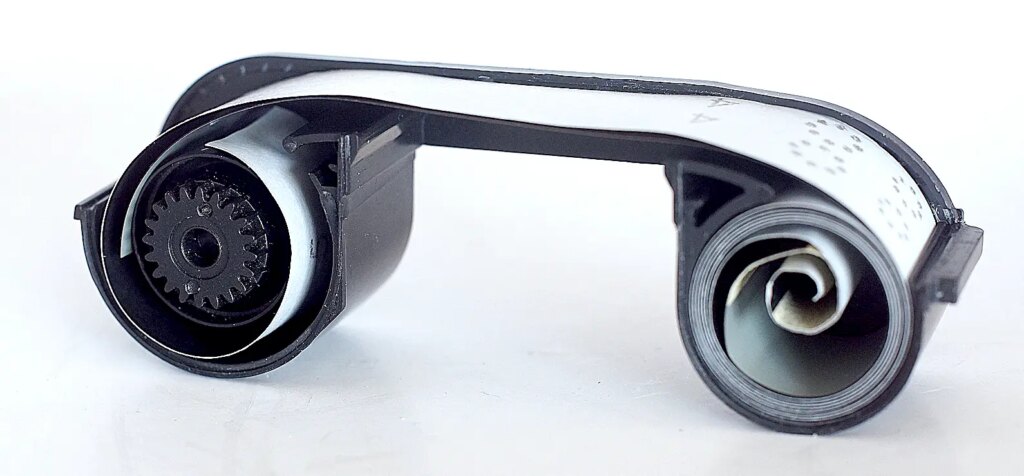
After separating the slit lengths in the dark, roll them quite tightly and tape them securely before storing them in a light-tight container prior to loading the cartridges. Rollei’s 120 film comes in a suitable example.
The death knell.
This is where things started to go seriously awry so I will keep it brief.
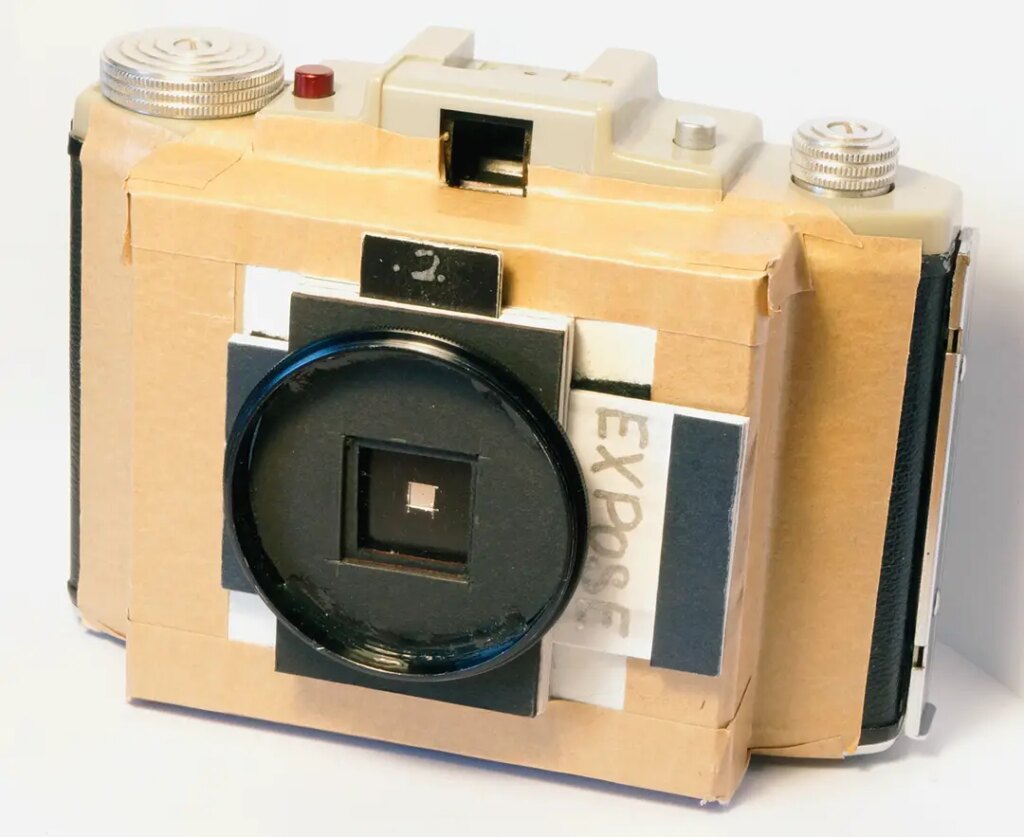
I trimmed a strip to length before loading it into the cartridge and taped everything together.
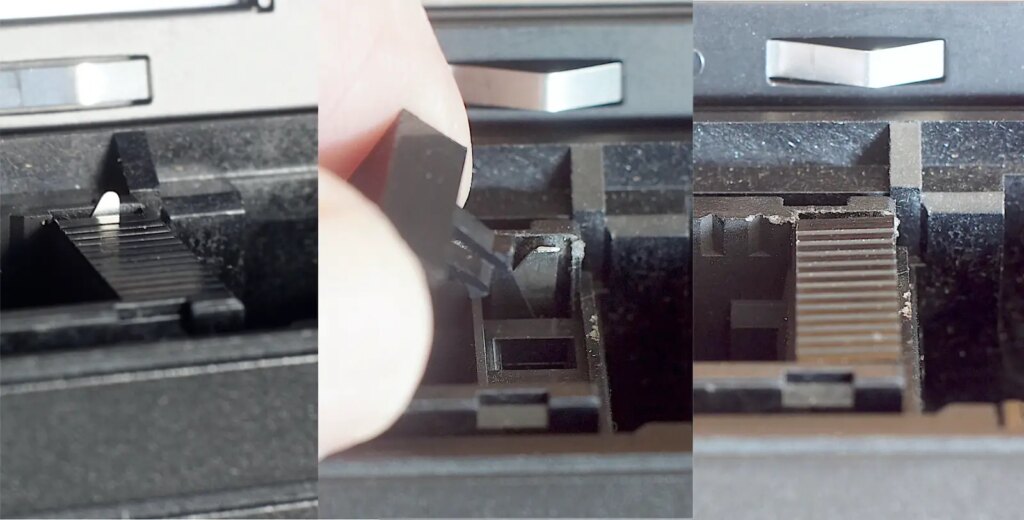
This was preceded by what I had had decided was necessary to allow the camera shutter to fire without the perforations. The small arm that locates in the perforation has to be trimmed so that the film doesn’t depress it preventing the shutter from working. This was done with a pair of nail clippers, the metal being very thin.
Unfortunately, because of my ineptitude or for whatever other reason, the film just refused to transport and locked up the wind completely, rendering the camera totally kaput. The only good side to this is that I had used my original Minolta 460 Tx which is lacking working battery power leaving a later, fully functioning acquisition intact to continue using with commercial film.
So, finally…
This then brought to an end my fascinating investigation of re-using cartridges in the 110 format.
I will continue with sub-miniature photography because I now have a workable slitter to provide approx. 80cm lengths of unperforated 16mm film, each one at the price of little more than a cup of coffee. Since submitting this article I have also bought a Minolta 16 MG on the local auction site so that I can continue exploring sub-miniature, both with my remaining 110 Minolta and the ‘new’ 16mm camera I can now explore.
A win/loose/win result in the end.
Share this post:


Comments
Bob Janes on A Win/Lose Tale of Making a 120 to 16mm film slitter.
Comment posted: 13/10/2023
Myles on A Win/Lose Tale of Making a 120 to 16mm film slitter.
Comment posted: 13/10/2023
Can you tell I'm a big fan of Minolta 16s! Some of the cameras are lovely, the 16 II being one.
I use a 35mm film slitter for my 16mm (and Minox) film requirements from Camerahack - v good too. They do a 120 version but haven't tried that. You won't need a film strip longer than 45cm for your MG or any other Minolta 16.
Hopefully we'll get to a "5 Frames..." from your MG at some point.
Comment posted: 13/10/2023
Myles on A Win/Lose Tale of Making a 120 to 16mm film slitter.
Comment posted: 14/10/2023
The 3d printed cartridges are great (I assisted a eBay UK seller by trying out his prototypes). I load and unload the feltless cartridges into and out of the camera in my darkroom. So feltless is fine for me.
Comment posted: 14/10/2023
Myles D on A Win/Lose Tale of Making a 120 to 16mm film slitter.
Comment posted: 14/10/2023
The 3d printed cartridges are great (I assisted a eBay UK seller by trying out his prototypes). I load and unload the feltless cartridges into and out of the camera in my darkroom. So feltless is fine for me.
Julian Tanase on A Win/Lose Tale of Making a 120 to 16mm film slitter.
Comment posted: 14/10/2023
Film cutter/slitters are strange animals; I have started to cut my own films at some point during the early 90s and believe you me, I have had really interesting experiences. I am cutting both subminiatural format, 9.2mm and 16mm also. The cutters I use are those on the market (some of them extinct), but I usually employ the use of the old Zipslit or the models made by my friend, Jimmy LI. I have also reviewed some of these machines for the 8x11 community out there: https://juliantanase.com/category/accessories/minox-film-cutters/
That is why your design looks very close to a good working cutter, and as said, really like it. I do appreciate the effort put into it, because I know how easy things can go south when working with such delicate and minute contraptions. Kudos!
Comment posted: 14/10/2023
Marco Andrés on A Win/Lose Tale of Making a 120 to 16mm film slitter.
Comment posted: 11/11/2023
As Tony Warren noted, Camerhack.it offers a variety of tools to accessories to cut 120 film to a variety of film formats: 127, 110 and N.00. The tools fit in a light-tight box that holds 120 film
- Knob for turning the takeup
- Film cutters
- Rulers to prepare backing paper
- Film feeders to insert film into a 120 spool for takeup spool for cut film
They also offer a 3d printed Fakmatic adapter to use 35mm film in a 126 camera, which I’ve used. Unlike 120 film, 35mm has too many perforations, requiring workarounds to “unsee” most of them.
Comment posted: 11/11/2023