5 Frames with the Haynes Classic Camera Kit – By Alex Wilden

By Alex Wilden

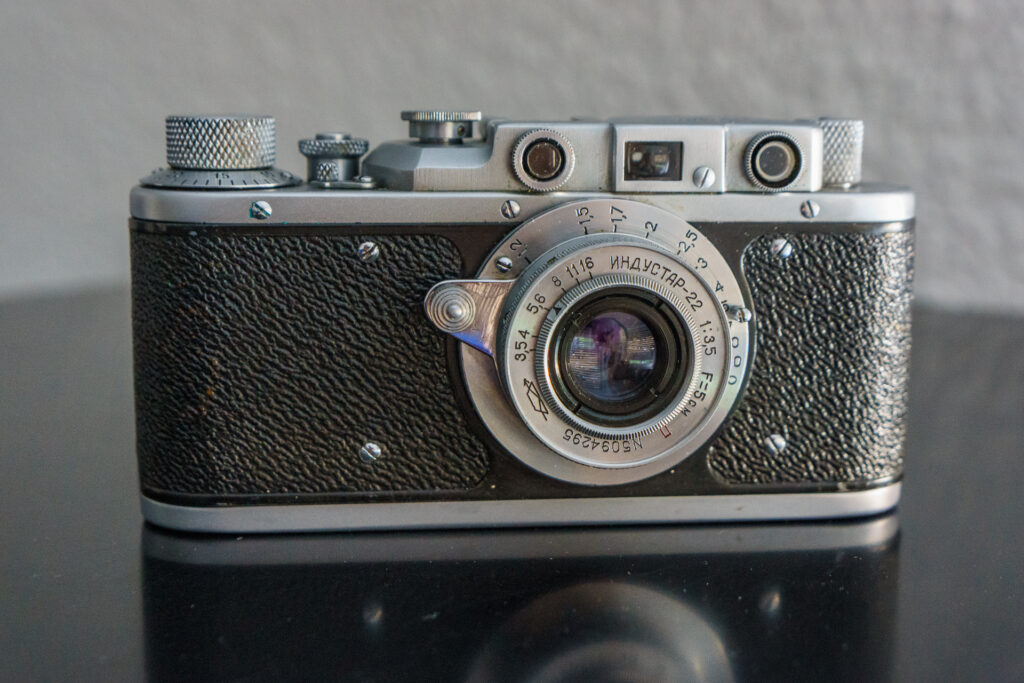
I’ve always wanted to build my own camera. In fact, I bought a 3d printer at the start of 2020 with that intention. While that particular project is ongoing I decided to do something a little easier.

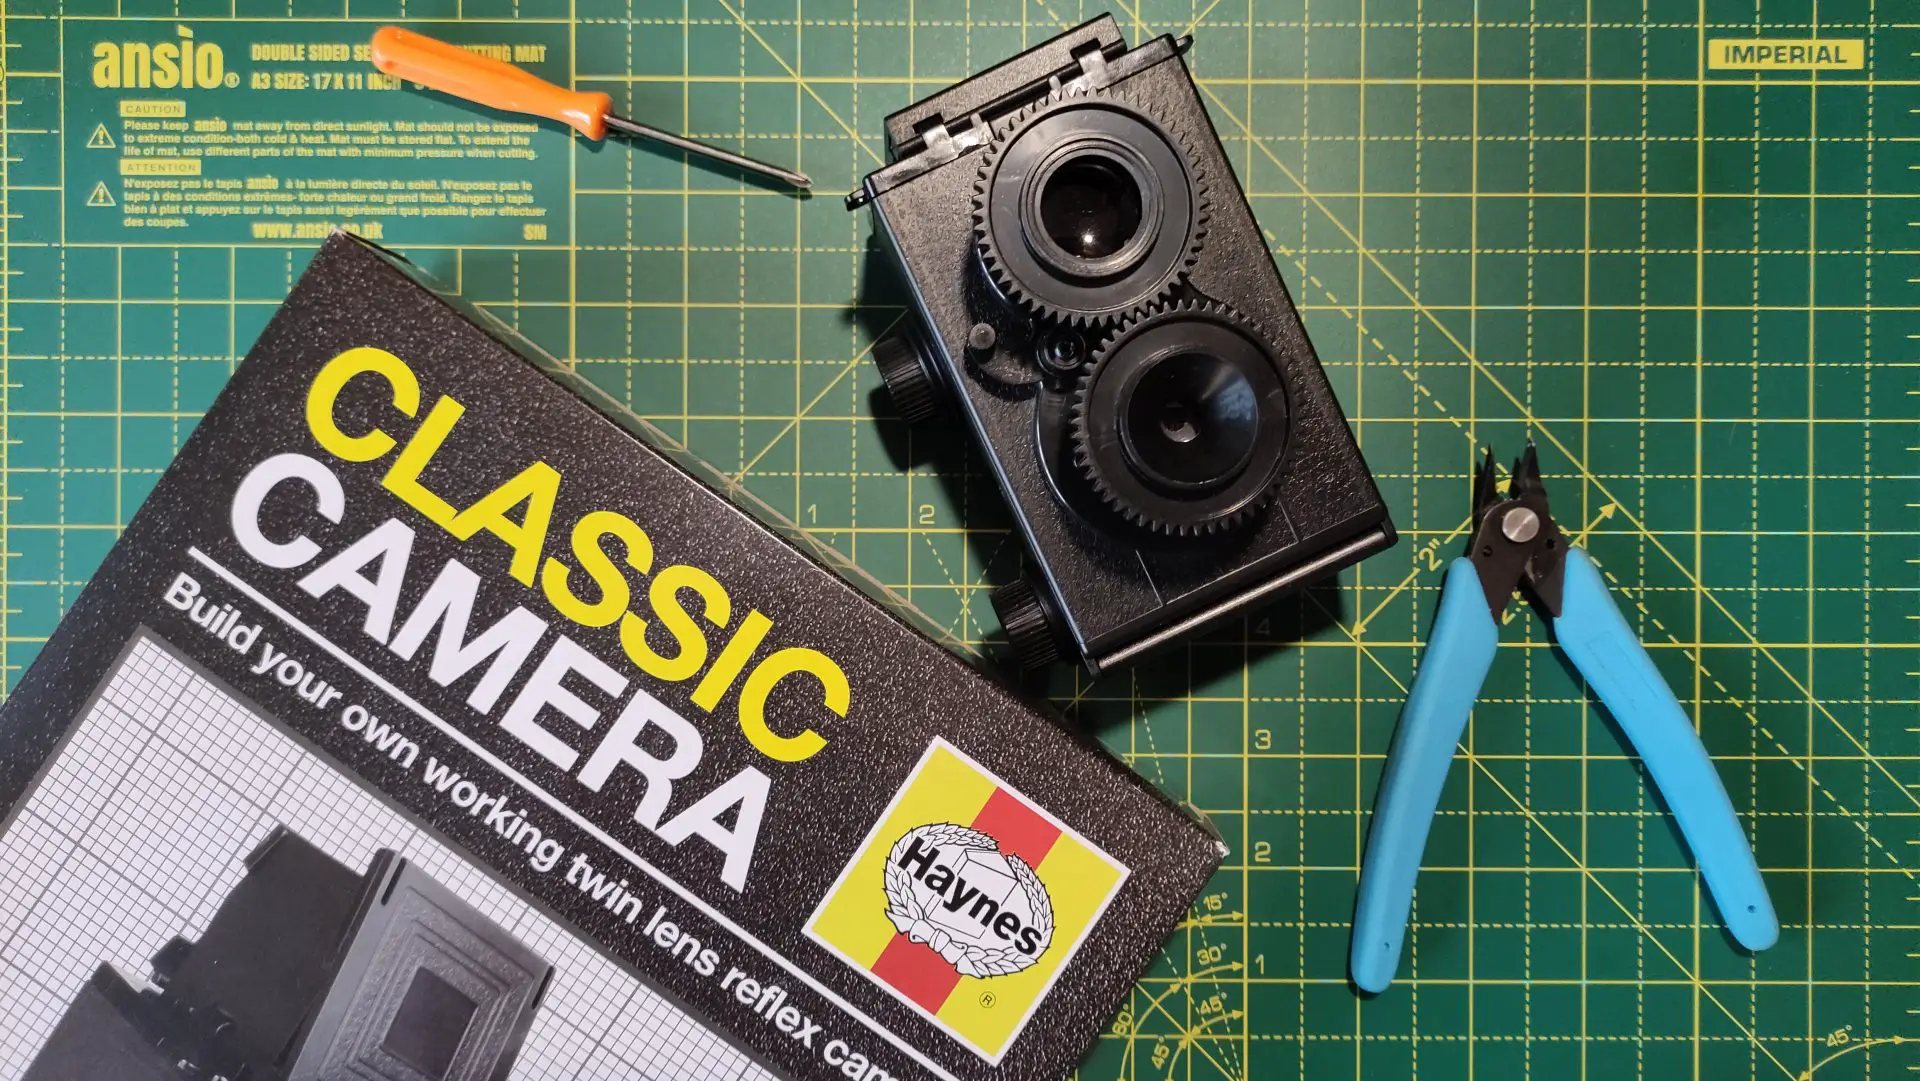
I spotted the Haynes Classic Camera kit in Waterstones while Christmas shopping, and managed to persuade my wife to get it for me as something to keep me busy on Christmas Eve. Although I didn’t get a chance to build it then, I did put it together one evening before the New Year.

Making sure not to lose the tiny screws and springs I managed to assemble the camera in just under an hour. Following the instructions was a dream, except for a couple of occasions where they tell you to do the opposite of what you actually need to do. But that’s just part of the “fun” right? Right?!?

Being a 35mm TLR I assumed the camera was a bit of an oddity, as I had never heard of one before. However, the folks over on the 35mm film photography Facebook page set me right and introduced me to a couple of gems like the Zeiss Ikon Contraflex and Agfa Optima Reflex. So now I need to get one (both) of those. My wallet doesn’t thank them for that.

Anyway, getting back to Haynes Classic Camera. Compared with a 120 TLR it is absolutely tiny, which does make it a bit of challenge to handle if you go out in the middle of winter and have to wear gloves like me. But I soldiered on and smashed through a roll of expired Delta 100 24exp (according to the instructions it only takes 24exp film) in a quick street photography session.

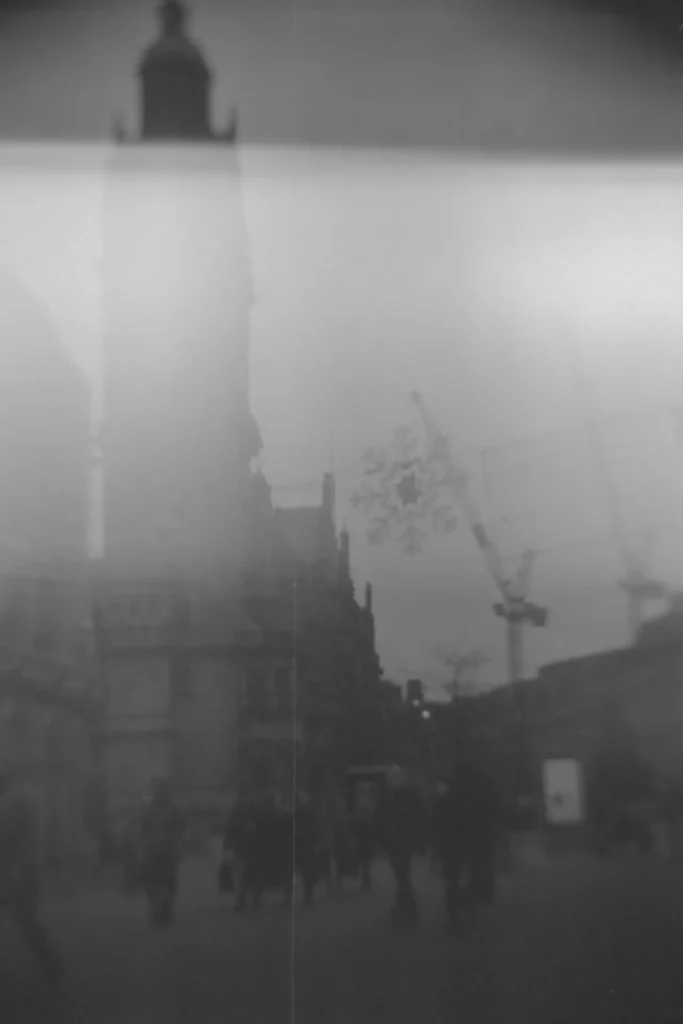
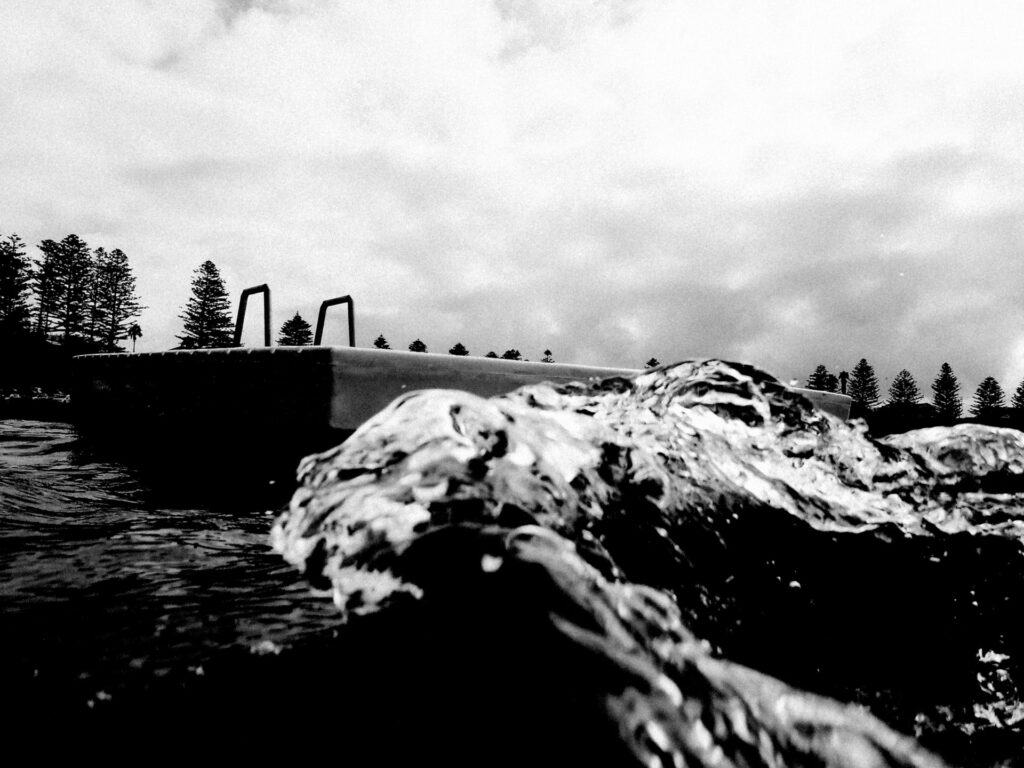
Can you spot my first mistake? The camera has a fixed shutter speed of 1/125 and aperture of f11, and there was me shooting in cloudy snowy conditions with low speed expired film. What a numpty. After I got home and developed the film I was greeted with some extremely thin negatives (go figure). But, there was also a bit of a surprise in store for me.

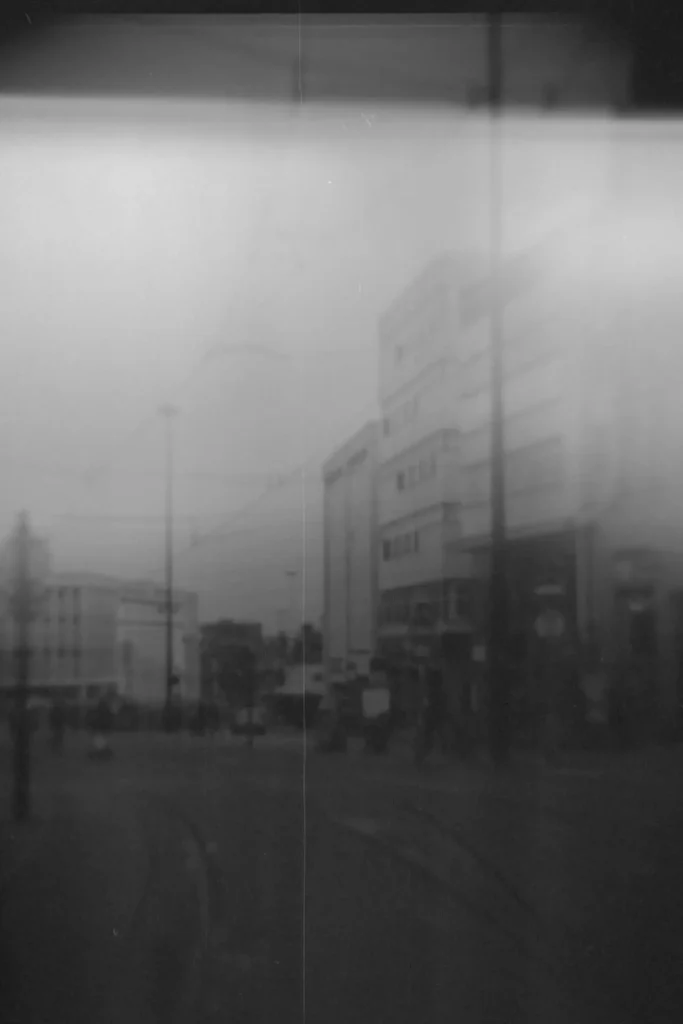
Now, if you’ve already looked at the images you can probably guess that this little plastic fantastic camera leaked light up the wazoo. Every single frame had the most epic (read: soul destroying) splash of light streaked across it. At first I was upset, I spent all this time putting together the rattly little tub and this was how it rewarded me?

But then I reminded myself that this is a TOY CAMERA. It’s not meant for technically perfect photos. Hell, it’s barely able to take photos (or is that just me?). Part of the charm of it is the unpredictability, and looking back on the photos a couple of weeks later they certainly do have a “Lomography” feel to them.

All in all. Was it fun? Yes. Will I use it again? Yes (once I fix the light leaks). If anything it has taught me not to take my photography too seriously and just enjoy it for what it is. I hope you enjoyed this article, if you did you can see a bit more of my experience in this video I made for YouTube.

Thanks for Reading, If you likes what you read please check out my Youtube Channel to follow more of my exploits!

Share this post:

Find more similar content on 35mmc

Use the tags below to search for more posts on related topics:

Contribute to 35mmc for an ad-free experience.

There are two ways to contribute to 35mmc and experience it without the adverts:

Paid Subscription – £2.99 per month and you’ll never see an advert again! (Free 3-day trial).

Subscribe here.

Content contributor – become a part of the world’s biggest film and alternative photography community blog. All our Contributors have an ad-free experience for life.

Sign up here.

About The Author

By Alex Wilden
From London, UK, currently living in Sheffield. I re-discovered my love of Photography a few years ago, and from there delved back into film and vintage items. I particularly love playing with quirky cameras.
View Profile

Comments

Bob Janes on 5 Frames with the Haynes Classic Camera Kit – By Alex Wilden

Comment posted: 14/03/2021

I think with some cameras you have to take the 'lumps' as part of the charm and incorporate them - Although I think stopping the worst of the light leaks ought to be quite possible.

Are you tempted to try an alternate lens? Not easy maybe because of the TLR thing, but it might be worth some experiments...
Reply

Leave a Reply

Your email address will not be published. Required fields are marked *

Alex Wilden replied:

Comment posted: 14/03/2021

Now that you mention it I might try and mate a F mount to this so I can try my Nikkor lenses on it!

Reply

Leave a Reply

Your email address will not be published. Required fields are marked *

Alan Withington on 5 Frames with the Haynes Classic Camera Kit – By Alex Wilden

Comment posted: 14/03/2021

I made two of these the first one exactly the same as yours. The light leaks were terrible and the lenses so bad that the blur and lack of focus was too bad even for Lomo fans! I wasted a few films before trying another kit (a proper Recesky one and I cured the light leaks too. They are from the mirror area, I put the thing in a changing bag and used a torch to find them. Once a thin bead of sealant was added around the body where the mirror mounts they were cured.
I also added a thin felt washer under the film rewind knob and painted the inside of the camera in matt black paint -especcially around the back of the mirror area. It work well although still unpredictable. I used XP2 or Kodak Ultra 400 as my shutter speed seems at the high end.
Focus is still tricky with infinity found before winding in the lenses. Good luck with yours and Bob's suggestion of trying another lens, I'm looking to do that now. I can't seem to add a photo I took with mine but can always send one or two over for you. Cheers Alan
Reply

Leave a Reply

Your email address will not be published. Required fields are marked *

Alex Wilden replied:

Comment posted: 14/03/2021

Thanks for the tips! I tried placing light seals around the back door but that didn't fix the leaks. I was started by to suspect the light was getting in around the mirror so thanks for confirming that's an issue.

Reply

Leave a Reply

Your email address will not be published. Required fields are marked *

Peter Roberts on 5 Frames with the Haynes Classic Camera Kit – By Alex Wilden

Comment posted: 14/03/2021

At the risk of stretching your wallet even further, if you want to to explore the 35mm TLR route may I suggest the ultimate gem: a Rolleiflex with a Rolleikin adapter?
Reply

Leave a Reply

Your email address will not be published. Required fields are marked *

Alex Wilden replied:

Comment posted: 14/03/2021

Thanks, I'll take a look at those.

Reply

Leave a Reply

Your email address will not be published. Required fields are marked *

Pateick Abe on 5 Frames with the Haynes Classic Camera Kit – By Alex Wilden

Comment posted: 14/03/2021

Try the Yashica 635 with the 35mm kit. It won't be as Hip as a Rolleiflex, but it will work as well at a lower price. (If you can find a complete kit, that is.)
Reply

Leave a Reply

Your email address will not be published. Required fields are marked *

Alex Wilden replied:

Comment posted: 14/03/2021

Wow, if the Yashica 635 is the cheaper option then I daren't look at the prices of the Rolleifex.

Reply

Leave a Reply

Your email address will not be published. Required fields are marked *

Lee on 5 Frames with the Haynes Classic Camera Kit – By Alex Wilden

Comment posted: 16/03/2021

Of course, with a kit toy camera, light leaks are not a surprise. But I am heartened to read that you plan to fix them. IMO there's a difference between the "Lomo" look and image destroying light leaks. I don't think light leaks are charming, nor do I interpret them as happy accidents. With a kit camera like the Haynes, you can hardly appreciate the charm of how this camera sees the world with those hazy, bright streaks across your frame. I hope your modifications work well to give this little camera a chance to render images in all their Lomo glory.
Reply

Leave a Reply

Your email address will not be published. Required fields are marked *

Alex Wilden replied:

Comment posted: 16/03/2021

Thanks!, My first attempt at a fix didn't go too well so I need to investigate further! Fingers crossed I can sort it out and then properly put it through it's paces.

Reply

Leave a Reply

Your email address will not be published. Required fields are marked *

Sroyon on 5 Frames with the Haynes Classic Camera Kit – By Alex Wilden

Comment posted: 19/03/2021

This page has some good info on 35mm TLRs. Then there are the pseudo TLRs, mostly medium-format but some 35mm too.
Reply

Leave a Reply

Your email address will not be published. Required fields are marked *

Scott Gitlin on 5 Frames with the Haynes Classic Camera Kit – By Alex Wilden

Comment posted: 21/03/2021

Looks like a member of the Gakkenflex/Recesky family of which I successfully built 1 but it required 2 kits to accomplish the build. There were no light leaks but the first kit came without a frosted sheet for the viewing lens. I never could successfully attach the top light-shield flaps. The "hinges" are super brittle. Installed a new top from the second kit and promptly broke off those hinges too. Hardest part of the assembly is getting the shutter activated but there are some YouTube videos that do a good job of explaining. The output is reasonably sharp in the center along with blurred vignetting. This camera's design limits you to portrait orientation - I was thinking about masking the frame for a square format. I have 2 sample pictures in my Recesky album on Flickr.
Reply

Leave a Reply

Your email address will not be published. Required fields are marked *

Alex Wilden replied:

Comment posted: 21/03/2021

From my reading up I believe it is based on the Recesky kit. I'm looking forward to doing some more tinkering with it, watch this space!

Reply

Leave a Reply

Your email address will not be published. Required fields are marked *

John on 5 Frames with the Haynes Classic Camera Kit – By Alex Wilden

Comment posted: 14/08/2023

I just got one of these and I can see that the inside of the camera is very shiny and reflects light onto the film from all four interior sides. I would suggest flocking the interior with matte black tape (which I'm going to do). Should improve the image barring light leaks and bad focusing.
Reply

Leave a Reply

Your email address will not be published. Required fields are marked *

Leave a Comment

Leave a Reply

Your email address will not be published. Required fields are marked *