This project aimed to improve the quality of the images produced by the Lomography Sprocket Rocket. The Sprocket Rocket is a plastic camera designed to achieve and does deliver genuinely panoramic exposures on 35mm film at a modest price. With a 1:3 panoramic aspect ratio each exposure width is 72mm which is double a normal 35mm frame, so 18 frames on a 36 exposure 35mm film. The plastic 30mm lens, if you don’t mind the imperfections of obvious distortion, heavy vignetting and flares can produce fun images including stylish film negative sprocket holes. Its simplicity encourages experimentation which is why I wanted to try and come up with my own cut-price advance in panoramic photography.
The best known panoramic 35mm film camera is probably the Hasselblad XPan but there is also an almost identical version, the Fujifilm TX-1. These can shoot impressive 65x24mm exposures and I believe the XPan II ceased being manufactured in 2006. As many will know, you have to fork out a lot of money to buy one of these today. There was little chance I could actually match their famous image quality but moving in the right direction at minimal cost was worth a go. Essentially, this means grafting a new lens onto the camera and finding a wide angle medium format one that was inexpensive: medium format because a lens from a 35mm camera wouldn’t have a big enough image circle to cover the panoramic frame. I looked at Mamiya 645 lenses but that would defeat the purpose of the exercise which was to do it cheaply and keep the camera compact. I had to work with the physical dimensions of the Sprocket Rocket and the shorter the flange focal distance of the donor camera lens the more likely I was to adapt it successfully.
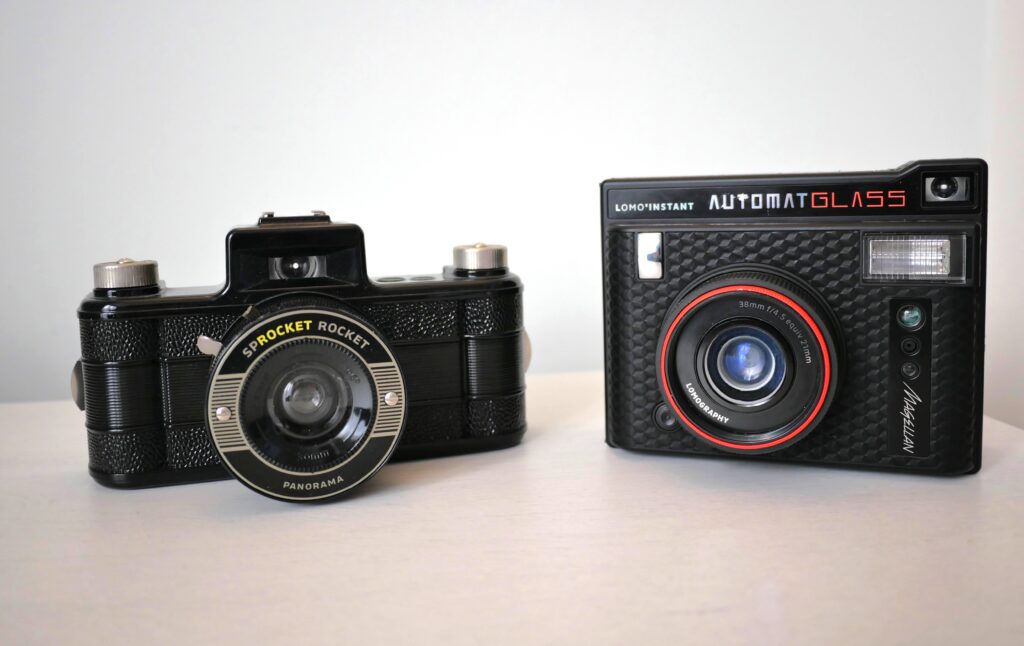
After research I felt the lens found on the Lomography LC-A 120 medium format point-and-shoot just might be the right candidate for this project. I discovered it’s also found on the Lomography Automat Glass Magellan which uses Instax film. It’s a 38mm f/4.5 Minigon XL with multi-coated glass, which is equivalent to 21mm on a 35mm camera and is quite sharp. The LC-A 120 is a 6 x 6 camera but the actual frame size is more like 5.6 x 5.6 (56mm x 56mm). 56mm is a fair bit short of the 65mm XPan panoramic frame size but I was optimistically hoping the Minigon’s image circle would extend enough to reach 65mm and further without excessive vignetting.
I wanted a wide angle of view as a more standard focal length would only capture a limited portion of the view in front of the camera, albeit in panorama format, and I wouldn’t be sure exactly what was in the frame anyway as the Sprocket Rocket viewfinder is a simple panorama shape to match up with the original 30mm lens. Using the very wide Minigon XL would make it easier to capture what’s in front of me and roughly predict what’s going to be in the composition.
The other advantage of a wide lens is increased depth of field and I was going to need as much of that as possible with a fixed focus lens. I wasn’t intending to be able to adjust focus as such a mechanism would complicate things and was probably beyond my current skills. My main challenge was to get the distance right from the rear element of the lens to the film plane so that it replicated the same distance on the LC-A 120 and Magellan for a focused image at close to or at infinity. If I could be in the ball park I then planned to use aperture settings such as f/22 or smaller to maximise depth of field.
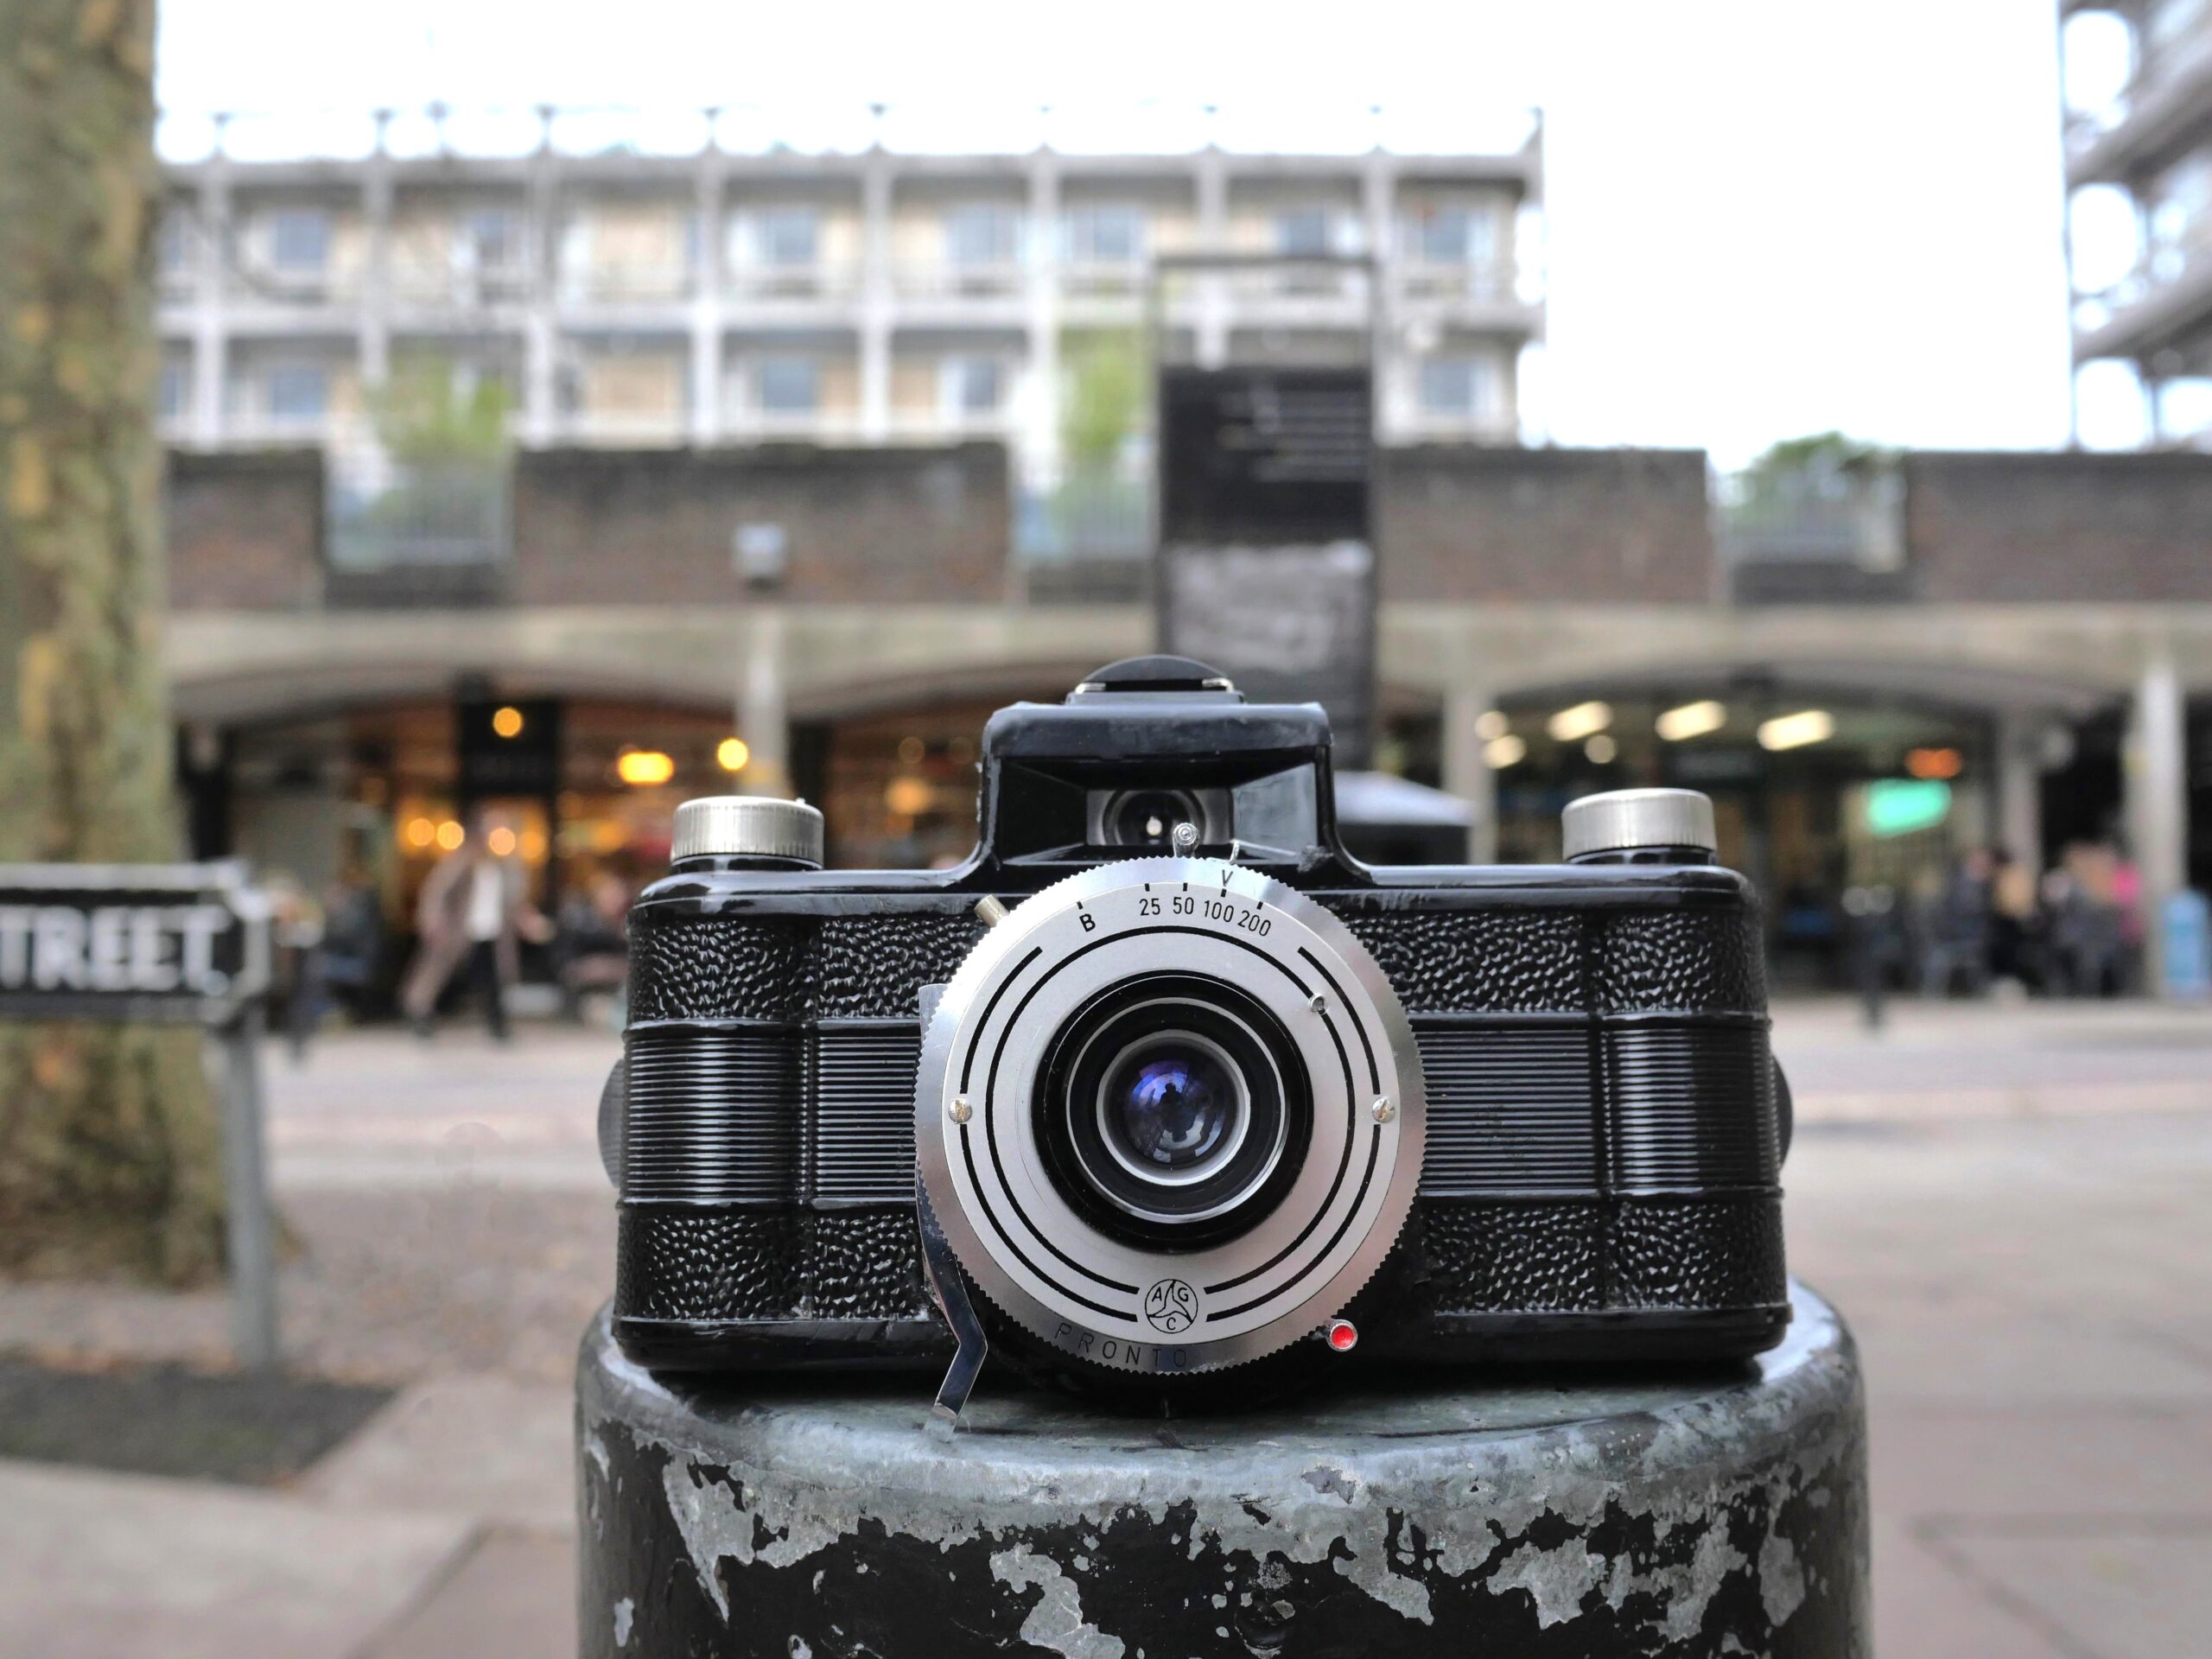
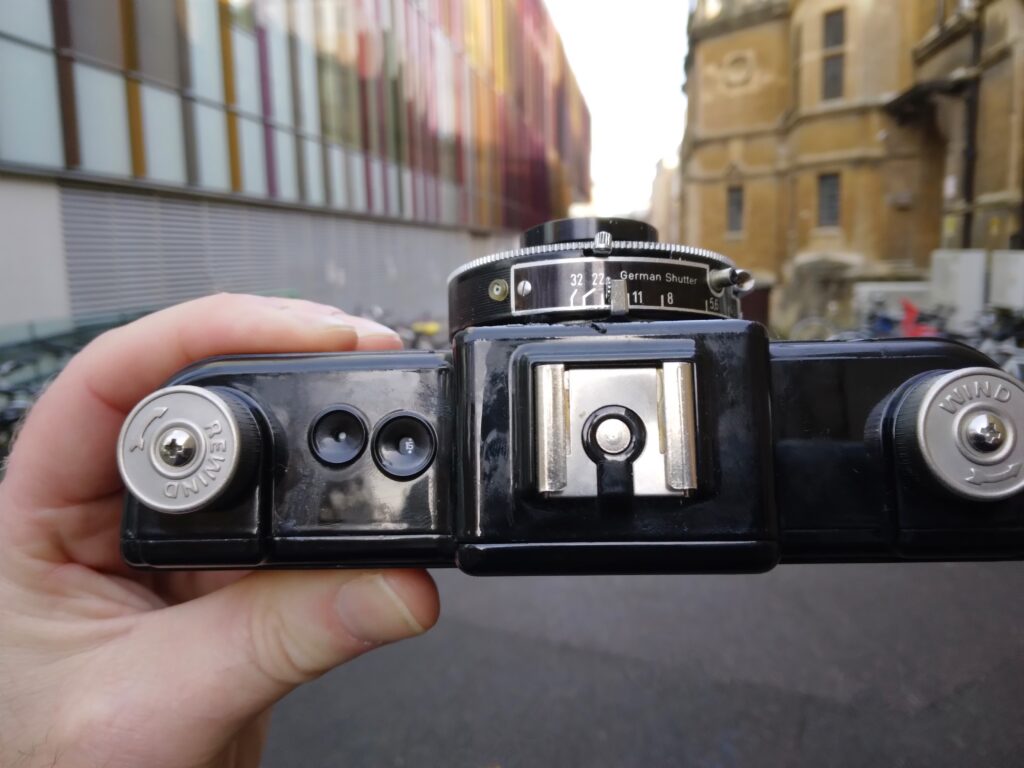
Attacking a used Sprocket Rocket I cut out the lens body ending up with a large hole. This meant losing the integral shutter and aperture functions which are a fixed 1/100 shutter plus bulb and Cloudy f/10.8 – Sunny f/16. I replaced it with a vintage but working AGC Pronto shutter and aperture mechanism from a 1950s medium format Kodak Sterling II. I cut away the whole lens assembly plate from the Kodak where it joins the bellows and it was easy to take out the 105mm lens itself as all it needed was to remove one of the focus ring stoppers and it unscrewed completely out of the lens housing.
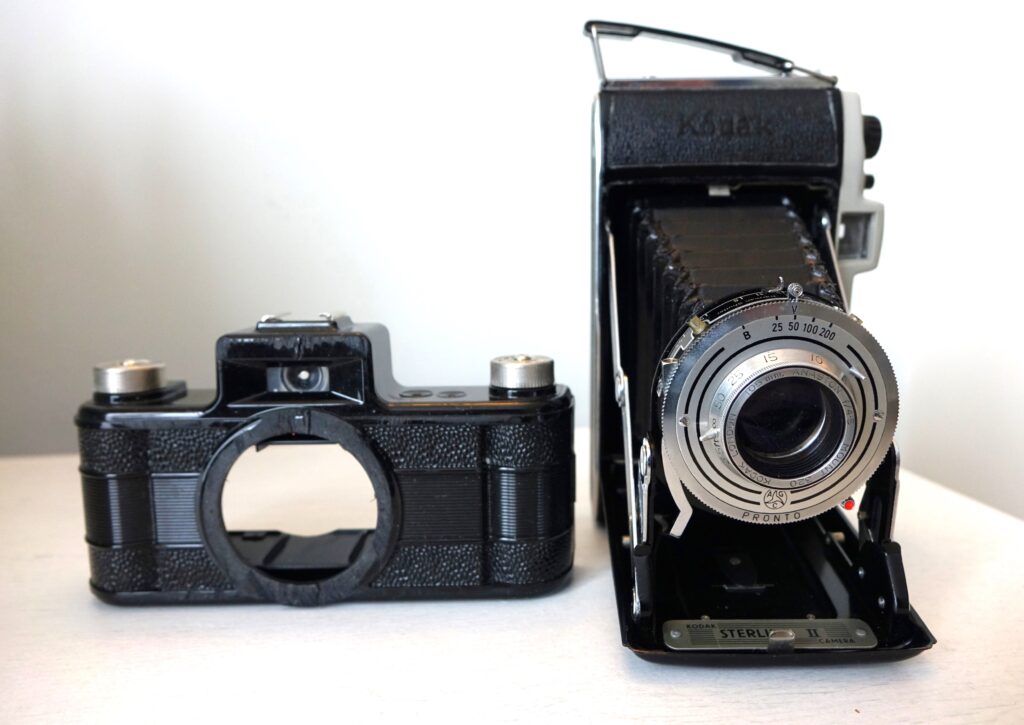
For the replacement lens I wasn’t likely to acquire a used LC-A 120 for under £100, but I did get a used Magellan instant camera for a lot less on ebay. It was a battle to extract the lens capsule intact and undamaged but managed it. The Kodak Sterling II is a 6 x 9 camera with quite a large glass lens which once removed from the outer barrel should allow enough space for the Minigon to slot in and for the rear element to be close to the AGC Pronto aperture blades, which it did.
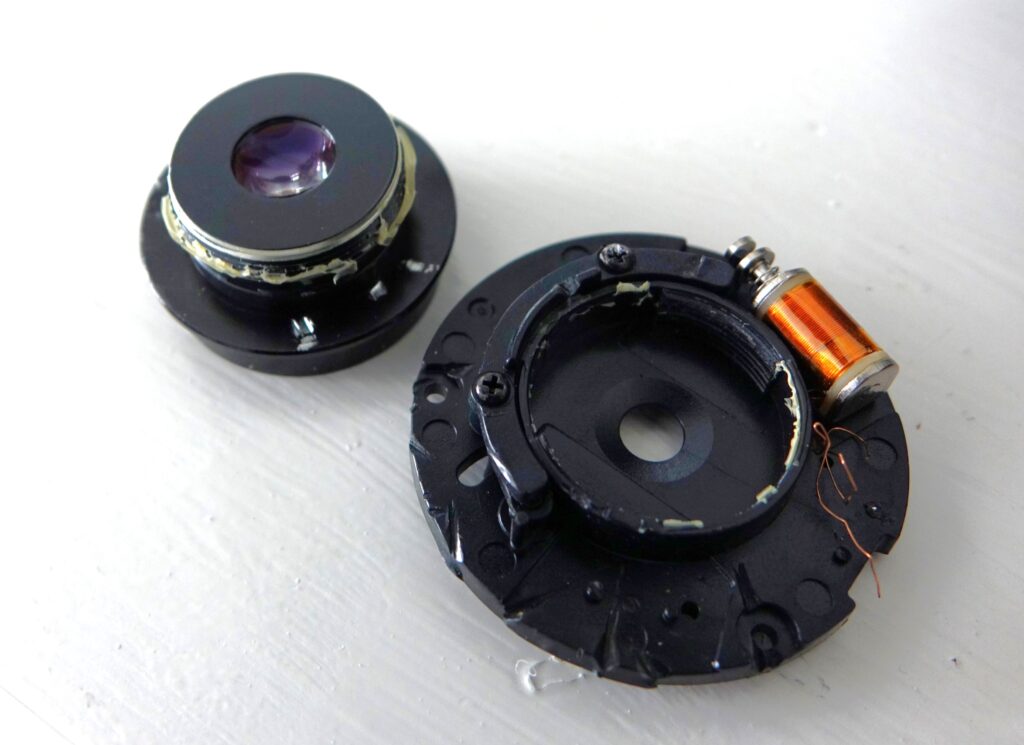
The Pronto unit has continuously variable aperture settings from f/4.5 to f/32 with ten blades, so for example allows you to approximate a setting of a non-standard f/13 if you want it, and speeds from B to 1/25, 1/50, 1/100 and 1/200. There’s a threaded collar projecting from the rear and I cut this down as it was likely to restrict the image circle. I accidentally nudged the self-timer lever and it locked up the shutter. It wouldn’t reset so I had to dismantle the unit to release it. I didn’t want to risk that happening again once I’d fixed the lens to the camera so I glued the self-timer into its default position. I attached the combined lens and shutter mechanism to the camera body using strong glue and sealing the edges with black Sugru mouldable glue which hardens. I now had a working camera with f/4.5 to f/32, a fixed-focus lens and four shutter speeds. Unfortunately I’d lost the bulb setting probably due to me poking about to release the self-timer.
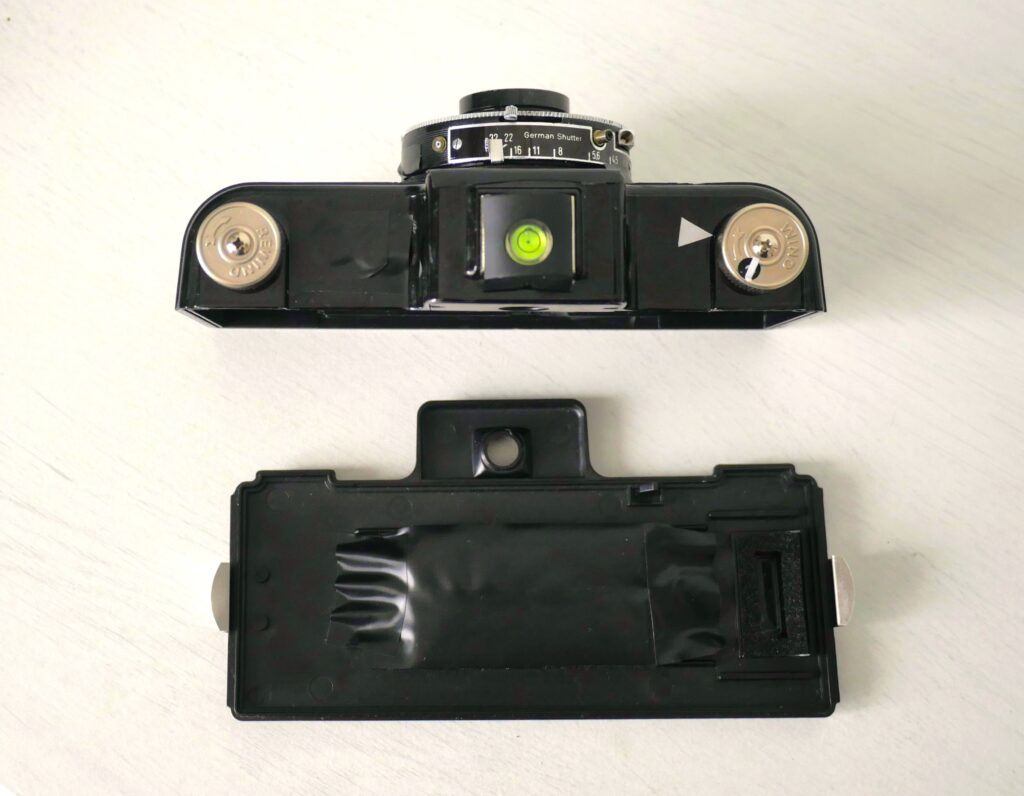
When it was time to go out and take some shots my first roll of film was a disaster because I hadn’t got the focus registration distance right and all the frames were blurred. The unhacked camera has a frame counter to the left of the viewfinder and when winding a white dot appears when the next panoramic frame is lined up. So to address this registration problem I cut down the removable plastic box inside to shorten the distance from the film plane to the lens which unfortunately sacrificed this helpful feature. But I’d already checked how many winding knob rotations were required to line up the next frame avoiding partial multiple exposures and it was one and about two thirds. As there was now more space between the film rails and back of the camera I made a basic pressure plate with felt and insulation tape.
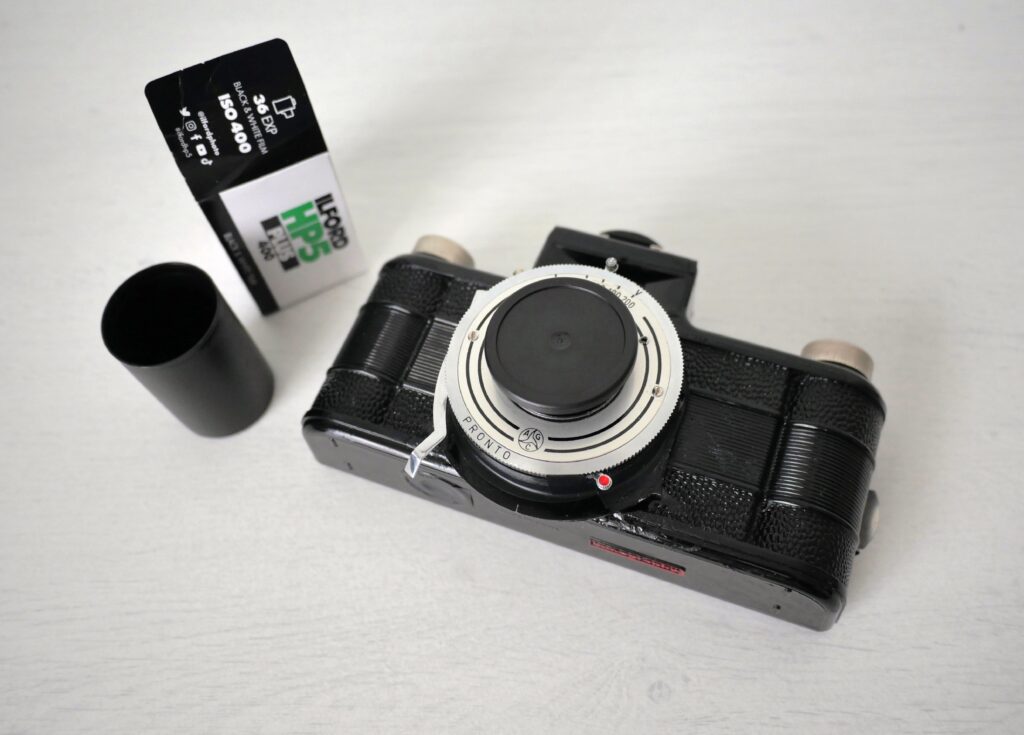
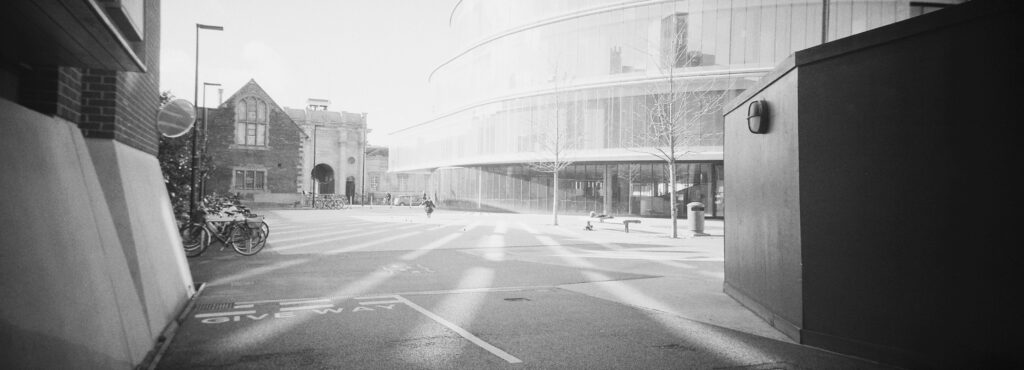
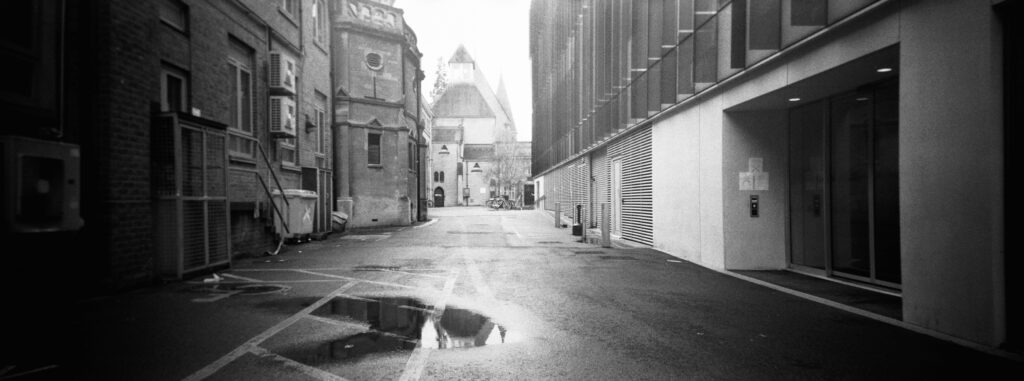
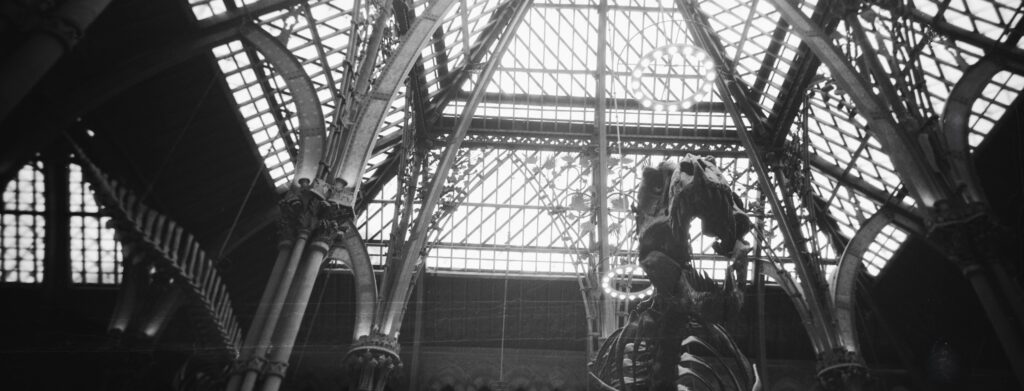
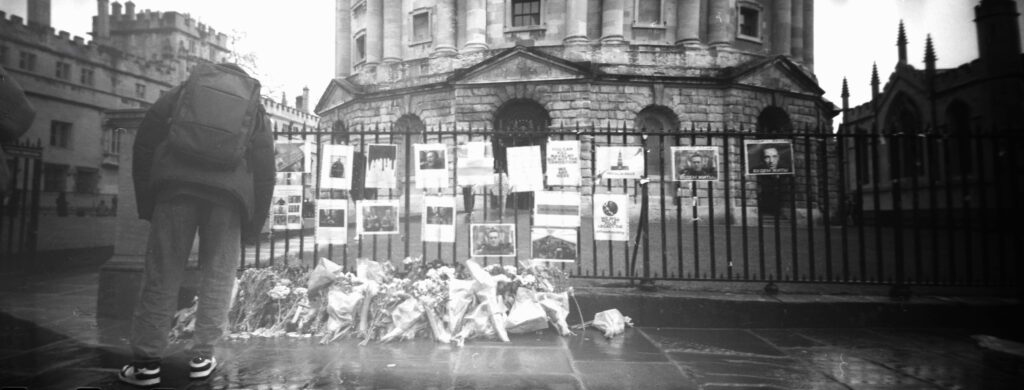
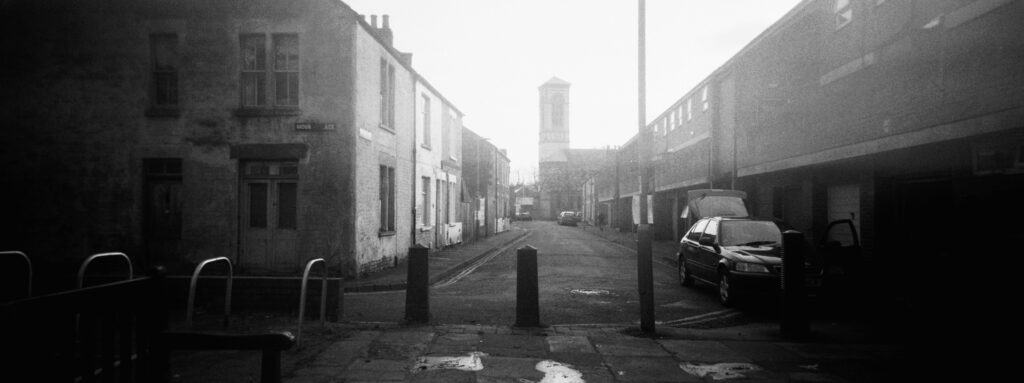
I then tried a roll of fast but expired Ilford Delta 3200. I could tell the focus problem was mostly corrected but the photos were overexposed as I’d miscalulated the metering. That lesson learned I decided to try again, loaded Ilford HP5 Plus 400 and went into Oxford. Incidentally, I tried the lid from the HP5 film canister as a lens cap and with a bit of tweaking it works.
This time I made more effort checking the light meter app on my phone and also by comparing the shutter speed readings for the same scene on a digital Panasonic GX9 which I’d set to ISO 400 and an appropriate aperture setting. I slotted a bubble level into the cold shoe and I think this is essential to reduce sloping horizontals and verticals which can be accentuated in a panoramic image. I shot nearly all of these exposures holding the camera at waist level looking down at the bubble level which has the added benefit you can see if you’ve left the lens cap on.
You can reasonably ask why not use a medium format camera with a decent lens and using an adaptor load it with 35mm film. Yes, people do, and you can get great shots. It works better with a camera that shoots film running sideways rather than vertically so a TLR isn’t ideal. You have to allow for losing the top and bottom of the image as it appears in the viewfinder and it helps to use wide angle lenses – you can use a standard focal length but it would limit your compositional options. Another challenge is winding the film the correct amount to leave an appropriate space between each exposure. You will probably need to prepare the film leader using a paper backing before loading, and remove the exposed film in a dark room or bag to rewind it. Or not do the above and simply shoot on whatever medium format or 35mm film you are using and crop the digital scan. Or use a digital medium format camera as seen in these excellent London photos by Danilo Leonardi. There’s nothing to stop anyone from cropping an image from any sensor, film or digital, to create a panoramic picture.
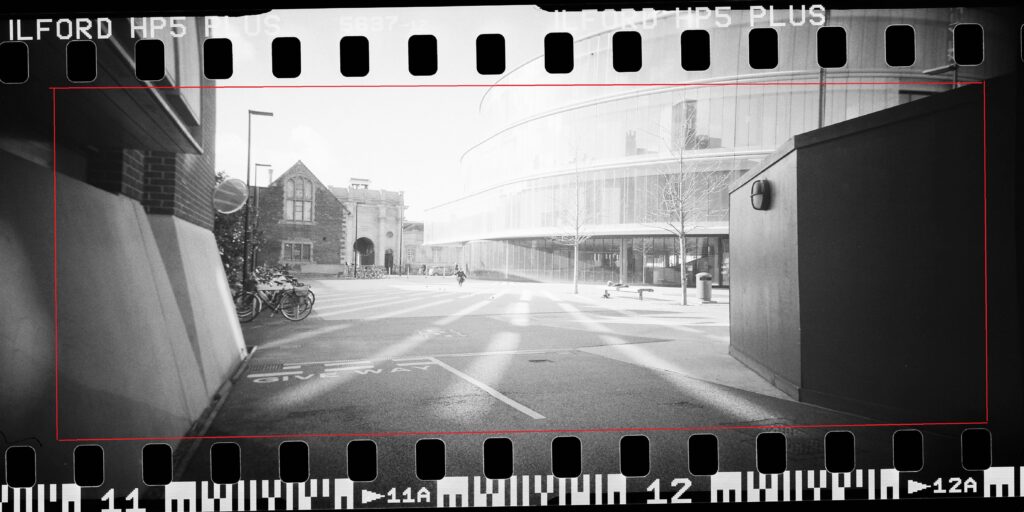
This modified Sprocket Rocket loads, shoots and rewinds 35mm film with no hassle and the viewfinder is designed for shooting in the panoramic aspect ratio. I could wind the film to consistently avoid double exposures and it’s very compact and light. You also get the full 72mm width and the sprocket holes. I should add I adapted a wide square lens hood from an old camcorder which is needed to cut down flare. Essentially, it remains the point and shoot I started with but with an upgraded lens and more control. There is still some distortion and vignetting, soft edges to the frame, veiling flare from the centre top and in many photos a wedged shaped darker area on the bottom left which tends to be more pronounced in bright conditions and I couldn’t find a way to get rid of it. Nevertheless, despite some false starts it was an enjoyable experiment to create it and fun to shoot with.
Share this post:


Comments
David Hill on Modifying and Shooting a Sprocket Rocket in Oxford
Comment posted: 14/06/2024
Great idea, a few stumbles, but ultimately a success. Hah! Well done!
Comment posted: 14/06/2024
Jeffery Luhn on Modifying and Shooting a Sprocket Rocket in Oxford
Comment posted: 15/06/2024
Comment posted: 15/06/2024
Jayden on Modifying and Shooting a Sprocket Rocket in Oxford
Comment posted: 15/06/2024
Hope to see more in future!
Comment posted: 15/06/2024
Phil Snaps on Modifying and Shooting a Sprocket Rocket in Oxford
Comment posted: 15/06/2024
I suspect some of the distortion may be caused by your pressure plate, as it doesn't look quite flat so it may push the center of the film too much forward.
My LC-A 120 gives very little distortion, though I'm still not sure if the lens is 100% the same.
Comment posted: 15/06/2024
Nathan on Modifying and Shooting a Sprocket Rocket in Oxford
Comment posted: 16/06/2024
Comment posted: 16/06/2024
Elika on Modifying and Shooting a Sprocket Rocket in Oxford
Comment posted: 18/08/2024
I'm going to buy them and have a try haha.
One question is that could the Magellan Glass lens fit the Pronto shutter unit directly without any glue?
Comment posted: 18/08/2024
Olivier on Modifying and Shooting a Sprocket Rocket in Oxford
Comment posted: 10/12/2025
Comment posted: 10/12/2025