How I Loaded and Shot a Univex Mercury with 35mm Kodak Ektar 100 – by Stuart Jenkins

By Stuart Jenkins

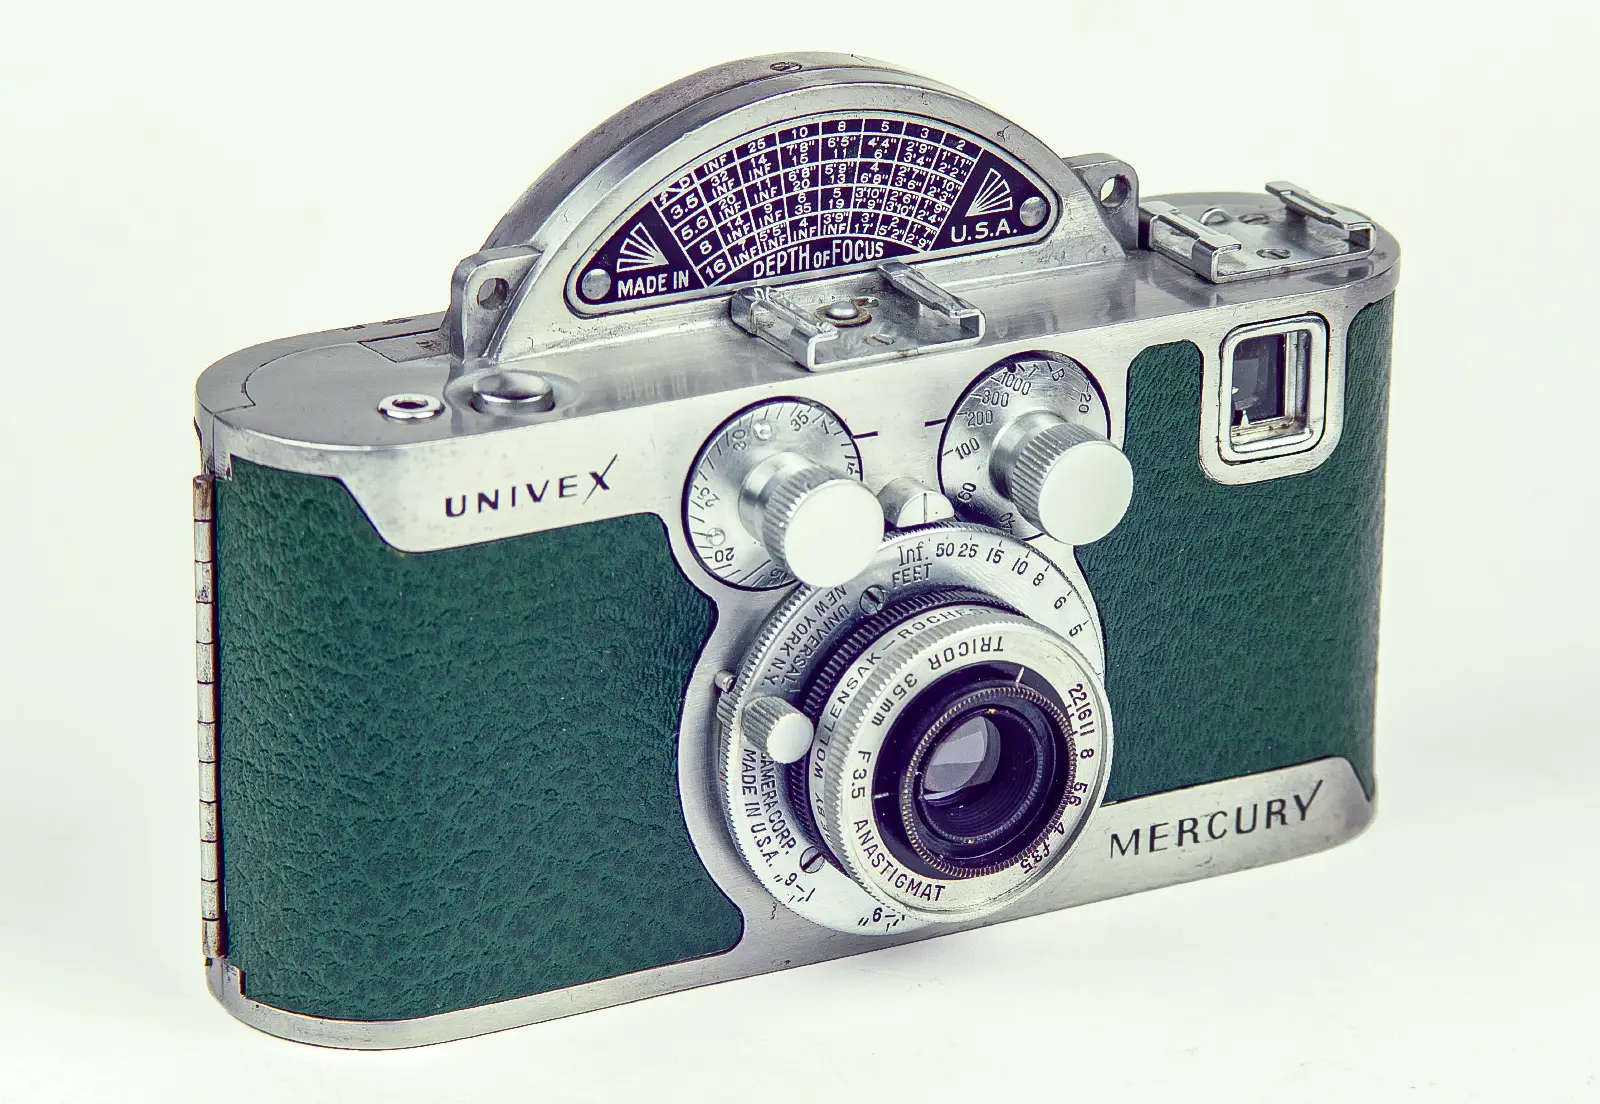
Universal Camera Corporation launched their Univex Mercury CC model in 1938, along with their proprietary #200 series films. It’s basically 35mm film, but on an open roll. The manual shows it having paper backing on the ends only, a bit like 220 film, to protect it from light while loading. Trouble is, the backing paper is perforated, which rather defeats the object.

The camera is often described as ‘half frame’ but that’s not strictly true. The image size is 25x19mm in portrait format, so it will just touch the perforations on both sides of 35mm film. Each frame winds the film on by 4.5 perforations, more than half of the 8 perforations for a full 35mm frame. The frame counter goes up to 36.

Can I use my camera?

I restored my Mercury a couple of years ago and finished it with some nice dark green leatherette. Since then I’ve been itching to use it. 35mm film will physically fit, if you can find a way to get it into and out of the camera without exposing it. The theory sounds simple. Inside a changing bag, just attach a length of 35mm film to both of the spools, roll it up onto the feed spool, and put it into the camera. I practiced on some old exposed film and found that there’s an awful lot that can go wrong. I could feel an engineering project coming on.

First, make a new spool

New 3D-printed spool on the left, original spool on the right

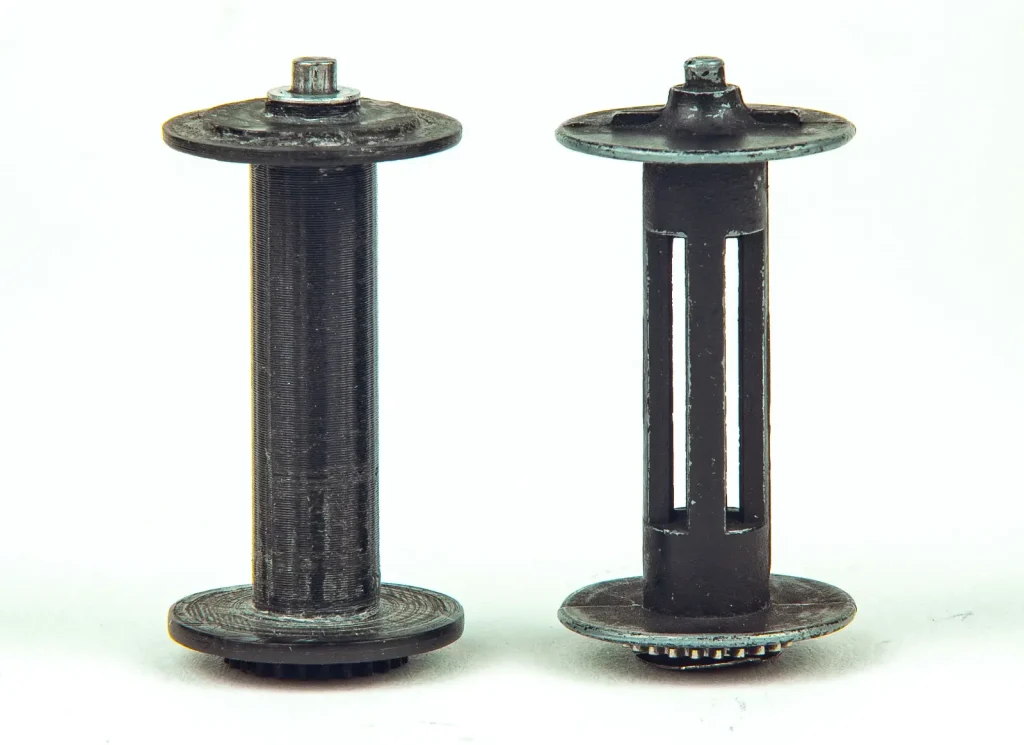
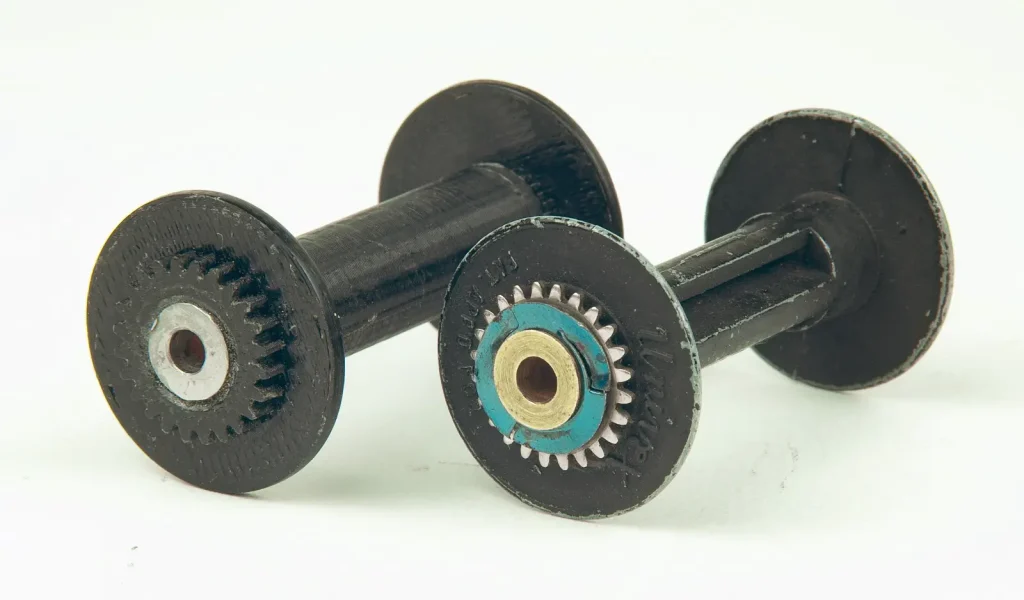
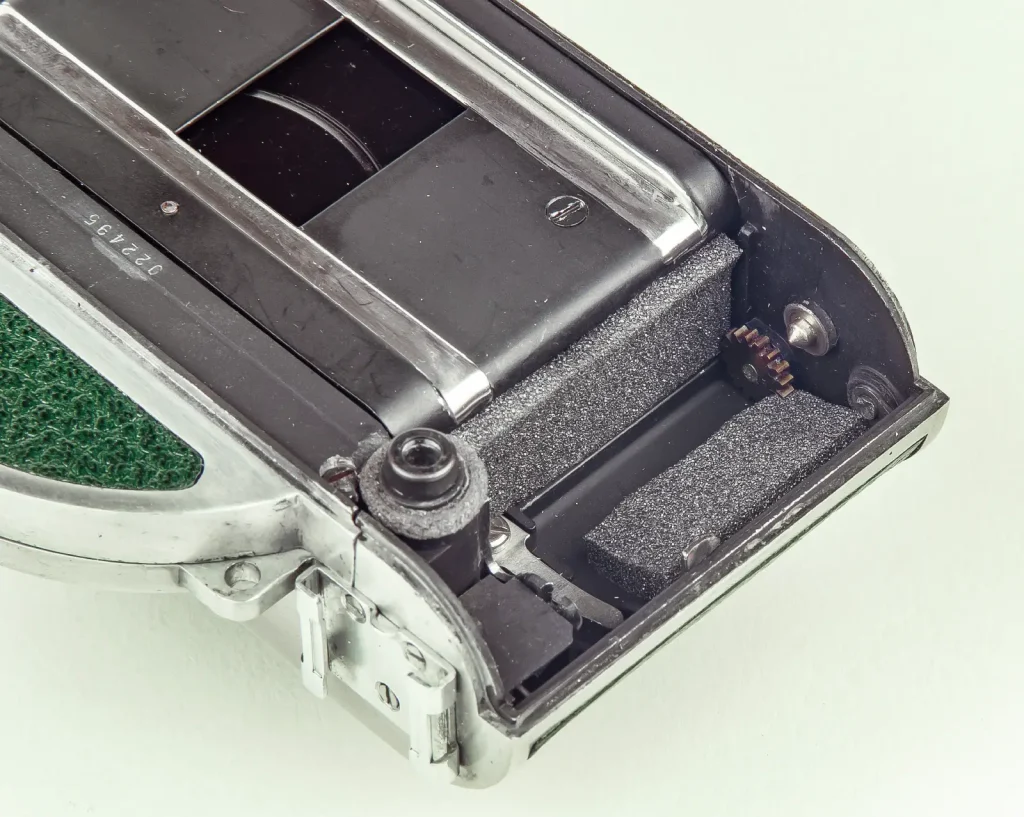
You need to have at least one original spool, because it has a special drive gear on the bottom. The gear isn’t fixed, but uses a spring washer that acts as a clutch and allows it to slip a little. That way the takeup spool can be driven a little faster than the film is coming off the sprocket, which keeps it tightly wound.  On the feed side, the spool engages with a little gear in the film chamber that drives a film transport indicator on the bottom plate. My camera only came with one spool, but as there’s no need for a slipping clutch on the feed side I was able to 3D print another one with a fixed gear on the bottom.

The blue spring-steel washer allows the drive gear to slip, but it’s quite stiff

Spool loading machine

I used FreeCAD software to design a shape that would hold a 35mm cassette at one end, hold the Univex feed spool at the other, and enable the spool to be turned by a known number of revolutions. A steel arm is just springy enough to hold the spool against the drive knob.

The 3D-printed shape

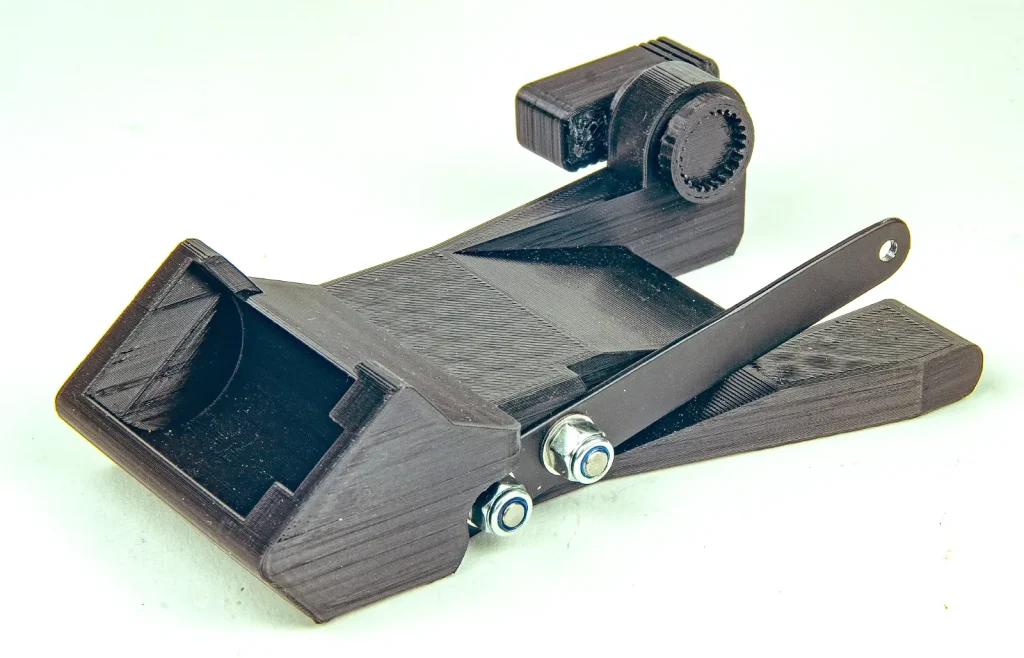
This enables a good alignment from the cassette to the spool, so the film will go on straight. Once inside the changing bag, I pulled some film out of the cassette, cut it straight across, and used tape to attach it to the 3D-printed spool (which has no slots). Pinching the perforations on one edge of the film as it moves will maintain the tension and make sure the roll is tight.

Film winding onto the spool

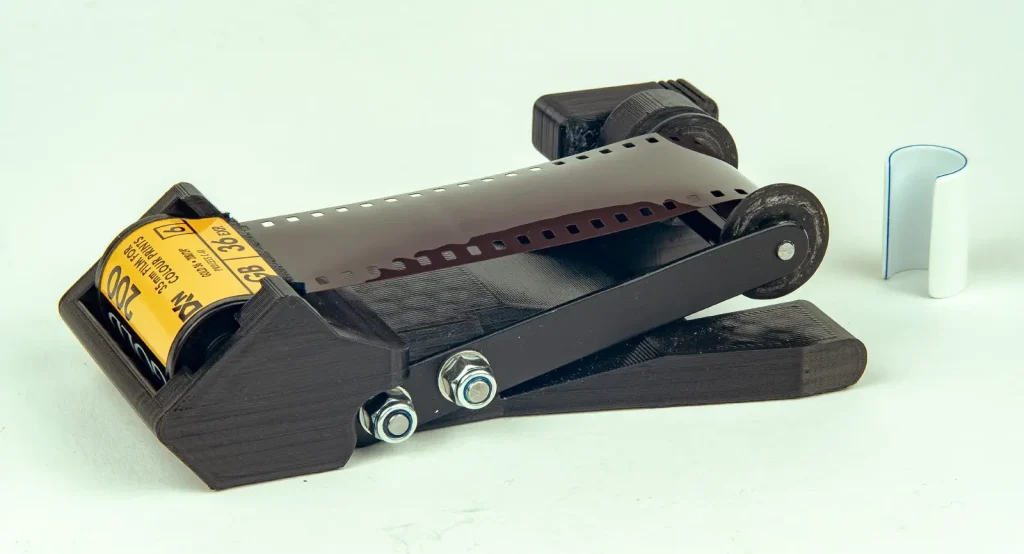
Previous experimentation in daylight with an exposed film showed that half of a 135-36 roll is 17 turns of the winding knob. Once wound, I kept the film in place on the spool using a clip made out of 15mm plastic plumbing pipe. That meant I could cut the film without it all unravelling. It turned out to be enough for 27 exposures.

Cutting to length, with the clip in place

Now I need some daylight

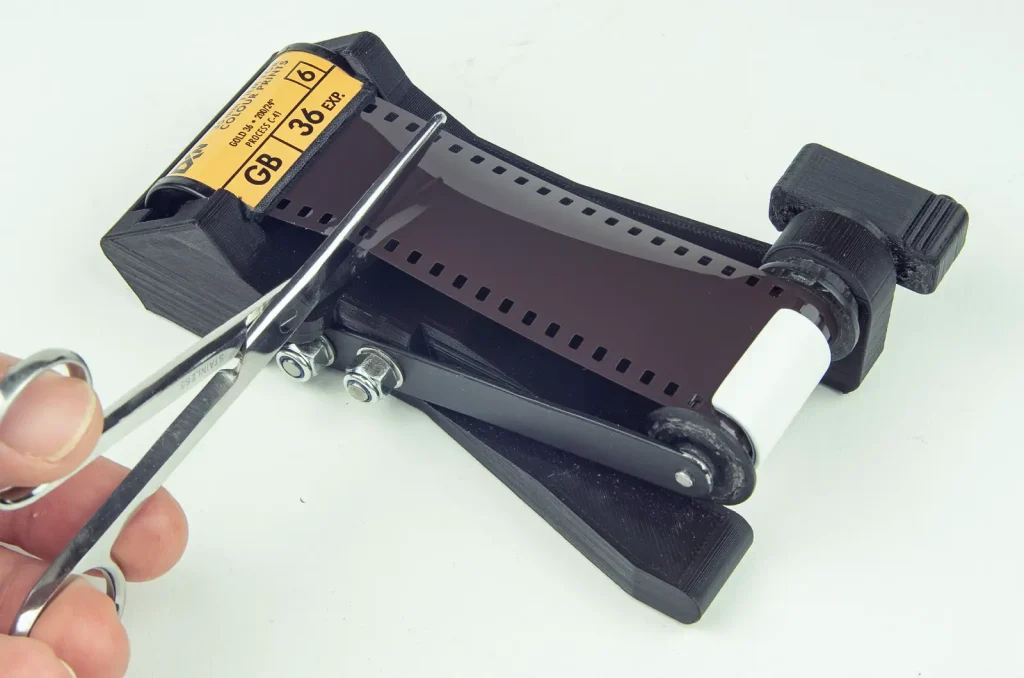
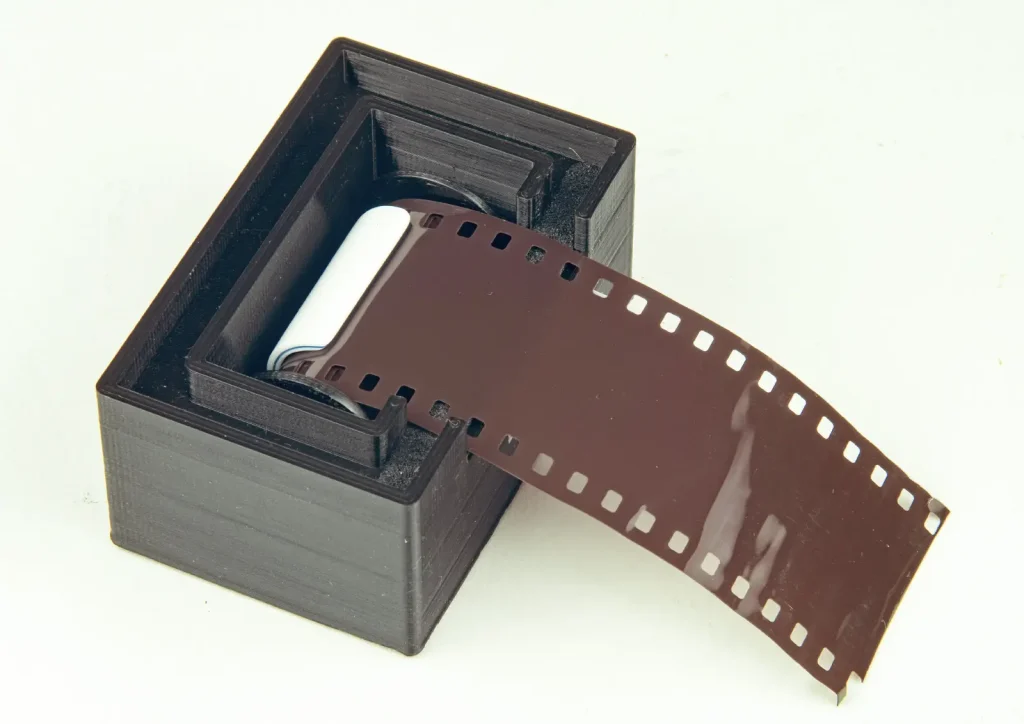
I knew that attaching the cut end to the original spool inside a changing bag was going to be difficult. It has to be cut on each side to leave a central tongue 22mm wide. The tongue then needs to be threaded onto the spool, and a bit of tape to finish wouldn’t hurt. Tricky to do accurately.  My solution was to find a way of doing that bit outside the changing bag. I 3D-printed a box with a sealed lid to put the loaded spool into.  Then then it can be brought out into the light.

3D-printed box with a foam seal
The free end sticks out through the foam seal

Now I could cut the film to shape and attach it to the spool without any stress, because I could see what I was doing. The only difficult bit is to remember to attach it the right way round.

Elastic bands hold the lid in place

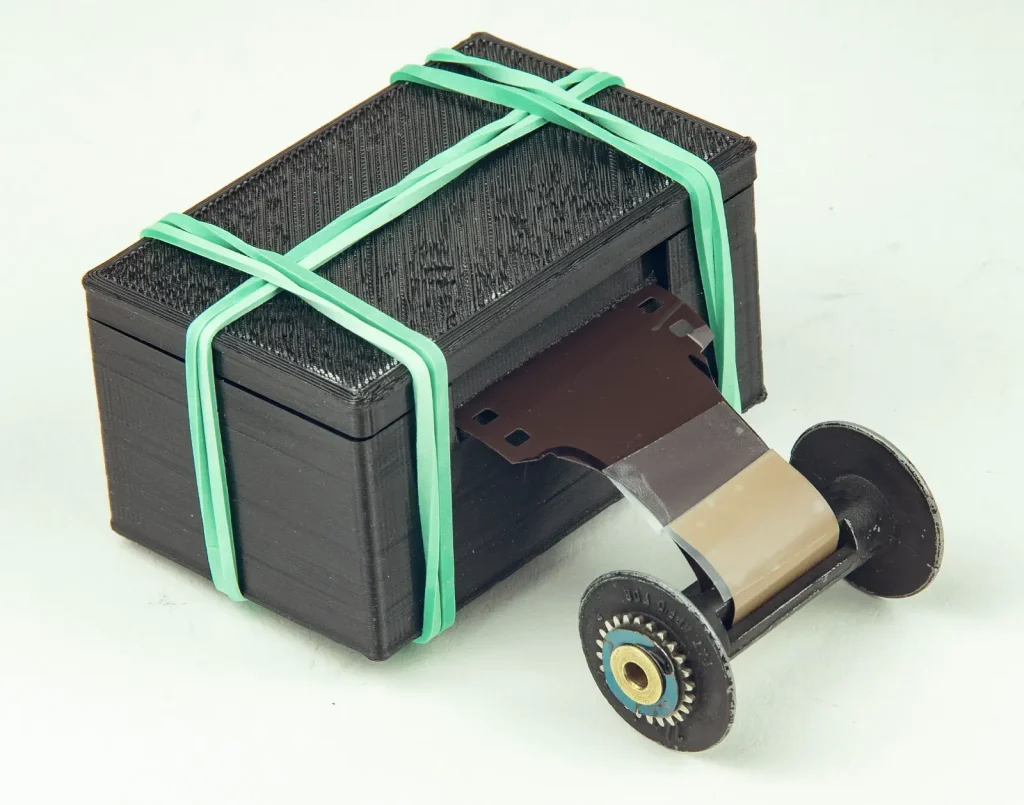
Back into the changing bag

The box and the camera go into the changing bag. The box can be opened and the takeup spool put into the camera. The clip is removed from the feed spool and it is carefully placed into the feed side while keeping the film taut across the film plane.

The film in the camera. A good fit.

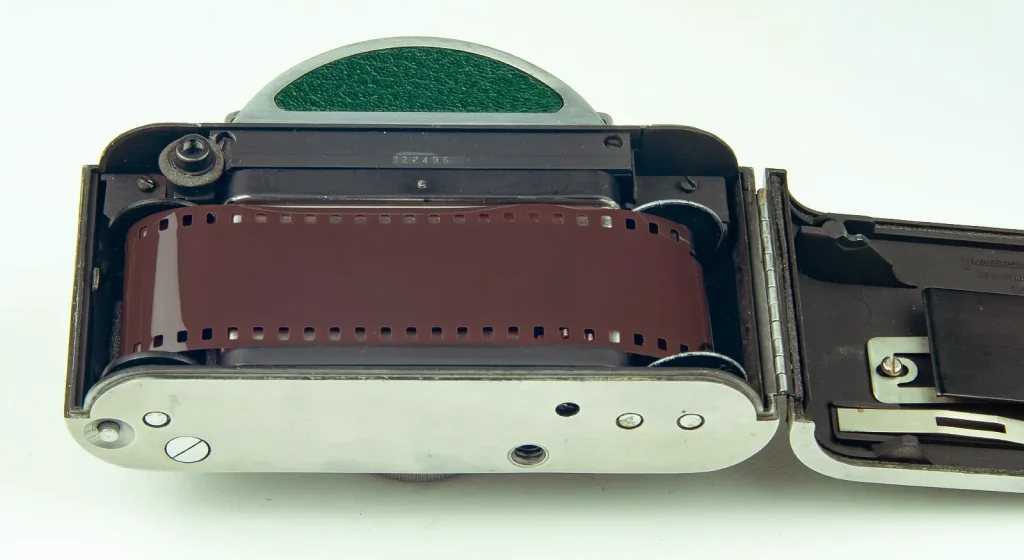
Once the feed spool is in place, it needs just enough friction to stop it unravelling. Originally there was a thin sprung steel arm for that purpose, but it’s not a good solution. I added some thick open foam to provide just the right amount of drag.

Foam friction pads in the feed chamber

Using the camera

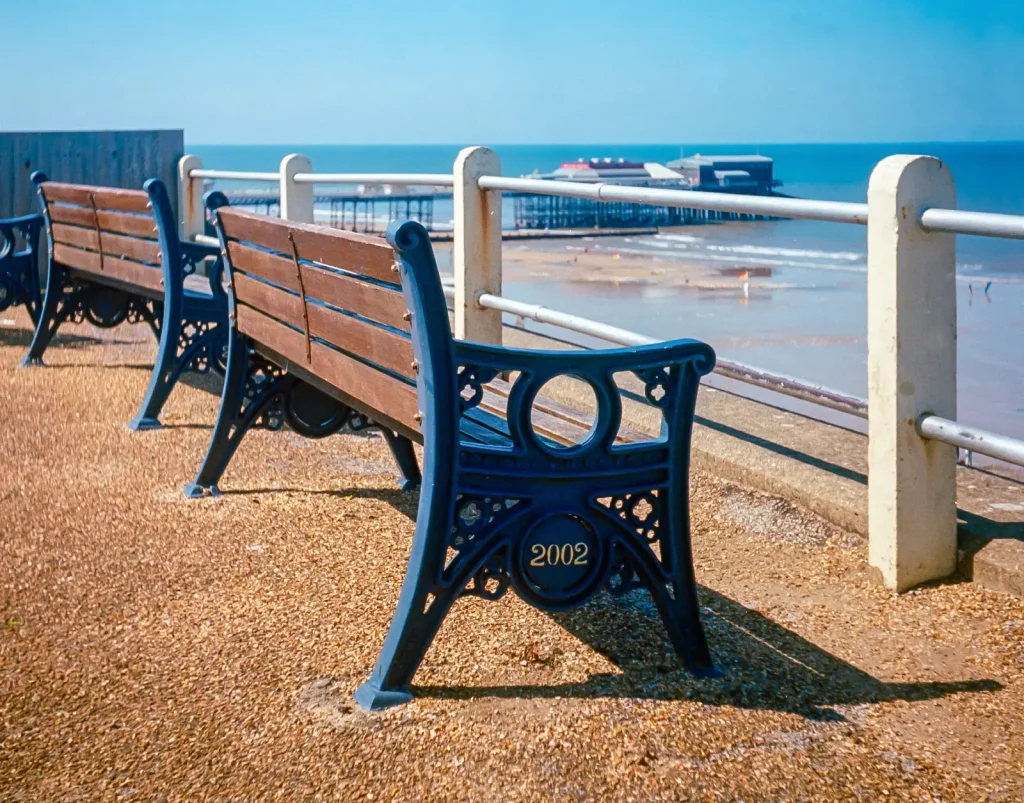
For its first outing in decades, I treated it to half a roll of Extar 100 and took a trip to the seaside at Cromer, then finished off the roll on an evening photowalk in Norwich. It’s a delight to use, and the mellow ‘schhhhhhhhhhhluk’ sound of the shutter is totally unique. The only downside of that is shutter lag, between the start of the shutter disc’s motion and the image being captured. Despite the top shutter speed of 1/1000s, it’s a factor to remember if you want to try panning action shots. The tiny viewfinder discourages that sort of use anyway.

Take note of the spinning film transport indicator on the base when you’re winding on. As you’re getting towards the end of the film, start watching it like a hawk. When it stops spinning, you’re done and any more shots will just be multiple exposures.

The shots

Tractor on Cromer beach. Aperture f16.
Sea view at Cromer. Aperture f11.
Seaside seaweed. Aperture f5.6
The old Laurence Scott & Electromotors factory in Norwich
River frontage of the old Colman’s mustard factory in Norwich

What next?

The Mercury has interchangeable lenses, but no other focal lengths were available. The early Tricor 35mm f3.5 was superseded by an f2.7 version and a Hexar 35mm f2.0. The focus helicoid is behind the mount (which has an imperial 15/16″-32 UNF thread) so the lens itself doesn’t need a focusing mechanism. I might try to find a decent half-frame 28mm that I can adapt to fit. An accessory shoe for a bigger auxiliary viewfinder is conveniently placed above the standard one.

Share this post:

Find more similar content on 35mmc

Use the tags below to search for more posts on related topics:

Contribute to 35mmc for an ad-free experience.

There are two ways to contribute to 35mmc and experience it without the adverts:

Paid Subscription – £2.99 per month and you’ll never see an advert again! (Free 3-day trial).

Subscribe here.

Content contributor – become a part of the world’s biggest film and alternative photography community blog. All our Contributors have an ad-free experience for life.

Sign up here.

About The Author

By Stuart Jenkins
Camera & lens collector, restorer, and tinkerer. As a photographer I'm trying to wean myself off digital and back onto film. IT Business Analyst by trade, and formerly a vintage aircraft engineer / restorer. Norfolk, UK.
View Profile

Comments

Heiko Hahn on How I Loaded and Shot a Univex Mercury with 35mm Kodak Ektar 100 – by Stuart Jenkins

Comment posted: 28/02/2023

Regarding the CC lenses, I may add that the "Tricor" brand name actually refers to five substantially different triplet lenses - the pre-WWII Ilex Tricor 3.5, Wollensak Tricor 3.5 and Wollensak Tricor 2.7 (rare!), and the common post-WWII coated Tricor 2.7 and 3.5 lenses made in-house by Universal themselves for the CX (but, of course, CC compatible).
Reply

Leave a Reply

Your email address will not be published. Required fields are marked *

Heiko Hahn on How I Loaded and Shot a Univex Mercury with 35mm Kodak Ektar 100 – by Stuart Jenkins

Comment posted: 28/02/2023

Many many thanks for the great film loading system! While Universal offered a reuseable film cartridge in #200 format, working examples of this cartridge are almost impossible to find - as is the beautiful art deco bakelite daylight loading device they offered (designed by Raymond Loewy). By the way, the "standard" Tricor lenses f3.5 - 35mm and f2.7 - 35mm seem to have been sold at the same time, as alternative options. The f2.0 - 35mm Wollensak Hexar was intended for use with the legendary Mercury CC 1500 (of which only 3.000 were made). Considering the photoresponse of the films available in #200 format in 1938, the impressive 1/1500s would have been rather useless without an f2.0 lens. The other CC lenses I have found so far are the Ilex Telecor f3.5-75mm (for which Univex made an auxiliary finder as well) and the ultra rare Wollensak Telephoto f4.5-125mm. I know of a Wollensak Anastigmat f4.0-50mm that was intended for use with the CC darkroom enlarger, but will fit to a CC as well.
Reply

Leave a Reply

Your email address will not be published. Required fields are marked *

Stuart Jenkins on How I Loaded and Shot a Univex Mercury with 35mm Kodak Ektar 100 – by Stuart Jenkins

Comment posted: 21/01/2022

No need to rewind the film at the end of the roll Chris. The original film was available in the either 18 or 36 exposure lengths, but you've no way of telling which you've got. If it's an 18-exposure roll, the counter might get to about 24 but your last half a dozen shots would be on the opaque trailer strip. The manual (available on the excellent Mike Butkus website) says to get to 18 or 36 on the counter, then hold down the shutter release and wind to the end.
Anyone who wants my STL files to 3D print can have them for free. It's far too niche to be able to sell them. I can put them on my Thingiverse account (stu_jenkins). Sounds like you're lucky enough to have two original spools.
Reply

Leave a Reply

Your email address will not be published. Required fields are marked *

Christopher Smith on How I Loaded and Shot a Univex Mercury with 35mm Kodak Ektar 100 – by Stuart Jenkins

Comment posted: 20/01/2022

Hello Stuart, my name is Chris. I recent became interested in using all the old film cameras I've collected just as for fun. I didn't realize what a gem this camera is. I just watched some videos on how to operate the camera and realized there is still a roll of film in it...I mean who knows what's on this roll. So I understand completely...you can no longer purchase this film type but you have come up with a way to retrofit new film. I also would be interested in buying the equipment you engineered to do this. You should make a YouTube video about this and sell them. So I'm going to try to finish the roll of film and see what comes of it. I still can't really find any info on winding the film when the roll is finish...this camera is wild. never seen anything like it. Mercury Univex...looks to be the original CC 1938 model...its a lil stiff but does operate. I've taken about 8 shots with it today and the counter is moving with each shot. Photography is 100% a hobby for me and I'm interested in chasing the film dream.
Reply

Leave a Reply

Your email address will not be published. Required fields are marked *

Brian Nicholls on How I Loaded and Shot a Univex Mercury with 35mm Kodak Ektar 100 – by Stuart Jenkins

Comment posted: 16/07/2021

Amazing article and results Stuart! I don't have your patience and resolve for all the fiddly modifications, but I would definitely buy one of these just to continually stare at its aesthetic beauty.
Reply

Leave a Reply

Your email address will not be published. Required fields are marked *

Stuart Jenkins replied:

Comment posted: 16/07/2021

Thank you Brian!

Reply

Leave a Reply

Your email address will not be published. Required fields are marked *

Scott Gitlin on How I Loaded and Shot a Univex Mercury with 35mm Kodak Ektar 100 – by Stuart Jenkins

Comment posted: 16/07/2021

What a great story! if that camera could talk it would say, "Thank you!" And it did deliver fine results.
Reply

Leave a Reply

Your email address will not be published. Required fields are marked *

Stuart Jenkins replied:

Comment posted: 16/07/2021

Thank you Scott!

Reply

Leave a Reply

Your email address will not be published. Required fields are marked *

Louis A. Sousa on How I Loaded and Shot a Univex Mercury with 35mm Kodak Ektar 100 – by Stuart Jenkins

Comment posted: 16/07/2021

Wow, perseverance paid off in spades. Well done.
Reply

Leave a Reply

Your email address will not be published. Required fields are marked *

Stuart Jenkins replied:

Comment posted: 16/07/2021

Thank you Louis!

Reply

Leave a Reply

Your email address will not be published. Required fields are marked *

Eric Risse on How I Loaded and Shot a Univex Mercury with 35mm Kodak Ektar 100 – by Stuart Jenkins

Comment posted: 15/07/2021

There were other focal length lenses, but they re quite rare! I’ve only seen a photo of one.
Reply

Leave a Reply

Your email address will not be published. Required fields are marked *

Stuart Jenkins replied:

Comment posted: 15/07/2021

I stand corrected Eric - what other focal lengths have you seen?

Reply

Leave a Reply

Your email address will not be published. Required fields are marked *

Philip Lambert on How I Loaded and Shot a Univex Mercury with 35mm Kodak Ektar 100 – by Stuart Jenkins

Comment posted: 15/07/2021

Amazingly talented work.
There are often cheap half frame cameras on eBay .
I bought an Olympus EES for £30 that works perfectly and another for£12 that seems to (untried). I have an old Minox 35mm somewhere that stopped working, optically very good. Back focus dimension unknown.
My Olympus gives sharp results on low-speed colour negative rated at half box speed. Maybe you could find a non-working example.
Phil
Reply

Leave a Reply

Your email address will not be published. Required fields are marked *

Stuart Jenkins replied:

Comment posted: 15/07/2021

Thank you Philip. Yes, they might be possible options. I might need something that has a manual aperture ring at the front of the lens though. I'll keep looking.

Reply

Leave a Reply

Your email address will not be published. Required fields are marked *

CP93 on How I Loaded and Shot a Univex Mercury with 35mm Kodak Ektar 100 – by Stuart Jenkins

Comment posted: 15/07/2021

Very nice. I just bought a second model, which uses regular 35mm, at a local antique shop for $40. Currently testing it with some CineStill BWXX. I know that at the fastest shutter speeds the shutter sometimes doesn't close, so we'll see what comes out. Next to find someone to process half-frame B&W 35mm.
Reply

Leave a Reply

Your email address will not be published. Required fields are marked *

Stuart Jenkins replied:

Comment posted: 15/07/2021

Thanks! You could always have a go at processing it yourself. No darkroom needed, just a changing bag.

Reply

Leave a Reply

Your email address will not be published. Required fields are marked *

Kurt Ingham on How I Loaded and Shot a Univex Mercury with 35mm Kodak Ektar 100 – by Stuart Jenkins

Comment posted: 15/07/2021

Superb!-
Is there a possibility I could purchase copies of the spool and loading device from you? I have no 3D printing capability myself
Thank you
Kurt Ingham
Reply

Leave a Reply

Your email address will not be published. Required fields are marked *

Stuart Jenkins replied:

Comment posted: 15/07/2021

Hi Kurt, thank you! I can see your email address in the back-end of the system. I'll drop you an email later and we'll see what we can work out.

Reply

Leave a Reply

Your email address will not be published. Required fields are marked *

Peggy replied:

Comment posted: 15/07/2021

That is amazing, well done. I am so impressed with all the 3D printing to solve problems. And the final images, double wow, so sharp.

Reply

Leave a Reply

Your email address will not be published. Required fields are marked *

Stuart Jenkins replied:

Comment posted: 15/07/2021

Thank you Peggy!

Reply

Leave a Reply

Your email address will not be published. Required fields are marked *

Calum Davey on How I Loaded and Shot a Univex Mercury with 35mm Kodak Ektar 100 – by Stuart Jenkins

Comment posted: 15/07/2021

Was starting to think 'gosh this is taking a lot of effort' and then saw the results and could imagine the immense satisfaction of resurrecting such an interesting camera. Lovely shots -- I think I prefer the aspect ratio to 35mm! Truly an amazing article, thanks Tom
Reply

Leave a Reply

Your email address will not be published. Required fields are marked *

Stuart Jenkins replied:

Comment posted: 15/07/2021

Thank you Calum!

Reply

Leave a Reply

Your email address will not be published. Required fields are marked *

David Campbell on How I Loaded and Shot a Univex Mercury with 35mm Kodak Ektar 100 – by Stuart Jenkins

Comment posted: 15/07/2021

Great article! I have one of these that I bought about a year ago. It will need some work to restore to usability. The shutter mechanism is probably gummed up a bit and stuck around 1/30th or 1/15th of a second. Before I bought it I had never heard of this camera. Also interesting that it is machined out of solid aluminum and the rotating shutter is akin to those used on movie cameras. I'm not up to your level of problem-solving skills in manufacturing a film loading adapter, so I will have to see what I might be able to do if I ever get to the point of actually trying to run a roll of film through this little beastie!
Reply

Leave a Reply

Your email address will not be published. Required fields are marked *

Stuart Jenkins replied:

Comment posted: 15/07/2021

Thanks David! I used Rick Oleson's repair notes on the Mercury II (on his website) to disassemble the camera. It really only needed the shutter mechanism to be flushed out with lighter fluid. When I reassembled it, I deliberately left out the four coil springs that push the focusing mechanism away from the film plane, presumably to eliminate backlash. They're not necessary, and they're too strong so they just made the focusing really stiff. Instead I just used good quality dampening grease on the helicoid and it feels much better.

Reply

Leave a Reply

Your email address will not be published. Required fields are marked *

David Campbell replied:

Comment posted: 15/07/2021

Next time I haul it out I will try the lighter fluid on it. Thanks. I will take a look at Rick Oleson's website and see what he has to say about this camera. I'm in the U.S., by the way. I guess most of your readers are in the U.K.?

Reply

Leave a Reply

Your email address will not be published. Required fields are marked *

Stuart Jenkins replied:

Comment posted: 15/07/2021

Site owner Hamish is also in the UK but it seems to be a pretty international readership.

Reply

Leave a Reply

Your email address will not be published. Required fields are marked *

Tom Perry on How I Loaded and Shot a Univex Mercury with 35mm Kodak Ektar 100 – by Stuart Jenkins

Comment posted: 15/07/2021

Appreciate the insane level of effort to get this beautiful camera usable again. Bravo!
Reply

Leave a Reply

Your email address will not be published. Required fields are marked *

Stuart Jenkins replied:

Comment posted: 15/07/2021

Thanks Tom!

Reply

Leave a Reply

Your email address will not be published. Required fields are marked *

Paul Brant on How I Loaded and Shot a Univex Mercury with 35mm Kodak Ektar 100 – by Stuart Jenkins

Comment posted: 15/07/2021

I'd thought it impossible to use these nowadays.
Great interesting post with some good shots .
Many thanks.
Reply

Leave a Reply

Your email address will not be published. Required fields are marked *

Stuart Jenkins replied:

Comment posted: 15/07/2021

Thanks Paul!

Reply

Leave a Reply

Your email address will not be published. Required fields are marked *

Leave a Comment

Leave a Reply

Your email address will not be published. Required fields are marked *