darktable is open source image workflow software. Open source means it’s free, both in terms of cost (in this case and many others, but not all), and in terms of what you do with it. You can take the code to pieces if you want (and are able to…) and make your own version. Not a problem!
It’s developed by a hard working team of volunteers, who I have enormous respect for. If you’re familiar with the ubiquitous Adobe products, darktable (often known as dt) is closest to Lightroom. Like Lr, its primary purpose is developing RAW images, as well as organizing them and so on. However, and I must stress this, it is not a copy of, nor a direct replacement for Lightroom! Some would argue I shouldn’t even have made the comparison, but I thought it was the simplest way to describe what it does. It’s available for Linux, Windows and Mac.
It can be a bit divisive at times – many people love it, but there are also those who don’t like it. For anyone who doesn’t like the way darktable does things, but does like the open source nature of it, I would suggest trying RawTherapee or ART (A Fork of Rawtherapee), a variant of it. These are both a little more traditional in approach, and very good as well.
darktable is different in how it works: you have a concept called the pixelpipe, which consists of modules each of which have an effect on the image. It is totally non-destructive, like all decent RAW processors, and the adjustments you make are saved in its database (like Lr) and if you want, also in a sidecar file, which means you don’t need to have access to the database to retrieve your edits. If you wanted to transfer to a different computer, also running darktable, you only need to ensure that you copy the .xmp sidecar file with the raw, and in almost all cases you have your complete edit. The only exception is if you used an external file, i.e. a LUT, that would need to be present too. Of course, once you’re done editing, it will export to JPG, TIFF or whatever.
It’s beneficial to have a GPU (graphics card) in your machine – some modules are quite computationally intensive, and darktable can use OpenCL acceleration. I have a low-mid range Nvidia GPU which makes all the difference to speed and responsiveness with modules like diffuse and sharpen.
Going back to the pixelpipe, darktable, by default, works in a scene-referred workflow. This just means that all (or most) of the adjustments on your image are done before the tone curve (or “tone mapper”) that translates the wide dynamic range captured by your camera into the the range that can be fitted into a jpg, or displayed on a screen. That doesn’t affect the order in which you apply adjustments, but it does have an effect how adjustments respond. In effect, it’s the ultimate in non-destructive editing, because you have access to all the data you captured while you work on the image. Modern cinema editing is done this way, apparently. In scene-referred, the last module in the pipe is the tonemapper (not to be confused with the nasty “HDR” style of tonemapping), which compresses the wide dynamic range into the output, in the way you want.
The current release of darktable, version 4.2, has two very good tone mappers – filmic rgb and sigmoid. They both do the same job, and can give very similar results. Sigmoid is a newer addition, easier to use (arguably) and I often prefer it, so I stick to that usually, although filmic rgb is considerably more flexible in some situations.
Having got some of that architecture out of the way, darktable is easy to use, as long as one realizes that there is usually more that one way to do something, but one way is easier and better than the others! It’s also heavily customizable. But a small collection of modules will do almost all of your needs, and they can be all you need to touch, so it is actually not very different to most similar software in normal use. It also has a comprehensive manual.
Something that trips quite a few people up initially is that when you open a raw file in darktable, it can look very dark, flat and dull. This is simply because it leaves all the editing choices up to the user, whereas almost all other software has a “ready-made” starting point.
This is part of the darktable philosophy – ultimately you should make all the processing choices that go into your image, not the software or camera engineers. It does mean that you don’t always have a good starting point, but once one knows this, it’s only a few clicks to get a decent looking image. However, I must admit if you are very happy with your jpgs from your camera, and just want small tweaks, it can take a bit of tweaking just to find your “jpg-like” starting point. This doesn’t bother me at all, as I don’t usually want the jpg look anyway… but it’s not usually that hard to get with a bit of experience, especially with the new sigmoid module.
I’ll try to give a very brief account of my workflow here. I should stress that this is MY workflow, at this point (it may change next week) and not necessarily the best, or even a correct way to do it. The basic recommended workflow (or one version of it) is detailed in the manual here. But I find my workflow as I show below to work better for me and my approach – it’s not that different in fundamentals anyway.
What’s more, this will only skim the surface of dt… it’s got loads of features, and in fact this is one of the criticisms most often leveled at it. My view on this is that any powerful software takes time to learn, but I personally don’t see it as an issue. If I was seriously into, say, analogue color photography, I would expect it to take quite a time to learn how to do the whole development and printing procedure.
My basic workflow in darktable
I use Windows, but most aspects are the same across platforms.
To start with, I have a few settings which are pertinent to my workflow in the preferences, accessed via the little cog icon at top right-ish. Under the processing tab, I set “auto apply pixel workflow processing defaults” to “none”, and I set the adjacent setting for “chromatic adaptation defaults” to “legacy”. I won’t explain about this here as I’m trying to keep things brief, but use of the “legacy” setting (relates to how white balance is controlled) is not actually normally recommended… but it simplifies things a little, and usually works well for my images.
On the storage tab, I set “write sidecar file for each image” to “after edit”. That way I only get a sidecar file created when I edit the photo, not when you import, rate or label images. That suits me, but it’s up to you, and how important you consider the metadata you create.
I want to mention that in darktable, a preset is something that only applies to one module; a style is more akin to the kind of preset that Lr users are used to.
OK, here we go… darktable opens on the “lighttable” view. I copy my photos to my hard drive using Windows explorer, so I only want to show darktable where the files are, not copy them. I click on the “add to library” button at top left. In the window that appears, at the top left I add my hard drive to the “places” box, then the list of folders will appear below. I choose my folder, select all and click add to library. Now I have a grid of pictures, and I can rate them, or view them full screen by selecting an image then pressing “F”.
These photos were taken on my old Pentax K10D – might be the subject of another article one day…
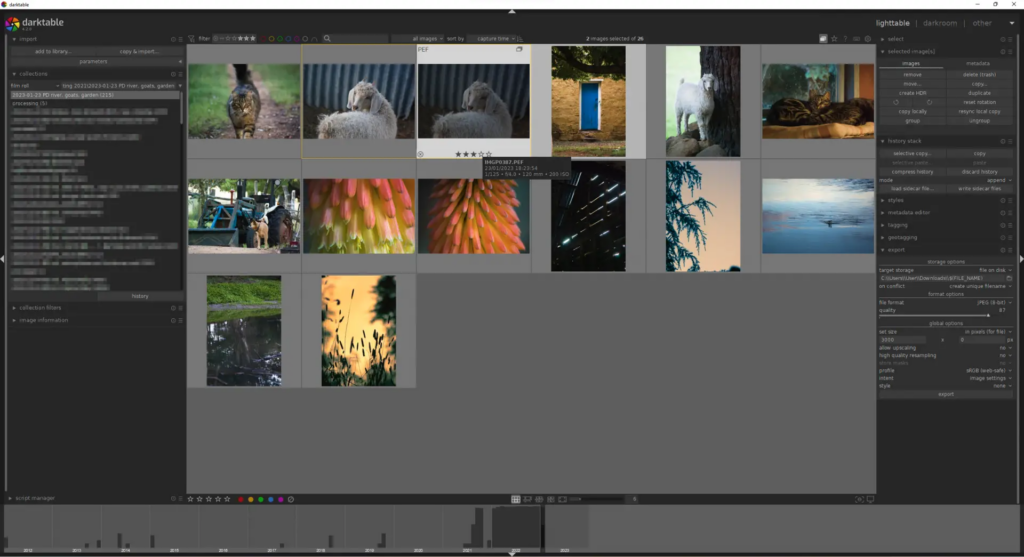
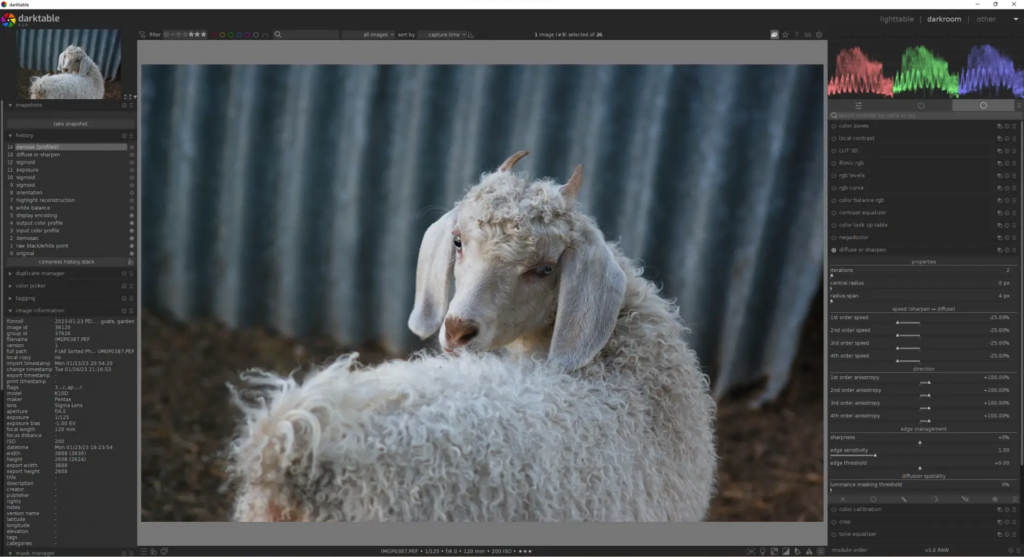
But for now, I double click an image to open in “darkroom”. It looks dark and flat.
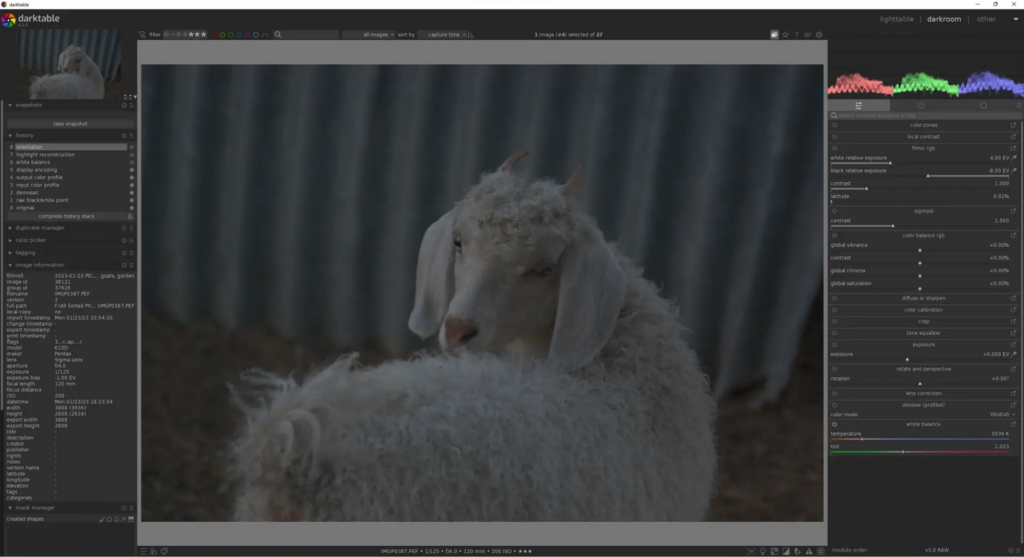
I must say here that I have a customized module layout on the right hand side – I have all my most used modules as shortcuts in the quick access panel. This is there by default, but with fewer modules. You can add whatever modules you want by right-clicking on the quick access tab, in my layout the left-most of the three tabs, with a little sliders icon, and selecting a module element to add. From this quick access panel, if one wants to see all the options available in a module, just click the little “arrow-pointing-out-of-a-box” icon to the right of a slider. If I can’t find a module, there is a search box!
If you click the ‘show only active modules’ tab, to the right of the quick access tab, it will show your current pixelpipe, with all the active modules you have applied, in the order that they are applied to the image from bottom to top. Again, this has nothing to do with the order that you make adjustments, only the way that image data is fed from one module to the next. You can change the order with ctrl+shift then click and drag on a module, but it’s possible to make a real mess and you should only change it in very specific circumstances!
Anyway, I enable sigmoid by moving that module’s contrast slider, and increase it a little, than slide the exposure slider up, till it looks about right. I often juggle these two sliders.
Now my image looks like this.
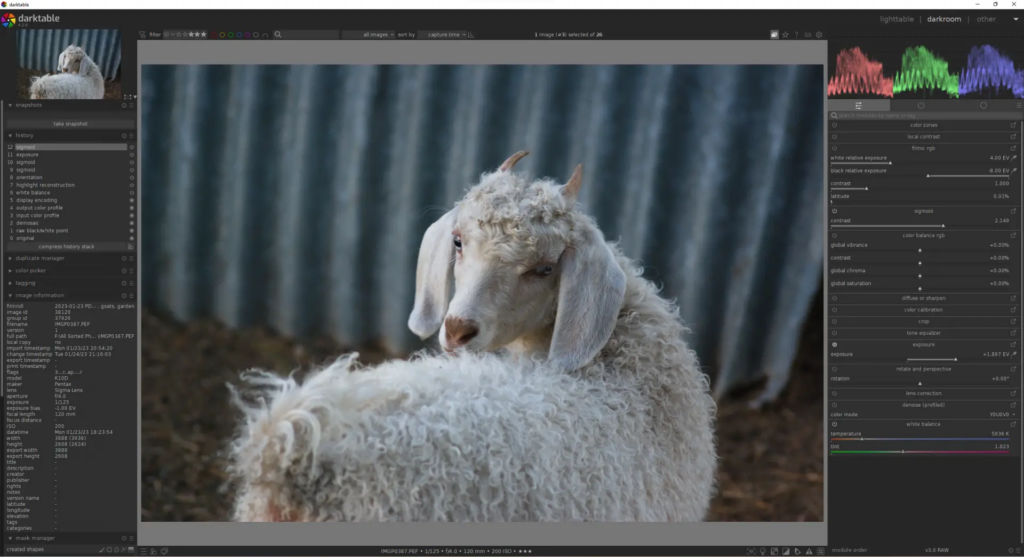
Looking quite good. It still seems a bit soft and might be noisy, so I enable denoise (profiled). This will automatically pick up the camera used, (except with some of the newest cameras) and the ISO setting of the shot, and apply a customized denoising profile.
Then, I go to the full view of diffuse or sharpen, click the hamburger icon to the far right of its title, and select the “sharpen demosaicing no AA filter” preset, and sometimes, I increase the ‘iterations’ to 2, to increase the effect. (I know the K10D has an AA filter, but this option simply gives a smaller sharpening radius which I prefer).
If the white balance looked off, I would go to the white balance module to adjust it.
So far so good. I now have a decent basic image. I only took me 10 seconds or so to get here, by the way. It takes a lot longer to write it!
I decide I want to make the shadows a bit bluer, and maybe the rest a little warmer, so I go to the color balance rgb module, go to the “4 ways” tab and adjust the “shadow” and “power” (midtones) groups of sliders:

That was quite a subtle change but I didn’t want to go too far. The first tab of this module is the place to adjust saturation, separately for shadows, midtones and highlights if you want to.
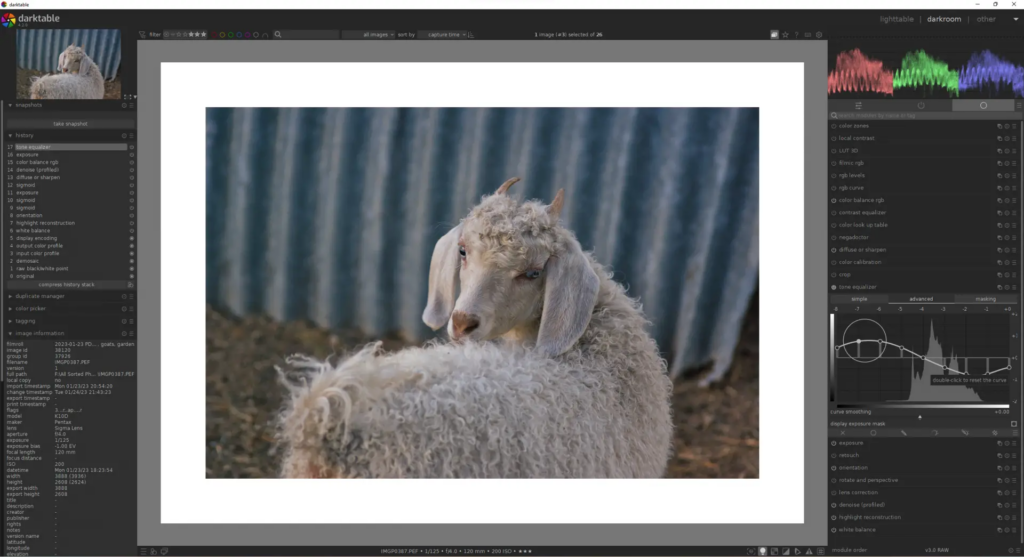
Did you notice the white border around the image? I turned on the ISO12646 color assessment mode with the little light bulb icon at the bottom right of the image. It’s very useful for assessing what the image will look like under average conditions.
I then decide I want the image a little brighter, so I return to the exposure slider and increase it a little, and also readjust the sigmoid contrast slider a little.
This image is pretty much done now, but I want to show you a module which is very useful on images with a wider dynamic range.
Bring in tone equalizer. It is basically for adjusting the exposure separately in the shadow, highlights and anywhere in between, while preserving details and local contrast. I like to use a preset called “compress shadows/highlights (gf)” as a starting point, but after applying the preset one usually needs to go to the “masking” tab, and click the magic wand icons to the right of the “compensation” sliders. This is to set the module to the range of brightness in the image. One can also adjust these manually, by aiming to get the grey block centered in the range, and not going as far as the edges.
It’s a lot harder to describe than to do. But now, I can use the “advanced” tab to move the curve around, or I can move my mouse over the image, and turn the mouse wheel to make adjustments to whatever brightness level is under the cursor. You will see the curve move while doing this.
That looks ok… not a great image, but it served its purpose!
To export it, I can scroll the stack of modules on the left, or collapse one or two, to bring the export module into view, which is pretty straightforward. You can also access this from the lighttable view, so you can export a whole set in a batch.
In the history stack module on the left, I can revert to any previous stage, and also, I can save the set of adjustments as a style to be applied quickly to any other image.
More useful modules
Another useful module is color zones. This has a preset called “HSL base setting” which makes it easy to adjust brightness, hue and saturation for different colors. This is a display-referred module, meaning it comes after the tonemapper, sigmoid, in my case, so one needs to be a little more careful to not blow out highlights, or cause strange effects with colors. But for smaller tweaks it’s very good.
color calibration is quite powerful. It combines a more technical and accurate approach to white balancing (remember that setting about chromatic adaptation? If you set it to “modern” the WB module will be preset to a “camera reference” setting and you handle the control of WB in color calibration). It also has a channel mixer, and controls for brightness and colorfulness of R, G, and B. Incidentally, this does all the things you can do in Lr’s “Calibration” section, just with a different interface. (admittedly a little unintuitive!) I like using it for shifting hues, in a broad but subtle way.
For sharpening, clarity and texture style adjustments, there is local contrast and contrast equalizer, as well as the powerful but harder to learn, diffuse and sharpen I used above.
The 3D LUT module lets you load LUTs (Look Up Tables) such as are used by many film makers on Youtube and so on. There is a very nice collection of these which try to simulate different film stocks, freely available here (near the top of the page), hidden away in the RawTherapee documentation.
The rotate and perspective module is self explanatory, except that it has useful automatic correction features that would be a little hard to explain properly here.
Retouch can clone and heal, but also apply blur to different detail levels, as is often used in portrait retouching.
You can mask modules, and have multiple instances of them, and even change the blending mode, giving massive flexibility.
The manual can be accessed, very conveniently, by clicking the “?” icon next to the preferences button, then clicking on the module or element that you want to read about.
Learning darktable
The power of darktable does mean that it takes a while to master – I’ve been at it for a year, on and off, and am very comfortable with it, but still occasionally discover new things.
As well as the manual on the darktable.org website, there are lots of very good tutorials on youtube. One creator I can recommend personally is Boris Hajduković – very detailed and knowledgeable tutorials. They often assume some prior knowledge, although he has almost always covered that in previous videos.
There is also a very friendly and active community on discuss.pixls.us, where I’m quite active. It’s a great place to discuss this kind of thing and many of the developers are active on there as well. On a side note, how often do you get to swap notes with an Adobe developer? A really great aspect of the Pixls forum is the Play Raw category – you post a photo, both the Raw file and your version, and invite others to show their take on it. People upload their sidecar files with their edits, so you can load them to see exactly how they did it
The devs put a lot of work into the software mostly without any funding at all, but bugs do slip through the net, and there’s not always enough people to fix things immediately. Reports of problems are always appreciated, especially if one is willing to follow a few instructions to help get to the bottom of it. Give and take!
I should probably add that if you don’t like the colours, tones, or anything else about the images in this article, don’t blame darktable… it’s bound to be me!
Summary
I hope you found this article interesting – I’ve wanted to do it for a while, and finally decided to give it a go. As you can guess, I like darktable, it’s not for everyone, but for those who like the approach it’s very rewarding.
Thanks for reading! You can see more of me on my new website, or on Flickr.
Stevenson (Steve) Gawen in rural NSW, Australia
Share this post:


Comments
Simon Cygielski on darktable Mini-Review – A Quick look at my Favorite Software
Comment posted: 17/04/2023
Comment posted: 17/04/2023
CHRISTOF RAMPITSCH on darktable Mini-Review – A Quick look at my Favorite Software
Comment posted: 17/04/2023
Comment posted: 17/04/2023
Andrew Wilkin on darktable Mini-Review – A Quick look at my Favorite Software
Comment posted: 18/04/2023
Comment posted: 18/04/2023
Steven G on darktable Mini-Review – A Quick look at my Favorite Software
Comment posted: 18/04/2023
Marc Cabuy on darktable Mini-Review – A Quick look at my Favorite Software
Comment posted: 19/04/2023
Google helped me to find your explanation. Thank you, great reading.
I became a darktable-fan 3 years ago and have survived the display-referred to scene-referred transition. I found the tutorials of Bruce Williams, your fellow countryman I think, very good too. He's trying to keep it simple. Boris Hajduković's are OK too, but I feel they are for the already advanced user.
To my opinion a powerful GPU in your computer is rather mandatory than just beneficial. I tried darktable 6 years ago for the first time and gave up. That was due to unbearably slow and unworkable response time in my computer without a separate GPU at that time. On the same computer I was using LR 5.7.1 with OK response time.
And yes, the support you get on a question, sometimes straight from the developers, is always very prompt and good.
Let's keep promoting this software. The hard working developers deserve it.
Marc (Belgium)
Comment posted: 19/04/2023
Ilya on darktable Mini-Review – A Quick look at my Favorite Software
Comment posted: 21/04/2023
Comment posted: 21/04/2023
Stevenson G on darktable Mini-Review – A Quick look at my Favorite Software
Comment posted: 04/12/2023
My workflow hasn't changed much. The main thing is that I now use the more standard sigmoid workflow. Where I say this:
"Under the processing tab, I set “auto apply pixel workflow processing defaults” to “none”, and I set the adjacent setting for “chromatic adaptation defaults” to “legacy”."
I now just set the new single option to "sigmoid".
And instead of using the white balance module to adjust... errm.. white balance I use the color calibration module.
This is standard dt workflow, and it works great. Just wanted to add this here so as to (hopefully) not mislead anyone more than necessary!