Yeah, I really built a drone that shoots 35mm film…
Before I can even begin to explain my absurd creation and why I did it I should explain my background.
Anyone who has known me for a long time will be aware that this was inevitable for me. My name is Jason De Freitas, I’m a 30 year old aeronautical engineer living on the south coast of NSW, Australia.
What originally put me on this path (besides being a natural geek) was RC helicopters. From the age of 16 I was flying and building these contraptions both because I was into tinkering and because I loved the challenge of flight. They couldn’t hover by themself, it was an immense feat just to keep the thing away from the ground for more than 30 seconds when first learning how to fly (I remember breaking that milestone.) I was so hooked on the difficulty and technicality involved that for years I dedicated so much of my time learning and perfecting aerobatics.
No wonder I’m so cool now.
The point of telling you this is to demonstrate how photography and specifically film was a completely unexpected branch of obsession that hit me like a freight train. A diverging branch in my timeline that would inevitably converge back together. Film really was very unexpected for me, when I first picked up an SLR it was simply to improve my photography and because I loved that it was fully mechanical (it was a Nikon FM2 for anyone curious). I do like to say that I fell in love with cameras first and photography second – film definitely is to blame for the latter.
If you’re here reading this then I don’t really need to explain it to you but for me I just love how deep into the process I can get while and I can always seemingly go deeper. From developing to scanning to printing I just love it all. If you’re familiar with my photography you’d know that my obsession with difficulty and technicality has continued with film through my analogue astrophotography. If you’re not familiar with my work well then you can probably see a theme here with using film where it’s excessively impractical. I do think that art can come from the process and the medium can add something special or at least different to the end result.
The Drone
Even the type of drone I chose for this was a bit silly. I used an FPV drone – the kind that’s typically flown by wearing goggles that are relaying a first person perspective from an onboard camera. Imagine strapping four propellors to a camera and flying it around – there’s no gimbal to aim the camera so you quite literally have to point and shoot the drone itself.
For example the entire drone has to be in a nose dive to take a birds eye view shot. This has many problems such as motion blur but in my opinion that’s easily trumped by how fun it is. The actual benefits of an FPV drone is how dynamic, agile, and small they are. My entire setup fits in one backpack that I can easily take hiking. In the future I do plan on taking advantage of how dynamic and aerobatic this drone is. Motion blur isn’t a bug, it’s a feature.
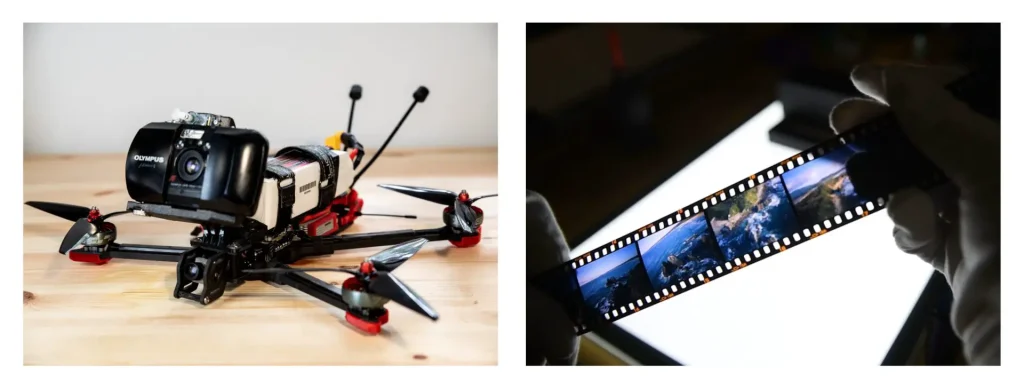
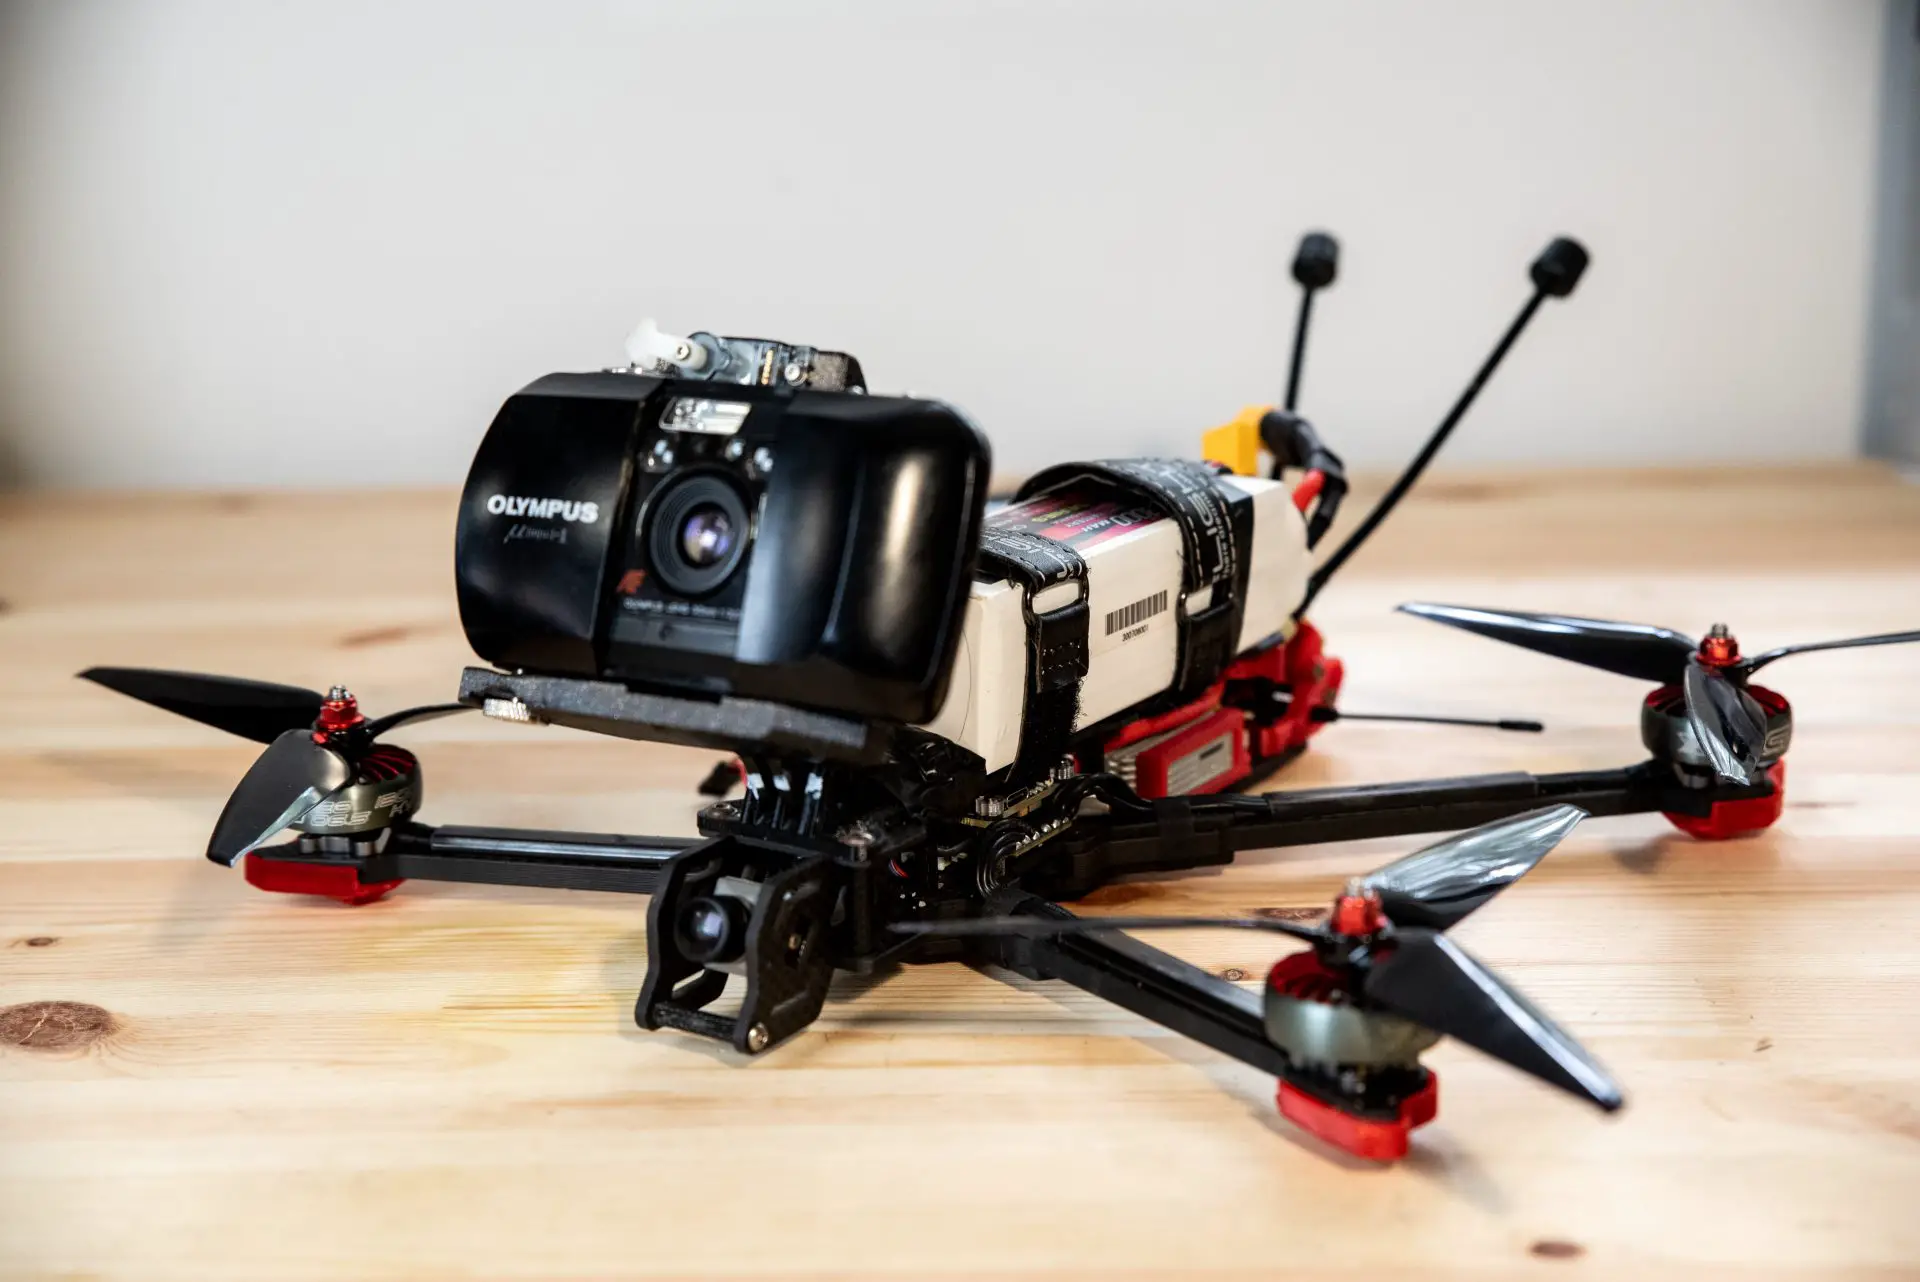
I have experience building 5 inch FPV drones (this might be the size you’re familiar with if you’ve seen ‘drone racing’ before) but for this project I decided to use a larger 7 inch drone for the extra room, payload capacity and flight time. This is roughly the largest common size before you break the 2kg (4.4lbs) weight barrier where regulations start to get extra restrictive. I used a 1300kv iFlight Chimera 7 as the platform and designed the rest of the camera integration.
The Camera
The choice of camera was constrained by two key requirements. It had to be lightweight and it had to have an automatic advance.
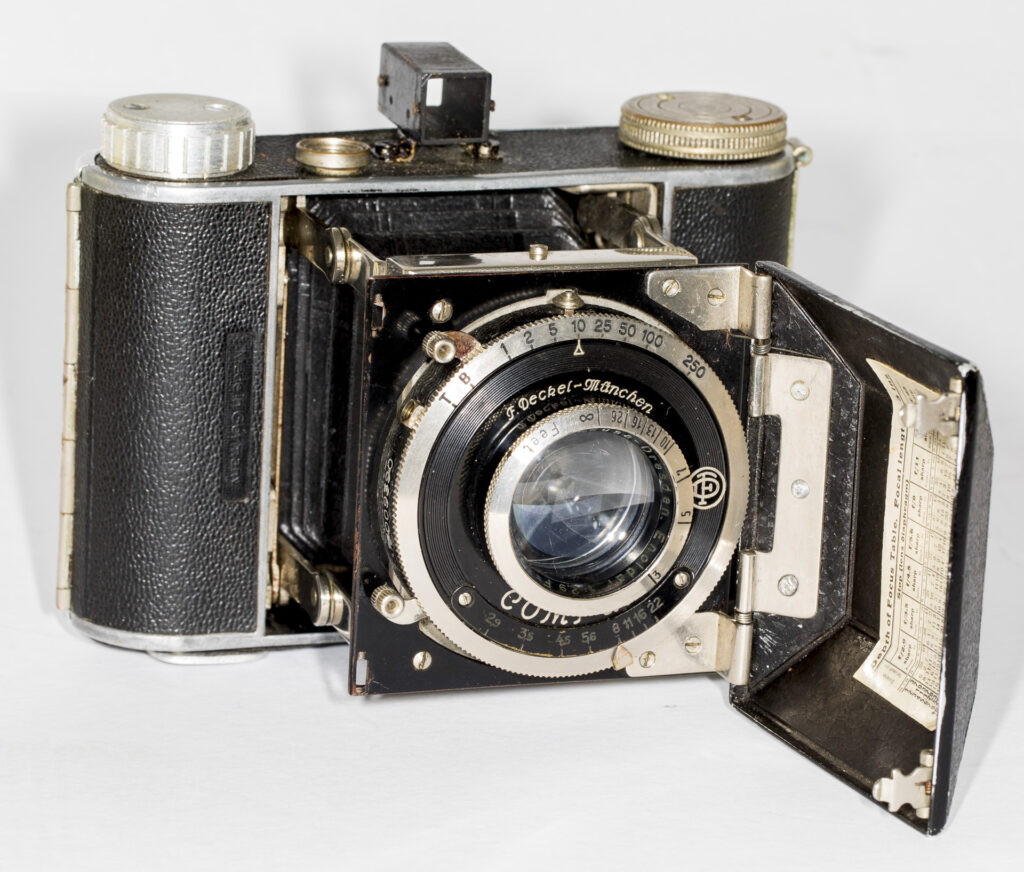
The obvious choice was a ’90s point and shoot (‘obvious’ used in the context of someone being foolish enough to use film here.) Other important factors are a nice ‘clicky’ shutter button as well as a very quick response – minimal delay between shutter press and shutter action is pretty important when the drone is constantly moving.
I was kindly donated an Olympus Mju-1 which was perfect for the job. With a roll of film inside it only weighs 80g more than the GoPro 8 I normally run on this drone. It’s quite impressive how small the whole setup is considering it’s a full frame camera – not that I expected results to be sharper than a comparable size digital camera in this application. Defining what the heaviest camera a drone can lift is tricky. It could easily lift something heavier but you comprimise the flight time and performance. It’s literally and figuratively a fine balance. I would say that on a drone this size 600 – 800 grams might be the limit but I’m yet to find out.
As an alternative to the Mju-i I have a Nikon AF600 that I plan to also use. This thing is absolutely tiny and has a slightly wider 28mm focal length that I believe would work better.
Remote Shutter Release
By far the most common question I’ve received about this project was how I fired the shutter. The answer is telekinesis.
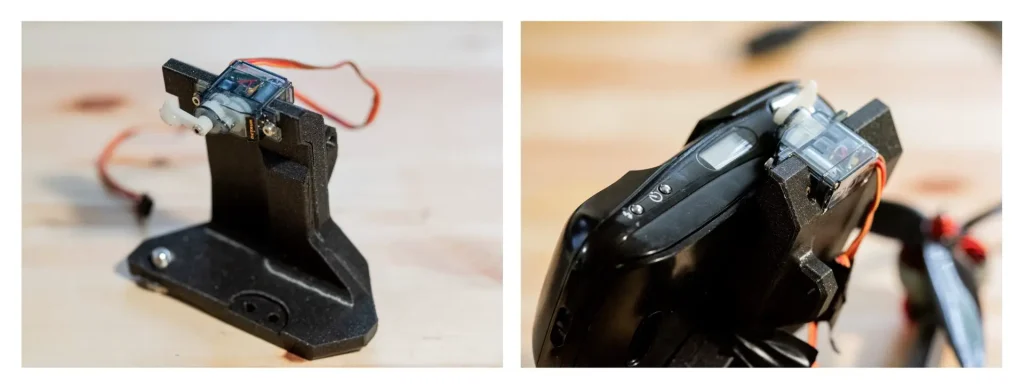
I did initally seek a camera that had an electronic cable release and connect that to the drone somehow but as far as I know that doesn’t exist on a cheap point and shoot. I also considered opening up the camera to intercept the shutter button but the easiest and most non destructive method was to mechanical press the button.
In CAD software I designed a 3D printed bracket that both mounted the camera to the drone and positioned a micro servo motor above the shutter button. The last step was to wire the servo to a spare aux channel on the flight controller – with some simple radio programming I was able to set up a switch that would control the servo. Flick the switch and the shutter fires.
STL files for the mount I designed can be downloaded from here – though they will only work for an Olympus Mju-1.
Remote composition
The second most common question I’ve been asked is in regards to composing.
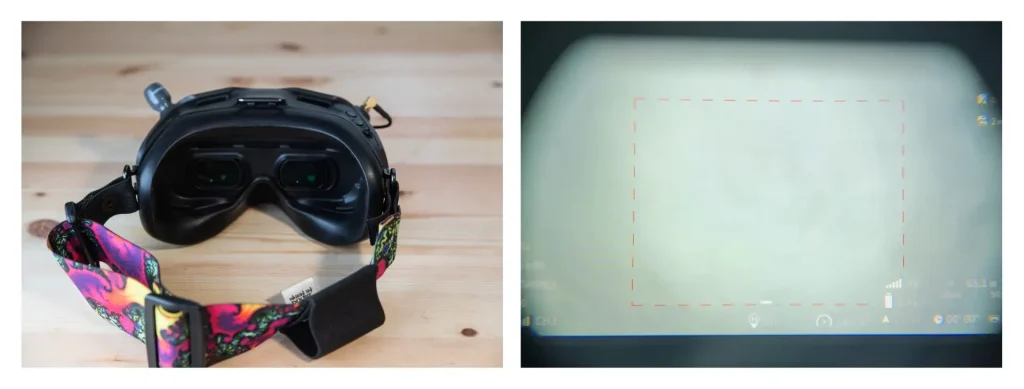
The FPV camera is mounted to the drone so there is no video feed looking through the viewfinder – the FPV feed in the goggles has to be aligned accurately to the camera. I achieved this by replacing the Mju with my phone and using it’s camera to reference the angle the bracket was mounted at compared to the FPV feed.
Once I had the angles lined up I had to take some test shots on the Mju-i to work out the framing in the FPV feed. I was able to set up frame lines in the goggles that matched the 35mm focal length of the Mju-i quite closely. This worked surprisingly well and composing shots with it was a lot of fun.
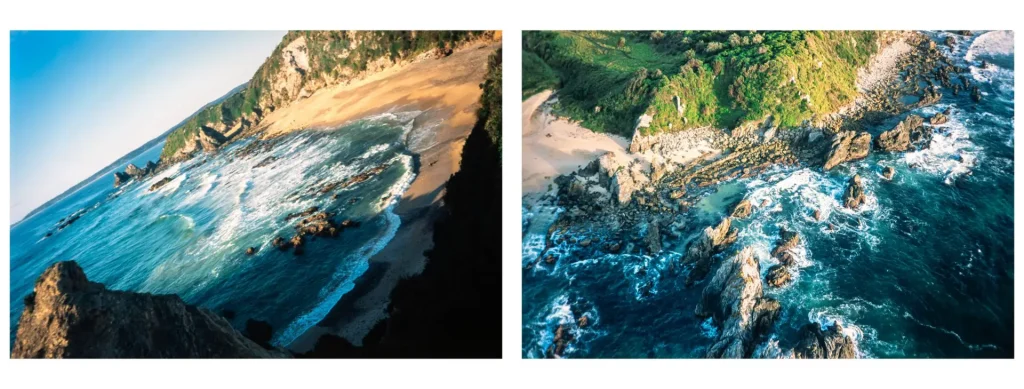
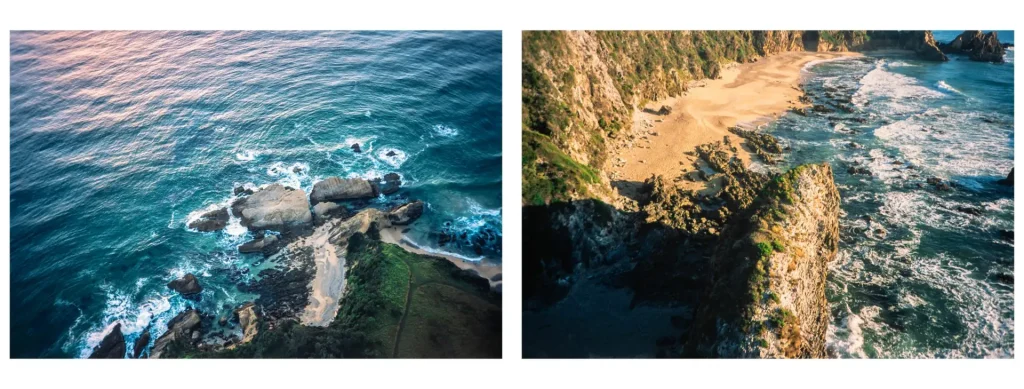
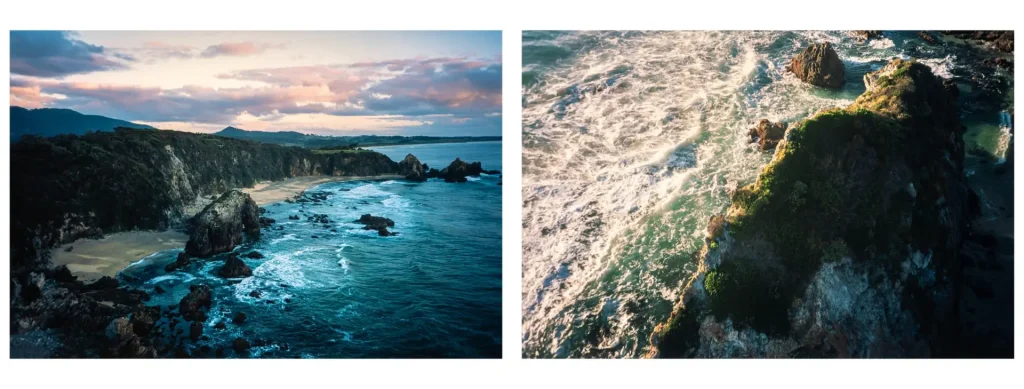
The results
After shooting a couple of test rolls to really dial everything in I decided to take it somewhere that I could really let it shine. Of course the weather was almost constant overcast all week but there were a few hours right at sunrise on Saturday morning.
I set off at 2am to make a drive down to a spot near Narooma – a small coastal town on the South Coast of NSW, Australia. A short trek that’s only possible at low tide lead me to the location I was after, Horse Head Rock. This is ancient rock formation right on the beach that’s estimated to be 500 million years old. I brought two rolls of Fujifilm Provia 100f with me, as well as some negative stock but I couldn’t resist loading the Mju-i with some slide.
I had tested slides on one of my test rolls with the Mju-i but I still knew it was risky considering how I had no exposure control. I’m a sucker for slide film and really think that projection is an underappreciated analog presentation. Prints are amazing but projection is real world magic.
While shooting the first roll I had one unexpected problem. After landing it appeared I only shot 15 frames when my trigger happy fingers were sure I had blasted through 36. The Mju was not playing nice but it’s at this point that I should point out it has taken more than zero tumbles in testing. Using my backpack as a make shift changing bag I pulled the film out and loaded one more, luckily there were no issues this time. I was certain my changing backpack technique would have ruined the first roll but to my delight it was flawless. Looking at the results I got with it I’m really finding that the best use for drone aerial photography is to take shots that aren’t from incredibly high up. You use it to find compositions that you just can’t get to otherwise, shots only a little higher than what you could with a tripod, or shots over water to get unique vantage points. Aerial photographs from an intimate distance.
What’s next? Well I’m having a hard time deciding as I want to take this to some new locations as well as mount all sorts of different cameras to it. It can only get more ridiculous. My next ideas will make this one seem sane. If you’d like to check out more of the results from this project and future ones then please check out my socials:
Share this post:


Comments
Jeff on Film Photography With a Drone – By Jason De Freitas
Comment posted: 18/03/2022
Comment posted: 18/03/2022
CHRISTOF RAMPITSCH on Film Photography With a Drone – By Jason De Freitas
Comment posted: 18/03/2022
Comment posted: 18/03/2022
Cire Llissat on Film Photography With a Drone – By Jason De Freitas
Comment posted: 18/03/2022
Stelios Themelakis on Film Photography With a Drone – By Jason De Freitas
Comment posted: 18/03/2022
Phil Snaps on Film Photography With a Drone – By Jason De Freitas
Comment posted: 19/03/2022
Alan on Film Photography With a Drone – By Jason De Freitas
Comment posted: 20/03/2022
BUT, the results are absolutely stunning!
Sam Westenskow on Film Photography With a Drone – By Jason De Freitas
Comment posted: 25/03/2022