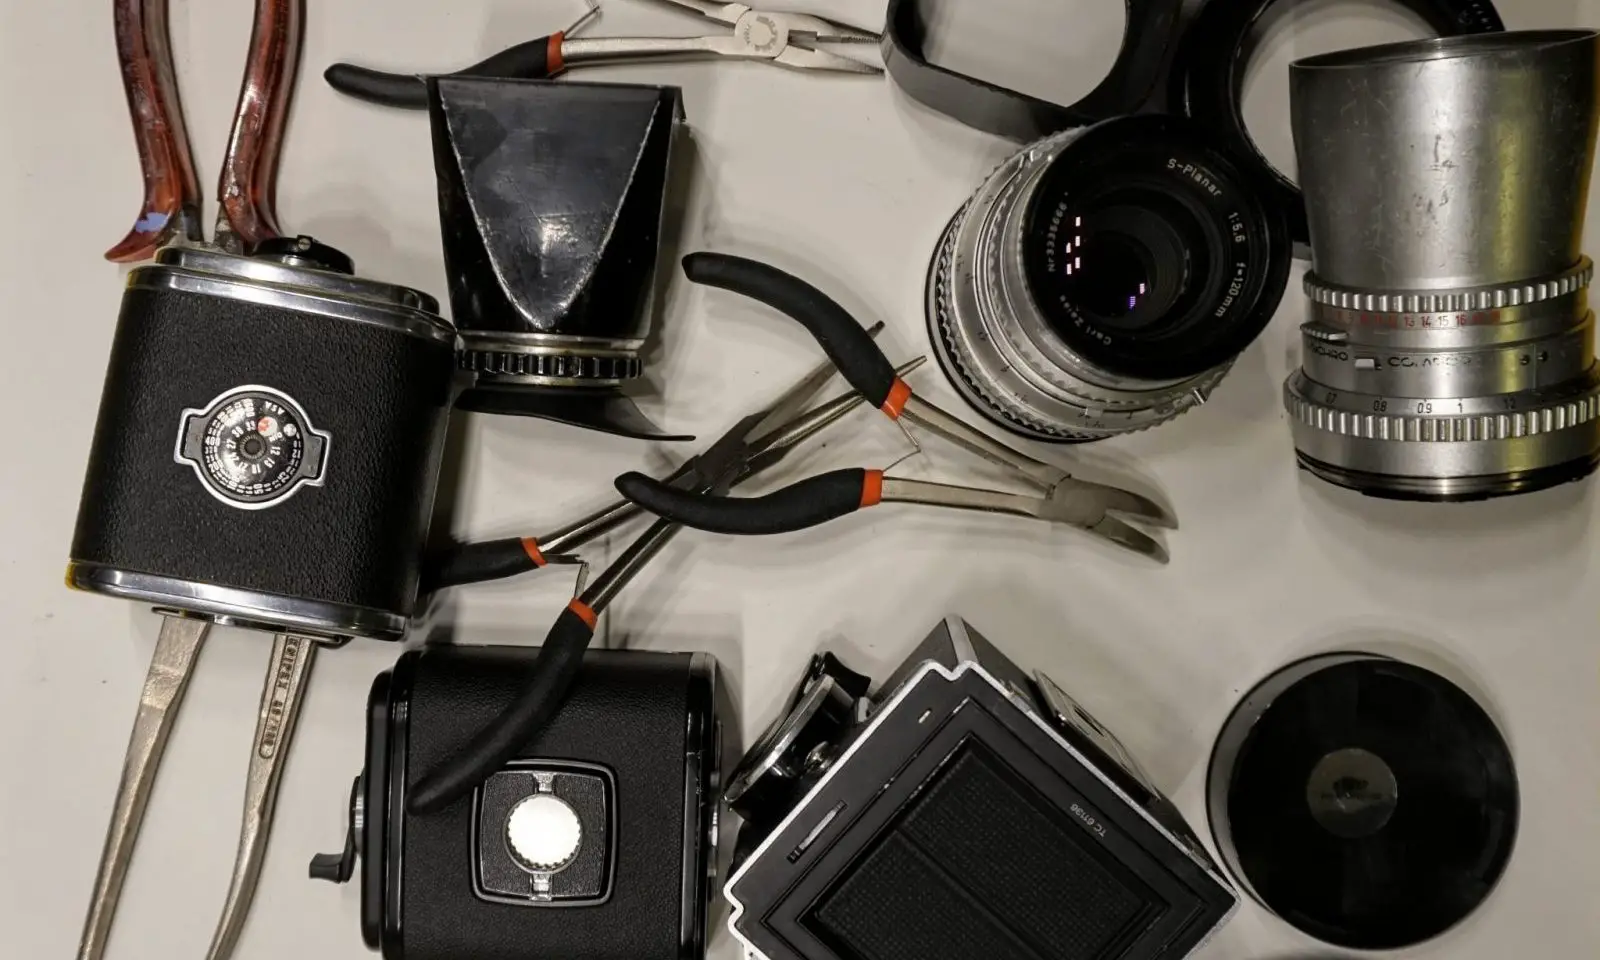
If you are reading this, you might have a magazine with some problems. This piece is written to help you. I found there to be very little documentation on the repair of these, but I think these these magazines, despite their complexity, are quite repairable by a slightly handy person. This is not written by a professional repair person, but by an amateur university students with some experience doing repair on these, as well as on other camera equipment.
Before this, however, I need to tell you how to identify which magazine you have.
The Early Magazine 12
There seem to be a lot of confusion as to which magazines are which. In essence there are two main types, these are also the most common one.
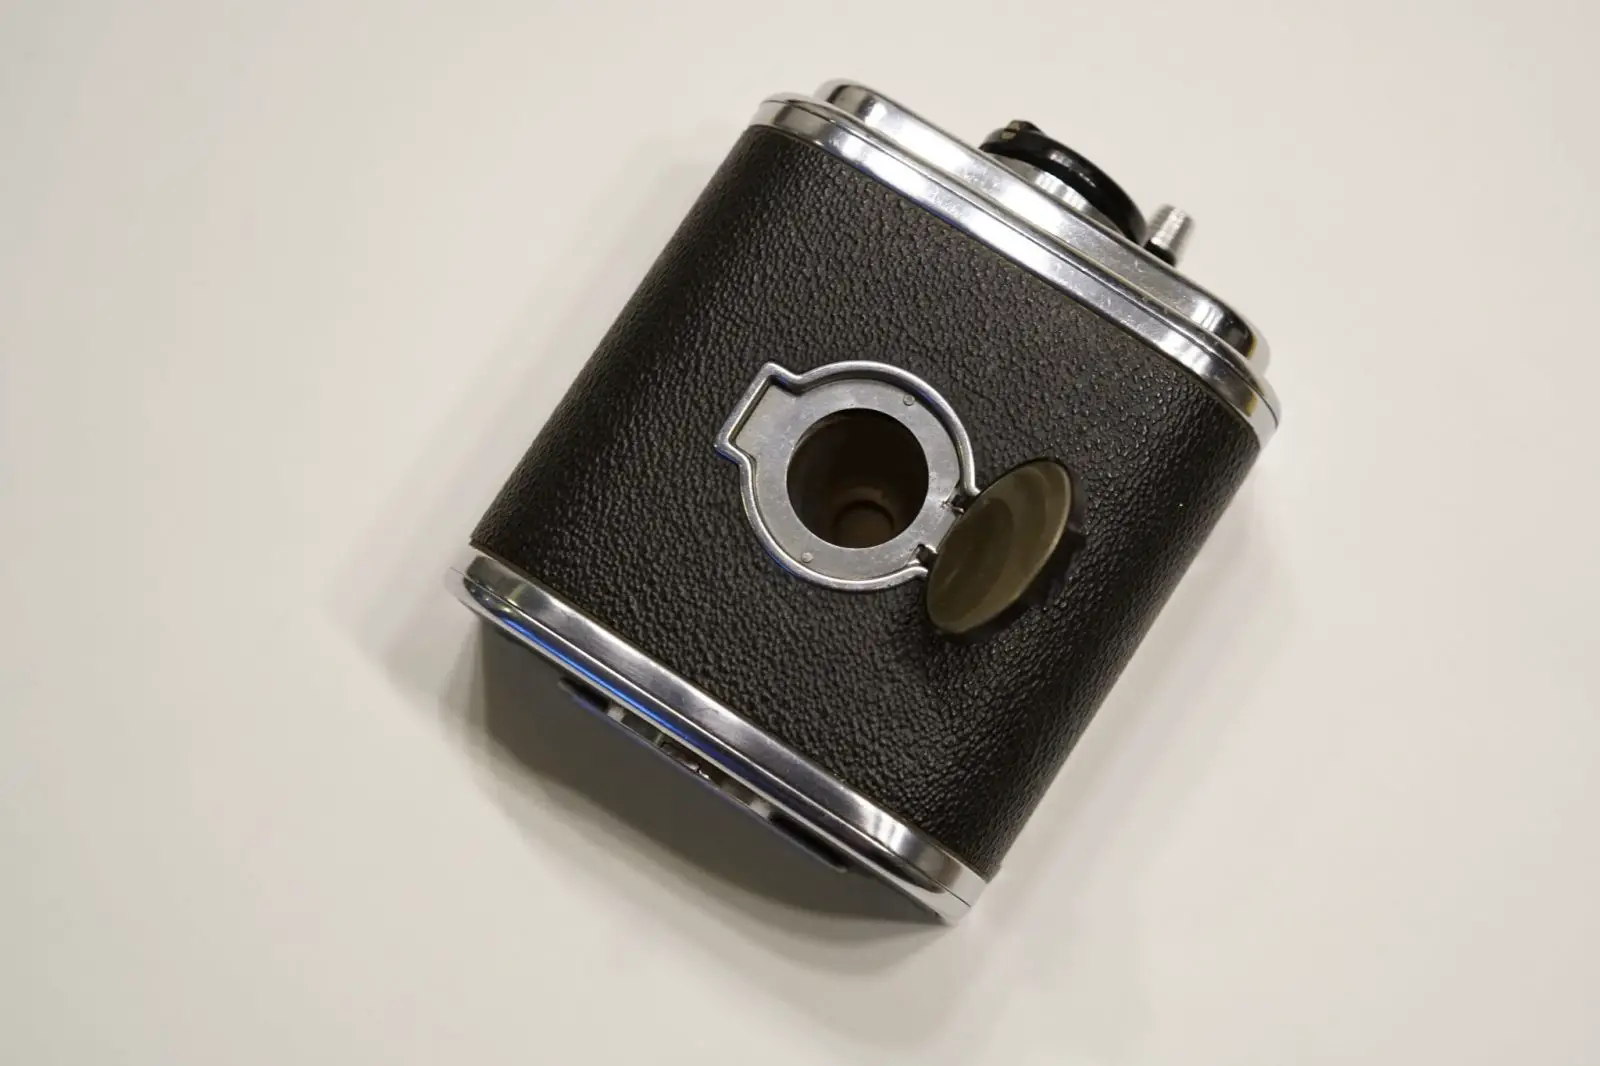
The oldest one is actually not called A12, it was just called Magazine 12 and was produced until the late 1960s. This older style is a lot simpler mechanically and lacks some of the features of the later film backs, but is no worse. The easiest way of recognising one, is to look for the peephole. As you can see in the picture below there is a peephole in the middle, through which you can see the film. To start a film on this back, you don’t need to align any arrows or anything, you simply make sure the film is rolled onto the receiving spool, then you close the magazine, open the peephole and turn the crank until you see a “1” appear on the backing paper of the film. Before you see that, you will see arrows, and probably the name of the film. Be aware that “1” might look more like just a line. When you get there, and you stop with the peephole right over “1”, you turn the crank backwards, and you will notice that the counter on the side of the film back, will turn to “1”. Now you are ready to shoot.
This version is mechanically relatively simple and should have fewer problems. I will thus not cover any repair on it. However, if you are having problems with this back, you might still find some of the information below useful, but things will not look exactly the same.
The A12 Film Back
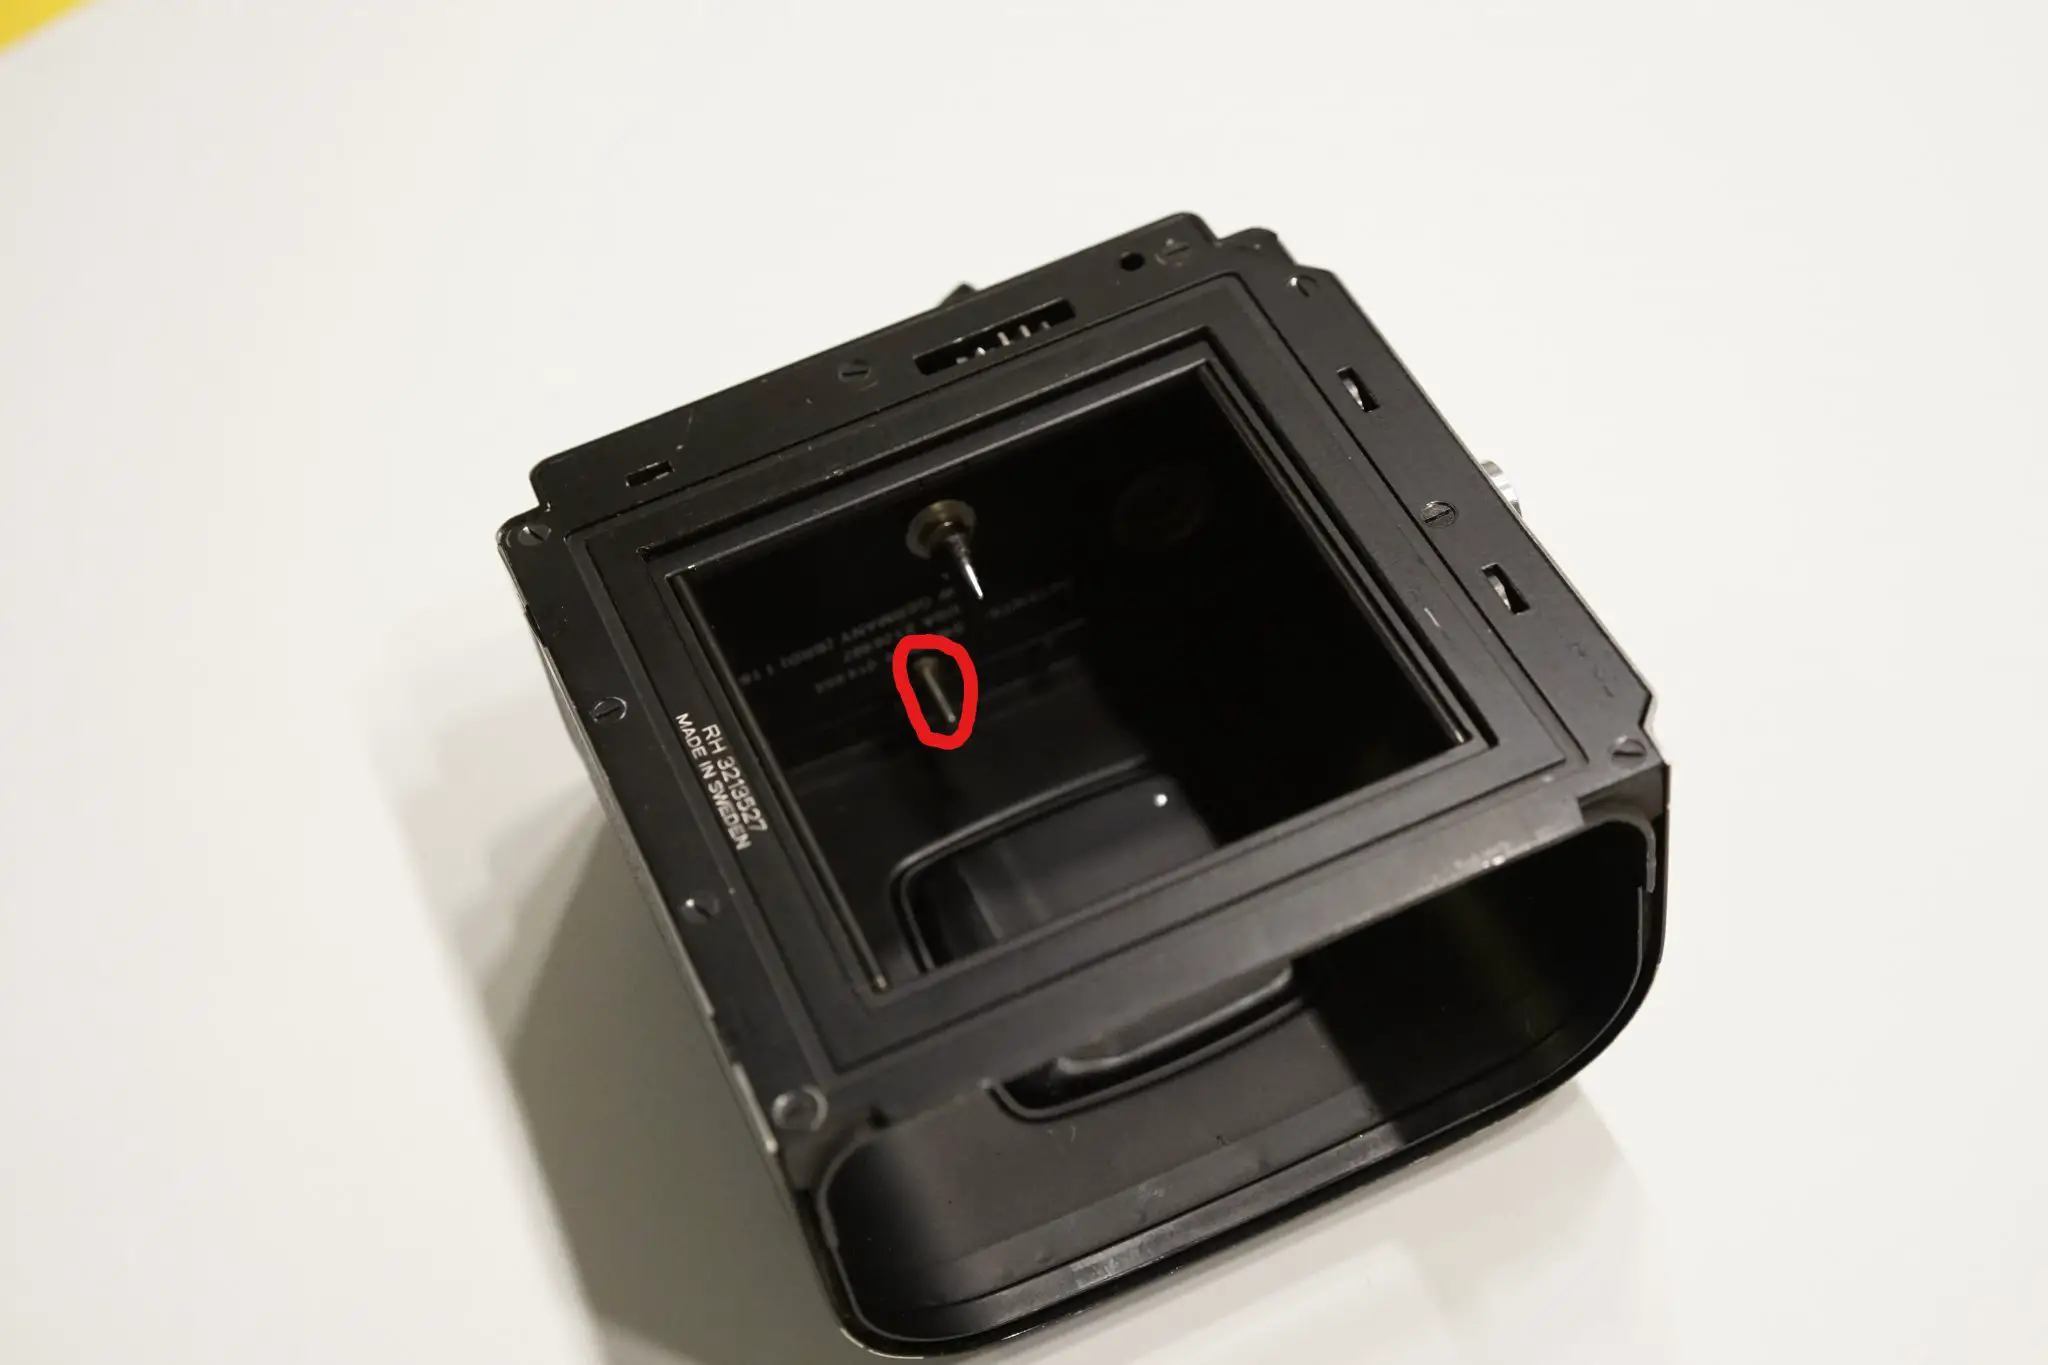
The other, more mechanically complex back, is the later A12, built from around 1970. This has a mechanism that knows how far down the film you turn, and then stops you when you get to the first frame (provided you align the arrows). The easiest way to know if this is the version you have, is to check if there is a peephole on the back. If there is none, and you cannot open it easily like on the picture above (don’t pull hard, it should pop open easily if it’s there), then you have the newer version. Another way of telling, is to look inside. Taking out the film holder, you will notice that there are two pins inside the magazine, not just one, like in the older model. The red (not very circular) circle in the picture below shows the second pin of the newer model. This pin basically allows the camera back to know when the film holder is inserted into the back.I will come back to how this works in more detail later.
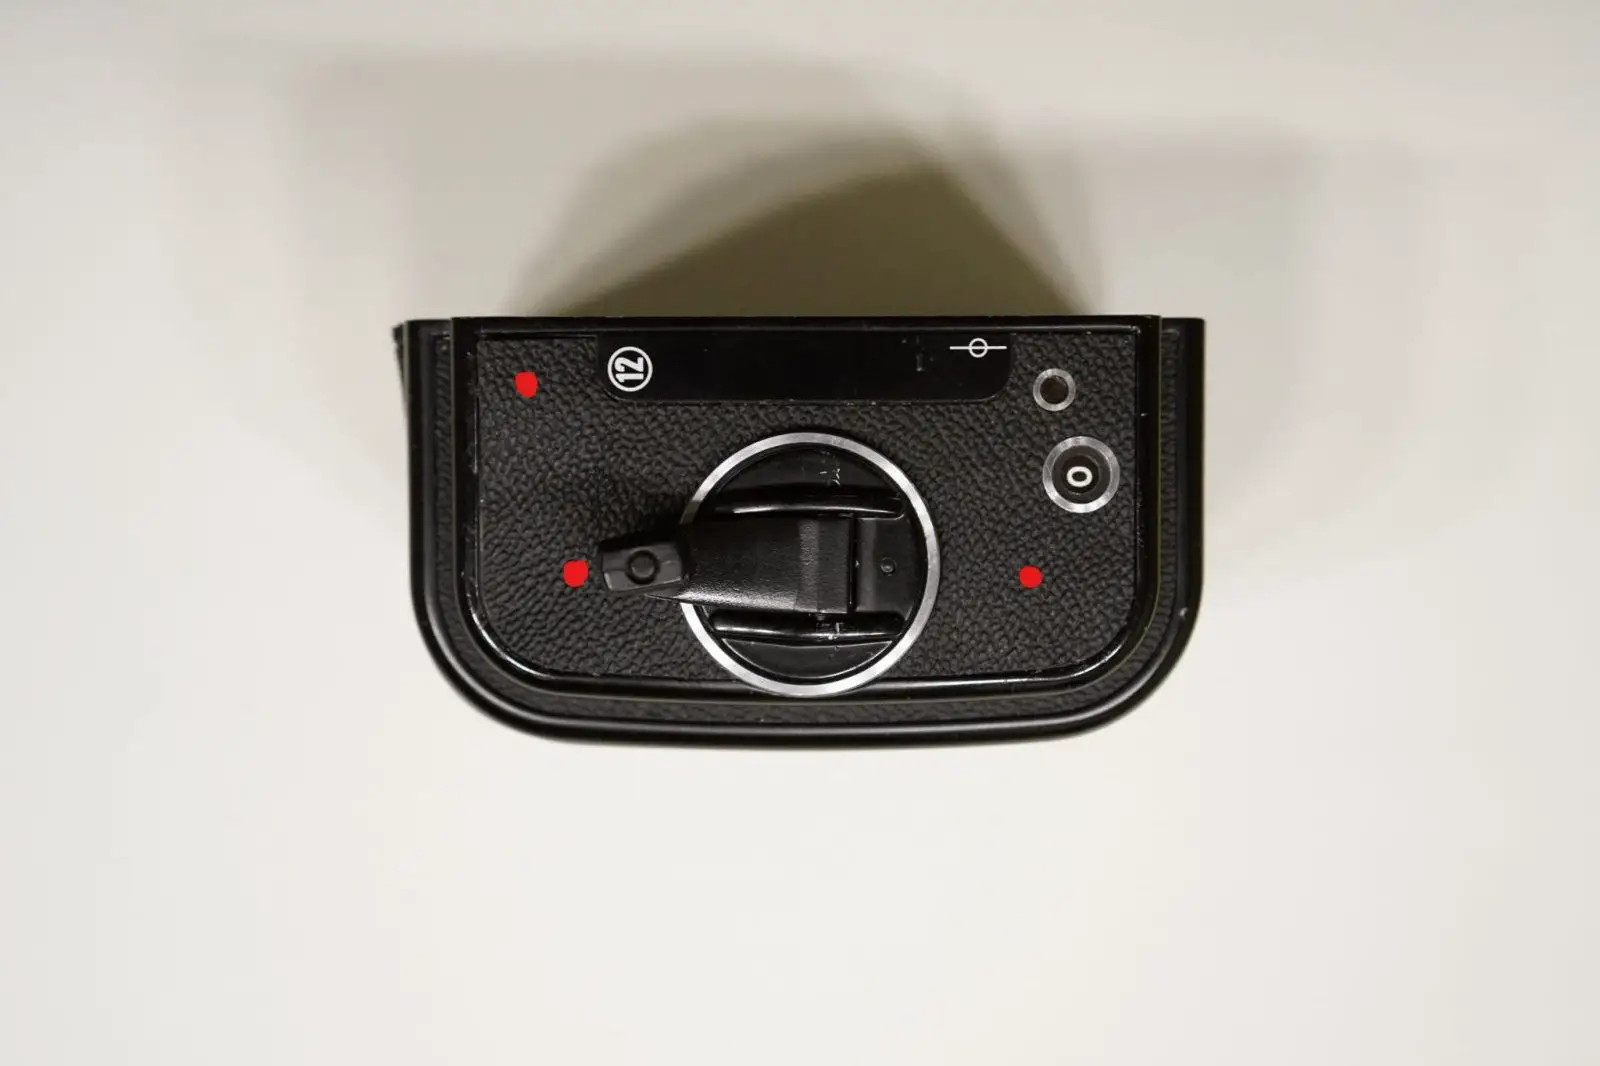
With this later magazine, you simply load the film, lining the large arrow on the film up with the little red arrow on the film holder. Then you close the magazine and turn the crank until it stops and the counter comes to 1. You are now ready to shoot.
Repairs on the A12
Because of this added mechanism, which I frankly wish they hadn’t implemented, there is a whole host of new things that could go wrong. I recently bought one of these, and even from the outside you could tell that something was wrong.
If the pin that I talked about earlier has no tension, meaning that it just flops around freely, or if it is completely stuck (notice that the other pin should be rigid), then your back is in need of repair. You could send it to your favourite repair person, but they would probably charge you around 80 pounds for an overhaul, and these can, if you’re good at the eBay Game, be had for around 100 pounds. Even though these are very clever mechanisms, they are very repairable. If you have a few small screwdrivers, lots of patience and a diagram of the back (included below), you should be able to take it apart and piece it back together.
Firstly, I imagine one of the most common problems to be a broken spring. One spring in particular. Most springs tire over time. If you have a back that has been used heavily since the seventies, there is a good chance your spring might have lost some of it springiness. This is crucial for the mechanism, which you might see in a minute.
First, to open the back, take out the film holder and the dark slide. Then, using a screwdriver or a large needle, peel away enough of the fake leather to reveal the screws (marked in red on the picture below).
You can use the crank as a handle to pull it off. Don’t use much force, it should pop off if you wiggle it. You should now see something like this:
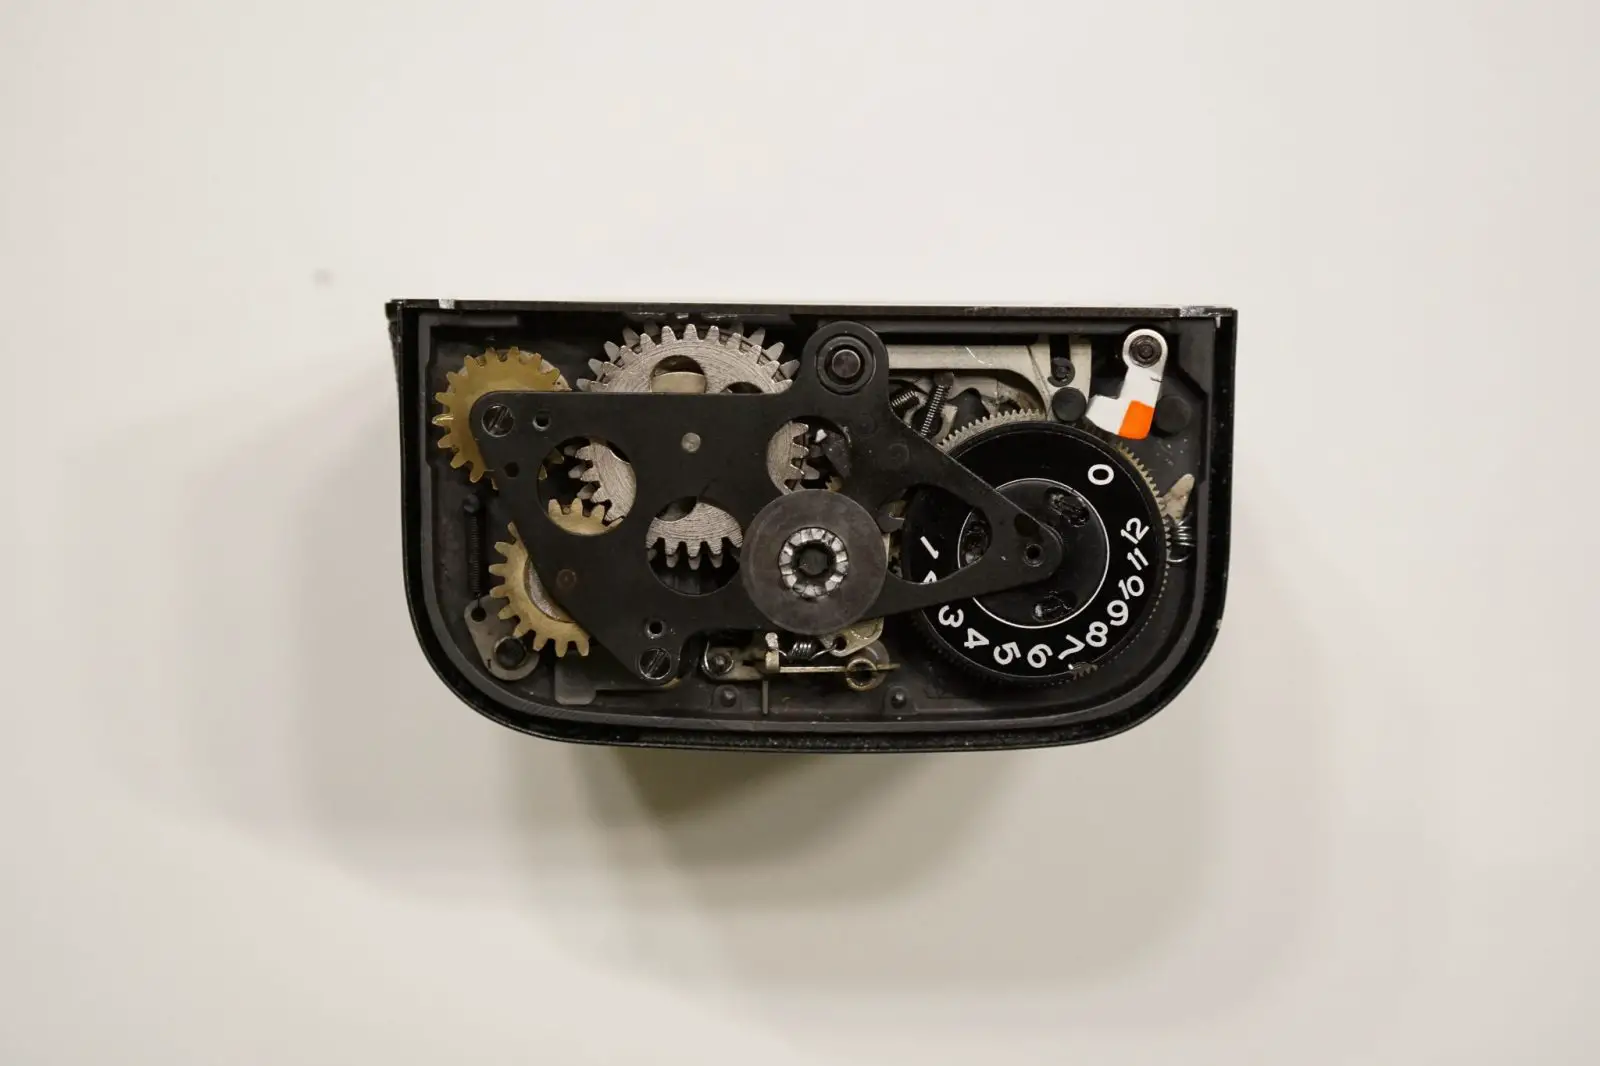
If things do not look quite like this, then these tips might not apply to you. On the right you have the large frame counter wheel. On the top right, the little red/white flag that lets you know if you’re ready to shoot or not. In the middle, there is the crank to advance the film when you load it and the large wheel on top connecting to the camera. On the left is the mechanism for keeping said system under tension.
The Advance Gear Assembly Engagement Mechanism
In the below image, the weakest point, in my opinion, is the red circled mechanism. This is the other end of the pin I was talking about earlier. When you insert the film spool, it pushes that pin into the cylinder marked with a red line. That little lever in the cylinder is spring loaded by the spring in the red circle. The purpose of this mechanism, is to engage the group of gears hiding under the large washer, connecting the counter wheel and the turning mechanism, whenever the film holder is in the magazine.
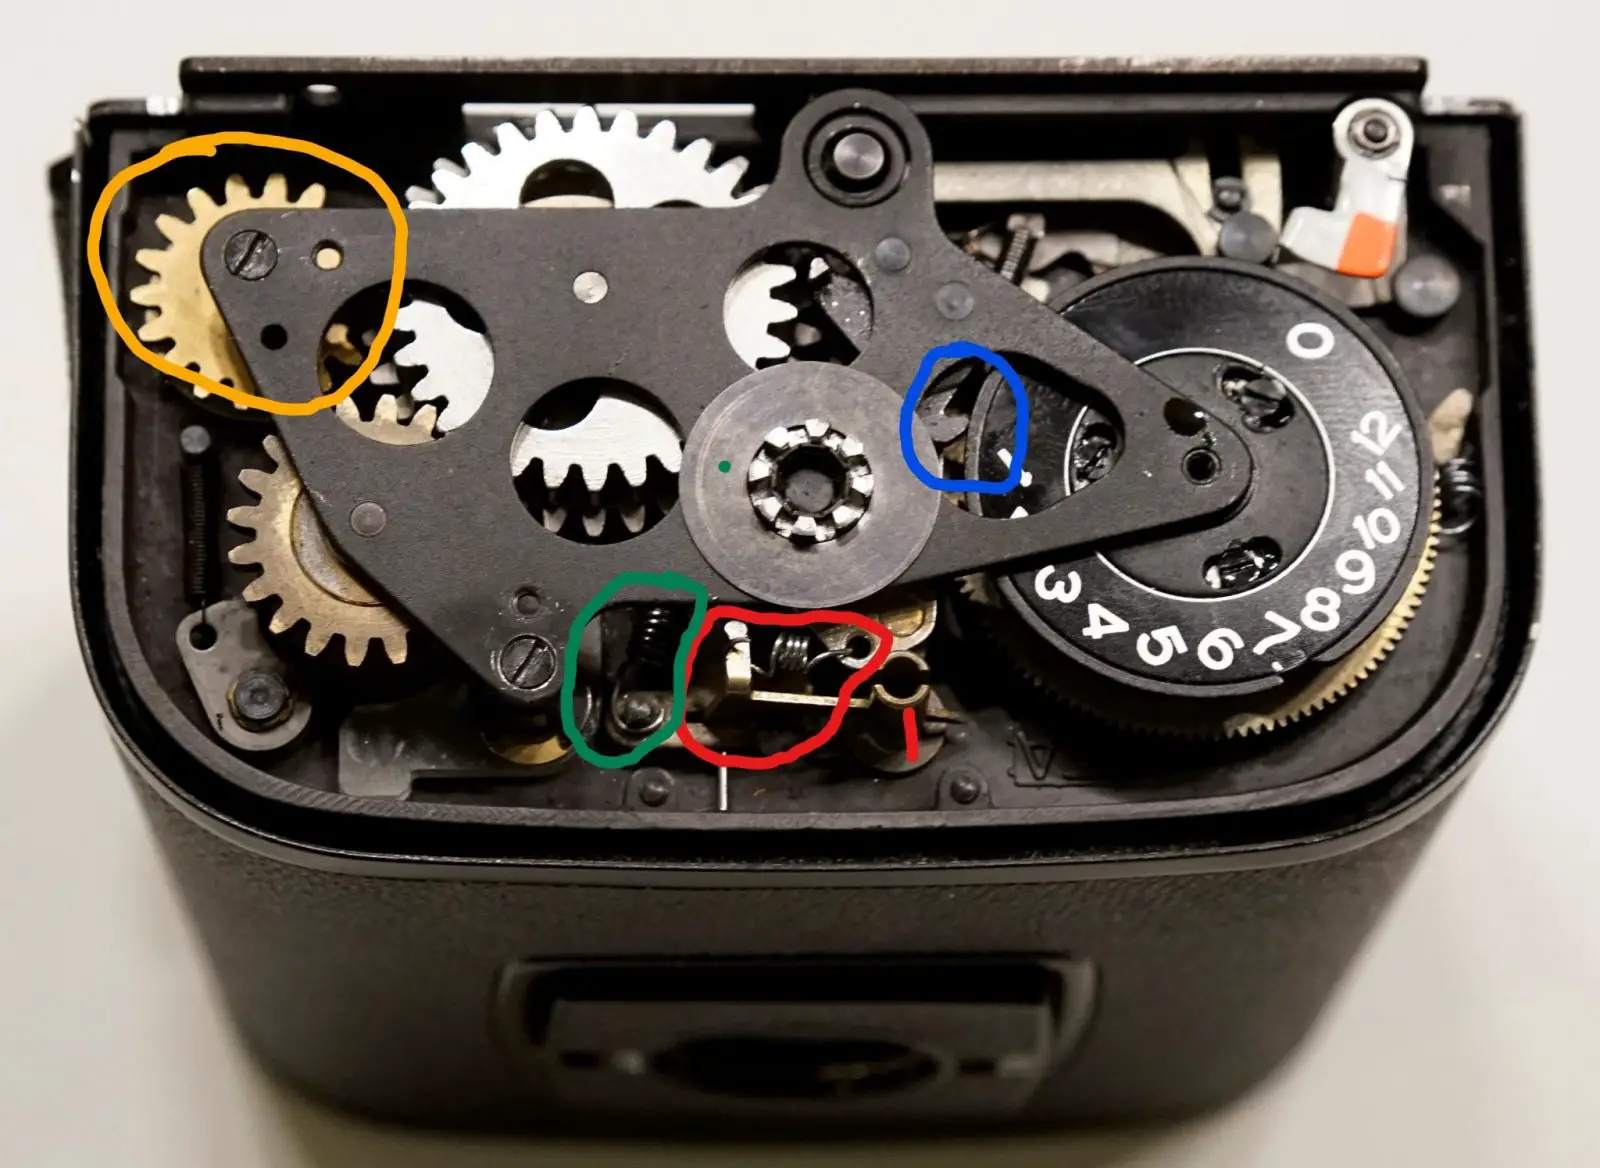
The main problem about this, is that the spring needs to be quite strong to pull the mechanism into gear. If the spring weakens over time, then the gears might not engage properly and the whole back becomes useless. If you are lucky, the spring might just have hopped off when someone dropped it and it is laying around in there. Using a needle or tweezers, reattach the spring as shown in the picture. In my case, the spring was missing: What followed was my adventure into hand making springs from old pens, hang in there, I will get there.
If, after attaching your recovered spring the counter wheel should turn slowly when you turn the crank cog (the one with a large washer), try to insert a needle in the little hole that the spring attaches to in the red circle, by the lever and pull it to the left (if you have it in the same orientation as the picture) until you feel it stop. Now, still holding the pressure, turn the crank cog and see if the counting wheel turns. If it does, it means the rest of the mechanism works and it’s your spring that has worn out and isn’t strong enough. To fix this, continue reading, you need a new spring. If it doesn’t, then you probably have another problem. Continue reading.
Making Your Own Spring
If your spring is missing or broken, you might need to replace it. I have scoured the internet, and unless you are interested in buying a thousand of them, you’re probably out of luck (the part number is 814 852 – Hasselblad A12 Magazine, if someone find an adequate replacement, do tell me!). However, with some practice and a bunch of spring loaded ballpoint pens I was able to make my own. The original, which can be seen in the diagram included at the bottom, spring has three coils (I don’t have a background in machines and such, don’t pick on me for my poor use of terminology) and is about 3 mm hook to hook. There is no definite way of making a perfect spring. However, I can give you some tips.
I used a 1.25 mm thick needle (basically a thick needle), two pairs of pliers and a wire cutting plier. Then you need some decent wire to make it out of. I salvaged some springs from Pilot spring loaded ballpoint pens. These are slightly thinner than the original, but we are compensating by making the spring with more coils and a smaller diameter. With one set of pliers, clamp the wire and the needle together, then grab the other and start wrapping the wire around as close together as you can. When you get 4 or 5 turns around the needle, stop and take it off. You have to wind the string close together, so that there is no gap between each coil. You now have to make hooks on each end. Make sure you don’t uncoil your shiny new spring in the process. You want to end up with 3-4 turns. A warning: This is difficult and fiddly work. Use small pliers and give yourself plenty of attempts. Don’t think you will do it in one try, it took me 10. Just think about the money you are saving.
When you finally manage to make a spring that you think fits, try it. Slot it into the hole and around the lever, then try to push the pin inside the back all the way in, or put the film holder back in. Doing this, you should see the gear assembly located under the large washer move. While still holding the pin down, try to turn the gears using the cog that the washer sits on. You should see the counting wheel turn. If it does not, you probably haven’t made a strong enough spring. Try again, perhaps with wire from a different pen, or try making it shorter. It might just be that it’s too long and you need to make it even shorter.
Another related problem, is the weaker spring (marked in green) working against this red spring. Check if it’s where it is on the picture above. If it is not, see if it’s in there, sometimes it pops off and you will need to reattach it to the top of the screw attaching the lever to the body. If this spring is lost or broken, repeat the above, making a longer, weaker spring.
The Counting Wheel Stop Mechanism
Marked in blue, you can see a small catch. It’s purpose is to catch the counting wheel, and thus stop the whole mechanism, when you have finished the roll of film. It should catch if you insert the film holder, then turn the wheel until 7 comes to the little catch. You should see the catch move into the slot, stopping the wheel from turning the other way. The problem about this whole mechanism, is that the spring discussed earlier has to be strong enough to push this catch into the notch. You can try giving the different parts a little bit of oil (sewing machine oil is good), but you might, like me, find that my home made spring is just not strong enough to push against. To fix this, repeat the above mentioned spring making process, but with a stronger spring (tighter, shorter and maybe with an extra coil, or thicker wire).
The Counting Wheel not Spinning Back
You might find that your counting wheel does not spin back when it should. This could be for a number of reasons, but the easiest fix, is to not screw the top plate (the black plate over the gears) so hard, this might relieve some pressure on the counting wheel and let it spin freely. If this does not work, then oil is key. Try not to splash it all over the place. Dipping a needle in oil and pushing it against the part you want to oil is good practice. Sewing machine oil should be fine. Oil the large gear below the counting disc, then give the edge of the disk itself some oil, it might be sticking to the top plate.
If the above didn’t help, you will have to replace the spring that gives tension to the counting disc. This is a larger procedure. I recommend the YouTube channel “Fix Old Cameras” and their video on the A12 back for a further strip down of it (link at the bottom). Feel free to get in touch with me if you think that might help you.
The Red/White Flag not Working
In some cases the red/white flag might not work. This is located at the top right of the pictures above. Underneath it, there is a spring that coils around the base. In most cases it is just a matter of relocating this spring, as it is quite easily dislocated. Use a needle to push it into the right orientation. This is also mentioned in the Fix Old Cameras video mentioned.
For Other Problems and Final Words
My film back came reassembled by an amateur and had several problems besides the ones mentioned above. If none of these problems apply to you, and you’re not quite sure what your problem is, a proper reassembly could help you. Fix Old Camera has a tear down and reassembly of the A12 Film Back. It can be found here.
Following this, some issues might be fixed. The most important one is the proper tensioning of the return wheel on the top left of the image (in orange), and of the correct orientation of the dog bone gear (watch the video).
The diagram I have mentioned a few times can be found here.
It is a long document, you will have to scroll down until you find the relevant diagram of what you are after. Page 31 is the most useful for the work mentioned above.
For more information and tips on Hasselblad film backs, as well as much more in-depth history, Emulsive.org has an excellent article on the topic. You can find that here.
This little piece has hopefully helped your repairing your own camera. I find repairing my own camera equipment very satisfying, as well as being a huge money saver. These things are not as difficult as many people make it out to be. Be patient, note where things are, sort your screws and, if you feel like you won’t remember where things go, take pictures as you go.
Thank you for reading, I hope you learned something or that it helped you repair your own film back.
You can find my occasional Instagram post @arilbaas
Occasionally I trust Adobe’s Portfolio with my photos, for better quality and presentation than IG can give. Not at all a serious portfolio!
Share this post:


Comments
Tips for Fixing Common Issues With the Hasselblad a12 Medium Format Film Backt Film Back – SySyPhoTo on Function and Repair of Hasselblad Film Backs (A12 and others) – By Arild Edvard Båsmo
Comment posted: 26/01/2019
Comment posted: 26/01/2019
Filippo Nenna on Function and Repair of Hasselblad Film Backs (A12 and others) – By Arild Edvard Båsmo
Comment posted: 23/08/2019
I've been using the older backs because you can squeeze 13 images on a roll!
Comment posted: 23/08/2019
Советы по устранению распространенных проблем с пленкой среднего формата Hasselblad a12 Назад – Творцам, настоящим и будущим on Function and Repair of Hasselblad Film Backs (A12 and others) – By Arild Edvard Båsmo
Comment posted: 16/02/2020
Luis on Function and Repair of Hasselblad Film Backs (A12 and others) – By Arild Edvard Båsmo
Comment posted: 10/04/2020
Peter Taylor on Function and Repair of Hasselblad Film Backs (A12 and others) – By Arild Edvard Båsmo
Comment posted: 23/11/2020
Best wishes from Brisbane, Australia
Mike on Function and Repair of Hasselblad Film Backs (A12 and others) – By Arild Edvard Båsmo
Comment posted: 14/12/2020
Hoping to get my hands on a Hasselblad either to fix or clean soon!
Georg Holderied on Function and Repair of Hasselblad Film Backs (A12 and others) – By Arild Edvard Båsmo
Comment posted: 21/03/2022
When I found out that Shanghai sells its GP3 film in 220 format I ordered a few rolls and took my A24 magazine out of storage.
When exposing the first film the magazine made crunching noises and most frames overlapped partially or completely.
I serviced and lubricated the magazine according to the Fix old Cameras article mentioned in this article and exposure of the second film went smoothly with the magazine making the correct rrrrrrrrr noises.
After developing my second film I found that the spacing was regular but increasing with each frame.
http://www.sx2pc.com/JPG/A24spacing.jpg
It looks like the mechanism that compensates for the increasing diameter of the take-up spool as it fills is not working properly.
I don't know how it is supposed to work and what to look for.
Can anyone point me where to look ?
Georg