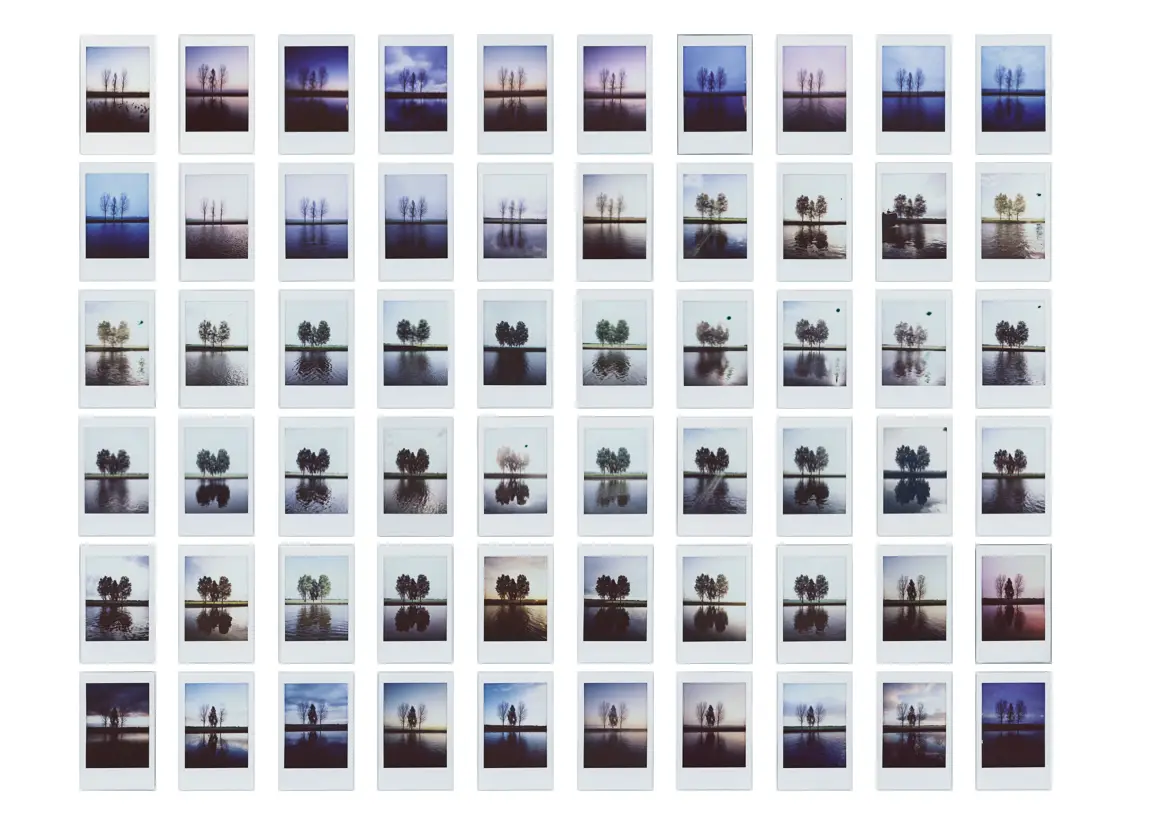
Two years ago I changed jobs to be able to work closer to home, allowing me to bike to work, and combine commuting with photography. Or at least it gave me more flexibility, with two cameras in a handlebar bag for easy accessibility: a digital M and an instax camera. Part of my commute is a rather picturesque road along a canal lined with trees. I chose this road for a year-long project in 2017, where I made a photo every workday-morning from the same spot with my instax camera.
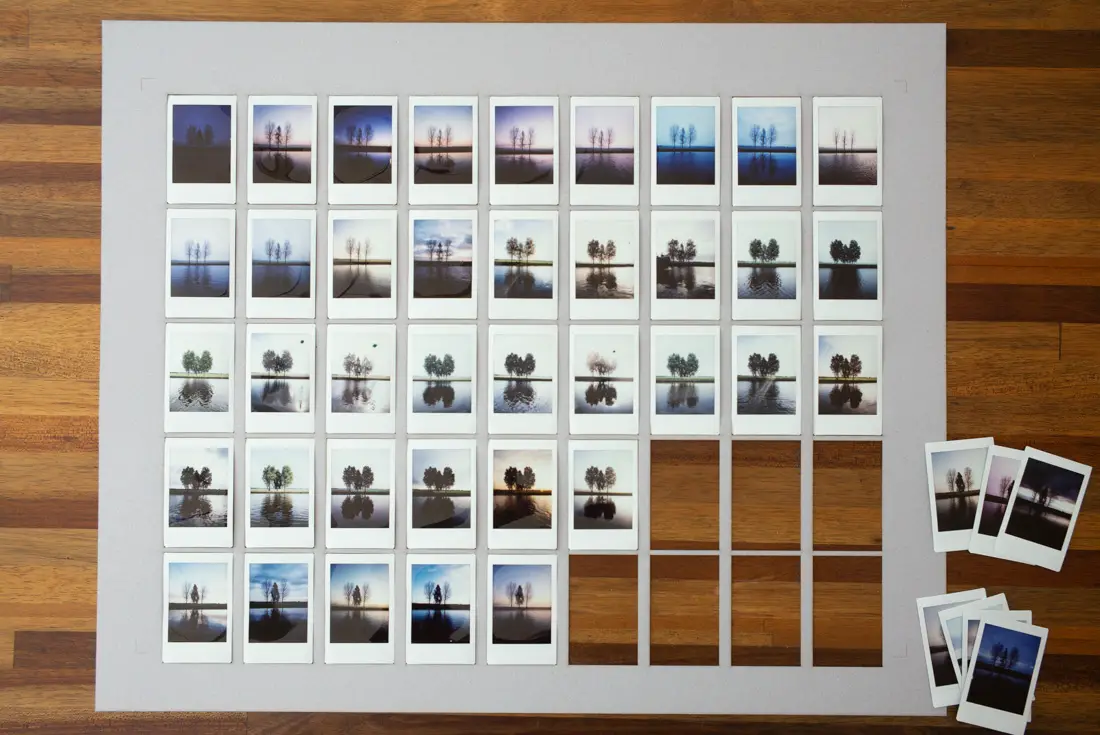
To be able to align each photo I looked for some landmarks in the picture. I stood on a small footpath, which helped me to keep a constant distance from the photo. I looked for the angle of the small streams in the meadow in the background to help me align transversely. And the circle in the viewfinder of the camera helped keeping the pitch of the camera constant. It is not a perfect method, but putting a pole in the ground to put my camera on was not an option.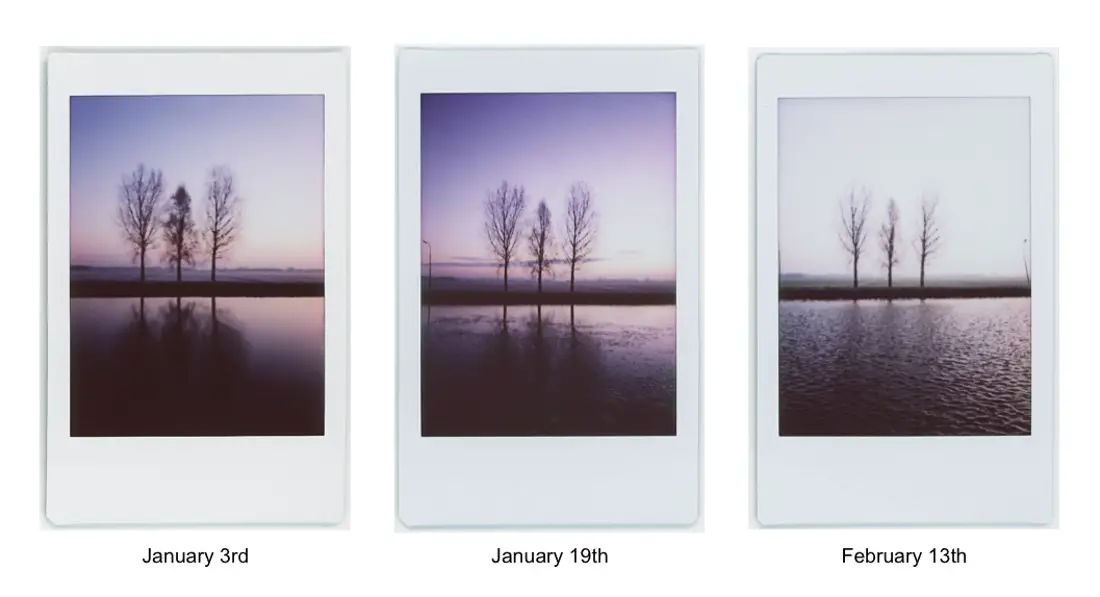
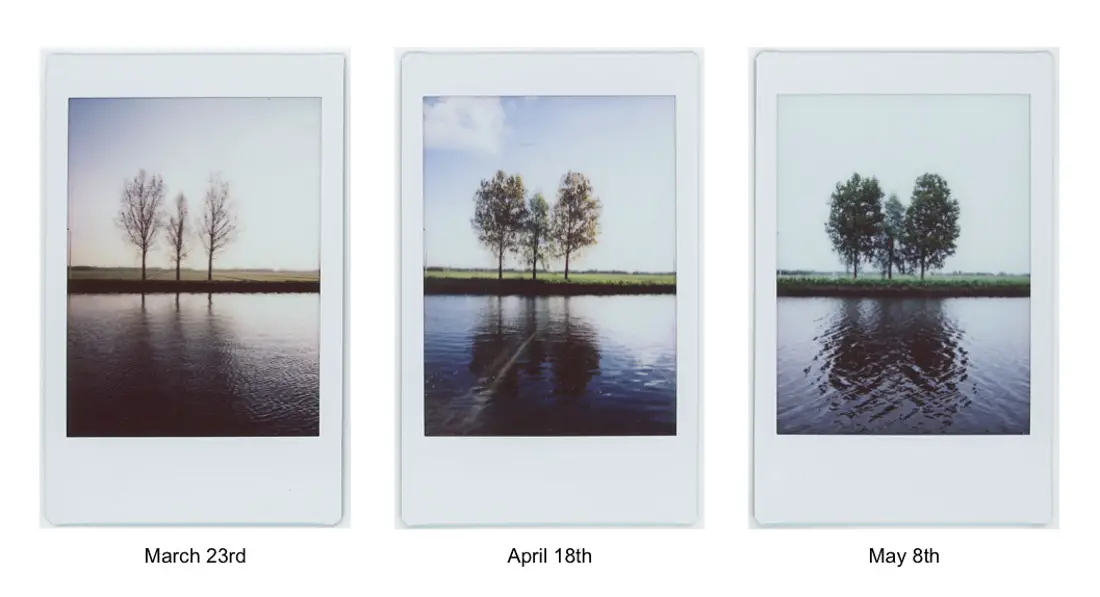
I was surprised by all the colours the instax can pick-up. Specifically in the early morning when the sun is not so bright. After a while I started using the ‘dark’ option of the camera to bring out the colours in the sky even more. I think the most difficult time for the instax camera was summer, when the sun was in my view on a clear day. That’s the difficulty with choosing a spot in the winter, it is not that obvious to predict where the sun will be during summer time.
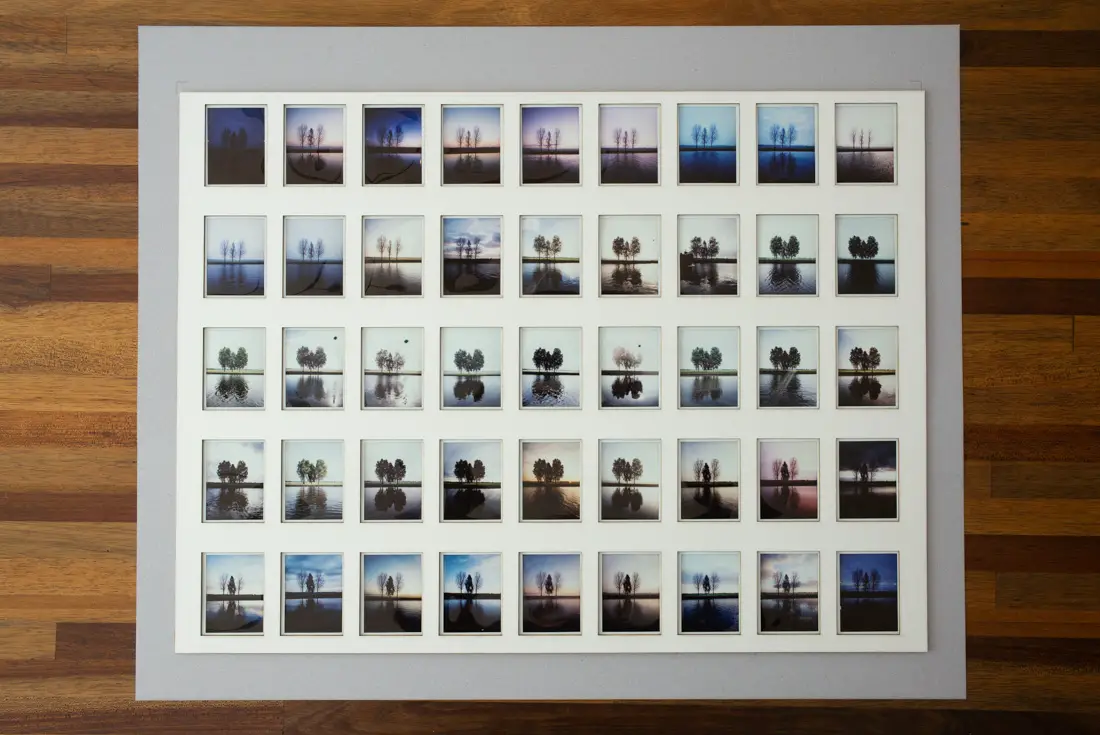
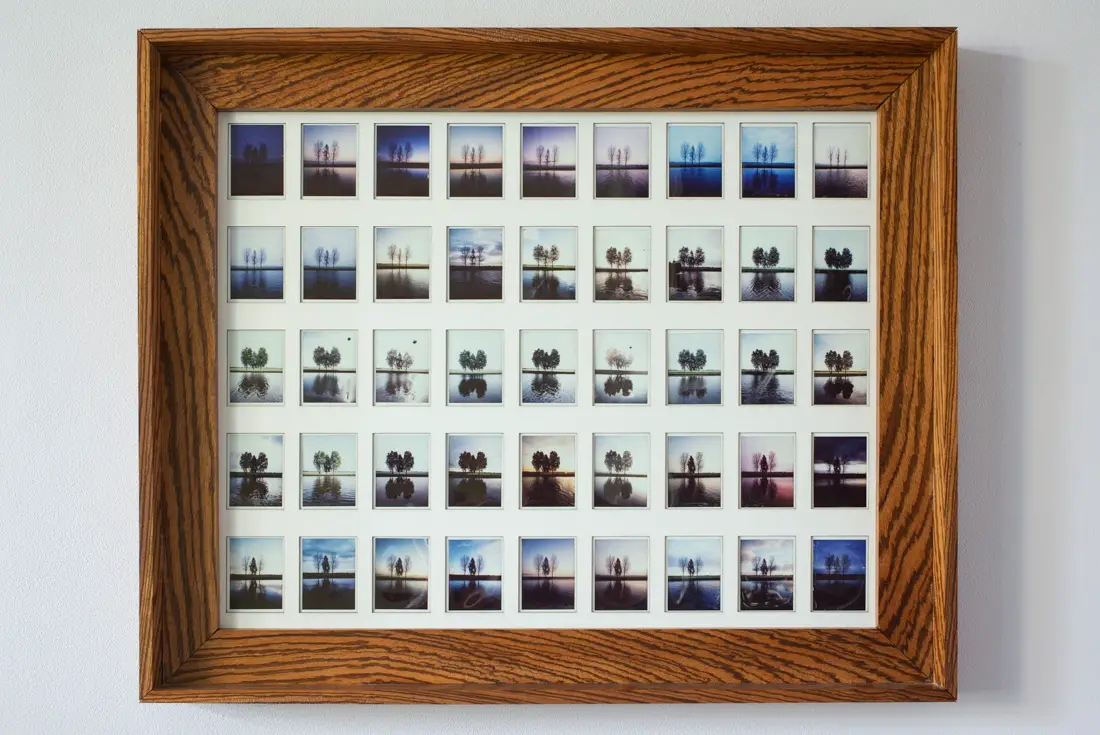
 Although not perfectly aligned, I still like the result when you see all the instax photos together, with the changing seasons and changing light. Above you can see the overview of all photos, there are not as much as you would expect as 2017 wasn’t my best year health wise. And, although I never missed a day for a project like this with the digital camera, I skipped a few very dull days for this project. Somehow the cost of the film got into my head making me more critical about it. I am not sure that was the right choice, as you can’t always predict whether a photo will be worth while.
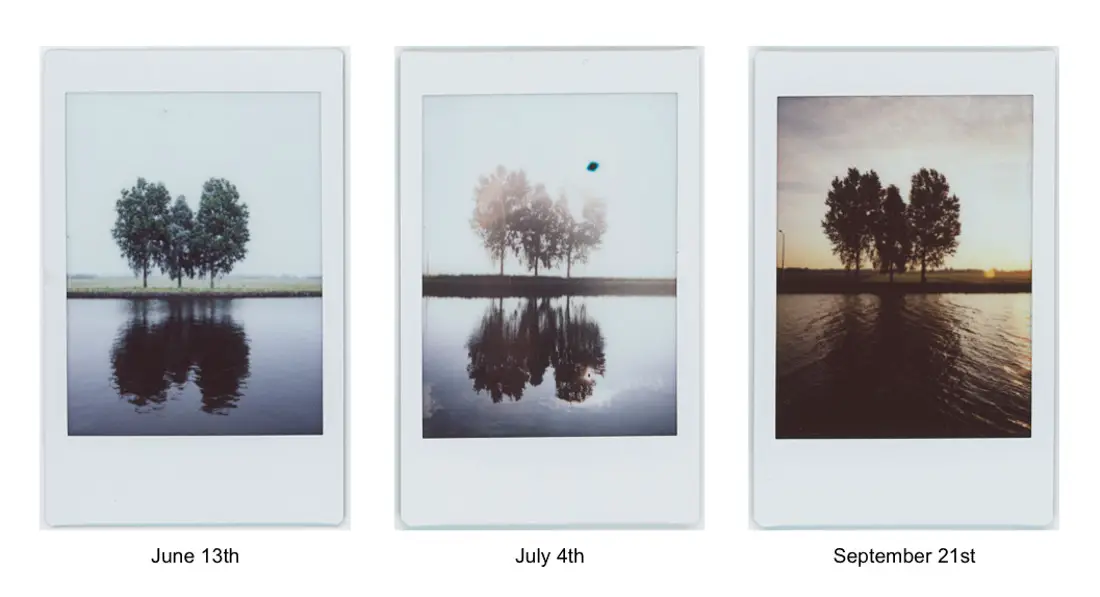
At the end of the year I encountered the challenge of how to create something of all the instax photos. I have a similar project with a digital camera where I make a movie of (a selection of) the photos, but that didn’t work with instax. I didn’t want to align instax scans and crop the result to make everything match. So I decided that I wanted to put a selection in a frame that I could put up on the wall. My man is an enthusiast wood-worker, and he was kind enough to made a beautiful frame out of zebrawood. After that it was up to me to fill it. 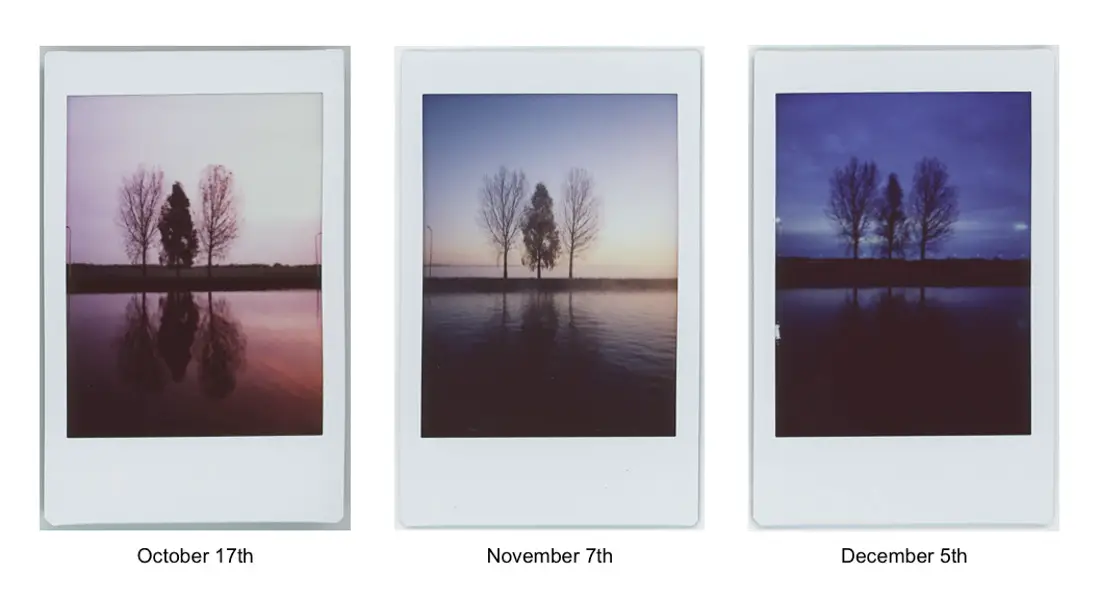 The frame has a backboard with white coating on the front. At first I tried to tape the instax to this backboard with double-sided tape. But the tape didn’t stick. And it was quite difficult to keep a constant spacing between the photos. I started talking to a colleague and fellow-photographer about my issue with putting the instax in the frame, both with positioning and with fixing. He mentioned a company called Laserbeest who can make accurate cuts with a laser in different materials. After thinking about how to take this on, my man came with the final idea. We ordered a sheet of carton with cuts the size of instax photos to function as a mould. On top of that comes a thicker type of carton with smaller cuts to function as a passe-partout for every photo. With the backboard behind the mould the instax photos would be sandwiched between the back and the passe-partout, and the mould would keep the instax in place. In theory this would work without any glue. However to be safe the passe-partout was created from a carton with glue on the back to fixate the instax.
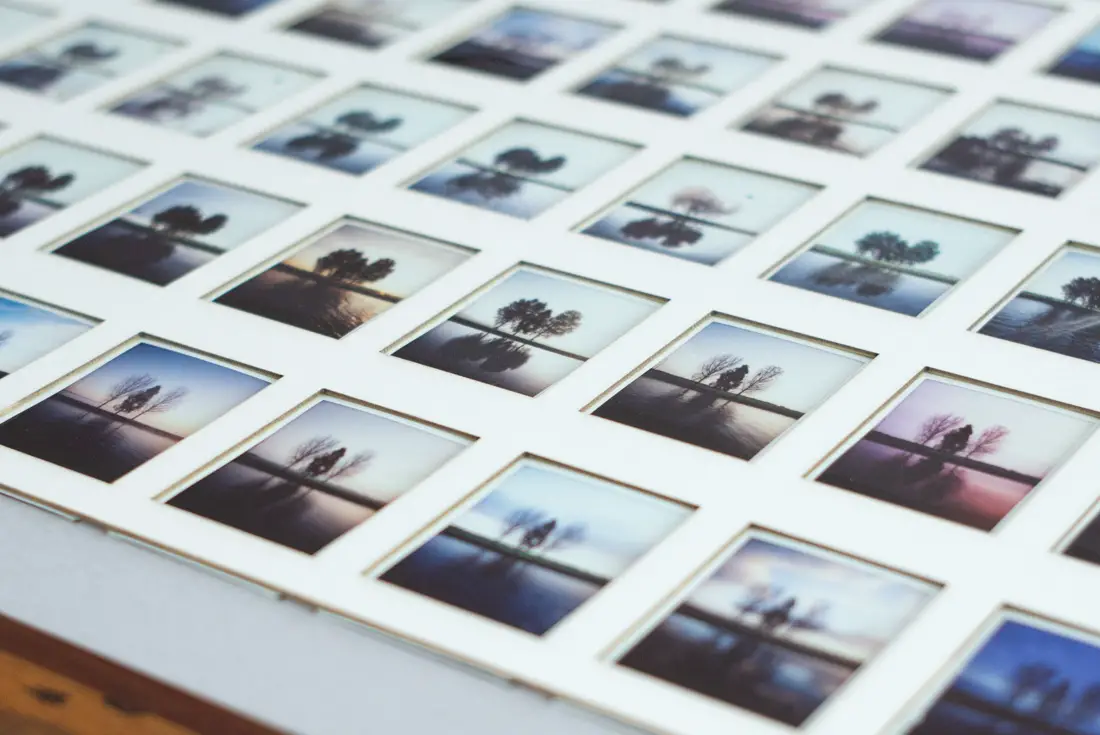
Below you see the mould with the instax photos neatly spaced.
The passe-partout is mounted on top of the mould. With the glue on the backside on of the passe-partout, both the mould and the instax are fixated.
The nature of the laser cutting is burning through the paper, leaving a trail of soot on the inner edges. I decided that it would be ok, basically creating an extra dark line around each photo. You can see the soot in the close-up below, the effect is quite subtle.
The mounting turned out quite challenging still, the instax started attaching to the glue on the back of the passe-partout before it was properly aligned, so I had to take them all off and re-attach again from the back. Because of the glue it was difficult to get a precise alignment, so there is a small tilt of the passe-partout with respect to the mould. However, I am glad that I finished the project. When I had trouble seeing the solution immediately it became unclear if I was able to finish it at all. And probably a second time I would change a few things making it more perfect. I am also no sure about the wooden frame, I might change it later as it is slightly overpowering the photos. But for now I am happy because a job done is better than a perfect one.
For those who are interested, the digital commute project I did the same year, but further up the canal, is on my website: whataukjesees. You can also find more of my photos there, both digital and film. I also post film photos regularly on instagram.
Thanks for reading and Hamish, thanks for having me!
Share this post:


Comments
Terry B on An Instax Project And A Framing Challenge – by Aukje
Comment posted: 22/05/2018
The April 8th shot is interesting as the lead in from the bottom left adds depth to this image and which none of the others attain. Looks like gremlins got to work on the July 4th image, or was it the UFO, but the result is very attractive and the resultant change in the foliage leads to an interesting image in its own right.
And top marks to your man, what a fantastic frame.
Comment posted: 22/05/2018
John F. on An Instax Project And A Framing Challenge – by Aukje
Comment posted: 22/05/2018
As an aside, I've found the Instax mini images are great for creating stereo pairs...
Comment posted: 22/05/2018
Comment posted: 22/05/2018
Comment posted: 22/05/2018
Laurence Kesterson on An Instax Project And A Framing Challenge – by Aukje
Comment posted: 22/05/2018
Comment posted: 22/05/2018
Terry B on An Instax Project And A Framing Challenge – by Aukje
Comment posted: 22/05/2018
Stereo photography was quite popular from around the latter part of the 19th century, but for most it would have been a viewer experience. Plate cameras, then roll film and 35mm cameras followed. The cameras were equipped with two taking lenses separated by roughly our average ocular distance, and the two images captured could be viewed side by side and in the L R position in which they were shot, in a hand viewer with two eyepieces with a central baffle positioned between them at the lens end to prevent "crossover". The result, with the right subject matter, could be a fairly realistic 3D image.
The process was called "stereo" whereas today we call it 3D.
Comment posted: 22/05/2018
Comment posted: 22/05/2018
Comment posted: 22/05/2018
Comment posted: 22/05/2018
Comment posted: 22/05/2018
Comment posted: 22/05/2018
Karl Valentin on An Instax Project And A Framing Challenge – by Aukje
Comment posted: 22/05/2018
were "Auggie" did just the same.
A picture at the same spot in from of his tabacco store.
Higly recomanded: https://www.imdb.com/title/tt0114478/
Comment posted: 22/05/2018
James on An Instax Project And A Framing Challenge – by Aukje
Comment posted: 22/05/2018
Comment posted: 22/05/2018
andreas on An Instax Project And A Framing Challenge – by Aukje
Comment posted: 23/05/2018
Comment posted: 23/05/2018
Des McSweeney on An Instax Project And A Framing Challenge – by Aukje
Comment posted: 23/05/2018
Comment posted: 23/05/2018
Dave Clarke on An Instax Project And A Framing Challenge – by Aukje
Comment posted: 23/05/2018
Comment posted: 23/05/2018
J on An Instax Project And A Framing Challenge – by Aukje
Comment posted: 24/05/2018
Comment posted: 24/05/2018
Peter Boorman on An Instax Project And A Framing Challenge – by Aukje
Comment posted: 25/05/2018
.
I keep meanimg to do a weekly project on my favourite tree. Your beautiful daily project is giving me a prod to get on wirh ir...
Comment posted: 25/05/2018
JKLPhoto on An Instax Project And A Framing Challenge – by Aukje
Comment posted: 26/05/2018
Comment posted: 26/05/2018
Dexter on An Instax Project And A Framing Challenge – by Aukje
Comment posted: 03/06/2018
Comment posted: 03/06/2018
Kyle McMurphy on An Instax Project And A Framing Challenge – by Aukje
Comment posted: 05/06/2018
Comment posted: 05/06/2018
Matthew Dodwell on An Instax Project And A Framing Challenge – by Aukje
Comment posted: 19/08/2018
Comment posted: 19/08/2018
Sroyon on An Instax Project And A Framing Challenge – by Aukje
Comment posted: 21/01/2021
Comment posted: 21/01/2021