
Shutter and iris are the main functions of older cameras that can have suffered over time. Build-up of “muck” or sticky lubricants getting where they shouldn’t mostly are to blame but a well cared for and gently used camera can have worn well. Those that have suffered may still have shutters that work fairly well, just a bit erratically whilst apertures and focus may be a little stiff but will still be accurate.
If the shutter isn’t bad enough to warrant laying out for a full CLA (clean, lubricate and adjust), a means of checking what actual speeds are being delivered is useful to ensure good exposure. Film latitude is quite forgiving and digital editing is extremely accommodating, but there is no substitute for getting the result you want from film, monochrome or colour, by having control of exposure.
S.O.P.
In the digital world, we are told to “expose to the right”, in other words, set exposure to place the brightest point at the right hand end of the histogram. This ensures that highlights are not blown out but are given just enough exposure for a reproducible tone whilst the shadows also receive the maximum possible exposure in order to keep noise to the minimum. This is probably the only exposure carry-over from analogue to digital, being the way to get the best results from transparency film.
With negative film on the other hand the opposite applies. “Expose for the shadows and develop for the highlights” was and still is the rule. The control employed here is to ensure the shadows receive enough exposure to retain detail in the negative, whilst varying development avoids over development of the highlights which can block up with too much. The tone range in a negative can therefore be manipulated through exposure and development, whereas digital files have a fixed tone range, though basically much wider.
Solutions.
There are some very sophisticated ways of measuring shutter speeds involving electronics, from sound recordings to oscilloscopes. Reading about these things convinces me they are far too advanced for my purposes or indeed skill level. After all, applicable standards at the time most cameras were made only required shutters to be within 30% of the marked speed, roughly a third of a stop, so digital precision may not be quite so essential. Clearly, as much accuracy as possible is desirable but for these purposes a much simpler device could suffice.

When originally considering this I immediately thought about what we used to do a long time ago using a wind up gramophone or a record player. By marking an old record with a white line from centre to rim and photographing it at different shutter speeds it was possible to work out from the arc recorded the actual shutter speed that was being delivered.
The maths.
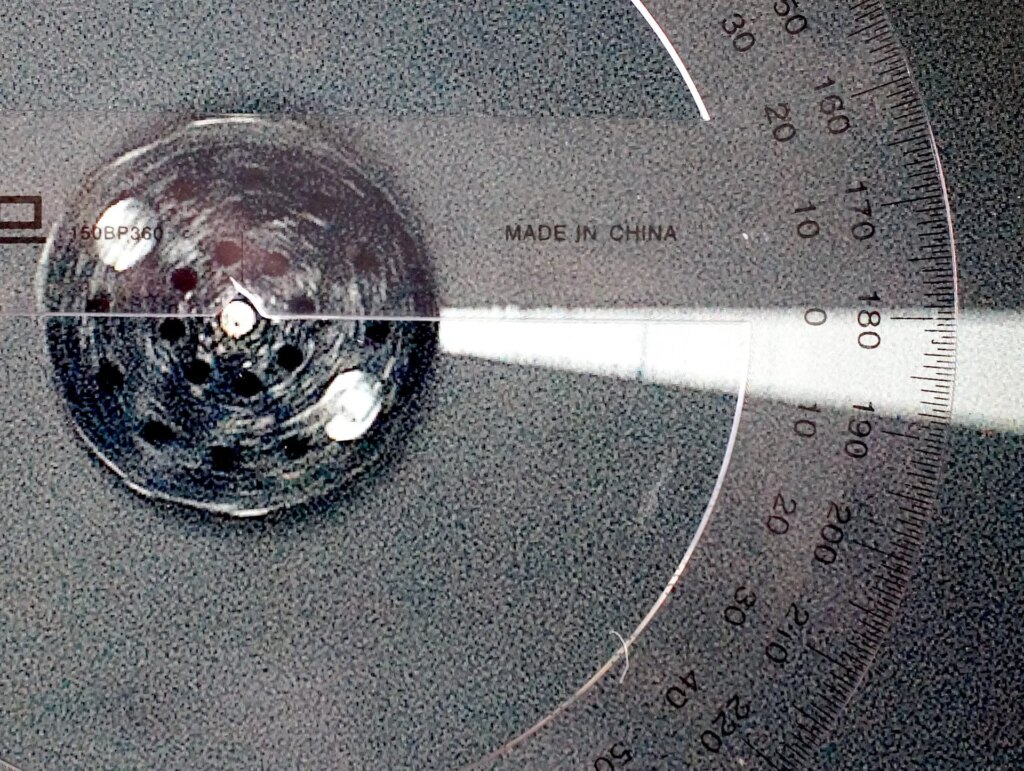
The turn-table speed of a record player at 78 rpm (revolutions per minute), the standard speed for early records before EPs and LPs came along, is close enough to 80 rpm which meant that in one second the turn-table made 80/60 revolutions, or 1 1/3 revolutions, 480 degrees of arc. One half second would give 480/2º or 240º, one quarter second would give 480/4º or 120º down to 1/300 second giving 480/300º or 1.6º. Clearly at the fast end it was tricky to be very accurate but, being visual, it was not too difficult to see if there was a significant difference. Using a protractor on a print produced angles for each speed and the actual speed calculated. A computer screen can replace the print nowadays.
Examples.
Using this 80 rpm speed gives angles for a 1 to 1/300 non-linear shutter as follows:-
1sec = 480º, 1/2 sec = 240º, 1/5 = 96º, 1/10 sec = 48º, 1/25 sec = 19.2º, 1/50 sec = 9.6º, 1/100 sec = 4.8º and 1/300 sec = 1.6º. A 1/500 sec top speed would give 0.96º, very difficult to measure but easy to spot if it was wildly out.
With a linear shutter, i.e. 1 / 1/2 / 1/4 / 1/8 / 1/15 and so on the angle for each increasing speed is half the previous one.
Slower speeds may need contrast boosted to bring up the arc’s image and 1 second will have an overlap on the trace. Add the overlap angle to 360º for the full angle which in this case is 90º giving 450º as the actual arc described so is just a little slow. Working with the negative can be easier as here.
First device.
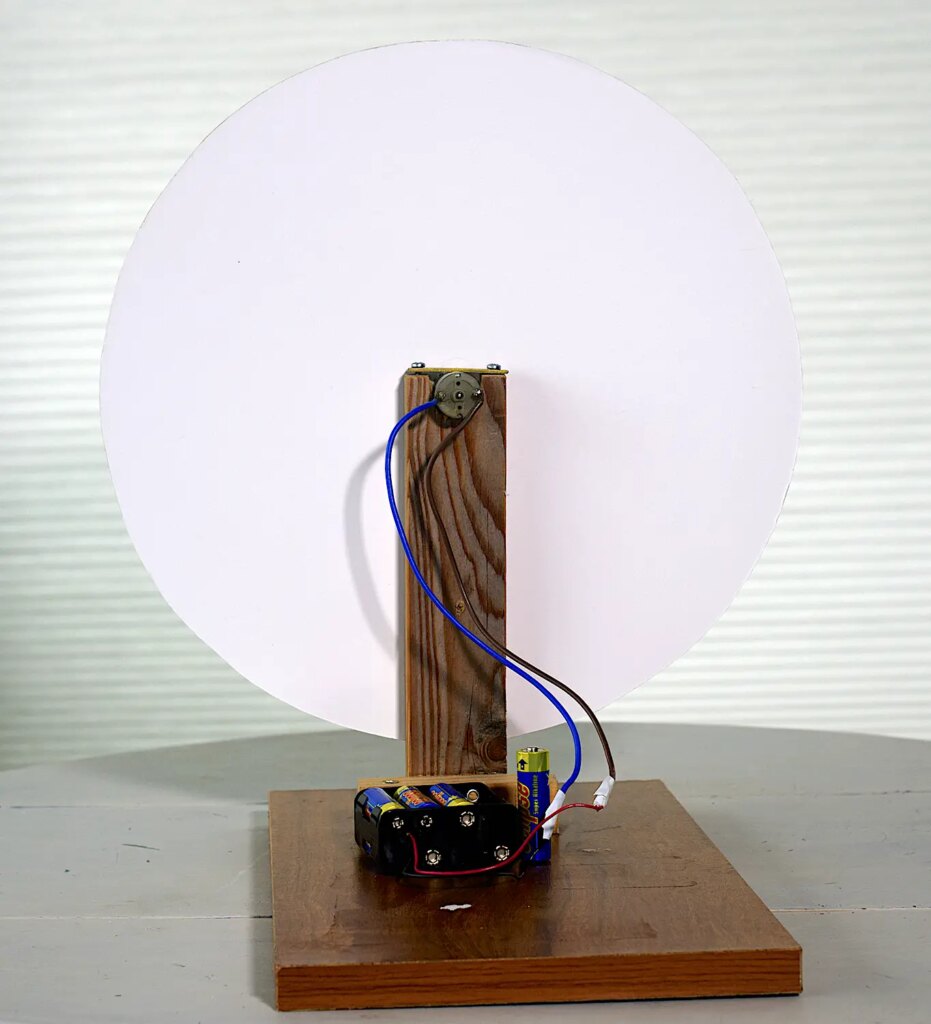
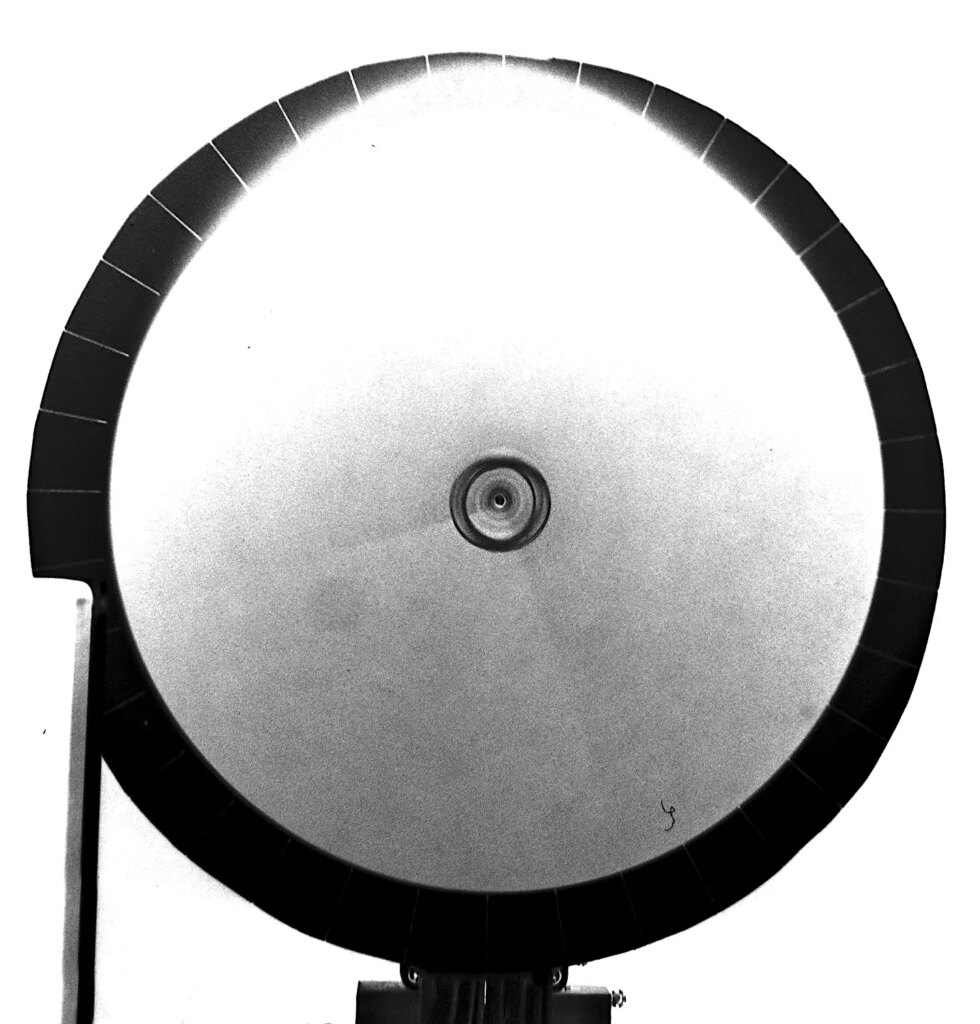
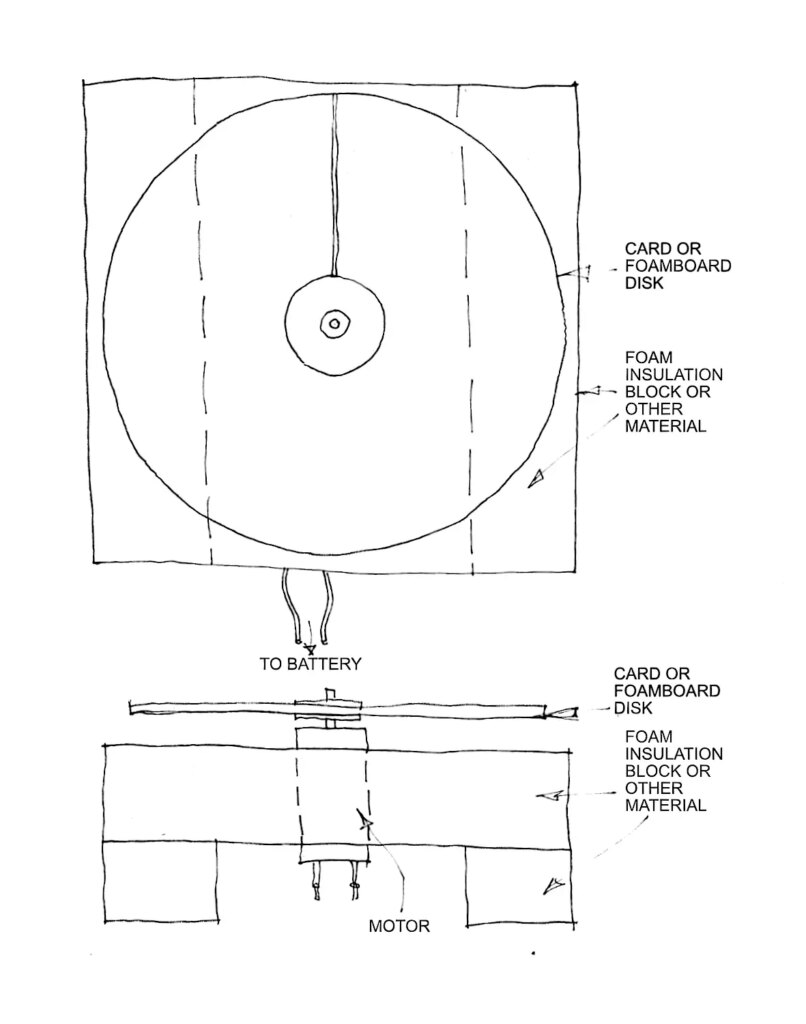
Having decided to make a device and no longer having a record player of any sort I went to the local electronics store and found a small, inexpensive motor in their hobbies section labelled as being geared to run at 60 rpm on 8 AA batteries in series giving 12 volts. There was a handy battery holder for 8 AA cells available also. I mounted the motor on a simple frame made from scrap bits of wood and mounted a disk of black foam board marked with a white line on to the axle. I fixed a larger disk of white card onto the upright behind the rotating disk, marked at 10º intervals around its circumference to simplify measurements. Measuring the speed of rotation in the same way a pulse is taken, i.e. counting the number of revolutions in 6 seconds and multiplying by ten gives the speed of rotation in rpm. This particular motor was running faster than the claimed 60 rpm when preparing this article, closer to the record player’s 78rpm.
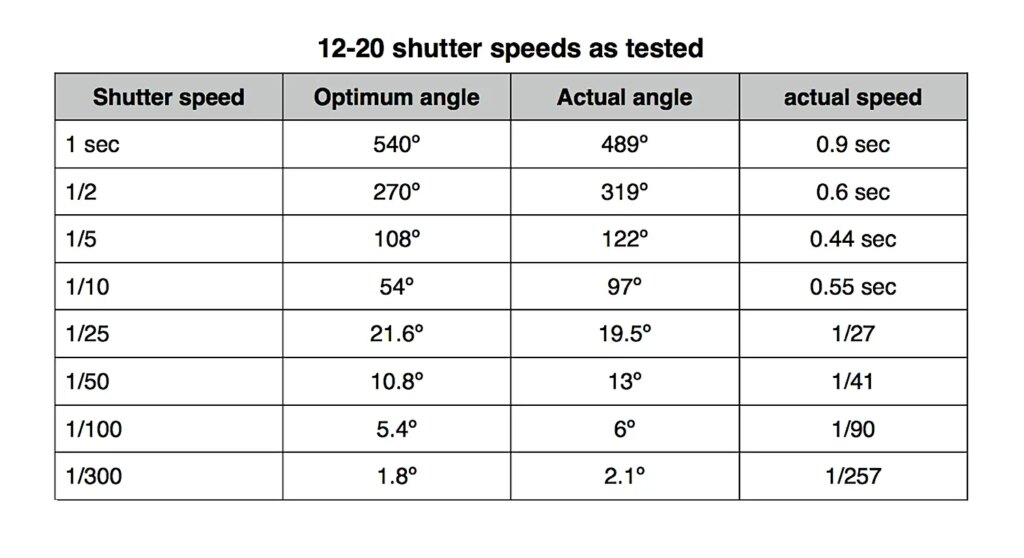
I have now used it on several cameras and large format shutters with useful results. These results from an Epsilon shutter showed which of the marked speeds to avoid, i.e. 1/5 and 1/10. When I did the test on the Epsilon, the disk was spinning a little faster at around 90 rpm, 1.5 revolutions per second, producing an arc of 540º as a starting point. If you make something like this it is worth checking the disk speed before each test session.
New idea.
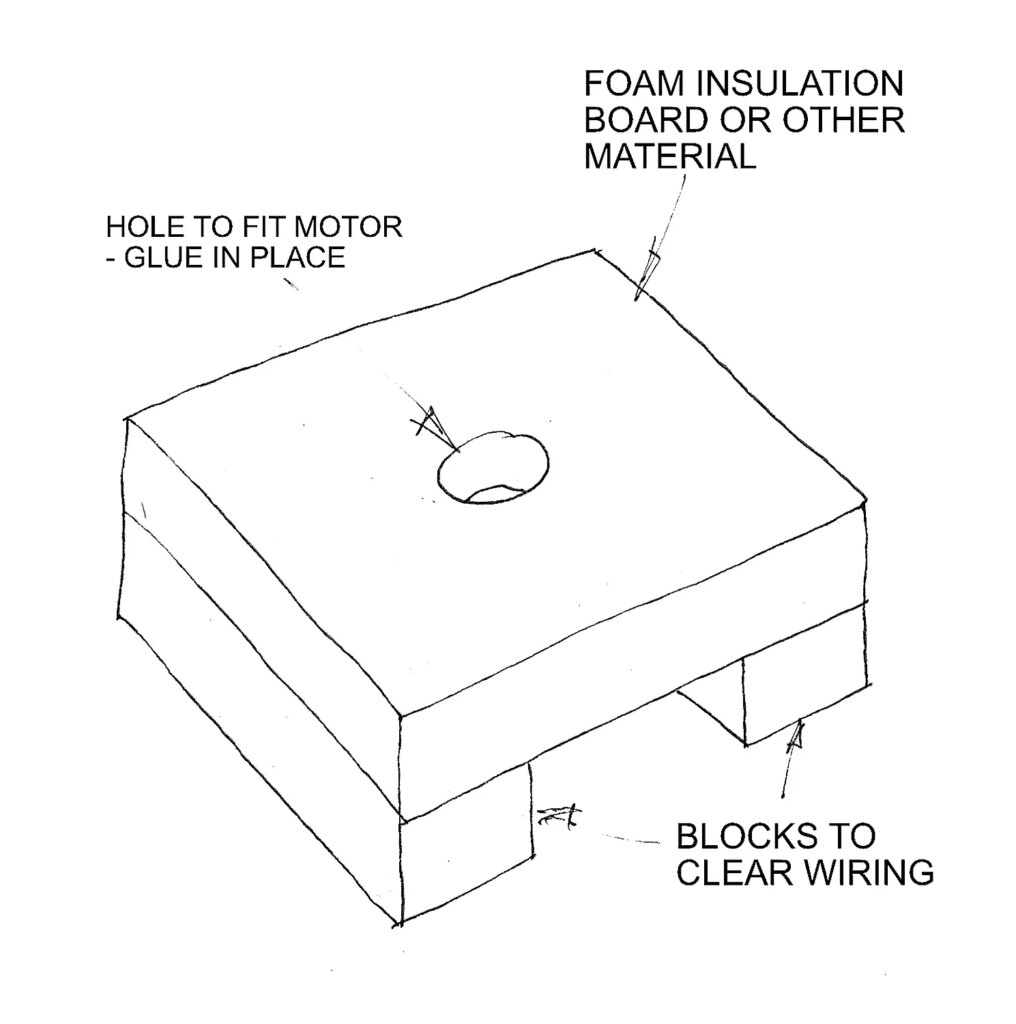
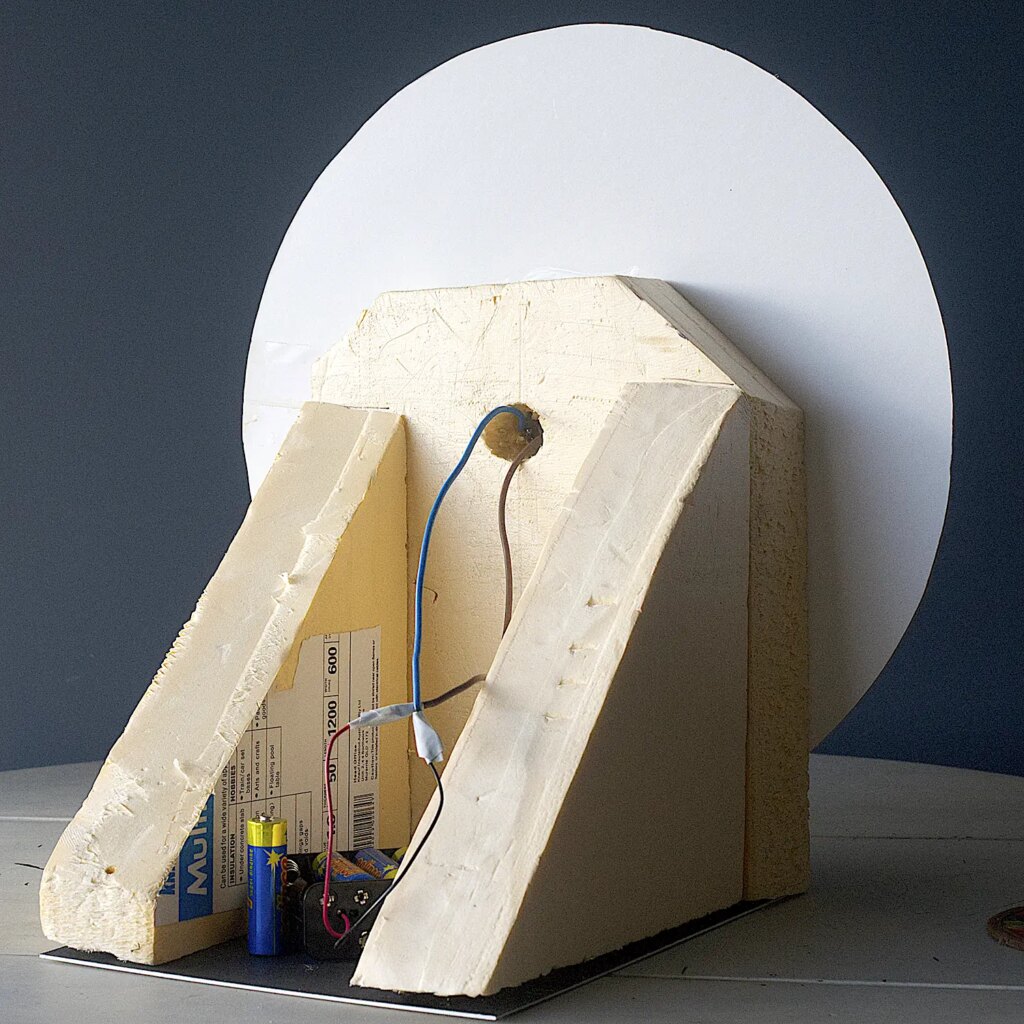
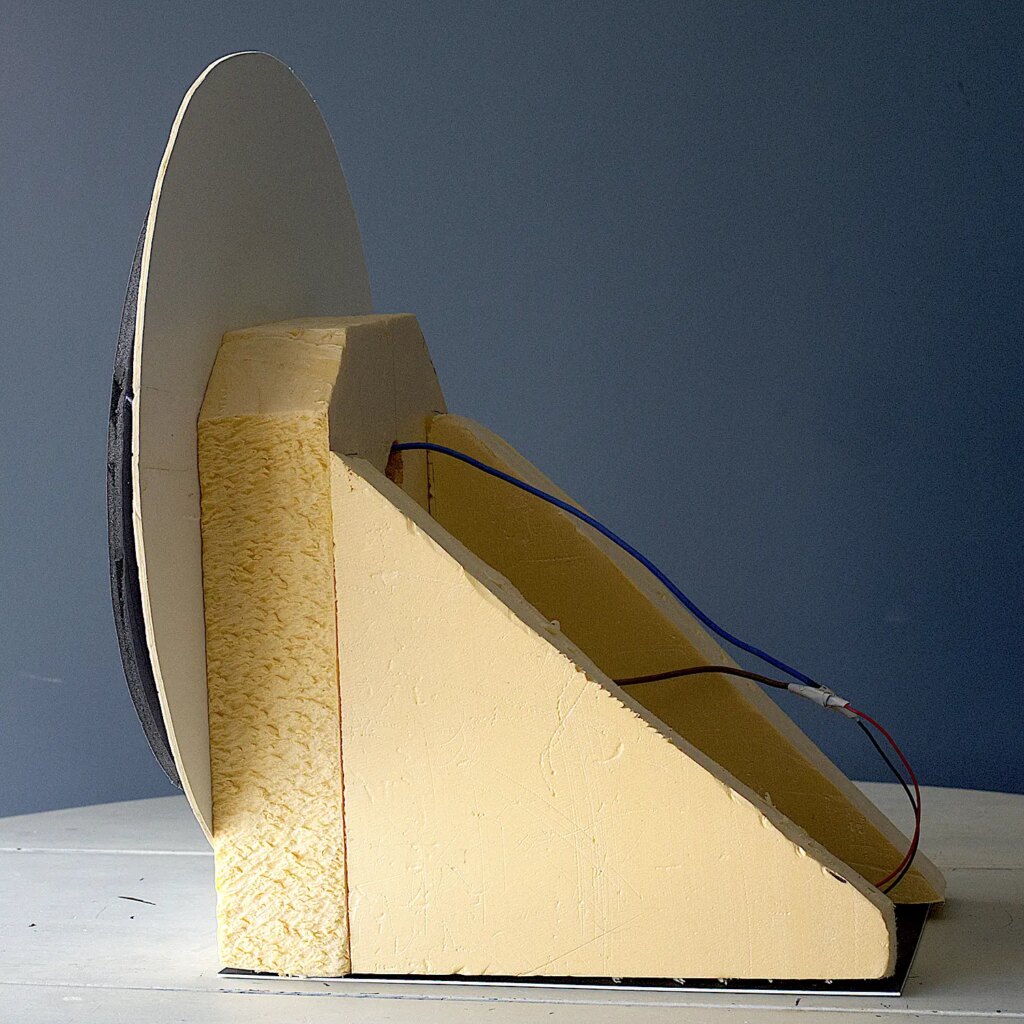
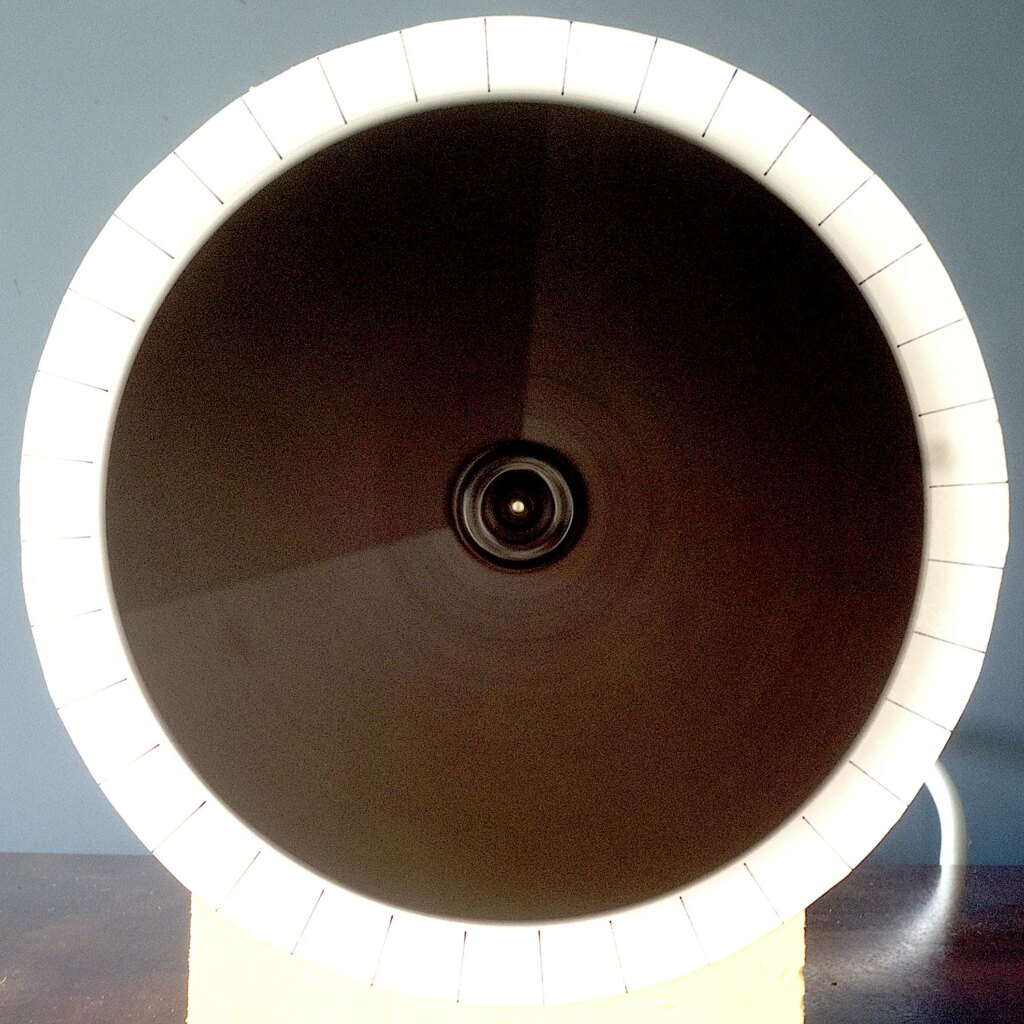
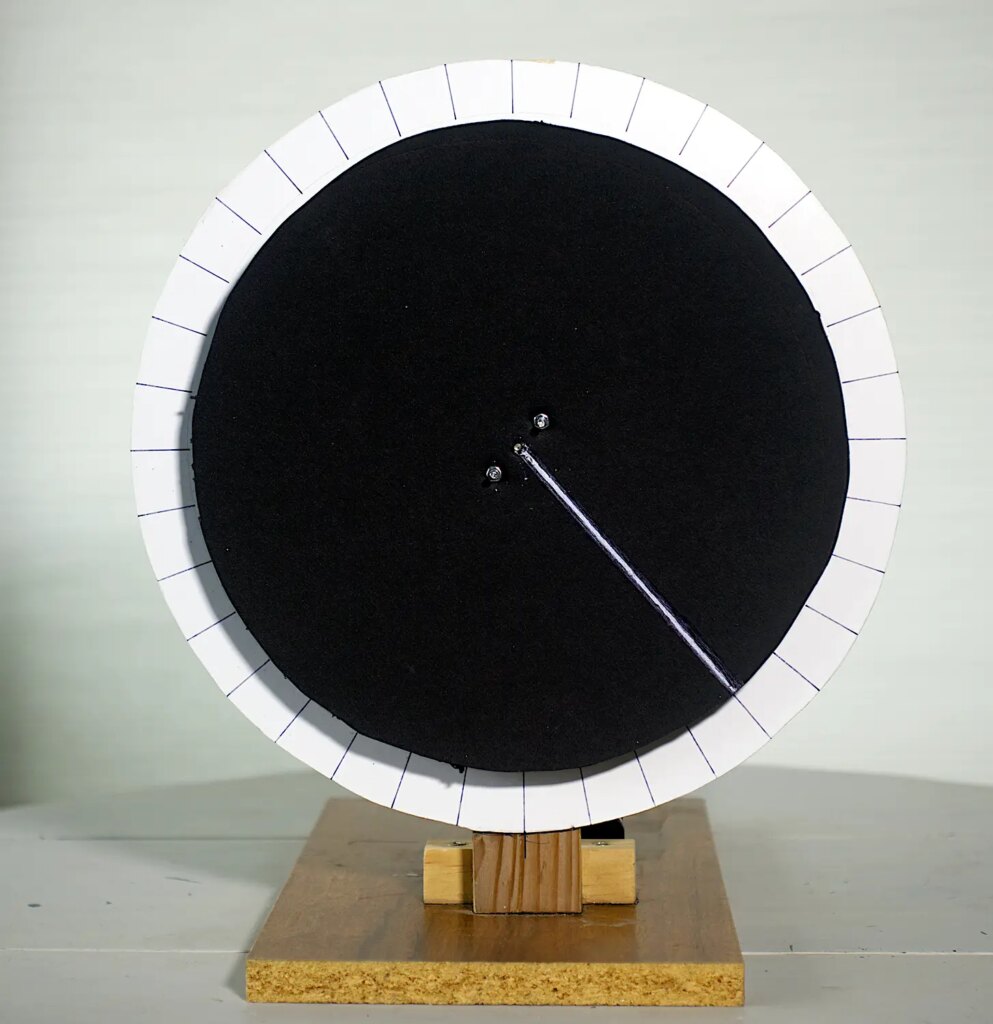
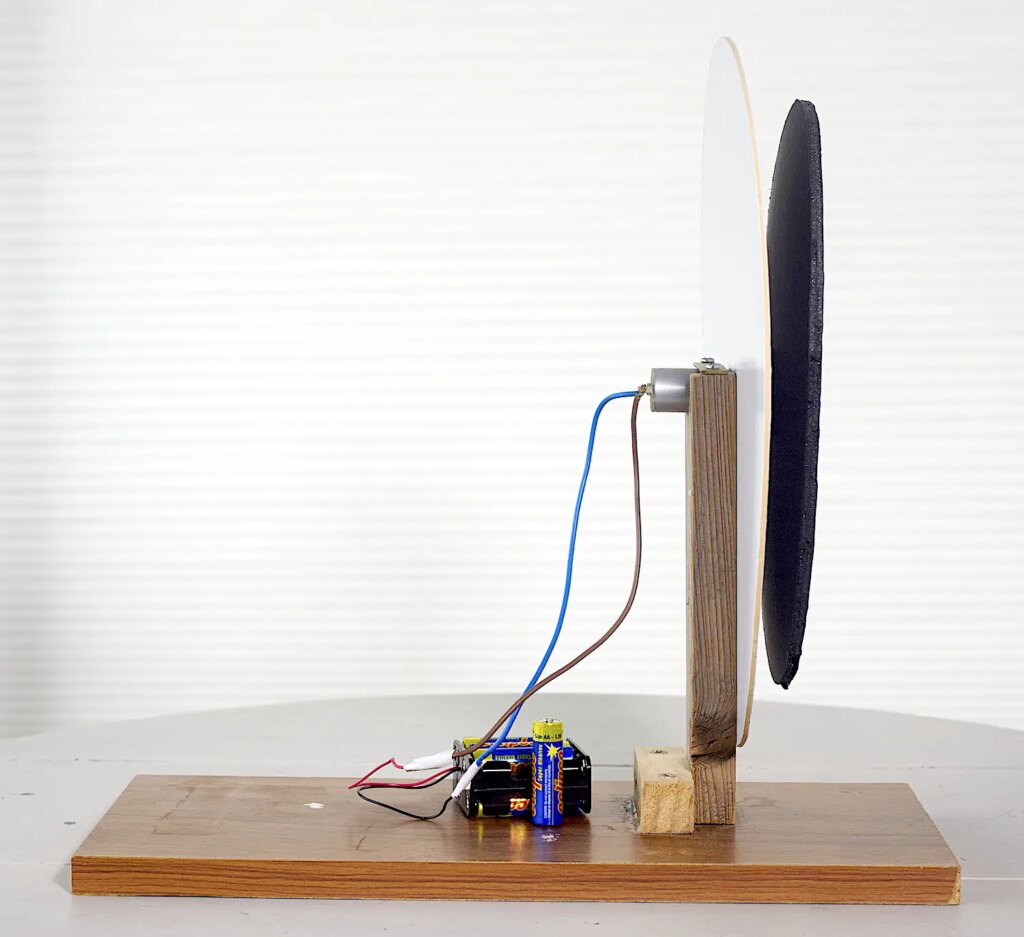
Thinking about this again whilst writing this, I thought that an even simpler device could be made using a board with a hole drilled to take the motor and photographed vertically, like the record player. I have made up such a device using polystyrene insulation but chipboard or anything handy will work. Actual dimensions can be any size space allows but the larger the disk diameter the more accurate the results will be. Any motor that runs at roughly this speed will suffice and a variable speed control would be a useful improvement to slow the disk down for slower speeds and speed it up for the faster speeds if it could be arranged. Mounting the motor and the disk will vary depending on the motor so a bit of improvisation will be needed if it is different to mine. This one only involved drilling a 19mm hole through the polystyrene to hold the motor and a push fit between the disk and the axle using an old plastic gear wheel fixed to the disk. A hole in the card of the disk could also work. Any adhesive which is suitable for polystyrene can be used, I used UHU Por. If the motor is a slack fit, a dab of adhesive will hold it in place.
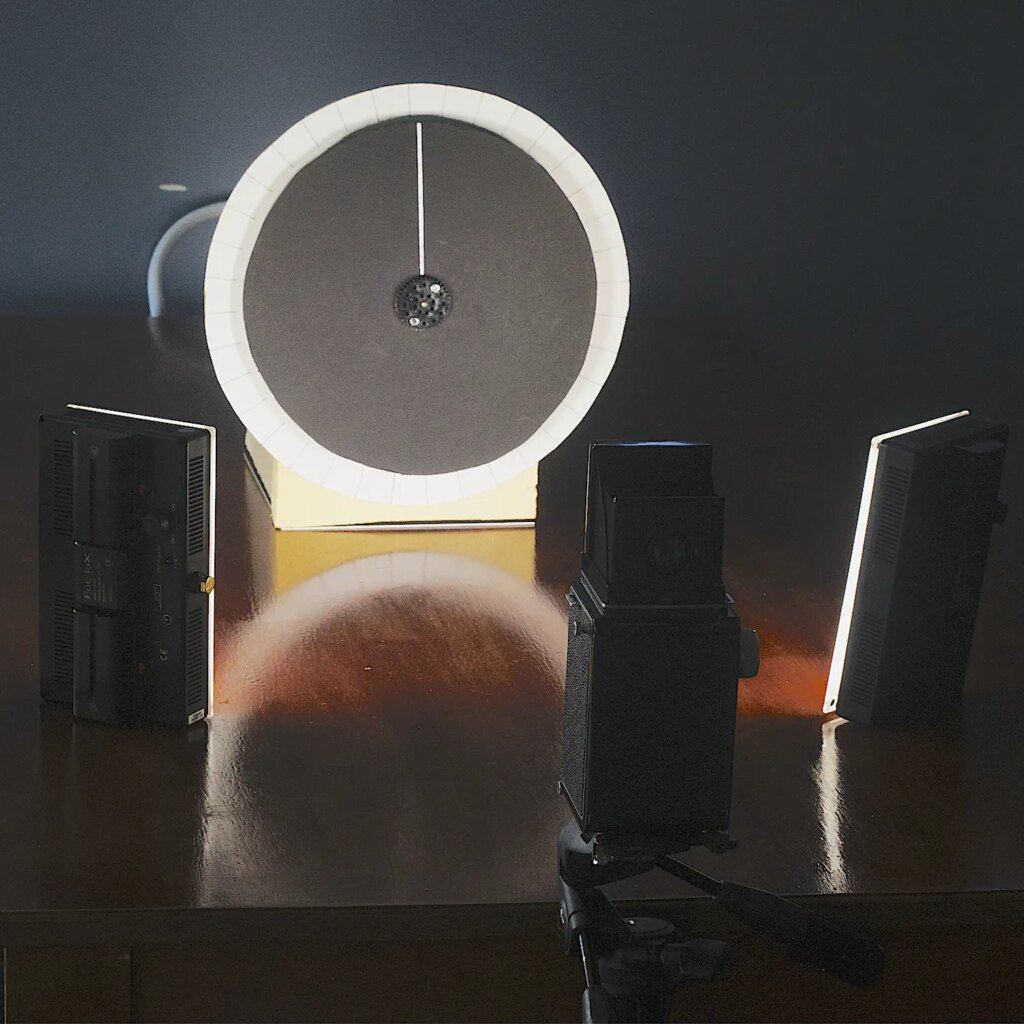
A simple device as shown above is relatively easy to make if an old gramophone/record player isn’t to hand. I slightly modified my own second effort so that it stands upright like the first, which makes lighting easier and shooting kinder on my back. The photo above shows my set up with two LED dimmable lights at 45º.
Adjustable lighting is also needed so that all speeds can be used, the slower ones needing much less light than the faster ones. I use dimmable LED units but pulling the curtains will also work.
In conclusion.
If you have an old record player gathering dust somewhere it is a simple matter to set up for testing without going to the trouble of making a new device. An old record or a disk of black card and a white line are all that is needed with the camera tripod mounted above it. I scan my negatives onto computer and work out the angles from the calibrated backing disk or with a cad program for tighter angles, but a protractor applied to the screen or a print is a workable option.
Exposure isn’t just about getting a full tone range but just one of the tools available to us in creating the image we are after. As Francis Bacon, Thomas Jefferson and others have said, knowledge is power.
Postscript.

Some of my test results with a focal plane camera. See comment below.
Share this post:


Comments
Bob Janes on A DIY shutter speed tester.
Comment posted: 24/05/2023
Regarding calibrating the speed of the disk (and assuming that a speed control was reasonably easy to set up and would stay constant) - I'm aware when I shoot prop driven aircraft through an EVF that there are instances where the prop appears to revolve slowly, stop or go backwards due to the strobing effect.
If you videoed the disk while shooting 30fps video, would you be able to calibrate fairly accurately to 30, 60 or 90 rpm?
Comment posted: 24/05/2023
Mike Avison on A DIY shutter speed tester.
Comment posted: 24/05/2023
Comment posted: 24/05/2023
Murray Leshner on A DIY shutter speed tester.
Comment posted: 25/05/2023
Thank you
Murray Leshner on A DIY shutter speed tester.
Comment posted: 25/05/2023
Same thinking with the old 1-2-5 shutter speed series.
I might build one of these. I'd have it done & working before I ever finish the other electronic testers I've considered.
Comment posted: 25/05/2023
Geoff Chaplin on A DIY shutter speed tester.
Comment posted: 26/05/2023
Graham Orbell on A DIY shutter speed tester.
Comment posted: 28/05/2023
The cameras had to run at exactly 25 frames / second ( for PAL TV ) to synchronise with separate sound recorders.
To check the camera speed we would film the sweep second hand of an electric clock operated off 50 cycle mains current. They keep perfect time controlled by mains frequency.
Film the second hand for a minute then process the film and count the number of frames / minute for the second hand to revolve over 60 seconds then do the math for frames / second.
A 16mm film projector speed could be checked by splicing a loop of processed exposed film of 250 frames ( or 500 ) and punch a hole in one frame. Project onto a screen and use a stopwatch to time the punch mark flash on the screen as the loop goes around, then use math to calculate frames / second
No doubt these days an analogue clock second hand in a smartphone or iPad would be just as accurate
Not sure how this can be applied to shutter speeds except maybe slow speeds
Comment posted: 28/05/2023
Bill on A DIY shutter speed tester.
Comment posted: 01/06/2023
There are two curtains, both of which have to move across the frame at the same speed, else you get uneven exposure and shutter blinding.
You need two light sources to measure the curtain crossing two.points. this way, relative curtain speed can be ascertained. There are many interweb ideas using audacity or a photo-rezister and oscilloscope, but they all have the same facing.
Shutter speed is a misnomer. Tbe shutter always operates at the same speed. It is the difference between first curtain opening and second curtain closing which determines exposure.
Have a look at my cheap simple shutter tester on tbe photrio forum.
Comment posted: 01/06/2023
Tony Warren on A DIY shutter speed tester.
Comment posted: 05/06/2023
Certainly, if accurate readings are wanted at higher speeds, then an electronic device such as Bill suggests will be needed if a faster disc speed cannot be achieved. With electronic control shutters though, unless there is an obvious problem, it may be unnecessary.
I will try to add an image to the article from my tests.