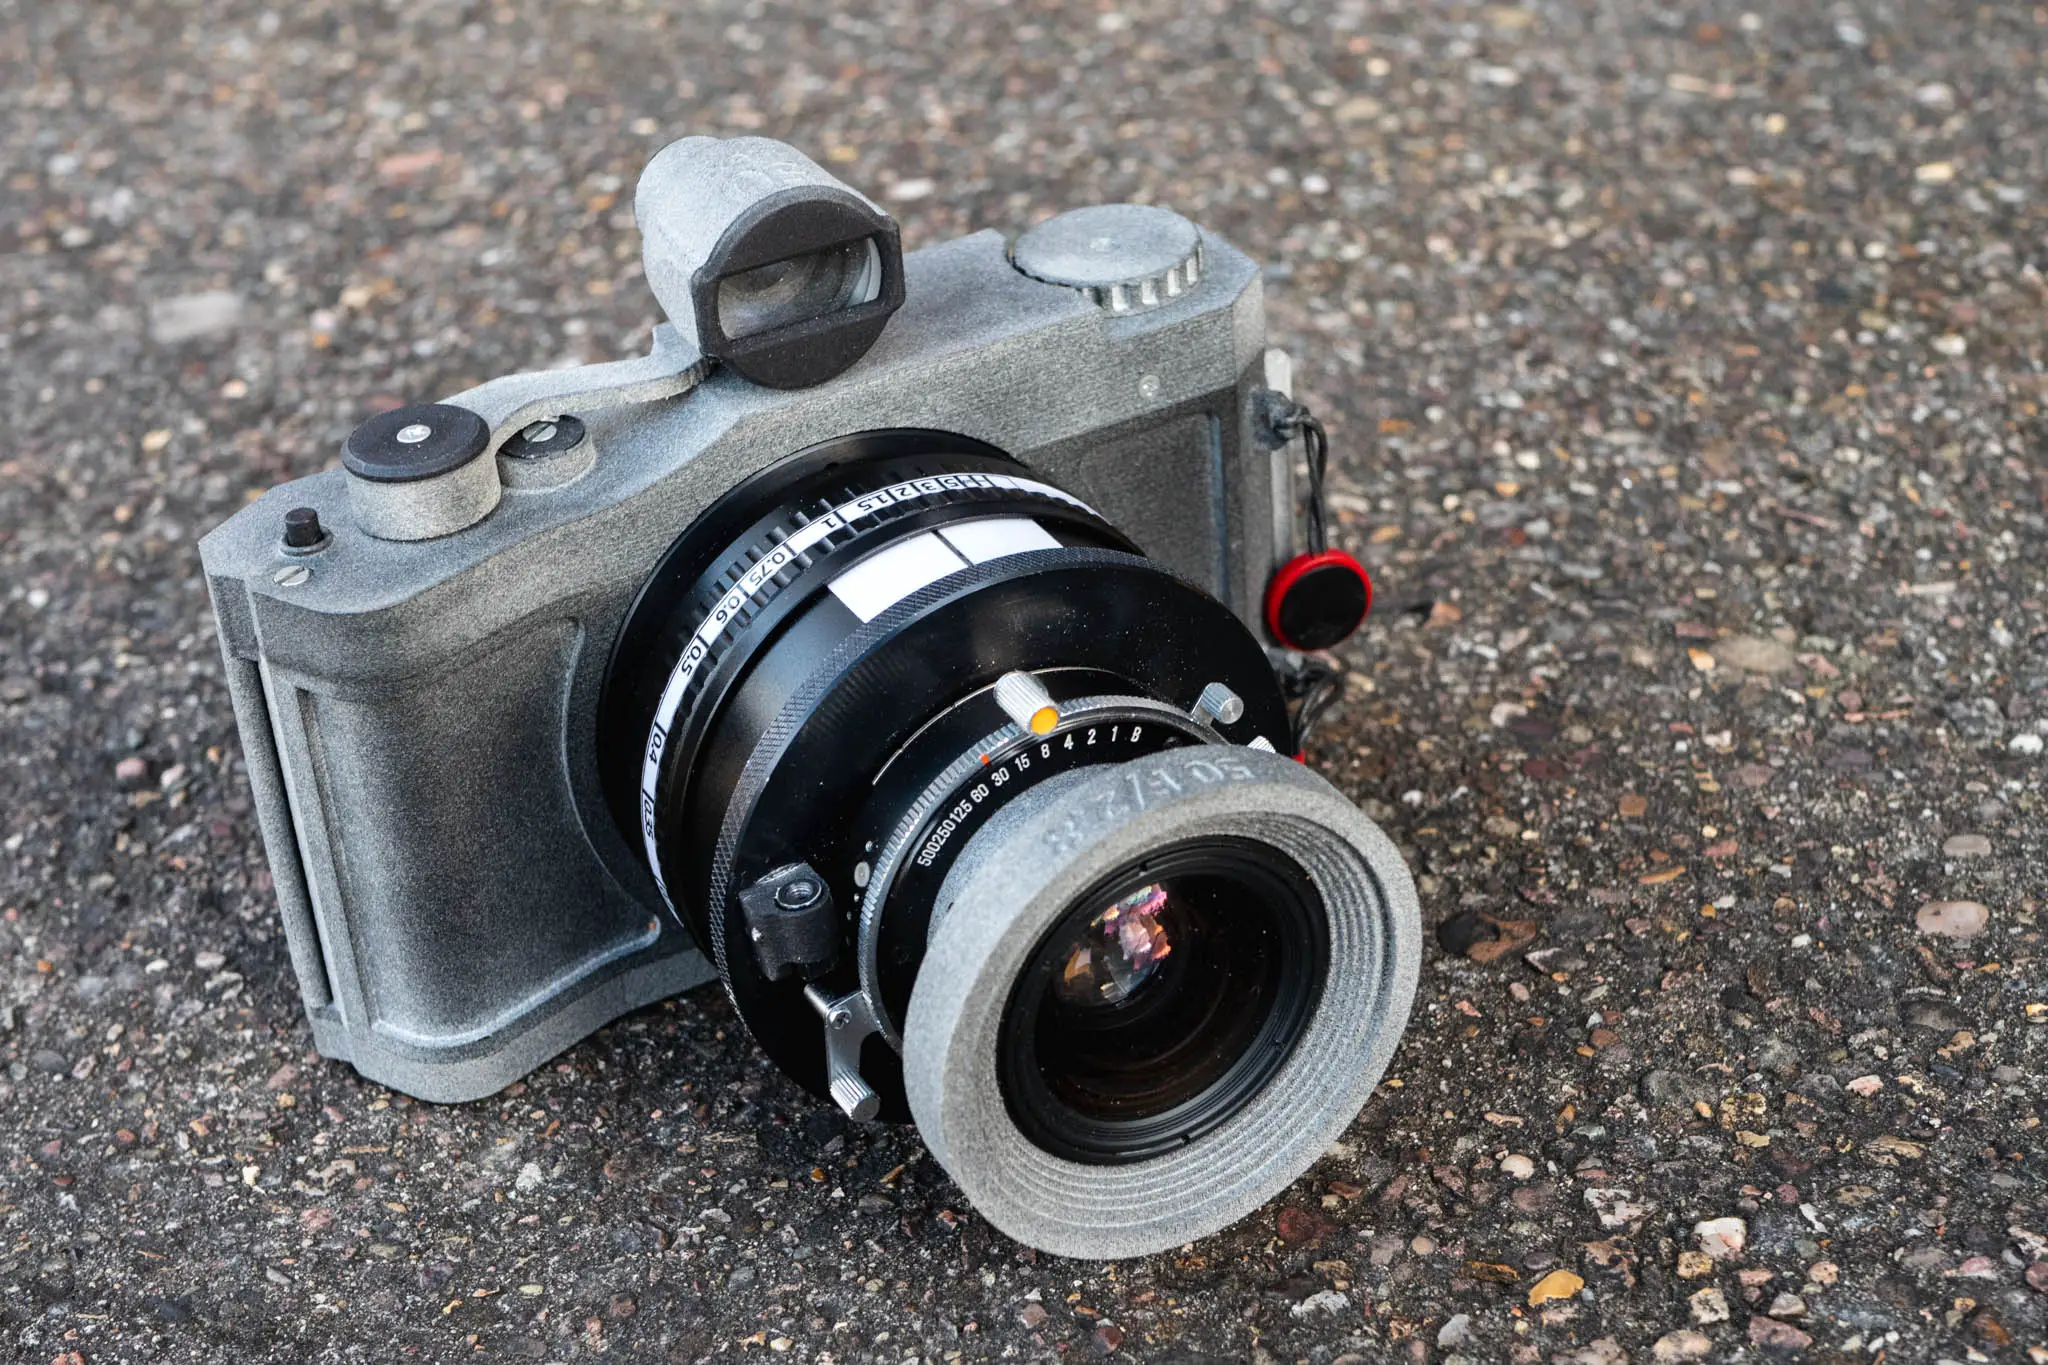
I’ve recently bought myself a Panomicron Oxygen – a panoramic 35mm film camera that’s the same format as the Hasselblad Xpan, but at a fraction of the price. It might not be as technically advanced as the Xpan, but the Panomicron offers me pretty much as much as I could want from such a format of camera, it’s more simple to use, and I’m in no way worried that it might break leaving me with a very expensive door stop – points for the Panomicron Oxygen, but just how good can a 3D printed camera be?
Sometime last year I sold my Hasselblad Xpan-ii. Its value had increased to the point that I couldn’t justify keeping it. I wasn’t shooting it much, and whilst really love the format, the camera felt a little like it was wasted on me. I sold it, rationalising that I couldn’t justify keeping it for the very odd occasion I had a desire to shoot the format. I don’t carry “big” cameras often, and when I do I am doing so with a very specific purpose in mind. I could imagine myself having that purpose with the Xpan once in a while, but the fact that it is so heavily reliant on its electronics worried me. The idea that it could sit on my shelf waiting to be used, and then one day me pick it up and find it not working was enough alone for me to want to part with it – especially as it had become such a valuable camera in the time I’d owned it.
I also fell into what I called the “landscape trap” with it. I bought it with the intention of shooting some well considered Anderson/Yeoman style images, and actually just ended up shooting landscapes. There’s nothing wrong with shooting landscapes with a panoramic camera, of course. In fact, I was very happy with a few of the shots I took. The issue was, I just felt like I wasn’t doing the camera justice. I looked at the photography from the likes of Cal, and just felt there was a cavernous gap between the value of the camera and the value of it to my photography. I’ve sold a lot of cameras for similar reasons – the Leica M-A and Contax T3 are others that come to mind – but the Xpan is the one that really sticks in my mind.
The difference with the Leica M-A and the Contax T3 is that I rationalised their sale in the knowledge that I had other cameras that did similar jobs. The Leica M4-P is essentially the same camera as the M-A, and for the way I used the T3, pretty much any point & shoot was close enough. I didn’t have a replacement for the Xpan beyond my little Minolta Riva Panorama, though actually, that felt pretty much enough for me… That being said, I did miss the resolution of the proper wide format. For landscapes or otherwise, the 24x65mm frame just brings a bit of the medium format magic to a 35mm strip of film… so I thought I’d try and find another camera that would utilise 35mm film in the same way.
Finding an Xpan replacement
Of course, this is easier said than done. As you may or may not know, there are very few cameras that take a panoramic frames on 35mm film. Most 35mm “panoramic” cameras crop the top and bottom off a normal 36mm wide frame. What I wanted was a 65mm wide frame. Unfortunately, the Xpan is pretty much the only camera to offer these wide frames without the use of a rotating lens. The disadvantage of a rotating lens is that they can cause issues if your subject is moving. This didn’t rule them out for me, but did make me want to explore other options first.
A custom camera
Of course the only real option was some something custom. There’s a few very clever people out there these days that are making various types of custom camera. Most of which take advantage of medium and large format lenses with shutters. The shutter is the technical sticking point for many DIY’ers – understandably really, they are complex bits of kit. Medium and large format lenses with the various Copal, Compur, Seiko etc shutters offer a solution to the shutter problem. Though since most of them are bigger lenses that cover bigger formats, many of the DIY cameras that take advantage of them are themselves medium and large format.
A 65mm wide frame is – as I’ve alluded – practically medium format. It certainly needs a lens with a medium format size image circle to cover the frame. But for one reason or another, there seemed to be very few DIY’ers out there who were making panoramic 35mm format cameras – and none that seemed like they’d be all that interested in selling one to me. That was until I came across Panomicron on Instagram.
Discovering and buying my Panomicron Oxygen
To be honest, I can’t really remember the timeline. Either I saw the post on JCH or one of Oscar’s early prototypes on his persoanl Instagram. Either way, I was aware of the project when I found the Panomicron Instagram feed and learned that he was starting to make the cameras with the goal of producing a few for other people. I didn’t contact Oscar straight away, but did keep a beady eye on the project. In fact, the thing that eventually made me get in touch with him was a desire to understand exactly where he was getting the optics from… something I shall come back to in a mo…
By the time I got in touch with Oscar he was finishing off his version-4 Panomicron Oxygen design and had started taking expressions of interest in a short-series production run. We chatted a little around the topic of me eventually buying one of his contraptions, but I didn’t commit. That was until he got in touch saying that one of the people he’d promised a Panomicron to had pulled out, and did I want to take their place. Of course the answer was yes, and not long later I received my new 24x65mm 135 format film camera.
A 3D printed camera
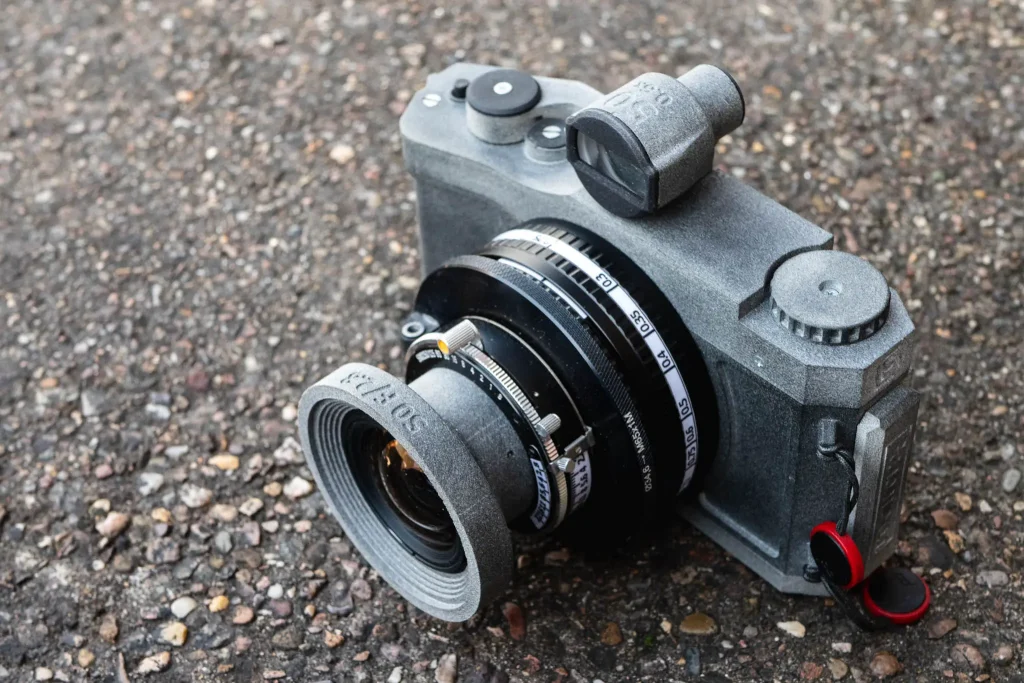
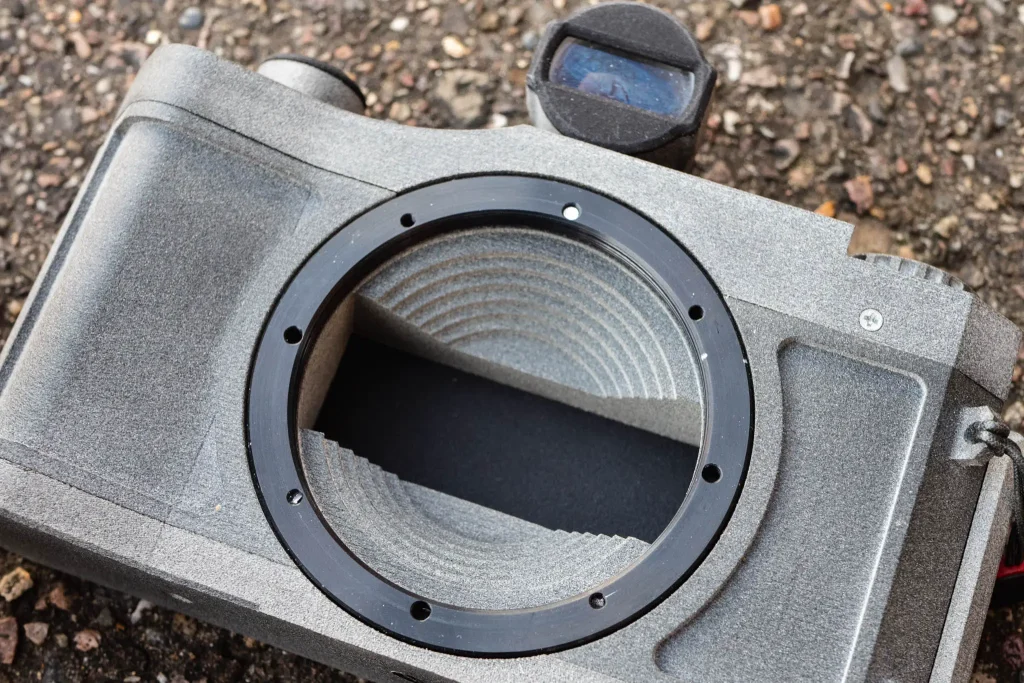
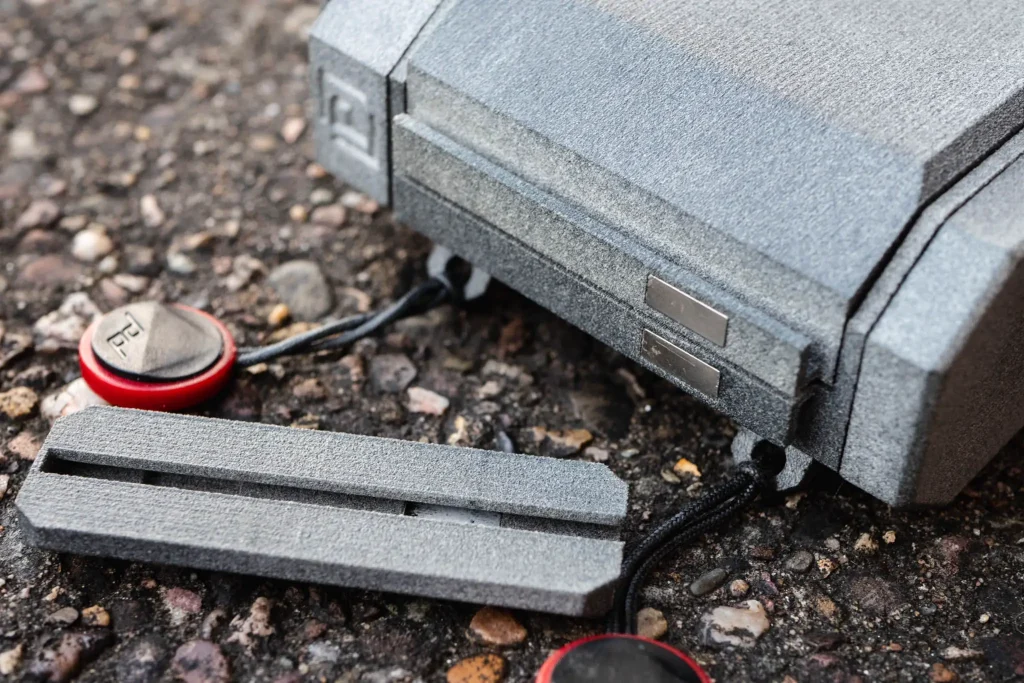
When I committed the cash to buy my Panomicron Oxygen, I was under no illusions that I was going to get a camera that felt like a mass-produced product. This is very much a 3D printed camera that in many ways is a little rustic feeling. I think it’s worth bearing in mind the reality that to have this thing made out of anything other than a 3D printed material would cost an absolute fortune. It’s the 3D printing revolution that allows this sort of thing to exist outside of the mind of its designer at all – so I personally can completely forgive it its less than mass-produced feel.
Of course, some 3D printed things do look a little more polished than this, but there’s more to that than meets the eye too. As I understand it, the grey material it’s made out of was chosen for the practical reason that it’s light tight – I think Oscar likes the look of it too, but obviously making a camera from a light tight material is fairly important. Personally, I’m neither here nor there when it comes to the look of this camera – it’s not the prettiest thing I’ve ever seen, but it feels solid and does indeed appear to keep those pesky stray light rays from polluting the film when it’s not supposed to.
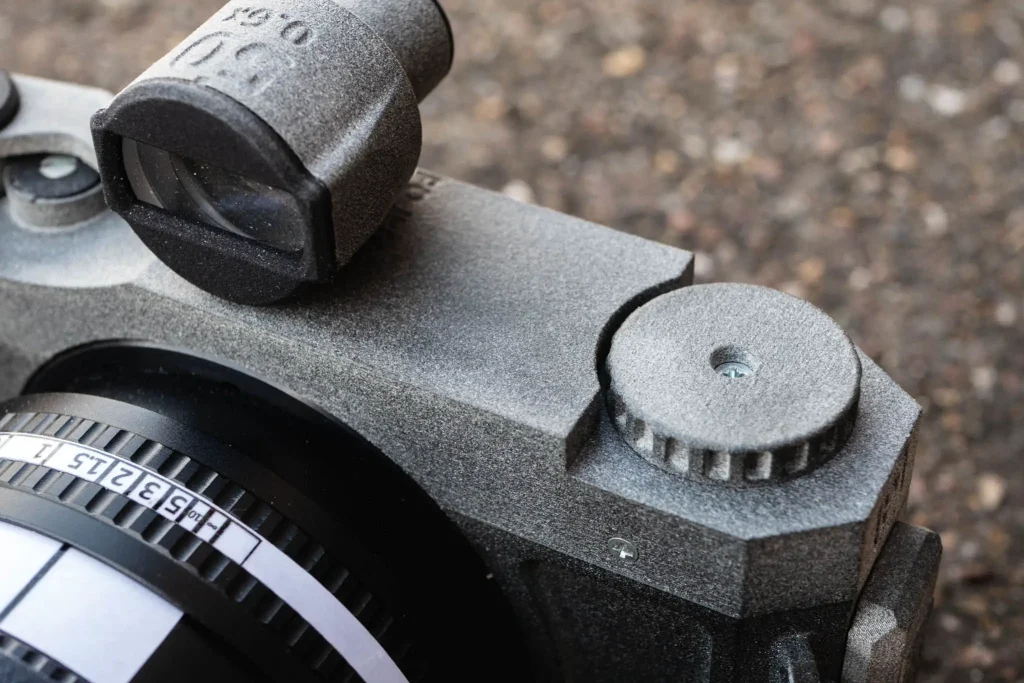
It works too – though it’s not without its foibles. For a start, the shoe that the viewfinder slots into is a little loose to the finder. To solve this. I just put a tiny spot of blu tack onto the finder’s foot so when it’s slotted in, it doesn’t come out as easy. The rewind knob is a little loose feeling too. The spring inside it isn’t as strong as it could be so it lifts too easily. It is a bit fiddly to rewind the film too, as the tension of the film feels a bit more fighty than in production cameras… but it still does what it’s supposed to.
I’ve spoken to Oscar about these issues and he tells me he’s looking into a solution for the next version. Of course, if this was an off the shelf camera that would probably mean me buying a whole new camera – which is not the case here. Oscar has said that upgrades will likely be backward compatible, so if I want the new upgraded parts they will just replace the bits on the camera I already have.
Foibles out of the way, there are a couple of really nice design features that genuinely impressed me. Again you have to acknowledge that this is a 3D printed camera and not an off the shelf production camera that’s had thousands of pounds thrown at R&D – as such, what might seem quite primitive compared to some cameras, to me is actually quite impressive when you put it into the context of a camera designed by one person in their spare time.
For example, whilst it does lack a frame counter, the little arrow for showing how much the film needs to be advanced is a very clever little feature that solves the issue of how much to advance the film quite nicely. The film advance is ratcheted too – although not sprung – this means that after you’ve taken your frame you push the advance as you would on any other camera, you just have to keep an eye on the little arrow until it’s rotated one full circle back to where it started. When it has, you just fold the film advance back to its folded away position.
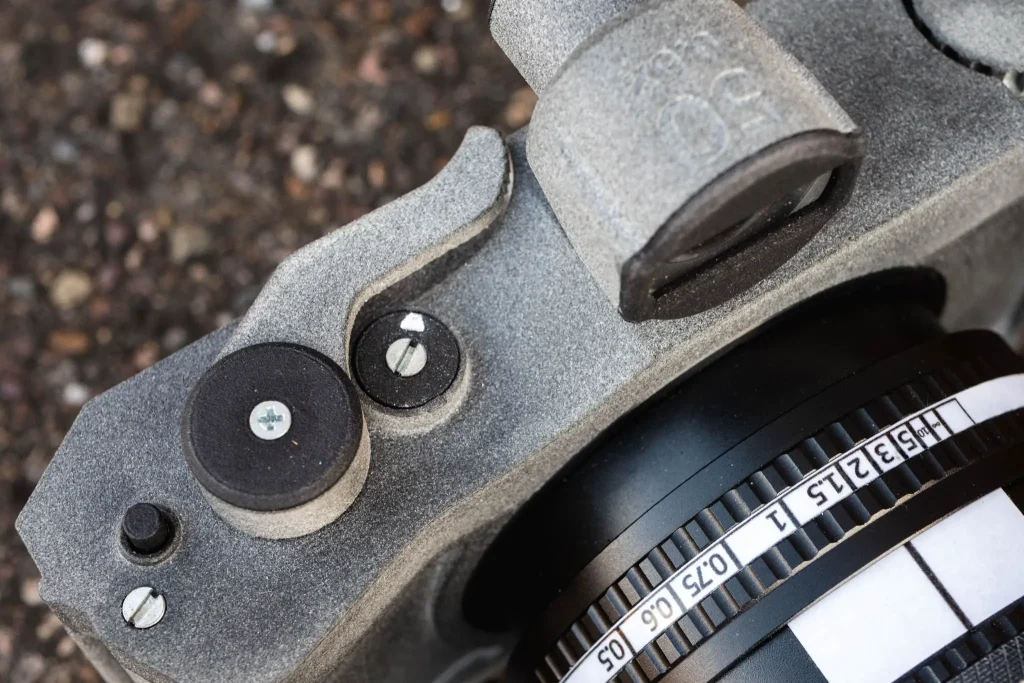
Funnily enough, the feature I think I like the most is the lock on the rear door. When the door of the camera is closed you just slot a bit of plastic over two parallel protruding parts. The nice little feature is a magnet and bit of metal embedded into the 3D print. The bit of plastic that slots into place is held by tight enough magnetic force for it not to come off by being knocked, but is still easy to remove when you need to. It’s essentially a really neat solution to an otherwise quite difficult problem to solve given the chosen method of manufacturing.
The lens and focusing
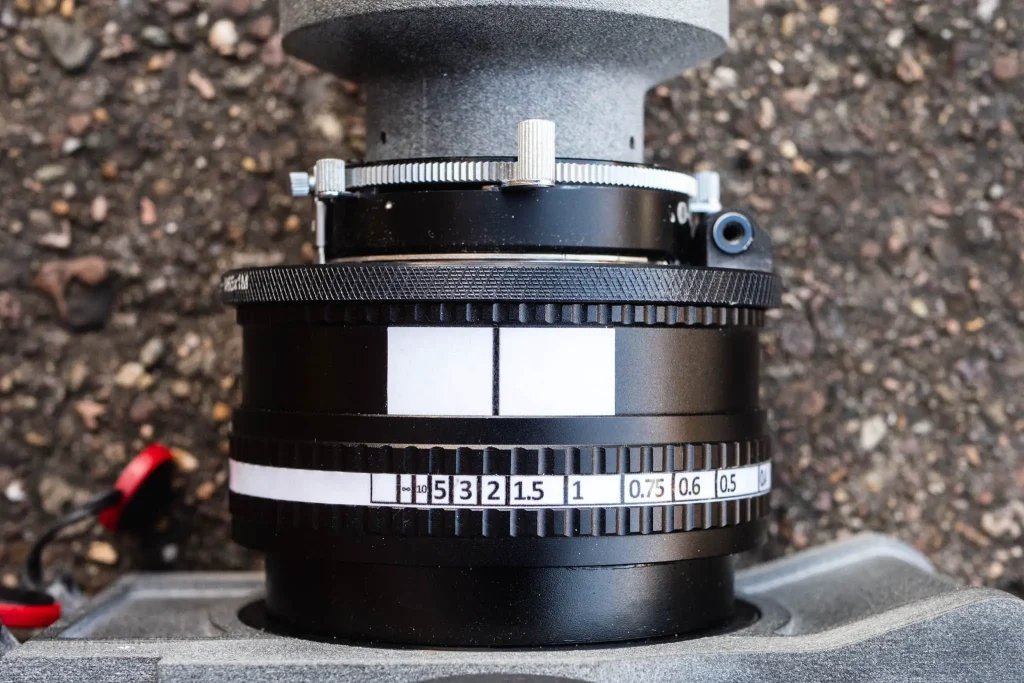
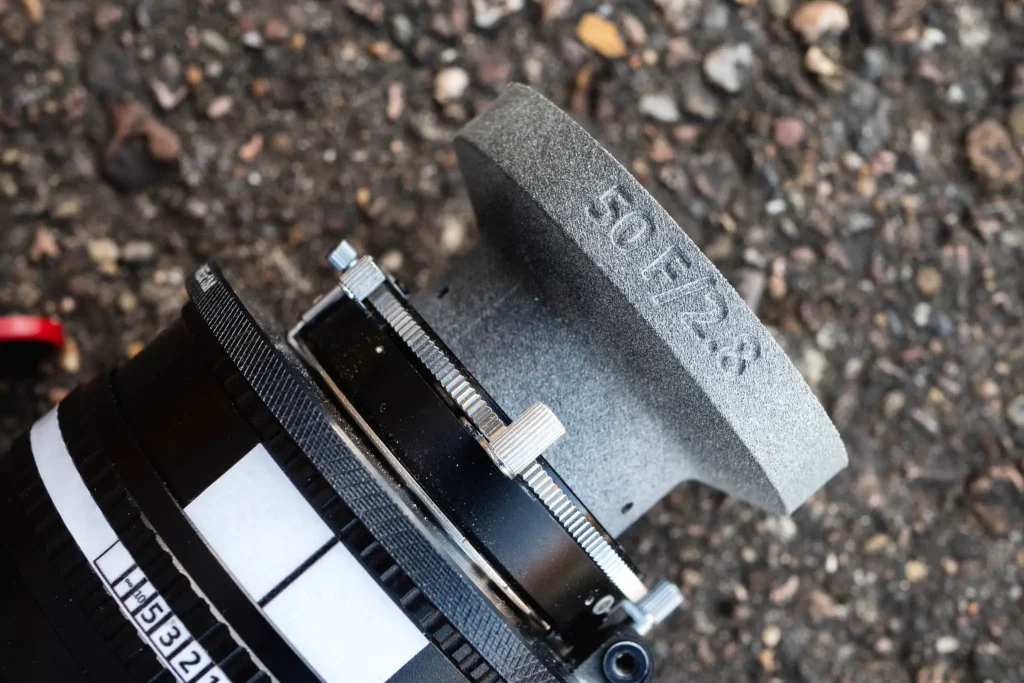
Beyond all this, there really is very little to the Panomicron Oxygen itself, short of the lens mount of course. The lens mount is a M65 threaded mount which is designed to work with what Oscar calls a “Chinese helicoid”. Search eBay for M65 helicoid and you’ll find whole load of suppliers of the things. On to the end of this is mounted a 65mm Copal-0 lens plate. Onto the top of the helicoid Oscar has printed a distance scale that’s suitable for the lens attached to the plate. The big question that had me originally get in touch with Oscar about in the first place was where the lenses themselves come from.
The lens
For me, the lens is the really interesting bit. As I’ve alluded to, the easiest type of lens to mount to a camera like this is one that has a shutter built into it. As it happens, many medium format lenses have shutters built into them, but most also have proprietary mounts and shutters that are triggered by the camera. In fact, one of the only types of lens that’s triggered by the user independently of the camera is the lenses for the Mamiya press cameras. Take a look at Oscar’s earlier designs and you will see that those are indeed the lenses he was using.
The lenses he uses for the Panomicron Oxygen, and indeed some of his other contraption are actually Bronica lenses from the ETR and SQ series cameras. Of course both of these series of lenses have their own mounts and have shutters that are triggered by the camera. In fact, they are electronically controlled shutters – but therein lies the solution, rather than the problem.
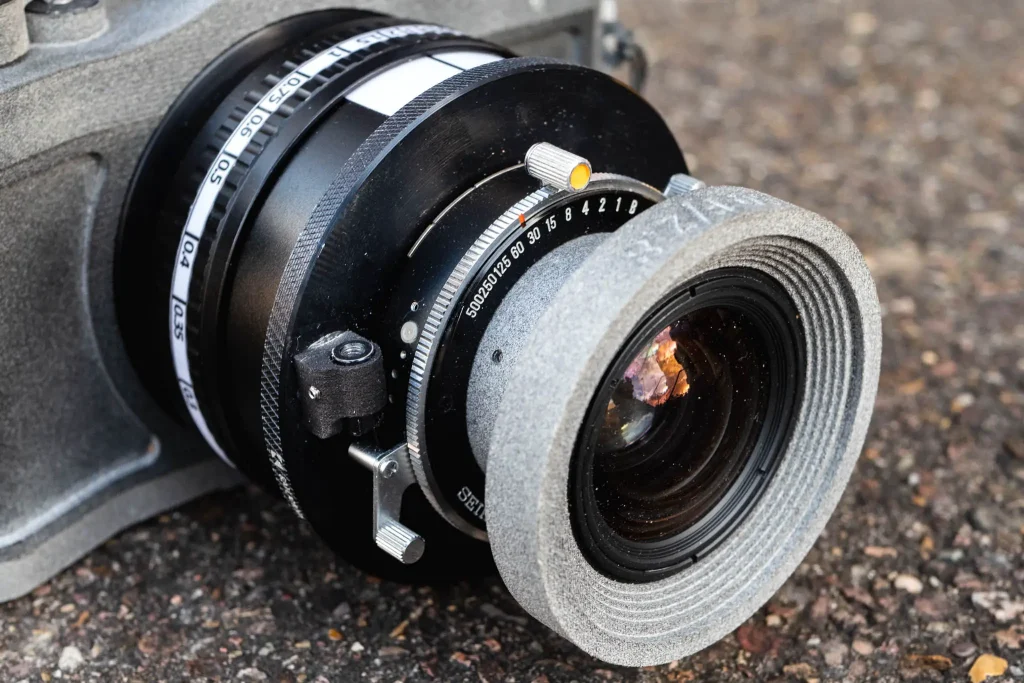
The electronically controlled shutters are actually 0-size Seiko shutters, with the optics screwed into them in the same way any other lens would screw into a 0-size shutter. The outer part of these Bronica lenses is effectively a housing for the unit-focusing lens within. This means that if you take the lens apart, you can extract the front and rear optical cells and screw them onto and 0-size shutter. This 0-size shutter and optics can then be mounted to the m65 helicoid, a focusing scale added to the top, and away you go. As you can see, Oscar also adds a housing of his own to the front optical cell to give it a look that’s a little more in-keeping with the camera.
My chosen lens
For my Panomicron Oxygen, I opted for a 50mm f/2.8 lens, but have also have a wider 40mm f/4 that Oscar is making a housing for. The 50mm is actually about right, I just bought the 40mm as I spotted a broken one on eBay going for good money. I’d quite like a longer lens, but since it’s scale focusing only, it seemed sensible to stick to a slightly wider angle.
The 50mm lens provides an equivalent of about 28mm in terms of horizontal field of view and 50mm (obviously) in terms of the vertical field of view. This is perhaps the main downfall of The Panomicron Oxygen compared to the Xpan for me. I preferred the 90mm xpan lens to the 45, but don’t fancy wrangling a longer lens with access only to scale focusing. Perhaps Oscar will make a rangefinder version at some point – it wouldn’t be the first he’s made!
Photos
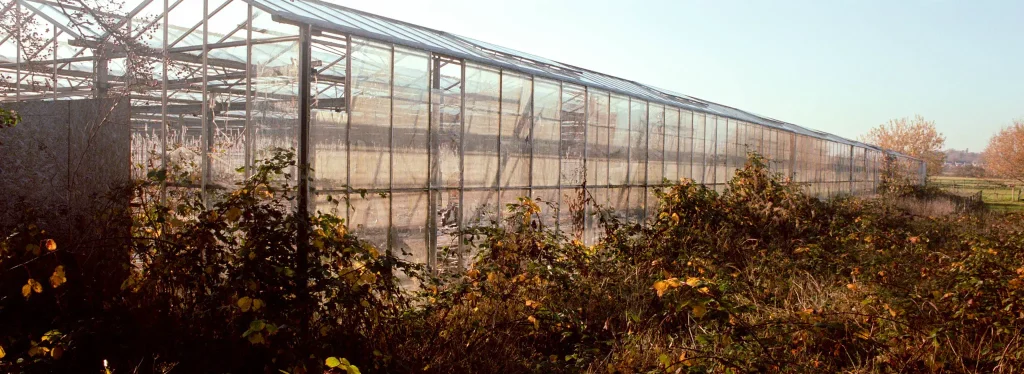
Unfortunately, at least for the sake of this post, I’ve not had much time to use the Panomicron Oxygen much. The only roll I’ve shot with it was also developed by Boots with some chemicals it looks like they last changed in the 1999s… so the colours are a little bit off. That being said, hopefully you can get some impression of the potential outcome.


Price and availability
For the sake of clarity, I thought this part of the post would be best it if came from the horses mouth, so I asked Oscar. He said:
The price list is on the www.panomicron.com website, it’s $450 for a body only, $600 for a full setup (helicoid viewfinder etc..) but no lens, and $1000-1200 for everything.
I try to make them as available as possible, although of course I don’t have much time to actually build them. I hope to do a series of 3 or 4 soon, though this depends on my uni schedule.
If you can’t afford one built by me, or can’t wait, the files are absolutely free to download on the site for everyone to download and print.
I do my best to answer every message I get from people trying to build it, so if anyone is unsure And wants help I’m more than happy to do so.
Final thoughts
There are of course limitations to the Panomicron Oxygen. It is a 3D printed camera and was designed by an individual in his spare time (a 19 year old at that) and not a team of seasoned camera designers with unlimited resources and manufacturing techniques at their disposal. Because of this, in many ways it can’t compete with the likes of the Xpan. But actually, for anyone used to using a camera without any of the bells and whistles, such as a built in lightmeter and auto-advance etc, the limitations are quite slight. I can genuinely say, the only thing I really miss when comparing it the Xpan for my photography is the rangefinder and the ability that brings to use a slightly long lens easier.
Yes the film advance lacks a frame counter, the viewfinder is a little loose and the rewind knob a little less than ideal, but the trade off is a camera that is a lot less likely to brick. I can also get spare parts if I need them – In fact, if I was sufficiently capable, I could print spare parts myself. In real terms, this means this camera – a camera designed by a 19 year old in his spare time – actually offers real advantages over and above a Hasselblad.
Of course, if you get Oscar to make you a complete Panomicron Oxygen, it’s not exactly cheap – though still less than half what an Xpan would cost you these days! If you get the parts printed, source a lens, helicoid, lens mount, shutter and viewfinder optics yourself you could probably save a little bit of cash compared to what Oscar charges, though probably not that much if you went for the high quality material Oscar uses. Either way though, he has made the drawings for the Panomicron Oxygen available, so if your into making this sort of thing yourself, you can!
For me, there was no choice – I am sure I could have found someone else to make one for me from Oscar’s files, but I’m much happier supporting him and his ideas directly. I’m pretty certain this guy has a long and fruitful career in product design ahead of him – if a bit of my cash in his pocket helps speed up the process, then I’m very much on board. Here’s hoping he continues to focus his attention on making new film cameras!
You can find Oscar’s website here
You can download the parts for the Panomicron Oxygen here
It’s definitely worth following the Panomicron Instagram here
If you didn’t see it, the post about his latest contraption, the “Holmium” over on JCH is very much worth a look too
Share this post:


Comments
StephenJ on Panomicron Oxygen review – A 3D Printed Hasselblad Xpan Alternative
Comment posted: 24/12/2018
Hopefully he will go on to bigger and better stuff.
For me, the helical is equally as difficult as the shutter, and a plastic one just doesn't cut the mustard.
I have been cutting out the middleman and just using a pinhole for my pano snaps... No proper shutter, lens or helical... Just call it art :)
Felicitations.
jeremy north on Panomicron Oxygen review – A 3D Printed Hasselblad Xpan Alternative
Comment posted: 24/12/2018
jeremy north on Panomicron Oxygen review – A 3D Printed Hasselblad Xpan Alternative
Comment posted: 24/12/2018
Ethan Moses on Panomicron Oxygen review – A 3D Printed Hasselblad Xpan Alternative
Comment posted: 24/12/2018
Comment posted: 24/12/2018
CalStewart on Panomicron Oxygen review – A 3D Printed Hasselblad Xpan Alternative
Comment posted: 25/12/2018
Also - this is a sweet post, too. I am particularly heartened that there are continued and evolving efforts to have an XPAN replacement emerge. I made reference in my contribution on the XPAN that it is a very electronic camera that will likely slowly disappear due to failing electronics or an absence of spare parts. That there is another option is cool. I wonder if it could be modified to accept the xpan lenses?
Thanks as usual for anohter great and interesting read.
Comment posted: 25/12/2018
Nick Lyle on Panomicron Oxygen review – A 3D Printed Hasselblad Xpan Alternative
Comment posted: 25/12/2018
Comment posted: 25/12/2018
Requin on Panomicron Oxygen review – A 3D Printed Hasselblad Xpan Alternative
Comment posted: 25/12/2018
Comment posted: 25/12/2018
Miika on Panomicron Oxygen review – A 3D Printed Hasselblad Xpan Alternative
Comment posted: 25/12/2018
Kate on Panomicron Oxygen review – A 3D Printed Hasselblad Xpan Alternative
Comment posted: 25/12/2018
Dave on Panomicron Oxygen review – A 3D Printed Hasselblad Xpan Alternative
Comment posted: 19/05/2019
My latest project is a 3d printed 120 panoramic camera. Six exposures 6x14 in size and it has a 90mm lens on it. Going to make a version 2 soon.
Comment posted: 19/05/2019
Dave on Panomicron Oxygen review – A 3D Printed Hasselblad Xpan Alternative
Comment posted: 19/05/2019
https://www.flickr.com/photos/davidcampbellphotography/
Ron Peters on Panomicron Oxygen review – A 3D Printed Hasselblad Xpan Alternative
Comment posted: 27/03/2020