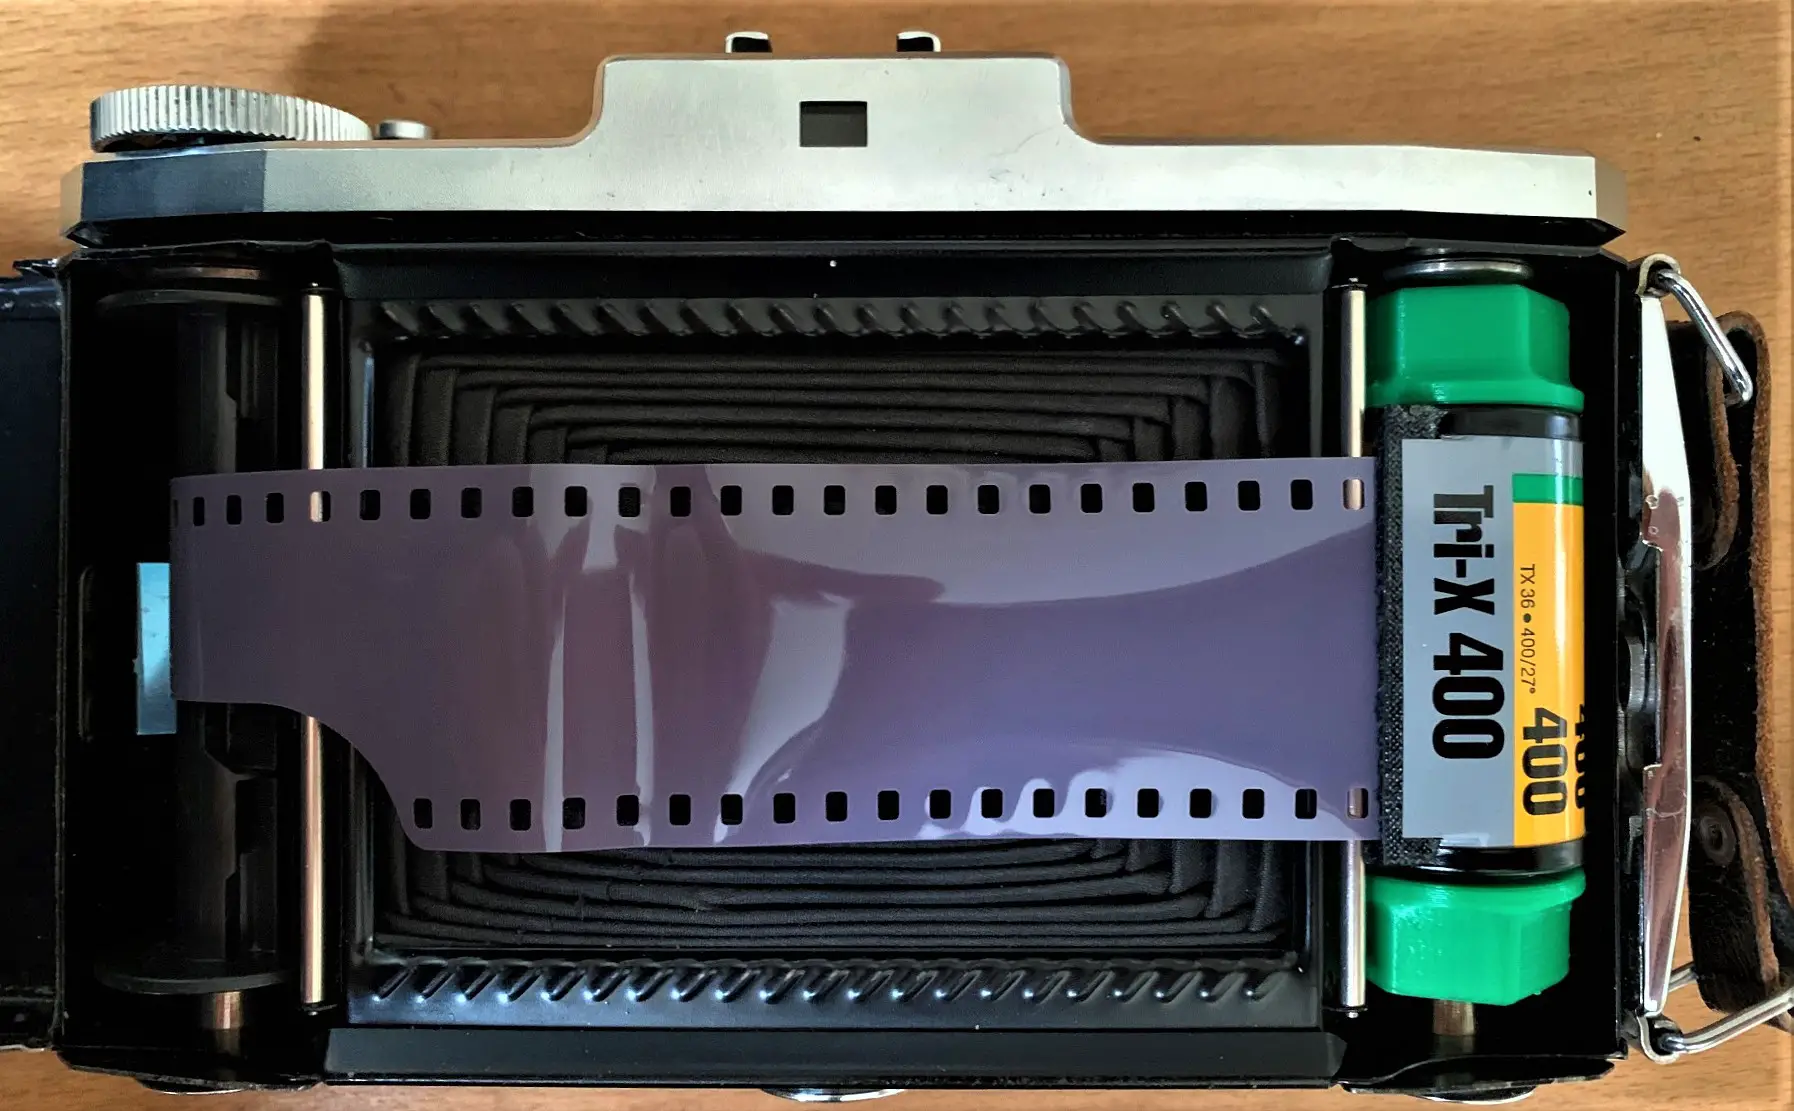
As a relatively new amateur photographer, I settled quite quickly into a default process. I have a favourite film in a preferred format that I develop with my process of choice. However, when someone sent me three rolls of expired Kodak Tri-X 400, I figured that I might as well experiment with them.
I have a Zeiss Ikon Nettar 518/2 folding camera which takes great big 6×9 negatives. I had already acquired some 35mm adapters for it in the past, but I only ever used them once or twice with mixed results. This seemed like a good opportunity to really get this sprocket panorama thing down. I might mess up the first roll, do a little better with the second, and hopefully really nail it with the third.
The First Film
It turns out that I messed up the first roll in several ways. To start with, I hadn’t attached the film to the take-up spool properly. I only figured this out when I had taken what I thought were rather more pictures than would fit on a single roll of film, but it just kept advancing without running out. Luckily, this meant that no film was wasted. I had just spent an evening walking around town with nothing to show for it, but at least I was outside.
I repeated the exercise the next day, after loading the film again. This time it all seemed to work. Because 35mm doesn’t have any backing paper, I couldn’t use the little door on the back of the camera to make sure I correctly advanced to the next frame. But I remembered that it was about five turns of the film advance wheel to get to the next shot. I managed to find six interesting scenes to shoot and went home to develop.
I mentioned before that the film was expired, but the cannisters didn’t have any date on them. So I thought I would play it safe and overexpose by one stop, which should be fine with this film regardless. Then I used stand-development in Rodinal to get the most out of the film’s latitude. There’s a lot of scepticism about stand development, but I have used this process dozens of times on Ilford’s Delta Pro films. Always with good results, and never a sign of streaking or drag.
It turns out that isn’t the case for Tri-X. And it also turns out that my frame spacing was rather large: five turns should have been five half turns.

The Second Film
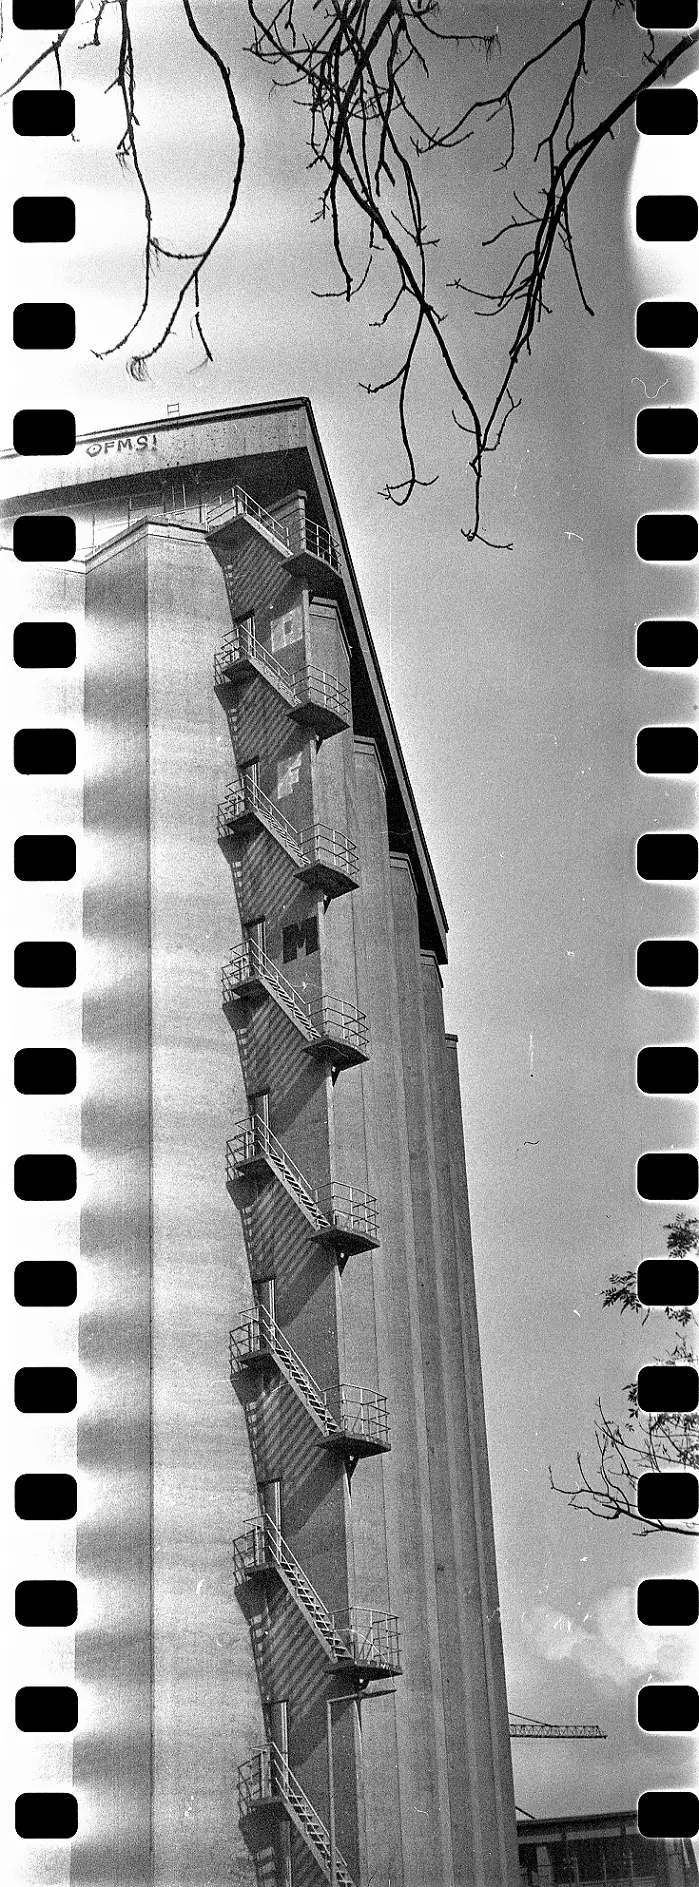
I took the lessons to heart, and managed to take twelve new pictures, which I developed in Ilford’s DD-X, the only other developer I had available. They came out great, although slightly dense, and extremely curly. Scanning them was difficult, but I was quite pleased.
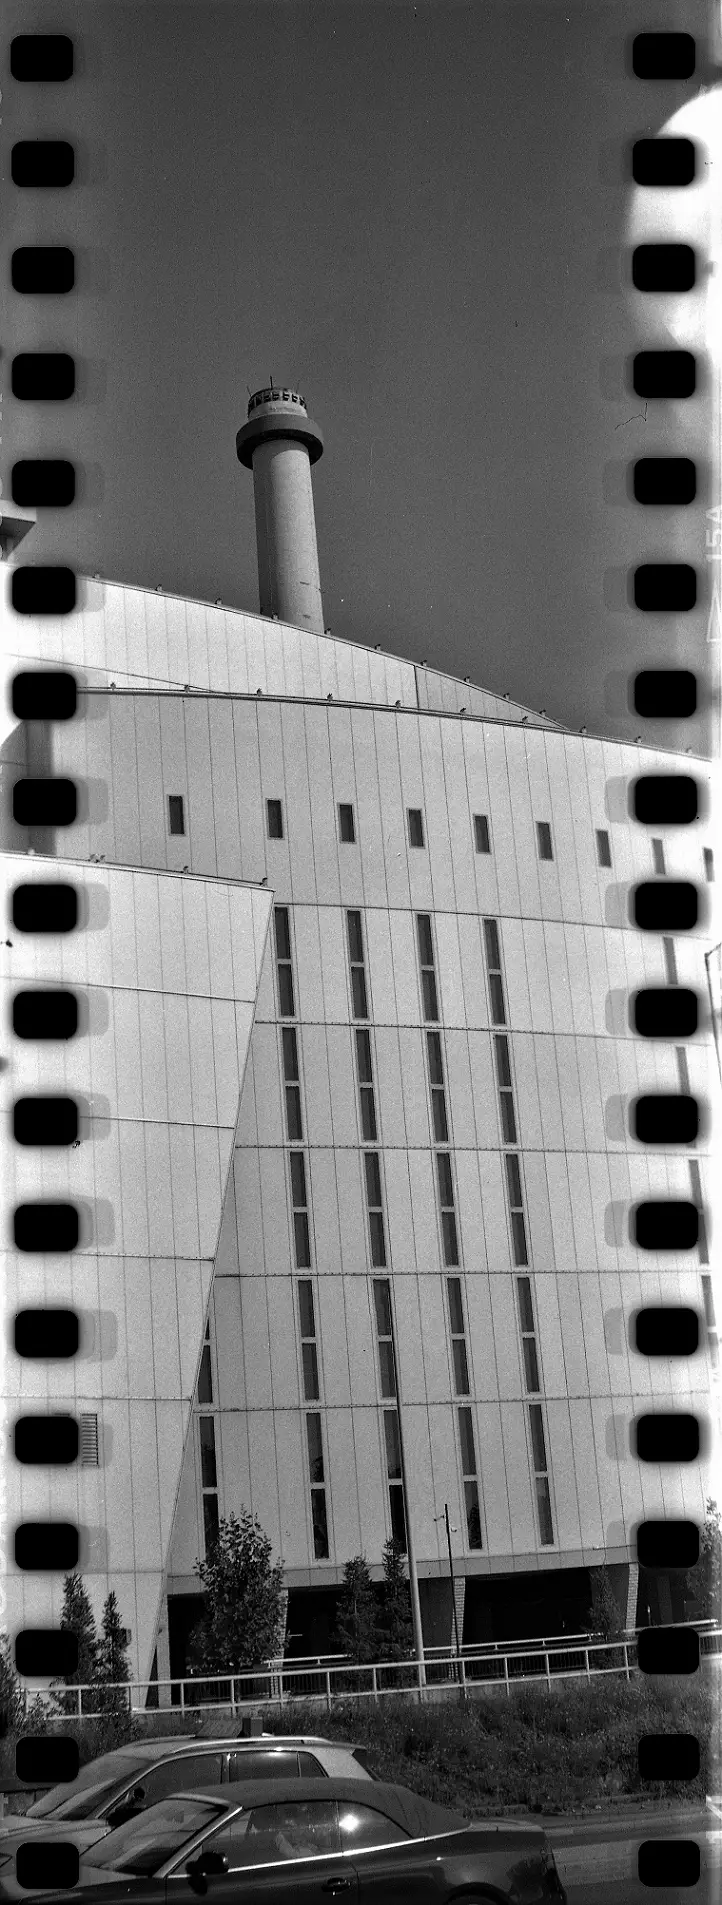
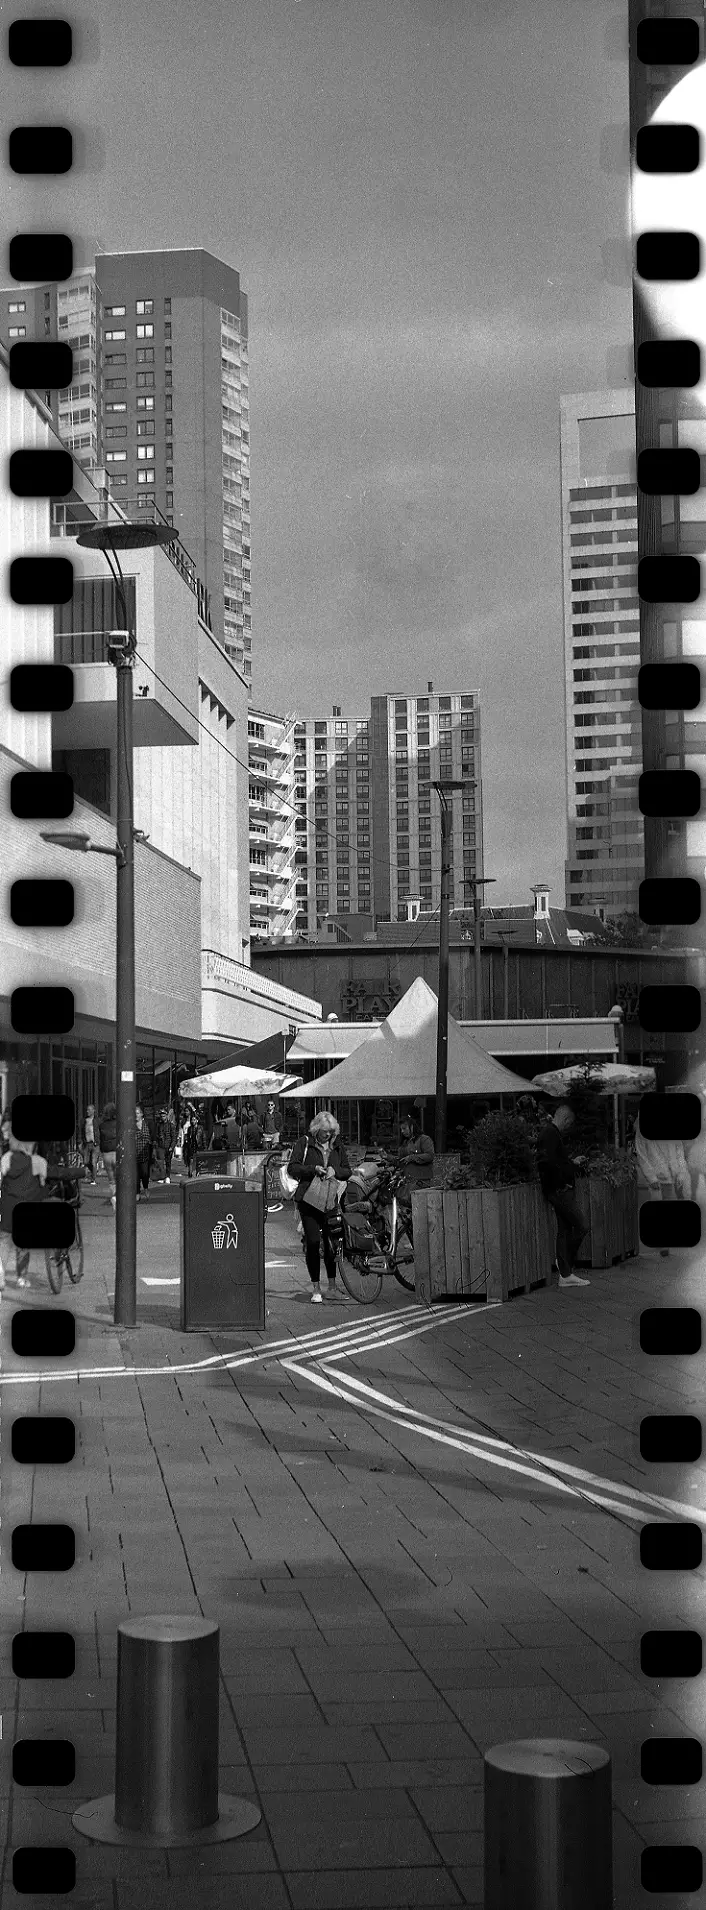
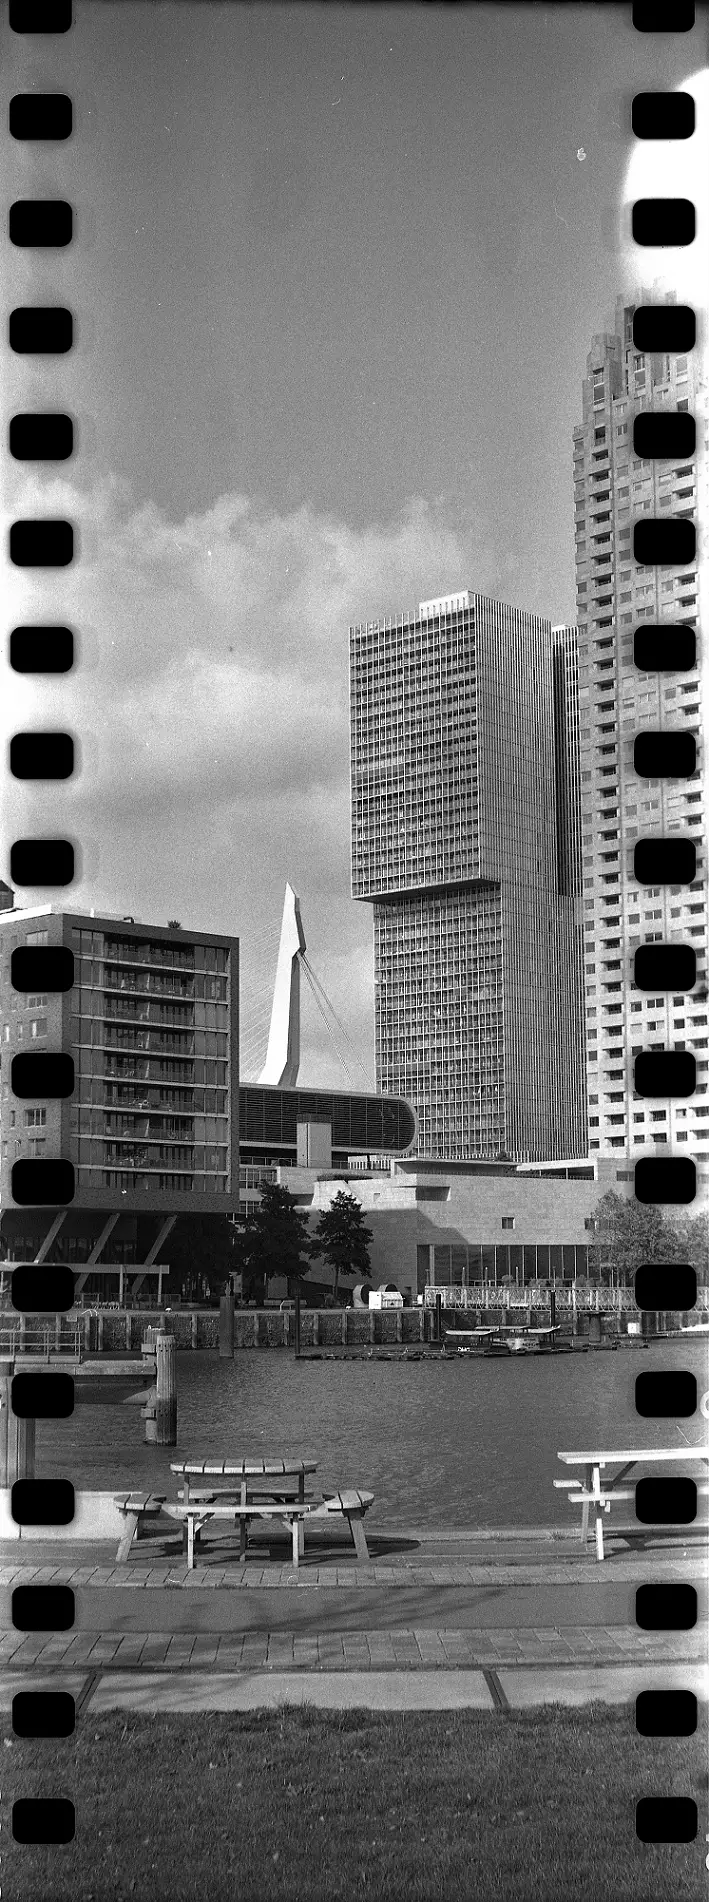
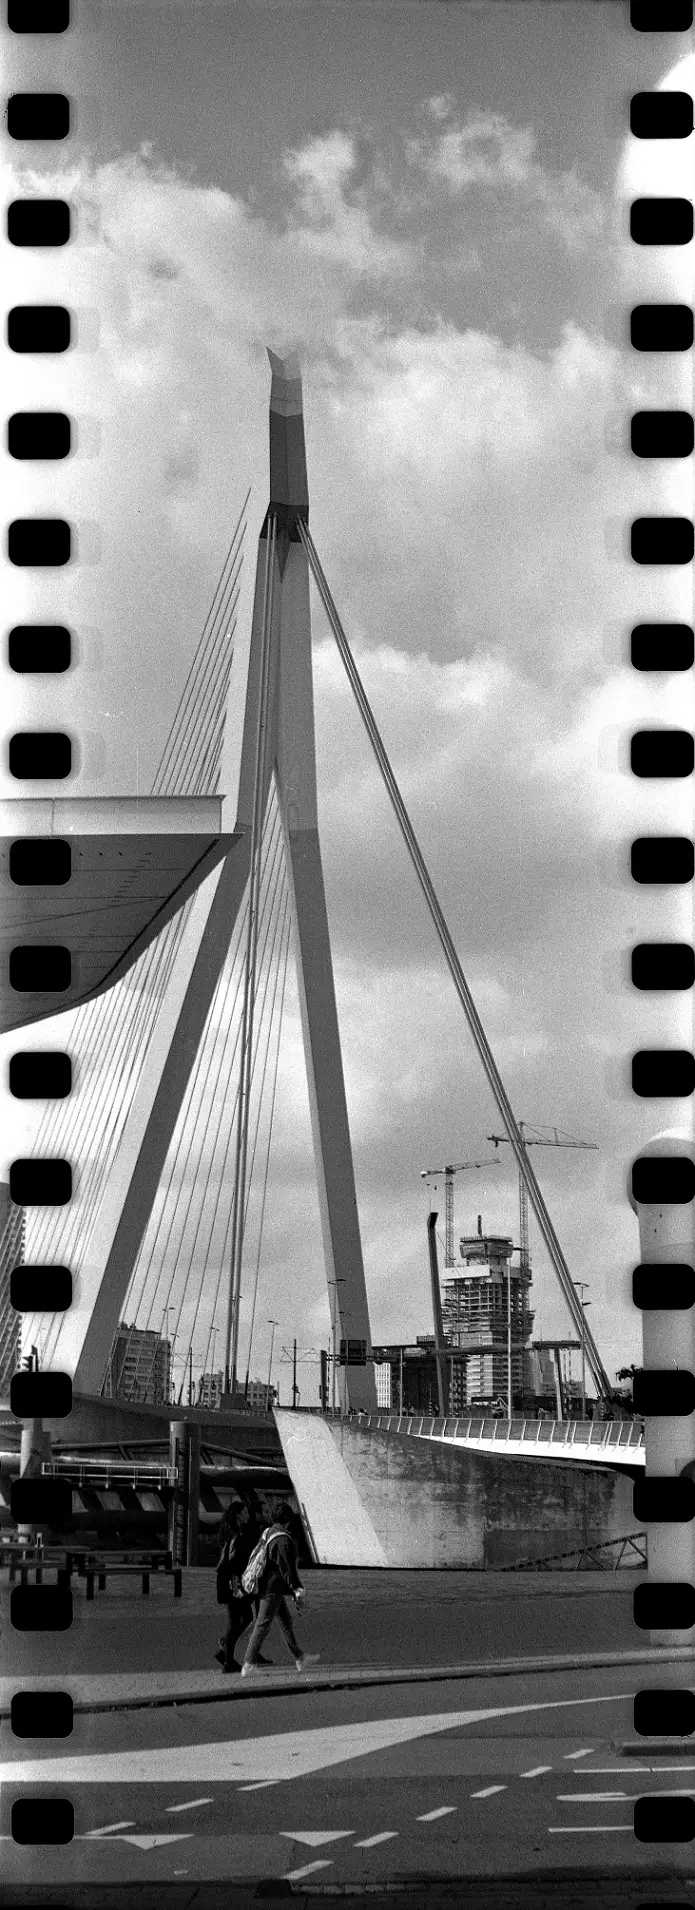
There were still some problems. My vertical pictures were leaning left. Either because I was using the viewfinder wrong, or because the film wasn’t running straight through the camera. There is some ghosting around the sprocket holes. And there is a light leak in the corner, probably because the light reflects from the frame counter window inside the camera. 35mm Film has no backing paper to stop this from happening. Unfortunately, I didn’t manage to eliminate these problems even with the third film.
The Third Film
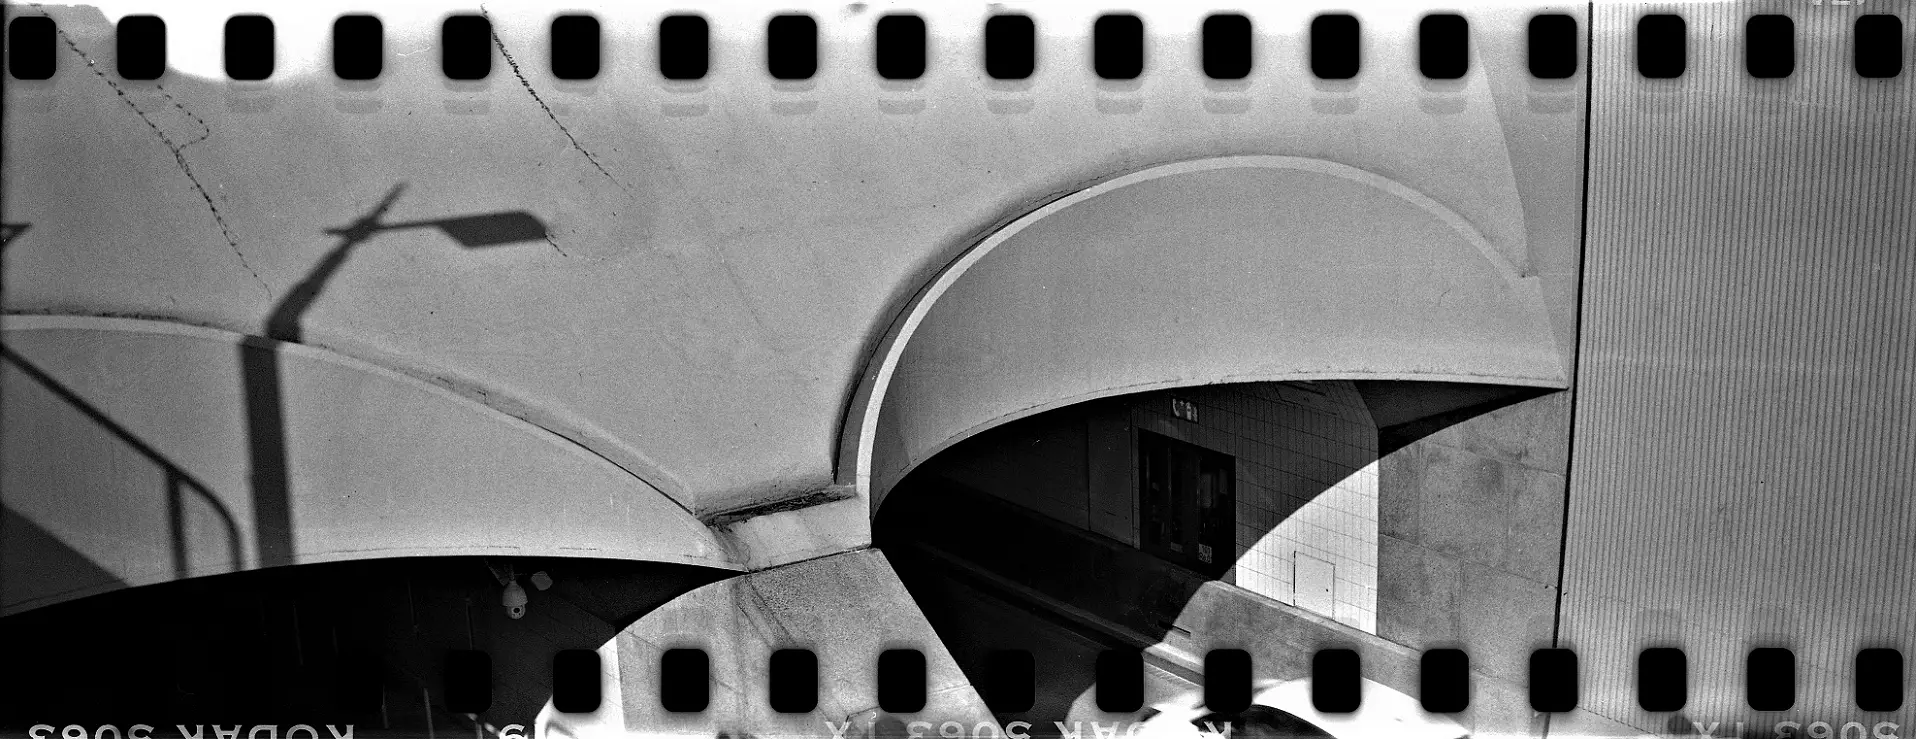
For the third film, I felt confident enough to do some double exposures. The Nettar doesn’t really allow for this, because the shutter is blocked until you turn the frame advance wheel. I figured that with a single turn, the frames would overlap enough for an interesting result.
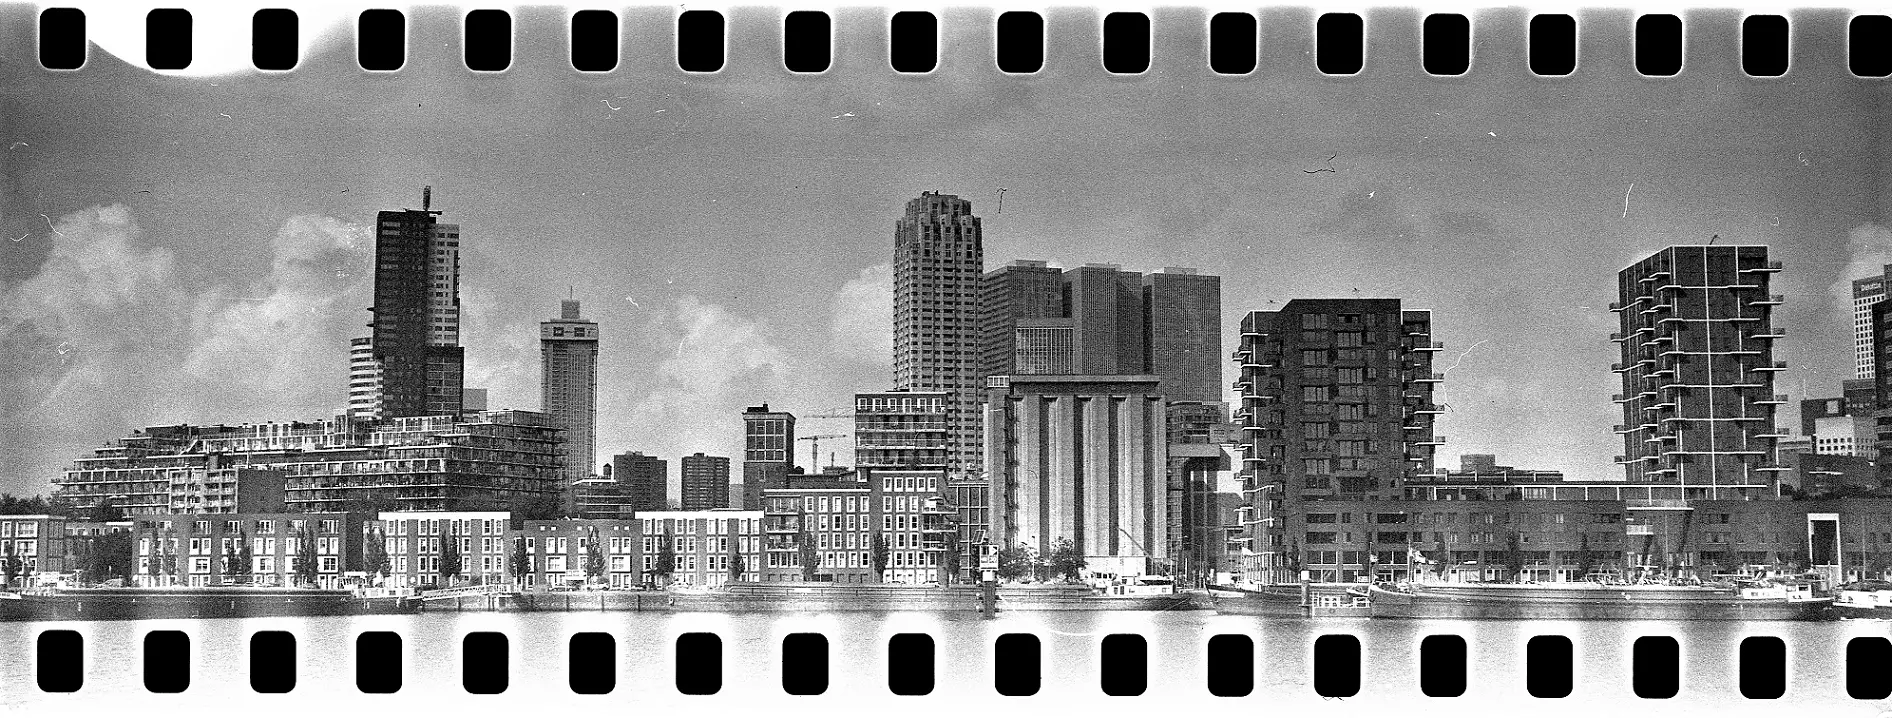
None of these double exposures really came out well. Most of that is because I just failed to make interesting compositions or to think about shadows and highlights. But I was quite happy with the regular shots. I’m a city boy, and I already take most of my photos in a vertical format. It was a lot of fun to take that to an extreme, and make these vertical panoramas. Of course, panoramas allow you show beautiful wide vistas. But it also allows you to focus on vertical lines without a lot of context to distract from it. And Rotterdam is a city with plenty of verticality. I normally shoot half-frame cameras (my ‘preferred format’) and whenever I’m holding a regular 35mm camera, I am almost always holding it sideways. Even with these panoramas, it felt like the natural thing to do.
I hope you enjoyed seeing these frames from these three gifted rolls of Tri-X. It has been one of the first times that I went out to shoot multiple rolls of film with a single goal in mind, so I think this could be considered my first project. It’s great to be able to share them here.
Thanks for reading
You can find me on Instagram
Share this post:


Comments
Bob Janes on An Experiment with Sprocket-Hole Panoramas – By Joris Koolen
Comment posted: 28/10/2021
I also find Tri-X to be rather 'curly' - I tend to use Agfaphoto APX 400 or Kentmere 400 (reputedly the same film in different packaging) as it is cheap, quite decent and dries very flat.
I've tried 35mm in various 120 cameras, including an old AgIFold and a Rolleiflex, but my best results were in a Nettar. If you pass the film stock from one 35mm cassette to another (with both held in place by converters) you can get the film a little straighter, but you do need strong adapters on the winding side. I blocked up the red window with Blu-tak and put a bit of 120 backing over the pressure plate on the inside.
Rodinal on stand generally works well for me - at 1:50 I'm usually leaving it for something like 70-90 minutes.
Comment posted: 28/10/2021
Bob Janes on An Experiment with Sprocket-Hole Panoramas – By Joris Koolen
Comment posted: 28/10/2021
For stand development, 1:100 should be OK, but might need as much as 180 minutes from my app (I think we are almost in the realms of tidal rather than Brownian motion by that point). I tend not to do any agitation, which I get away with at 70-90 minutes, but I know some people do give the tank a shake every hour.
As far as the film not being straight, the other tactic to trying to keep it really straight is to glory in the wonkiness of it - even to the extent of deliberately holding the camera askew...
Jalan Lee on An Experiment with Sprocket-Hole Panoramas – By Joris Koolen
Comment posted: 28/10/2021
My Bronica ETRS had horrible light leaks when I tried 35mm with spacers to hold the canister. So switched to "loading" the film onto a used backing paper. Tape the leader at the correct spot and load it in the dark. I have a piece of tape at the correct end spot so I can feel where to cut the film. I do leave the end loose so it can roll up tight on the spool. There is enough on a 36 exposure roll to load two 120 backing papers. Works pretty well.
Comment posted: 28/10/2021
Mark on An Experiment with Sprocket-Hole Panoramas – By Joris Koolen
Comment posted: 28/10/2021
Those of us with 110 film cameras also put 1-2 layers of painter’s masking tape (I like the blue) over the counter viewer as some of the films are very sensitive that bit of light.
Good show
Comment posted: 28/10/2021
Don Goodman-Wilson on An Experiment with Sprocket-Hole Panoramas – By Joris Koolen
Comment posted: 28/10/2021
Comment posted: 28/10/2021
Peggy on An Experiment with Sprocket-Hole Panoramas – By Joris Koolen
Comment posted: 28/10/2021
Comment posted: 28/10/2021
Bob Janes on An Experiment with Sprocket-Hole Panoramas – By Joris Koolen
Comment posted: 29/10/2021
J on An Experiment with Sprocket-Hole Panoramas – By Joris Koolen
Comment posted: 29/10/2021
Frankly, I think your results with the 35mm asdapter spools are very credible and with a further venture with this modification your images can be up there with the best and with an investment that is very inexpensive. Cropping out the sprocket holes will give you results tghat are very comparable to the Widelux and possibly equal to the highly vaunted Hasselblad/ Fuji X-Pan. Who knows?
Anyway, excellent article and admirable results.
Comment posted: 29/10/2021
Holly Gilman on An Experiment with Sprocket-Hole Panoramas – By Joris Koolen
Comment posted: 09/11/2021
Comment posted: 09/11/2021