Sirui is a Chinese company founded in 2001, who make a range of photography and video accessories including anamorphic and cine lenses, tripods and stabilisers. They also produce lighting equipment, and this – as you may know if you’ve read my articles about flash photography – is something I’m very interested in.
Accordingly, when Sirui contacted us to ask if we would like to review two of their recent lighting products – the T120 telescopic light and the B25R bendable light – I was excited to try them out. This article is about the lightsaber-like T120 telescopic light. I’ve also included a brief introduction to RGB LED lights, for readers who are new to such lights (or to continuous lighting in general). My review of the B25R bendable light will appear next week.
Disclosure
Sirui kindly sent us the lights for review purposes. In my articles, I obviously try to be honest and objective, and in any case, I’m sure you’re intelligent enough to form your own opinions based on the facts and image samples provided.
Should you wish to purchase the T120 telescopic light, Sirui have also offered a 10% discount for 35mmc readers. To avail of this discount, please use this link, along with the discount code 35T120. Neither I nor 35mmc will earn a commission from such purchases; the benefit is entirely yours.
As noted in the next section, LED lights are particularly useful for video. But I am not a videographer, so this article will focus on photography applications. (There are YouTube reviews which focus more on video, if that’s something you’re interested in.)
Most of the photos in this article were shot with a Fujifilm X-E4. Some of the BTS photos were shot on my phone.
With all that out of the way, let’s get down to the review!
Introducing the T120
The full name of the product is the Sirui T120 Telescopic RGB LED Light. That’s a whole string of numbers and abbreviations, so let’s break it down.
The “T” in T120 stands for telescopic, and the “120” refers to its length: 120cm when fully extended.
RGB stands for Red, Blue and Green. In addition to these three primary colours, the lights can also produce a vast range of other colours simply by mixing red, blue and green in different proportions. This gives you a great deal of flexibility in your lighting, to create and fine-tune the look and feel you want. RGB lights are thus more flexible than single-colour or bi-colour LED lights (the latter typically allow you to control the colour temperature only, from cool to warm).
LED, of course, stands for light emitting diode. Photographers who work with artificial light have long differentiated between continuous light (which is always on) and flash (which is instantaneous). Each has its pros and cons. Flash setups tend to be much smaller and lighter. You get more power, typically at a lower cost. On the flip side, flash is instantaneous, which can make it harder to visualise. For the same reason, metering and exposure are also trickier with flash. And of course, if you’re making video content, flash does not work at all – continuous light is the way to go.
Traditionally, photographers who worked with continuous illumination preferred tungsten or halogen lights, but with recent advances in technology, they have mostly been superseded by LEDs. LEDs consume less far energy and have more environmentally-friendly components. Unlike tungsten or halogen lights which heat up with use, making the studio potentially less comfortable for both photographers and models, LEDs “run cold”. The colour and intensity of LED lights are easier to control – with the press of a button or even with a mobile app, as opposed physically inserting and replacing colour gels (which could melt under the halogen heat).
The downside? While incandescent and halogen bulbs have a “perfect” CRI (colour rendering index) of 100, LEDs tend to have a lower CRI. Even so, modern LEDs have high CRI ratings which – barring scientific or very specific use cases – should be good enough for almost anyone. The Sirui T120 LED, for example, has a near-perfect CRI of 97 (according to the Sirui website; I haven’t measured it myself).
Construction
LED lights typically come in the form of tubes or panels. The Sirui T120 is a tube light (Sirui also make panel lights such as the E30B). In terms of light characteristics, a tube is more like a strip box, while a panel is more like a small softbox.
There are many companies making LED lights, including Neewer, Godox and Nanlite (to name a few). The Sirui T120’s USP, as suggested in its name, is that it is telescopic. The light is 69cm long when folded, but extends to 114cm – nearly twice its length. This makes it easy to store, and to carry around for outdoor shoots. To extend the light, simply grip the top ring and pull firmly upwards. To collapse, push it back in again. The light can be switched on and off in both folded and extended state.
The outer shell of the Sirui T120 is made of plastic, but it appears to be good quality and pretty sturdy. I wouldn’t worry about carrying these lights in a rucksack, or being knocked around a bit in the studio.
Accessories and power supply
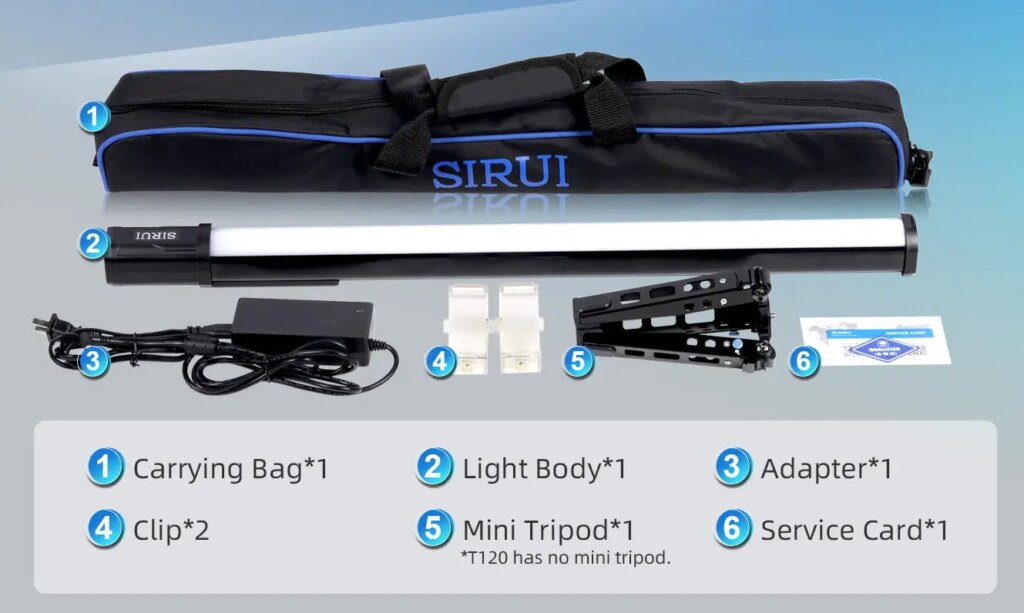
The Sirui T120 comes with a carrying bag, a power adapter/charger (20V/3A), and two plastic clips for attaching to stands. The Sirui T120 Pro comes with a mini tripod, which I have not used.
The lights have standard 1/4″ tripod sockets on either end, and as well as on each of the clips. The light can also stand upright on the floor, but it’s not super stable; a knock or a gust of wind might tip it over. Indoors, if you’re careful not to bump into it, it can stand on its own.
The lights also have a DMX interface (3.5mm ports) which allows up to 15 lights to be connected and remotely controlled, but I haven’t tried this feature myself.
The Sirui T120 has a built-in lithium battery which can last 2.5 hours on full charge. During a dance photoshoot, during breaks, I simply left the lights on as studio illumination. I could have plugged them in if I wanted – and in fact the lights can be used while charging – but they lasted the duration of the shoot with power to spare.
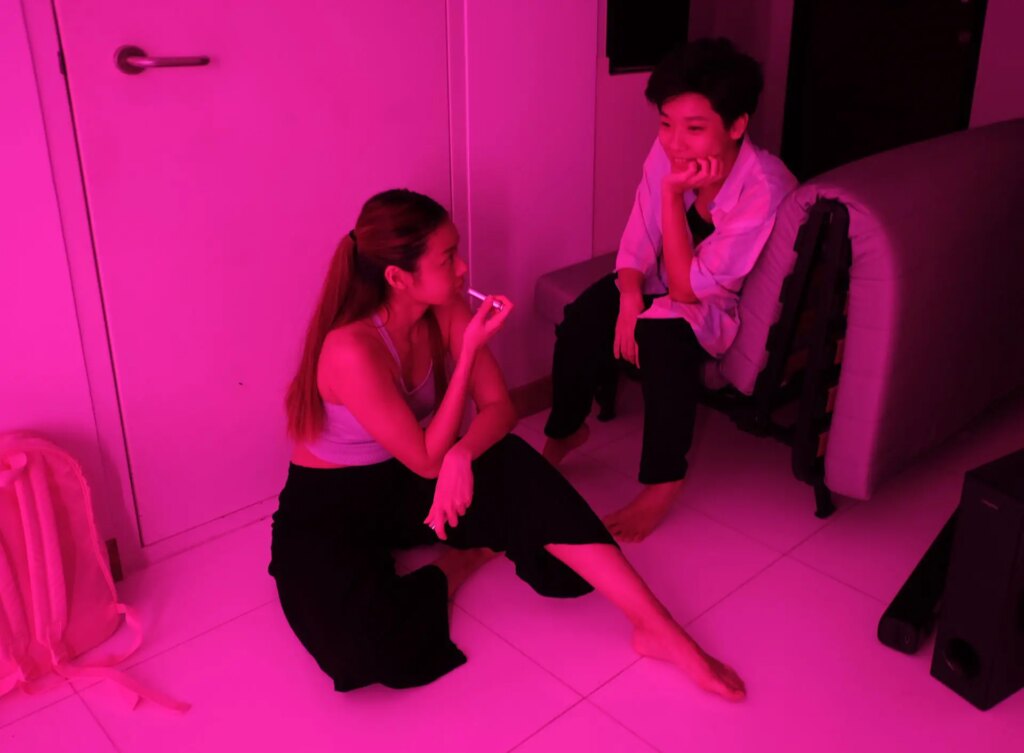
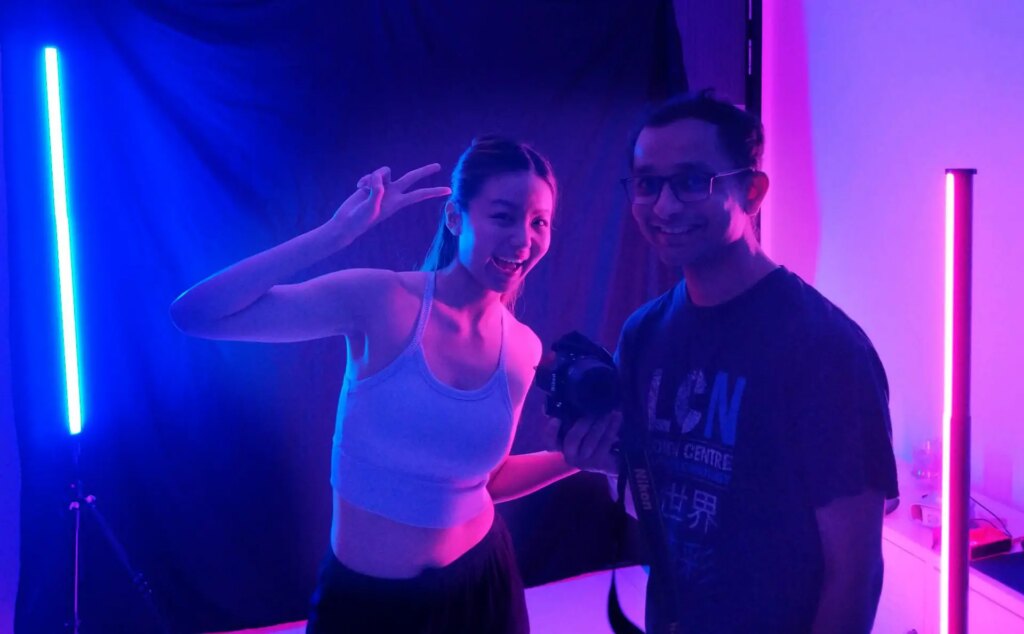
Ezekiel, who is a film photographer (and kindly posed for a shoot, see below), pointed out that the lights can probably also be used as safelights in the darkroom. My Gen-Z friend informs me that coloured room/party lights are also popular on TikTok (as a millennial, I’m out of this particular loop).
The lights don’t emit any noticeable heat which is helpful, especially in a studio. After an hour or so, they are slightly warm to the touch, but that’s about it.
Controls
Buttons
The controls are simple and intuitive. Other than the power switch, the Sirui T120 has just four buttons: Mode, Function, [+] and [−]. The Mode button cycles through five modes: CCT, HSI, RGB, FX and DMX. The Function, [+] and [−] buttons let you tweak the settings for each mode. The four modes (other than DMX, which as I mentioned, I have not tested) are as follows:
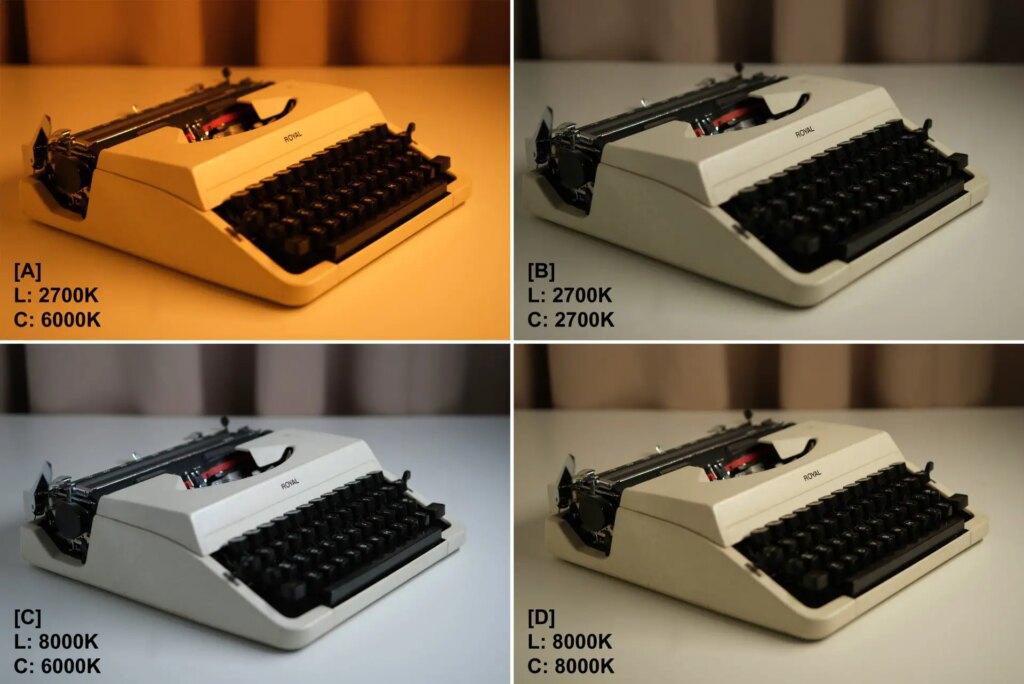
CCT (Correlated Color Temperature) controls the colour temperature. On the the Sirui T120, this ranges from 2700K (warm lighting) to 8000K (cool lighting). The intensity (brightness) can also be adjusted from 0–100%.
In the photos below, I tested the two extreme colour temperatures: 2700K and 8000K. The CCT of the light is denoted by L, and the camera white balance by C. In the left column (A and C), the camera white balance was set to 6000K (day white). As expected, A looks warm and C looks cold. In the right column (B and D), I matched the camera white balance to the CCT, producing a more natural look despite the extreme CCT settings.
HSI (Hue Saturation Intensity) mode lets you control the hue, e.g. 0° for red, 120° for green, 240° for blue, with other colours falling in between. Saturation and intensity can both be adjusted from 0–100%.
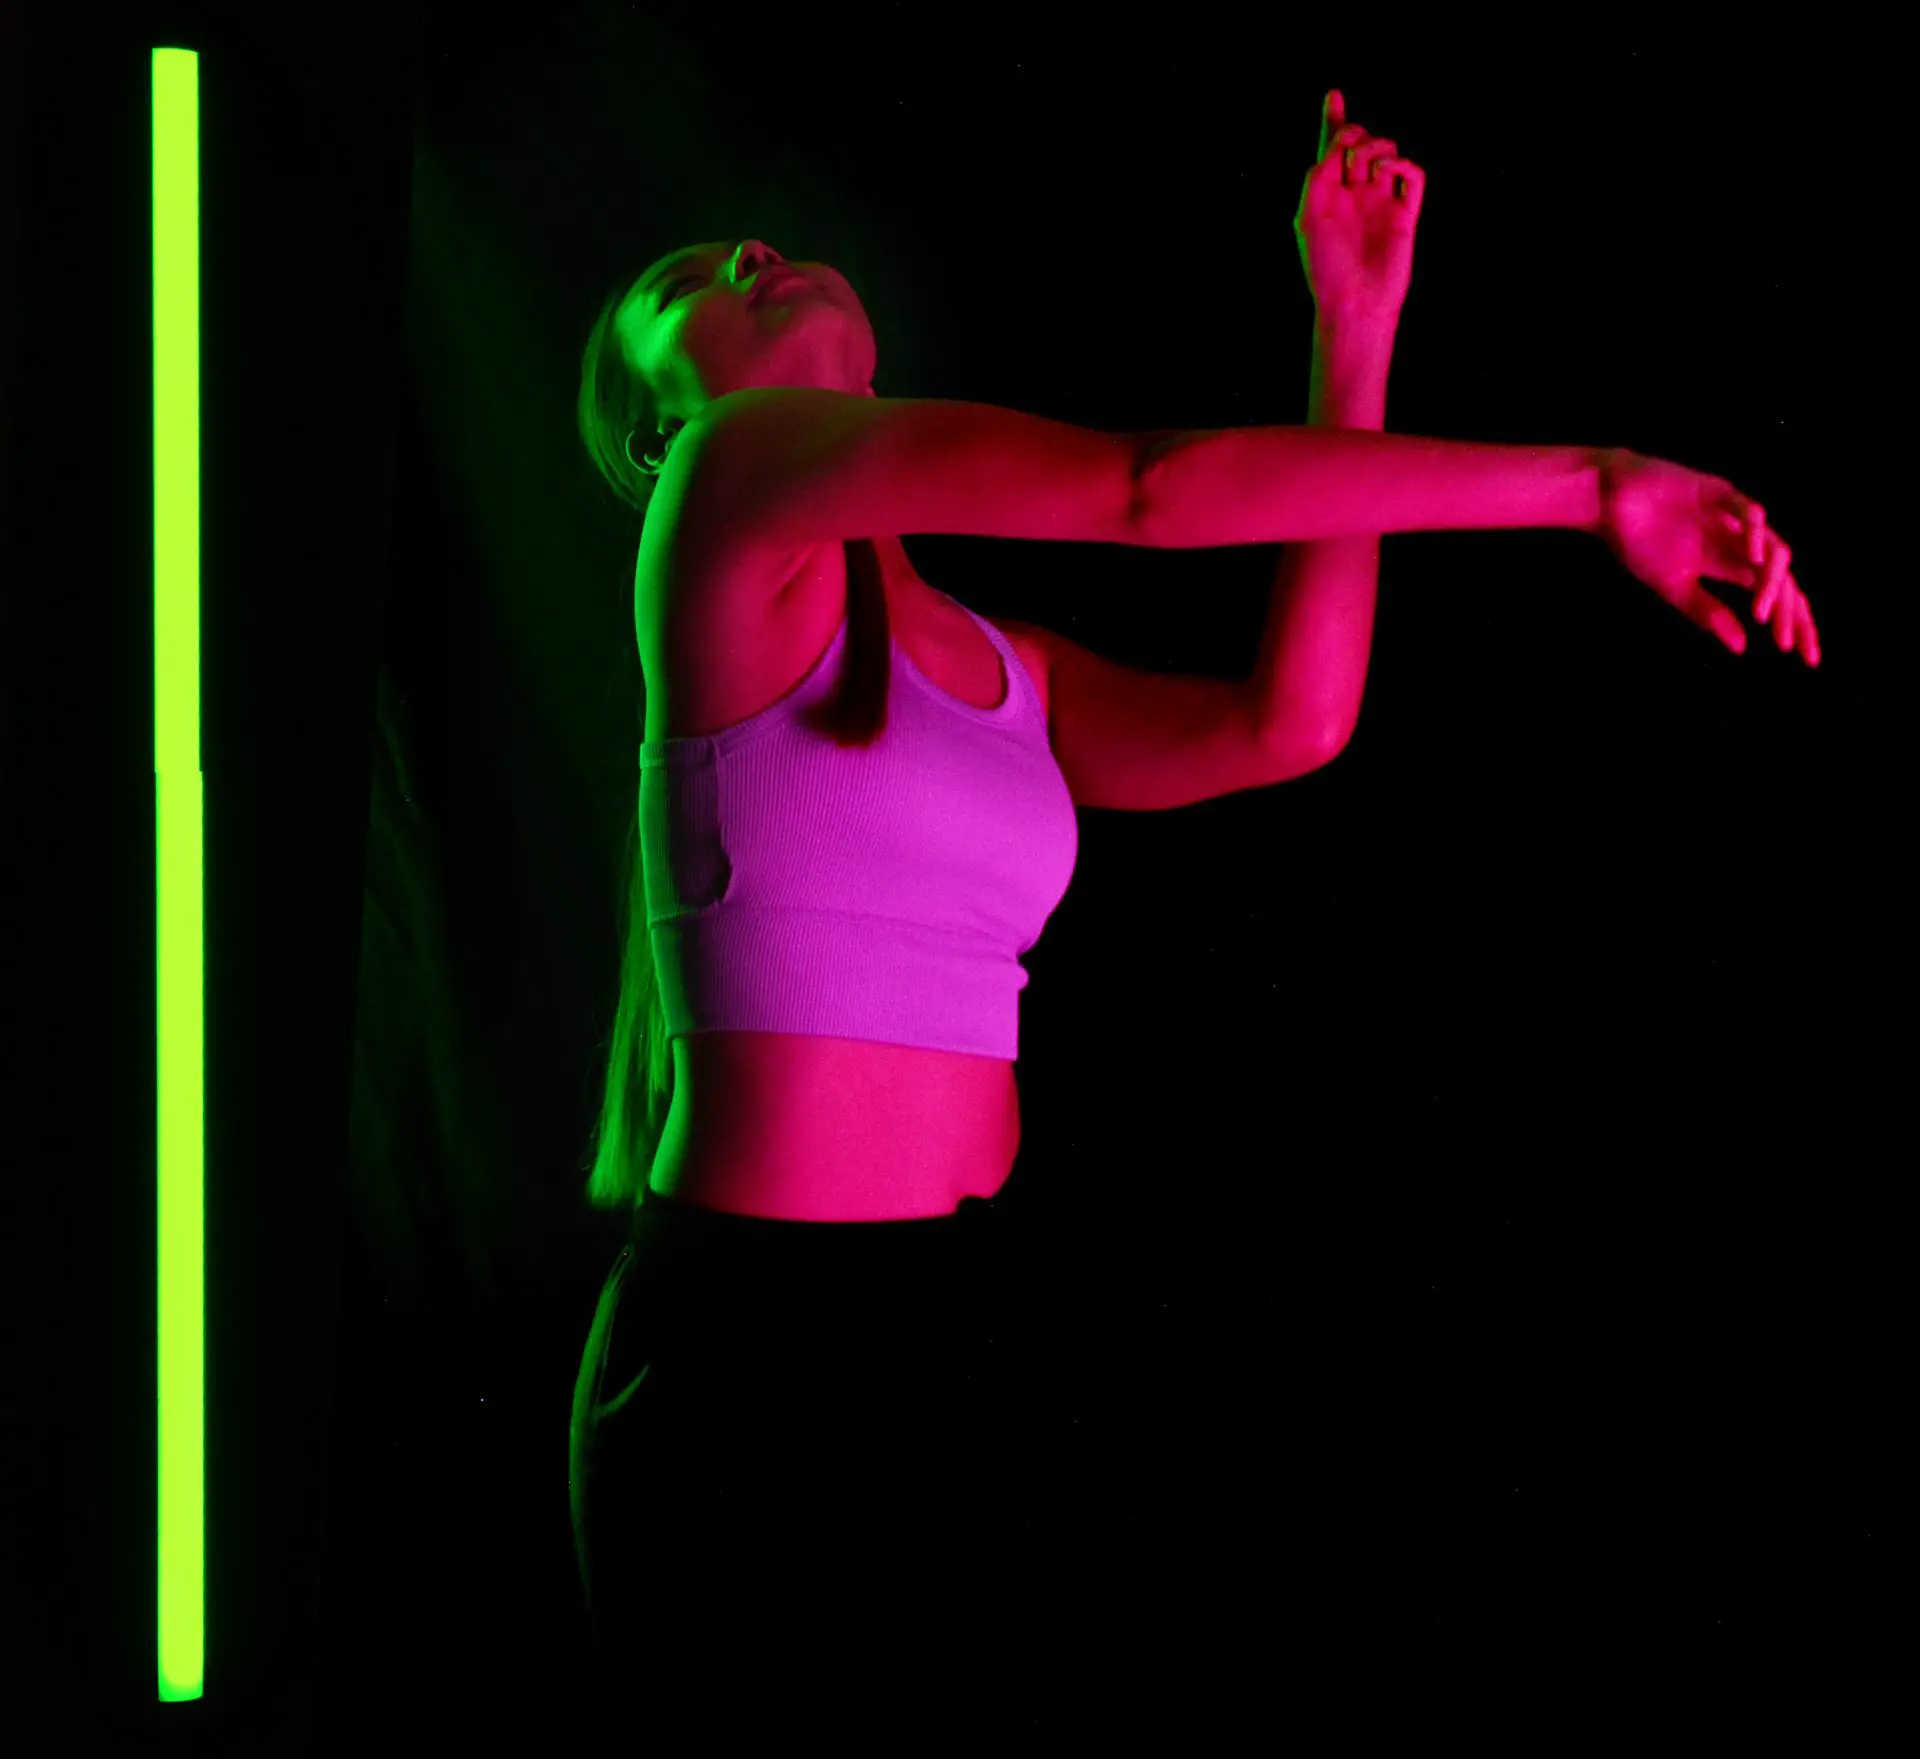
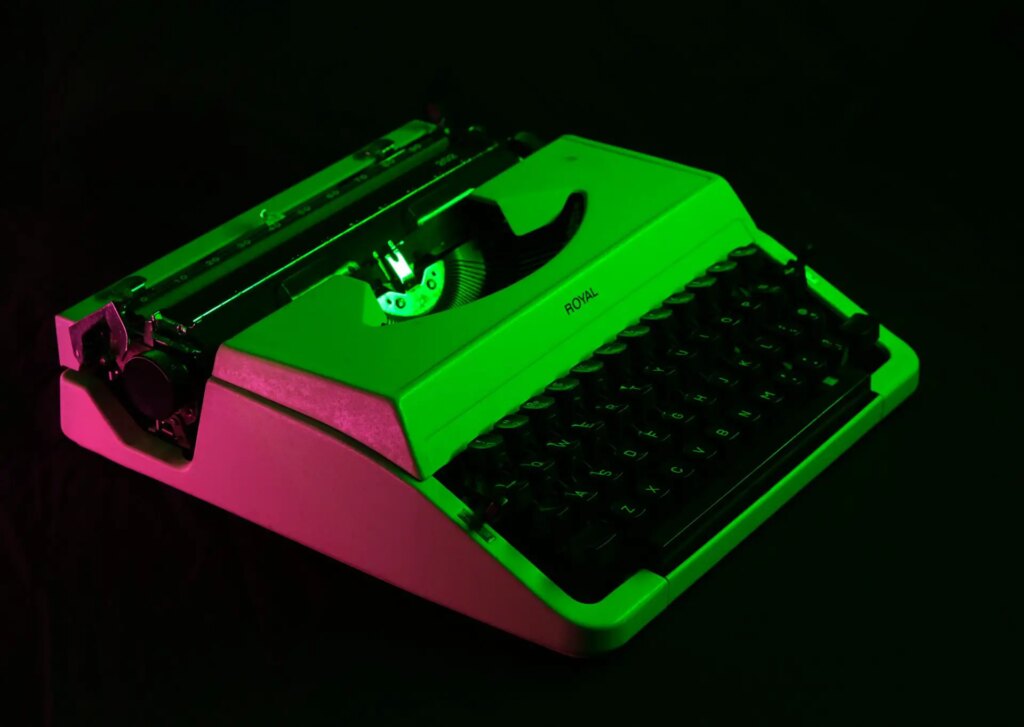
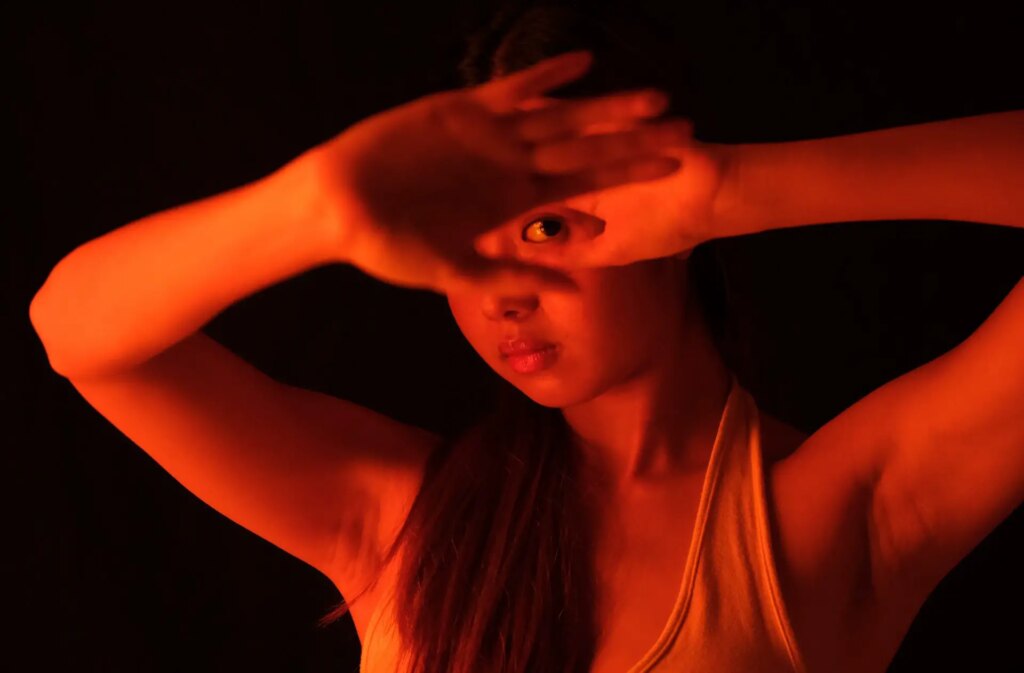
RGB mode adjusts the Red Green and Blue values separately, each ranging from 0 to 255. For example, 0-255-0 is pure green, and 255-0-255 is magenta (mix of red and blue) – these are the colours I used for the photo below. You can also control the intensity (e.g. 100-0-0 is a dimmer red than 255-0-0).
Finally, FX mode has various lighting effects such as disco, lightning, candle and ambulance – these are more useful for video than for still photography.
Even if you turn the light off and back on again, the interface “remembers” the mode which you last used, as well as the settings for each individual mode. For me, small details like this play in big role in enhancing the ease of use.
You can long-press the Mode button to turn Bluetooth on and off, and long-press the Function button to save specific light settings.
Minor quibbles
Overall, I think the Sirui T120 is a great piece of kit, but there are a few things I would probably change. First, it would be nice if Sirui had a downloadable instruction manual. While the controls are relatively intuitive, the long-press feature (see above) took me a while to discover, and in general, I think an instruction manual would help people get to grips with it more quickly.
Secondly, to change, say, the R value in RGB mode from 0 to 255 (max), you have to press and hold the [+] button for a good while as it changes in increments of 1. It would be handy if, after you press for 2 seconds or so, the value increased by increments of 10. But this is not a big deal because I was mostly using the app (see below).
Thirdly, also on the topic of buttons, [+] is on the left and [−] is on the right. This seems rather counter-intuitive (at least for those of us who read from left to right), and is different from how such buttons are placed on most devices.
Fourthly, when the Sirui T120 is off, there’s no charging indicator as far as I can see. For a device with a built-in battery, this seems like such an odd omission that I’m left wondering if I somehow just missed it. And finally, for those of us who are probably not going to purchase the add-on tripod, it would be nice if the base could be made slightly more stable.
Sirui Light mobile app
The Sirui T120 can also be controlled via Bluetooth with the free Sirui Light mobile app. The app is really good. I found it faster and more convenient than using the buttons on the body (and frankly it’s just fun to use). For example, you can use a colour wheel or sliders, which is much better than pressing buttons to tweak one parameter at a time.
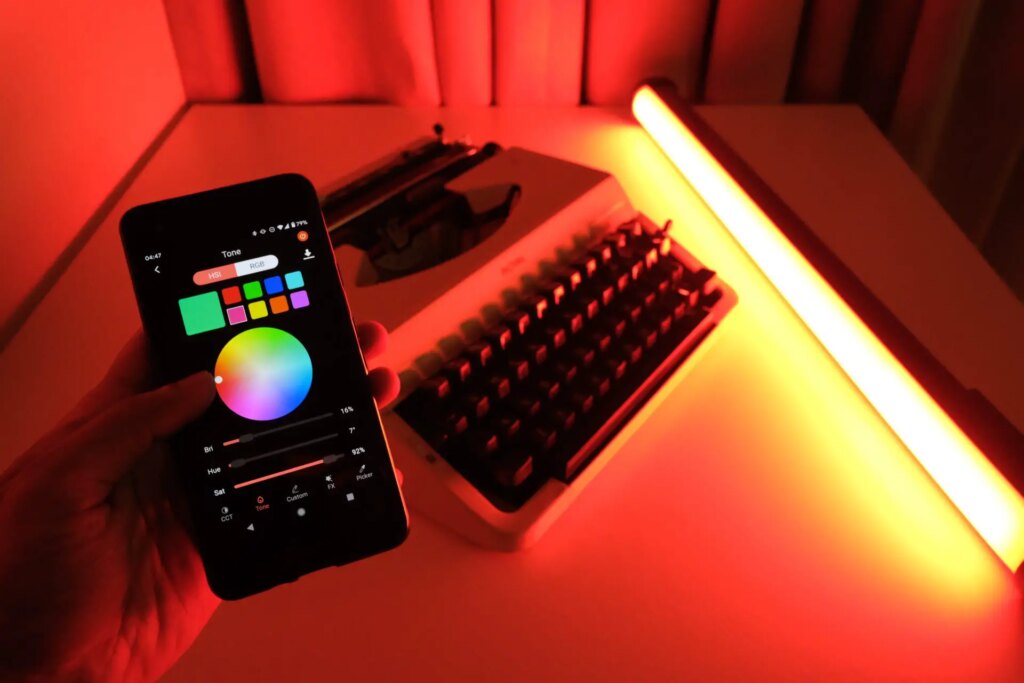
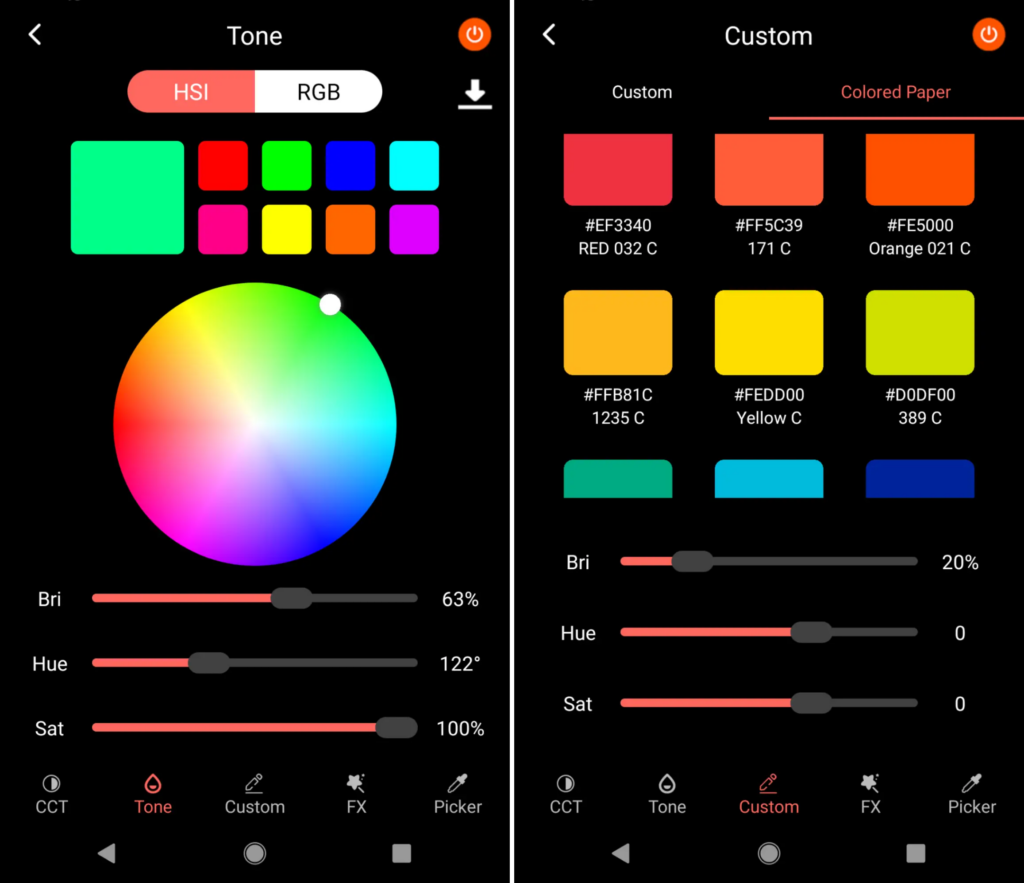
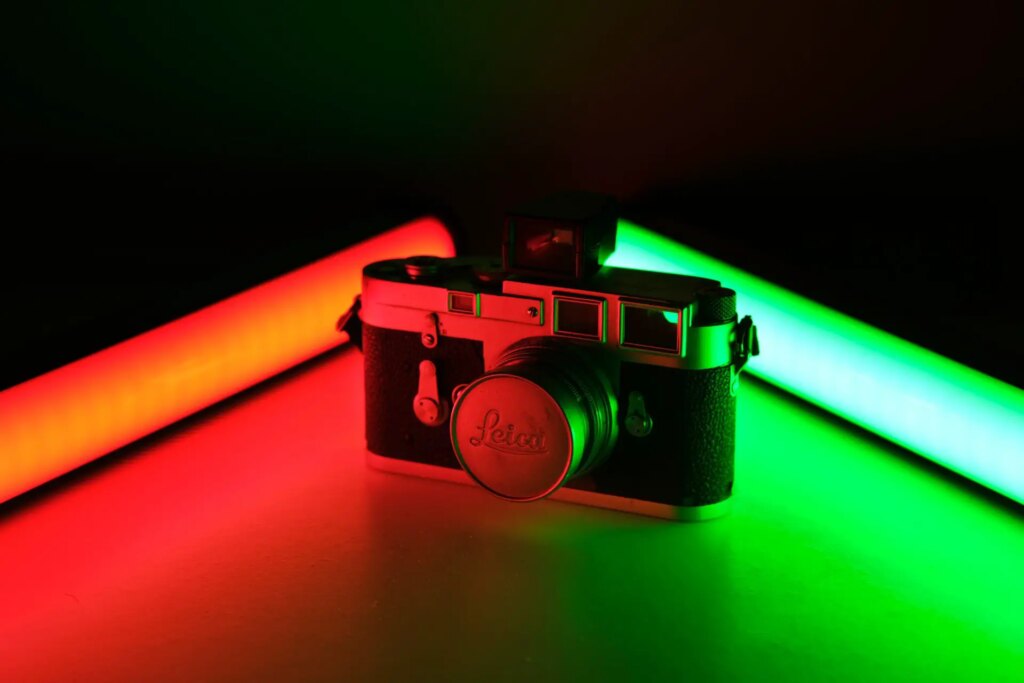
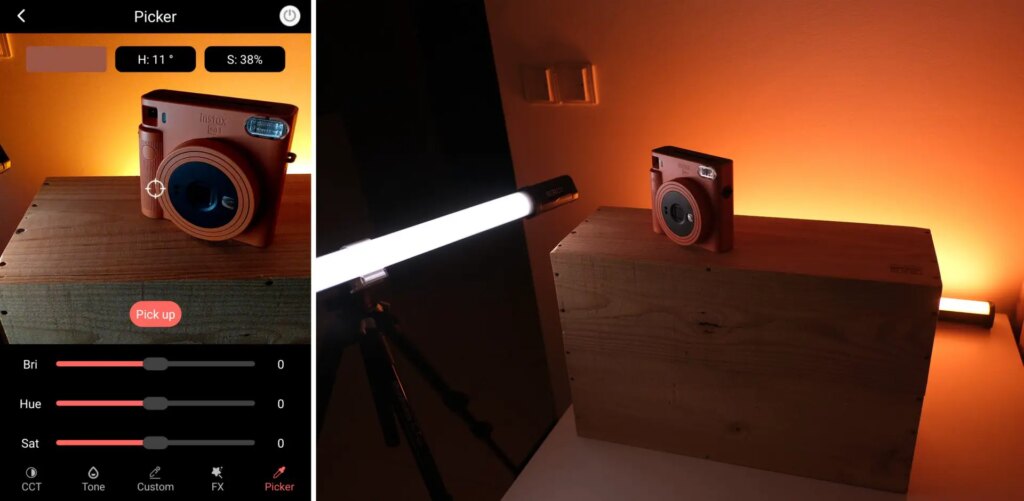
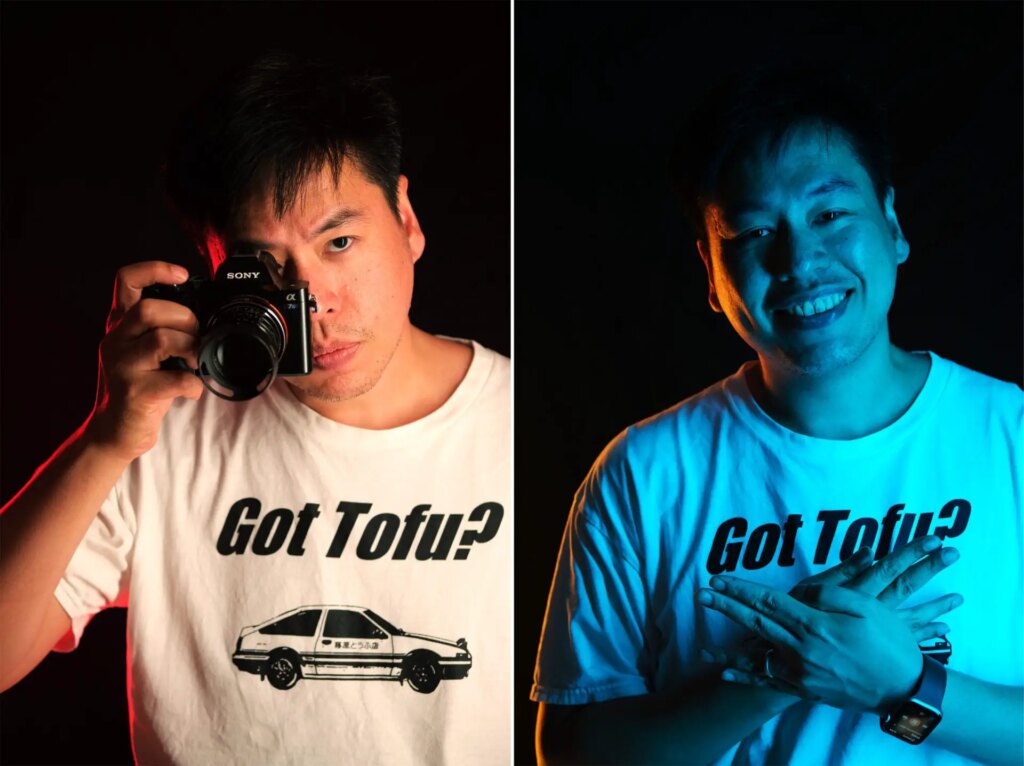
The coolest feature, for my money, is the colour picker. You can point your phone camera and “select” any object, and the Sirui T120 tries to replicate its colour. The sampling, in my experience, was surprisingly accurate. Besides being super fun, the colour picker is a handy tool if, say, you have a primary light whose colour can’t be controlled, and you want the Sirui T120 to match that colour. Likewise if you want your background light to match the subject’s outfit (or in this case, the colour of the camera).
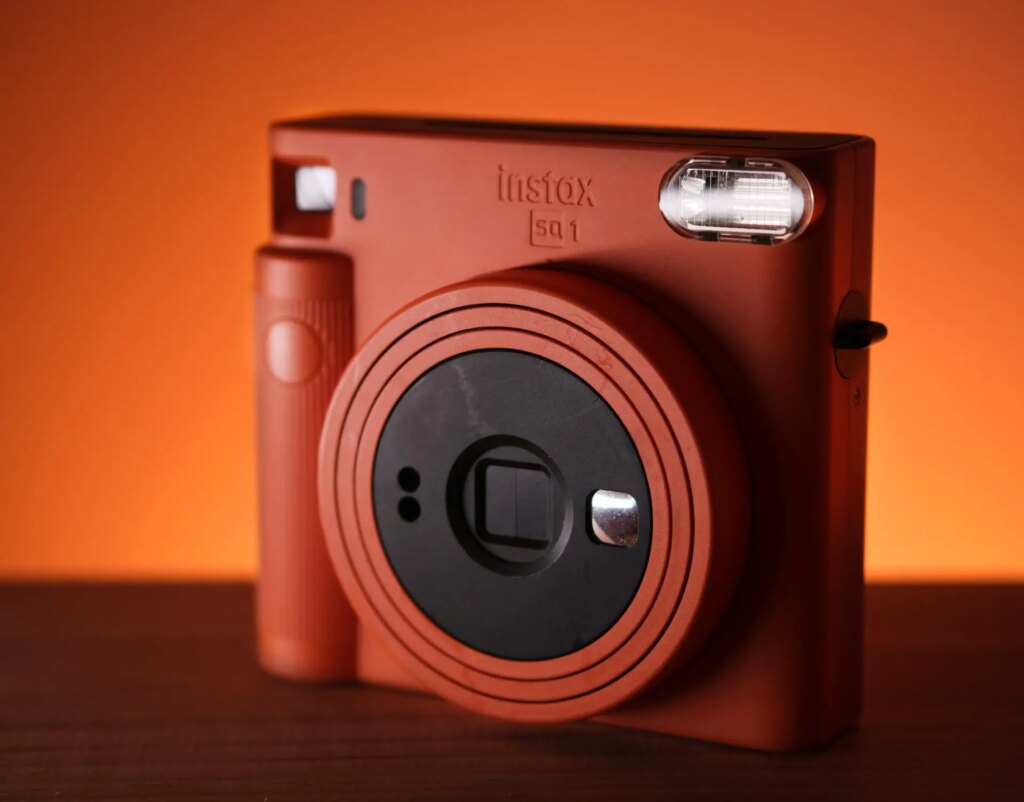
The images below show how I set up the shot above. On the left, the colour picker in action, and on the right, the lighting scheme – one Sirui T120, set to CCT 5000K, as the key light, and another, controlled with the colour picker, to illuminate the background.
One light or two?
In an ideal world, perhaps more is better, but in practice, we all have constraints of cost, space and weight. With one light, you can set a “safe” colour temperature (slightly warmer than daylight), place it in a three-quarter position, and voilà, you have a basic portrait setup. (I could have used a reflector to fill in the shadows, but I didn’t do that here.)
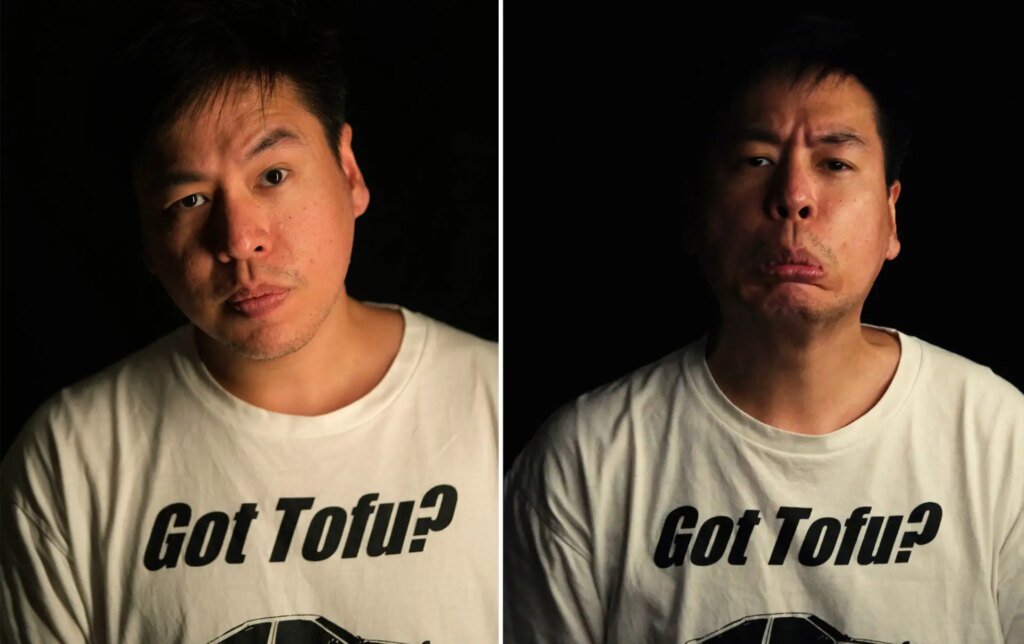
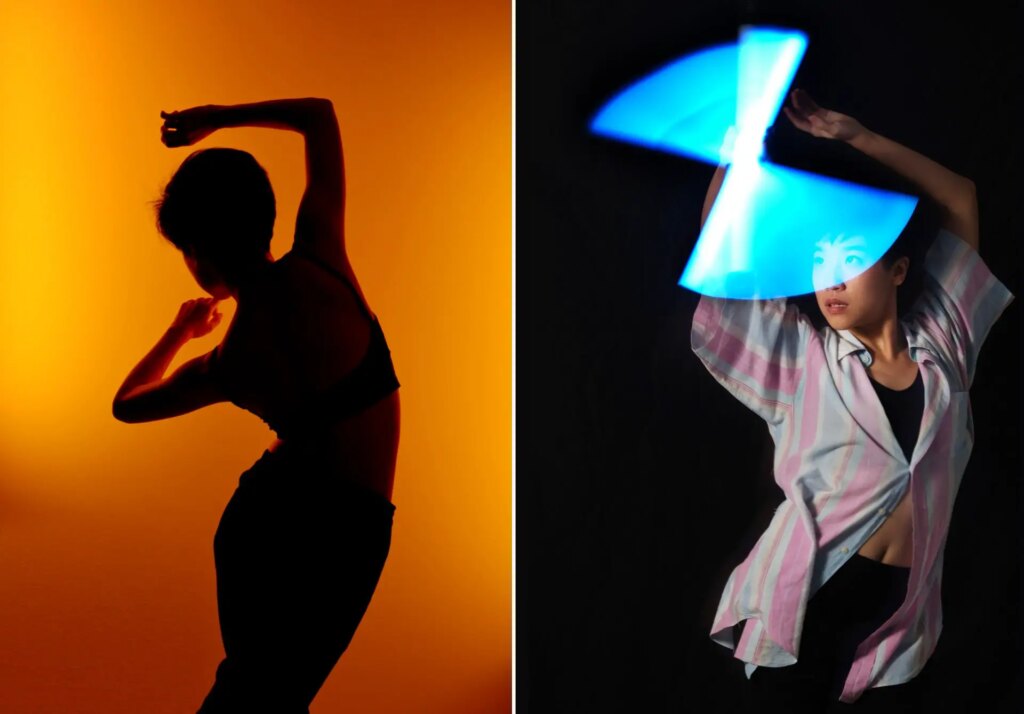
Or maybe you pick a funky colour (because why not), position the light more frontally for flatter illumination, and with the same Sirui T120, you get a very different look.
In vertical orientation, the light behaves more like a strip box. Horizontally, it wraps light around the subject. A second light opens up many more possibilities. For example, you can use one light as the key, and the second as a rim light.
You can place both lights behind and on either side of the subject, bathing the background (a white wall) in a wash of light and colour. Or the light can appear in the photo itself, with motion blur from a long exposure.
Bicycle photoshoot
I used the Sirui T120 to take some photos of my bicycle in an underpass, and I thought I’ll share the photos here because they reveal several interesting things about the lights.
The two photos below were shot with ambient light only.
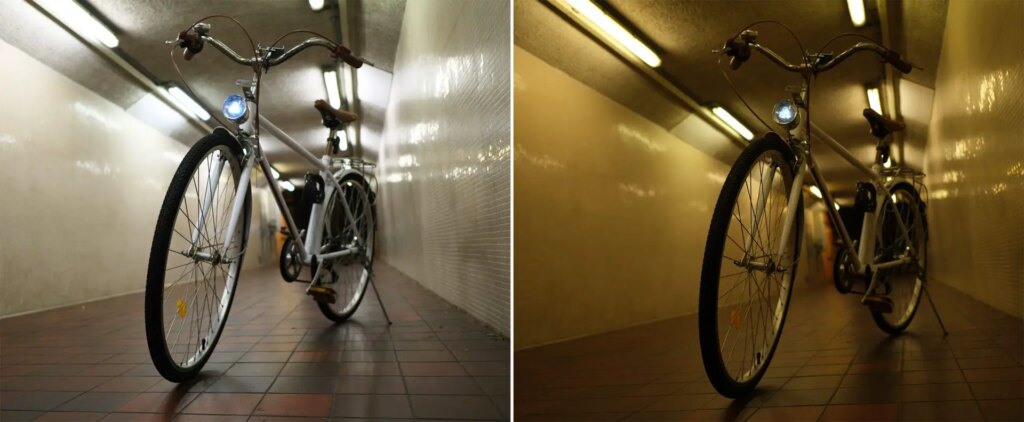
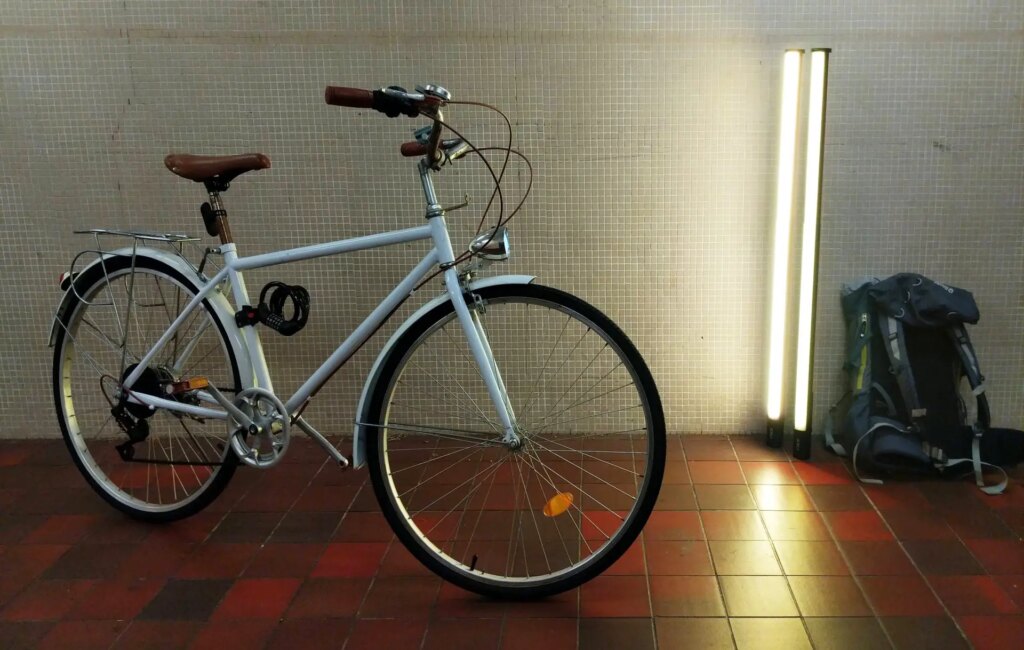
For the photo on the left, I used Auto White Balance and Auto Exposure. For the one on the right, I switched to Daylight White Balance to bring out the greenish cast of the fluorescent subway lights, and also underexposed for a more grungy feel. This is closer to the look I was going for, but now the bicycle is too dark.
The photo below-left is the same as one above-right – ambient light with Daylight White Balance and underexposure. For the photo which is below-right, I used the Sirui T120 lights to illuminate my bike. (Both photos are essentially straight out of camera – just cropped, with no exposure or colour edits.)
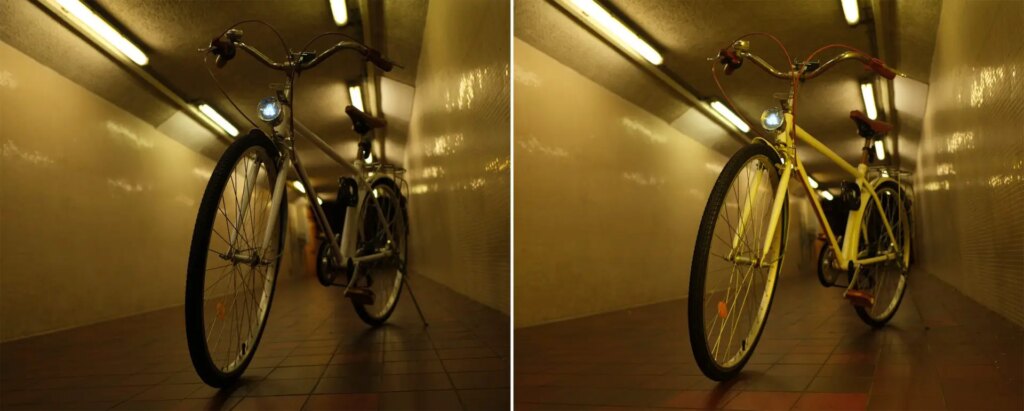
To me, the photo on the right preserves the grungy feel, while the added lighting – without being too obvious – draws more attention to the bike.
For this photo I used both Sirui T120 lights placed next to each other. The tunnel looks dark because I underexposed, but the ambient light was actually quite bright (you can get an idea from my camera settings in the caption above). I also had to place the lights a few feet away so that they wouldn’t be in the frame. Under the circumstances, in order to overpower the ambient light, it turned out that I needed both lights working together as the key light.
Second, you can see the value of being able to fine-tune hue, saturation and intensity. Using traditional gels to colour-match the fluorescent lights of the tunnel would have been a lot more tricky. Of course, I could also have chosen a different colour for a more funky effect, or 5600K (daylight, matching the camera white balance) for a neutral look.
Third, the fact that I took these photos at all is a testament to how (relatively) portable the lights are. I was able to cycle around with both lights (folded up, of course), plus my camera and other miscellaneous items – all in my small rucksack pictured below. Since the lights are free-standing, I didn’t even need a tripod. Especially for on-location video or film-making, where using speedlights is not an option, I can see how the portability of the Sirui T120 lights could be invaluable.
Final thoughts
At a retail price of £230 / $259 (35mmc readers have a discount, see below), the Sirui T120 Telescopic RGB LED Light is not cheap, but for what it does, it’s competitively priced. The telescopic construction and long battery life make it compact and portable. There are innumerable ways to tweak the colour and quality of the light, both with buttons on the body and wirelessly with the Sirui Light mobile app. It has a high CRI (97), plenty of power, at least by LED standards (700 lux at 1 metre), and no noticeable flicker. The tripod sockets and clips make it easy to attach and orient as needed. The app deserves special mention – well-designed, intuitive and fast.
Notwithstanding a few minor quibbles noted earlier, the Sirui T120 is an excellent creative tool – versatile and fun to use. If you’re interested in availing of the 10% discount for 35mmc readers, you can purchase it via this link (https://bit.ly/3hauEIJ), using the discount code 35T120. Neither I nor 35mmc will earn a commission from such purchases; the benefit is entirely yours.
Thanks for reading. For more of my work, feel free to check out my Instagram.
Share this post:


Comments
Molly Kate on Sirui T120 Telescopic RGB LED Light Review – I See You Have Constructed a New Lightsaber – by Sroyon
Comment posted: 02/01/2023
Comment posted: 02/01/2023
ºColor-Solinarº on Sirui T120 Telescopic RGB LED Light Review – I See You Have Constructed a New Lightsaber – by Sroyon
Comment posted: 02/01/2023
Comment posted: 02/01/2023