First Experiments in Home Developing Colour – My First Steps into Analogue – Part 5 – By Andrea Bevacqua

By Andrea Bevacqua

Carrying on my path of improvements, I wanted to experiment with colour films as well, so I decided to get myself onto Analogue wonderland and pick some up to try. Luckily I have the possibility to shoot 135 and 120 format, so I decided to give both a go. I was almost sure that I would get bad results from the 120 as I’ve never used ad TLR camera and wasn’t even 100% sure the camera I was planning to use was even in working order.

Developing

I used the Unicolor C-41 powder developer, so I had to prepare the three bottles: developer, stop and fixer. I have to admit that this step took a bit of time as it requires a bit of preparation and attention.

The powder needs to be poured into the water at a 43°C.  Once all the chemicals are ready, the development can carry on at 39°C, which is about the temperature of the water coming out of the hot tap, so not too much fuss. Then for the development times it is quite straightforward – I just had to follow the table of instructions included with the product.

What I also think needs to be mentioned is the different approach to the 120. To load the reels for the tank, is a different story compared to the 35mm. The film is not only larger but it seems to me that it is also thicker and more curled so it means that loading it up requires a bit more attention. I found a video on Youtube which was very helpful.

Scanning method

The scanning method is not changed much from the last article, I am just familiarising more and approaching it with more confidence. One of the differences I noticed is the final size of the .tiff files. Obviously, because the colours files are saved at 24 bit, there is just more date. For a scanned file at 1600 ppi resolution and scan quality of 300 ppi I now have .tiff about 40 Mb, for both 135 and 120 format.

Editing of the scans

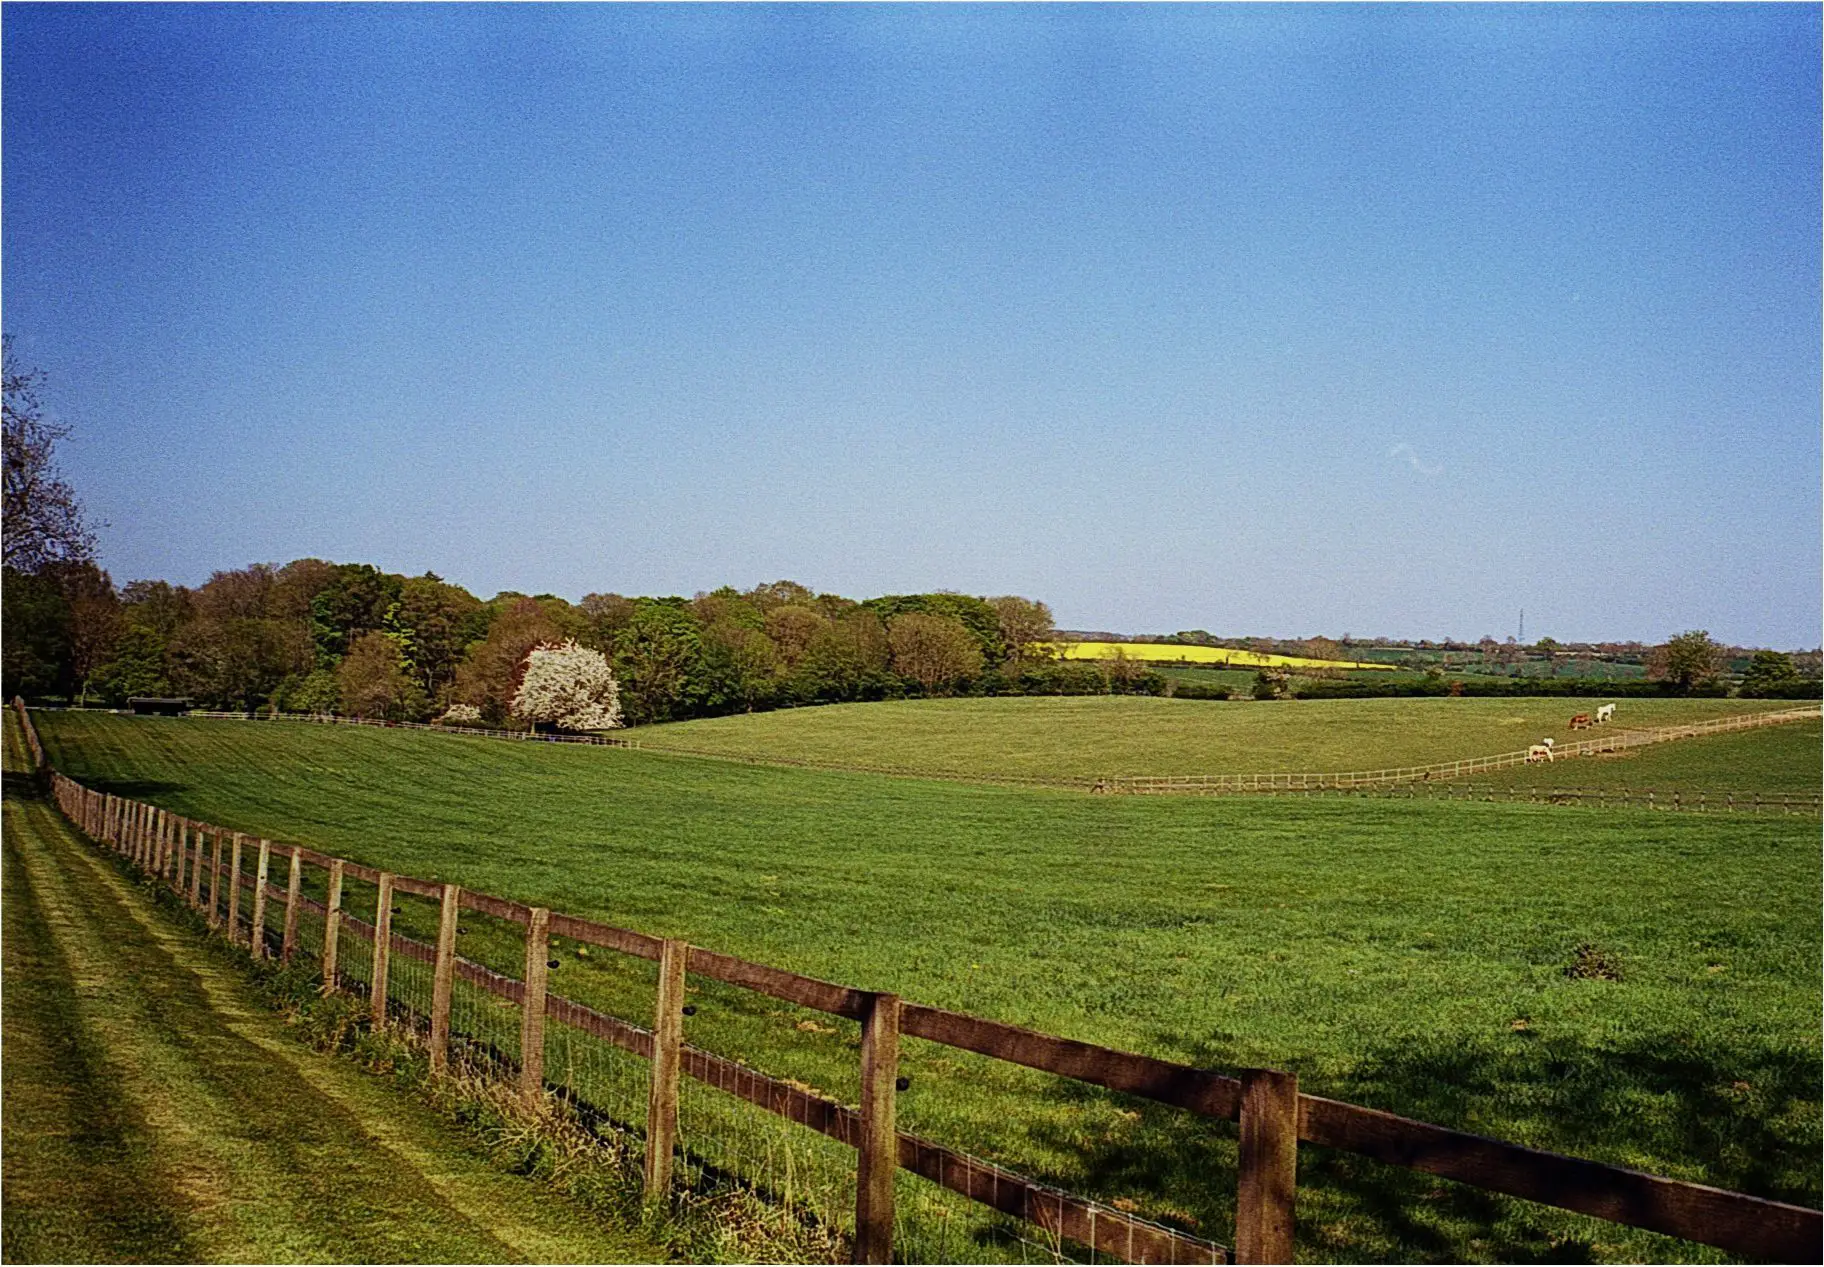
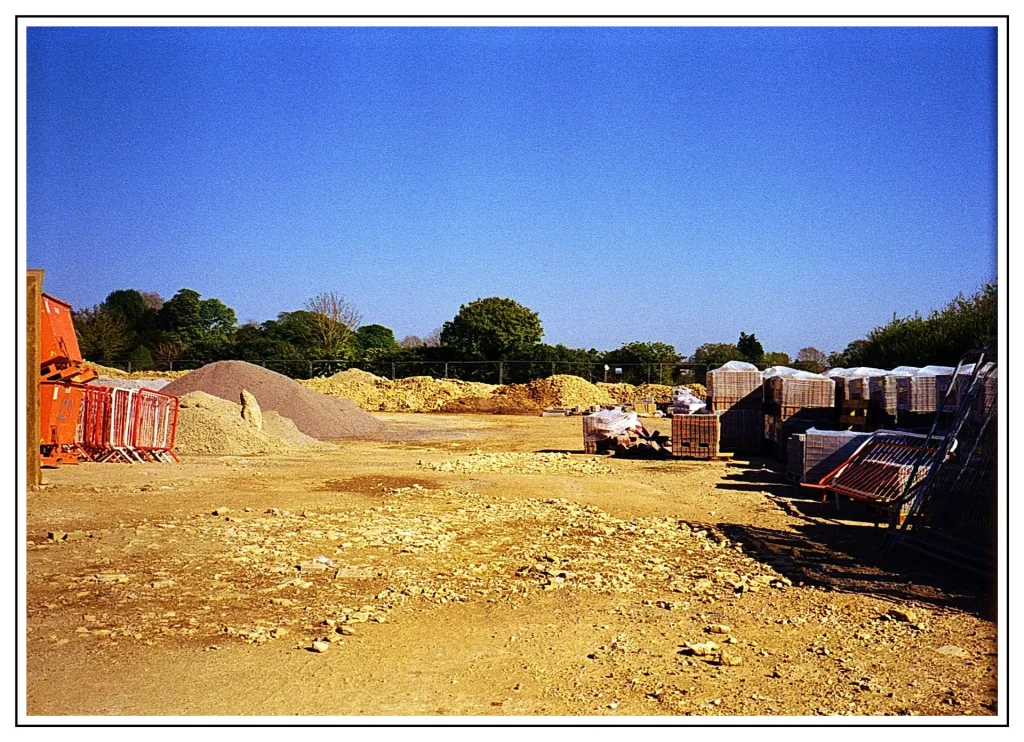
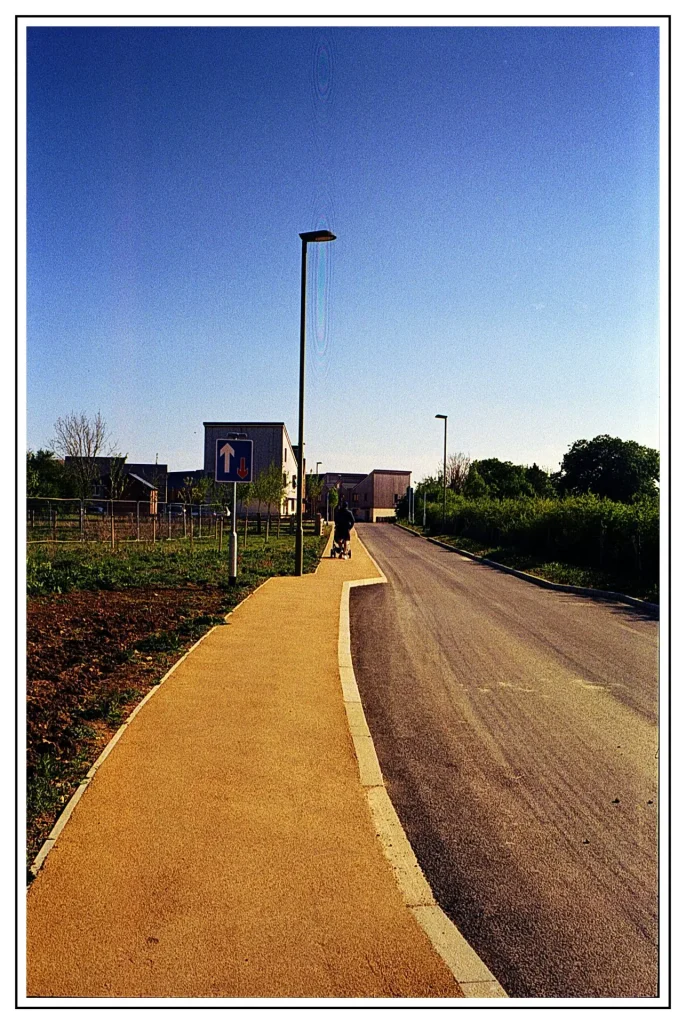
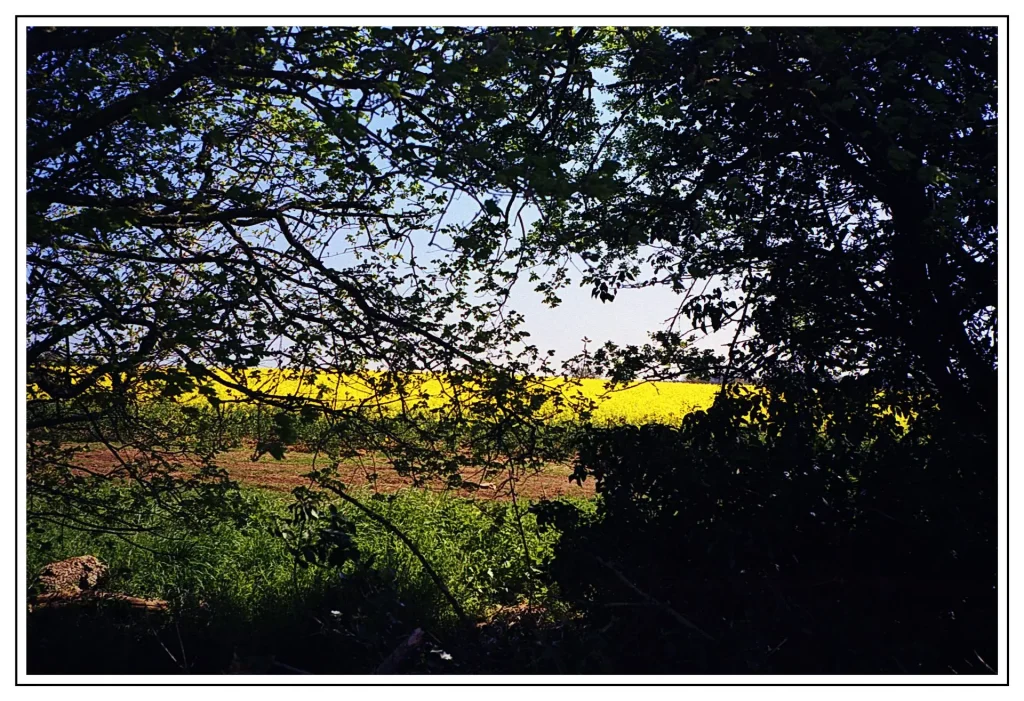
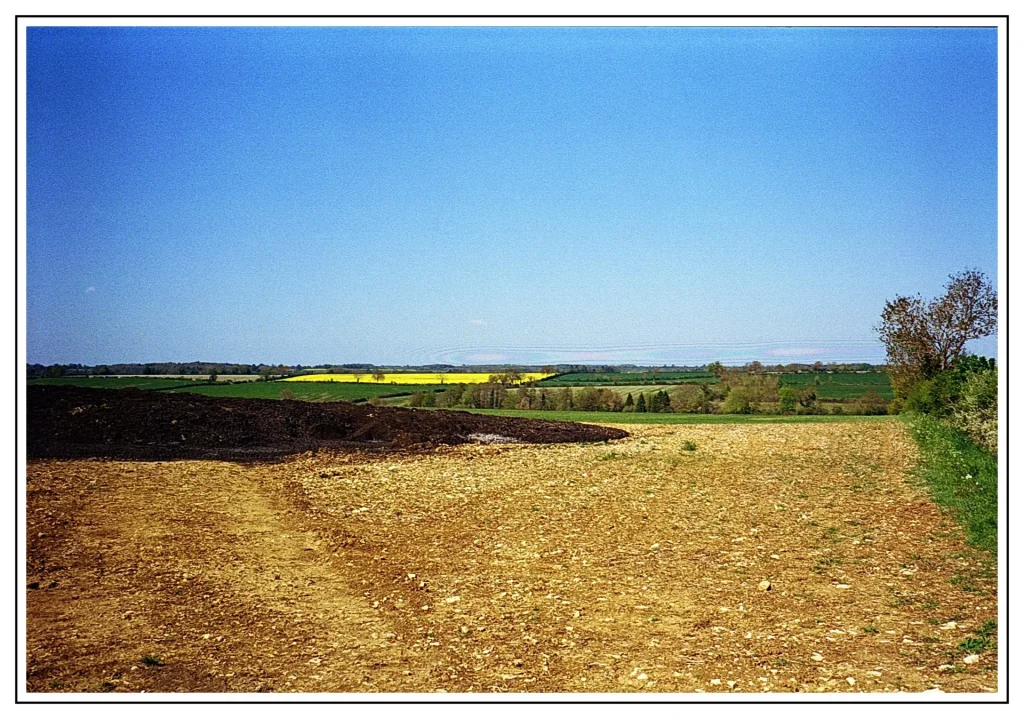
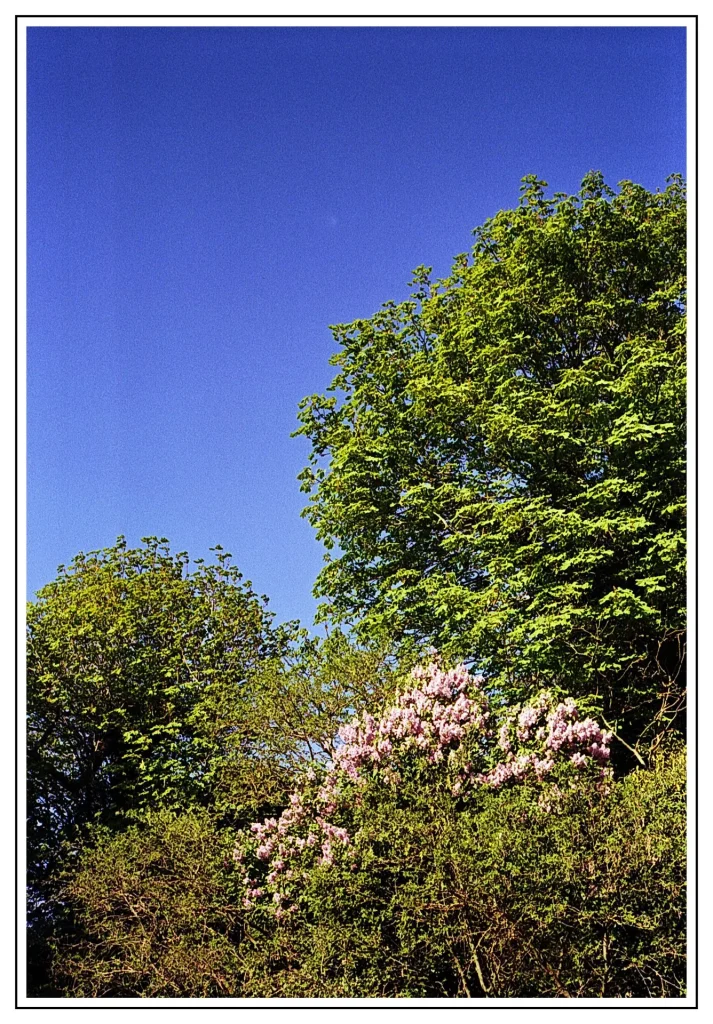
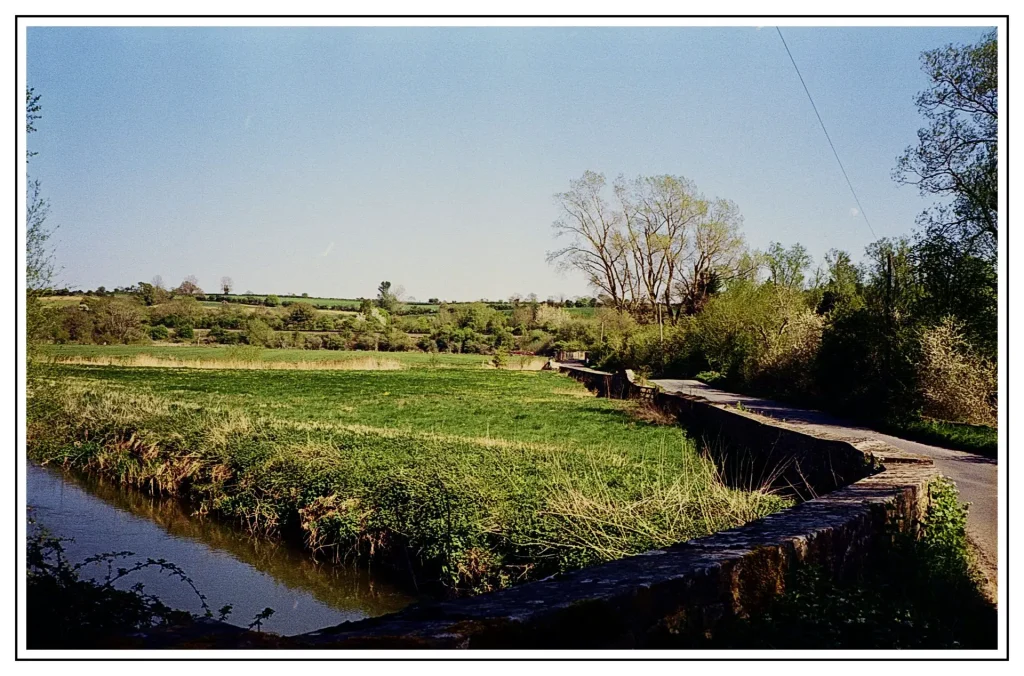
With colour scans I found it more difficult (if that is possible). I think there are more variables to keep in consideration. The white balance for instance. I also found very easy to mess around with the contrast of the colours with broad variation in results. The days I went out were really beautiful and sunny and the green of the grass and the blue of the sky were very bold and vivid, so the results are images bursting with colour.

Results

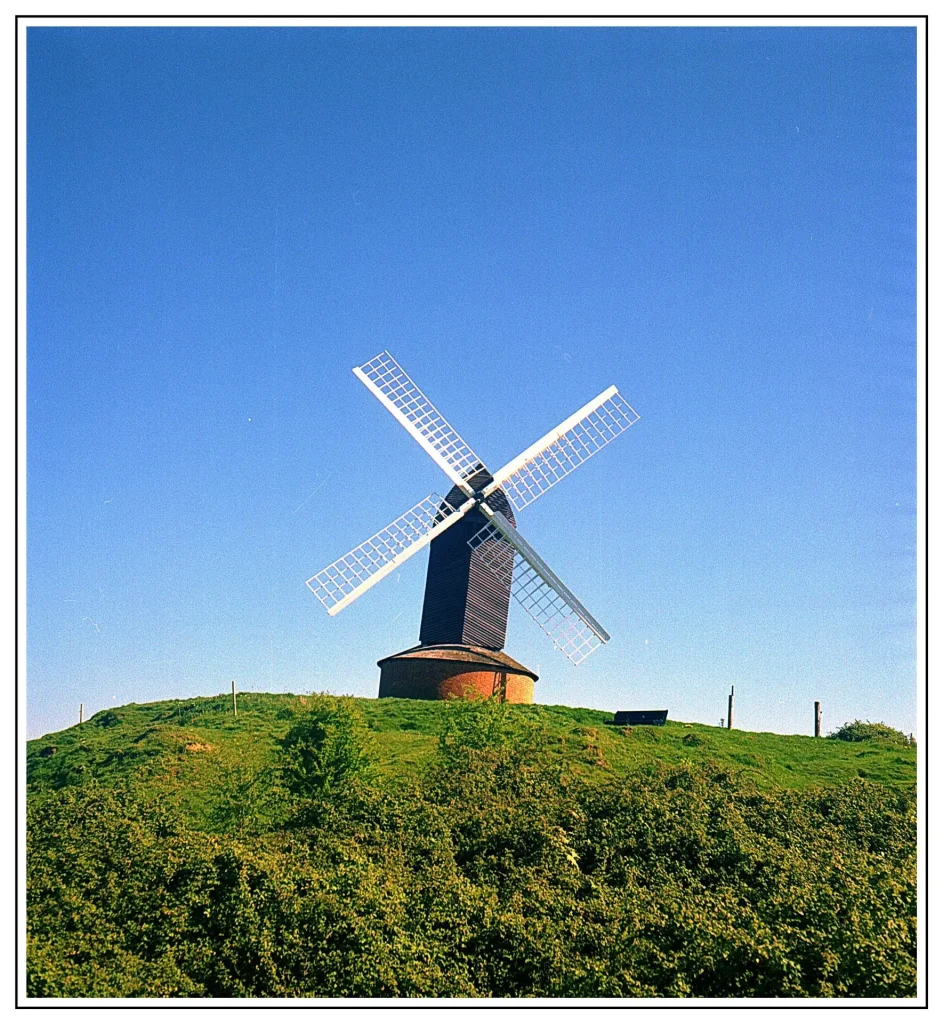
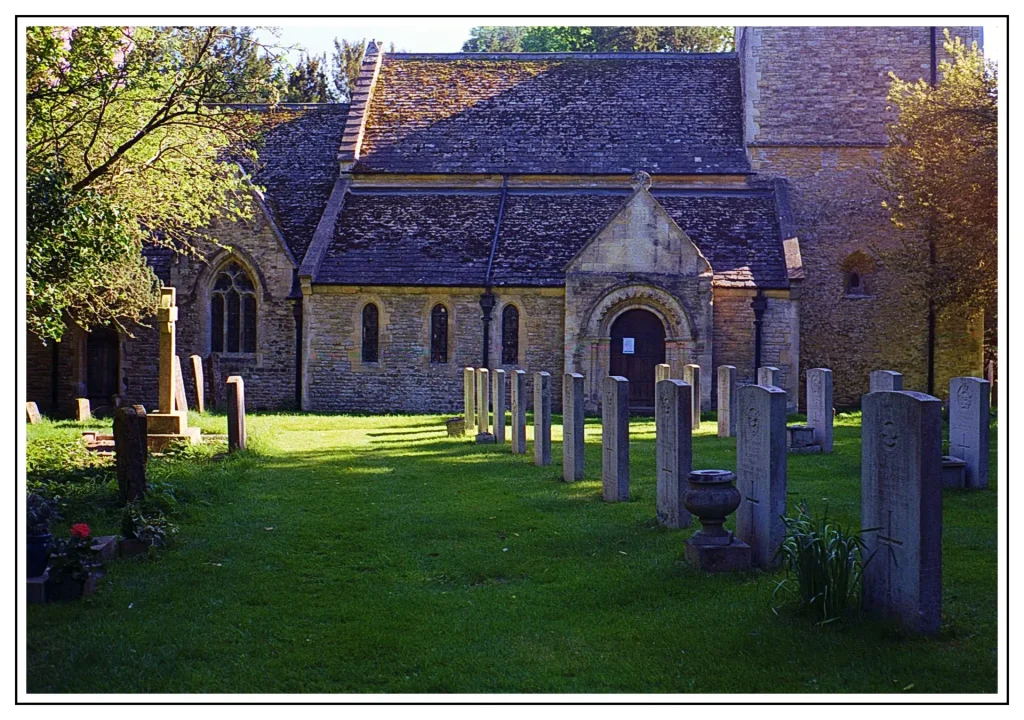
Once again, I was impressed. All the images were not too bad, I also managed to have all the 12 photos from the 120! So the TLR was working quite well and gave me sharp images full of beautiful colours. I did not think that an 80 year old camera would have been capable of such results!

The following 135 format images are shot with Kodak Color Plus 200 and the 120 are shot with Lomo Color Negative 100.

Considerations

Of course I made errors… In the pictures there is some dust here and there, and also some watermarks. I am used to draining the films with the squeegee straight out of the development tank and I find it more difficult with the 120. Also, because of its thickness and dimensions, it feels as though it is easier to scratch it in the film changing bag.

My next step will be to clean the negatives with isopropyl alcohol in order to remove the watermarks – unless anyone got better solution?

In some images there are some marks on the right hand side which I do not understand what they are, and they don’t seem to be watermarks to me.

Because 120 format film are not in canisters, so are not completely light sealed, when loading up the camera you have to keep a thumb on the roll in order to keep the film in tension. As such, at the beginning, I thought I made some mistake at this point. I thought that these lines were caused by some sort of light leak, but checking it more carefully I don’t think this is the case either. Maybe I just forced the film a bit when I was loading it up on the reel and it got ruined?

As usual, I would love to receive constructive comments and tips.

If you fancy, you can check out my Instagram.
You can read more about my journey into shooting film here.

Cheers,
Andrea

Share this post:

Find more similar content on 35mmc

Use the tags below to search for more posts on related topics:

Contribute to 35mmc for an ad-free experience.

There are two ways to contribute to 35mmc and experience it without the adverts:

Paid Subscription – £2.99 per month and you’ll never see an advert again! (Free 3-day trial).

Subscribe here.

Content contributor – become a part of the world’s biggest film and alternative photography community blog. All our Contributors have an ad-free experience for life.

Sign up here.

About The Author

By Andrea Bevacqua
I am passionate about photography but I have got so much to learn! I am just at the beginning of my analogue journey and I am so thirsty to know and understand how to produce decent images. What fascinate me the most is the street photography and all the stories that it can tells.
View Profile

Comments

Eric Norris on First Experiments in Home Developing Colour – My First Steps into Analogue – Part 5 – By Andrea Bevacqua

Comment posted: 04/06/2020

Andrea:
I've been getting great results with Cinestill's C41 kit for color film. Only two chemicals (developer/stop and blix), and a total of about 12 minutes of processing. It's really quite easy, and every roll I have processed so far has turned out just as it would have from the professional lab I had been using until they shut down for the COVID-19 crisis.

It's also inexpensive. Cinestill says I can process 24 rolls with a batch of chemicals that they charge $25 for, which translates to about $1 a roll.
Reply

Leave a Reply

Your email address will not be published. Required fields are marked *

Andrea Bevacqua replied:

Comment posted: 04/06/2020

Thank you Eric, yes, I had good results with the Cinestill B&W monobath so I think I will try the colour one as well

Reply

Leave a Reply

Your email address will not be published. Required fields are marked *

Richard on First Experiments in Home Developing Colour – My First Steps into Analogue – Part 5 – By Andrea Bevacqua

Comment posted: 04/06/2020

Hey Andrea,
I just wanted to point out that there are some instances of Newton rings on your scans. These are not caused by mistakes during developing but rather because the film touches the glass of your flatbed scanner. You can avoid these by raising the film up some more where it is touching.

Nice pictures, I want to develop color at home as well!
Reply

Leave a Reply

Your email address will not be published. Required fields are marked *

Andrea Bevacqua replied:

Comment posted: 04/06/2020

Thank you Richard! I will check it more carefully

Reply

Leave a Reply

Your email address will not be published. Required fields are marked *

Andrea Bevacqua replied:

Comment posted: 04/06/2020

Are you speaking about the second image? I thought that was a watermark

Reply

Leave a Reply

Your email address will not be published. Required fields are marked *

Terry B replied:

Comment posted: 04/06/2020

Andrea, what scanner are you using? Images #2 and #5 are definitely Newton's Rings. Without knowing your scanner, it is hard to pinpoint why, although the propagation of Newton's Rings is well understood. If a negative or slide is sandwiched between two pieces of plain glass, and without any cardboard mask (as will often be the case when photographers mounted their own slides) then the rings will invariably be created on the shiny side of the film. This indicates to me that the shiny side of your negatives are coming into contact with glass in your scanner. Most flatbed scanners use plastic negative holders that keep the film off the glass platen and thus avoiding Newton's rings. It would therefore appear that you're placing your negatives correctly (shiny side down) directly onto the platen, as a flatbed requires the film to be emulsion side uppermost, but if you are using plastic negative hilders, the film is still somehow coming into contact with the glass platen. A clue here is that in the two images the rings run more or less along the same path indicating that when the rings occur they seem to be always in the same area and direction and that the film is likely to be slightly "bowing" along its length; this is not a consistent feature with slides where they can appear anywhere within the image. Having said this, you seem not to be experiencing the ring all the time, a factor which I would say does point to the negatives not always being placed the same way on the platen each ans every time. The striations appearing at the side of one of the 120 images isn't so easily explained. In most cases, 120TLR cameras run the film from bottom to top and so given the subject this is clearly the left side of the camera film gate as the image on the film will be recorded upside down and reversed laterally. Ordinarily, I'd be trying to explain away the marks as a development issue, but it is hard to explain these marks that way, although they could still well be. A number of TLR cameras use a feeler wheel to set the frame counter, and this has to be held under pressure against the backing paper.Normally this is "toothed" or "geared" so that it can grip the paper as the film is advanced and for this purpose it will often be held against the backing paper under quite some pressure, too. So, I'm wondering if this is somehow causing a light issue, either in the camera, or is deforming the backing paper sufficiently, and along a regular pattern, to allow a light leak when you are removing the film from the camera. This possibility would be greater if the film wasn't been wound tightly. Did you notice if the while fil was very firmly wounf when you removed it, or did it feel just a bit loose? Now for the reason why it could relate to development. When I loaded 120 into my tank, I didn't remove the film completely from the backing paper. I unwound the backing paper until the film was reached at which point I inserted it into my tank reel, a Paterson, and just let the backing paper droop as the film was unwound onto the reel. Now the interesting thing about this method, is that what was the left side of the film during exposure now becomes the uppermost part in the tank. And we know that if any irregular development issues arise they will be more manifest at the top of the tank if there isn't sufficient devoloper, or the correct developing procedure isn't being followed. The main argument against this, though, is I can't tell if the fault is consistent along the length of the film from looking at your images here, so I'm guessing you will need to try a few further films to see if it ios regular occurrence or not. Now for drying marks, if indeed these are what you have, and you've not simply misinterpreted the Newton's rings as such. If you live in a soft water area, as I do, you wouldn't normally have a problem, and this is good as the film scratching potential of a film wiper can be dispensed with. But the harder the water, or higher the chalk content, then marks can become troublesome. If this is the case, then a tiny drop of wetting agent could help, and you may not even then need the film wiper. Not sure if any of this resolves your problem, but some just might.

Reply

Leave a Reply

Your email address will not be published. Required fields are marked *

Richard replied:

Comment posted: 04/06/2020

The second and fifth image, yes. I see Terry here has given an excellent answer already! I just wanted to point out that some of your negatives came out better than you may have thought :) I have a V550 scanner (almost the same as your V600) and the medium format holder came with this card to slide under the film to keep it straight. You could try that! If the negatives are very bent, I've achieved good (enough) results by cheating and inverting the negatives. I'm going to re-iterate that your post was very inspiring! I should buy some Cs41 powder soon....

Reply

Leave a Reply

Your email address will not be published. Required fields are marked *

Andrea Bevacqua replied:

Comment posted: 04/06/2020

Hi Terry, Thank you very much for your detailed answer. I will try to reply accordingly. I am using a Epson V600 with its film holder...which I have to say for the 120 format I find it quite rubbish. I find very difficult to keep in place this format. The 35 mm is fine but the 120 is quite wobbly. What probably happened here Is a result of two factors: - the negative was not correctly in place - some time it happen that the negative is quite curved so probably touched the glass. I have to try to to re scan the same negative and see the difference. Quite odd to be honest as you said I try to pay attention at the position of the negatives. To avoid this I watched a video on YouTube where a guy was scanning (on an Epson flatbed) negatives directly on the platen using a liquid which I don’t remember the name, I should have to find it out, and another piece of glass on the emulsion side. In theory it should work but I think it can be a bit messy. About the side stripes, I think I understood your point. These photos were taken with a Rolleiflex which as been serviced after this roll (and this roll was probably my first ever 120 I have ever shoot, so I easily messed up some thing) so maybe if it was a problem of the camera would have been sorted...hopefully. To be honest, I can’t remember if I did not keep in tension the film or whatever. This could be a good reason to take out the camera and test with a few shots ????. I live in an area where the water is quite hard so I am now using the Ilfotol. Using this wetting agent, I stopped wiping the negatives but some times I still have some watermarks so I started using both wetting agent and the squigee. Things are improving but the way is so long... Thank you very much for your help Terry!

Reply

Leave a Reply

Your email address will not be published. Required fields are marked *

Andrea Bevacqua replied:

Comment posted: 04/06/2020

Hi Richard, I am glad that you found my post insiring :-) I have got the card with the film holder but I am not sure how to use it. I read the ridiculus instruction with the scanner but I did not figure out how to use that. Yes, the suggestion of inverting the negative is a good call. I will try that. Buy some powder and let us know how it did go!

Reply

Leave a Reply

Your email address will not be published. Required fields are marked *

Terry B replied:

Comment posted: 04/06/2020

Ah, Epson. I've never owned one, but I've read about their negative carriers which do seem to present problems from time to time. The carriers for my Canon 9950F aren't exactly robust, but at least they've never given me any problems. When you rescan your negs you could try scanning with the emulsion side downwards and then in software reverse the image. I've not read about the "wet" process, sounds interesting, but messy! Two things I noticed but overlooked commenting on was the file size for your 120 v 135 film scans. I'm surprised that both came out at around 40mb per file as I would have expected the 120 to be significantly larger for the same dpi. Unless you're in the market for poster sized prints, don't try 2400dpi with 120! The other was the overall quality of your images. Impressive.

Reply

Leave a Reply

Your email address will not be published. Required fields are marked *

Terry B replied:

Comment posted: 04/06/2020

Andrea, thanks for the link. Very interesting results, but I simply wouldn't have the patience to go through the wet scanning procedure - too much of a pallaver. For you, though, and assuming you can justify the price, the 850 holder he used does seem to be the answer.

Reply

Leave a Reply

Your email address will not be published. Required fields are marked *

Andrea Bevacqua replied:

Comment posted: 04/06/2020

I will try to reverse the negative as well. Thanks. I found the video https://youtu.be/mfGKd_AEZtY if you fancy to check it out. The other option seems to use the film holder for the Epson 850, which should be better. Worth a try if it is not bloody expensive. Yes, the file size are roughly the same because I scanned the 35 mm at 2400dpi and the 120 at 1600dpi, so different resolution but similar final size of the files. Thank you Terry!

Reply

Leave a Reply

Your email address will not be published. Required fields are marked *

Andrea Bevacqua replied:

Comment posted: 04/06/2020

I would not have the same patience too! I would probably do that work just for "THE negative" I think is wort it. Also it seems that the 850 holder is not compatible with the 600 model (and is laso quite expensive) but anyway, I am sure I will improve the scanning in a way or another.

Reply

Leave a Reply

Your email address will not be published. Required fields are marked *

Philip Lambert on First Experiments in Home Developing Colour – My First Steps into Analogue – Part 5 – By Andrea Bevacqua

Comment posted: 04/06/2020

About the best colour prints I have seen in years.
Phil
Reply

Leave a Reply

Your email address will not be published. Required fields are marked *

Andrea Bevacqua replied:

Comment posted: 04/06/2020

Too kind Phil, thanks

Reply

Leave a Reply

Your email address will not be published. Required fields are marked *

John on First Experiments in Home Developing Colour – My First Steps into Analogue – Part 5 – By Andrea Bevacqua

Comment posted: 04/06/2020

Hi, Andrea - I agree with Richard - the mark in the second image is a Newton ring. But what beautiful color photographs!
Reply

Leave a Reply

Your email address will not be published. Required fields are marked *

Andrea Bevacqua replied:

Comment posted: 04/06/2020

Hi John, yes, something more to add at the list to understand. Thanks, Andrea

Reply

Leave a Reply

Your email address will not be published. Required fields are marked *

Bruno Chalifour on First Experiments in Home Developing Colour – My First Steps into Analogue – Part 5 – By Andrea Bevacqua

Comment posted: 04/06/2020

Andrea, if you still have watermarks using Ilfotol, it might be that you need to increased its proportion in your solution because of the hardness of the water. Avoid squeegee as you may from time to time scratch your negatives (anything providing centrifugal force... your arm or a salad spinner ... is probably safer for your film).
Reply

Leave a Reply

Your email address will not be published. Required fields are marked *

Andrea Bevacqua replied:

Comment posted: 04/06/2020

Hi Bruno, Thanks for your comment. I have never thought about the salad spinner! Good shot, thanks! I will try to increase the proportion as well

Reply

Leave a Reply

Your email address will not be published. Required fields are marked *

Marc Wick on First Experiments in Home Developing Colour – My First Steps into Analogue – Part 5 – By Andrea Bevacqua

Comment posted: 04/06/2020

Great results Andrea, and of course sometimes you have scratches or a bit dust. But who cares, if I want a totally perfect photo, I use my digital camera. To avoid waterdrops on your negatives, I suspend the negatives and use a piece of a paper roll which I slide two times from the top to the bottom. The redundant waterdrops are totally removed.
Reply

Leave a Reply

Your email address will not be published. Required fields are marked *

Andrea Bevacqua replied:

Comment posted: 04/06/2020

Thanks Marc, I will bear in mind you suggestion as well.

Reply

Leave a Reply

Your email address will not be published. Required fields are marked *

Kurt Ingham on First Experiments in Home Developing Colour – My First Steps into Analogue – Part 5 – By Andrea Bevacqua

Comment posted: 04/06/2020

Nicely done, photos and scans.
Reply

Leave a Reply

Your email address will not be published. Required fields are marked *

Andrea Bevacqua replied:

Comment posted: 04/06/2020

Thanks Kurt!

Reply

Leave a Reply

Your email address will not be published. Required fields are marked *

Malcolm Myers on First Experiments in Home Developing Colour – My First Steps into Analogue – Part 5 – By Andrea Bevacqua

Comment posted: 05/06/2020

Andrea, you mention "water from the hot tap". You might be better off using distilled water and heating it up in a microwave oven. You never know what nasties might be in your water supply. However, your images are excellent, so perhaps treat distilled water as the icing on the cake.
Reply

Leave a Reply

Your email address will not be published. Required fields are marked *

Andrea Bevacqua replied:

Comment posted: 05/06/2020

Hi Malcom, at some point I started to use distiled water for the rinse, but then I started using the wetting agent so I thought I would not need it. If I really want to go crazy, I could use distilled water for everything: mix the powder, do the stock solution and rinse the negatives but probably is just a mater of practising. Thanks for taking the time to read my post!

Reply

Leave a Reply

Your email address will not be published. Required fields are marked *

Terry B replied:

Comment posted: 05/06/2020

Malcolm, an interesting observation. Something like a Brita water filter should do the trick. I like the idea of heating the water in the microwave, no possibility of any residue coming off a kettle element, or from an immersion heater and where the water has to travel along pipes (does anyone bother to get these cleaned?) especially as Andrea lives in a hard water area.

Reply

Leave a Reply

Your email address will not be published. Required fields are marked *

John Furlong on First Experiments in Home Developing Colour – My First Steps into Analogue – Part 5 – By Andrea Bevacqua

Comment posted: 05/06/2020

Your concerns about the Epson slide holders are very often expressed by others. Have a look at http://www.betterscanning.com for alternatives.
This guy has a good reputation for his products - the only 'downside' is that he's in the USA, so there's import duty and handling charges from ParcelFarce to take into consideration. In terms of temperature control, it looks like the 'sous vide' devices are becoming more affordable - there's on on eBay for around the 40 quid mark.
I particularly liked your churchyard images - the shadow detail has come through beautifully.
Reply

Leave a Reply

Your email address will not be published. Required fields are marked *

Andrea Bevacqua replied:

Comment posted: 05/06/2020

Hi John, thanks for your inputs. I will take a look on ebay and the website as well. Cheers, Andrea

Reply

Leave a Reply

Your email address will not be published. Required fields are marked *

Leave a Comment

Leave a Reply

Your email address will not be published. Required fields are marked *