Yet another shoe mount light meter review! This time it’s about a meter at the budget end of the spectrum in the form of the V-201X.
I was approached to review this meter by a company called Cameractive. The chap who got in touch with me told me he’s the overseas exporter of the V-201X and gets them directly from the company that makes them who he referred to as “Cooldark”. Apparently the chap behind Cooldark is a techy type and not particularly good at marketing or branding. I’ve also heard of this meter being referred to as the Cooltech V-201X, and actually more frequently without a brand name at all. To that end, it would appear true that the company behind the meter – regardless of how good or bad it might be as a product – are indeed quite pants at marketing and branding.
In fact, I think the best bit of marketing that’s ever been done for th V-201X light meter was when Matt Bechberger brought the Reveni light meter to Kickstarter. Until then, I wasn’t aware of any other 3D printed shoe mount light meters. As soon as I shared the news on the website a whole load of people got in touch with me to tell me it looked more expensive and no better than the Chinese V-201X and L-101 light meters that could be bought off eBay.
In fact, even without handling either meter, it seemed to me that the Reveni was going to be a superior product. For a start, it appeared to be a lot smaller. It also had a wider range of settings and features, and, well, looked like a nicer thing too. To me, the V-201X light meter looked a little large and more clunky somehow. It looked less like a designed product and more like a prototype.
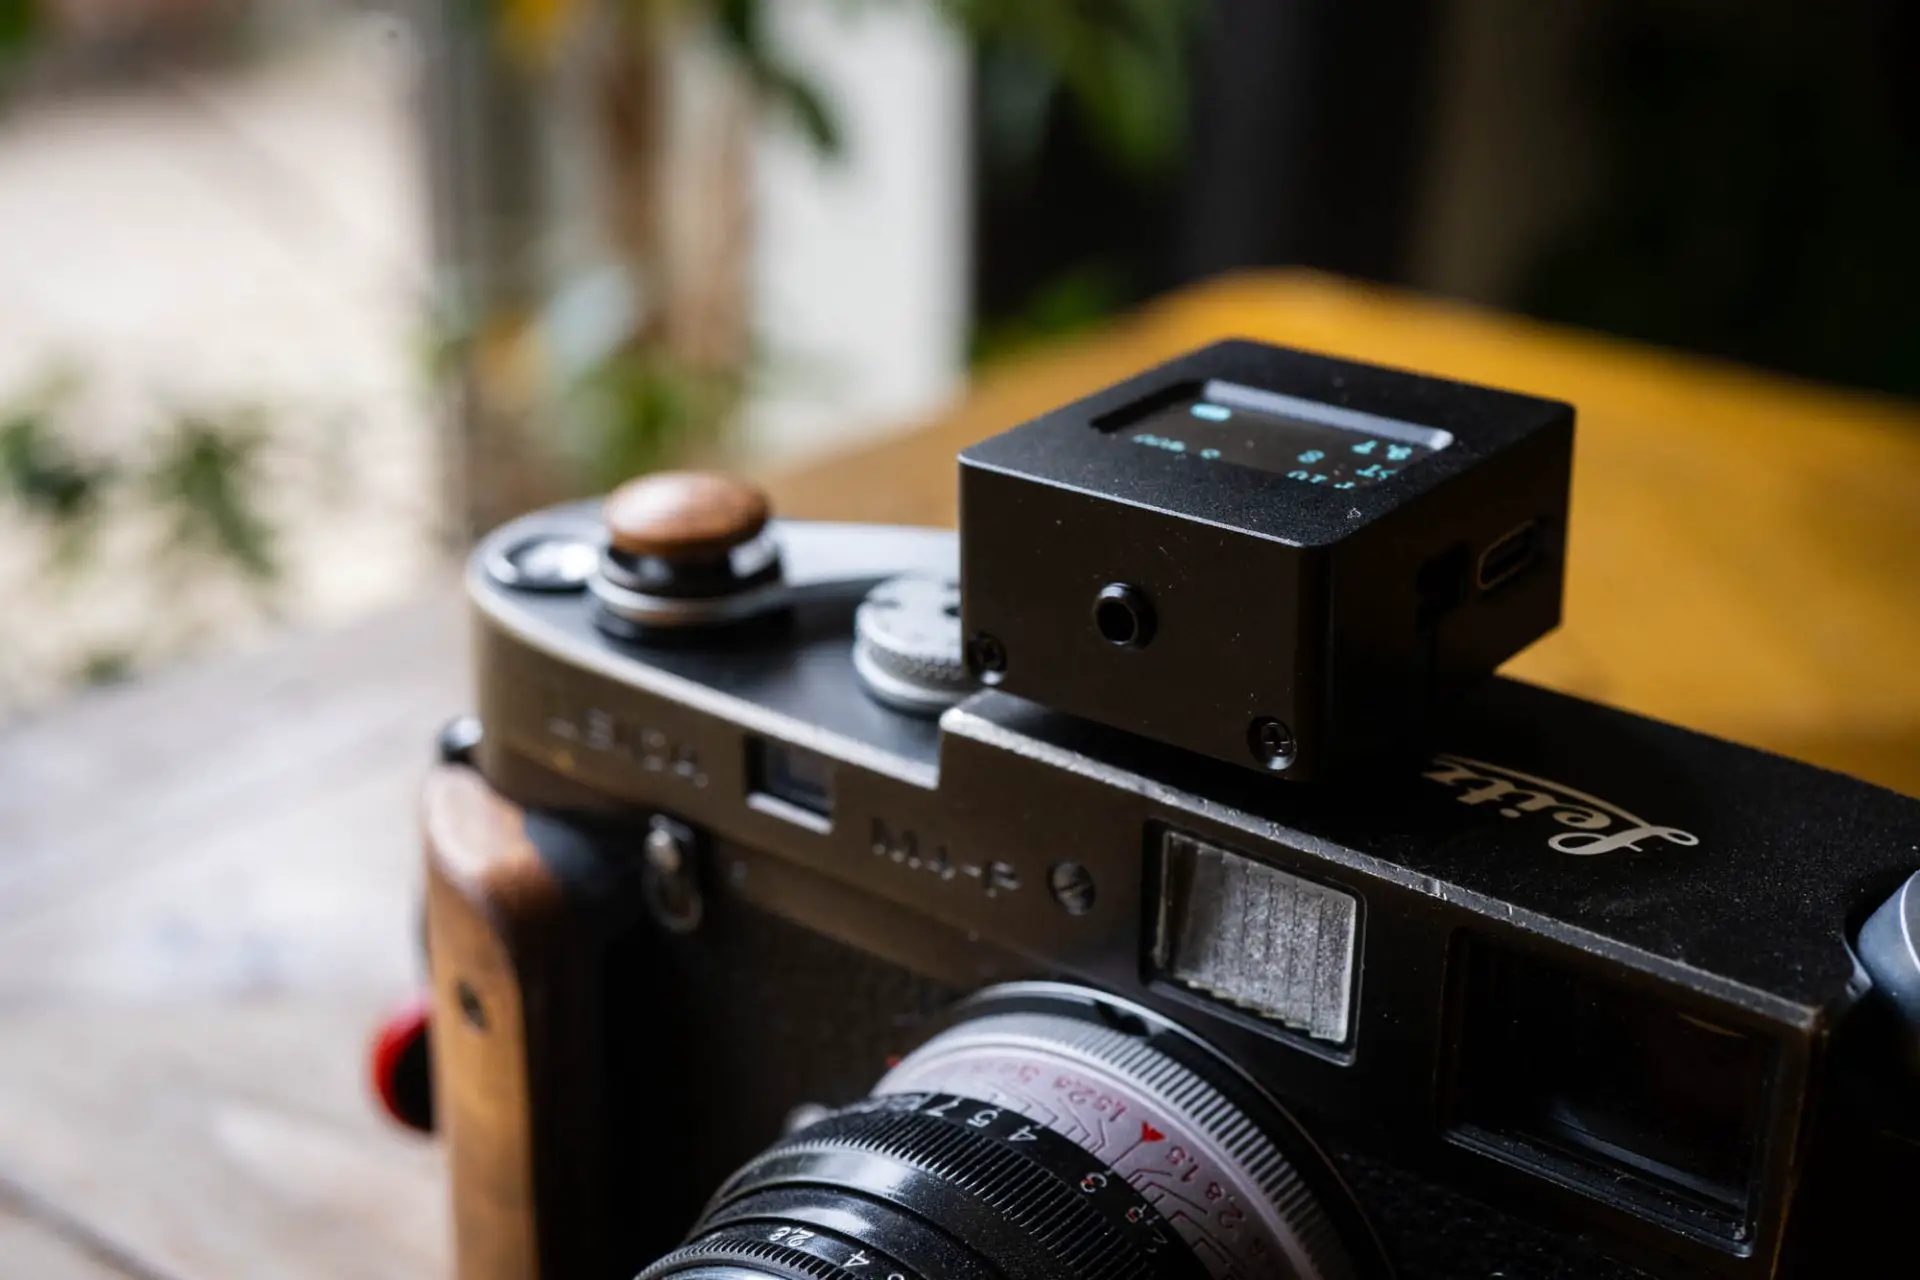
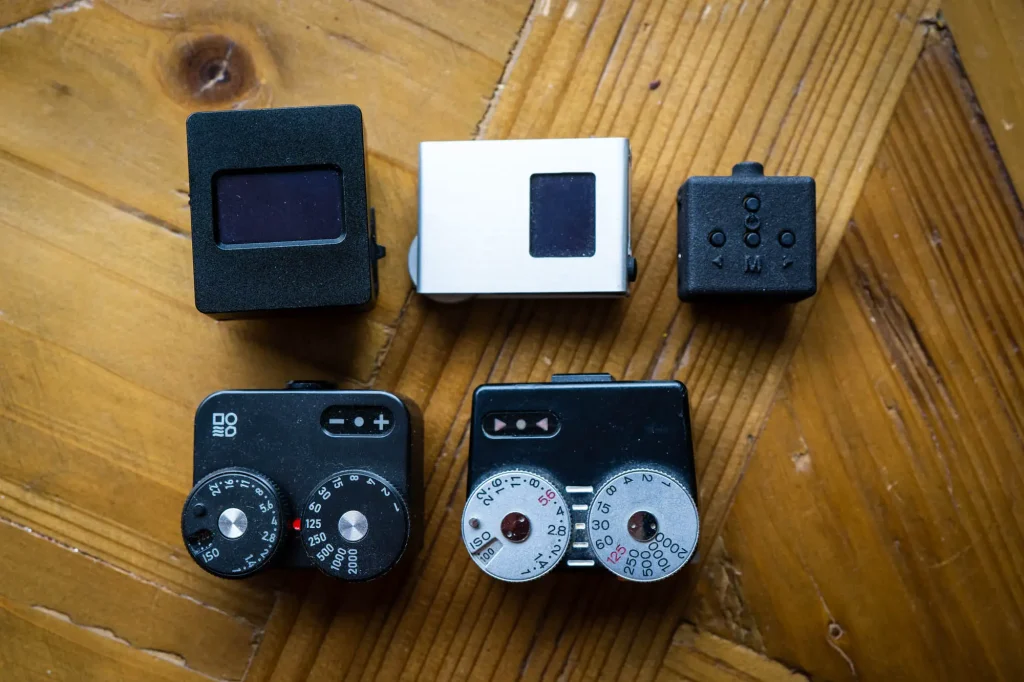
At that time, the V-201X, like the Reveni, was made out of 3D printed plastic. In fact, it still appears to available with the 3D printed outer shell. Unlike the Reveni there is now a version that has a metal upper housing with the base part still being 3D printed. I actually have both here. Just before the metal-shelled V-201X landed with me, Alan Duncan from Canny Cameras offered to loan me his. In all honesty, I’d forgotten the one was coming from Cameractive, so I let him send it to me.
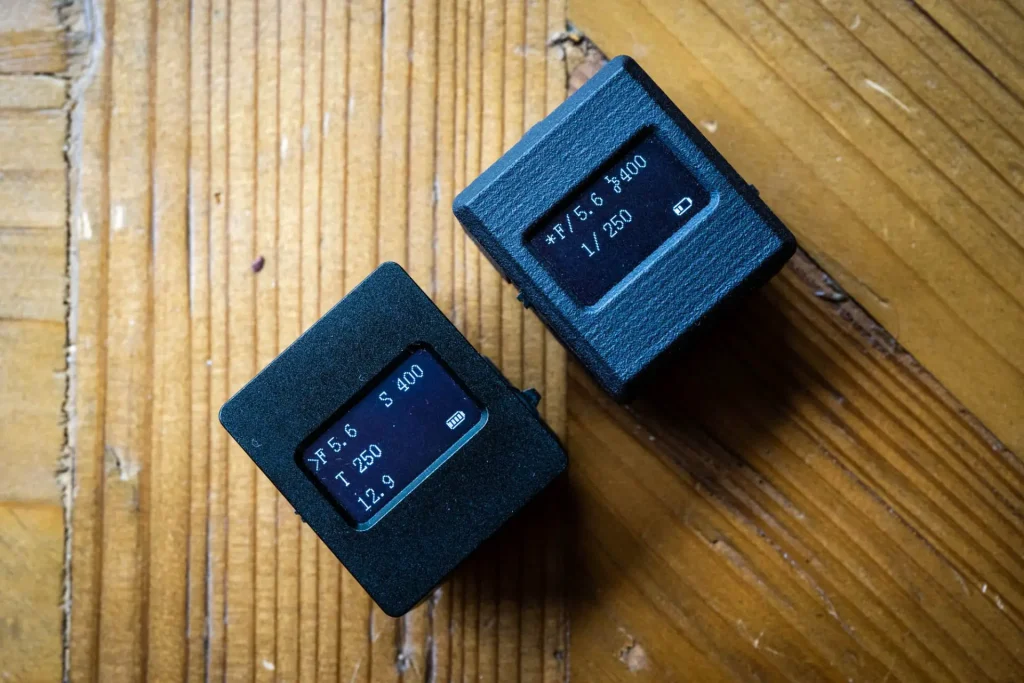
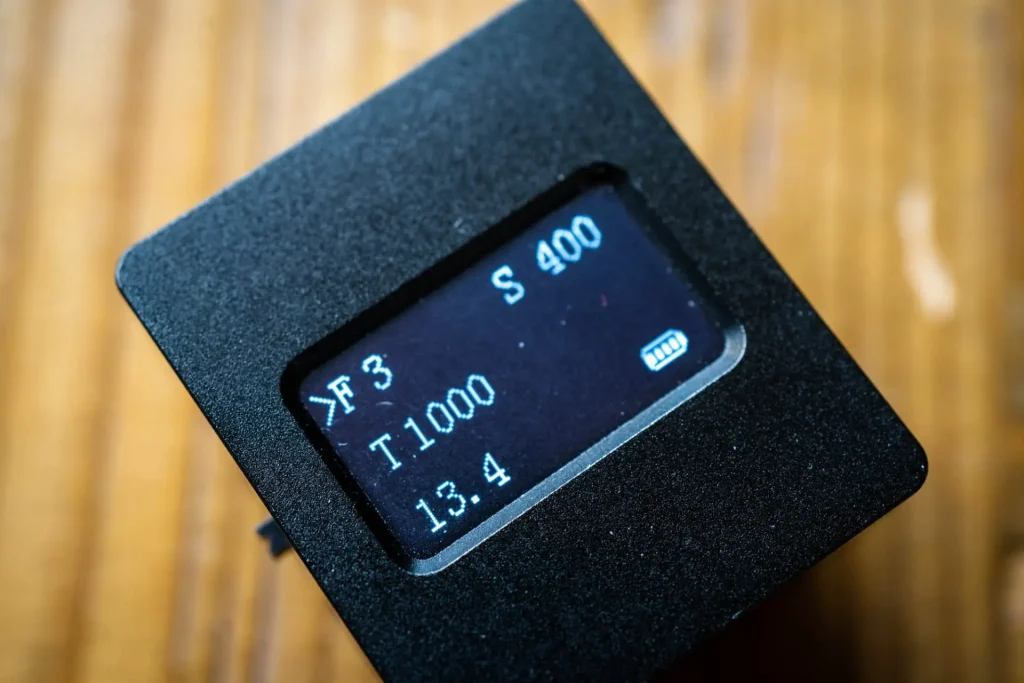
Interestingly, the two meters I have here have slightly different features. The fully 3D printed version, which I suspect is simply an older model just shows shutter speed, aperture and ISO. The one with a metal upper shell also shows exposure value. I quite like to have the exposure value display myself, but for some reason the with the exposure value readout comes the ISO being denoted by an ’S’ rather than ISO as it is on the other. There’s no real issue with this, it just meant it took me a moment to work out what I was looking at when I was reading the meter the first few times I picked it up.
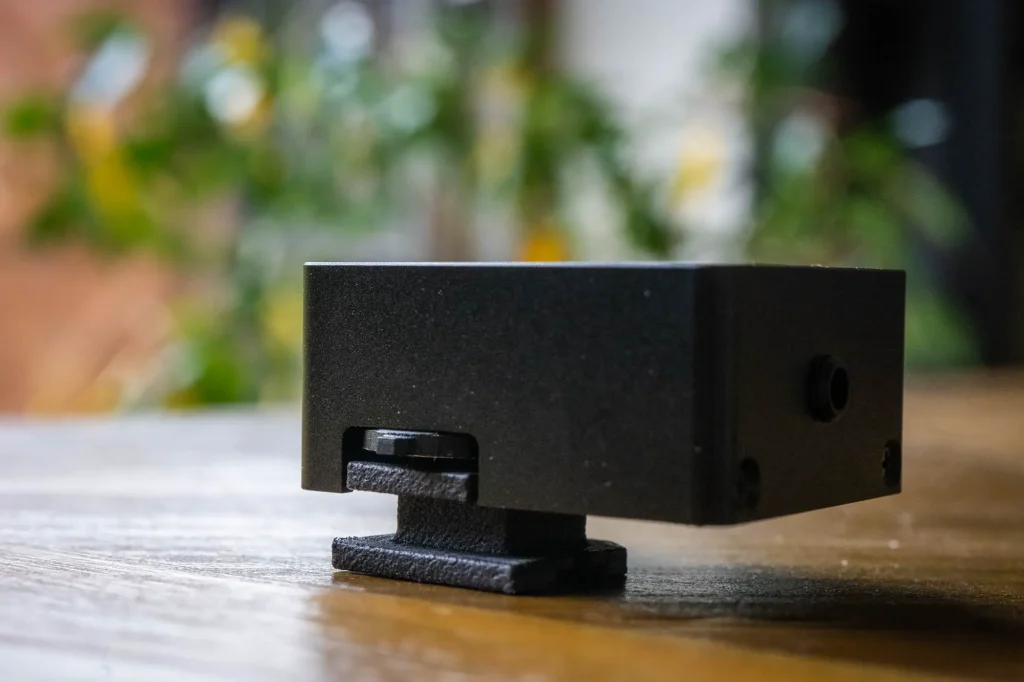
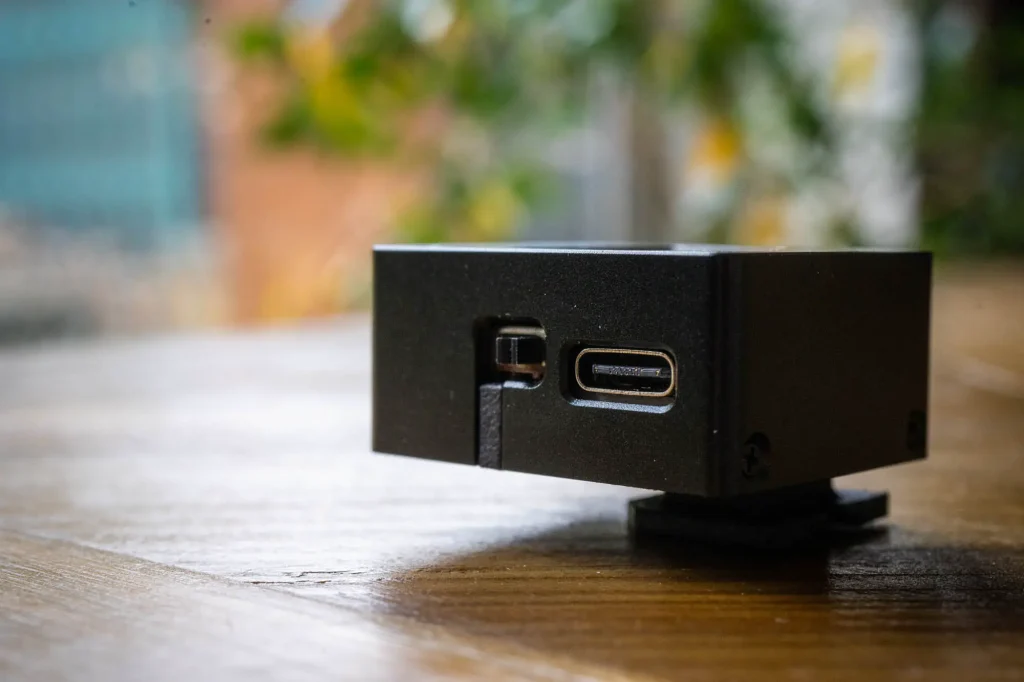
In terms of other features, in short, there aren’t any. The V-201X is controlled with a small rocker/lever on the side. On the other side of the meter there is a on off switch and a USB-C port for charging. Pushing rocker side to side changes the settings, pushing it in briefly switches the meter from aperture priority to shutter priority mode. If you want to change the ISO, you just press and hold the lever to switch it into a mode that allows the ISO. Once the ISO is set, a quick press switches is back to aperture priority mode. There are no other settings that I can find.
V-201X Stats
The V-201X aperture settings range from f/1 to f/64 with (for the most part) 1/3rd intermediate settings (I’ll come back to that in a moment). Adjustable shutter settings range from 1 second to 1/2000 with a conventional whole stops between. In aperture priority mode, the shutter settings will go up into the minutes. The ISO settings range from 6 to 6400 with 1/3rd stop increments between 50 and 800 and full stop increments either side.
I cannot find any reference to the EV range it will work in but experimenting with it, it seems to bottom out a bit above EV1. I’d guess, like most of these meters, it goes up to about EV20. The metering angle is specified to be 30 degrees.
Battery
The V-201X light meter is powered by an internal lithium battery and is, as I have said, charged via a USB-C socket on the side. According to the various stats I have found about this meter, it takes 30 mins to charge and will run for 24 hours constantly. I didn’t test this, but it didn’t run out on me when using (and fiddling with it a lot) it for a day.
Interestingly, the metal-shelled version I have here goes into some sort of standby mode after maybe 30 seconds (I didn’t time it), whereas the 3D printed one stays on permanently until it is physically switched off. The metal V-201X is taken out of the standby mode with a press of he rocker. I guess the standby mode would help the battery last even longer.
I actually really like the fact that the V-201X is rechargeable, especially as it charges so quickly. I would probably be a little annoyed if the battery ran out when I was out using it since it would be harder (impossible) to swap new batteries into it. But then, if it did run out, I always have the smartphone meter as a back up anyway. This all said, I suppose the big drawback of an internal lithium battery is that eventually it will stop charging/holding charge rendering it useless. I would just hope that didn’t happen for a good few years of use.
V-201X Quirks
There are a few usability quirks with the V-201X light meter. To begin with, the fact that is switches back to aperture priority from the ISO setting mode seems a bit odd to me. Personally, I think it would be better if after setting the ISO it returned you whichever mode you were using it in, but I suppose it doesn’t make too much difference in use since for the most part the ISO would just be set once for a shoot.
I also find it a little odd that when you switch from one mode to the other, rather than retaining the current settings, it remembers the previous setting you left it in. So for eg, if you were shooting in aperture priority mode with it set to f/5.6 and the shutter speed was reading 1/1000th, if the last time you used it in shutter priority mode you had set it to 1/125th, it would return to 1/125th and show you an aperture reading of f/2 when you switched modes. To my mind, it would make more sense to retain the selected settings and just switch mode – this would make it seem more fluid in use. As it is, it feels clunky and a little bit bewildering switching from one mode to the other.
Additionally to the slightly odd user experience, the V-201X also displays some odd intermediate settings that aren’t always in 3rds. So for eg, between f/2 and f/2.8 it only has f/2.4 instead of the more conventional f/2.2 and f/2.5. Then between f/2.8 and f/4 it adds f/3 to the more conventional f/3.2, f/3.5. I suspect actually that there’s some sort of rounding issue going on and that f/3 is meant as the full stop between f/2 and f/4.
From a personal point of view I just found this a bit weird, rather than anything else. But my big criticism is that as the cheapest shoe mount light meter on the market it might attract beginners, and to a beginner trying to get their head around stops and reciprocal settings etc, I feel this might be a little confusing.
Another quirk of the V-201X, though this only applies to the 3D printed one I have is that it hangs if left in the ISO changing mode. Switching it off and on again fixes this. How much this would impact anyone in real life is debatable, and the metal version doesn’t suffer this issue as it goes into standby before it happens anyway.
Build & Quality
The V-201X build quality is pretty good for what it is, or at least it is as I expected. The 3D printed nature of some of it will no doubt put a few people off. It doesn’t me. I have no issue with 3D printing as a manufacturing process as long as the quality is good, and it is as good as you’d hope here in my opinion. Of course, the metal shelled version does feel a little nicer overall.
Unfortunately, the rocker on the metal shelled version I have feels a little less responsive than I would like. The 3D printed one is nicer to use, but it still doesn’t feel particularly immediate as you flick through the settings. The rocker switch itself is a little sharp against the tip of your finger too. Also, the casing isn’t a snug fit around the on/off switch either which doesn’t look as nice as I think it could. The metal version I have also has a charging light that lights up around the USB port when plugged in. It glows red when the meter is switched off and green switched on, it seemed to charge regardless.

Metering accuracy
In my recent Doomo review I quibbled that the meter I had seemed to read slightly out. My issue was less that is was slightly out and more that I couldn’t adjust it myself. In real terms the amount it was potentially out was relatively meaningless, though with it causing slight under exposure if I were to use it, I would err toward adjusting the meter’s exposure value to compensate.
Both the Reveni and Hedeco meters I have recently tried allowed user adjustment. Unfortunately, despite it being similar to these meters in terms of the OLED screen, the V-201X doesn’t provide any user adjustability. This feels like a bit of a shame. Clearly these little OLED meters can be programmed to allow a little bit of user adjustment, so not having that option here feels like a missed trick.
What is possibly slightly more unfortunate is that the V-201X actually reads similarly to the Doomo. Though I should say that the two V-201X meters I have here do read slightly differently (probably less than 1/3 of a stop) to each other too. Again, in real life use, I would say this meter is more than accurate enough for most people’s needs – but if I were to use it regularly, I would compensate the exposure value slightly.
V-201X Compared
As I have worked my way through these light meter reviews, I have found myself naturally comparing them to each other. All of them have their cons, but they also all of them have their key USPs too.
The Voigtlander VCii is lovely, but expensive and hard to find. The Doomo makes a great substitute for the Voigtlander for those looking for a more “analogue” approach to metering, but isn’t user adjustable and didn’t read quite right to me.
The Reveni is a little fiddly, but tiny – I literally couldn’t think of a single camera it wouldn’t mount on. The Hedeco is also tiny, though like all of the rest of the meters here wouldn’t mount on as many cameras as the Reveni does. That said, the Hedco is a lot faster and easier to use. My Hedeco metered perfectly out of the box too. Both Hedeco and Reveni are user adjustable.
I must admit, the V-201X overall feels like the least attractive proposition to me. It’s not user adjustable, it’s fiddly and a little uncomfortable to use, the aperture settings are a bit weird and it feels a little ungainly in terms of its size and overall build quality.
That being said I must admit, the USB-C charging is probably the thing that impressed me the most. I’m used to having to charge my gadgets, and would like the fact that I don’t need to worry about buying little button cells for it. In the near future most of our devices will be USB-C chargeable too, and I already find I always have one around. As you can see in the picture above, I have been charging mine off my daughters Nintendo Switch chargers.
The V-201X is also the cheapest of these little shoe mount meters which makes it accessible to a wider audience, and probably more attractive to beginners. Though, I would caution any beginner about the confusing f/stop scale…
Final thoughts
Overall, it’s the cheap price and the USB-C charging that saves the V-201X for me. I’m not entirely sure when comparing the plastic shelled version to the 3D printed version I have here that I am looking at differences in features between the two, or simply that the metal one is just newer and is therefore is more representative of the meter you would get if you bought one new today. Either way, I think it is worth acknowledging that there are different versions out there. For the difference in price I’ve seen them for, I’d probably just buy the metal shelled one.
That said, for my money, I think I would stump up a few extra quid and go for one of the other meters I’ve compared it to. Personally, the lithium battery is not a big enough draw for me. But, your money is not my money, and for those on a budget looking for a little shoe mount meter, as long as you’re aware of the caveats, the V-201x is a perfectly viable simple to use light meter that’s probably plenty accurate enough for most people.
Thanks to Cameractive for the loan
Share this post:


Comments
Lee on V-201x Light Meter Review – The Budget Option
Comment posted: 05/04/2021
Comment posted: 05/04/2021
Wim HH van Heugten on V-201x Light Meter Review – The Budget Option
Comment posted: 05/04/2021
Thanks for the review! One remark: You say that it's a bit strange that the display only shows 1/2 stop aperture values (and not 1/3). To me that seems to make sense. My vintage SLR lenses have half F-stops,, not 1/3 stops. I guess exposure times are only shown in the 'normal' full values?
Comment posted: 05/04/2021
Paul Trantow on V-201x Light Meter Review – The Budget Option
Comment posted: 08/04/2021
Comment posted: 08/04/2021