
As you may recall, my initial attempts at star trails on film were with my Olympus OM1 and Fuji Natura 1600 in early 2019. The results with the 35mm film and camera were a little hit and miss, but they were promising enough that I was encouraged to keep trying, and wanted to try again with medium format. I fulfilled my desire in October of 2019 – this is the story of that experience.
My destination was once again the New South Wales mid west, based in Dubbo. Dubbo is a regional centre about one hours flight from Sydney, or about five hours on the road. Work takes me there twice a year for a few days at a time. The days are devoted to work and the evenings I devote to photography. The skies there are usually more clear than clouded. It makes for good astrophotography, but it is a burden on the farmers who crave rain. In fact, smoke and dust in the atmosphere were an issue on this trip to a greater extent than I had experienced previously, but at that time, is was not even close to the extent that has horrified this country since. The dust storms through Dubbo in the months since that visit have been truly hellish (and also resulted in mud rain when they reached Sydney). You will have seen images of the fires on the Australian east coast the past months, no doubt.
The gear
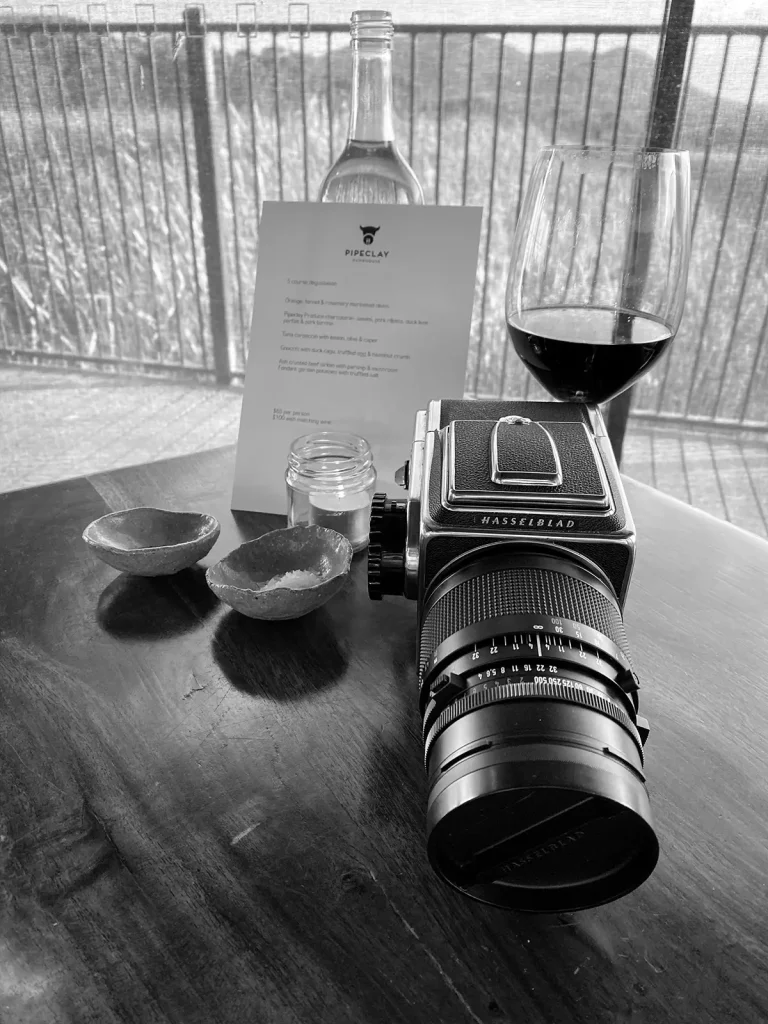
I had decided on medium format gear for this trip as I had wanted a bigger negative for relatively less grain in the final image. I don’t mind prominent grain when it is called for, but it isn’t my particular aesthetic. I personally own three medium format cameras. There is my Mamiya 6, a relatively compact 6×6 range finder that is battery dependent; the Pentax 6×7 with mirror lock up, also battery dependant; and my Hasselblad 500c/m, also 6×6 format, but fully mechanical.
The Pentax 6×7 mirror is held up by electromagnets, so on long exposures there is an active drain on the battery. This was such an issue that a modification was produced that decoupled the battery whilst maintaining mirror lock up on the Pentax 6×7 during long exposures to maintain battery life. In fact, this modification was specifically for astrophotography. My Pentax 6×7 doesn’t do this. There is less information on the Mamiya 6 and the effect of a long exposure on the battery (if you know the answer to this, please comment below!), but from my own past experience a dodgy battery and a long exposure can result in the film advance locking with a resultant loss of frame. The Hasselblad in its mechanical glory does not have the concern of dying batteries. So, whilst I prefer the wider format, I took the 500c/m. I mostly shot with the Zeiss C 40mm f/4 lens, but also took the 80mm f/2.8.
The Film
The next issue is film. I knew on this occasion that at the start of this trip the moon would be dark or very new. My astrophotography has always been about the landscape, and the landscape was going to be incredibly dark without moon light. I thought a faster film was called for – at least if I didn’t plan on being in the one spot all night with the shutter open.
There are, of course, a couple of high speed 135 options with Ilford Delta 3200 and Kodak Tmax P3200. Natura 1600 is a colour option if you can still find it (and don’t mind selling a kidney). Slower still, though workable, are Kodak Portra 800, Fuji Venus 800 (also now discontinued), Cinestill 800T, and the new darling, Lomography 800. It’s a little thinner for 120 options, with only Delta 3200, Cinestill 800T, Lomography 800 and Portra 800 being readily available.
I knew I wanted to shoot colour, which eliminates Delta. My previous rolls of 120 Lomography 800 had problems with the quality control where the emulsion bled at the edges of the frame post development forcing me to crop the photos. I didn’t want to risk this with these photos. In the end I chose Cinestill 800T over Portra 800 because I had Cinestill in the cupboard. I planned to shoot the Cinestill 800T at Exposure Index 3200 and push the development.
Even at EI 3200 my exposures were going to be a minimum of 15 minutes to up to 1 hour. Calculating the exposure relied more on charts, rather than metering. From my chart, at EI 3200 at f/4 (my fastest aperture), with at most a quarter moon of light or Exposure Value -5 or less (and this was optimistic), the exposure required would be 15 minutes minimum. Reciprocity failure – that delightful chemical property of film where it becoms less linearly reactive to light the longer it is exposed to it (meaning you need longer exposures than you think you do) – would definitely be an issue.
Reciprocity data is unfortunately not available for Cinestill 800T (I did ask Cinestill directly). As has been commented on elsewhere, having no published reciprocity data for cinema films is not unusual (Cinestill 800T is the motion picture film Kodak Vision 500T with the remjet pre-removed). Movies are generally produced under appropriate lighting where super long exposures are simply unnecessary. Exposure bracketing could be an option to deal with the lack of reciprocity data, though perhaps an impractical one. I would be looking at bracketed exposures of potentially 15 minutes, 30 minutes, and 60 minutes of exactly the same scene, and with my limited time in the region I didn’t want almost two hours for three images of the same scene. Ultimately, I decided that I would not bracket, but would take an educated guess of between 1-2 stops of extra exposure to compensate for reciprocity failure, knowing that Kodak films generally needed more light rather than less. I would take my chances and aim for a greater variety of shots.
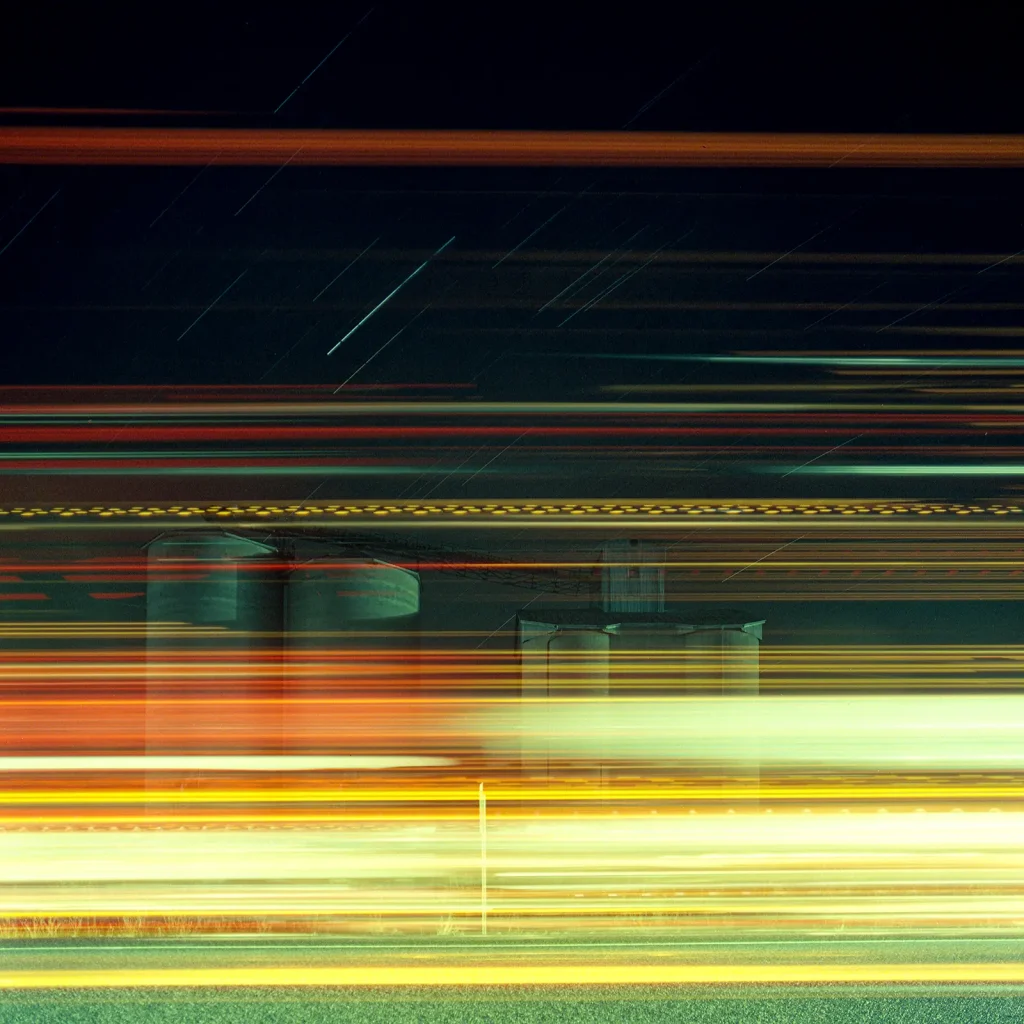
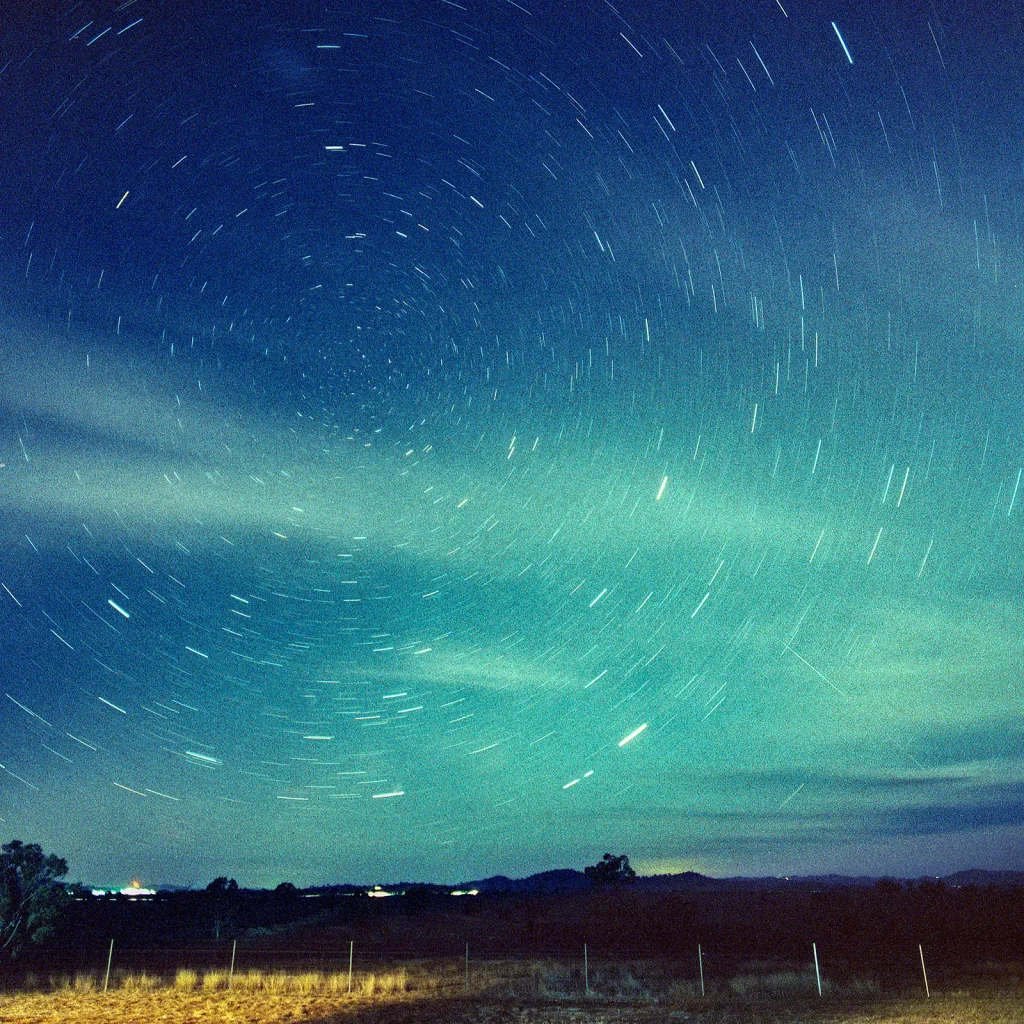
In the end I shot two rolls of Cinestill 800T in two locations. The first location was just north of Dubbo. I took a series of photographs near Ballimore where a grain silo sits adjacent to the Golden Highway (otherwise known as the Dunedoo Road). There is a modest amount of car and road train traffic (large trucks with multiple trailers) that made an exposure calculation even more tricky. There was very little to no moon light on the scene, interspersed intermittently by bright truck head lights, tail lights, and running lights randomly every 5-15 minutes. How do you calculate that in your Black Cat exposure guide?
The first photograph was taken from across the highway from the silo, safely away from the road verge. I exposed the frame for 40 minutes, allowing an extra stop for reciprocity failure. This was of course enough time for passing trucks to invade the frame, but I trusted that the latitude of film would absorb that light, rather than blow out the scene (which it did on my digital capture). You can tell the truck passed from left to right as the tail lights start just to the left of the middle of the frame and, whilst the headlights enter right and fade out just before the middle of frame. The truck light trails were an unsurprising, though unintended feature. If you look to the background there are star trails above the grain silo.
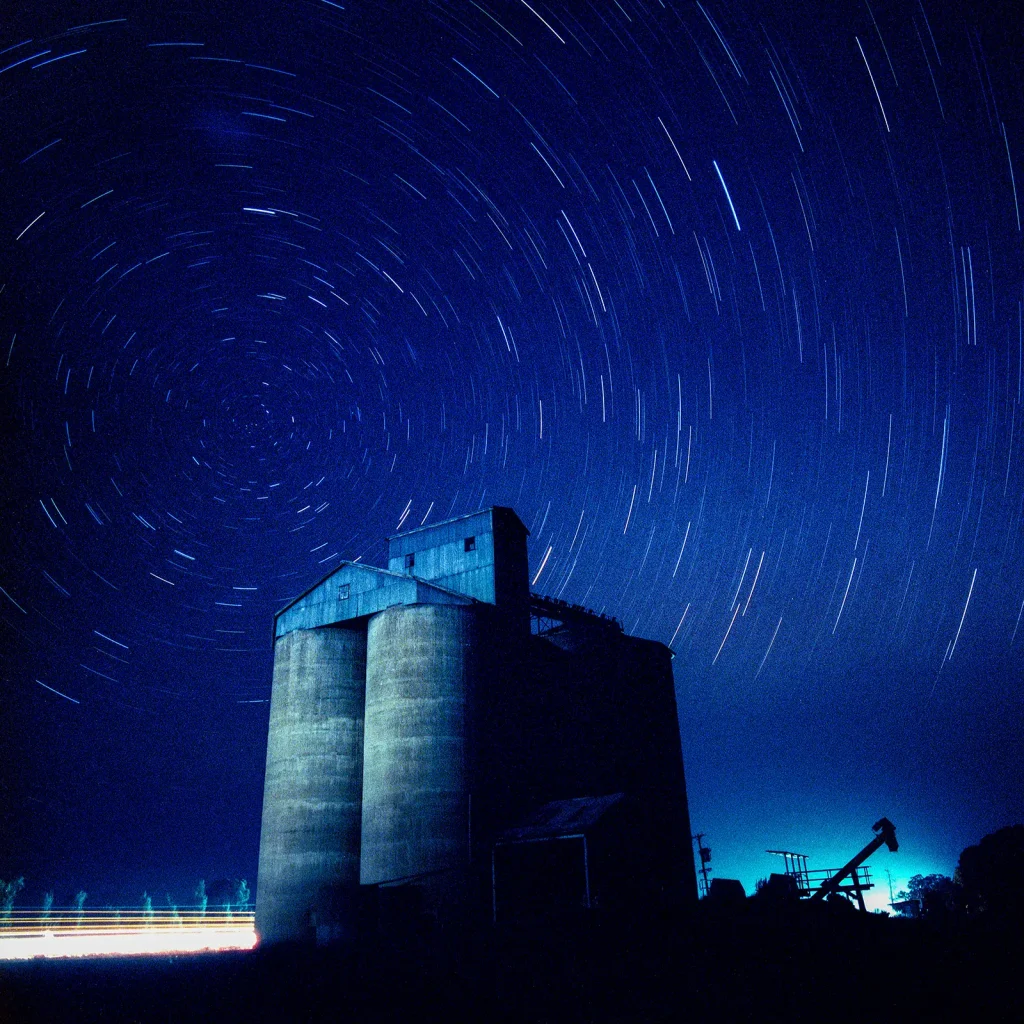
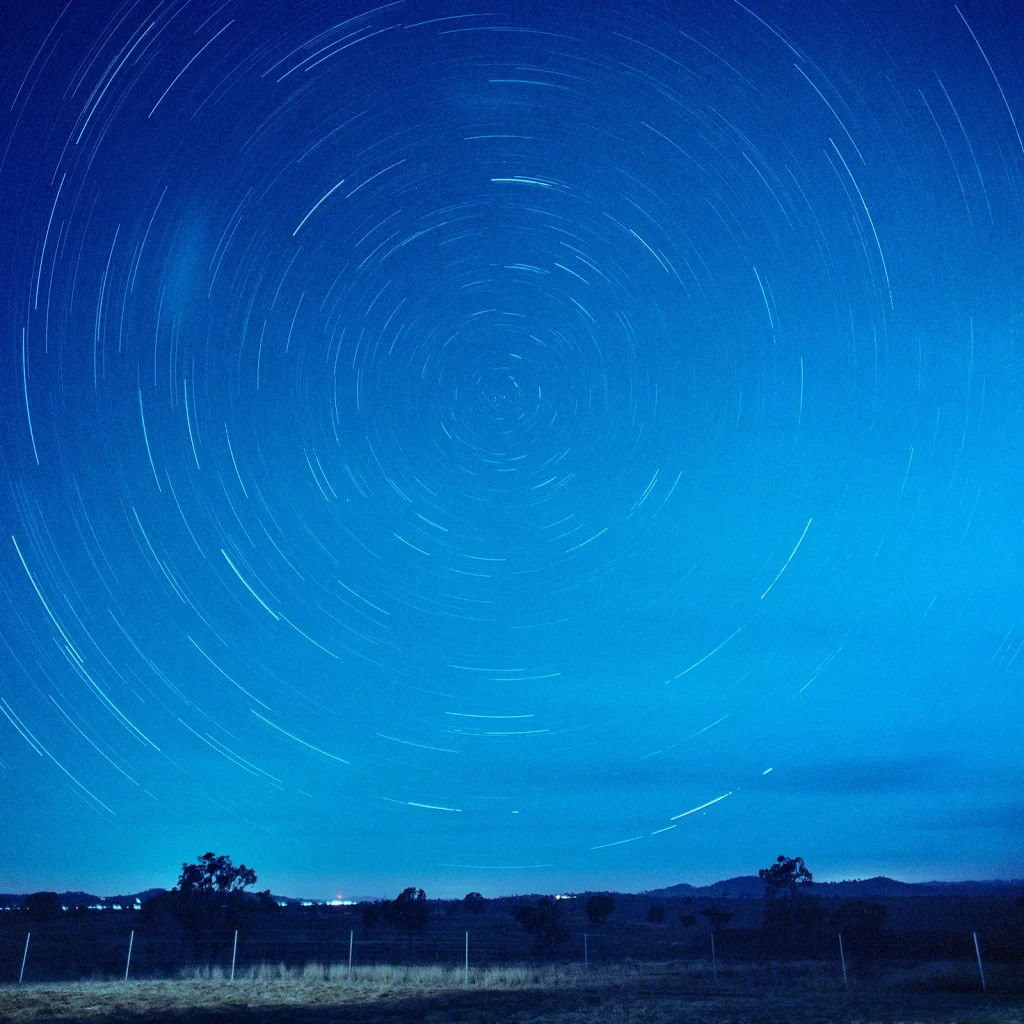
But what if I used the lights of the traffic as a feature and tool? This should cut down the exposure time. The second and third photographs were taken next to the grain silo itself. The first is a 15 minute exposure and the second a 30 minute exposure. The silo is lit by the headlights and sometimes the taillights of the passing traffic. The photographs have both come out rather blue due to the tungsten characteristics of Cinestill 800T in the absence of tungsten lighting. This can be corrected with a warming filter, but I don’t want to increase exposure times any more than I have to, and I actually don’t mind the colour cast, particularly for these night shots.

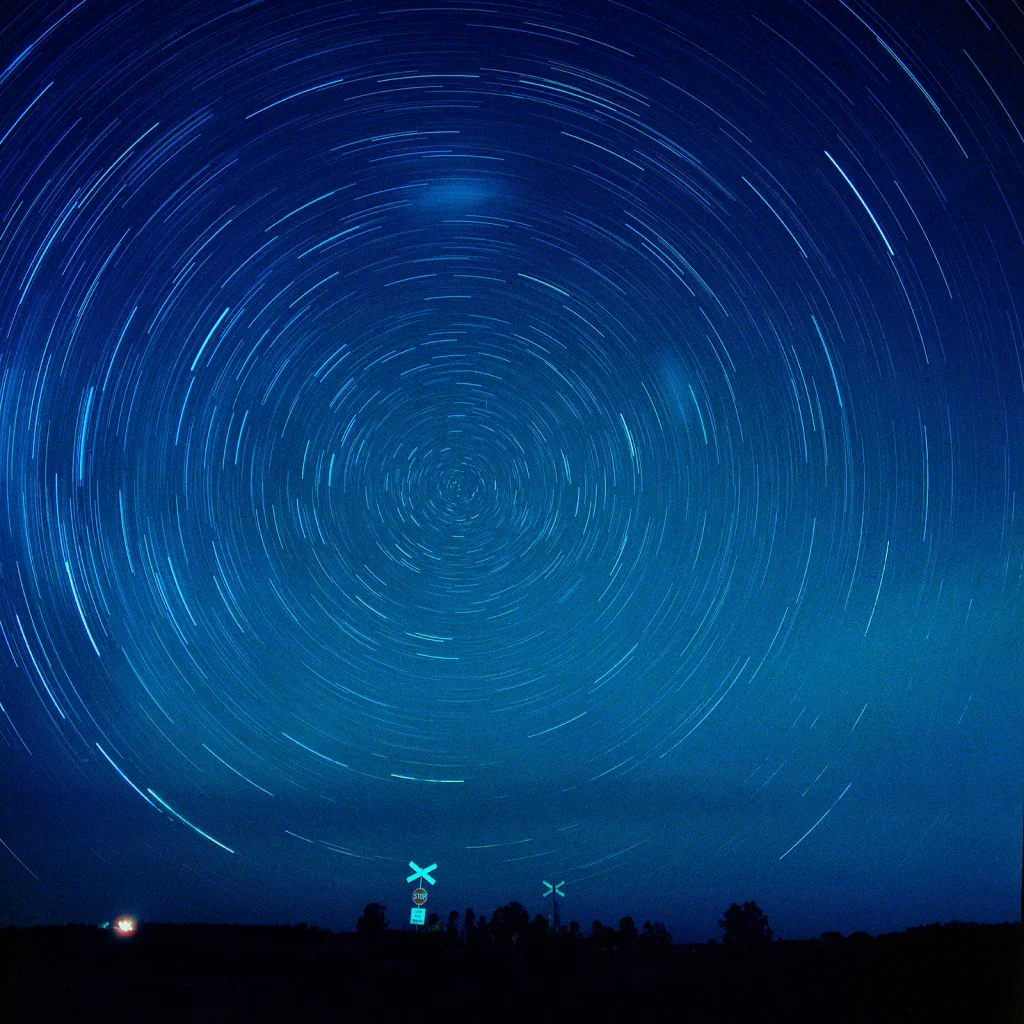
The fourth image is from closer to Dubbo. I had photographed here before with the OM1 and Natura 1600. On that occasion I had missed focus and had found myself with a rather soft image. This was exposed for 1 hour, adding an extra stop for reciprocity. I love the pin wheel of stars when facing due south. I would have preferred more of the actual landscape to have been illuminated. As it is, there is only the indirect lighting on the traffic signs at the railway crossing coming from the passing traffic on the highway behind me. I should return here when there is more moonlight as I suspect it may look more special.
The fifth image is from my second roll of Cinestill 800T and is shot a few nights later at Gulgong, about 100km east of Dubbo. The moon was a little brighter by this time, and I calculated an exposure of 15 minutes. The sixth image in the same location with the same conditions but was exposed for 1 hour. I think you can see a significant improvement in grain and tones with a two stop compensation for reciprocity.
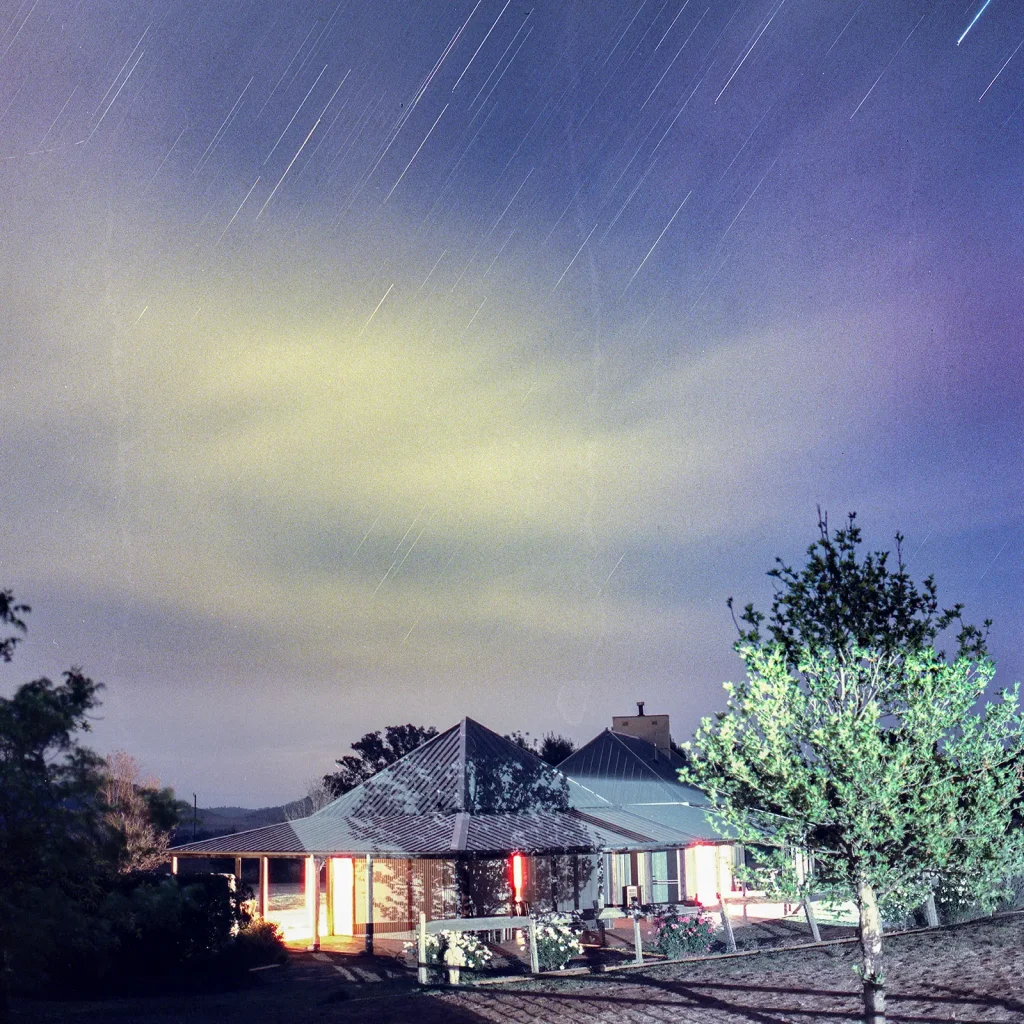
The final image was captured with the Zeiss CF 80mm f/2.8 lens for 15 minutes wide open. The clouds were moving in, but the star trails are still visible above the cottage.
Both rolls of film were home developed in the Cinestill C41 colour developing kit, using a “Rodinal push” (I used R09, a Rodinal equivalent). I learnt about the Rodinal push from listening to Edward Conde’s Podcasts (Grainy Dayz Podcast and the Ultra Low ISO Club Podcast), he also writes about it on a Lomography Blog. The film is first given a Rodinal 1:100 stand development for 10 minutes, followed by a standard C41 development. The addition of a first development in Rodinal provides a pushed development without exhausting your C41 chemicals.
What have I learnt from this new foray into star trails at night? I prefer medium format to 35mm film. Cinestill 800T pushes acceptably well to EI3200, but it should get at least two stops extra exposure for reciprocity failure compensation. I should work out what the reciprocity failure data is for myself before my next trip. Capturing star trails is a neat trick that I may never get tired of, but you still need to make a photograph. I would prefer to have much more available light in order illuminate the landscape (essentially this means having a much brighter moon), or alternatively, the luxury of being able to make two to four stops longer exposures (a luxury I don’t have on a short trip when my base exposure is 15-30 minutes). The images start looking same same if it’s only stars that are visible. After all, it is the same stars wherever you are in the hemisphere. It’s the landscapes that differentiate your image (have a look at Jong Lee’s Instagram as an example of effectively using a variety of landscapes under star trails). So next time I am hoping for a fuller moon. I might also try Kodak Portra 800, and if I ever have the luxury of time, I would love to try Ektachrome or Provia.
Let me know in the comments below if you have any data on Cinestill 800T reciprocity failure calculations, and if you know whether long exposures drain the Mamiya 6 battery. Any other comments are welcomed too. Till then, happy shooting.
www.instagram.com/billthoo
www.instagram.com/analognights
Share this post:


Comments
Alex Kreisman on Shooting Star Trails with 120 Cinestill 800T – By Bill Thoo
Comment posted: 06/03/2020
Comment posted: 06/03/2020
Peter on Shooting Star Trails with 120 Cinestill 800T – By Bill Thoo
Comment posted: 06/03/2020
Comment posted: 06/03/2020
Huss on Shooting Star Trails with 120 Cinestill 800T – By Bill Thoo
Comment posted: 06/03/2020
Comment posted: 06/03/2020
Castelli Daniel on Shooting Star Trails with 120 Cinestill 800T – By Bill Thoo
Comment posted: 07/03/2020
That’s the best. How could you go wrong? A ‘Blad w/a glass of ????, a good munchie (you must have finished that ????!) and the promise of a good photo op.
Comment posted: 07/03/2020
matthew jones on Shooting Star Trails with 120 Cinestill 800T – By Bill Thoo
Comment posted: 09/03/2020
Comment posted: 09/03/2020
eric on Shooting Star Trails with 120 Cinestill 800T – By Bill Thoo
Comment posted: 04/05/2020
Thanks so much for last reply on other stars photography.
Yes agree Sydney RewindLab is one of the best Lab on earth and they work very very very well, process are precise and scan marvelous. And they are very smart.
I did not know this is good time to do now. I use a old Leica M3, and mostly Ektar 100 (how long exposure please with a Voigtlander 15 mm at f5'6, please ?) {I have a stock of Ektar and Velvia 50). The Hawkesbury River can provide me nice spots. What time do you take the photos actually ? Sorry to ask all these questions, but I have never done it.
I love your image !!! They are so great.
Now all materials are from Japan, Korea, Australia, Europe, North America (included phones : I will try some the manual mode of my LG V 40 ThinkQ and is excellent ultra wide angle).
Thank you a lot for sharing.
Comment posted: 04/05/2020
Mike on Shooting Star Trails with 120 Cinestill 800T – By Bill Thoo
Comment posted: 01/04/2021
Comment posted: 01/04/2021
nate ford on Shooting Star Trails with 120 Cinestill 800T – By Bill Thoo
Comment posted: 06/09/2021
In order to create the illusion of motion, movie cameras shoot 24 exposures per second. The projector plays back the finished film at the same rate, the rapidly projected sequence of very brief still images creating the “persistence of vision” illusion, and voila- we perceive motion. Given these parameters, an exposure lasting longer than 1/24th of a second is physically impossible. In fact, even 1/24 is too slow because after each exposure, the shutter needs to close and the camera mechanism must advance the film to the next frame. The film moving must happen while the shutter is closed or the resulting film would show streaky motion blur from the film moving, same as if you advance the film in your Hassy while the shutter is open. Hence, while there’s some variation among various camera designs, the standard exposure time for cinema is 1/48th of a second, usually metered as 1/50. Some movie cameras have variable shutter angles, allowing for some flexibility in shutter speed for special effect- eg, the narrow shutter angle used to create the frenetic, choppy, almost strobing effect of the opening battle scene in “Saving Private Ryan.” And of course, high speed motion picture cameras shoot at faster speeds than 24 frames/sec, to create the illusion of slow motion when projected back at 24. But for the most part, “shutter speed” in cinematography is treated as a fixed value. And that value is much faster than one that would bring reciprocity failure into play.
Comment posted: 06/09/2021
Pete on Shooting Star Trails with 120 Cinestill 800T – By Bill Thoo
Comment posted: 20/08/2022
With a much longer exposure I would have expected the lit grass in the foreground to be brighter, and not necessarily a different colour altogether, for instance.
I’ve been shooting digital at night for years but am starting to experiment with 6x6 medium format alongside so this kind of article is super helpful. Film definitely behaves differently. Thanks for putting it together, Bill.
Comment posted: 20/08/2022