Last year, a friend sent me an article about someone using a 100 year old Cirkut camera to make amazing contact-printed panoramic photos on 8 inch wide paper. I hadn’t known anything about these cameras, and was captivated, and spent some time reading further about these remarkable machines. A few weeks later, when I was out shooting with my Holga 120 for the 2022 edition of Holga Week I started to think about the fact that the advance wheel on a Holga is conveniently easy to access and turn, and I wondered if you could make a simple toy version of a panoramic camera by just holding onto the advance knob and letting the camera turn around it with the shutter open.
For the last year I have, occasionally, daydreamed about building such a panorama camera. As Holga week 2023 has approached, I started thinking seriously about how to make it happen. I read more about slit scan cameras, including some of the best online info that seems to exist in the form of the many articles written by Andrew Davidhazy, a retired professor of photography in the School of Photographic Arts and Sciences at RIT. Andrew has very helpfully posted these on his website.
The first thing I realized was that, as with most things in life, it would not be as easy as I had imagined. I thought I could hold the film advance knob and use it to spin the camera on some kind of pivot. But what I quickly understood was that this would not work because the film needs to advance much more than 1 rotation for every 360 degrees of camera spin. For each rotation of the advance knob, only ~38mm of film is advanced, but a 360 degree image on 120 film with a 60mm lens should be closer to 370mm! So the advance knob should actually rotate just about 10times for each full rotation of the camera! Obviously, if I wanted to make this kind of camera work, I’d need to have the film knob turn much faster than the camera. But, undeterred, I got to work…
Hardware
Slit insert
The first, and easiest, step was creating a slit to convert the Holga into a basic slit scan camera. I designed an insert that I could print on my 3d printer using an excellent template that I found on thingiverse. This is a direct swap for the insert that comes with the camera.
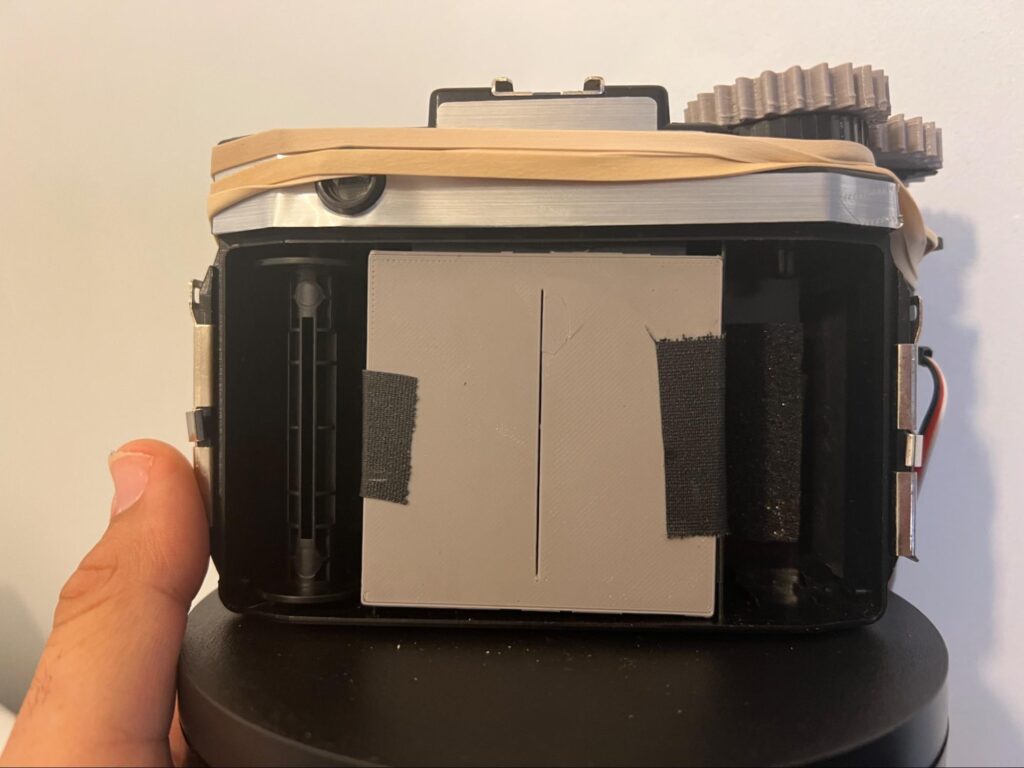
Based on various sources of slitscan camera info, I started with a slit width of .4mm. Just about the smallest opening my printer could probably handle.
Camera Rotation
Next I had to figure out the camera rotation. In my initial idea, I would manually rotate the camera in a smooth arc by holding some kind of handle attached to the advance knob with the camera mounted on some sort of bearing mounted on a tripod. Once I realized the advance knob needed to spin at something like 10:1, I realized this approach was probably not going to work. I briefly wondered if I could 3d print a geared mechanism that would still let me turn the camera by hand and advance the knob rapidly, but it didnt seem feasible. Instead I bought a cheap, small electronic turntable from amazon. There are MANY such turntables available. This one can rotate continuously, has 3 speeds (8/15/30 sec per rotation) and can be powered via battery and USB-C. The only potential downsides I could see for this turntable were that it does not have a faster speed than 8sec/rotation and on the slower speeds the turntable is not as smooth as it is at full speed.
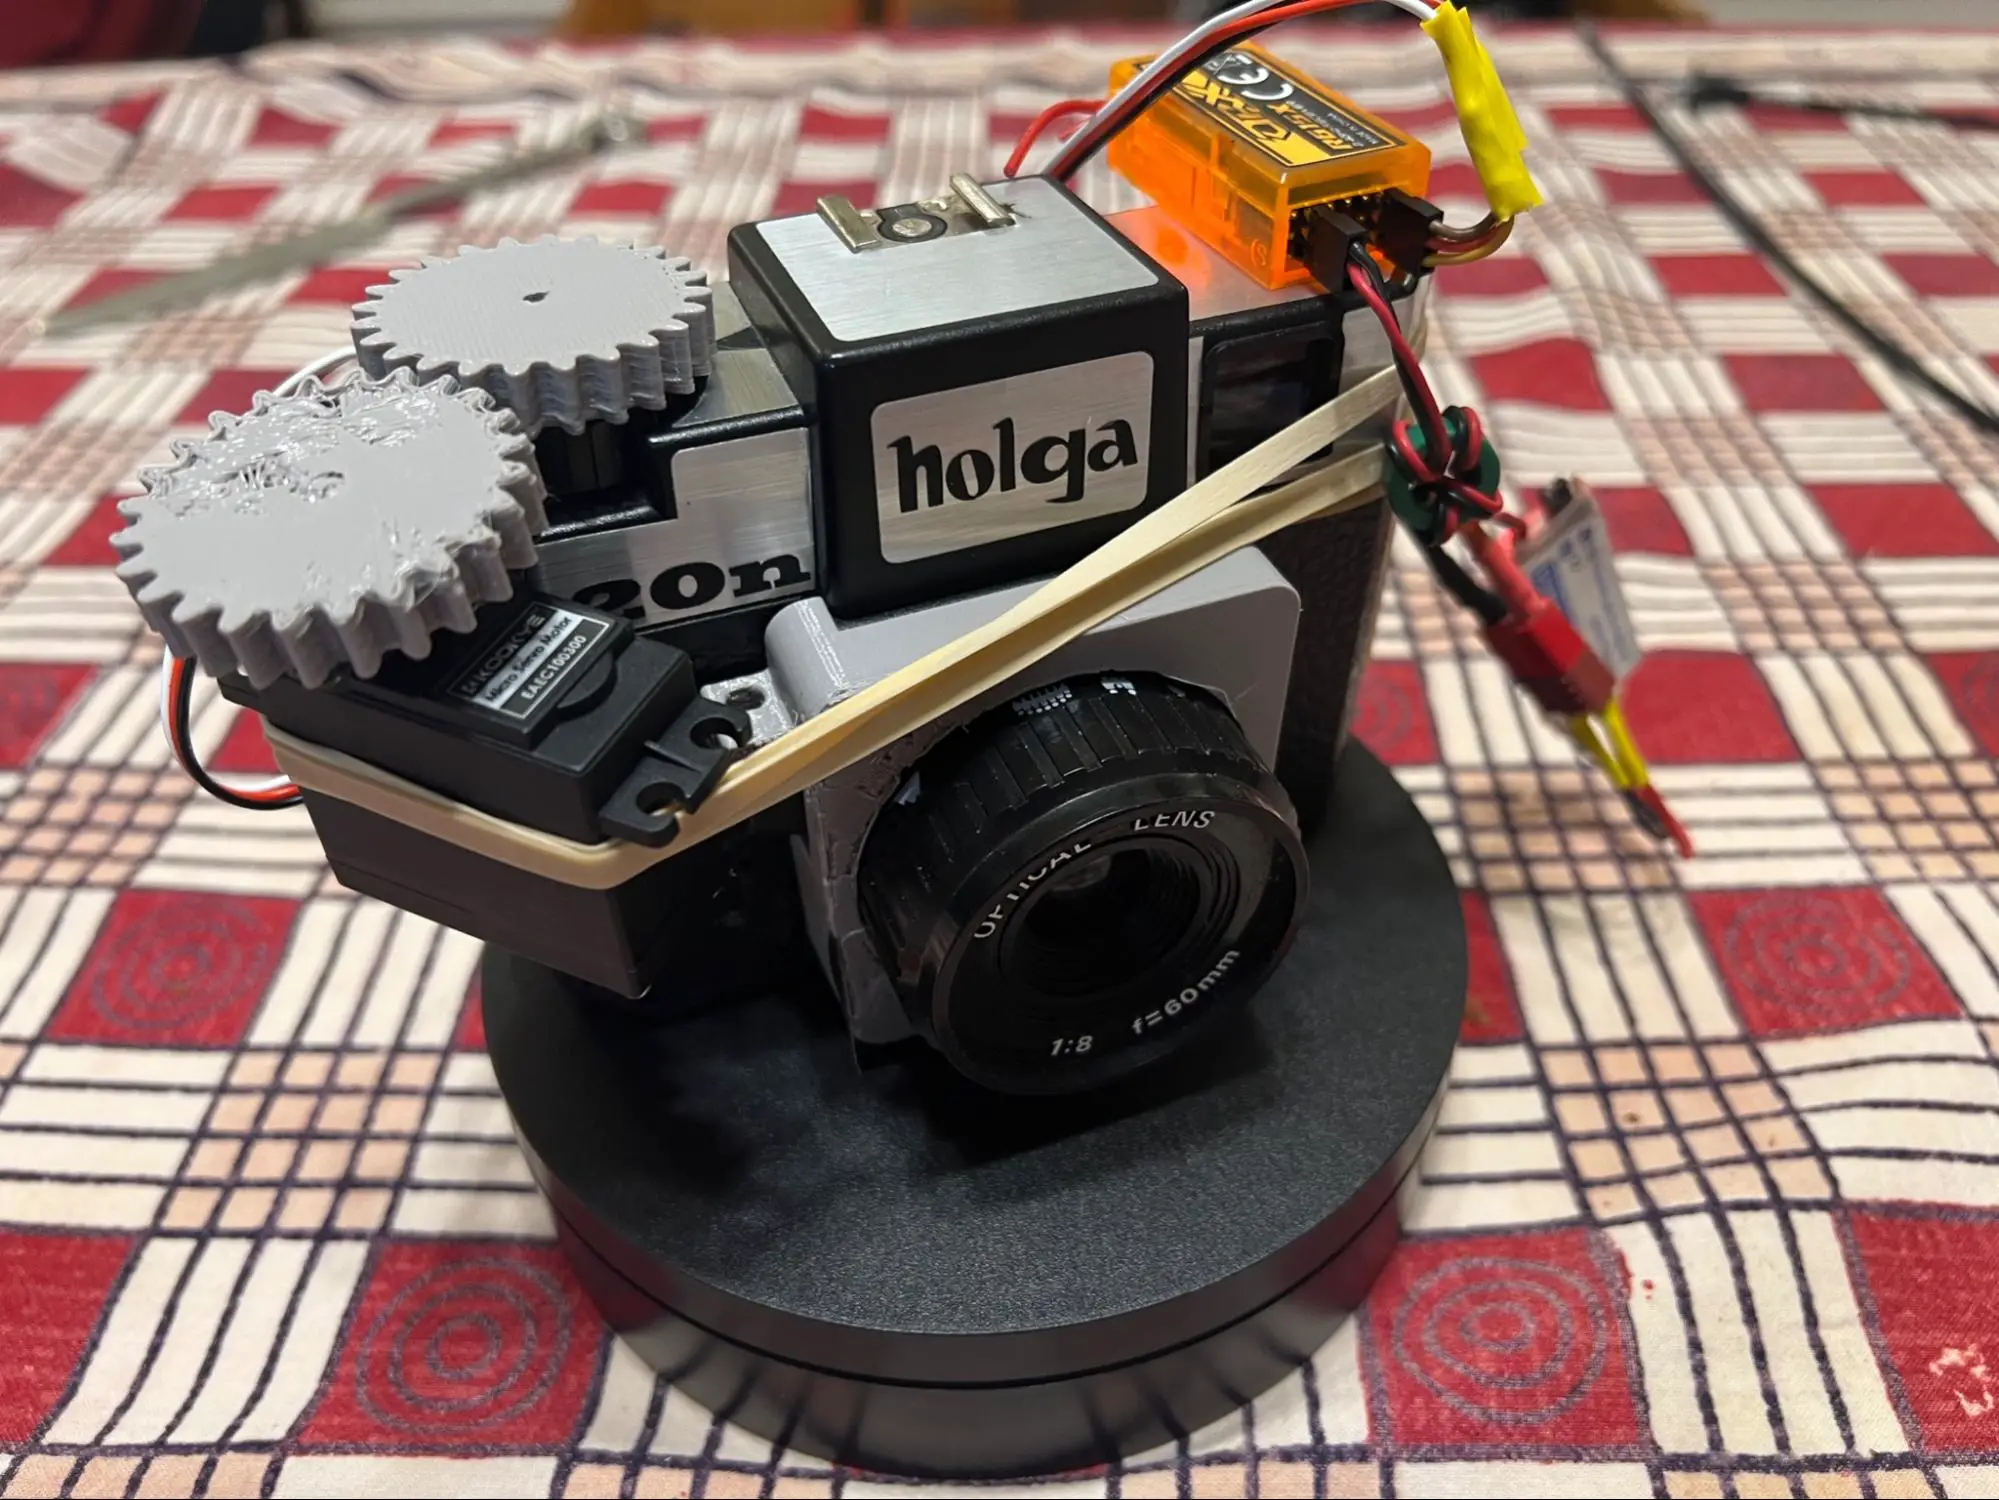
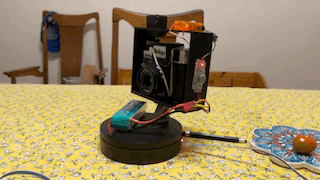
Initially I was just tacking the camera down to the turntable, using hot glue, so that it can be easily removed to reposition it or adjust things. Ideally the camera should rotate around the nodal point of the lens. But at this point I was just guesstimating the nodal point for the Holga and aligning that with the center of the turntable. This is a significant potential source of blurriness.
Film rotation
The hardest problem to solve was how to create a mechanism to advance the film at a constant speed. Many examples of this sort of camera published on the internet use small dc powered motors. But I have extensive experience building and flying model airplanes, so I decided to use a continuous rotation servo instead, which I am much more familiar with. A servo is easy to power, and could potentially be controlled by either an arduino running some code, a manually adjusted potentiometer, or a radio control system. Initially I was imagining controlling the servo via an arduino and some AA batteries (housed in a small 3d printed case). In such a setup you could write a “sketch” to run the servo at exactly the right speed. But in my initial tests I was having a hard time setting up the separate power for the arduino and the servo. So instead I switched to using a radio control system. I am powering everything via a 2200mah lithium polymer battery plugged into a BEC (Battery Eliminating Circuit) that outputs 5v. The BEC powers an r/c receiver which, in turn, powers and controls the servo. For initial testing the servo speed was controlled by the throttle stick on my r/c transmitter, but as I got the system set up, I switched to controlling the servo (on/off) via a switch. This keeps the rotation at a constant speed and I can tweak that speed in the transmitter settings. It is also possible to set separate programmed speeds to match the film advance to different camera rotation speeds.
The servo was initially driving the film advance knob via 3d printed gears that I found on Printables. Initially I mounted these gears at a 1:1 ratio, but I quickly discovered that at its fastest speed, the servo is only driving the film at ~8 rotations in the time it takes the camera to go around once on the fastest turntable speed (8 seconds). This is almost but not quite fast enough. So the options then are to either change the gearing to allow the servo to turn the knob more quickly, OR to only use the turntable at the medium speed (15 seconds).
Finally, for mounting the servo to the camera I was just using hot glue, some rubber bands, and some plastic spacers. In my initial setup I had mounted a 3d printed adaptor to hold a cable release, but it got in the way of the servo, so instead I locked the shutter mechanism open, and used the lens cap as a shutter.
Calculating Exposure
One thing that gave me some trouble was trying to match the two adjustable speeds (camera rotation and film advance) with the slit width to arrive at something approximating a correct apparent shutter speed with which to calculate the correct exposure. Although it seems like it should be simple, it took me a while to wrap my head around calculating the apparent shutter speed with a slit scan camera. It goes like this:
Apparent shutter speed = slit width (mm) / film advance speed (mm per second).
With my camera set to 15sec per 360° on the turntable, the film advance has to turn 10 times in 15 seconds to have the appropriate film advance speed. For each revolution of the advance, the film is moved ~38mm. But the film is only advancing a fraction of a rotation per second (10 rotations/15 seconds). So the film is advancing .66 rotations per second which equals 25mm of film (.66x38mm). In my initial setup this means the apparent shutter speed is .4(the slit width)/25 (mm/sec) = .016. Which is pretty close to 1/60. That’s not bad at all and is only slightly slower than the nominal normal shutter speed of a Holga!. Given that the Holga has f stops of ~13 and 22 (I previously modified my older Holga to have a functional second aperture). This should be “reasonably” close to the correct speed for ISO 100 film on a sunny day with the smaller aperture.
Results
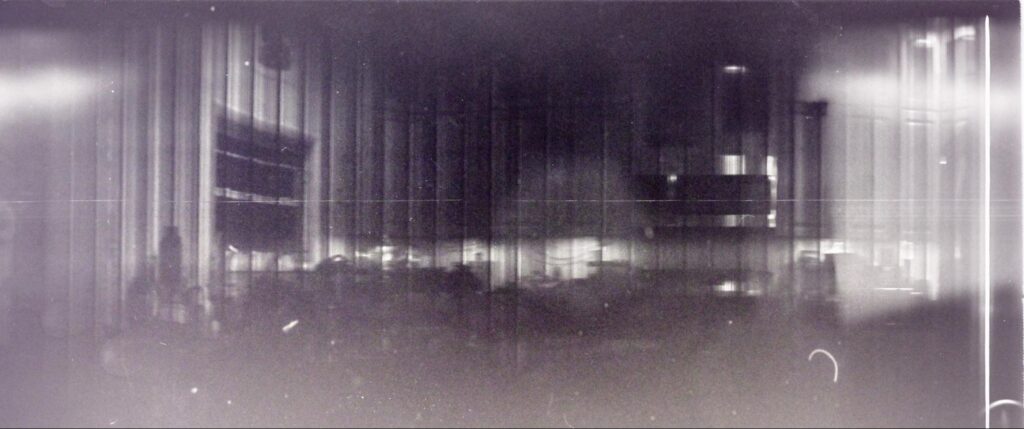
In a rush to test all the components, and the basic functionality of the system, I did my first test on my dining room table late at night. There were a bunch of obvious problems with the initial setup: The gears were not meshing properly, and there wasn’t enough light so I resorted to pushing some Foma 100, and I hadn’t sorted out the exact speed to sync the servo to the turntable. But, I was extremely excited to develop the roll and see that I got something, even if it had heavy banding due to the binding of the gears.
Revision 1
I learned a bunch of things from the dining room table test. Mainly that this was basically feasible, though I would have to work out several problems.
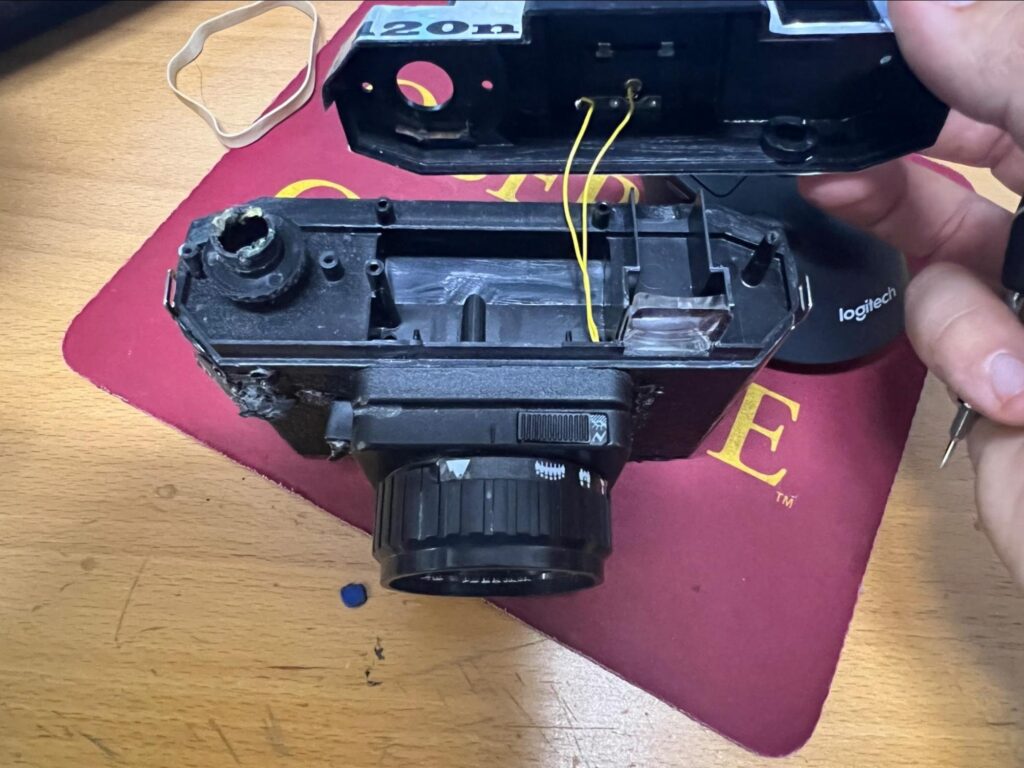
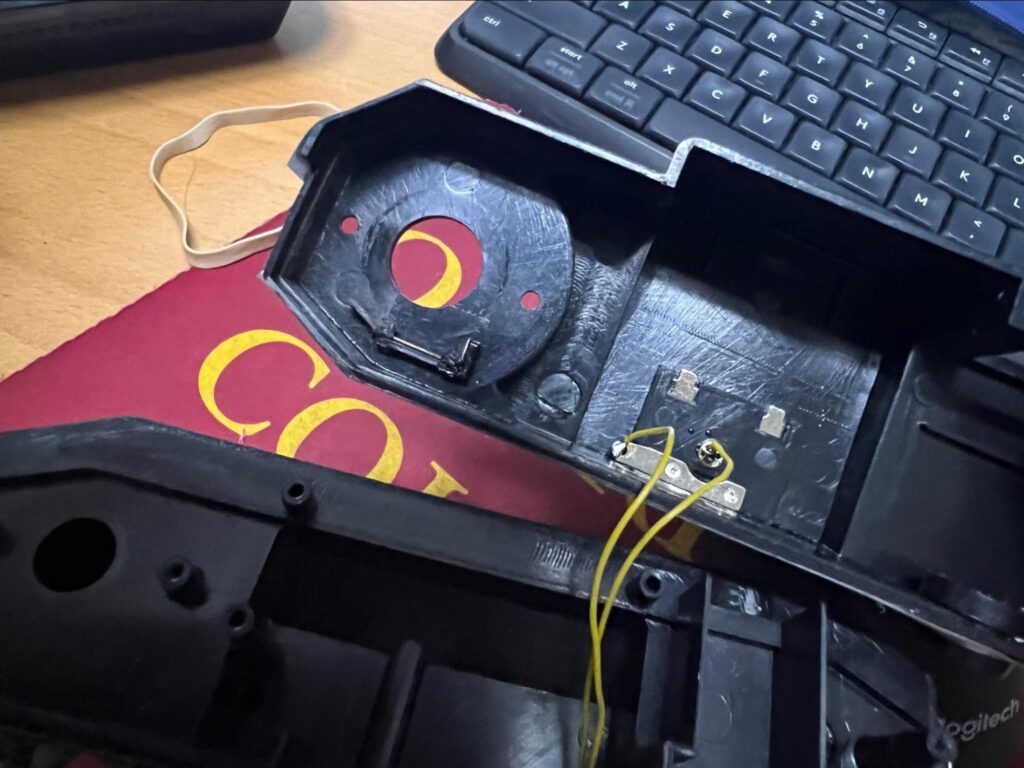
The biggest was smoothing out the rotation of the knob advance. I could SEE it binding in real time and thus slowing down and speeding up. I tried changing the gearing, and adjusting the angles and location. Eventually I realized that because of the lack of stiffness in the whole advance system (its just made of flimsy plastic), the amount of force needed to advance the film, and the force needed to hold the gears together, it just wasn’t going to work smoothly.
So I thought of a better way of mounting the servo. I designed a 3d printable frame to surround the Holga with a slot to hold the servo directly OVER the knob, allowing the servo output to be directly mated to the knob and turn it without any gearing. The downside is that you lose the ability to adjust the gearing to increase the final speed, but the power transfers much more smoothly, and there are no worries about gears not staying aligned! The frame was easy to design and prints relatively easily since it can sit flat on the 3d printer bed. I added a hole underneath so that the camera can be secured to the frame via a tripod screw. There is a little bit of play to allow the servo to be directly centered and then float freely so that it does NOT rock the camera. The rest of the electronic component can be glued to the frame as well. The result is a system where the film advances quite a bit more smoothly.

Before testing Version 2 in the real world, I respooled some empty 120 paper and ran it through the camera. I immediately noticed that while the servo was now able to spin the knob smoothly, the detents in the knob that allow you to advance a holga by listening for the “clicks” was visibly causing the film to stutter at each click. I knew this would cause banding (and in fact is the cause for much of the banding in the original test), but for some reason I thought I would have to break the top of the camera to be able to remove the clicks. So I resolved to test the current setup before doing anything dramatic.
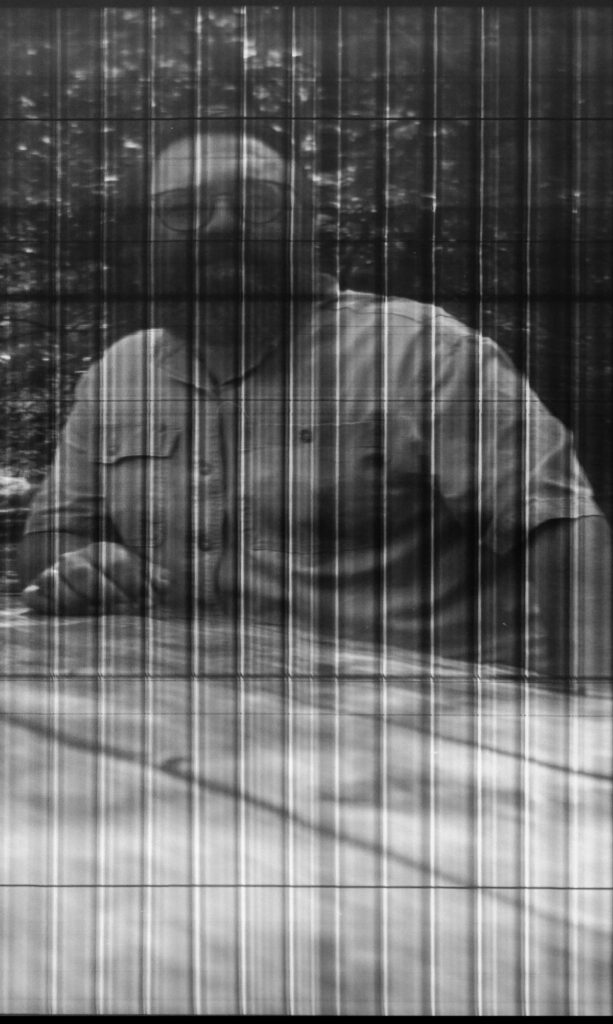
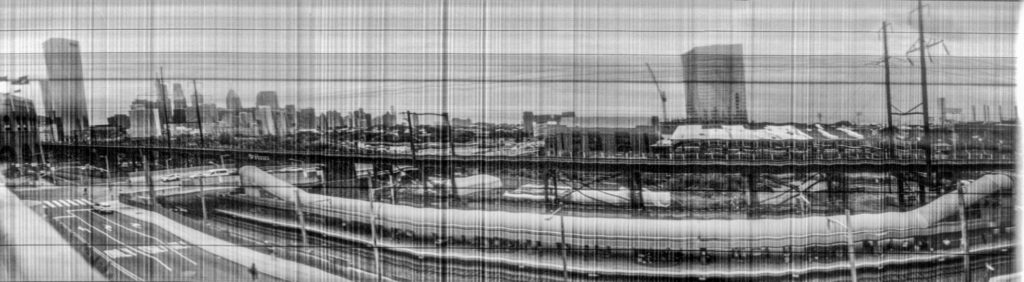
Here is my first result outdoors using v2. I took the camera to Rittenhouse Town a local historic landmark, to test. The result is a complete single frame exposure of an entire roll of 120 film, from start to finish, with just a little cropped off the end. It is one continuous image that is longer than 360°, and in fact is closer to 500° (you can see two of the houses repeat at both ends). I am sitting at a bench in the middle. The banding is severe, but the image is still fairly sharp. The camera rotated smoothly and the advance turned smoothly except for the clicking. The image has a width to height ratio of approximately 14:1. Here is a link to the full res-version on Flickr.

Immediately after this test I realized that the clicking is actually easy to resolve. There are 3 screws that allow the top of the holga to be removed. Two are located under the advance knob. With the top removed you can see the little piece of bent metal that causes the clicking (and stops the knob from running backwards. I simply bent this metal out of the way (which is reversible) and replaced the knob. This should remove a major source of banding!
Revision 2
With the clicking removed, the system functioning as well as I thought I could make it, and Holga Week 2023 in full swing, I took the camera to work with me and attempted a 180 degree exposure from a garage overlooking the Schuylkill River and Philadelphia skyline.
I did a pair of ~180 degree scans and then 1 additional partial scan at a different spot on the river.
In a fascinating result, the lack of the click wheel DID have an effect on the banding, but it did not completely alleviate the problem. There are still some significant bands appearing:
The bands are smaller, less consistent, and less intrusive, but they are still there. I suspect this might be due to the fact that the turntable, if observed closely, does not actually turn smoothly but instead seems to move in tiny steps.
I suspected the banding could be further ameliorated by increasing the width of the slit, which may make the apparent shutter speed slower than the inconsistencies in rotation, thus smoothing them out. I designed a new 1mm slit which, at the middle speed on the turntable, will produce an apparent shutter speed of 1/25.
Revision 3 – Slit Adjustment
For my final test, I printed the 1mm slit insert and took the camera back to Rittenhouse Town. With an apparent shutter speed of 1/25 I loaded the camera up with expired Efke 25, thinking a daylight exposure would now be better with a slower emulsion (i.e. a sunny 16 exposure of 1/25@f16). Unfortunately, by the time I got to the location, the sun had hidden behind some clouds so I had to settle for an underexposed image:

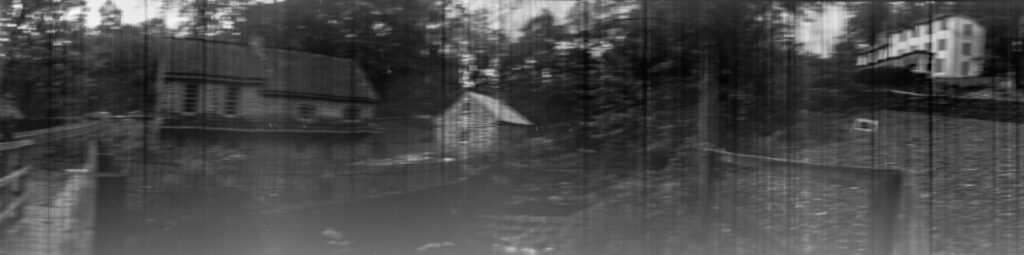
As suspected, a 1mm slit is not a perfect solution, either, as there are still inconsistencies between the film advance and the rotation, but as the slit gets wider, the difference in speed now begins to show up more as smearing rather than banding! This is, of course, the reason why the original Cirkut cameras had finely constructed brass gearing to directly link camera and film rotation. I think that even though the banding is once again less noticeable in the image above, the image is less sharp because of the speed inconsistency. Though I do like this softness and think it is not out of place in a toy camera panorama!
Conclusion
Regardless of whether further improvements in the related problems of banding and sharpness are possible, I am happy with the outcome and think this is a neat way to take some extremely wide, but not perfect images. Looking for “perfection” with a Holga is a fools errand anyway! I’m looking forward to trying this out with color film and with trichrome processing of b+w images, though the banding/smearing may really create problems for lining up trichrome shots.
Although I was inspired to build this by the amazing Cirkut cameras of yore, there are many examples of other people doing similar types of photography, much more recently, with toy cameras. The most notable, of course, is the commercially available Spinner 360 camera from Lomography which lets you collect 360 degree panorama images on 35mm with less banding. There is even, I recently learned, a “motorizer” which lets you operate a Spinner 360 remotely and electronically. You can also do a similar process with a standard holga on a tripod, as “HolgaRamas“, which can produce variably overlapped images for a similar effect. Finally, since this seemed like such an obvious thing to do, I am really unsurprised to have found, as I was writing this up, another example of someone building a slit-scan panoramic Holga: The “Holga-Pan” is a beautiful and much more heavy-duty build that was put together 20 years ago by Richard McCaleb. Check out the awesome article written by Sonny Rosenburg! I notice that with a direct linkage between the film and camera rotation there is less (but not zero) banding.
Please let me know (on ************@******on.art“>Mastodon or Bluesky) if you try making something similar or use any of the models I’ve linked here. This is such a fascinating way to make pictures, and Id love to see more builds of variations on this theme. Maybe you have an idea for an easy way to more directly link the two types of rotation. Or, if you happen to be reading this during the HolgaWeek ‘23 voting, consider voting for one of the two images I entered using this camera!
A Note on Scanning
Someone on Bluesky asked about how to scan an image that spans an entire roll of 120. And it is actually relatively straightforward. I have switched to DSLR scanning for all my negatives and use 3d printed holders (like this one for 120) on a light table below a copy stand. For the 360+ degree image I loaded up the holder as usual, estimated an average exposure that would work for the entire image with the camera set to manual, and took a shot of the first section. Then I slid the film through the holder until only about 20% of the first image was still visible, and took another shot. I repeated this process until I had shot the entire roll. When I brought the images into Light Room Classic I rotated them all, and then used the “Photomerge to Panorama” tool to assemble them. This was followed by my normal workflow to invert and adjust digital scans.
Final BOM
Even though it took several iterations and is MUCH more complicated than I originally imagined, it is not too impractical to build a slit scan panorama holga (though it helps to have access to a 3d printer and some r/c equipment laying around!). Here is my final list of materials for the working setup. But you could fairly easily substitute some things here, like swapping out the r/c system for an arduino controlled by a physical switch.
A 120 Holga
The 3d printed Frame
A continuous rotation servo
An r/c receiver
An r/c transmitter
A BEC to power the servo and receiver
A 3s lipo battery (this size is overkill, but its what I had)
A turntable (I am using this one, but I wish Id bought a different one!)
120 Film (Though 220 would be awesome!)
The Slitscan insert or the 1mm version
Share this post:


Comments
Karen McBride on The Cirkut-Holga: A toy slitscan panorama camera
Comment posted: 08/12/2023
Comment posted: 08/12/2023
Stevenson G on The Cirkut-Holga: A toy slitscan panorama camera
Comment posted: 09/12/2023