In my previous piece, I mentioned how colour photography on film has become completely unaffordable for me since 2016. In 2018, having shot most of my remaining colour films, I decided to remove colour films from my personal projects. I only shot black and white films from there on.
I have a stash of Fuji C200 I am saving for a project but besides that, it’s all black and white from here on. The first challenge lay in finding a film that was cheap while delivering good performance in the field. As mentioned in the previous post, the Orwo N74 was the perfect fit for me. It was so good I actually did a review for Emulsive and you can read it here. But Filmotec decided to change the emulsion which was significantly slower than the 400 ISO rating of the N74. There were also fogging issues with the first few batches and I gave up trying to get them to switch back to the original N74 recipe.

So here is part two of my journey as a film photographer. In this part, I’ll talk about how I found my go-to film after a few tests. There was only so much testing I could do during the lockdowns in Singapore back in April 2020 so it was baptism by fire in some ways when I brought the rolls of film on my trips over the past 6 months or so. The images here are from the tests done on the field I’ll also share the tests I put the film through while shooting my projects in Germany and India. Having done that, I’ll give the reader a glimpse into a “new” form of colour photography I have embraced.
Living life in ISO Priority
Filmotec’s focus seemed to shift from making proper photographic/cine films to marketing bling bling accessories. Hence I decided to try out another film with much annoyance at having to go through the same experimentation I did 4-5 years ago. But hey, Covid came, my shoots and workshops got cancelled and I had all the time in the world from March 2020 onwards.
Enter Kodak Double X. The only way to try this out was to buy the overpriced Cinestill XX or buy a 400 feet tin straight from Kodak. Buying the 400feet tin meant rolling it up in to 35mm cartridges, selling off as many as possible on the local market and use the rest to experiment. I chose the latter pathway. Didn’t regret it one bit.
At around S$5-6 a roll, it was a no brainer especially since I expected myself to shoot at least a dozen rolls in all kinds of lighting conditions to see its performance. So, having rolled up the films, I spent my lockdowns shooting photos of my nieces and my dad.
I really didn’t have to do much testing though. 30 years ago a gentleman by the name of Steven Spielberg used this film to shoot a blockbuster movie named “Schindler’s List”. Surely the film should work for a nobody like me. And if something went wrong, it’s probably not the film. It’s likely to be me and my incompetence. I could at least rest assured the manufacturing quality will not be an issue.
So why live life in one ISO? Because that’s all I could afford. Everywhere I went, I’d bring 20 rolls of Double X and one or two rolls of Delta 3200.

The tragedy of the current photographic film market is the excessive varieties of low and mid Iso films and very few high Iso films. Ilford alone produces 7 different films between ISO 50 and 400. But it only produces one film with an ISO greater than 400. Manufacturers like Silberra fell into a messy situation because they produced so many different emulsions between two ISO stops instead of spreading it over a bigger range of film speeds. So I do hope this void in the high ISO film range is filled with something affordable.
In situations where the appropriate ISO was 400, I’d mutter a curse, set my shutter speed a stop slower and shoot on 200 ISO. If I foresaw having to use an ISO greater than 400, I’d switch to the Delta 3200. Shoot a few frames on it, unload it, mark the number of frames on the canister and reload the double X and carry on shooting at 200.
And it was not so hard too “downgrade” from a hardcore 400 ISO shooter to a 200 ISO shooter. When life gives you lemons, you lower your ISO.
The double X is rated at ISO 250 but I shot it on 200. Although a third of a stop is not much of a difference but coupled with an added minute when developing with D76, the blacks hold on to a little bit more detail. I’ll explain this later in the pictures.
So here are a series of photos shot on Kodak Double X. For me a film needs to pass 5 tests for it to become a “staple” and here is how the Kodak Eastman Double X performed in not 5 but 6 tests I put it through. The tests are listed below:
- Outdoors in daylight
- Indoors with window light
- Low Light
- Backlit Scenes
- Fog
- Flash and Artificial Light Photography
A Word on the Photos
Three Projects, Two Countries, One Film
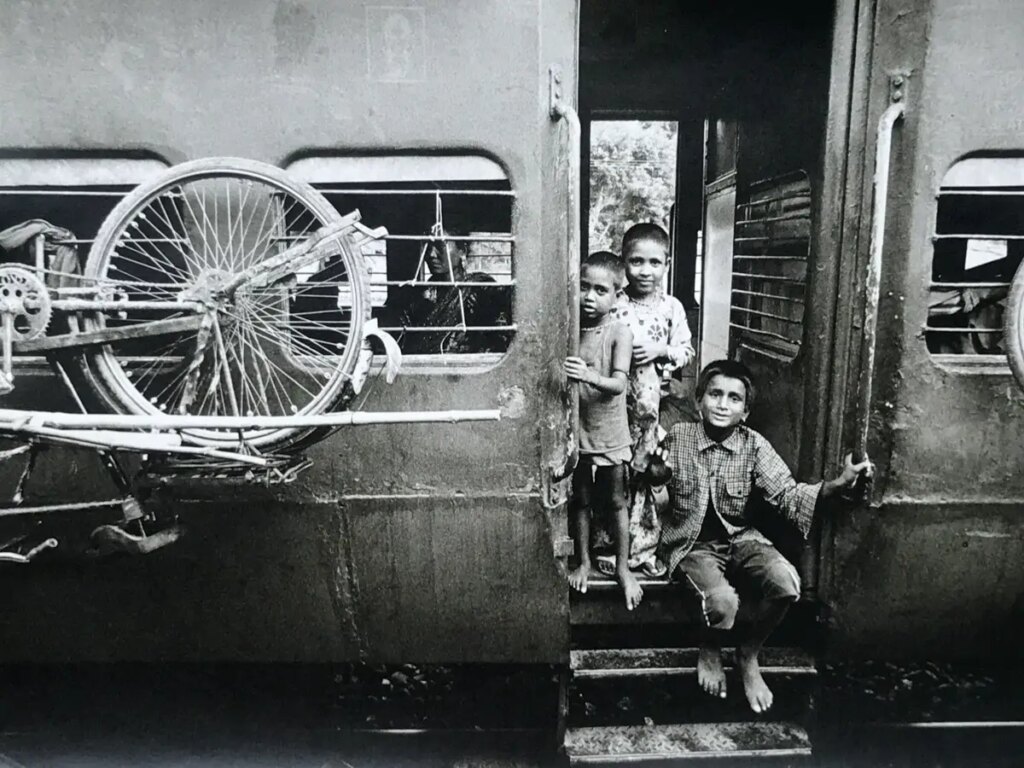
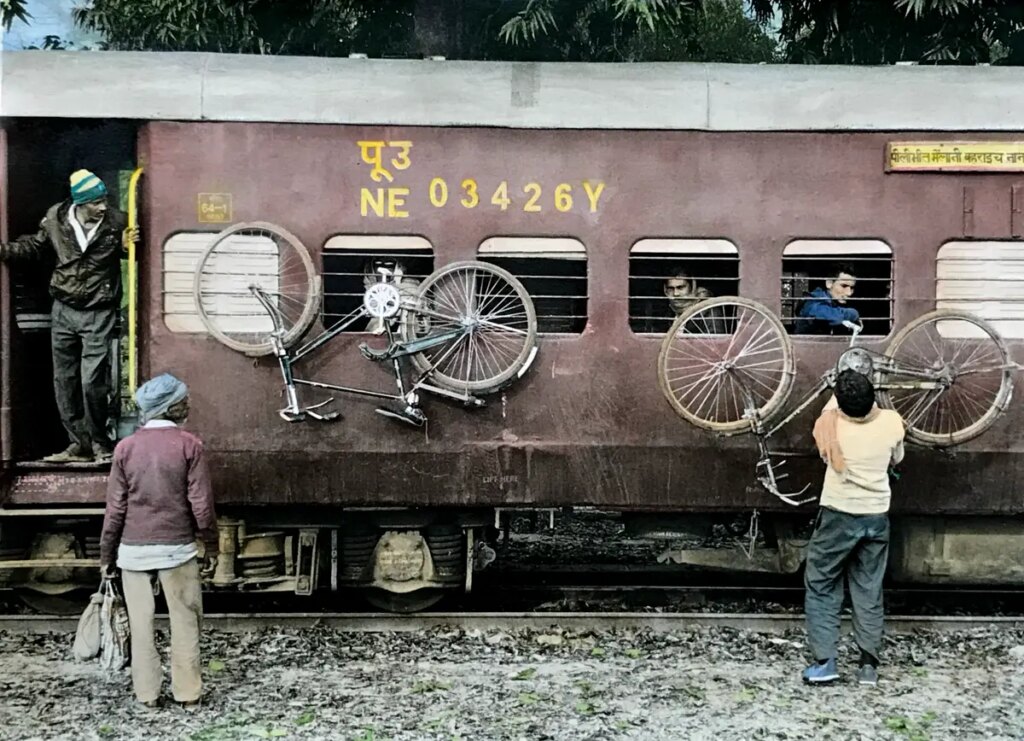
The photos shown in each of the tests span across three projects, one of which has been ongoing for six years. The photos from India are from a 6 year long project that covers the vanishing smaller gauge railway lines in remote parts of the country. 80% of the photos were done on Orwo N74. Of the 200 or so rolls of film I have shot for this project, only 15 rolls or so are on Double X.
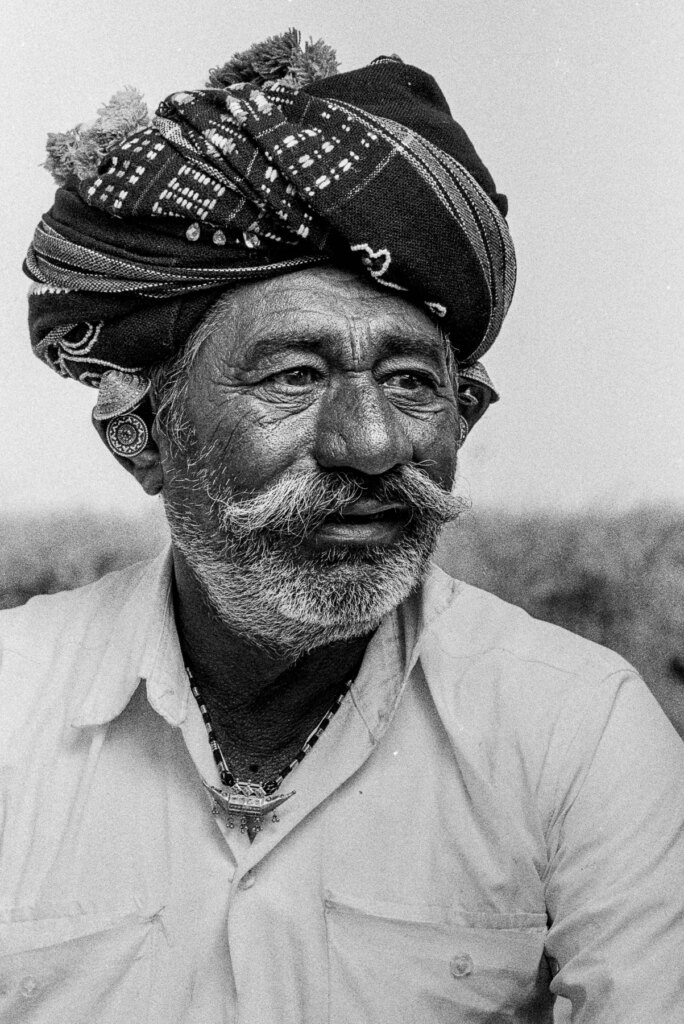
The second project in India documents the traditional clothing of people living in the western region of Kutch. I mainly shot ladies with their ornaments and gentleman with their shepherding clothes. This is not a major project and I am just shooting this to keep my sanity in check after all the lockdowns the past couple of years.
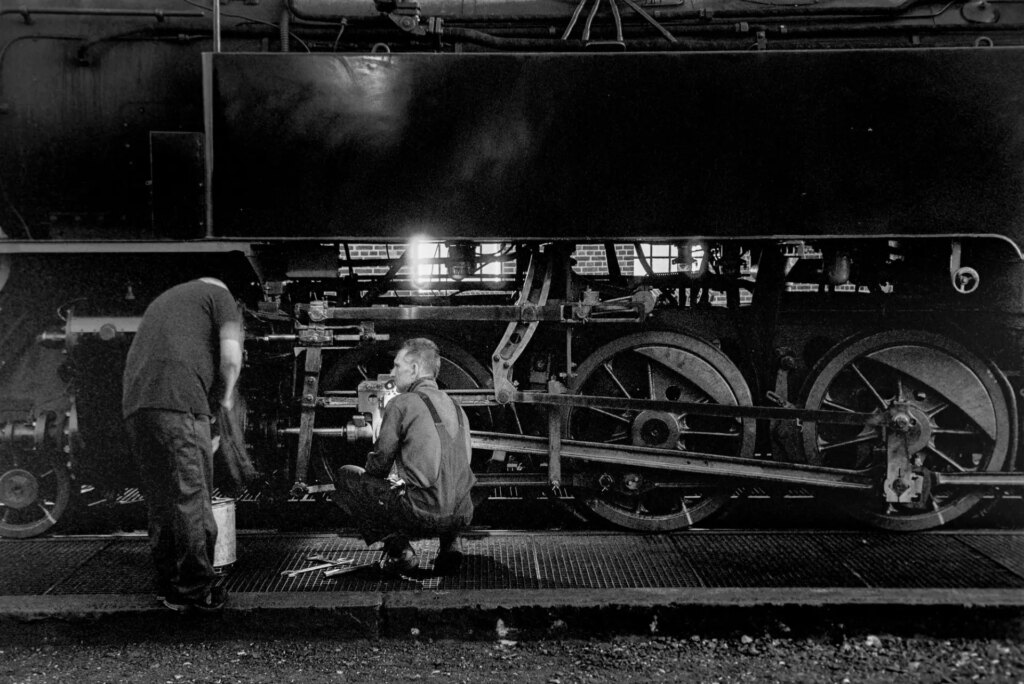
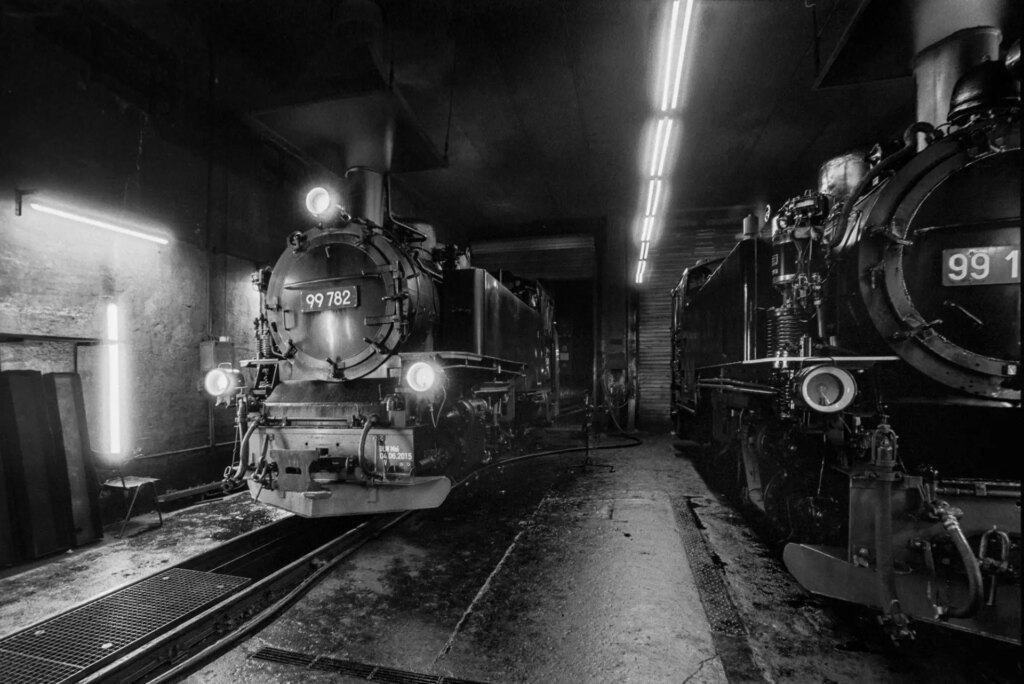
The third project is also a way to keep myself busy. I shoot the extremely well preserved German steam trains in various parts of East Germany. I have fascination with trains and steam trains hold a special place in my heart.
Test 1: Outdoors in Daylight
Sunlit scenes
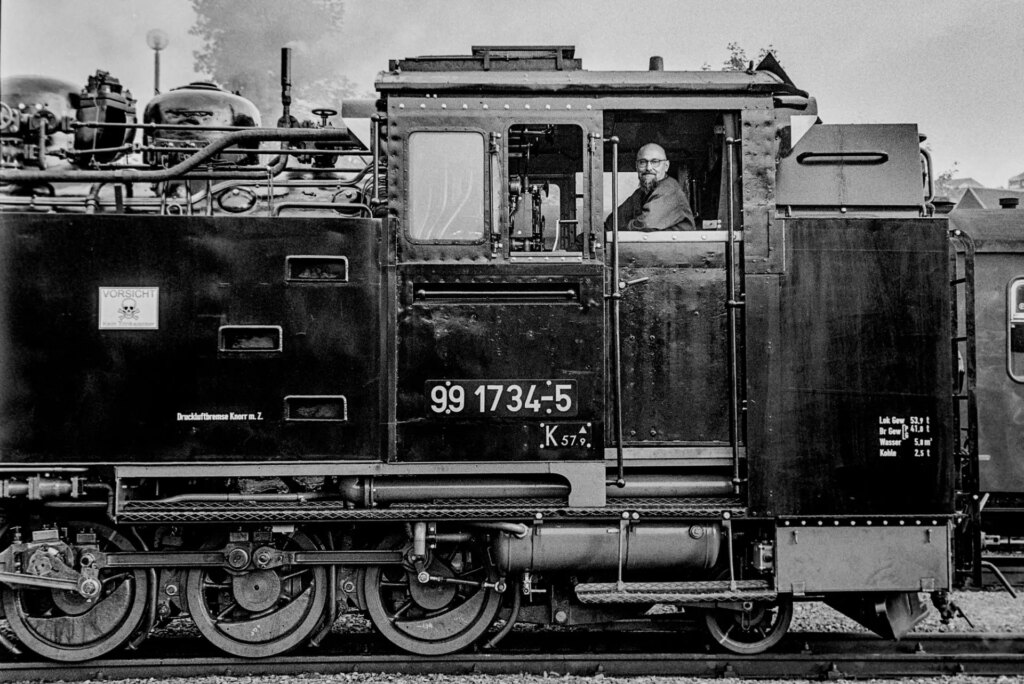
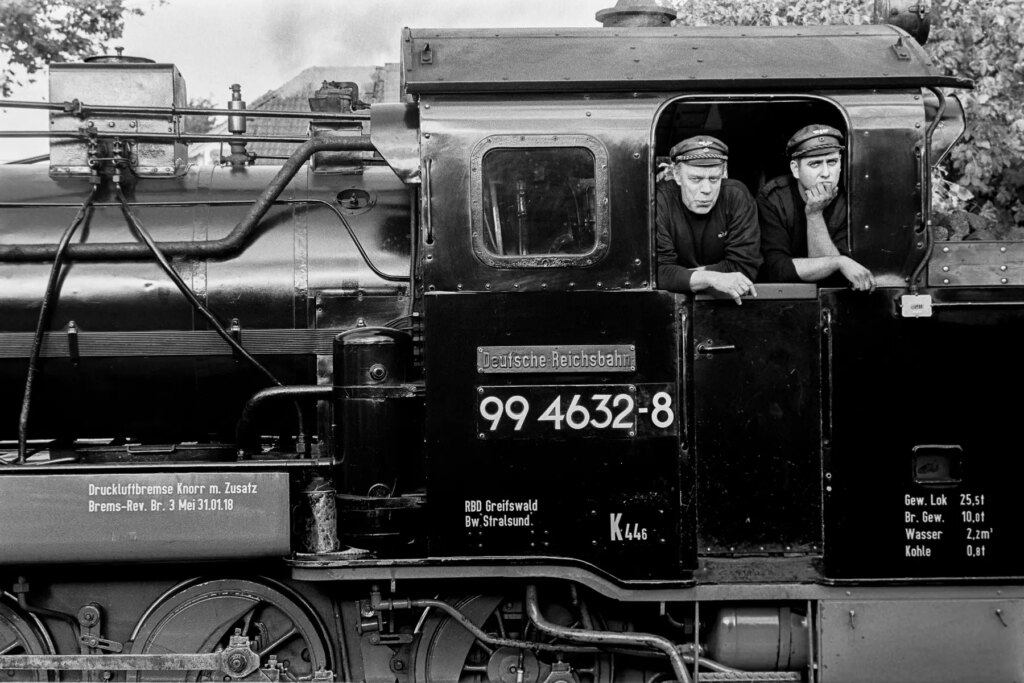
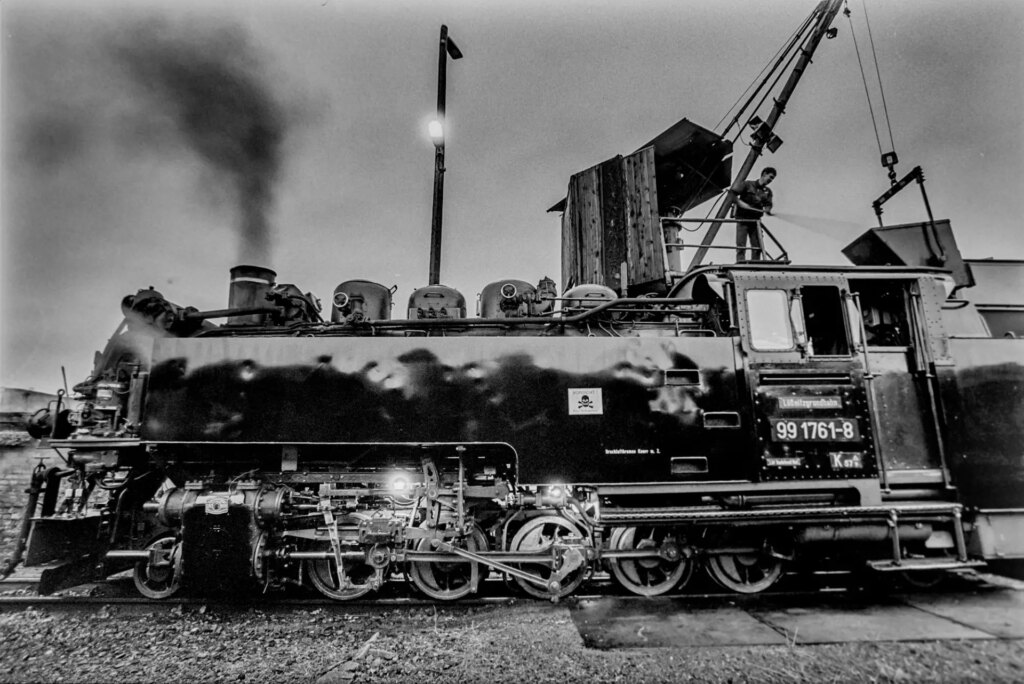
In the abundance of light, it’s hard to find a film that wont perform well. By performing well, I mean recording adequate detail in the bright and dark tones of any sun lit subject. To this end, the Double X behaves just as good as most films. In Germany, I was doing a short photo story on the steam trains in various parts of east Germany. I was a bit worried about the films capability to record the texture of the metallic black steam locomotives.
But as you can see from the images above, the film has recorded the tone and texture of the black locomotives pretty well. To be extra sure, I exposed the film at ISO 200 (even though double X is a 250 ISO film) and overdeveloped it by a minute in D76 (1:1) at 20 Degrees Celcius. A 1/3 stop over exposure in camera is not a significant jump in brightness. But the additional ten percent processing time helped retain shadow details I think. Most sunlit shots turned out well exposed and were easy to print in the darkroom too.
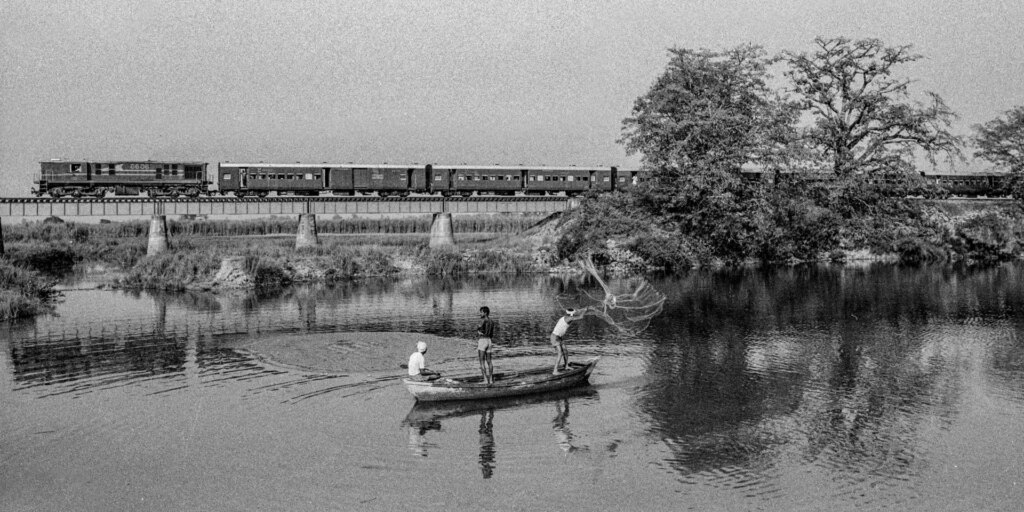
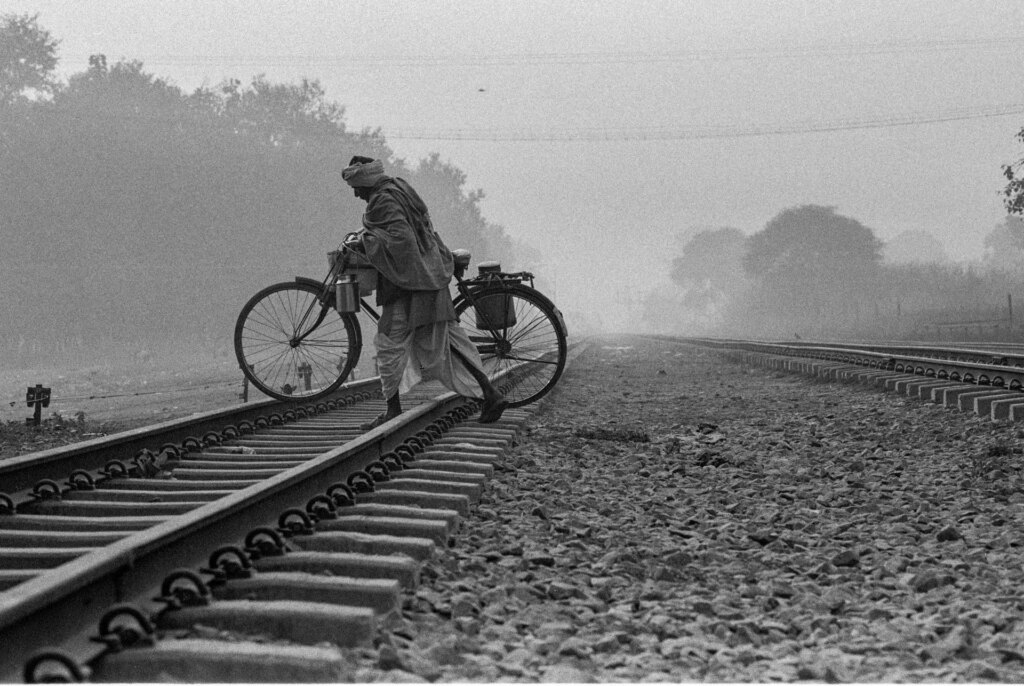
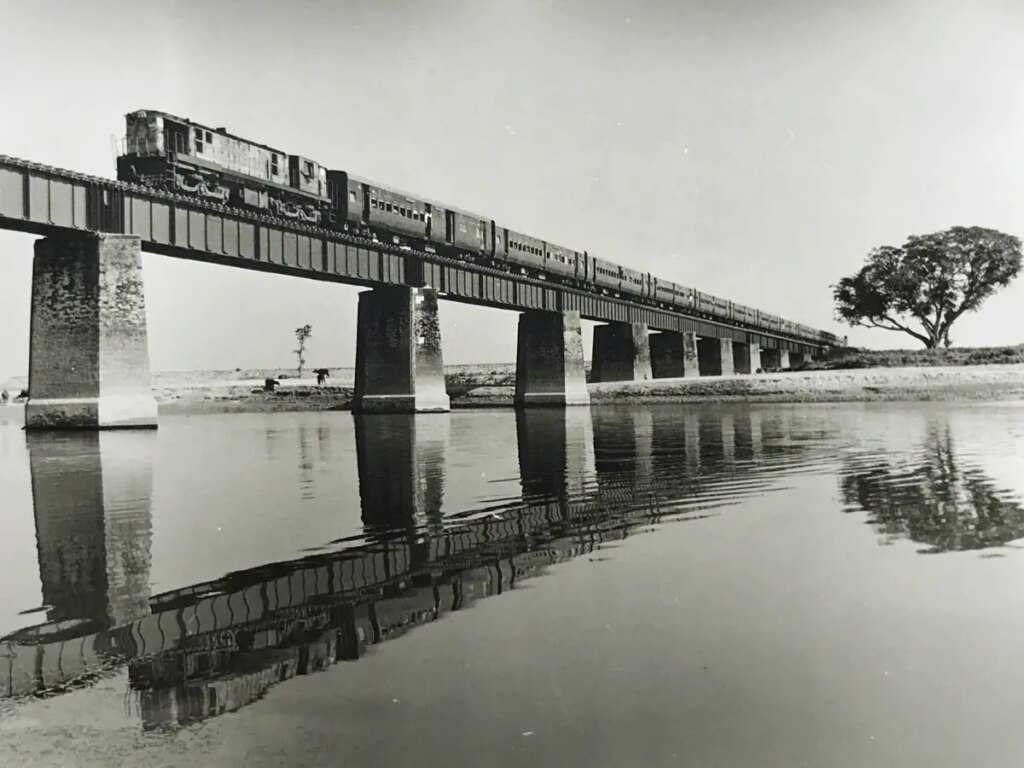
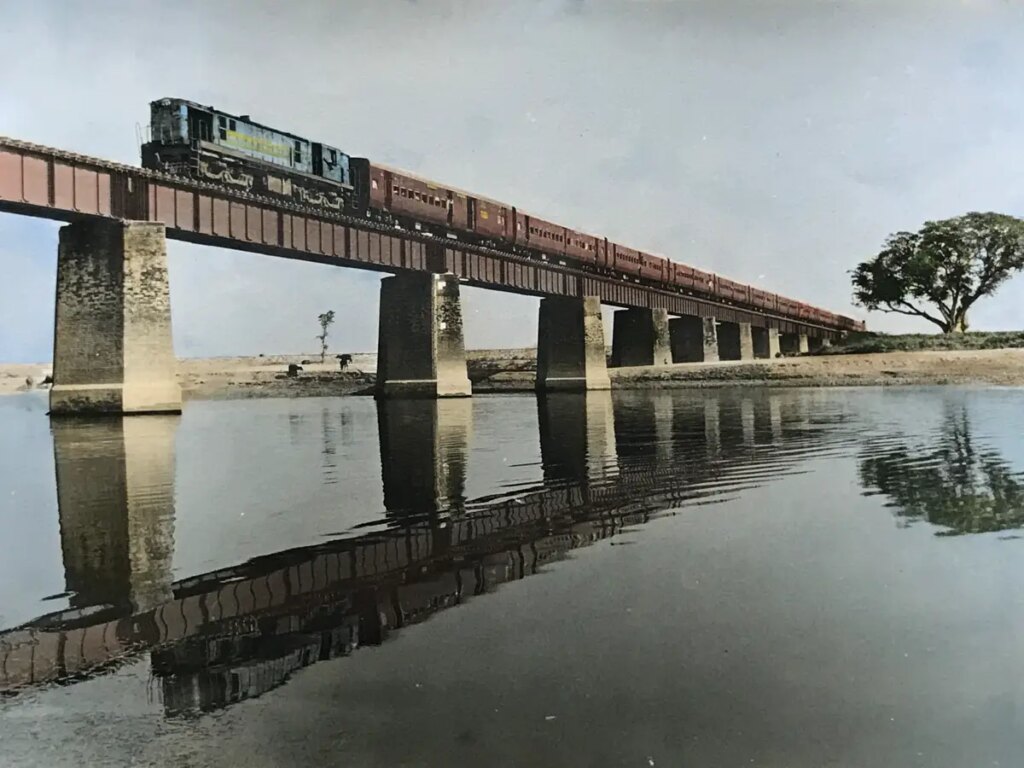
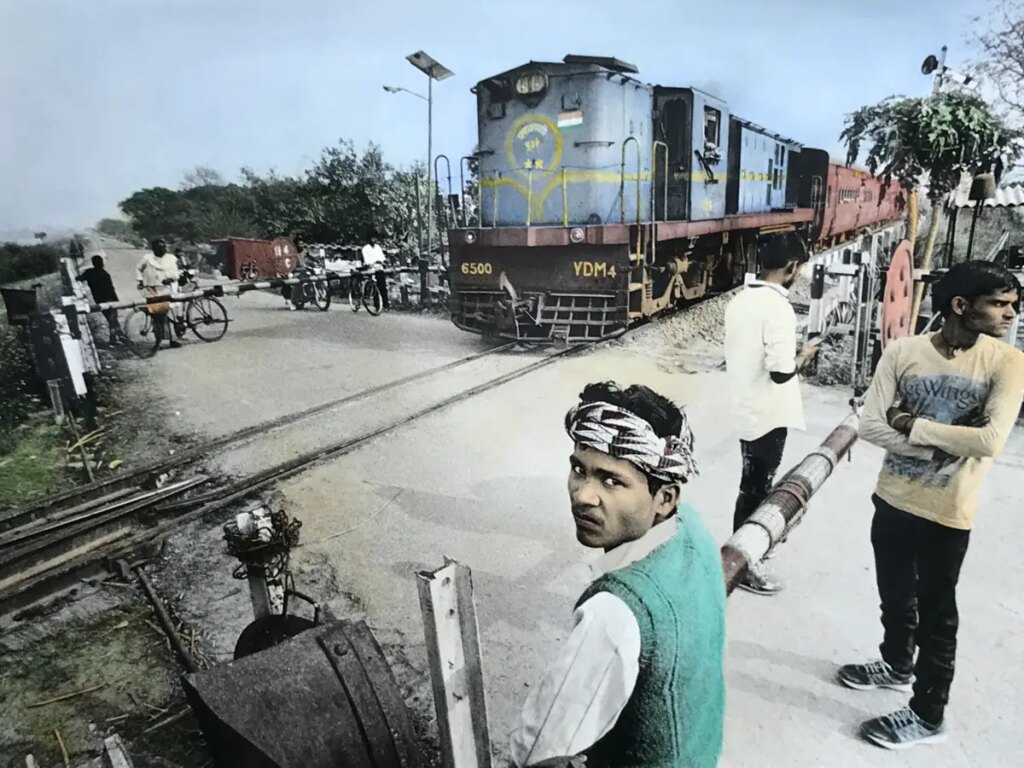
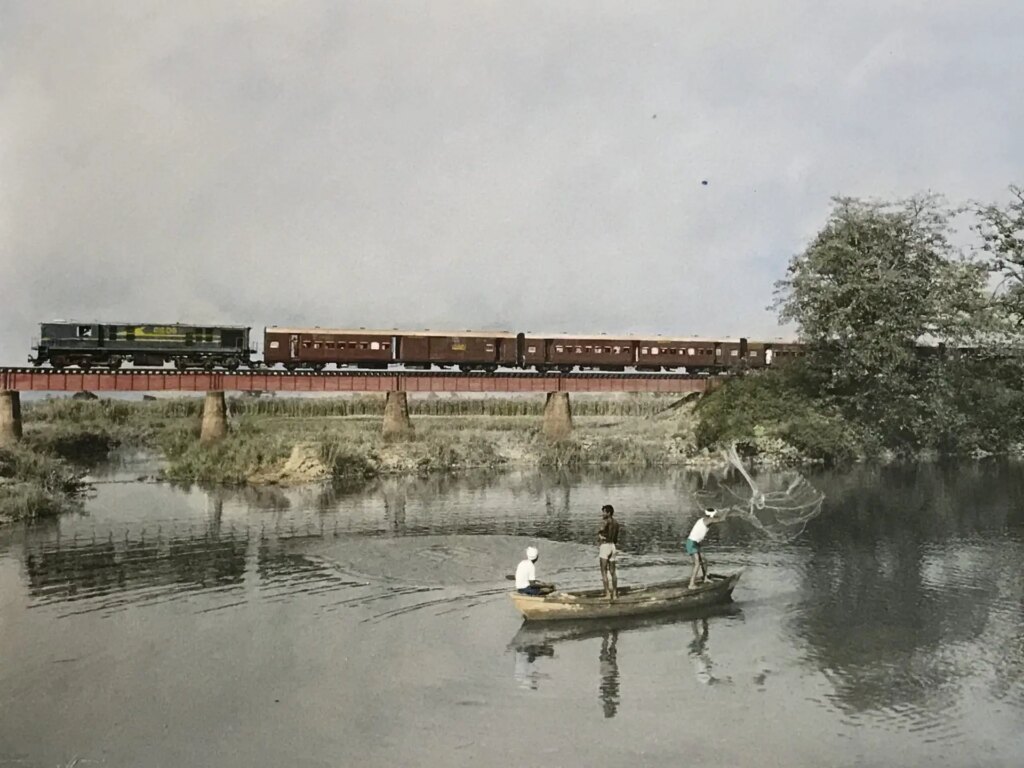
Another location I shot a lot of photos out in the open daylight was in India. Here I shot the vanishing meter gauge trains that ply in the remotest regions of the country. My main aim with this project was to photograph the trains passing through places that have remained unchanged for decades or maybe even a century. The Double X came to my rescue when I ran out of Orwo N74 and I am happy to be able to shoot the final photos of this project on this film stock.
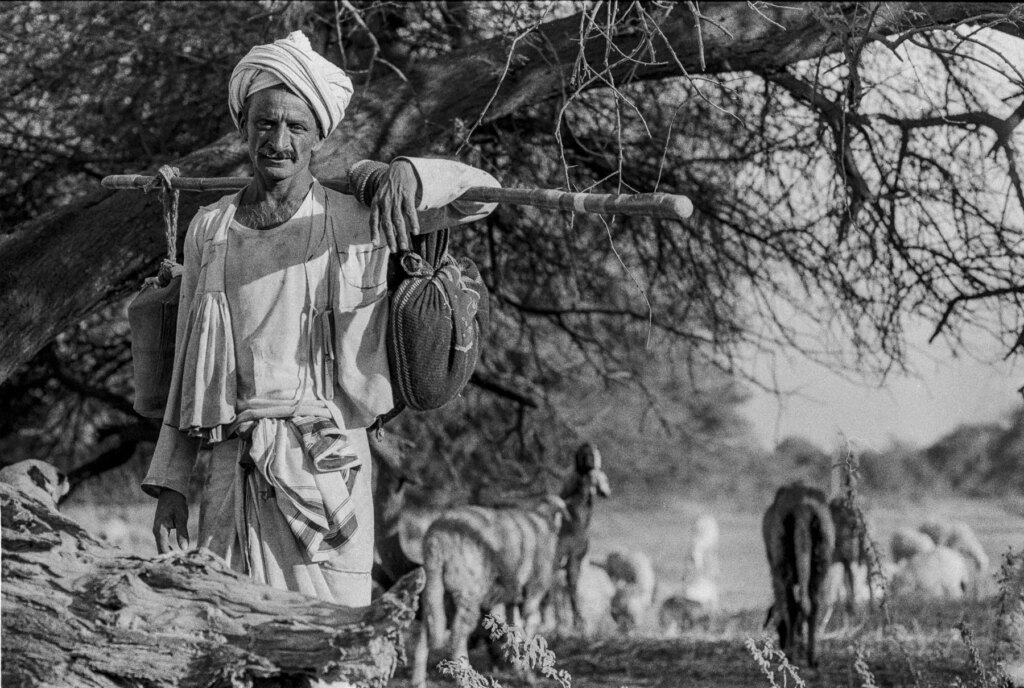
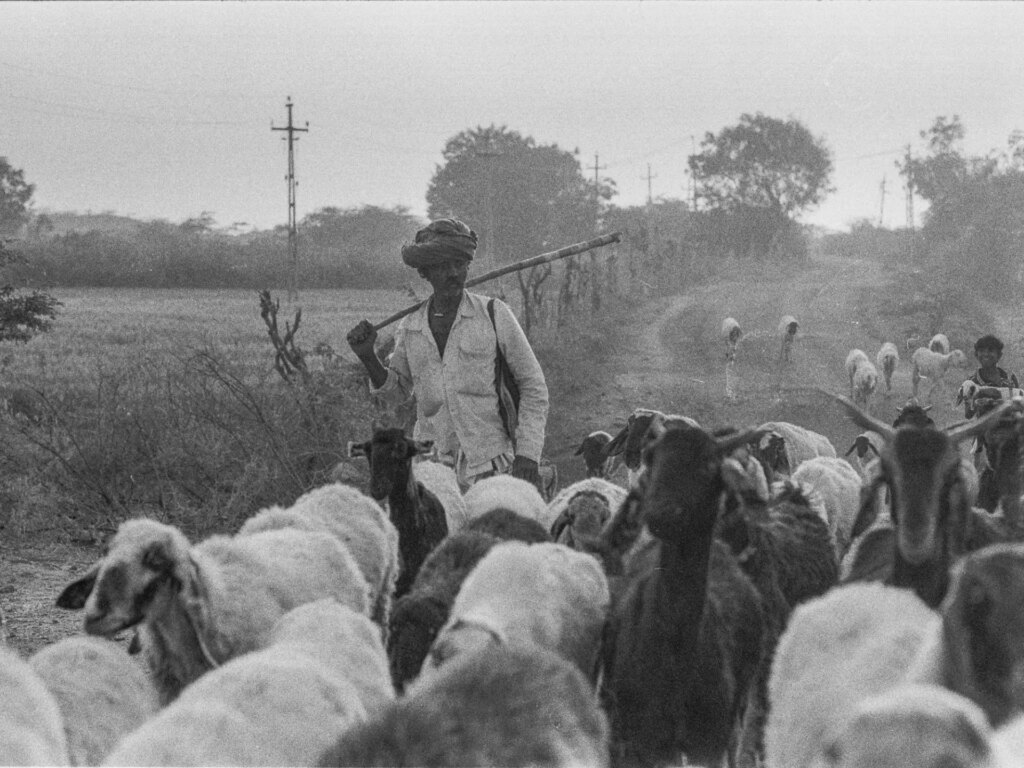
As mentioned earlier, I worked on a small project to photograph the clothes and activities of the nomadic shepherds in western India. In doing so, I ended up in the scorching hot sun that was a bit difficult to manage. It was difficult because the lighting was too harsh in the middle of the day so I mainly shot close to sunrise and sunset when my subjects could look into the sun without having to squint their eyes too much.
I did adopt other methods to mitigate the lighting problems which will be covered in the “Backlit Subjects” section. The photo above illustrates another less severe problem I had with the exposure. while German locomotives were black, most of the clothes worn by the male shepherds were white while their skin tone was considerably dark having been tanned by the sun for years. But, as you can see the film recorded adequate details on the face without making it too difficult to recover the highlights on the clothes.
The first set of photos you see here were mainly done under bright sunshine with the sunlight coming from behind the photographer.
The one feature of this film that becomes very clear is the conspicuous grain which might surprise some of you. Yes, it is a 200 ISO film and the grain looks like a 400 or higher ISO film. An explanation for this was given by an assistant cinematographer who gave a very interesting perspective on why Kodak was not too worried about the noticeable grain on this emulsion.
“……For Eastman to obtain a faster speed for movie film, the grain was larger than the grain on still film. This was considered acceptable since each image of a movie would only be on screen for 1/48th of a second. That tended to be true. Looking at film projected at 24FPS (Frames per second) largely does ameliorate the grain. However, looking at a frame of movie film as a still, the grain can be pronounced.”
It makes sense to me and I had no issues with the grain. And if the grain gives Spielberg movie like vibes, who am I to complain?
Another factor that makes the grain look conspicuous would be the use of D76 developer instead of the recommended D96. I have only processed this film in three developers so far — D76, Ilfotec DDX and HC110.
While DDX does reduce the grain size, the negative is a bit difficult to print in the darkroom as it becomes difficult to get deep blacks in the image. Paradoxically, a lower contrast negative is much easier to print in the darkroom than a higher contrast negative, at least for me. But DDX does something that makes me unable to create adequate contrast when printing with a diffuser head even at grade 5 contrast. D76 does produce more grain (not as much as HC110 though) but produces a more easily printable contrast in my opinion. I could be totally wrong on this but this is from what little experience I have from having shot around 50 rolls on my projects over the past couple of years. Of course, it also helps that D76 is about a third the cost of Ilfotec DDX for the same working volume.
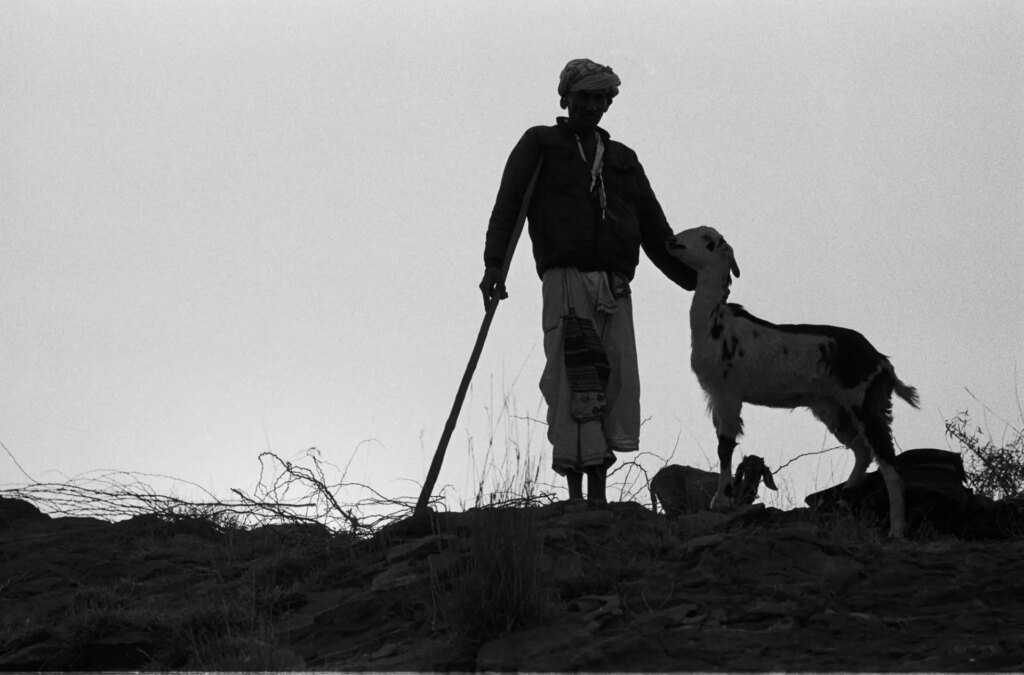
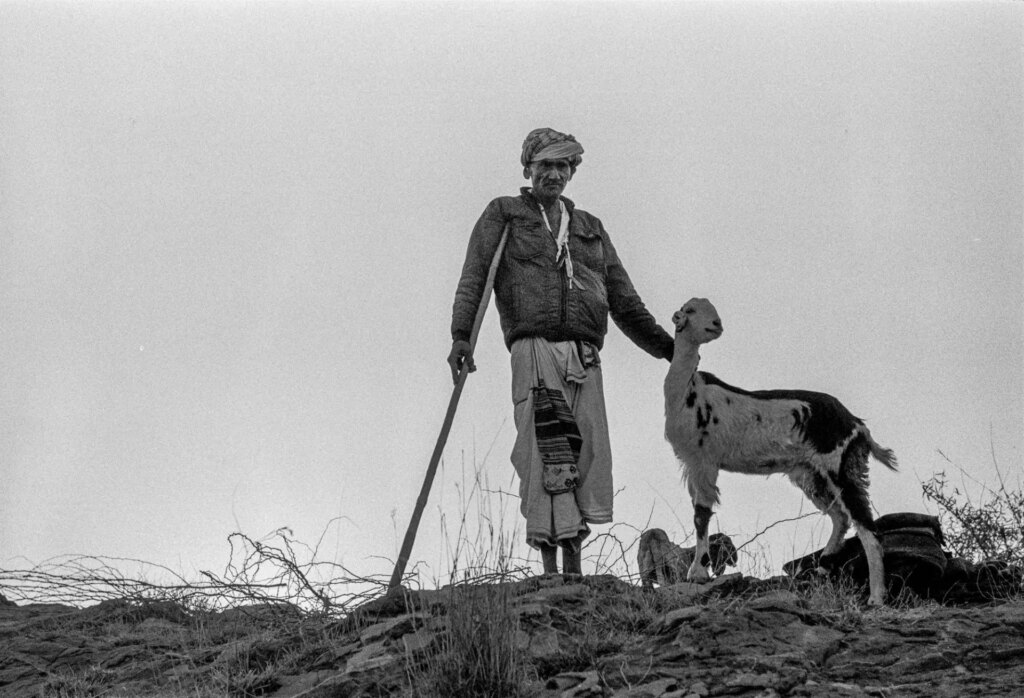
In the photo above, shot shortly past sunrise, I was quite happy with the range of tones the film produced. The gentleman was of a very dark complexion and I was a little worried about the left half of the face being too underexposed but the film held out pretty well and I managed to retrieve details in almost all parts of the image, from the highlights in the sky behind to the dark hands and face on the left of the image.
The film is after all a motion picture stock so it is imperative that the contrast be low for post processing and for achieving whatever contrast is needed when projected from print film. So shadow details are the Double X’s strong point. It performs better than the Orwo N74 and perhaps even the HP5. This ends up benefiting the darkroom printer too because it Is much easier to increase contrast than to decrease it when printing on multigrade paper at least.
In the German autumn, the sun was easy enough to look into when it rose from right behind me. It lighted up the gentleman’s face perfectly making it a fairly easy shot to execute. At the risk of sounding like a broken record, I was amazed again to see the texture being recorded on the black locomotive.
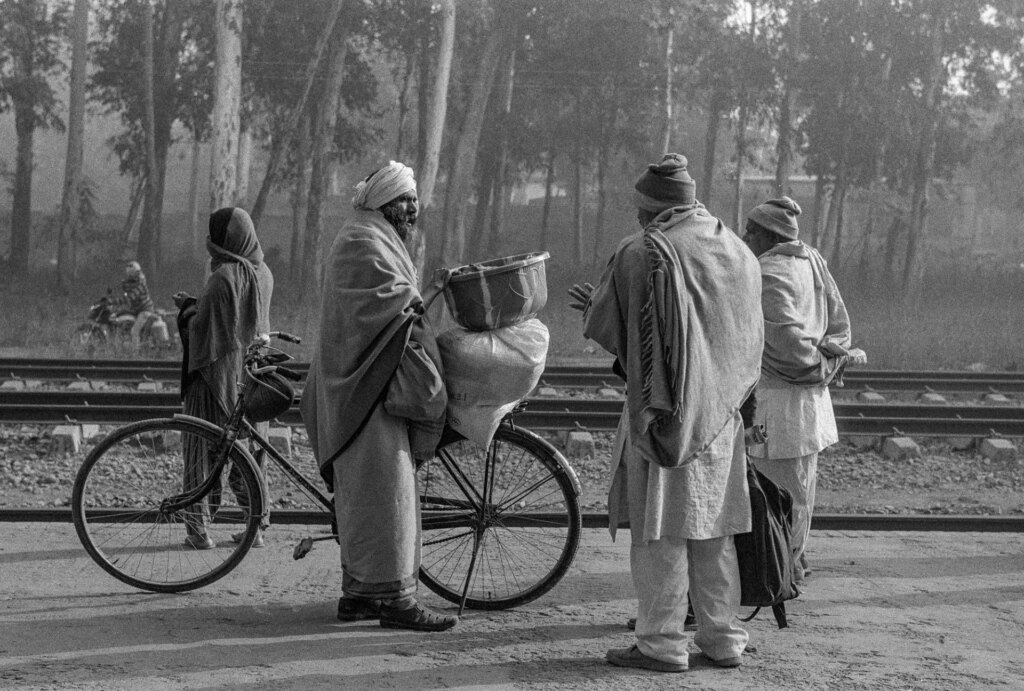
In the image above the light comes from the right and lights up the face of the bearded gentleman waiting for the train. Literally everything in the shadow side has more than adequate detail for retrieving during printing or digitising. Of course the mild morning fog caused the light to be a bit more diffused thus allowing the light to wrap the subject a bit more than had it been a clear day. But I will show you examples of window lit shots where the film holds amazing details in both the bright and dark areas in subsequent tests.
Overcast Daylight
All this is fine when the sun shines but what happens when it gets overcast? Well thats when I miss my 400 ISO films. But more because I end up having to compromise the shutter speed or aperture (sometimes both!) to allow that additional stop to enter the camera. The problem becomes annoying when I try to freeze movement. I inevitably end up opening up a stop wider to keep the shutter speed adequately quick. Some examples follow:
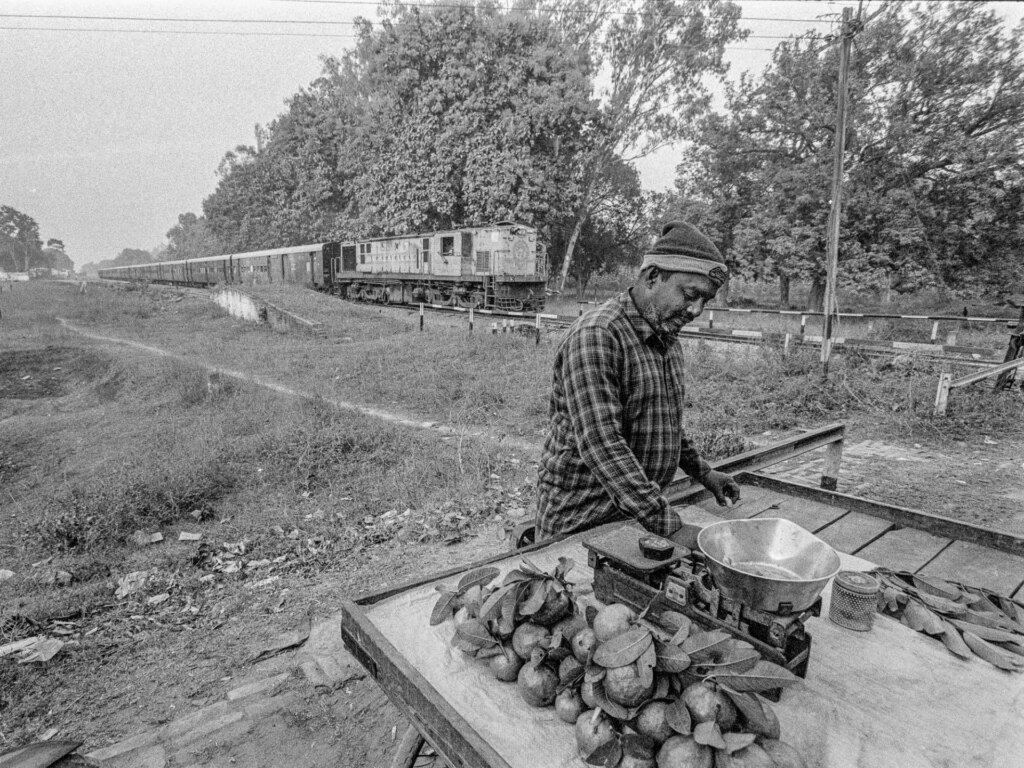
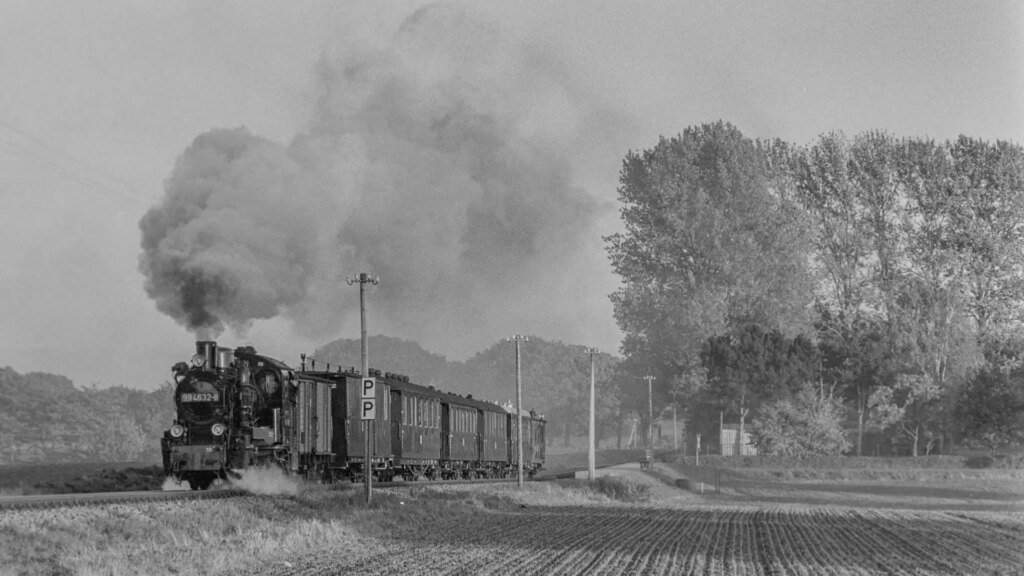
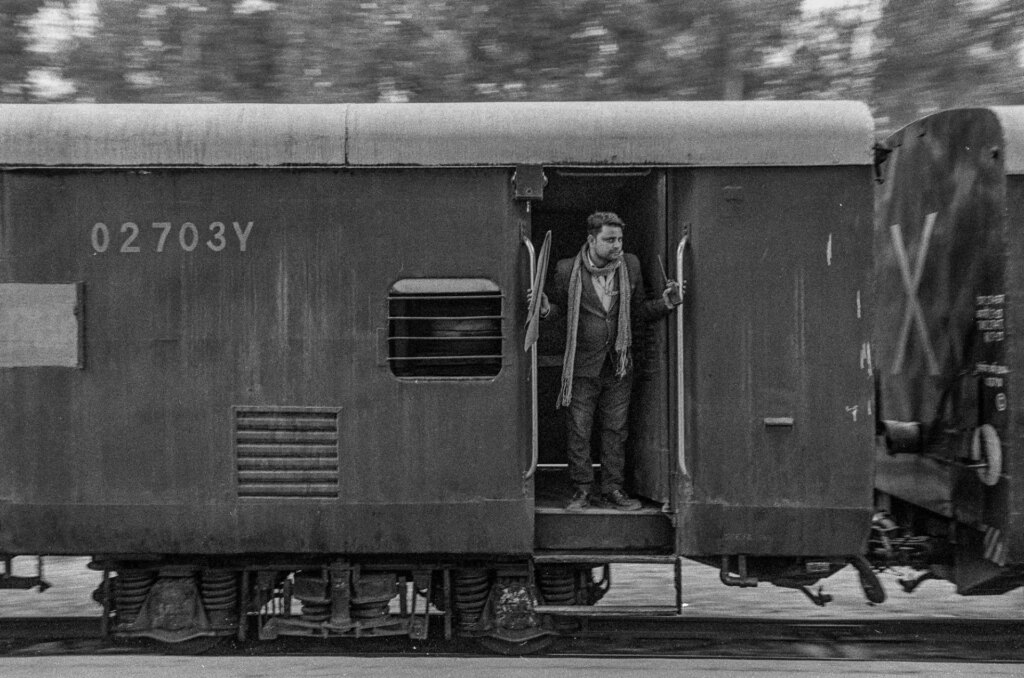
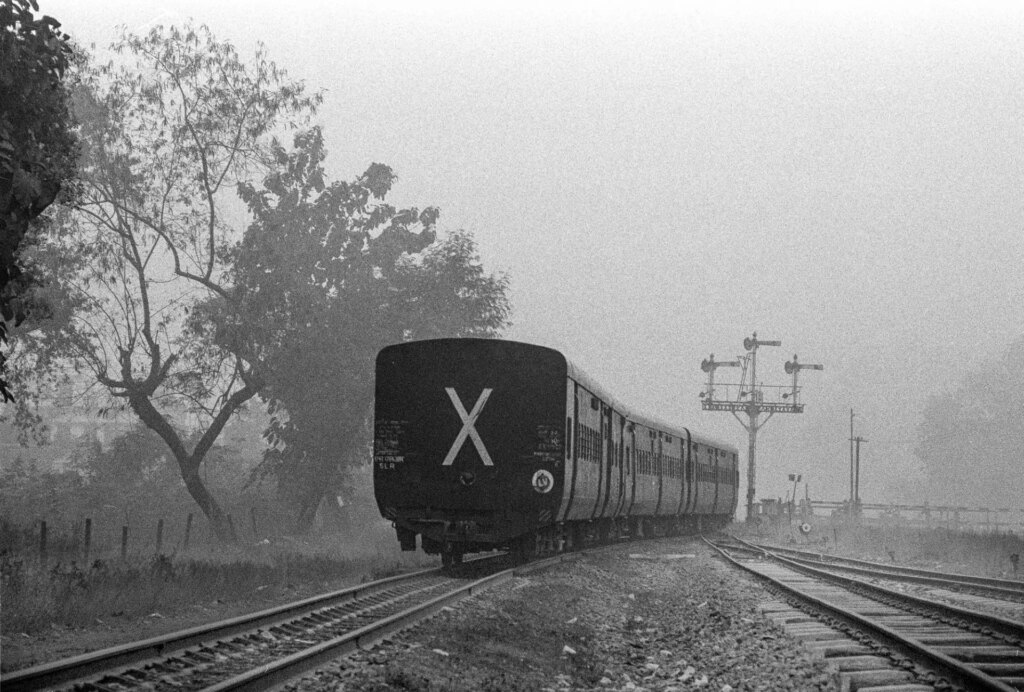
While not particularly overcast, the sun was pretty much hidden by trees so the light hitting this whole scene was completely diffused. Fortunately the train was just departing the station so it wasn’t travelling too fast. Even with a shutter speed of 1/125 at f/5.6 I managed to keep the train frozen. The depth of field was achieved with a rather wide 17-35mm lens set at around 18-20mm zoom for this shot. The resulting negative was a tad underexposed but no part of the image was lost due to the underexposure.
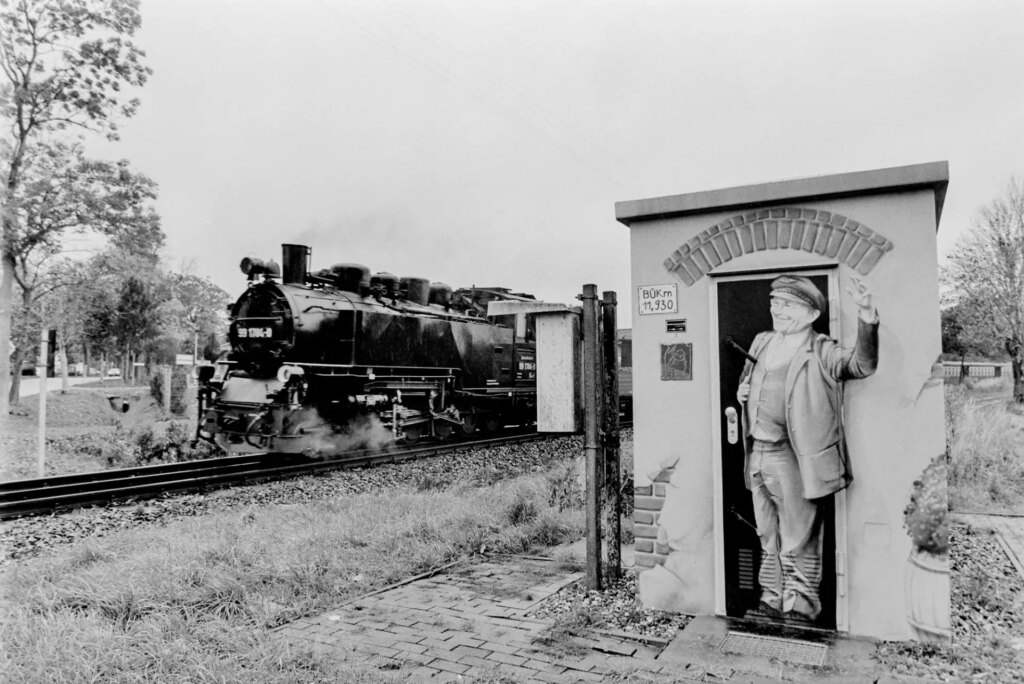
I was, however, not so lucky in Germany when the cloud cover became a bit too thick. Even at f/4 (on a 24-70 f/2.8 lens) the best I could do was 1/125s and the train to Lauterbach Mole decided to speed up and become blurred in the photo. On a 400 ISO film I could have hit 1/250 and probably kept the train a tad bit sharper. Well that’s life I guess. You can’t have it all.
The photo above could have been messed up for a couple of reasons. The overcast condition already resulted in a slower shutter speed but the black locomotive confused the meter of the F100 further into thinking this was a low light shot. Fortunately I compensated by quickening the shutter speed and getting the exposure right. As you can see the texture of the locomotive was recorded really well by the film. It was a joy printing from this negative.

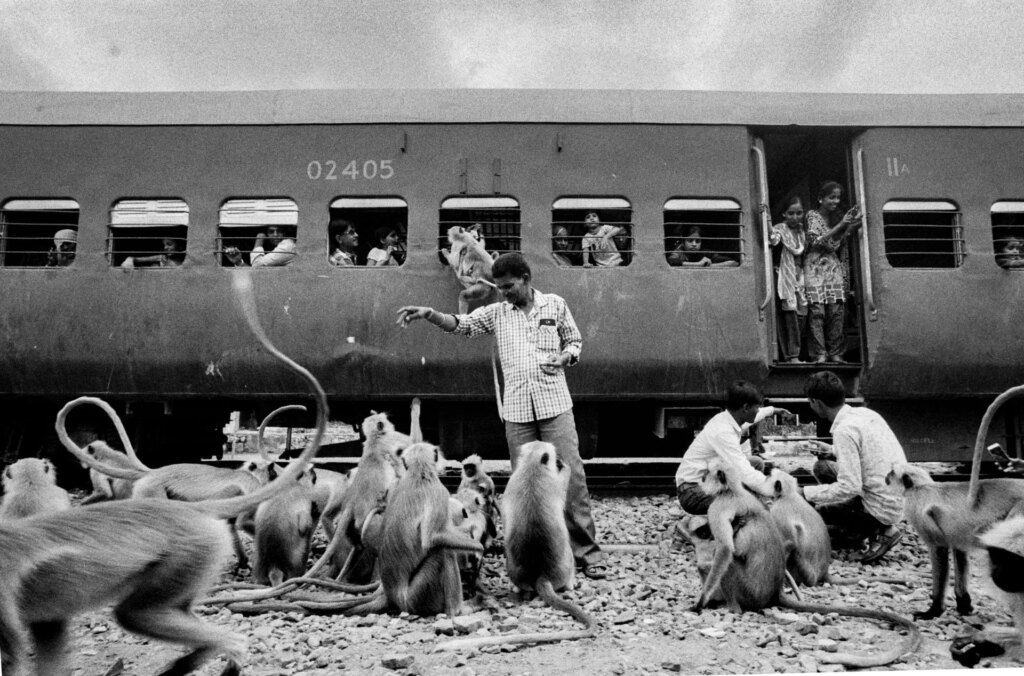
From the image above, it can be assumed that under overcast conditions, the film allows decent shutter speeds as long as nothing moves too quickly. Like the monkey in this photograph that obviously doesn’t know the low ISO I am working with.
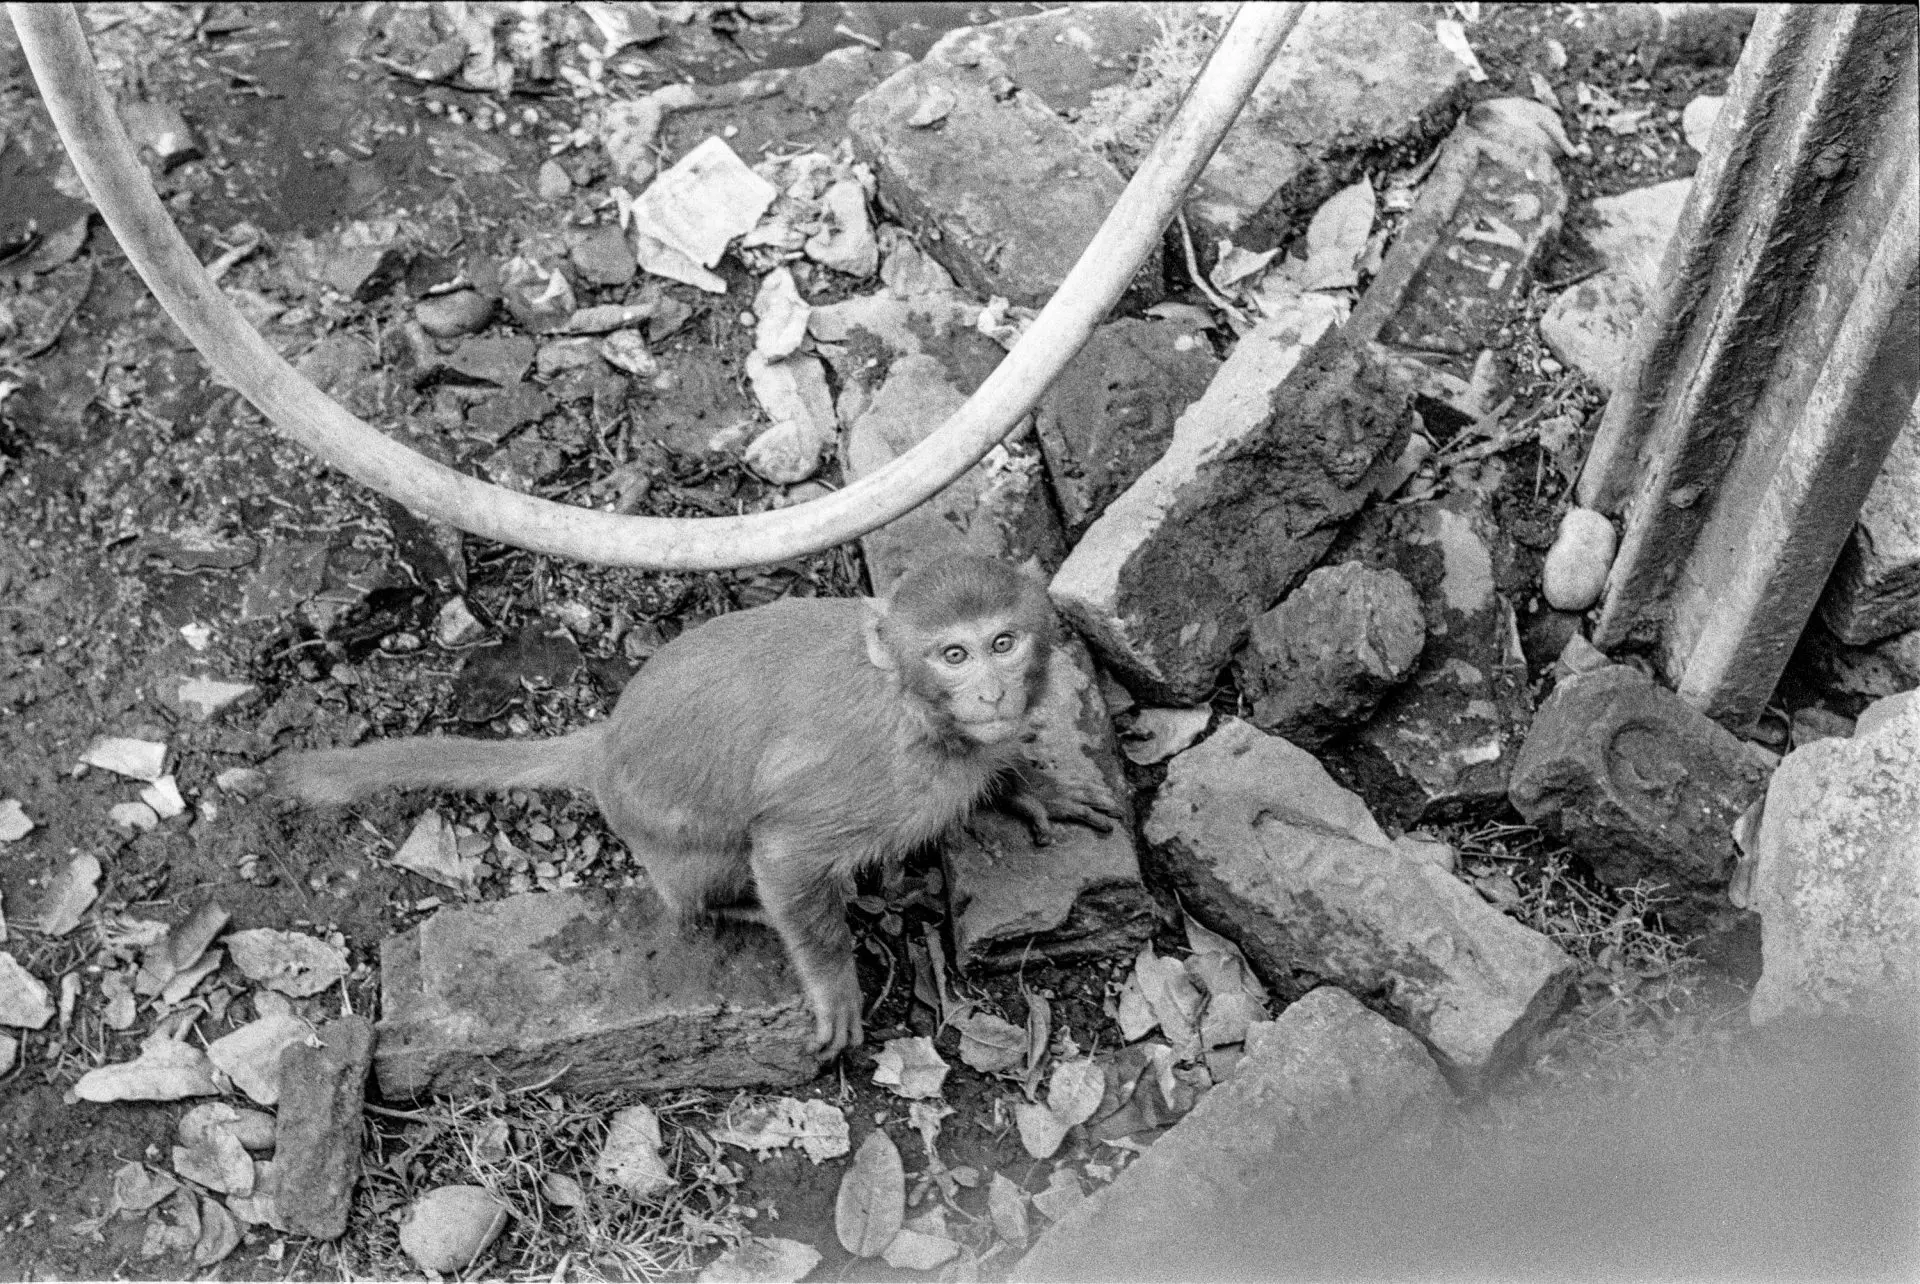
Yes, it is not easy shooting moving subjects but I got lucky with this monkey that happened to take a glimpse of me for a moment longer than 1/60 of a second, in which time I managed to photograph it from the window of the train. My elbow decided to be part of the picture too, unfortunately.
So what can you do if the subject moves?
You do a panning shot of course!
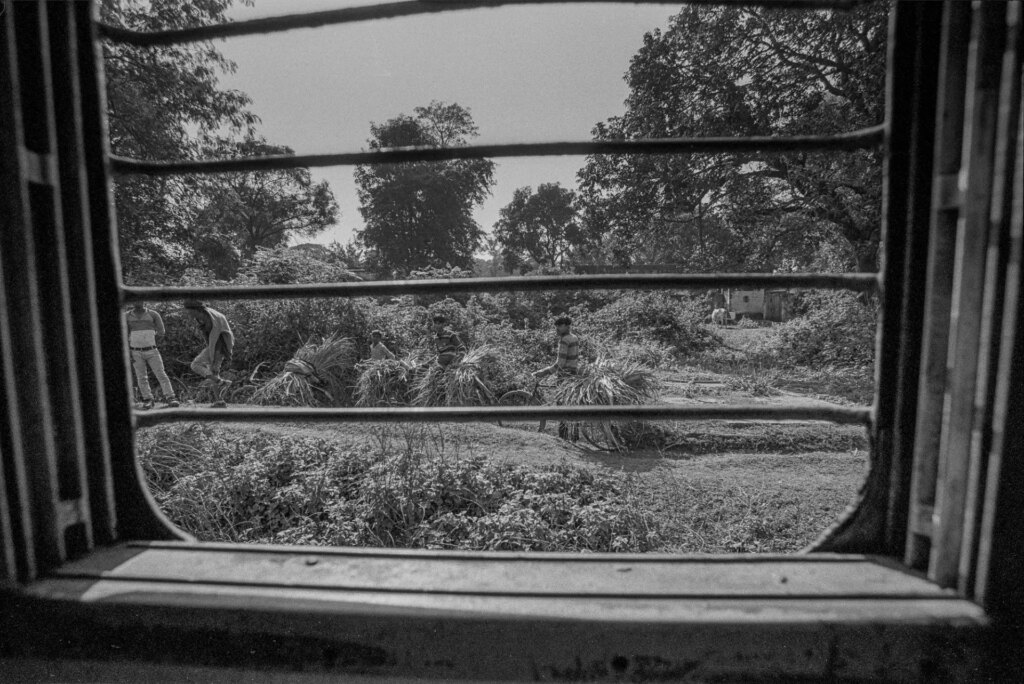
Test 2: Indoors with Window light
I use window light for portraits as it is ideal when shooting in the middle of the day where the outdoors would be too harsh. Here is where the double X truly shines. Honestly at first, I was not happy to sacrifice a stop of light when the light coming from the window can sometimes make you yearn for a 400 ISO film. But I am glad I bit the bullet and shot with the meter set to 200 ISO. Apart from the light on the subjects face, take a look at how much of the darker interiors are actually recoverable in post.
I almost never push film (read my reasons for this at the end of this piece) but looking at how much detail this film captures in the underexposed areas, the beanie wearing hipster should be able to push it and still get decent results from this film.
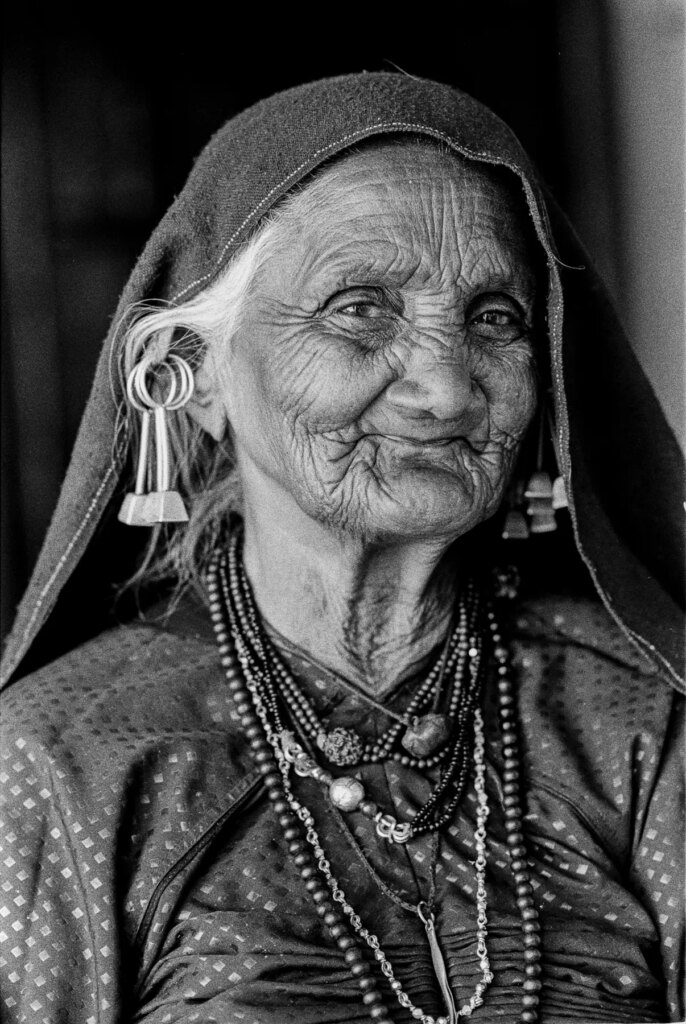
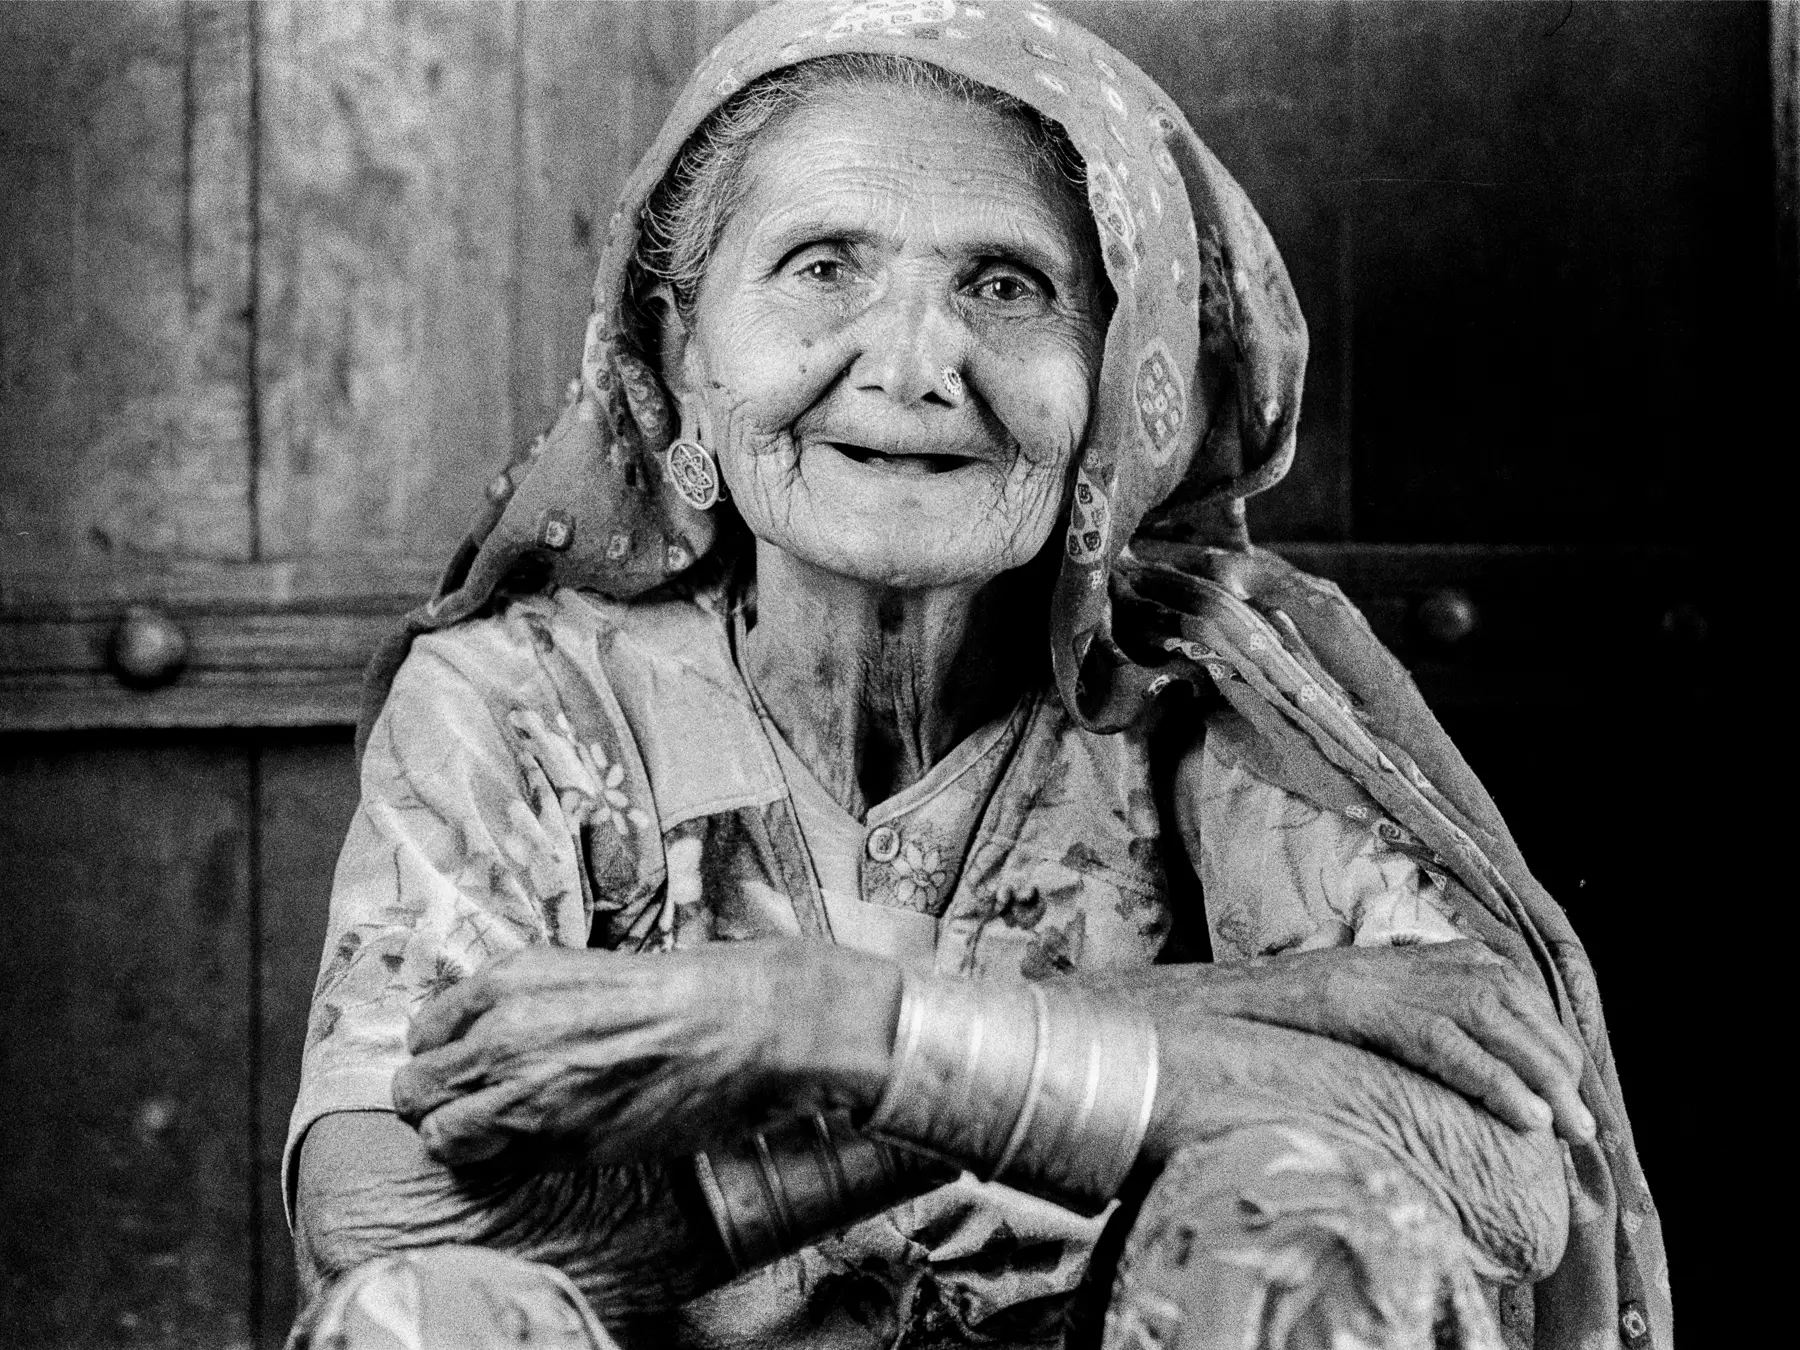
I shot a lot of wrinkly old people as part of a small project on the vanishing sartorial elegance of indigenous cultures in India. A few images appear here and in subsequent sections. Once again, many of the older ladies here wear black and the camera’s meter goes bonkers. But unlike trains that are not in my control, I had the privilege to patiently sit the model and pose her so there was no excuse for wrong exposure.
The best part about shooting dark subjects is that the grain kinda vanishes in the dark tone so it appears like a proper 200 ISO film with finer grain. But of course, the grain becomes noticeable on the face where the tones are brighter. If you’re a wrinkle counting photographer, this film probably won’t work for you but I was quite satisfied with the results.
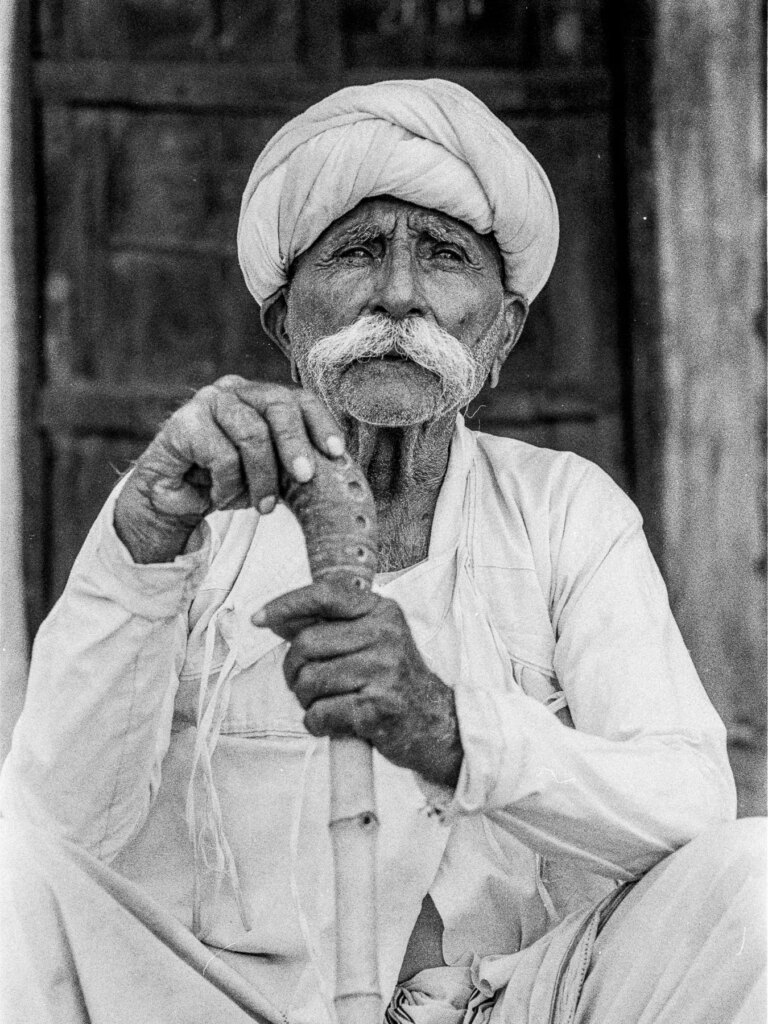
Well this was a particularly large window because he was seated in his courtyard in front of his house so there was lot of courtyard light. But no direct sunlight. The older gentlemen in this community mainly wore white but generally had dark complexions so metering wasn’t such a pain. But burning the details on the white robes was a bit of a pain in the darkroom. The door at the back was almost black in colour but its amazing how much texture and details were recorded on the film.
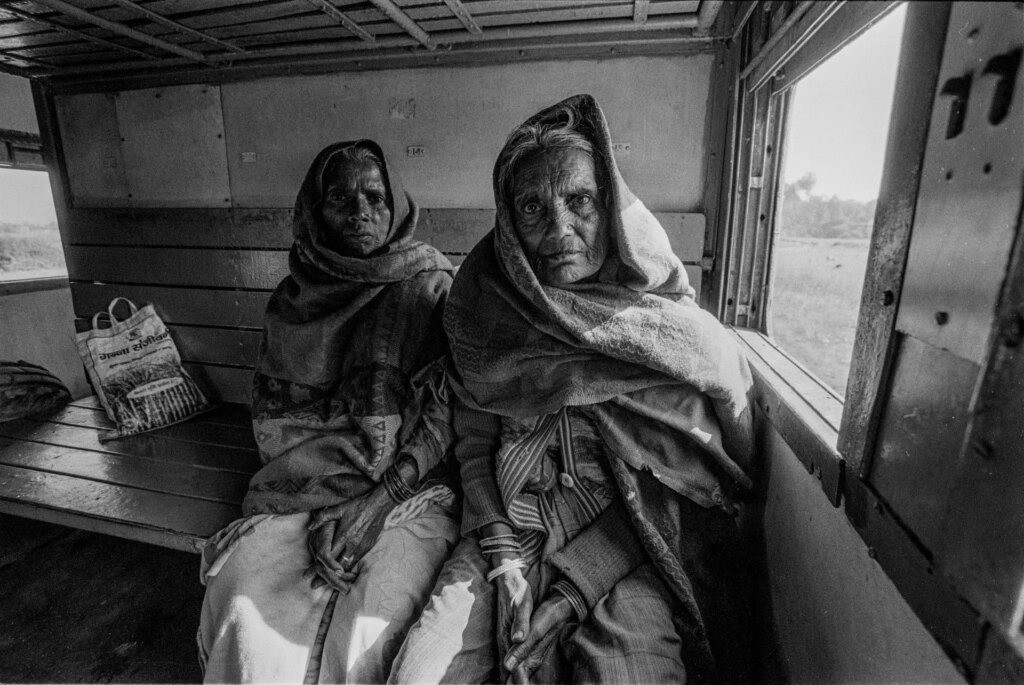
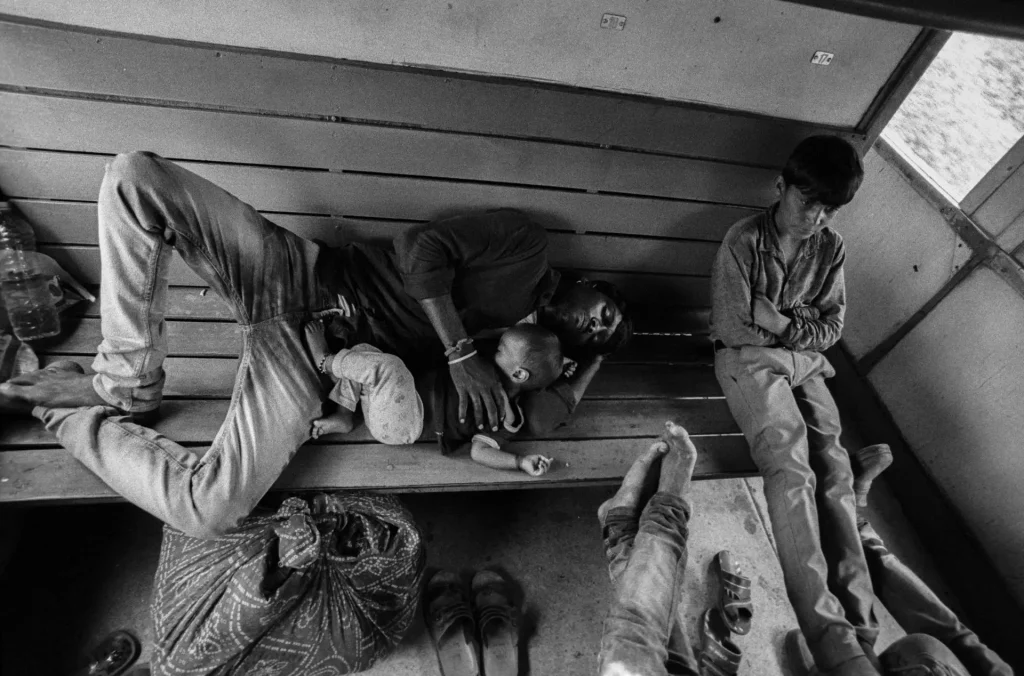
This image is what makes me miss the ORWO N74.. With the rocking of the train and sometimes scarce window light, having a 400 speed helped in ensuring a decent shutter speed to keep the image shake free. When shooting the Double X, I am forced to open a stop of aperture to maintain the same shutter speed. But combined with the rocking train sometimes it makes me miss the focus on my subjects. Fortunately the burst on the F100 saved my rear for this shot. You can see how much shadow details are recorded by the film.
The lady on the left is completely blocked by the other lady and received very little light. What is also amazing is that the sunlit world outside the window is also visible. I foresee having to burn the highlights to heaven, hell and back but hey, it feels good knowing the details are there and only need to be brought out for the viewer to see. On Lightroom of course, it’s just a pull of the highlights slider to make the world outside the window reappear.
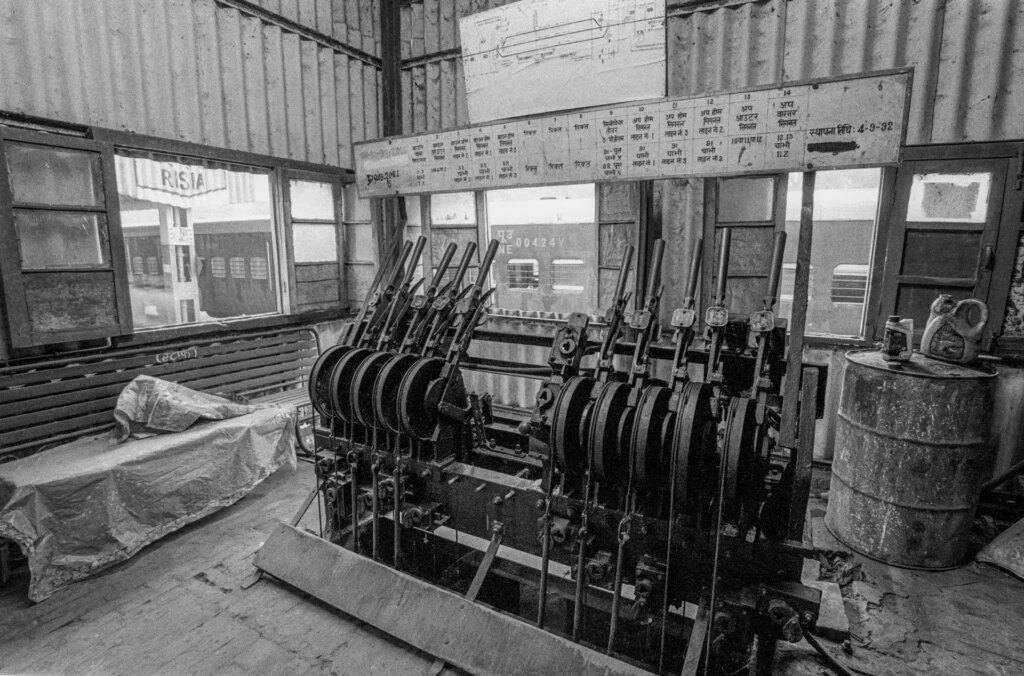
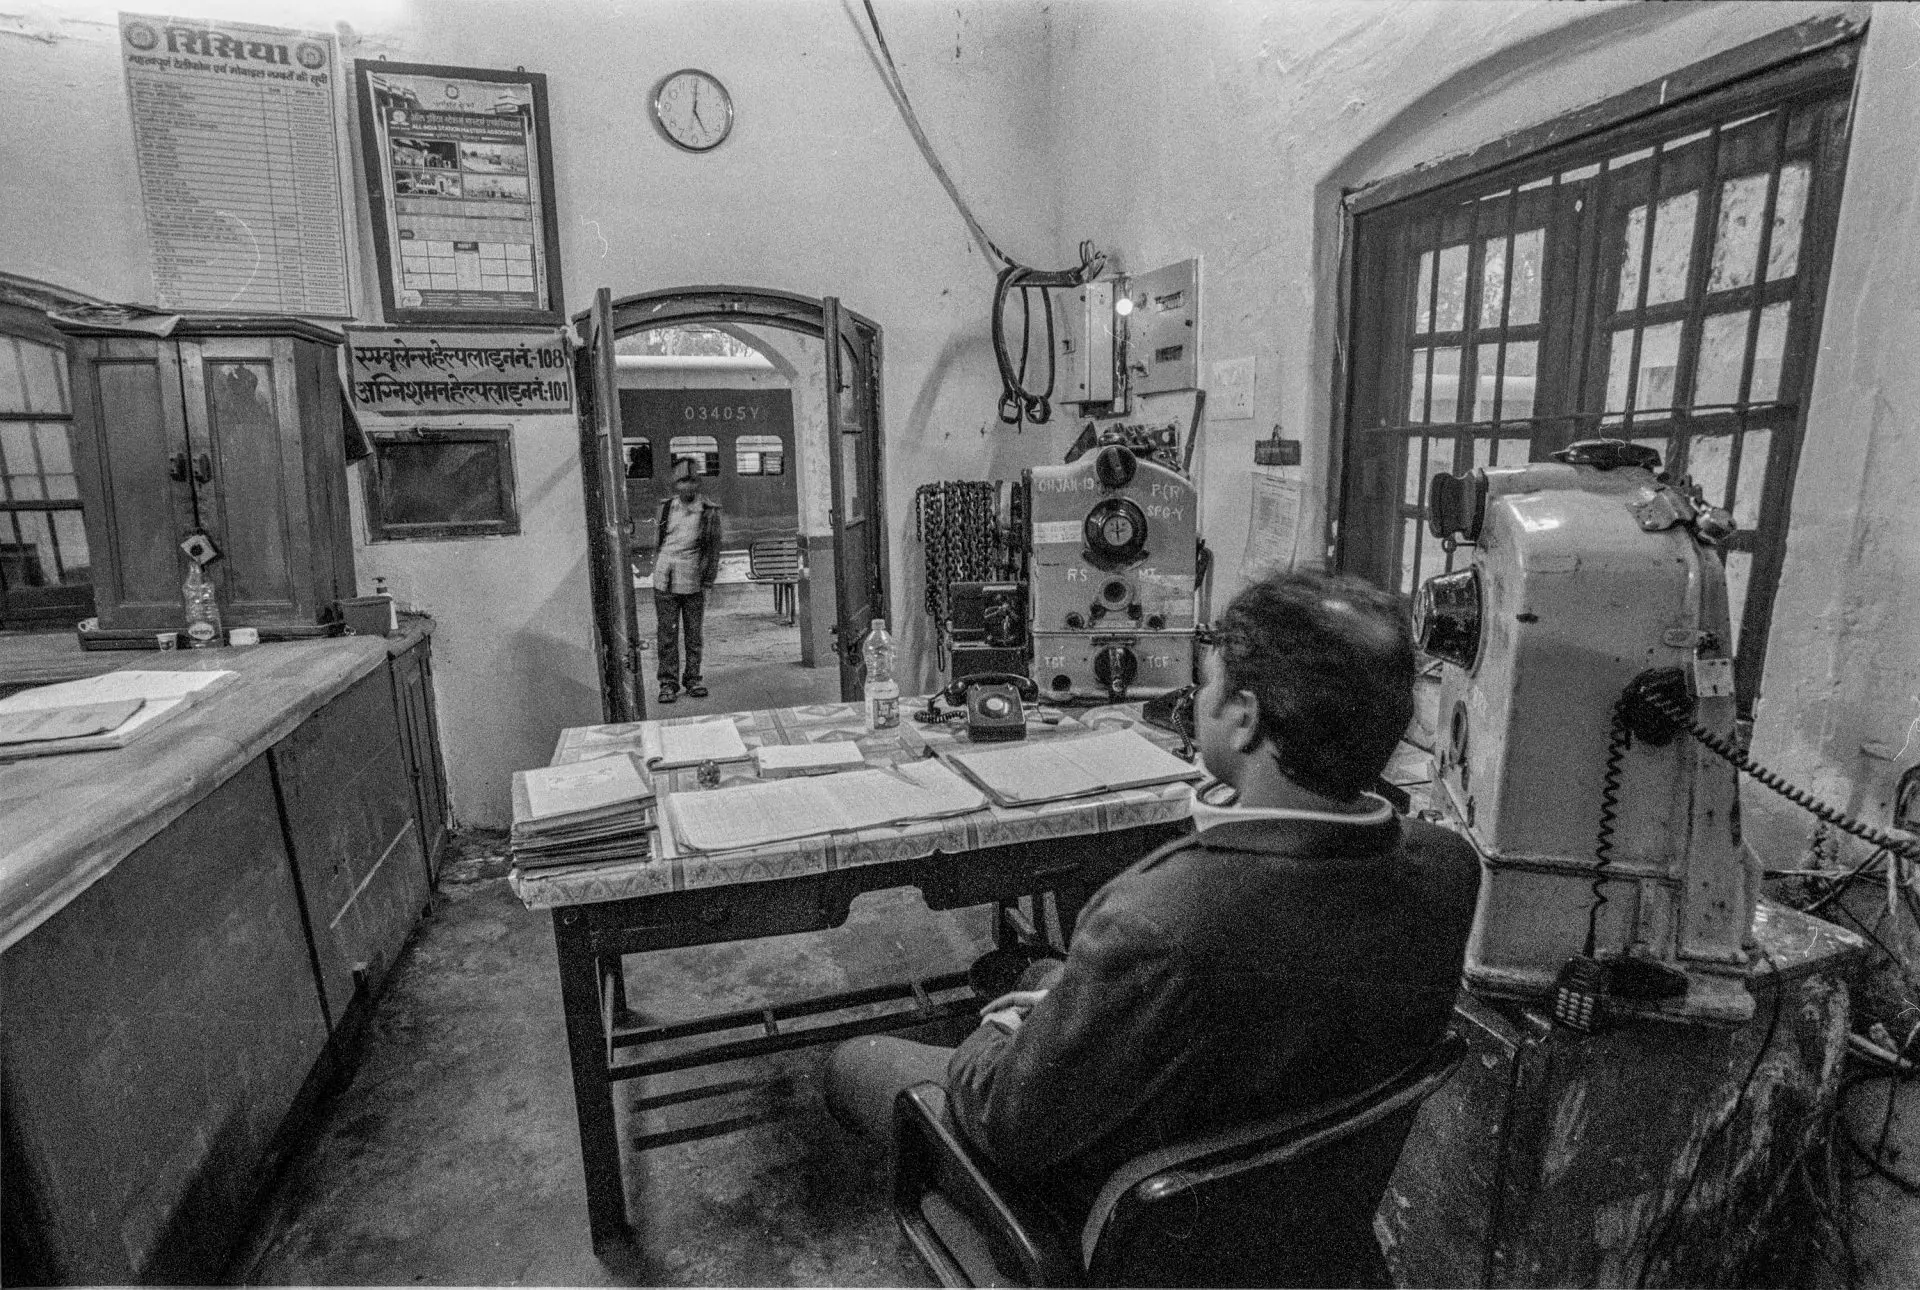
The sun is on the right of the frame and lighting up the station premises outside but the inside was lighted up by a fluorescent light which wasn’t too bright. But the details on the black levers are clearly visible as is the much brighter station signboard and train on the outside of the lever cabin.
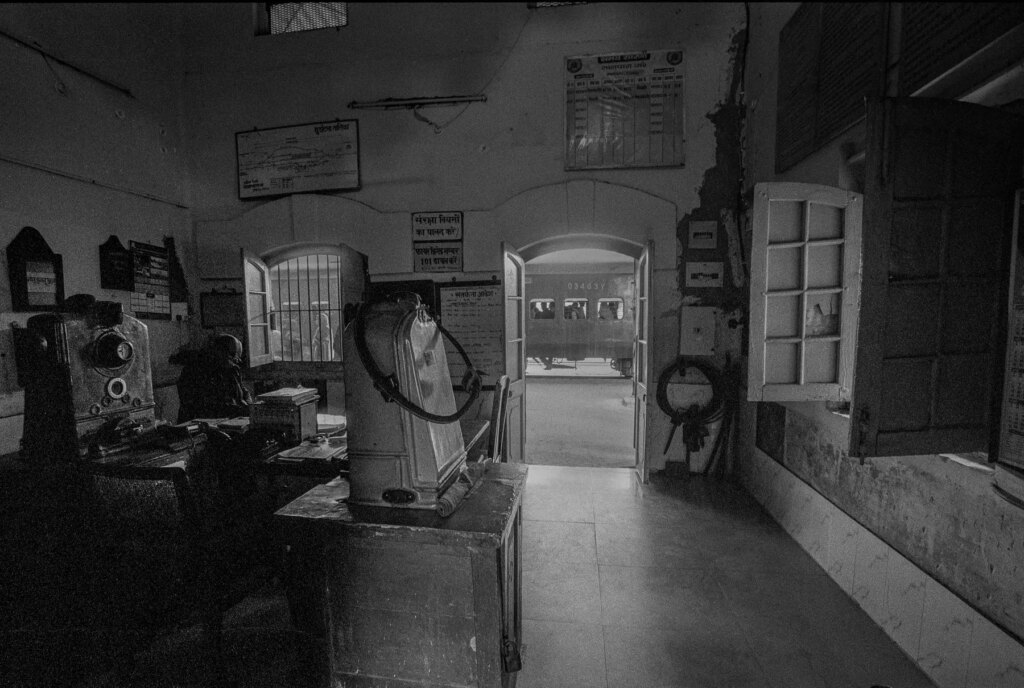
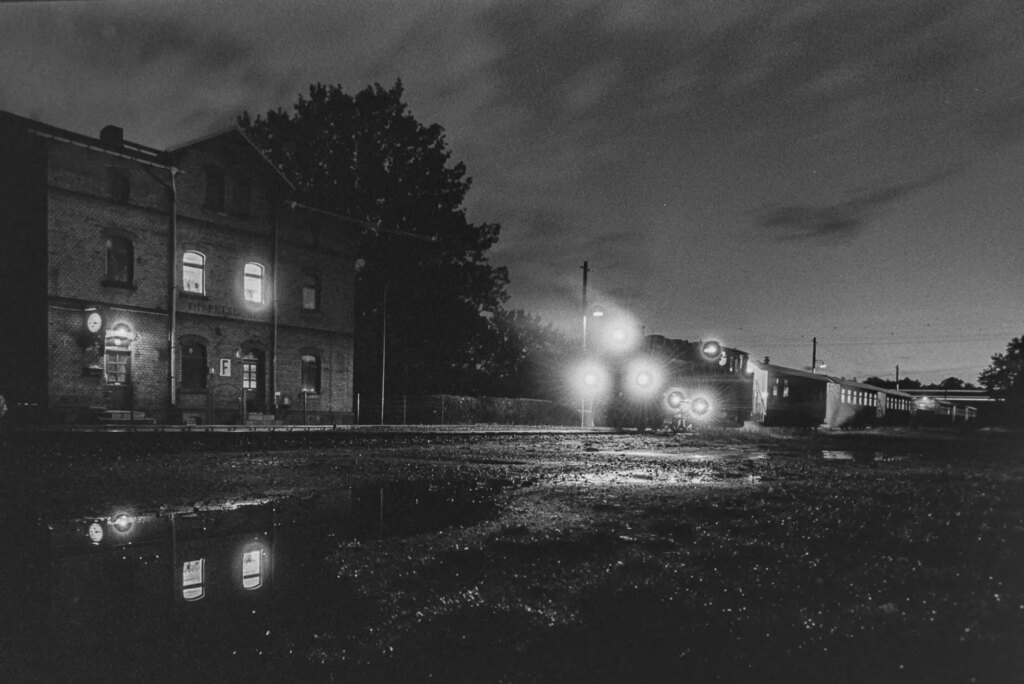
The shot above was an extremely unfortunate case of a window lit shot. I had positioned myself inside the station master’s office to shoot the train as it would appear to the station master. The station master’s office had a couple of fluorescent tube lights lighting it up pretty well. The arrival of the train, unfortunately, coincided with the arrival of a power cut. I was plunged into darkness almost.. The sun was shining from a window in the room behind me. That is what lights up the table in the lower middle of the frame. But the rest of the scene was lighted up by what little light creeped in through the door and windows in front.
The exposure was around 5 seconds which should rightfully put this image in the low light section. Before we head over to the next test, take a look at how how much of the high ceiling room’s walls are visible. Not to mention the details on the train outside. The details on the bottom left are recoverable but the digital scan produces considerable noise so I didn’t bother retrieving the details there.
Test 3: Low Light
I come from an era where Fuji Acros was once available for S$5 a roll so it was assumed that reciprocity failure was never going to be a problem for the film photographer. Fuji took care of its low light photographers by manufacturing the Provia 100F and Acros 100. In doing so, they ensured photographers do not need to learn logarithms to compensate for reciprocity failure. Honestly, you don’t have to learn logarithms to do it but I’m just exaggerating a bit here.
The Double X is a motion picture stock so there is really no need for Kodak to worry about reciprocity failure and certainly no effort need be made during manufacture to mitigate the effect. The film would speed through the movie camera with each frame being exposed at a fraction of a second, not even reaching anywhere near the 1 second or 1/1000s extremes. But I took a gamble and shot a fair bit of low light scenes with this film and I will put some images here for you to see how it behaves in decreasing amounts of available light.
Low Light but Not Night
At the crack of dawn or at dusk, the awkward shutter speed hour sets in. Too slow for hand holding and too troublesome for tripod mounted shooting. But I overpowered laziness and put the camera on a tripod. In Germany, it didn’t help that dawn came with a dense cover of clouds so the low light condition continued longer than an hour.
The photo above, shot at Radebeul near Dresden in Germany, was shot at 2 seconds with an aperture of f/5.6. I particularly wanted the entire locomotive to be reasonably sharp with the well lighted up wheel mechanism. The photo was shot around 5-10 minutes before sunrise or perhaps just at sunrise. It was an overcast day so light was scarce. I had a roll of Delta 3200 but I hesitated loading it into the camera because I knew the light was going to change drastically in a matter of minutes.
So I took out my tripod instead and shot photos at shutter speeds hovering around the 1 second mark. As mentioned earlier, I don’t bother with reciprocity tables because I don’t think there are any for the Double X. And I’m not a technical photographer so I prefer bracketing over reading mathematical equations and whatnot. So for shutter speeds from 1 to 10 seconds I overexposed by a stop and for exposures longer than ten seconds (up to 30 seconds), I’d overexpose by two stops. A two stop over exposure was achieved by opening up the aperture by a stop and slowing down the shutter speed by a stop. For a single stop, I’d just double the duration for which the shutter was open. For example, if a one second shutter speed is required, I’d shoot the photo at 2 seconds and so on.
The situation was the same during sunset too. This was shot in north Germany at a place called Külungsborn West where the Mollibahn steam trains run. The shutter speed was around 1/2 a second at f/5.6. When you carry 20 rolls of Double X and 2 rolls of delta 3200, you really think long (but not too long!) and hard about switching over to the high Iso film for a few shots. Fortunately I continued shooting on the Double X and still managed to get shots without much blur. Shooting on a 200 ISO film means you pull out a tripod a few minutes earlier than if you had been shooting on a 400 ISO film.
Low Light in Complete Absence of Daylight
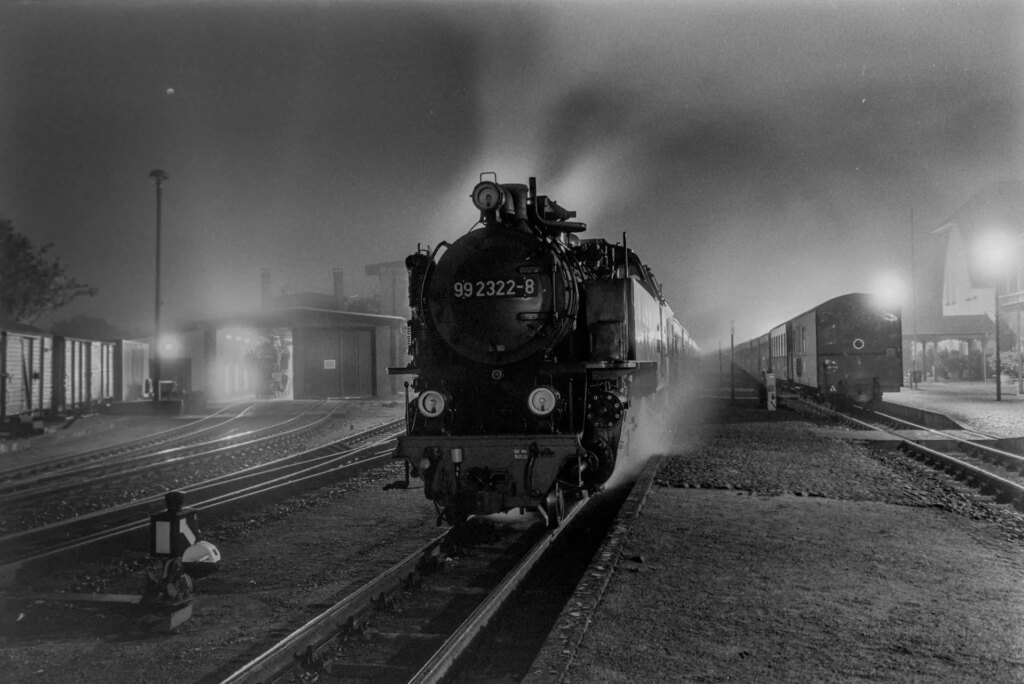
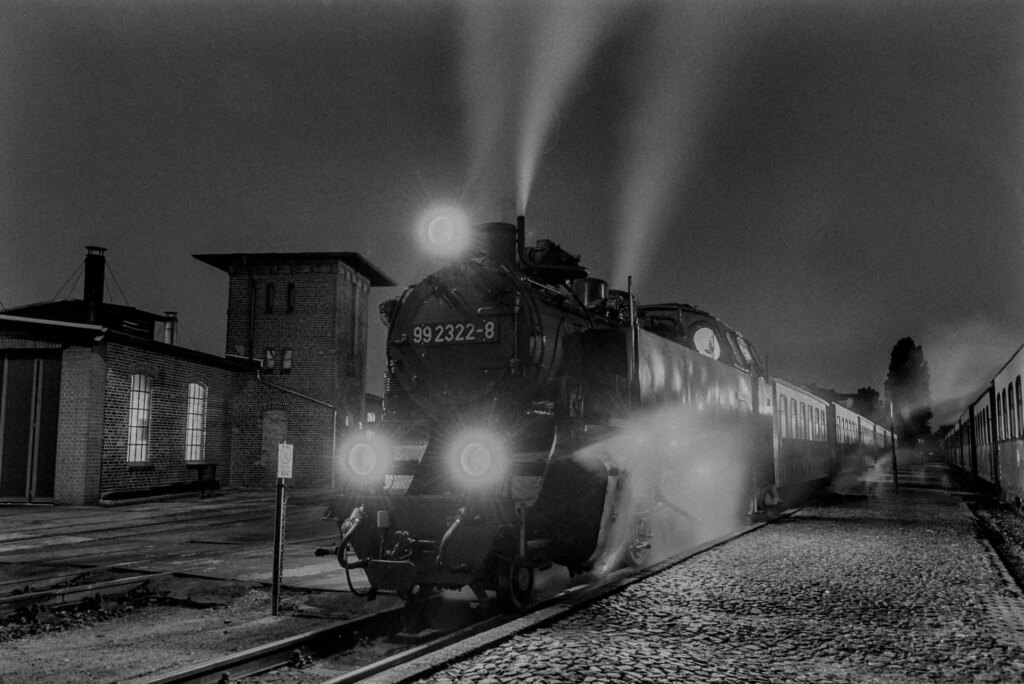
The two photos above were shot minutes from each other, an hour or so before sunrise so it was like a night shot. The location is the same as the previous photo, Kühlungsborn West. Each of these photos were 30 second exposures. I was a bit worried that the strong light from the back (in the first photo) might result in the locomotive becoming a silhouette especially since it was black.
So I erred on the side of caution by taking two additional steps. Firstly, I overexposed the shot by two and three stops (bracketed). Secondly, I used a small head mounted torch light to throw some additional light on the front of the locomotive. You can see it being reflected under the number plate on the right.
Minutes before departure the locomotive driver switched on the headlamps. This is where the double X recorded a very decent shot of the locomotive just before departure. The lighted up lamps were recoverable in scans so you can see how well the highlights hold on this film.
Even on the first photo you can see the shed on the left which is pretty brightly lit. But the details can be comfortably recovered in post.I wonder how much burning would be needed to bring out the details on the lighted up lamps in the darkroom prints. Wish me luck.
The shot above was a worrying one for me because, going by what I saw it seemed like the image would have just blacks and whites with nothing in between. I’d be dammed if I either over or underexpose my photos. If I overexpose the photo, the lights will appear as big white patches. And if I underexpose I would be losing details on the black locomotives. I also had to worry about reciprocity failure. So I bracketed like crazy and shot photos at 1, 2 and 3 stop over exposure.
Surprisingly enough, the photos all turned out okay and the lights were recoverable in almost all of the photos. It helped that the locomotive headlamps were not at their brightest as they were to be switched off soon. The ability of the film to preserve highlights despite several stops of overexposure, made it a pleasure to work with for long exposures. The reciprocity failure is not as bad as the Foma emulsions. With a simple one stop compensation for 1-10 second exposures and 2 stops for longer exposures, it is very useable for low light photography.
However it did fail me sometimes when the light sources were a bit too bright and a too far away. Like the shot above at Friedewald Bad (near Dresden). The headlamps of the locomotive were at full blast and they pretty much hid the locomotive. The train stood there for around a minute so I only managed to take two photos of around 30 seconds each. I tried opening up the aperture to 5.6 to allow for a two stop overexposure to preserve the details in the shadows but not much came off it.
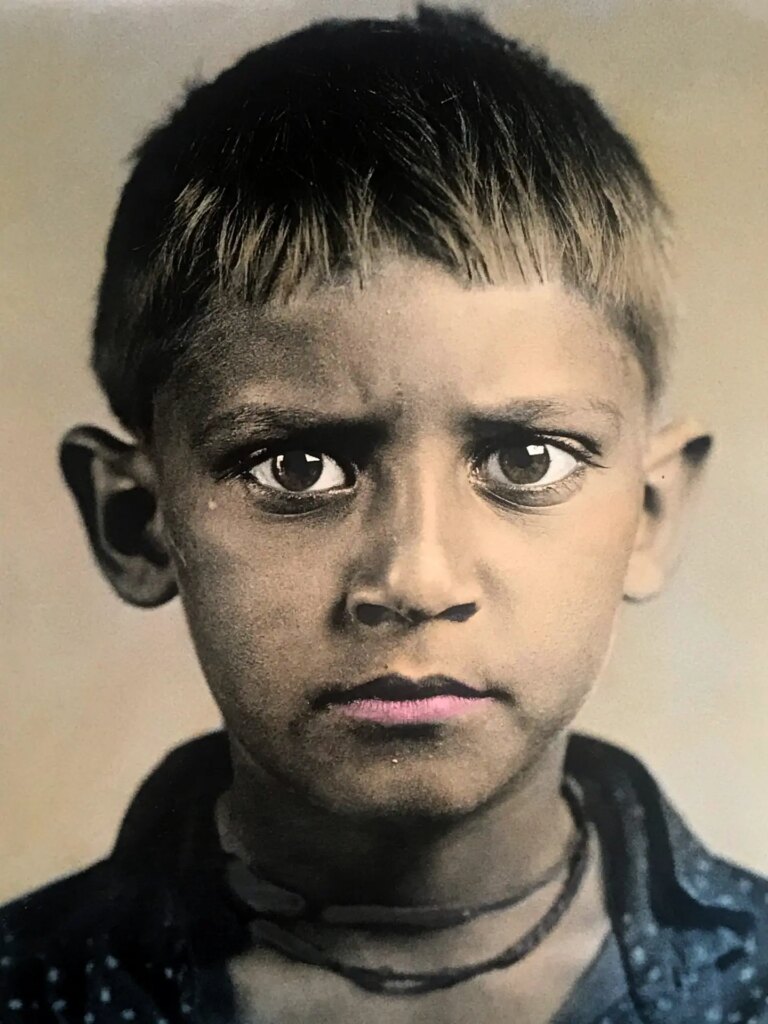
The last photo of the window light test (previous test) should have looked something like the photo above. This photo was taken at 5pm when the sun had almost set in this part of India. Had there been a power cut once again, it might have probably been impossible to get a decent shot. Here, the shutter speed was around 3-4 seconds. Good enough for a properly exposed photo. But not good enough to freeze the curious kid outside. But when I saw the scans from all the long exposures, I was very satisfied with how this film handled low light.
On this occasion I actually wanted to switch to the Delta 3200, only to realise I had left the film in my hotel room. Hence I had to pitch the tripod and arouse the curiosity of a passing kid.
Test 4: Backlit Scenes
As mentioned in the earlier section, it’s easy for most films to perform when the subject is lighted up directly by the sun. Backlighting causes some problems for photographers even if we compensate by overexposing the photo to preserve details on the subject. Very often its a trade off between blowing off your highlights at the back or underexposing your subject itself. I tried to conservatively use reflectors at first to light up my subject before throwing all care to the wind and overexposing the negative to keep my subject properly exposed.
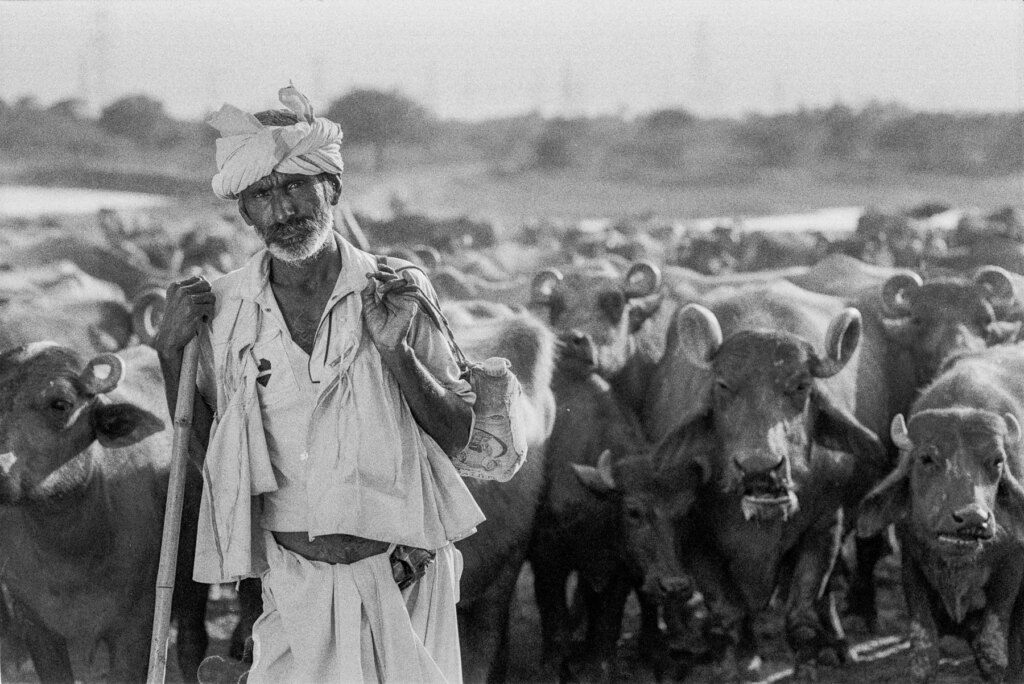
The shot above was shot with a reflector bouncing back light on to the buffalo herder’s face. The light in this part of India can be pretty harsh throughout the year. Hence I was worried about losing details on the herder’s dark complexion. I also intended to pass him a print of the photo on my next visit. Hence I had to capture his expression and his facial features as clearly as possible. The film didn’t disappoint. I hope to be able to pass him his photo next year.
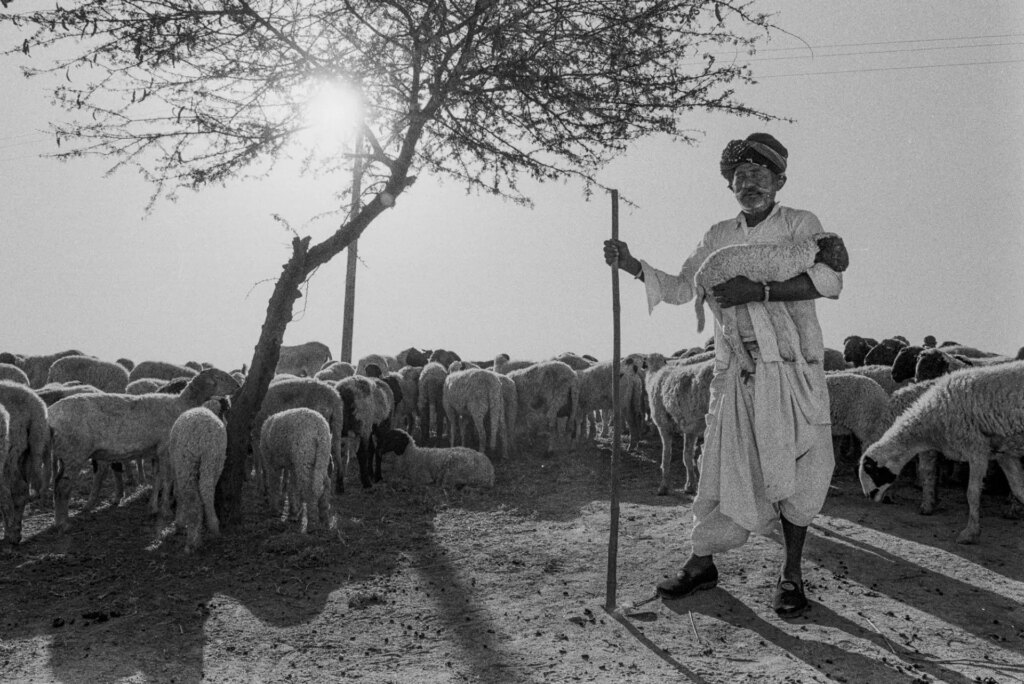
My fears grew a bit when shepherds started asking me to shoot full body photos with their herd.. The crop was looser and the reflector I had was inadequate to light up the full body of the shepherd. Just lighting up the face would look weird. So I put my faith in the spirit of George Eastman and fortunately, he didn’t fail me. I managed to recover the highlights in the sky and the details on the gentleman’s face digitally. I wonder how painful it would be to make a darkroom print though. This photo was overexposed by almost two stops to keep the gentleman properly exposed.. Of course when I took this photo, George Eastman’s spirit had not confirmed its willingness to help me. So I actually set up another flash lit shot which will appear at the end of this piece.
The Kid: He thinks he is a photographer. He is shooting into the sun without compensation though! Loser!
I shoot on aperture priority when running behind shepherds. On this occasion though, I forgot to compensate for the backlit scene. The shot was only shot with a positive compensation of one stop. And I already lost some of the details on the face. Fortunately I did not promise this shepherd his photos. Besides, my friend managed to get him properly exposed on this Sony A7. But yes, I don’t get it right all the time. As with the previous sections, you can see mistakes happen all the time. But the nature of the film kinda forgives me once in a while.
I couldn’t decide whether to shoot the shepherd as a silhouette or properly exposed so I did both. Turns out I could retrieve enough detail from the silhouette to make it look almost properly exposed. The sun was rising behind him.
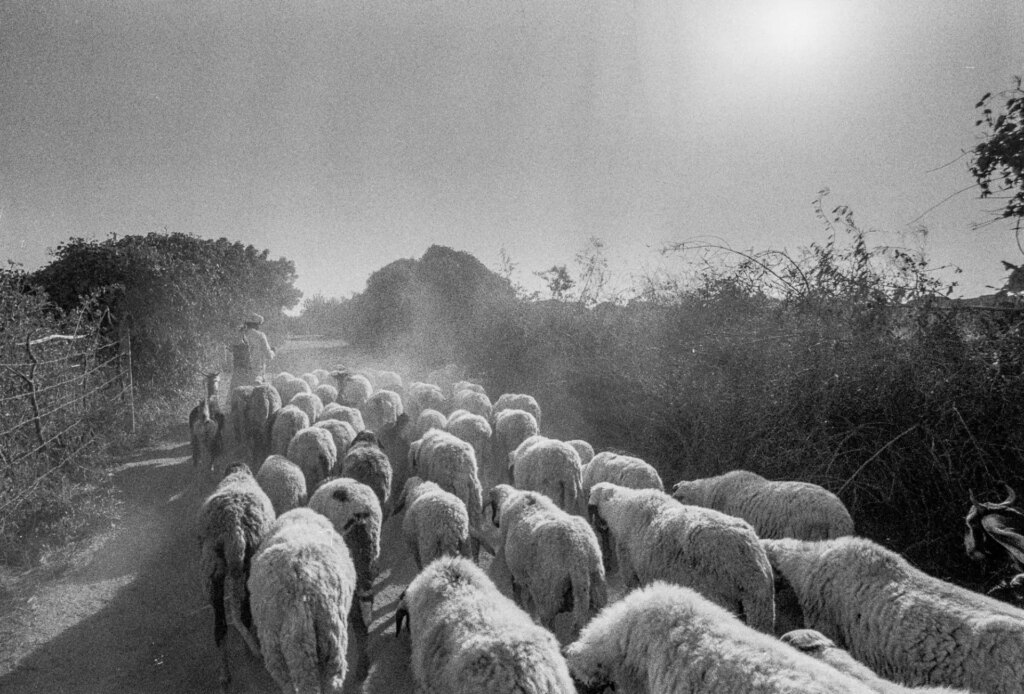
I shot a fair bit of photos against the sun, of shepherds returning home with their flock. The dust created by the sheep’s feet made for a nice veil. But focusing was challenging even with a capable camera like the Nikon F100.
Sorry that I keep returning to railway photos. But I have shot these fast vanishing trains for 6 years already. Hence I have way too many photos in all kinds of lighting conditions. As such, I fall back on these photos for examples. This is a tardily executed shot as I shot these sugar cane farmers as the train was passing them. The shot happened rather quickly. But I was very happy that the exposure was okay to the extent that the details on the inside of the train window can be recovered too!

Hanging off the Mollibahn train in Germany, I was blessed with clear skies and grazing horses when the train zipped past this village. Not much was needed to recover the sun and the underexposed horses made for interesting silhouettes.
I had an advantage of a foggy morning which reduced the backlighting problem a little. The fog itself was another environment I wanted to test the film in and it came the next day. The results appear in the next section.
Test 5: Fog
Shooting in fog always presents its own set of challenges. If the fog is too thick, even focusing becomes a problem. Furthermore, the diffused light with the white fog sometimes confuses the camera into underexposing the photos. I only shot around 20-30 pictures in fog. I was luckier with the Orwo N74 when working with the fog and shot a lot more images. Here are a few to give you an idea of how the Double X film handles fog. By fog I mean the meteorological condition, not film fogging.
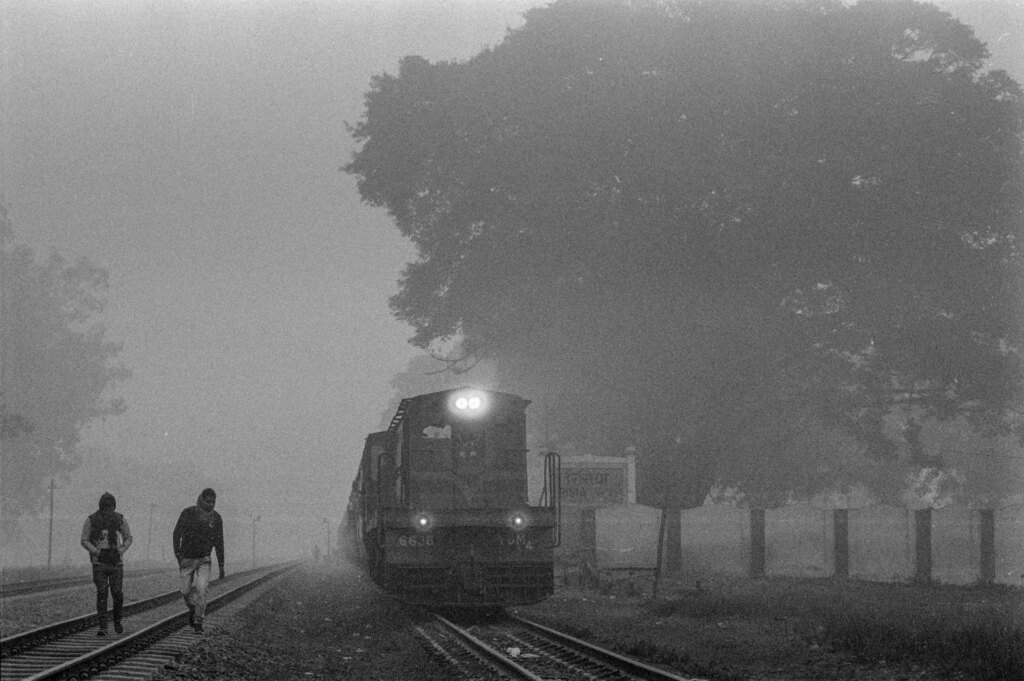
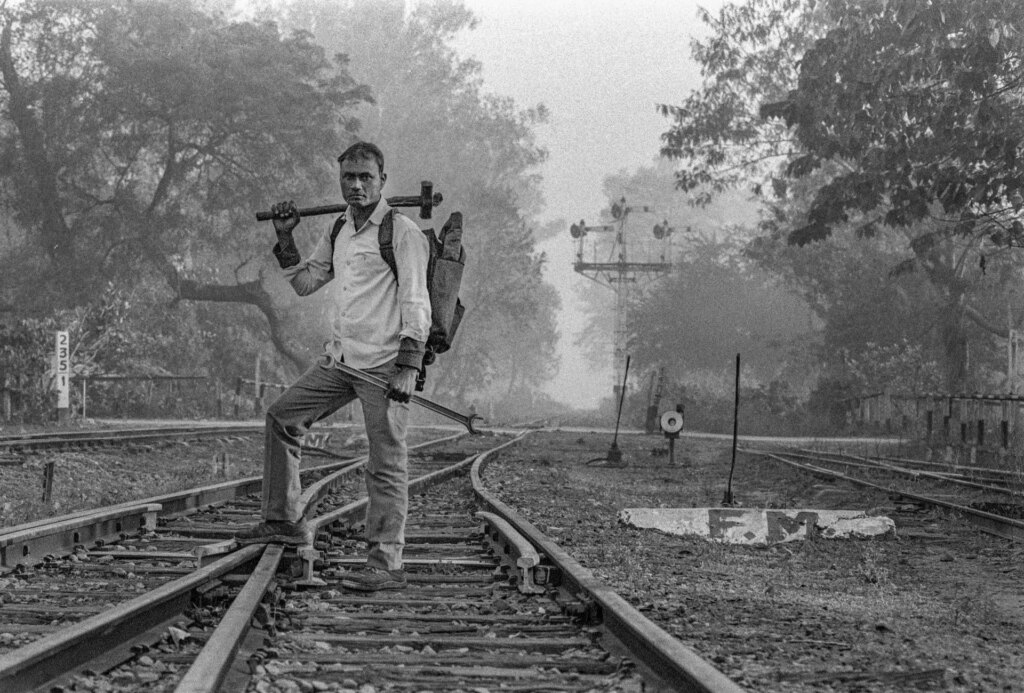
At this railway station, the fog was pretty heavy (I’ve seen heavier fog though) but the camera managed to lock focus when the two gentlemen walked into the frame. Fog creates an interesting environment lifting the photography by creating a veil of mystery. This would have been a pretty ordinary shot otherwise. The film captured adequate detail including the station name on the right hand side.
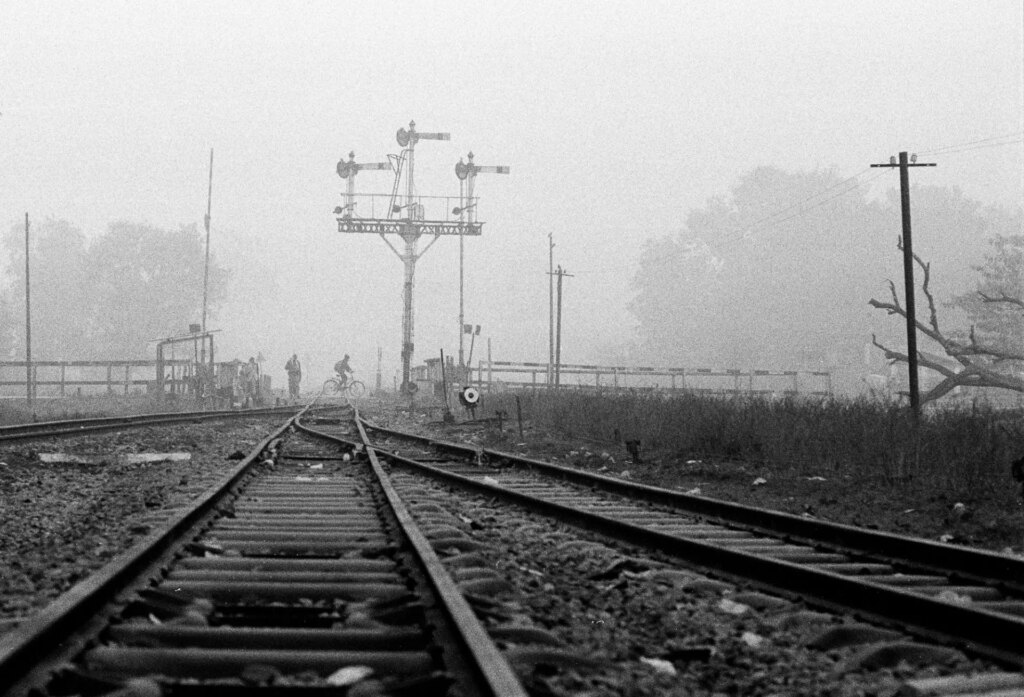
Those are about the only shots I did in fog. But I think the Double X handles fog better than the Orwo N74 in that it records more detail. Ofcourse this is also a function of the fog thickness and all but it does seem like it handles fog pretty well. Some have suggested to add on a filter to mitigate the fog effect like a yellow or orange filter. However that would slow down my shutter speeds even more so I’d rather not do that.
Test 6: Flash and Artificial Light
This is a section that came about entirely as a result of shooting in places with unfavourable lighting conditions. Most of the following photos were shot inside people’s homes or outdoors under very harsh sunlight.
I brought along a flash gun, soft box and also a one feet LED light panel. I’ve generally only worked with available light when overseas. But this project required me to shoot inside peoples homes that wasn’t always well lit.
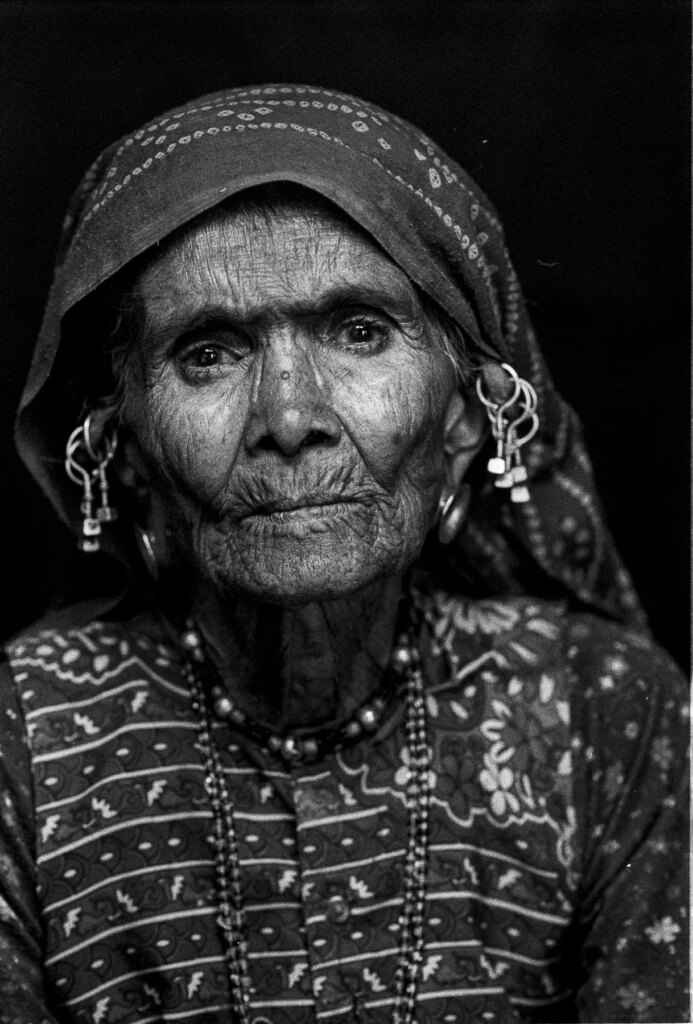
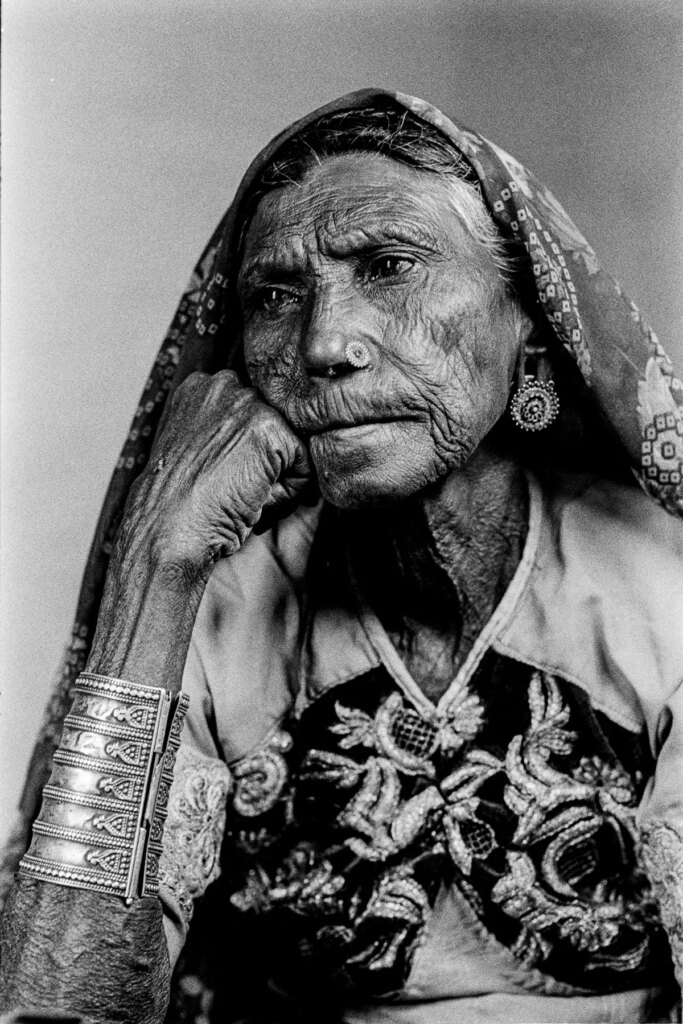
When shooting old ladies in their homes the available light was inadequate even for a 400 ISO film. The Delta 3200 film would have been too expensive and grainy for use especially since I am supposed to pass them the photos on the next visit. Telling them about film vibes won’t cut it so keeping the grain in control was important. I foresaw this and brought along a Godox LED panel. The panel worked well indoors for head shots but anything looser was not possible. So I did a fair number of headshots using this LED light placed close to the ladies.

But the shot had to be executed quickly because the panel was quite bright and I didn’t feel too comfortable putting it so close to the model’s eyes. But the ladies were wonderfully patient and allowed me to photograph them on both film and digital.
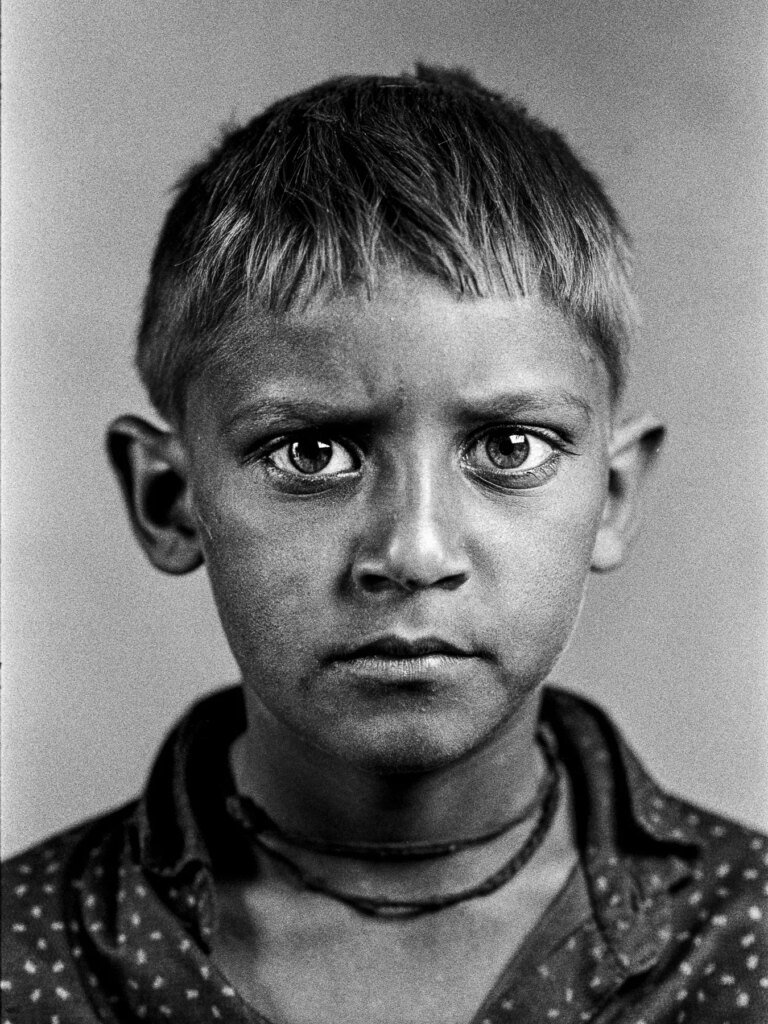
Even this kid, allowed me to bring the light real close for the soft lighting and massive catchlights. It was great to have the LED light for my portraits. But I couldn’t depend on it too much as it only works for headshots. If I were to shoot half or full body shots I would need a flash. And the flash has an advantage of being able to overpower the sun in terms of brightness. The LED panels were pretty useless once we left the dim interiors of people’s houses. And that’s where the flash came to my rescue.
This is the same gentleman I photographed against the sun with his flock of sheep in the backlit section. I promised him his photo so I insisted we do a tighter shot. To play it safe, I used a flash gun to light him up. At the shutter speed of 1/200 with the aperture at 11, the Double X recorded a very crisp image of the gentleman. Crisp with adequate details on his skin and beard. I hope the gentleman will like this shot when I pass it to him next year.
Concluding Thoughts and FAQ’s
It’s been an amazing experience working with this film, shooting everything under the sun and moon (and indoors) with it. Living life in one ISO was something I had not done before. While I always knew this was possible, I never brought myself to doing it until economics forced me into a corner and made me shoot everything I saw on a single ISO film.
The Double X has outstanding dynamic range and latitude. It also has decent reciprocity characteristics for long exposure. Adding to this, the manageable grain, makes it great for shooting most genres in photography. This is of course, just my opinion and you are welcome to criticise it or disagree with me.
So I can say I do 99% percent of my film photography on 200 ISO and the remaining one percent on Delta 3200. I guess the title of this piece should be “Almost living on ISO 200”
I am answering two questions I foresee, having gone through this rather long piece of write up with photos.
Why ISO 200?
In my opinion, ISO 200 is the next best ISO film after the ISO 400 film. The ISO 400 film can be used comfortably in broad daylight or under overcast conditions. The 200 Iso film, for me, isn’t as versatile but its the best option when 400 Iso films aren’t affordable anymore. The Double X (once again, this is just my opinion) performs better than the lower priced 400 Iso films like the Fomapan 400 and the Orwo N75. Hence I am okay sacrificing a stop of light for better latitude and dynamic range.
The film was also easily available here in Singapore without having to pay an arm and a leg. When shooting projects overseas, 20 to 30 rolls of film run through my cameras. So having a low cost, decently fast film is very important. From 2005 to 2015 it was Kodak Tri X and Neopan 1600. In 2015 it was Fuji Neopan 400. Between 2017-2019 it was Orwo N74 and now it is Kodak Double X. I really hope it ends here. I don’t think I have the energy to put another new film through the rigorous testing I’ve done so far.
Of course, when I say easily available, I don’t mean you can walk into a store and buy a brick of rolls. Kodak Singapore will sell you a 400 feet roll which is delivered from Rochester in a few days. 400 feet gives around 80 rolls of 36 exposure films. Once again, it’s easier said than done. I roll the 400 feet rolls into 100 feet rolls before using a bulk loader to make 36 exposure cartridges. Such is life. You make up for the lower cost of film by paying extra in time and effort. The question “What am I doing with my life?” has crossed my mind several times when rolling up the 400 feet roll into smaller lengths.
Why no Push/ Pull tests?
It has started to annoy me when the question “How does the film behave when pushed?” pops up during conversations. Pushing has become an annoying modern day pursuit for no worthwhile reason in my opinion. People did it in the past out of desperation not because they were bored. Yes there are situations when you really lack light and don’t have a fast film to get a proper exposure. But if that is happening every day then, the problem is not with the light. The problem lies with the photographer who doesn’t carry the right film stock to be shooting in low light. If you foresee having a lack of light or having to shoot after sunset then please bring along some higher ISO films. And spare me the annoying question, “Oh so how does it push?”. Better still, bring a digital camera and shoot the night away. Handheld even!
Think about it, you wouldn’t deliberately underexpose a photo on a digital camera and then use Photoshop or Lightroom to retrieve details from the underexposed areas. Then why do you put film through this? I can understand if you were photographing Robert Kennedy and someone switched off the lights and shot him dead. You only had one type of film to work with so you push it. But most of us are not in that situation so respect the light and bring along a film stock that does justice to the light. If you’d like to know why I brought up Robert Kennedy into this piece all of a sudden, take a look at this article from a decade ago.
I never push any film besides the Delta 3200. The native ISO of the Delta 3200 is 1000. When shot in 3200 (as shown on the box) its almost a 2 stop push already. When the manufacturer confidently says it can be pushed, it is to be used as a weapon of last resort. A 400 ISO film can be used in a situation requiring an 800 ISO. One needs to open up the aperture or slow down the shutter speed by a stop. At least for the kind of photography that I do that option is available. I don’t need to push a 250 ISO film to 1600 because someone in a beanie cap is doing it.
It goes against all the thoughts and processes that went into making the film and what it was made to do. So if you want to push this film, don’t. Nah, kidding. Do what you like. Like what you do.
But as a concluding note on pushing, I would like to say that the film holds shadow details really well. So I foresee this film being pushable.
Wait, What about the “Coloured”?
Yes, this piece is about going from black and white to coloured. So, here is how I do colour photography now. I don’t buy colour film anymore. Neither do I shoot much on a digital camera. I use oil paints and colour darkroom prints made from photos shot on black and white film.
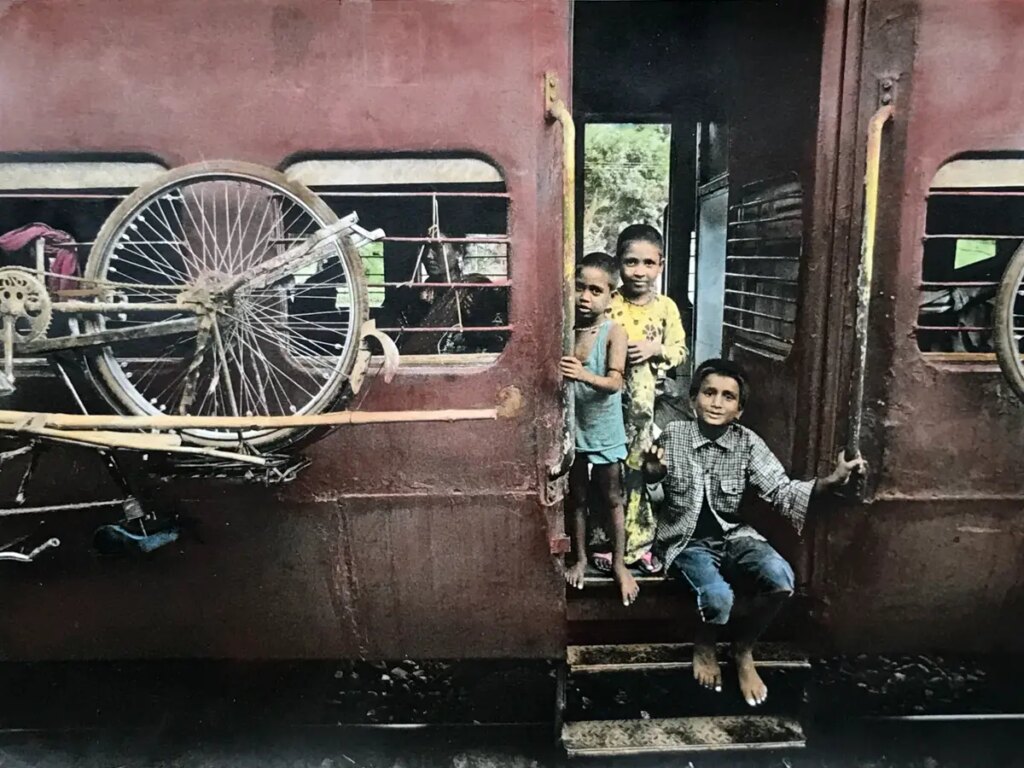
Life has become complicated in some ways. It takes around 2 to 3 hours to colour a 12 by 16 inch print. However there are advantages too. The white balance is what I want it to be and I don’t have to drag sliders on Lightroom to get the colour balance right.
And that is how I do colour photography on film today.
Share this post:


Comments
Martin Siegel on The Descent of a Film Photographer Part 2: From Black and White to “Coloured” – By Nandakumar
Comment posted: 09/05/2022
Fine article to read, thanks for sharing!
Comment posted: 09/05/2022
Steve Abbott on The Descent of a Film Photographer Part 2: From Black and White to “Coloured” – By Nandakumar
Comment posted: 09/05/2022
Where I differ is that I shoot it at 400, and can't notice any difference from exposing at the "native" 250 ASA. I've only developed in HC-110, as I like it for it's versatility and keeping properties, and I'm delighted by the results - although I'll probably try it in D96 (or rather the Bellini equivalent) soon. Today, I shoot nothing else for 35mm B&W except for T-Max 3200 at gigs. However, I use Bergger Panchro 400 for occasional use in 120 format, and quite like it; Cinestill sell the Double-X in 120, cutting it down from 70mm IMAX film stock, but it's pricey, and cutting it myself, and trying to stick old backing paper on in the dark would be too much for me!
Comment posted: 09/05/2022
Des McSweeney on The Descent of a Film Photographer Part 2: From Black and White to “Coloured” – By Nandakumar
Comment posted: 09/05/2022
Peter Roberts on The Descent of a Film Photographer Part 2: From Black and White to “Coloured” – By Nandakumar
Comment posted: 09/05/2022
Your trials and tribulations to achieve the results you were striving for made interesting reading. I'll leave the technical comments to much cleverer people than me, but suffice to say you have an impressive body of work. The portraiture shows humanity and sympathy and makes me feel that through your work I have in some small way touched the lives of the subjects .
The way you have introduced human interest into your railway images is impressive and inspirational, the work of a true artist.
I say artist because you saved the best until last. Your hand coloured prints blew me away and are a world away from awful digital "colorization".
Thank you so much for posting.
Johan on The Descent of a Film Photographer Part 2: From Black and White to “Coloured” – By Nandakumar
Comment posted: 10/05/2022
Jamie W on The Descent of a Film Photographer Part 2: From Black and White to “Coloured” – By Nandakumar
Comment posted: 11/05/2022
Alexander Seidler on The Descent of a Film Photographer Part 2: From Black and White to “Coloured” – By Nandakumar
Comment posted: 11/05/2022
Hans on The Descent of a Film Photographer Part 2: From Black and White to “Coloured” – By Nandakumar
Comment posted: 11/05/2022
There is no singe solution to suit everybody, for myself bulk rolling brought new problems. I can only bring so many rolls with me, before I need a resupply. On a thru-hike or summer away from home that is really asking a lot, I have to lug around 50 rolls in my backpack. I have even thought to teach a family member how to bulk load, so that they can mail them abroad to me, but that just isn't practical.
Also, the financial savings aren't quite as good as many bulk-loader videos on youtube will lead you to believe. You get 3-4 less frames per roll compared to prepackaged, you need good cassettes (which add significant cost) and the only place I can buy Eastman 5222 is in the UK, unless I am mistaken there are no bulk sellers in mainland Europe, I looked everywhere and emailed all the Kodak spokespeople. (someone please correct me if I'm wrong..) So for me at least, there are high shipping and import fees involved. It is a great film tho.
My own solution is to shoot FP4 pushed one stop, developed in home made microphen. Compared to Ilford 1 litre packs, it costs me 1/10th the price and I just make what I need, I never have to chuck a leftover 200ml. I develop 12 rolls at a time in Paterson 8 reel tanks. FP4 per 10 rolls is quite affordable and holds shadow detail to taste. It's also easily available the whole world over.
And finally, you're right about ORWO. They seem more interested in making skate board decks and trucker caps with their logo on it than making sure their film stock doesn't look like HP3 left in the Sahara desert for 70 years. (I too am bitter about N74 getting replaced, if you can"t tell!)
Comment posted: 11/05/2022
Nandakumar N on The Descent of a Film Photographer Part 2: From Black and White to “Coloured” – By Nandakumar
Comment posted: 12/05/2022
Once again, thank you so much for your appreciation and encouragement!
Graeme on The Descent of a Film Photographer Part 2: From Black and White to “Coloured” – By Nandakumar
Comment posted: 16/05/2022
Given the quality of the photographs (and the writing) I wonder whether there is an opportunity here either for a photo magazine or a crowdfund offer to provide colour film and processing. I want to see more, I want it on paper and I’d be prepared to put my hand in my pocket to help it happen. More of this please.