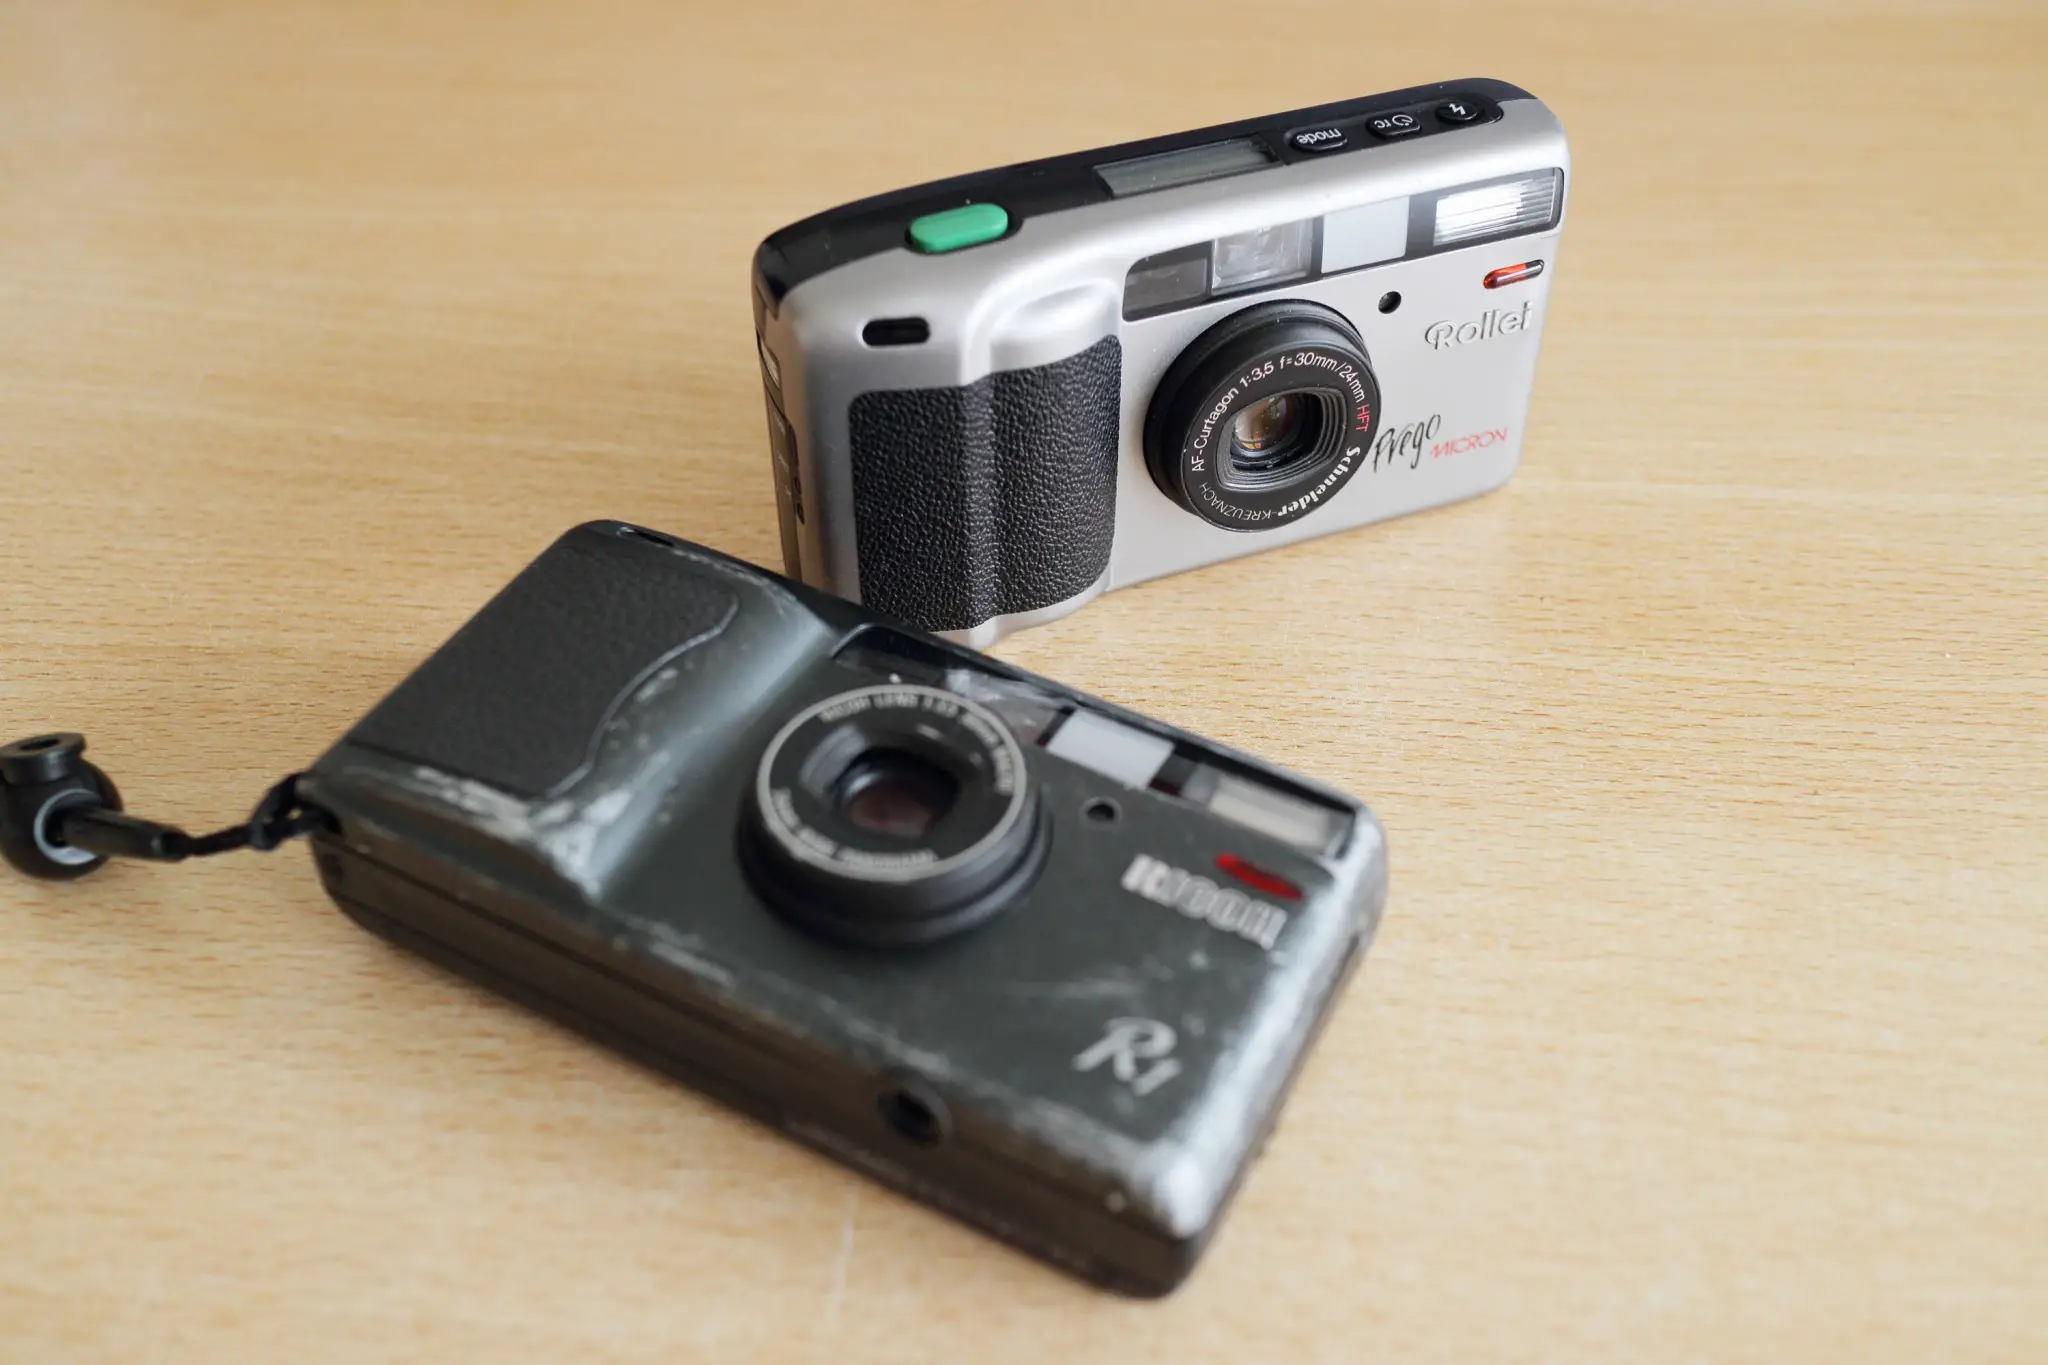
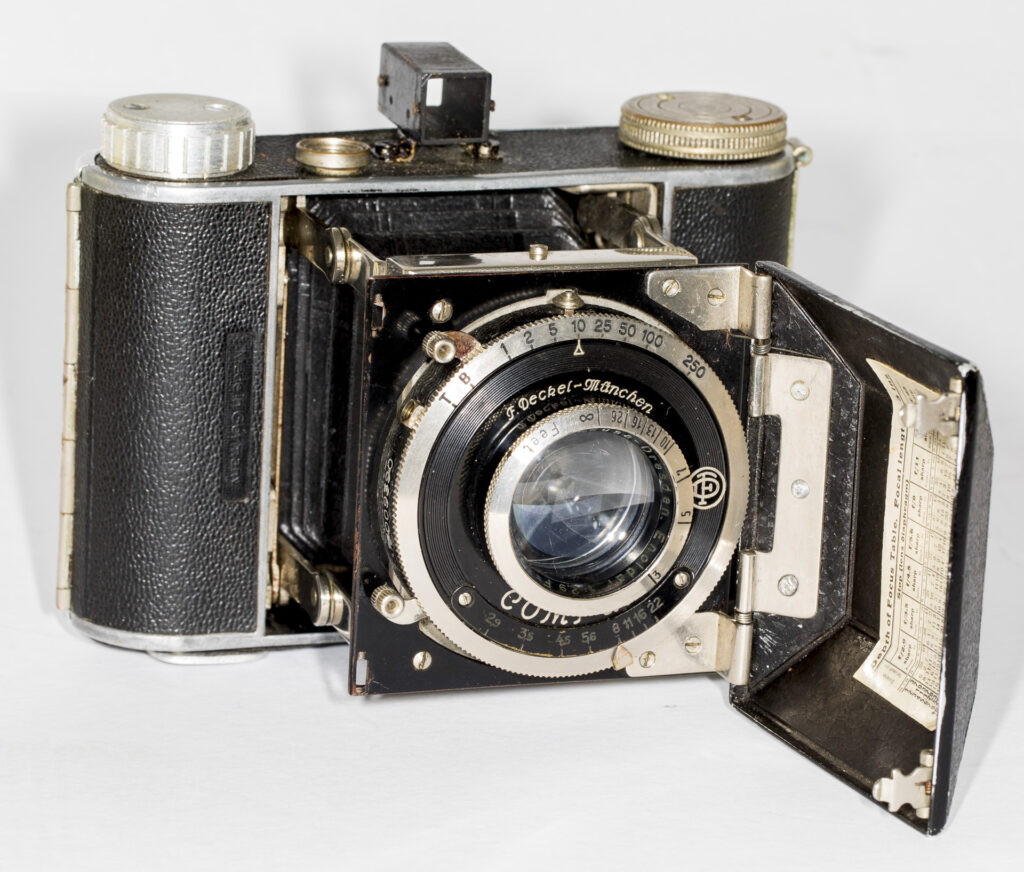
While I was visiting San Francisco in September last year, my friend Arachide presented me with handful of cameras. Those were his thrift store finds. I am still amazed by what he can score for price lower than a battery needed to revive it. Besides Minolta Explorer Zoom, he also presented me with two sibling cameras – Rollei Prego Micron and Ricoh R1. The Ricoh especially looked really beat up. The LCDs were bit busted and the light seals were crumbling into sticky mess but what the hell. They were free cameras! Once back at my place, I fixed the light seals in no time, thanks to a wonderful kit that Arachide sent me few years back. It worked like a charm.
Differences between the two
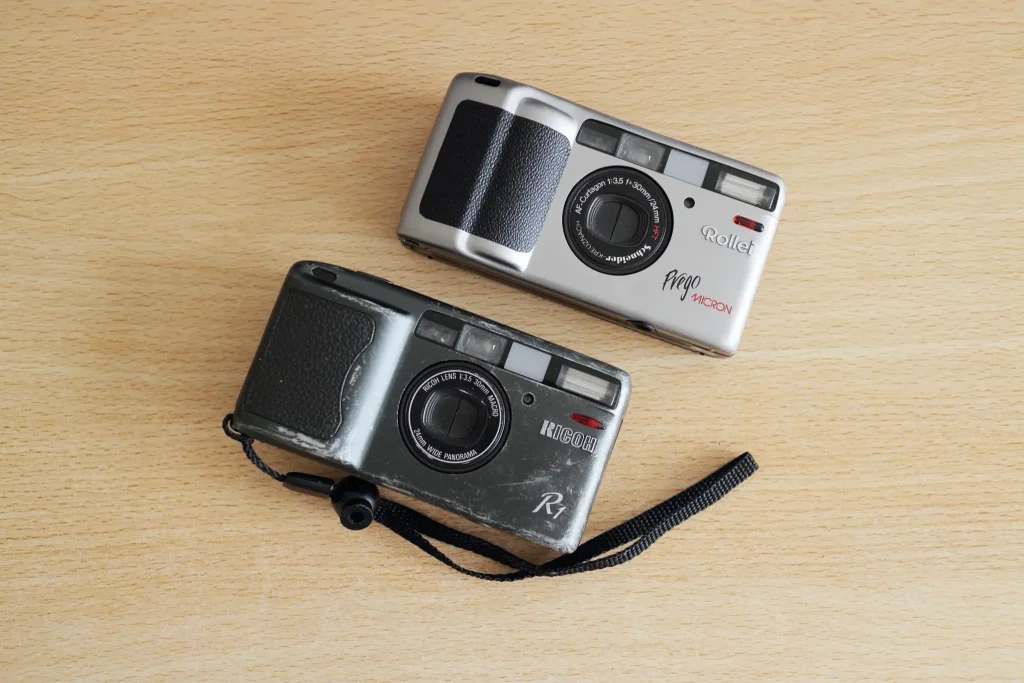
Now these cameras look very much the same except a metal chassis and lens designation. In original, Rollei is lacking the leatherette grip and the shape of the front plate hints the inside structure and film compartment. The Ricoh R1 in shape resembles its more mature siblings with the signature Ricoh shape. Both of them fits my hand nicely. On Rollei Prego, my fingers naturally slide in the groove while on Ricoh R1 they rest on the bump. I’ve added a small piece of leatherette to Rollei, otherwise it’s just a smooth metal finish. I think it helped visually and also in terms of grip and handling comfort. I would be pressed to say which one of them is better but I have a slightly better feeling from holding the Ricoh version.
The lens is marked as Ricoh Lens 1:3.5 30mm Macro on Ricoh (duh) and as a Schneider Kreuznach lens on Rollei.
Otherwise those cameras are exactly the same (except for minor details I’ll get to later) and I will use the name Ricoh R1 throughout the rest of the article.
Handling and ergonomics
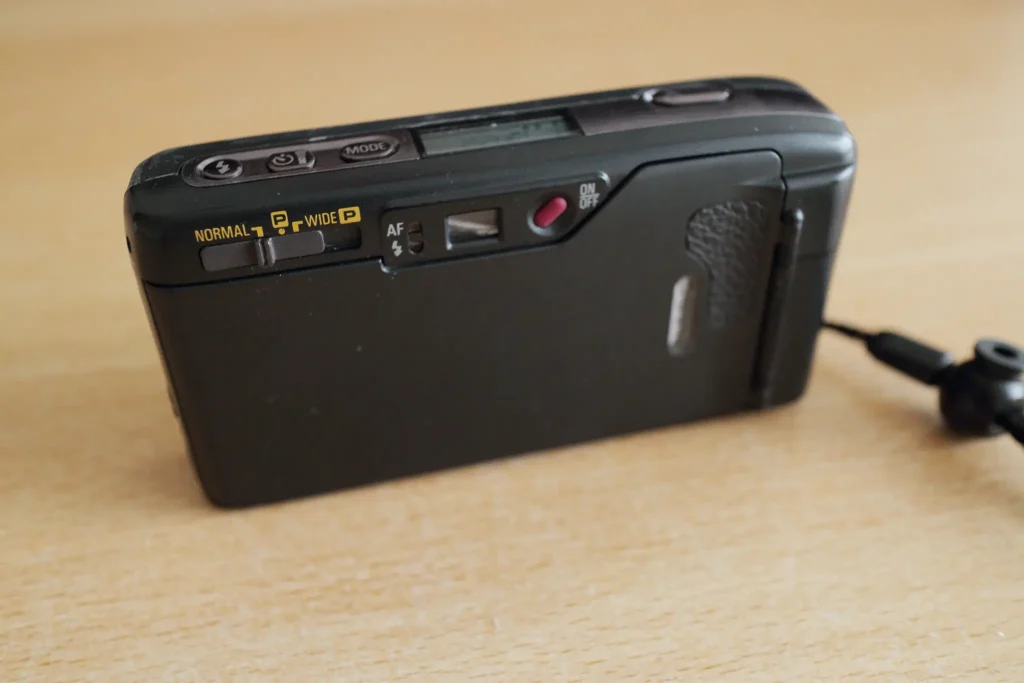
Now many readers of this blog and compact camera enthusiasts are familiar with the Ricoh’s GR series. From what I’ve found, this camera preceded the GR line by one year but it shares the overall look and shape. As opposed to the more feature packed GRs this one is purely automatic with little controls. All settings are controlled by three buttons on the top and one panorama/lens switch on the back. Selected mode is displayed on the top LCD together with the remaining frames.
The LCD is quirky as one would expect with Ricoh. When Arachide gave me these two, both of them had some elements not showing with Rollei showing almost everything except one or two number segments and Ricoh one showing like half of them. What the hell right, it’s free and it’s nothing major (note here, the camera can be operated without the LCD completely as almost all the modes can be recognized by the camera’s behavior. I’ll get to that later). But strangely when I got back from San Francisco, I could not see a single missing segment on Rollei, which I started using as a black and white pocket camera. Cool. The Ricoh was still busted though. While I switched to Ricoh R1 for the review and popped a new battery in, suddenly all segments came back to life. Some of them disappeared for a while just to reappear again the next day… finicky but still they show more
Ergonomics wise, this is one of the best cameras to hold. The shape allows for a firm grip. Unlike with Fuji DL Super Mini, where no such feeling is provided by the sleek flat exterior. Also it puts your fingers further away from the lens, limiting the risk of putting your fingers in a frame (it happened to me few times with the Fuji). The camera is unbelievably small and narrow everywhere but the grip part. It is just 2.5 cm thick! That is just crazy. While walking around with camera in hand, I feel very secure and it is just an overall joy to hold and use.
It is also pretty quiet. Especially turning on produces ever so soft whirr. Compared to the Fuji’s it’s very silent. Film rewinding after the shot is about normal.
Viewfinder in this camera is also packed with features that might be surprising in a camera that is viewed as a low end of the Ricoh spectrum. First thing you see are two brackets in the center of the frame quite far apart. These are left and right focus points with the center one not being displayed and only implied. Upon focus, left bracket, center square or right bracket is displayed. Now here is a part where the Rollei and Ricoh version differ. I cannot tell if it’s because there might be something broken in the Ricoh but in the Rollei when the camera focuses very near, the top part of the viewfinder shows a bar signifying the need for parallax compensation. That is damn neat! This top bar is also displayed together with the bottom bar when the camera is switched to the panorama mode (the bottom bar has word PANORAMA written on it). That means that you are unlikely to shoot accidentally in different format, because you see it in the viewfinder. The panorama switch is not that easy to switch by accident but it happened to me once. In Ricoh version, these bars are not there. The viewfinder changes slightly and top and bottom outer lines are not displayed in panorama mode, but I was unable to make it show the horizontal bars for close focusing parallax and panorama mode. Weird.

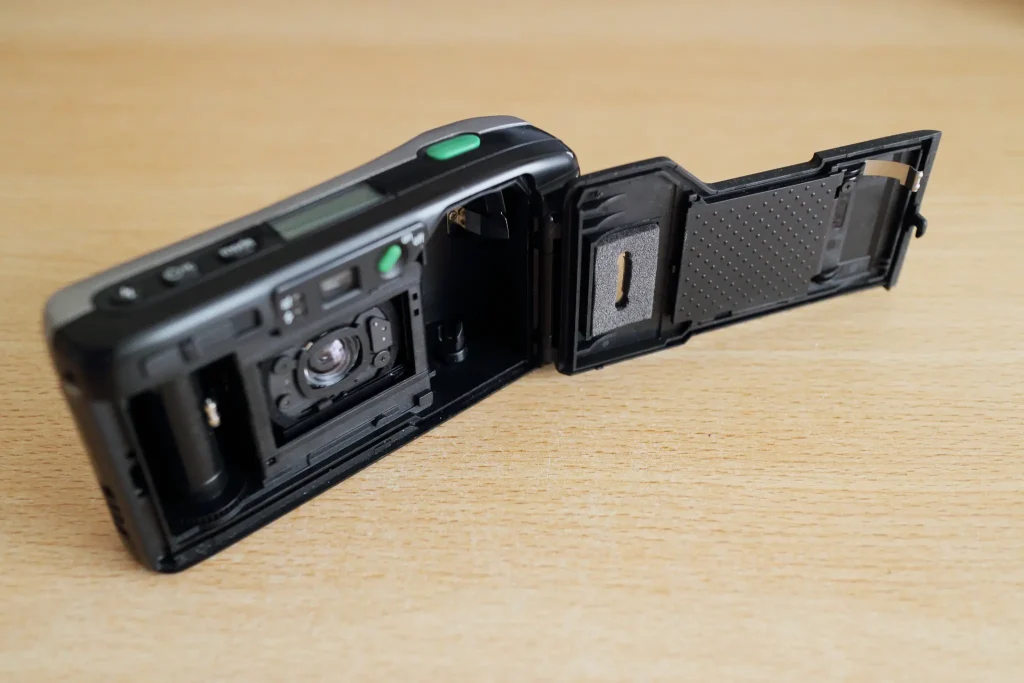
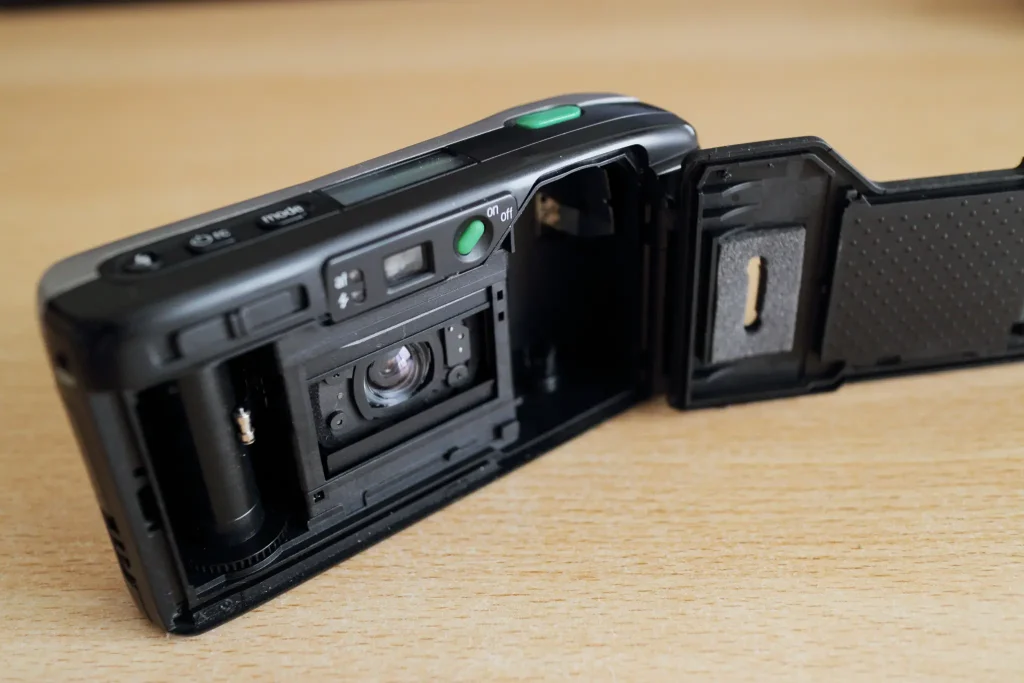
Another cool feature is a film pre-wind. I wrote about it in Fuji DL-500 and Fuji DL Super Mini article. Now this camera will unwind only 36 frames, even with the longer films. I’d prefer that it would unwound everything like the DLs. This way you could squeeze more frames from Fomapans (my black and white film of choice at the moment). This pre-wind feature is being marketed as a feature to save your film when you accidentally open the camera. Usually only the last frame is lost. When you pull the back release button the camera whirrs a bit. I believe it is rewinding the film a bit to save the last frame shot completely. I haven’t tested this yet but it seem quite plausible. Speaking of films, as usual, this camera has an easy load system. Just place the tip in the right spot, close the door and you are on your way.
On the back on the left side of the viewfinder sits two diodes. Top lights green for focus, bottom lights red for flash. When the focus cannot be achieved the green led blinks. If the flash is charging the red one blinks. When the focus is reached or the flash is charged, they light up.
Features and quirks
You might wonder why I put quirks together with the features, well the first menu item is bit of a quirk so that’s why. Now on the top of the camera we have three buttons – flash, timer/remote control and mode. Let’s start with mode, shall we? There are three modes in total. Some of which can be combined with flash and all of them can be combined with timer/remote control. The modes are following: super night mode, infinity focus and center point focus.
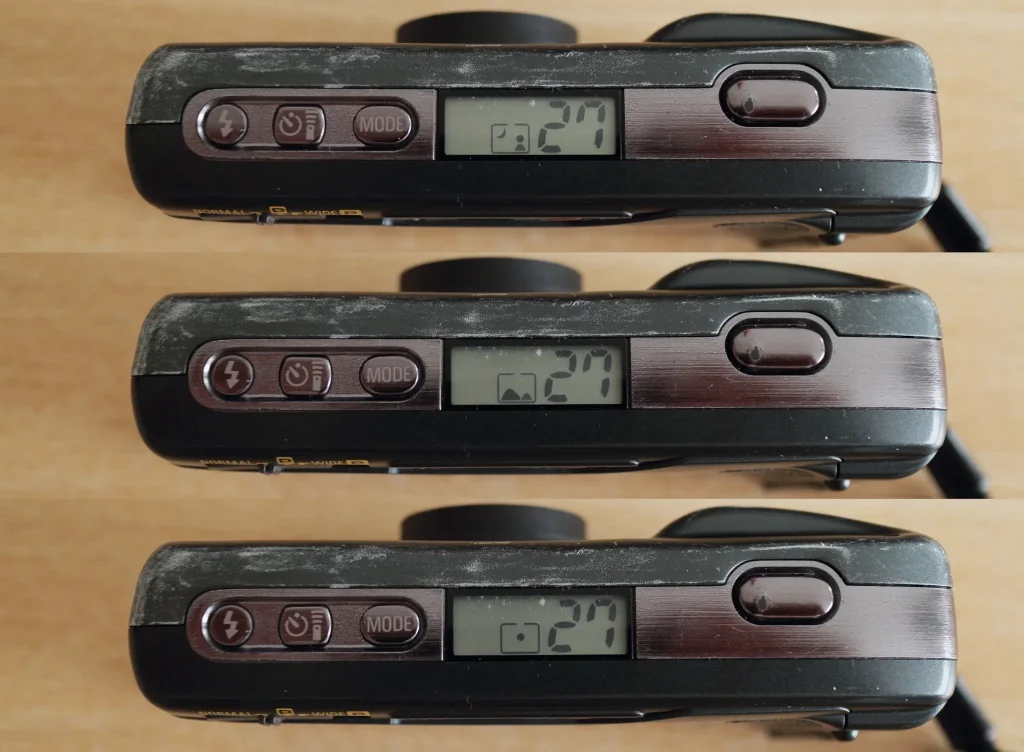
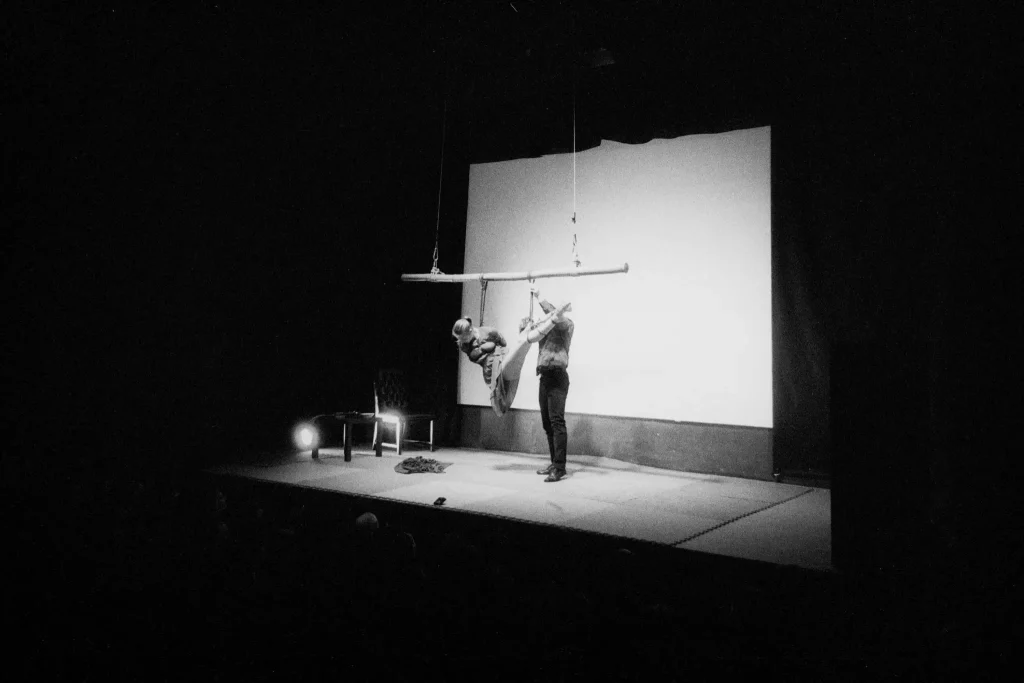
The super night mode is a cool thing in itself. LCD shows an icon of person with a crescent moon. What it does is it first takes a picture at infinity without flash with as long shutter speed as needed, then refocuses to the focus distance (at the time of the focusing) and fires the flash. All this on a single frame effectively doing a double exposure. It’s meant to provide ambient exposure with properly lit shot of people. It is supposed to be used on a tripod but hand held is just so much more interesting.

Next is infinity focus. LCD shows icon of hills (they are round so they are not mountains, mountains are sharp). This is the single most important mode on every camera for me. I would not buy camera that does not have a sure way of focusing to infinity. When this mode is on, the focus confirmation lights up immediately and flash won’t fire even in the dark (the red/bottom diode is off because the flash is turned off).
Last mode is center point focusing. LCD shows icon of a center dot. By default the camera offers three points of focus and chooses the nearest one it can latch on. Sometimes however, we want to force it to use the center one. This by itself does not make for great mode but wait, there’s more. Not only it forces the center point but when you half press the shutter, it extends the lens to its focused position! Yay! Pressing the shutter results in almost no lag. Way cool feature if you ask me.
Once set, these features remain in effect until the mode is changed or camera turned off. Settings are not retained through power off. It’s probably the fact, that remembering would require an internal memory and that’s a nasty can of worms. This way it’s a simple state machine that requires no memory and cycles through a hardcoded state diagram.
Last feature to mention is a predecessor of the Ricoh’s snap focus. When the focus cannot be achieved but the shutter button is pressed all the way anyway, it focuses to 2.5 meters. Again this is amazing in its simplicity. Taking a picture of somebody in the dark… 2.5 half meters will provide enough head room in depth of field and for anything further away there is the infinity focus. I believe that it works with the super night mode as well, that when shooting at night, it will use the 2.5 meter focus mark.

Now to the quirks. The main bone I want to pick is the order. Tell me, how many times you need to switch on the super night mode compared to infinity? For me, the ratio is maybe 1:100. I shoot on infinity almost all the time. Even though the camera might focus properly, it might decide to use the flash so when in the city for example, I lock the infinity (I don’t want to look stupid, taking pictures of a cathedral with flash). Super night mode is cool feature that I used handful of times. The center focus point selection is more important than that. My order would be infinity, center point, night mode. I cannot wrap my head around the choice of Ricoh’s engineers.
This thing is half feature half quirk is date function. It works flawlessly and it is set on the site with tiny LCD (that works, surprisingly) above the battery (CR2). But the placement and look of the date is not very pleasing. It is rendered in dot matrix style and placed quite a bit inside the photo and not near the border. I personally still prefer the seven segment orange digit style of Canon BF-80 and the likes. I guess it all comes down to taste. But I keep it off.
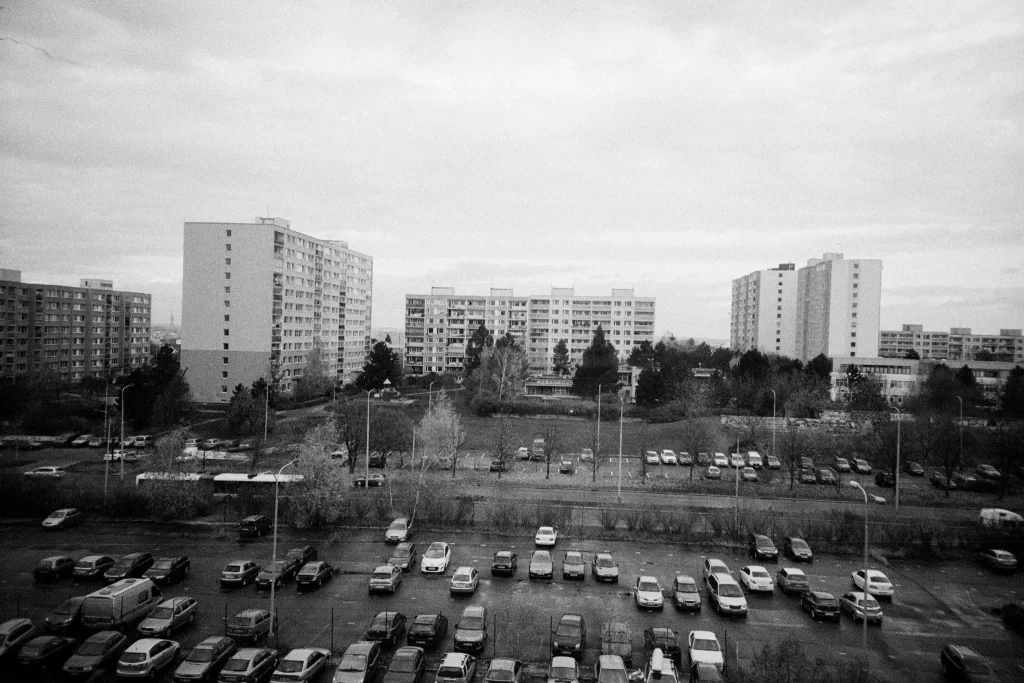
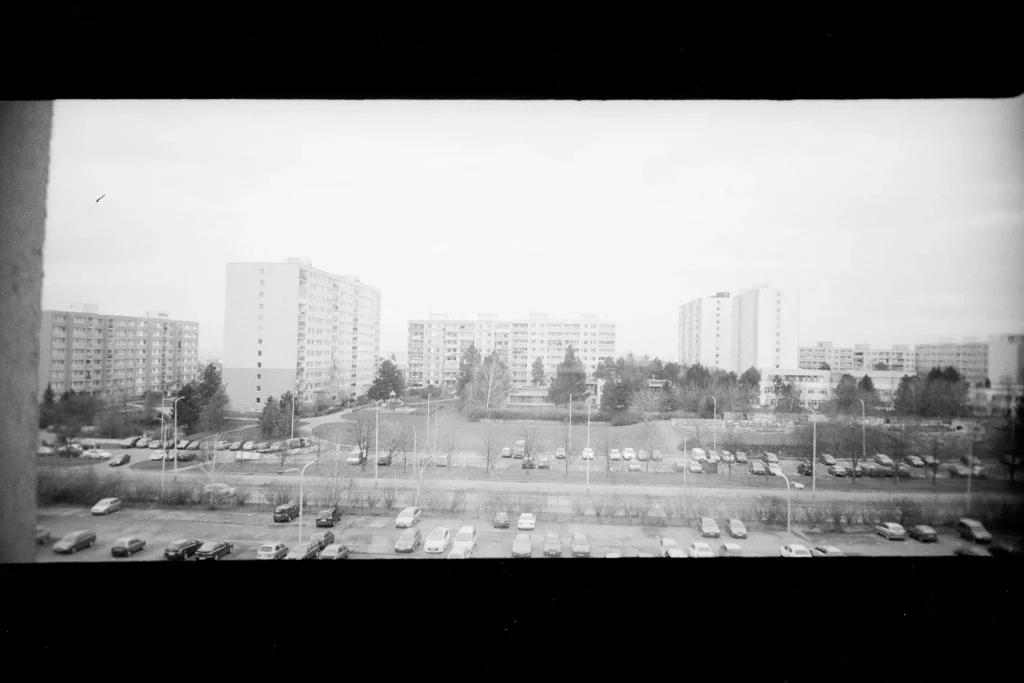
Another quirks I found is that with the Rollei Prego Micron version, even though I take a great care during shooting, I can’t seem take a leveled photo when I try. I align the horizon to some marks in viewfinder and yet the photo is tilted quite a lot. The Rollei version also has trouble with frame spacing. On my last film on Rollei the accumulated displacement was two whole centimeters. It means that I just cannot slide the film in to the scanner and leave it there but I need to constantly adjust every two or three frames. This is time consuming and a big show stopper. The Ricoh R1 is so far so good with only frame misplaced a bit here and there, like one per film, which is acceptable and even DL Super does that. I take exact spacing as a mark of quality camera. My Olympus OM-1 SLR spaces so evenly I can crop all pictures the same way – no need to readjust for borders. Arigato Miyazaki san!
Last bone I had to pick is film scratching. I know, that I shoot Fomapans that are really prone to scratching but still. My films have one long scratch through the whole length from both cameras Ricoh and Rollei. Sometimes, it is not visible thankfully but many times, it is. It might not be visible when enlarging with diffusion head but the Nikon LS-5000 is cruel and unforgiving when it comes to scratches. I cannot for the life of me figure out the source of the scratch. It is on the outer side not on the emulsion side. Once I figure this out, I will let out a sight of great relief.
Lens and focusing
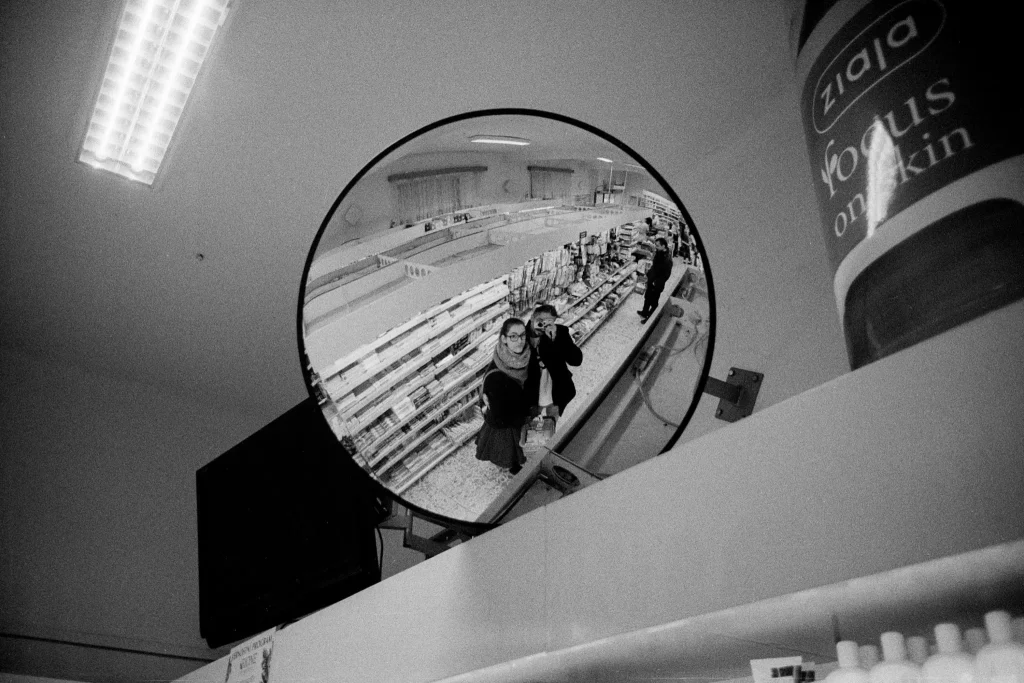
I’ve already mentioned quite a bit about focusing so I’ll continue with that. The camera has an infinity focus and snap mode (by full press of the shutter). The rest is done via three point passive AF sensor located next to the viewfinder. In basic mode, it latches on the nearest usable point. The passive sensor has its ups. That is it can focus on objects in mirror. Good for selfies. And also it has its downs. In low light the AF is not able to focus (it does not have AF assist light) or it cannot focus on surfaces lacking features (like white walls). But the snap mode is a bit of a life saver in such situations. Just remember that focus is at 2.5 meters. When focusing what you need to take into account it the orientation of the sensors. They are not cross type so they only care for vertical lines. Horizontal, not so much. You need to rotate the camera to portrait position if you’d like to focus on a horizontal line.

The lens barrel is circular and like with the Minolta Freedom zoom you can put a snap-on filter on it but unlike Minolta, it has light meter on the body and not on the lens. In reality this is not a problem. Yellow filter will eat maybe 1 stop and what I found to be working is point more towards the sky while half pressing the shutter (with infinity focus for those glorious clouds against dark sky) and then recompose to include more of the ground in the frame. All in all it’s more of a quirk that I can use like three times a year when the clouds in summer are just right. During the rest of the year, there is no need for this.

Now to the lens. Judging by the focal length of 30 mm it is a bit of an odd ball. I believe that this feeling is purely psychological as difference between 28 and 30 mm is negligible. Not to mention the fact that the usable area of the negative is always bit smaller and also the fact, that the real focal length can be bit different from the one proudly stamped on the lens (especially if you have your scans processed in a lab, the sometimes crop quite a lot). So be it 28, 3o or 32 mm I don’t really mind.

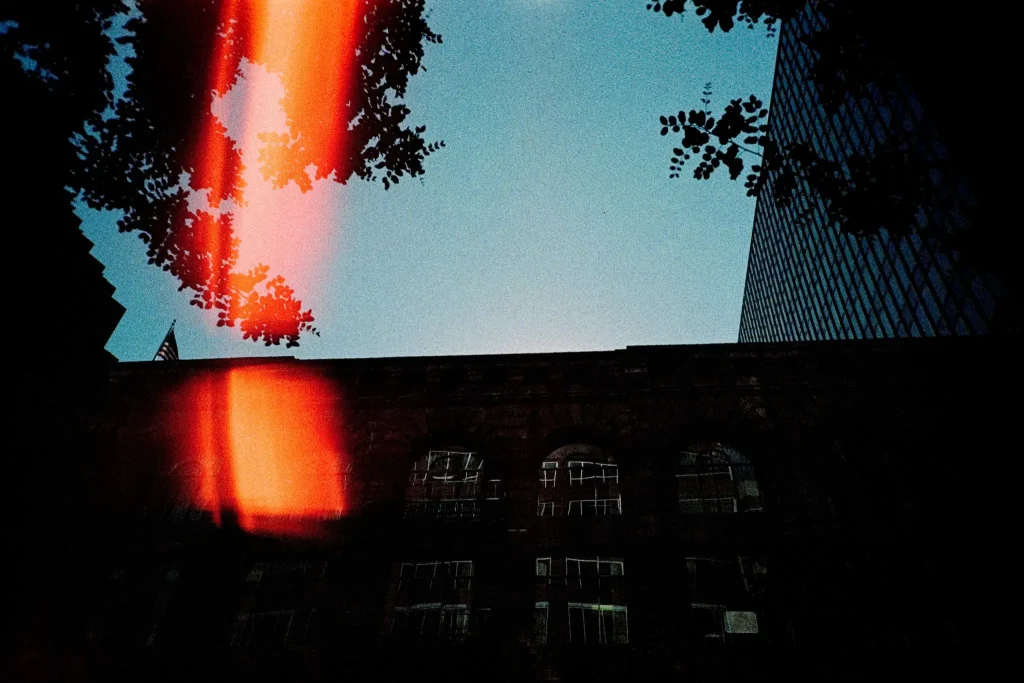
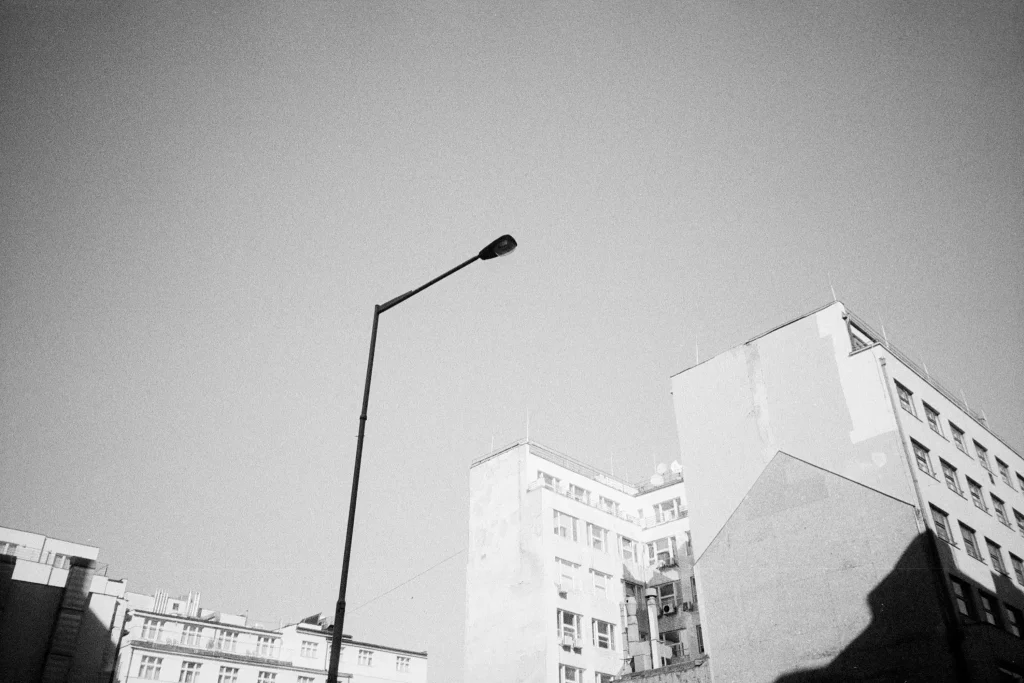
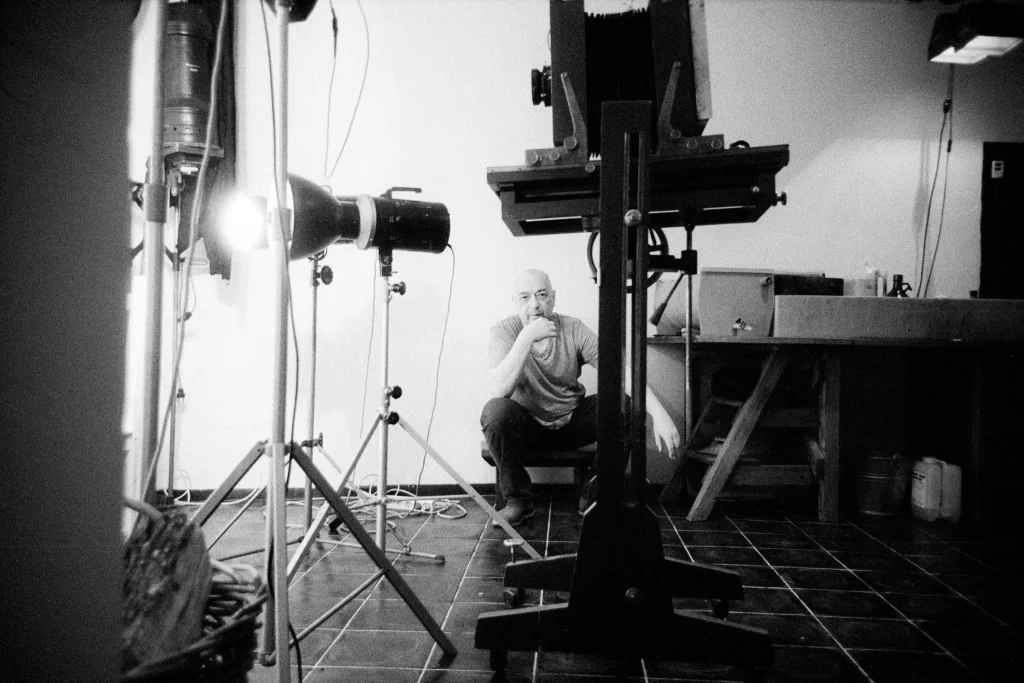
The lens is quite sharp and I like the images it produces. It is tad softer than the Fuji DL Super Mini, which is noticeably sharp and images from Fuji are crisper even scaled down, but it does not matter that much as it is still in the sharp ball park. What bothers me slightly is a bit of a pincushion distortion. It is definitely not as pronounced as on the Minolta Explorer Zoom but it is there. Nine times out of ten, it does not matter. I am used to seeing mostly barrel distortion, especially on the wide lenses. In reality it might be again more of a psychological thing. For what the lens offers it’s more than alright.

When used for portrait/close up shots, it provides very pleasant background blur. One cannot expect the bokeh balls the size of 50/1.4 but it does deliver some nicely separated foregrounds.
By the flick of a switch the lens turns into 24mm f/8. This is only in panorama mode, unless you jam the flaps. The 24 mm option even at f/8 sounds very tempting but the truth is, that not even with the panorama flaps engaged is the image aberration free. Sides of the image are very soft and blurred. With the flaps disabled, it’s just messy. The corners are black as they were never intended to show in the picture. It is definitely a “lomofication” of the lens. In later versions the 24mm option was disabled and only the 30mm and 30mm panorama mode was left.
Exposure
Here the Ricoh R1 can finely shine. Even though it does not offer any exposure adjustments like back light compensation I must say that exposure wise this is a very good camera. It can tackle quite harsh light and thanks to its 2 sec max shutter speed it is a great night shooter. I have some really cool night shots from it. Yes they are blurry but in a good way. Fuji’s top at ½ second. The long exposure is also great with the super night mode, where it can combine the shots in an interesting way. Especially when shooting hand held.

ISO is set via DX code so DX code hacking (or fashioning it from scratch for Fomapans… that’s why their film is so cheap I guess) is sometimes needed. I am quite happy with the way how Foma Fomapan 400 shot as 400 is turning out. Especially for the low light environment. I recently started using Foma Retropan developer (metol-hydroquinone based) and that is a stronger soup than Rodinal I was using before. I want to try it on 800. The developer produces nice and dense negatives. Sometimes maybe too dense even.
It also packs a small flash that I found is quite useful. In my personal feeling is that it is better (stronger) than on the Tiara and probably as strong as on Mju II. All pictures with flash turned out very well lit and with the super night mode, it can combine the ambient exposure with flash flawlessly. If you however take picture too close, it can wash out the faces. Maybe it’s because of the developing but I find I should not shove it into people’s faces. Many times I am surprised with the quality when I turn the flash off. For longer distances, it is very good.

Closing points
Even though the camera has finicky LCD that’s where the finickiness ends. It does not translate into feeling of unreliability. The opposite is true. It provides me with sense of security and comfort of knowing that I can reliably capture almost anything under most circumstances be it daylight scene from shot through a window or night time candid moment. It feels like a very solid companion camera. Thanks to its size, it can slide it in the pocket and know, that I can take the shot. I wish the lens was better (a Mju II lens in this camera… I should stop dreaming of impossible) at least in terms of distortion but it is not a deal breaker. I enjoy it so much, I let go of some other P&S as they started gathering dust because of it.
P.S. It’s just sooooo good to hold it.
P.P.S I do sometimes compose differently than just on center, not much though but with the camera being used for snapshots mostly, there is not that much thought given in composing 🙂
Share this post:


Comments
Daniel F on Ricoh R1 Review (Rollei Prego Micron) – An overlooked achiever – by Benn
Comment posted: 13/02/2016
Comment posted: 13/02/2016
Comment posted: 13/02/2016
Lars on Ricoh R1 Review (Rollei Prego Micron) – An overlooked achiever – by Benn
Comment posted: 13/02/2016
I now use the digital Ricoh GR a lot. And the reason I got that first Ricoh GR Digital IV, which led on to a GR, goes all the way back to the experience with the ergonomically excellent R1.
Good review, btw - that night snow photo is excellent!
Comment posted: 13/02/2016
Comment posted: 13/02/2016
Comment posted: 13/02/2016
Blinx on Ricoh R1 Review (Rollei Prego Micron) – An overlooked achiever – by Benn
Comment posted: 13/02/2016
Comment posted: 13/02/2016
Comment posted: 13/02/2016
Martin Salmon on Ricoh R1 Review (Rollei Prego Micron) – An overlooked achiever – by Benn
Comment posted: 21/03/2016
Comment posted: 21/03/2016
Martin Salmon on Ricoh R1 Review (Rollei Prego Micron) – An overlooked achiever – by Benn
Comment posted: 03/04/2016
Fuji X70 Review - A Photographer's Camera - 35mmc on Ricoh R1 Review (Rollei Prego Micron) – An overlooked achiever – by Benn
Comment posted: 26/04/2016
George on Ricoh R1 Review (Rollei Prego Micron) – An overlooked achiever – by Benn
Comment posted: 19/08/2016
How i can connect with you? Did u sell one of this cameras? Wrote me on e-mail plz.
Rollei Prego 70, or, The Trouble With Names – Pedro Trevino’s P&S Journal #3 - 35mmc on Ricoh R1 Review (Rollei Prego Micron) – An overlooked achiever – by Benn
Comment posted: 19/07/2018
Non-Destructive Hacking the Ricoh R1 for Full-Frame Wide-Angle Photography - By Howard Hurd - 35mmc on Ricoh R1 Review (Rollei Prego Micron) – An overlooked achiever – by Benn
Comment posted: 14/08/2018
Gold.Chapman on Ricoh R1 Review (Rollei Prego Micron) – An overlooked achiever – by Benn
Comment posted: 28/04/2020
Michelle on Ricoh R1 Review (Rollei Prego Micron) – An overlooked achiever – by Benn
Comment posted: 29/03/2026
I am however, experiencing the same negative scratching issue you wrote about. Did you ever find the culprit? I’m racking my brain as I don’t see any dust and I’ve cleaned the film back but still keep getting long streaks on hairline scratches. Any leads would be so helpful! Thanks again :)