
My phone buzzes with a text from my new friend Tze Yong.
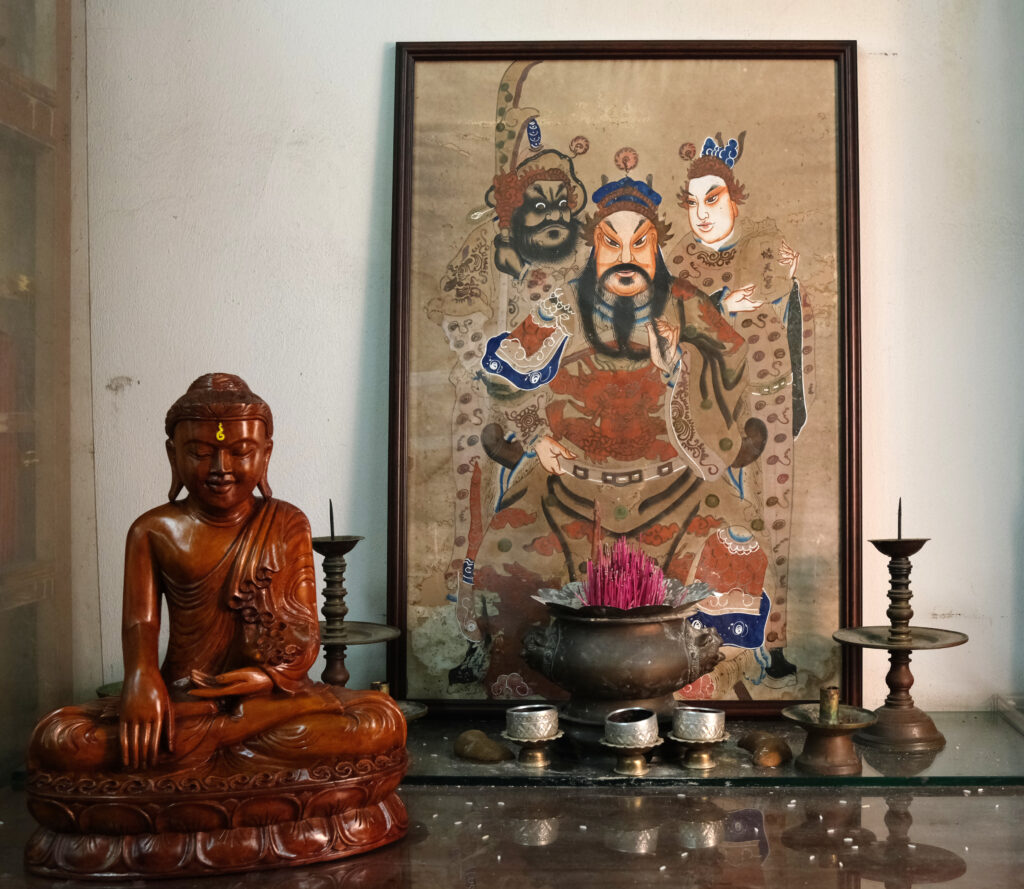
“Xuántiān Shàngdì (玄天上帝), also known as True Warrior Great Emperor (真武大帝), is a prominent deity in Taoism, revered as the ruler of the northern heavens and associated with water and martial prowess.”
How did it come to this? I thought I was just reviewing an LED light.
Indeed, this article started life as just another gear review. When Zhiyun sent me the Molus X60 RGB light, I started out looking at the usual stuff – power, features, ergonomics, quality and shape of light. These are things you can easily test in a studio – or even in a living-room, which is what I tend to do. But before writing a review, I also like to do a “field test”, because often there are things – both positive and negative – that are not obvious in a controlled environment, and only become evident in “real world” use.
For my field test of the Zhiyun Molus X60 RGB light, I reached out to Tze Yong from Say Tian Hng Buddha Shop in Singapore – a 6th-generation family business established in 1840 that crafts Taoist and Buddhist wooden statues by hand – and asked if I could do a photoshoot in their shop. As it happens, the shoot turned out to be so fascinating that I decided to place it front and centre in my article (the gear review and technical info comes later).
I made this choice for two reasons. First, as a showcase for the qualities of the Molus X60, the Buddha Shop photoshoot is pretty much perfect – it’s almost like the light was specifically created for this type of shoot. Second, you may or may not be in the market for an LED light, but we can all appreciate cultural heritage, skilled craftsmanship and the ineffable charm of hand-painted wood.
Now I’m admittedly a gear nerd, and I like talking about overclock, CRI and illuminance as much as the next person. But even for me, gear-talk pales in comparison to standing amidst rows of silent wooden deities, listening to a Taoist artisan’s account of how the Monkey King stole the Peaches of Immortality.
But before I get to that, a quick word about the light. If you’re into videography, you most likely know of Zhiyun, a Chinese company which makes a range of very popular gimbals. Zhiyun also make lights, and while I suspect these are primarily targeted at videographers, they can be used for still photography too, as I have done in this review.
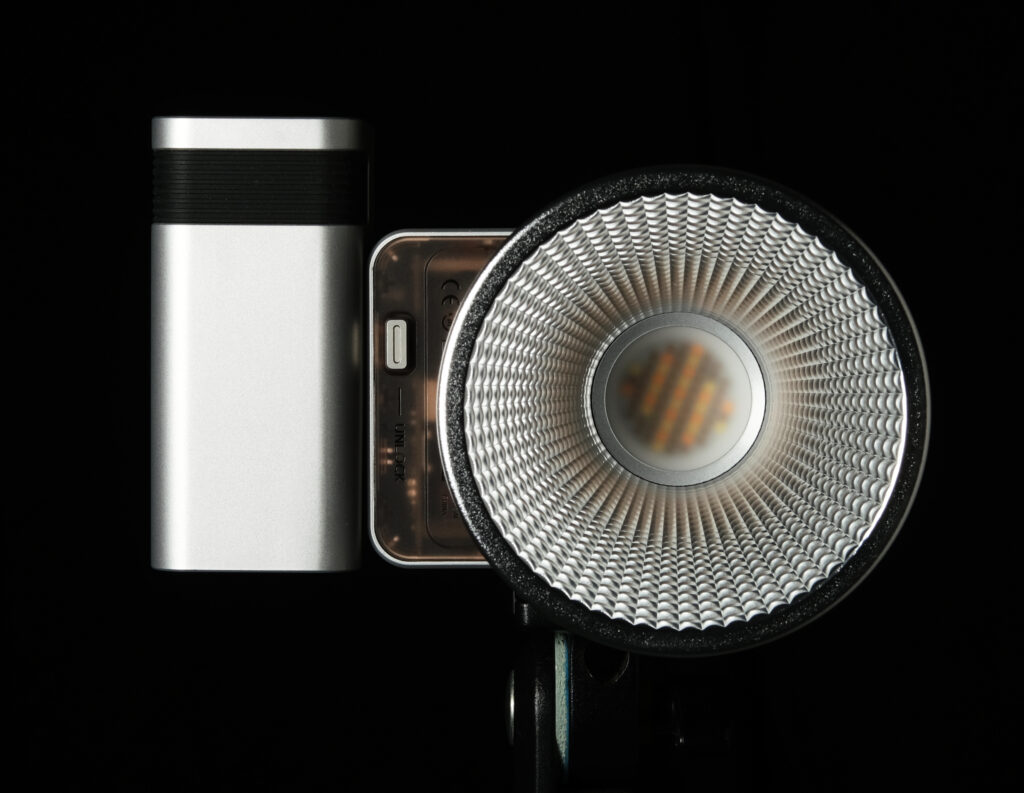
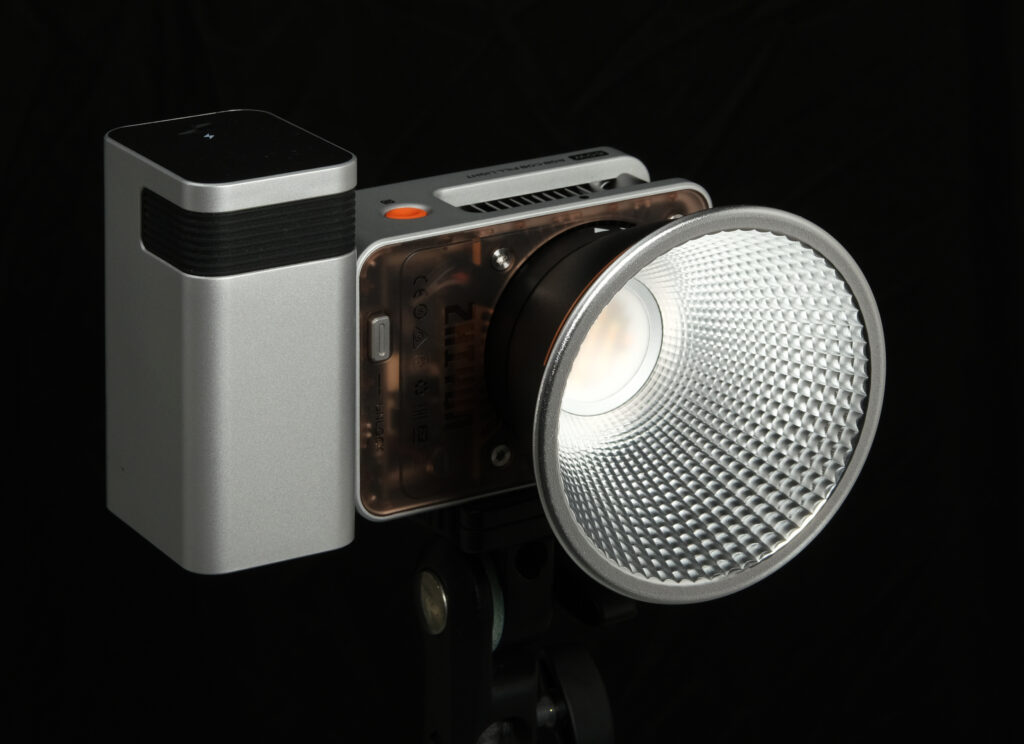
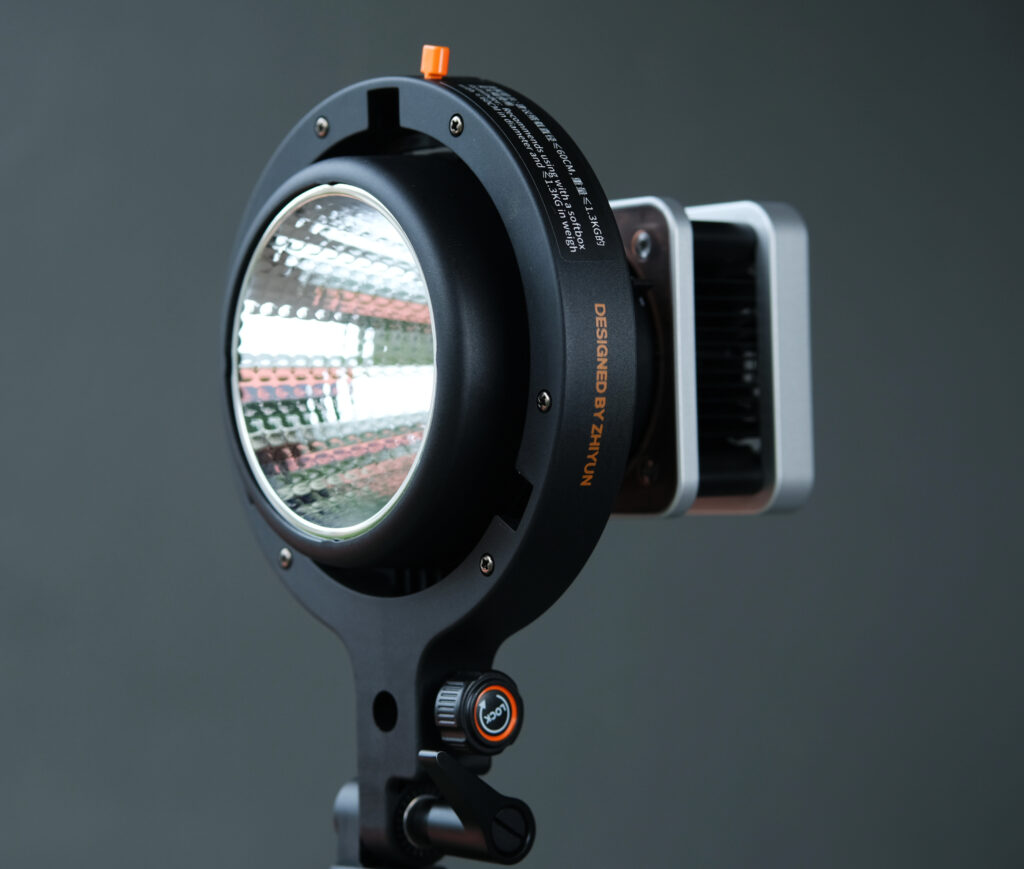
One of Zhiyun’s main USPs seems to be lighting solutions that are compact but surprisingly powerful, and the Zhiyun Molus X60 RGB, the light that I’m reviewing today, is no exception. It is a COB LED light with 60W of adjustable output, colour temperature and RGB, app control and various other features – all in a package not much larger than a deck of cards.

So why was this light perfect for the Buddha Shop photoshoot?
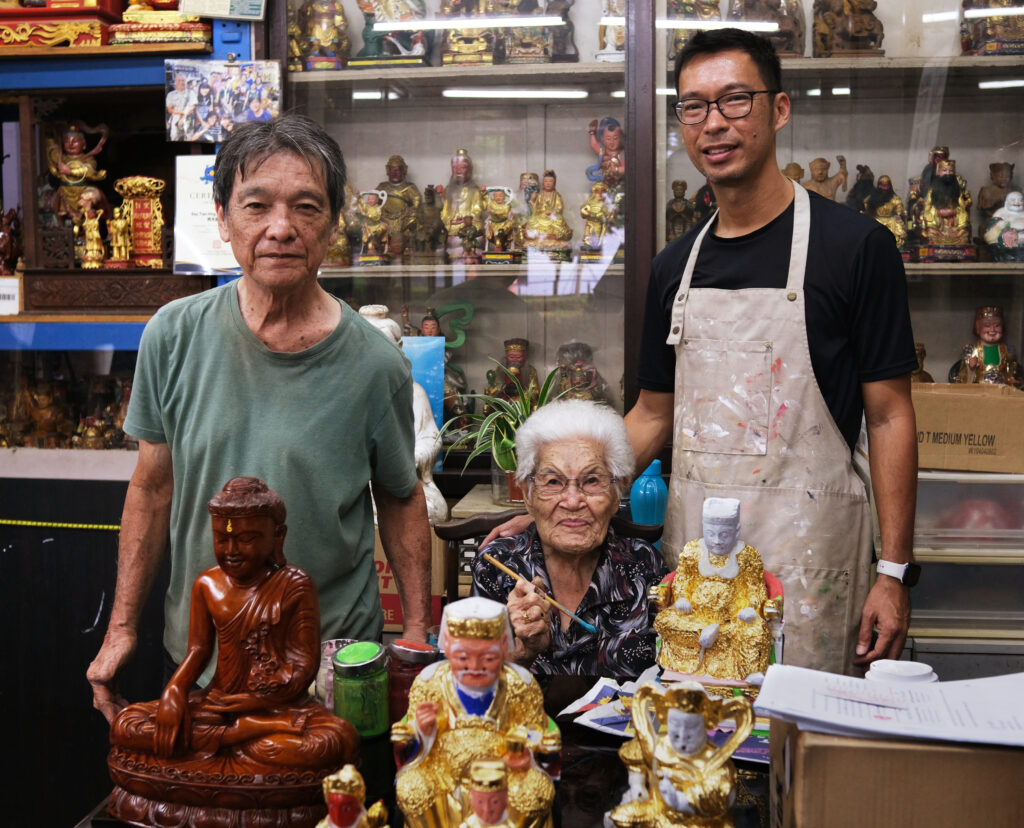
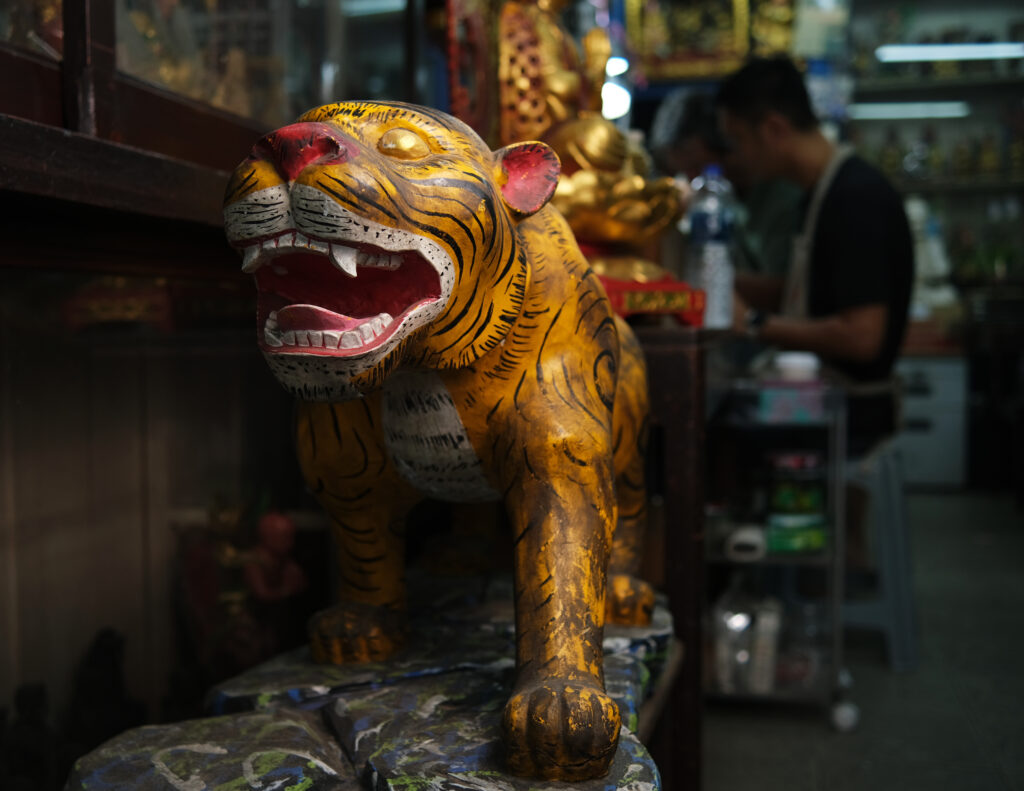
First, let me introduce you to the shop. The Say Tian Hng Buddha Shop is the last-surviving Taoist effigy-making shop in Singapore. It’s run by Ms Tan Chwee Lian – who is 94 this year! – and her son Ng Yeow Hua. Her grandson Tze Yong’s day job is in philanthropy, but he also works part-time as an apprentice at the shop; he’s a passionate and eloquent ambassador for the craft, and for Taoist tradition and art in general.
The shop photo below was taken in the late afternoon, using available light only. What you see is a straight-out-of-camera (SOOC) jpeg, using a Daylight white-balance setting.
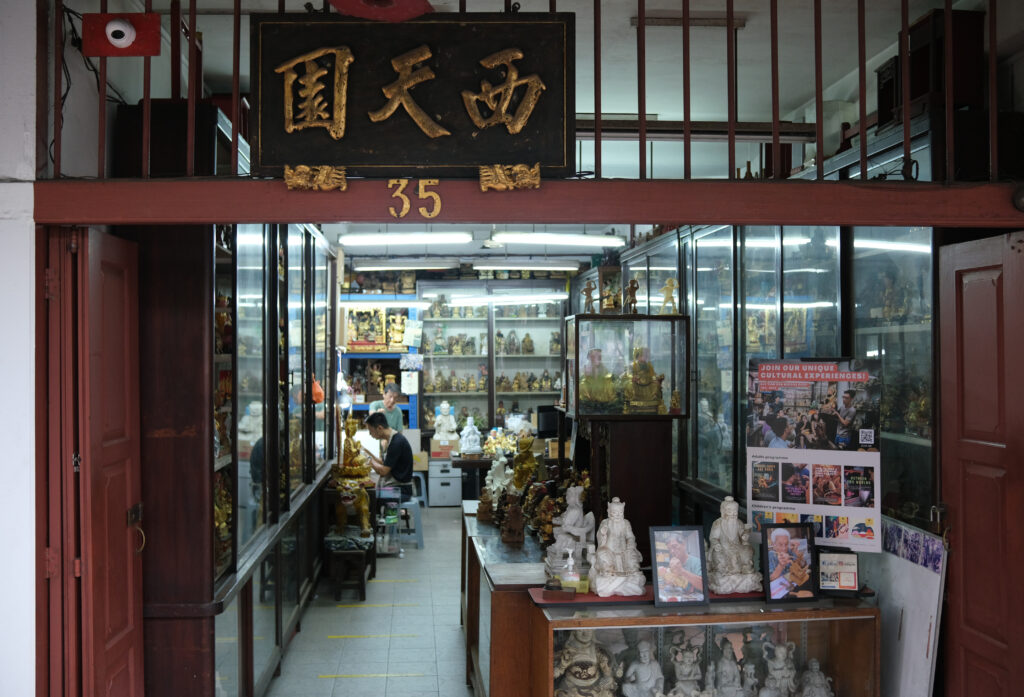
As you can see, the lighting in the shop is an uneven mix of daylight and fluorescent light. Fluorescent light tends to have a greenish cast. The cast is not evident to the naked eye (our eyes and brain being incredibly good at white-balance compensation) but it doesn’t look great in photos. So the shop is beautiful in real life – like a cave of wonders – but for a photographer, it poses certain challenges.
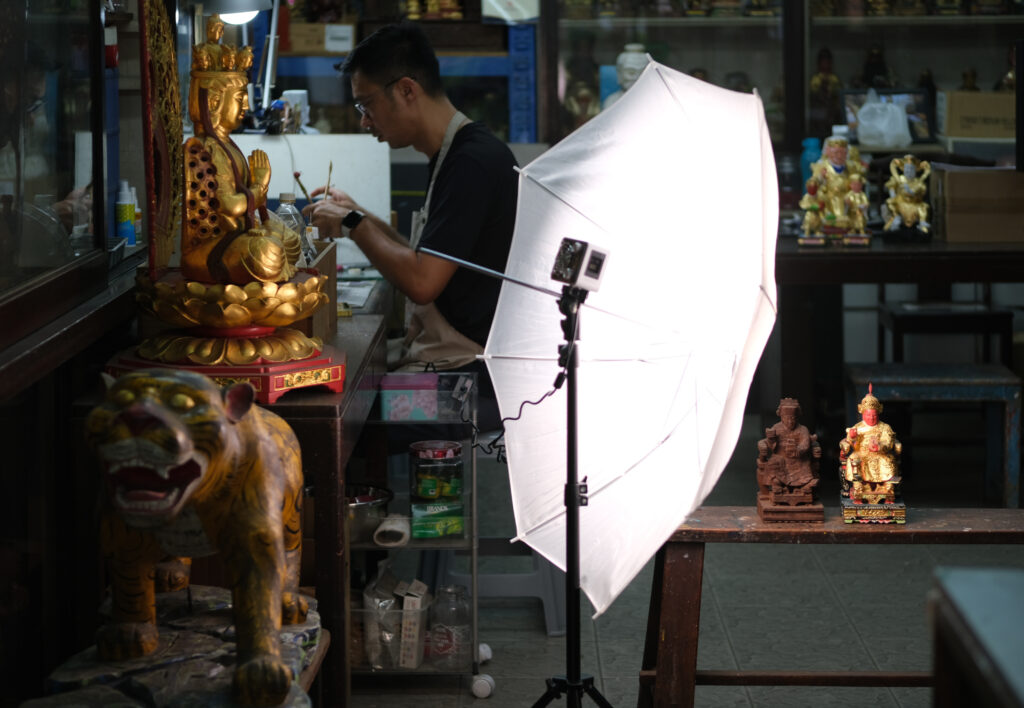
Moreover, it has glass display cases which cause unwanted reflections. And finally, with all the shelves, cabinets and workbenches – the shop also doubles as their artist studio – there is not a whole lot of space. I was constantly worried about bumping into a display-case, thereby triggering a domino effect of invaluable wooden figurines, with both economic and spiritual consequences.

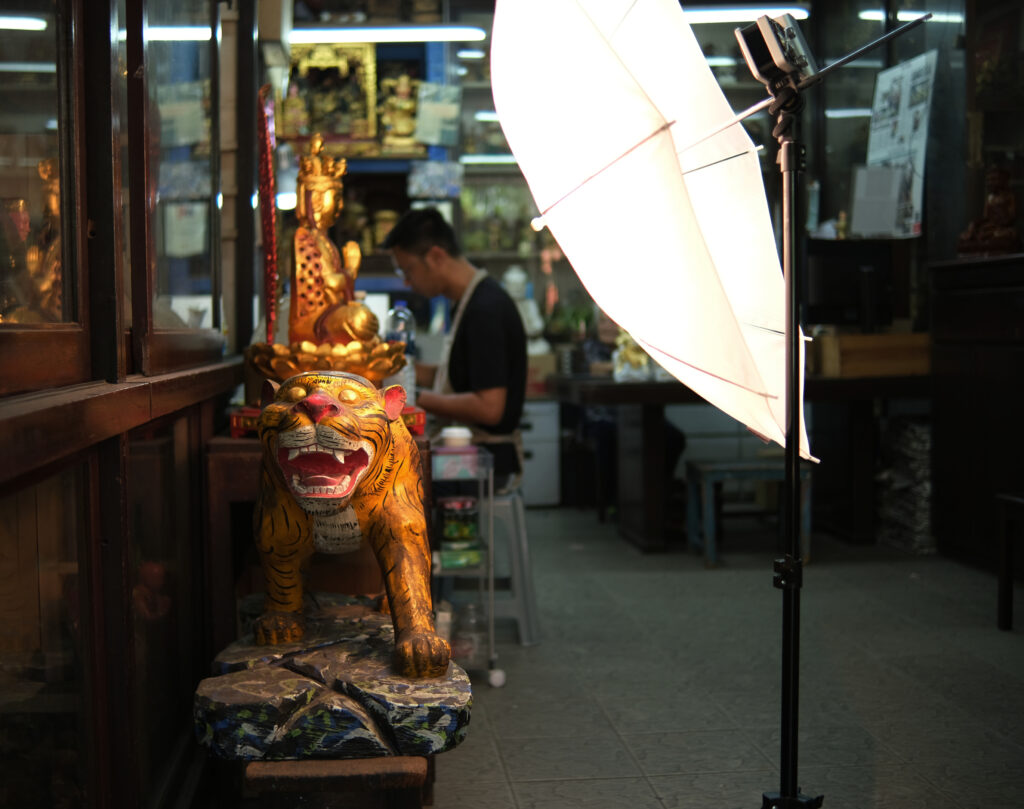
In a situation like this, the Molus X60 really comes into its own. The compact size is a real boon. I could put it in a corner, on a lightweight stand – unobtrusive and out of the way. Having the attached battery helps too – no trailing power cords to trip you up.
I wanted to take a minimally disruptive, documentary approach, showing the family going about their work, just like on any other day. In such a situation, you don’t want a great big light looming over the space and blinding everyone. As a photographer, I try to blend in and not draw attention to myself, and I like to work with gear that can do the same.
Despite its diminutive form-factor, the light is surprisingly powerful. Even with the shoot-through umbrella that I was using to soften the light, it’s strong enough to outcompete the fluorescent tubes. Of course, you can’t use it to light the whole shop, but for close-ups and portraits, it’s good enough.
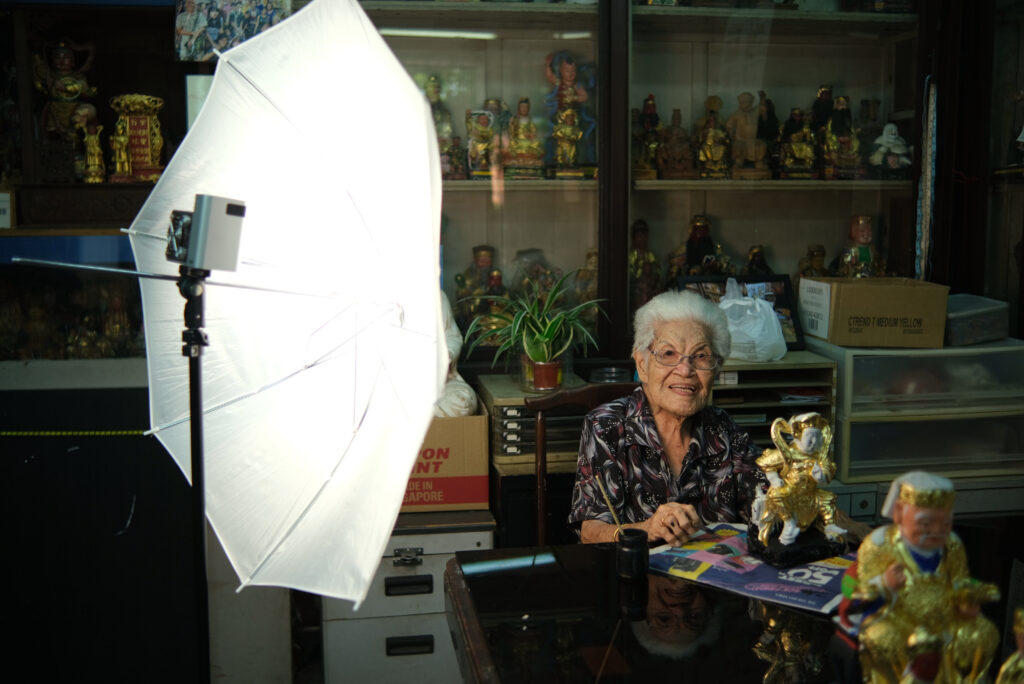
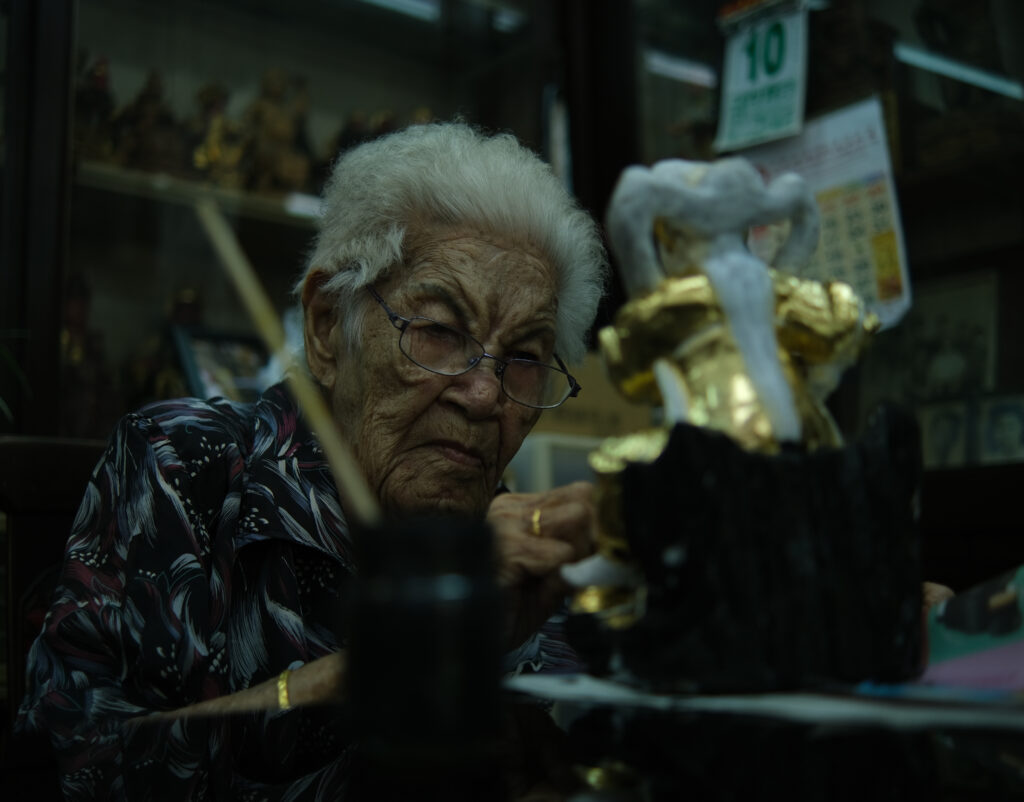
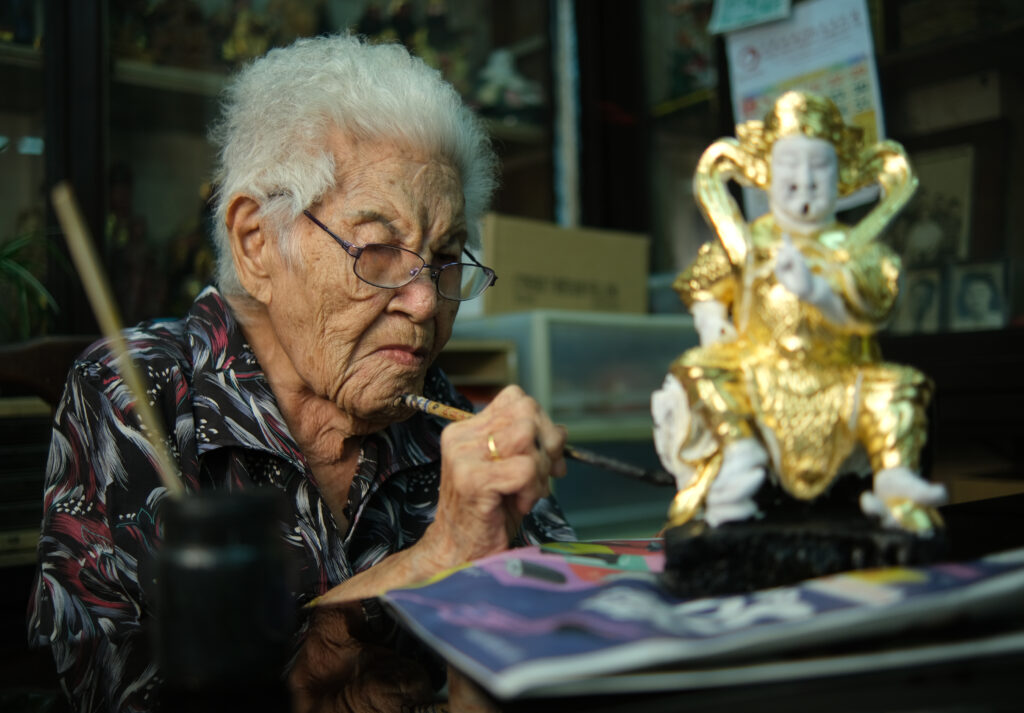
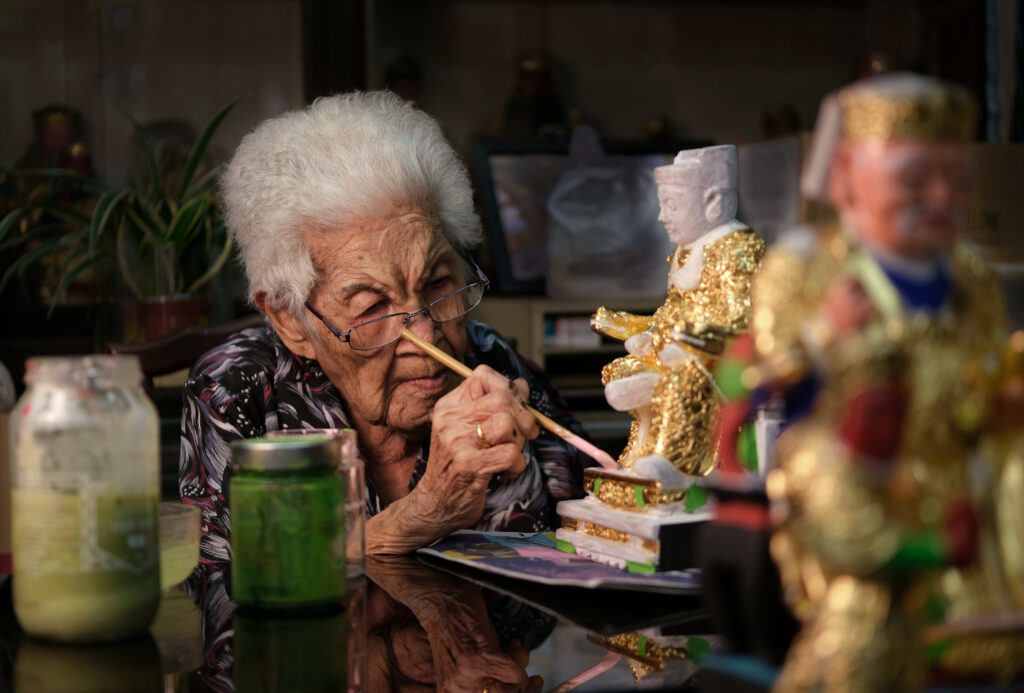
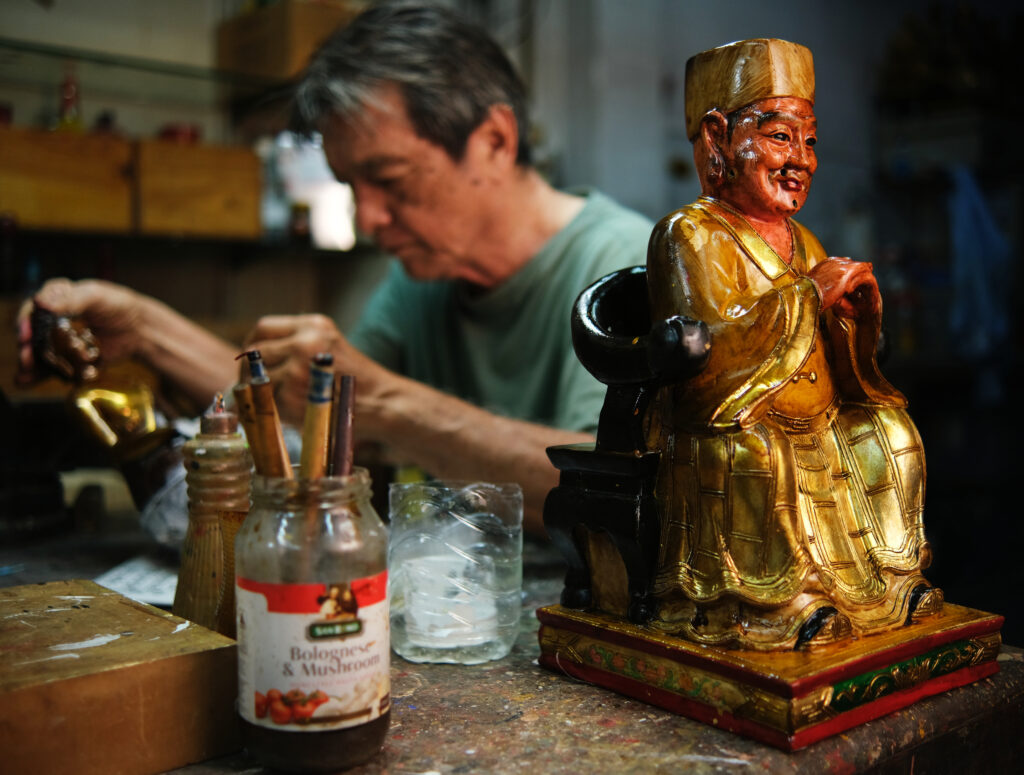
The effect of the light should be obvious from the next three photos, which show Ah-ma (or Granny, as everyone calls her) painting a figure of Xuántiān Shàngdì. All three photos are SOOC jpegs, with the white balance set to a neutral 5000K. The first photo below was shot at ISO 800 using available light only – you can see the greenish cast I was talking about. There’s also too much light on the background, which draws attention away from our subject.

In the next photo, I “dropped the ambient”, using ISO 160. Now the background is subdued, but Ah-ma is far too dark.
For the third photo, I used the same camera settings, but with the Molus X60 and umbrella diffuser. Game-changer!
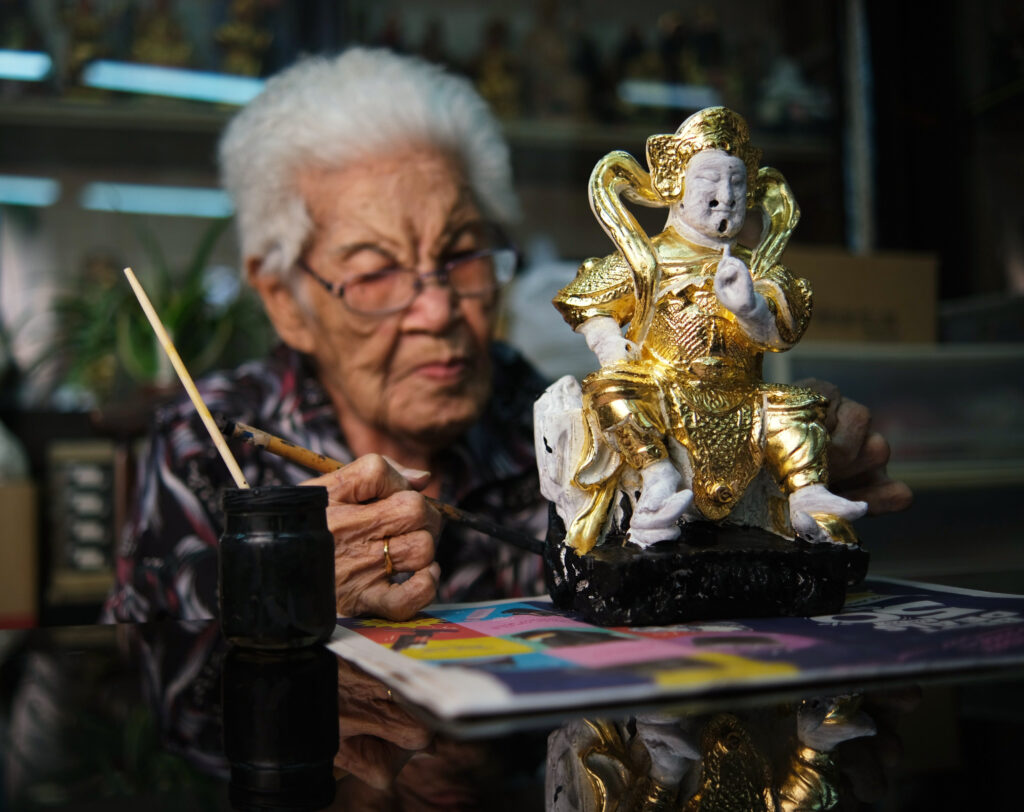
This is a flexible setup. For the next photo, I turned the light slightly, so that it mainly lit the figurine. Some feathered light falls on Ah-ma, while the background is lit only by ambient light. The Molus X60 is lightweight and easy to manoeuvre – sometimes I just use my outstretched left arm to point it this way and that, even as I continue shooting with my right hand.
Another example: the two photos below have the same camera settings, but the first one is available light only, while the second is lit with the Molus X60. The third photo shows the setup.
I loved seeing all the different skills and techniques that go into creating these wonderful figures. While Ah-ma mixed paint and applied it with delicate strokes…
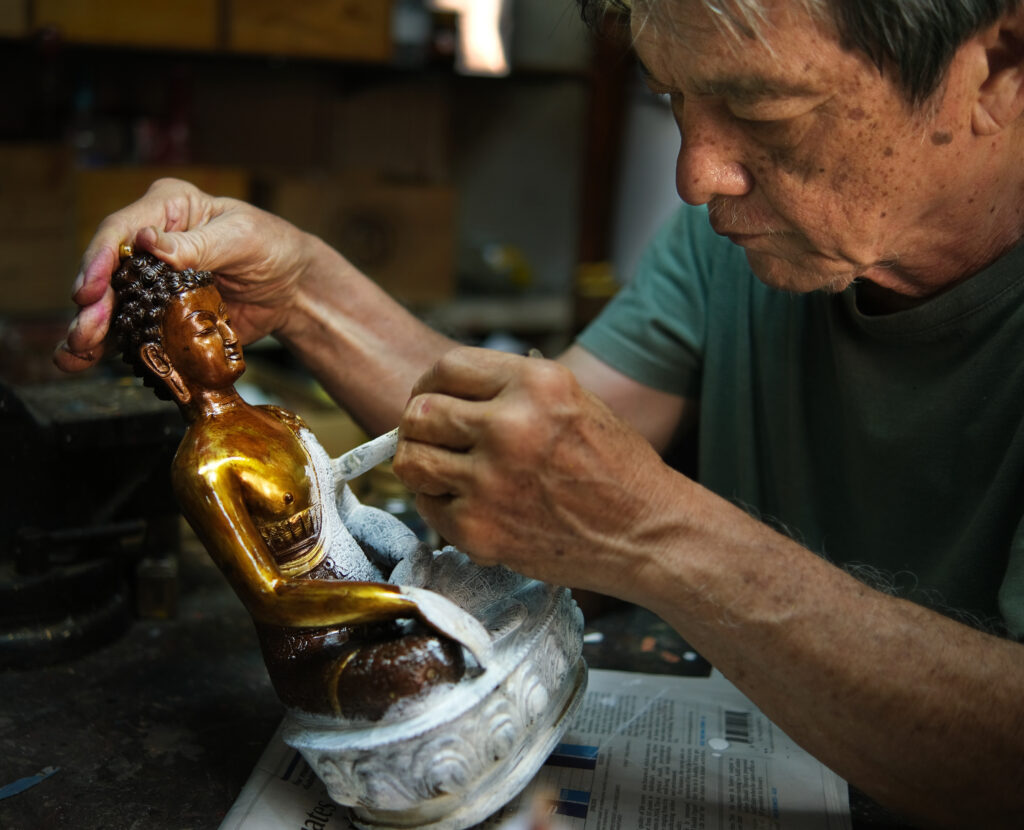
…her son gilded a figure of Guan Yu with gold-leaf – a process so delicate that the ceiling fans in the shop have to be turned off…

…and Tze Yong adorned a Monk Pu’an figurine with an intricate “thread sculpture” of a crane, a Taoist symbol of longevity and wisdom.
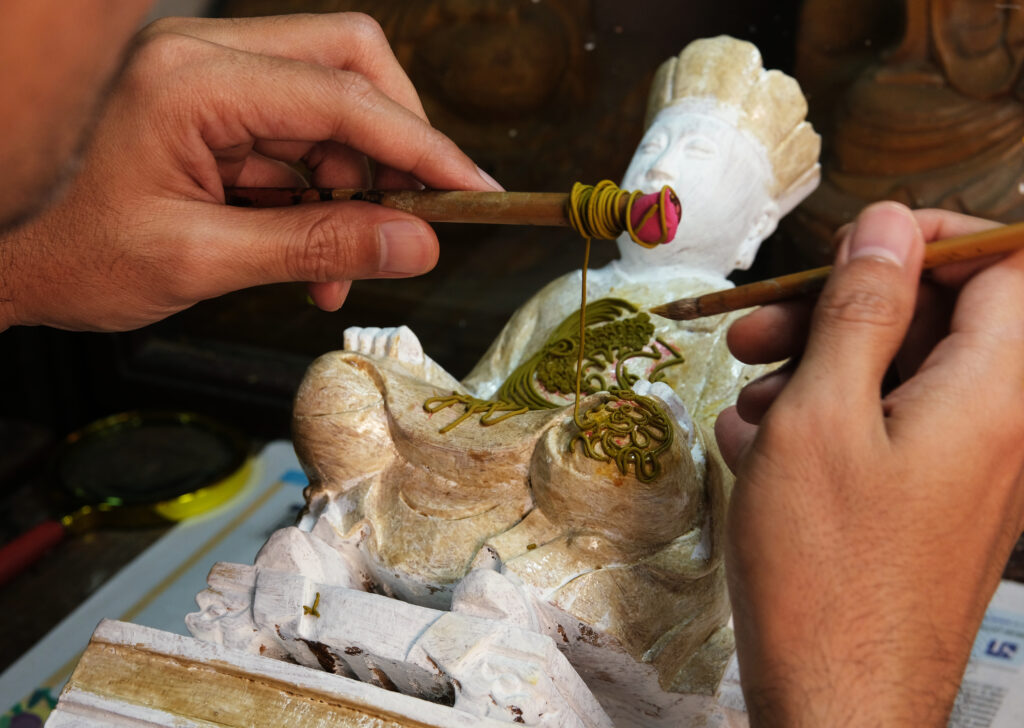
I was amazed to hear that the “clay” for the thread sculpture is made from joss-stick ash. “Not our own joss sticks,” said Tze Yong, pointing to the receptacle shown below. “We get the ash from temples.” He explained that joss-stick ash has symbolic and ritualistic significance, and it’s also a form of upcycling.
Indeed, I noticed many more examples of upcycling and generally minimising waste – like this pasta-sauce jar being used as a bamboo-stick holder:
In the photo above, the freshly-applied varnish on the figure is really gleaming. The Molus X60 was great for highlighting the texture and sheen, much more so than I could have managed with available light.
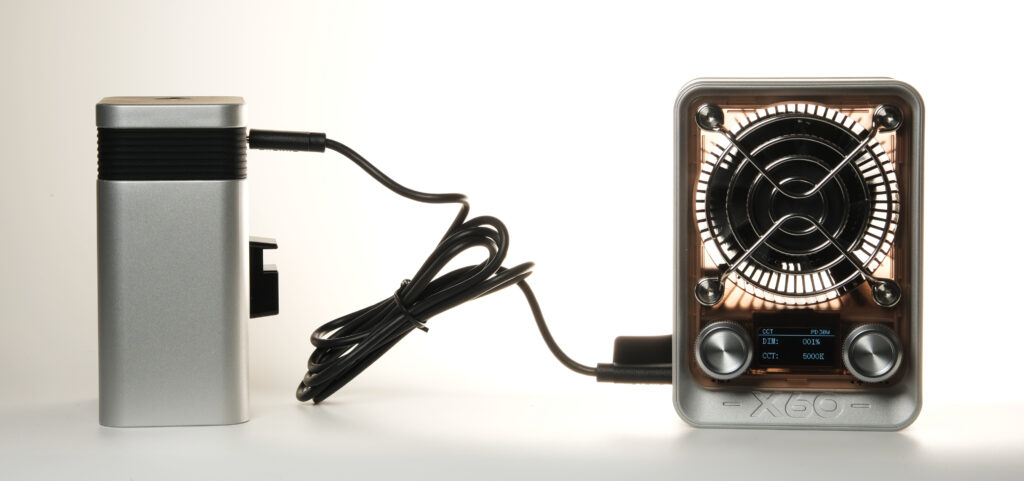
The shoot lasted almost 2.5 hours. The Molus X60’s battery has a rated runtime of 50 minutes at 100% power. I ran the light at full power throughout, though I switched it off when I could to save charge. Near the end of the shoot, as you would expect, it eventually ran out of juice. In the photo below, it’s plugged in to a mains socket via the included DC adapter.
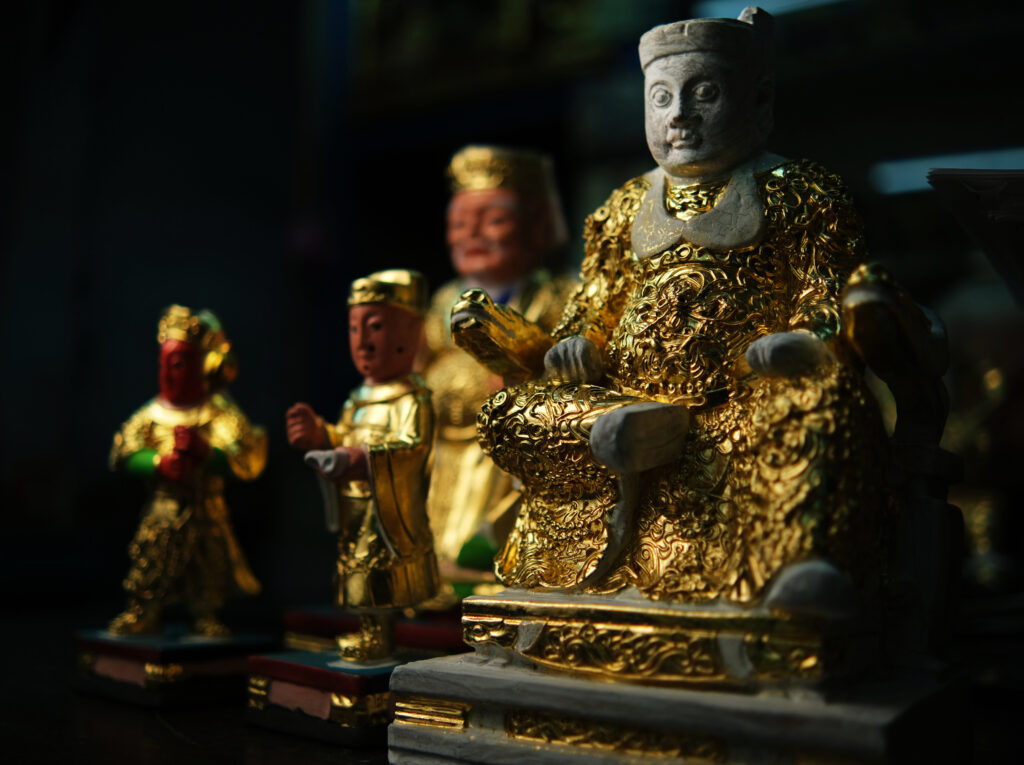
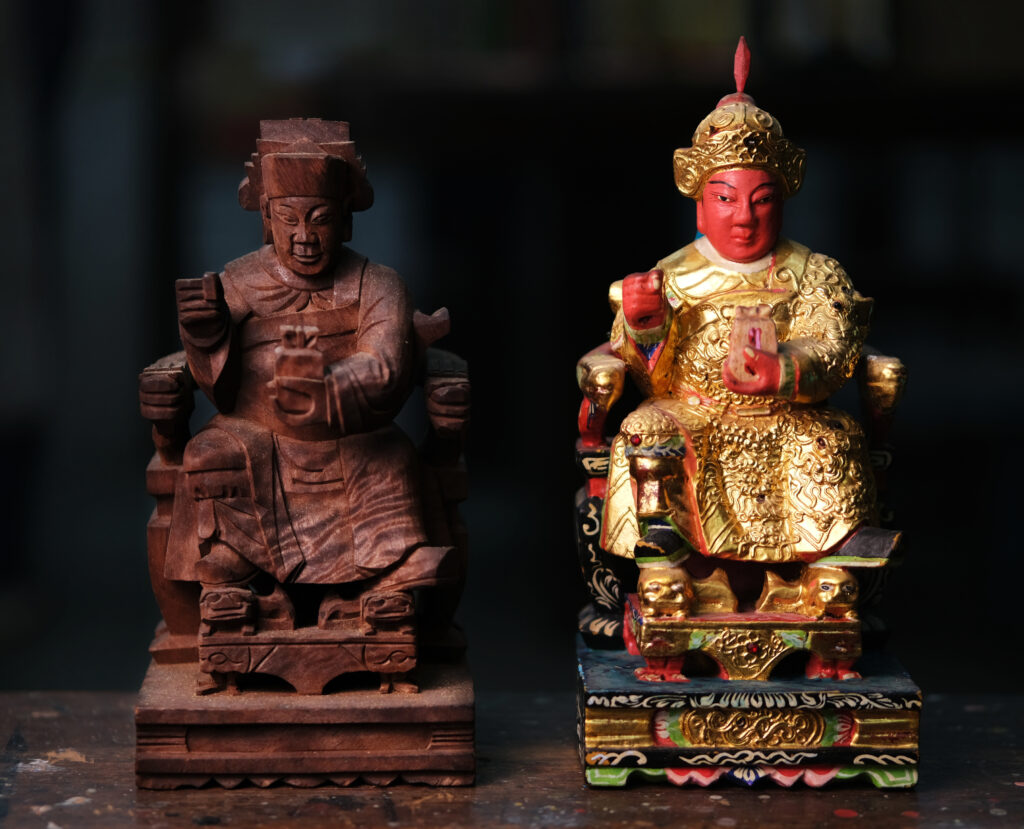
This setup was for a final set of close-ups. The photo below shows an unfinished wooden form, alongside a final, painted and gilded figure.
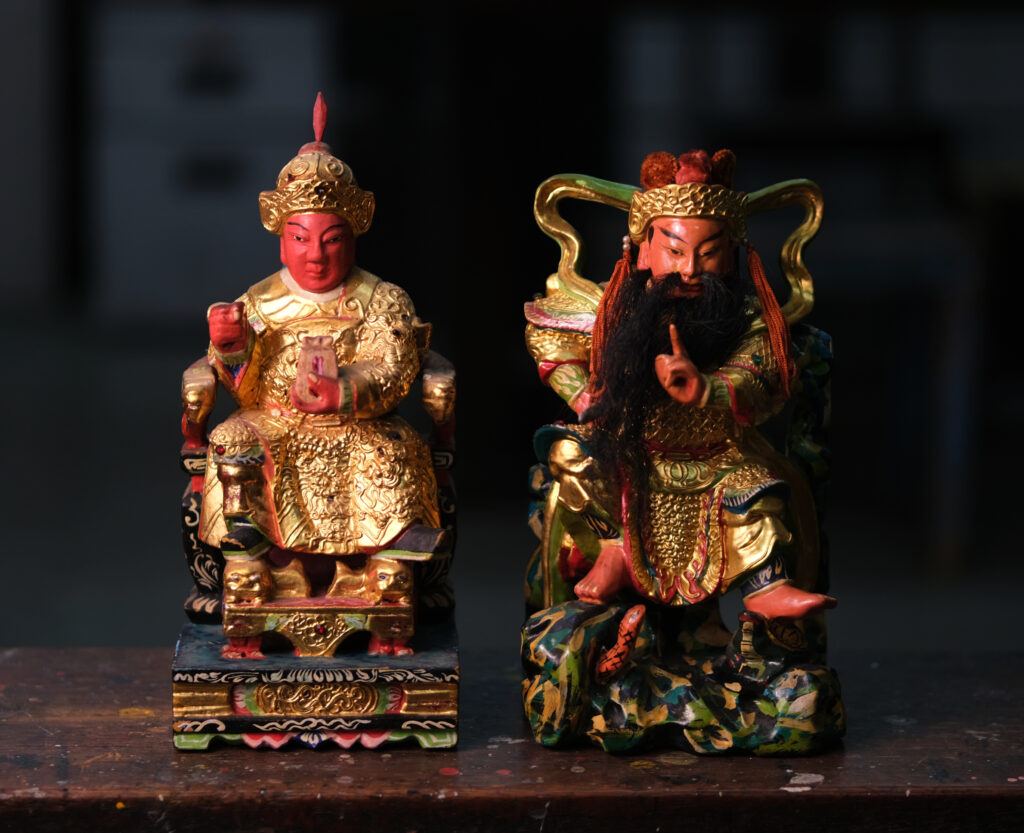
Here we see two finished figures…
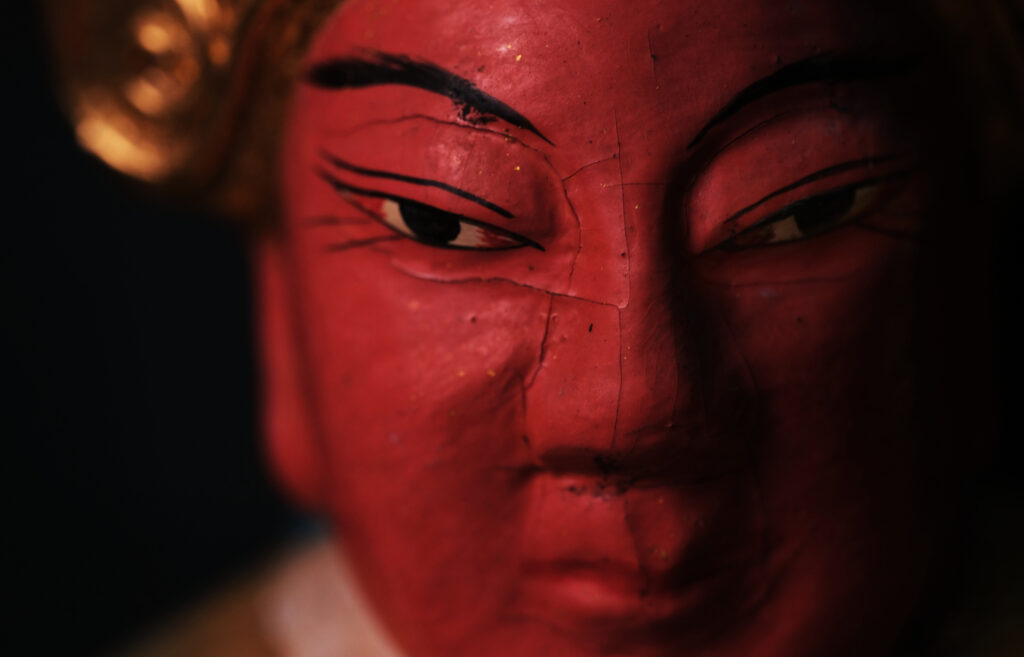
…and a close-up, which my friend said would be perfect for a record cover.
 That brings us to the end of this particular shoot. I have several more photos from that session, which I would like to compile as an online album. But I’m not sure what form it would take, how to display them, and what website I would use. If you have any suggestions, let me know!
Before I move on to the technical part of the review, here’s a link to Say Tian Hng Buddha Shop’s website. (I have no affiliation with the shop, I just admire their work and ethos, and I am grateful to them for welcoming me into their space.) Tze Yong mentioned that the shop’s traditional customer base was from Singapore, Malaysia and China, but they now receive orders from Europe and other countries. Some purchasers are practising Taoists or Buddhists, while others collect the figurines for their cultural and artistic value. So if you (or anyone you know) are interested in acquiring these unique works of art, please feel free to check out their website and Instagram!
Zhiyun Molus X60 RGB Light: Overview
Back to the light! The Molus X60 is a COB LED light for photography and video, with adjustable power, colour temperature, app control and various other features. It comes in two versions: Bicolour and RGB. The Bicolour version has adjustable colour temperature (2,700-6,500K), while the RGB version has all of the above plus full-colour RGB.
Each of these comes in:
- a Standard version (without battery, and thus needs to be plugged in via the included DC adapter);
- a Combo version (which also includes a grip battery); and
- a Pro version (which also includes a mini-softbox).
The kit I am reviewing is the RGB Combo.
Disclosure
Zhiyun kindly sent us the Molus X60 for review purposes, but I was not paid for this article, nor did Zhiyun have any input into its content. At the end of this article, I have included an affiliate link. If you follow that link and purchase this or any other Zhiyun product, I will get a small percentage, at no extra cost to you.
In my reviews I always try to be honest and objective, and also provide lots of image samples so you can decide for yourself. If you have any questions or doubts, just let me know in the comments and I’ll be happy to address it!
Most of the photos and videos in this article were shot with a Fujifilm X-E4 and various lenses. The film photos were shot on a Minolta X-370s. If you want more details about gear, feel free to ask me in comments.
With all that out of the way, let’s (finally) get down to the review!
What’s in the box
The Zhiyun Molus X60 comes in a cardboard box, inside which there is a storage bag. The bag has a fabric exterior, a handle , and foam inserts to hold the different parts, which include:
- The light itself (with protector cap)
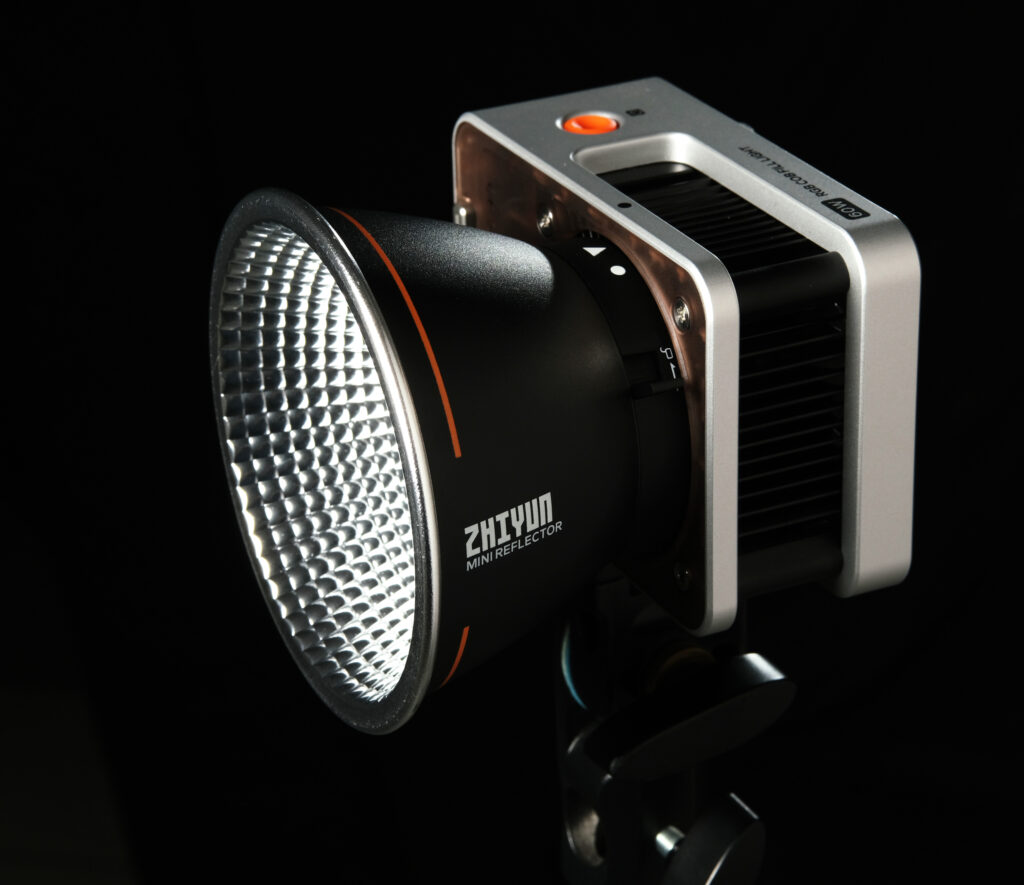
- Mini-reflector
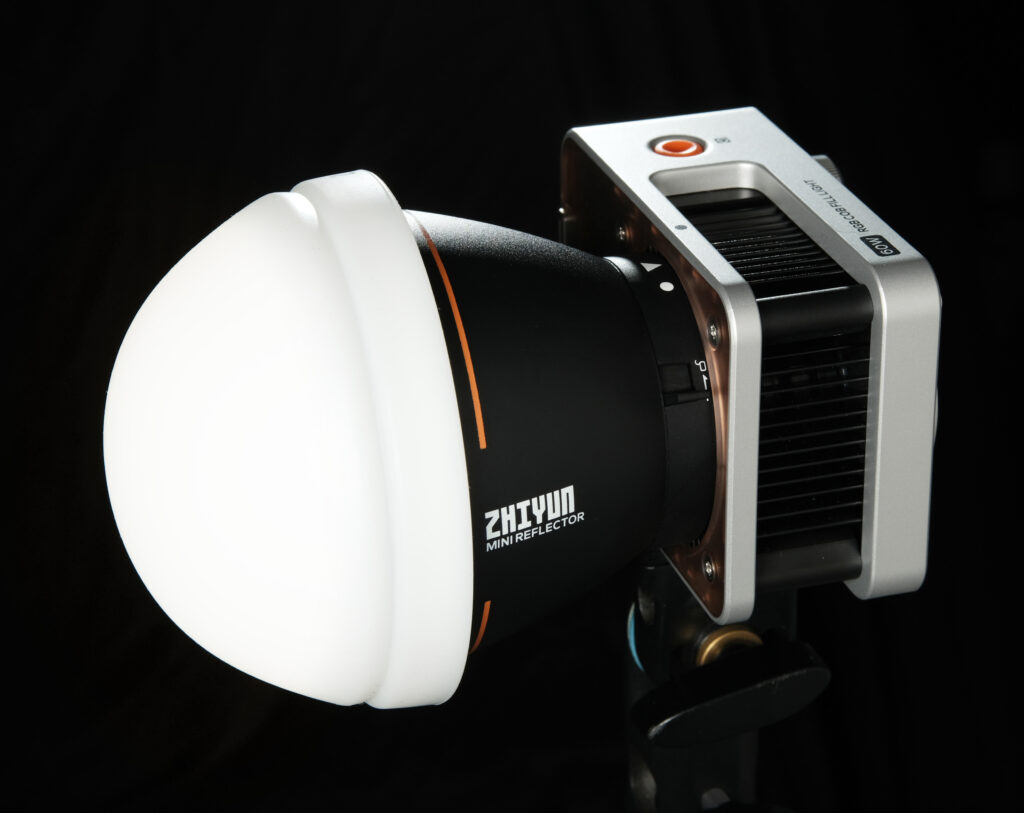
- Diffusion dome
- DC power adapter
- Grip battery
- 60W USB-C charging cable.
I’m reviewing the Combo kit. The Standard kit includes all of the above except the storage bag, battery and USB-C cable. The Pro kit includes everything in the Combo kit, plus a mini softbox (ZY mount).

Having the battery makes it much more convenient and versatile, so I would definitely recommend the Combo or Pro kit. Having said that, the X60 Bicolour, X60-RGB and the more powerful X100 all use the same battery, so that might be one reason to get the Standard kit – if you already own a few more of these lights and plan to share the battery.
Specs

The following specs are taken from the Zhiyun website. I didn’t measure them myself, but Gerald Undone tested the key specs in a very informative YouTube video, and they seem accurate as you would expect.
| Size (without reflector and battery) | 100*71*56 mm |
| Weight (without reflector and battery) | 319g (X60-RGB); 313g (X60) |
| Output power | 60W |
| PD input power | ≥18W |
| Color temperature range | 2700K–6500K |
| CRI (Color Rendering Index) | ≥95 |
| TLCI | ≈98 (X60-RGB); ≥97 (X60) |
| Brightness (1 meter, 6500K/100%) | 2010 Lux (X60-RGB); 2680 Lux (X60) |
| App control method | Bluetooth |
| Battery size | 94*61*53 mm |
| Battery weight | 370g |
| Battery capacity | 2550mAh/21.6V |
| Battery runtime (100% power) | 50min |
Size, look and feel
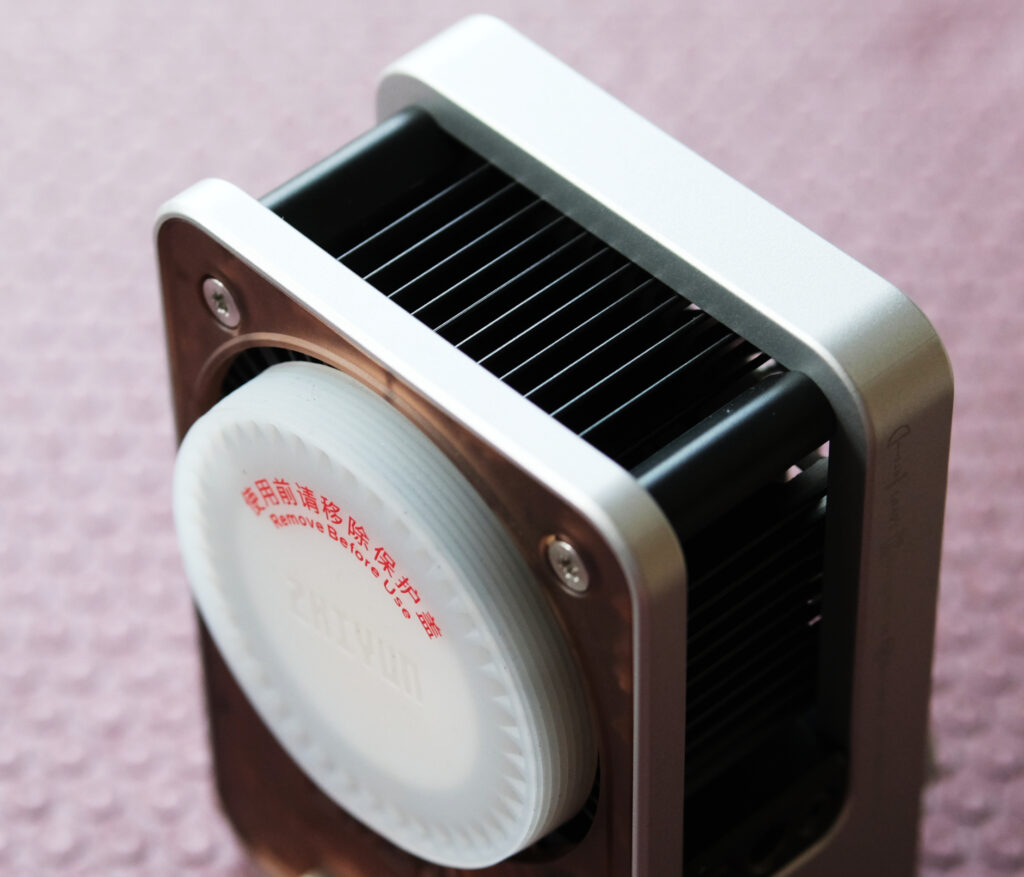
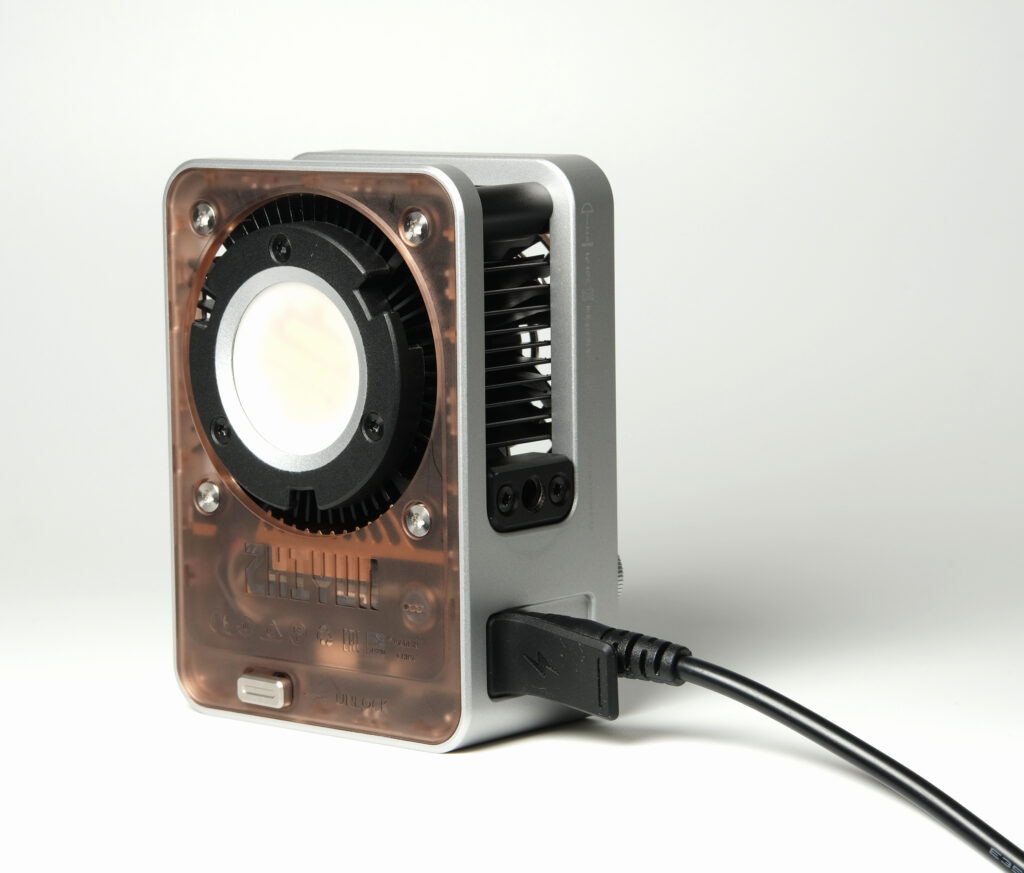
The Zhiyun Molus X60 is tiny. The main light unit is not much larger than a deck of cards, and the grip battery is about the same size too. Zhiyun claims it’s the smallest 60W COB light on the market, and I can well believe it. I like compact and portable gear (who doesn’t!) so on that count alone, the Molus X60 has a huge advantage.
The light feels well built, the controls are well-laid-out and pleasantly tactile, and I also really like how it looks – a steampunk aesthetic with the burnished chrome finish and metallic grilles. There are subtle design touches which I appreciate – for example the protective cap is ridged, which gives your fingers some purchase and makes it easier to peel off.
The Molus X60 has a temperature sensor, so the fan automatically turns on when necessary. The fan is pretty quiet. If you’re recording audio, it may be an issue if you have a sensitive microphone less than a meter away from the light. Otherwise it shouldn’t be a problem.
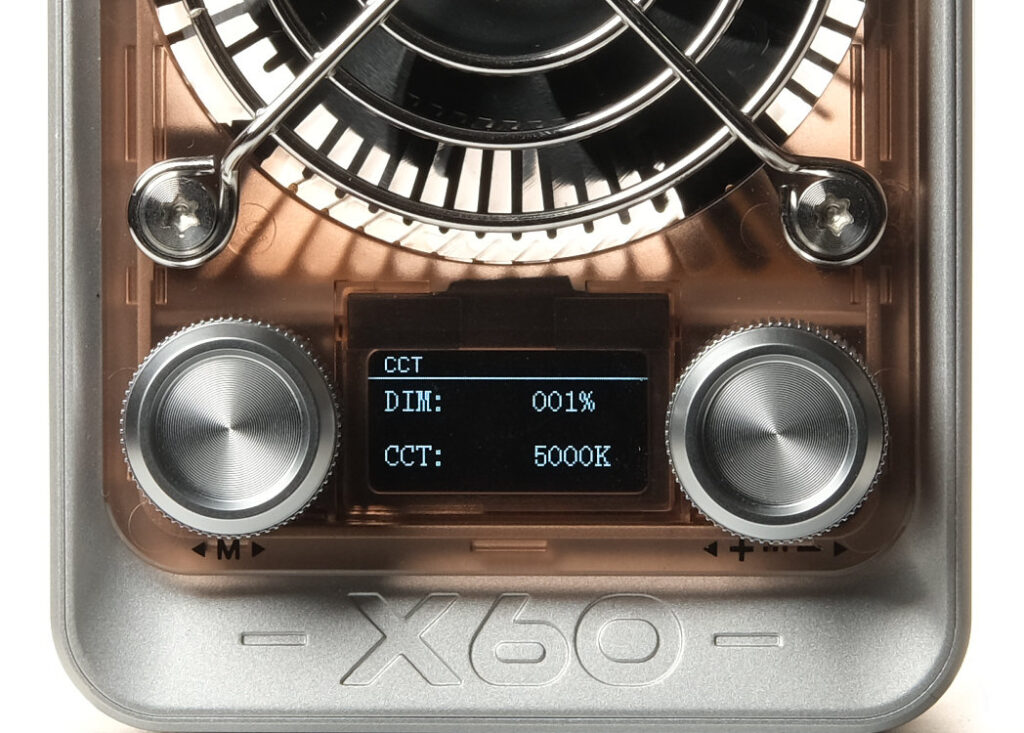
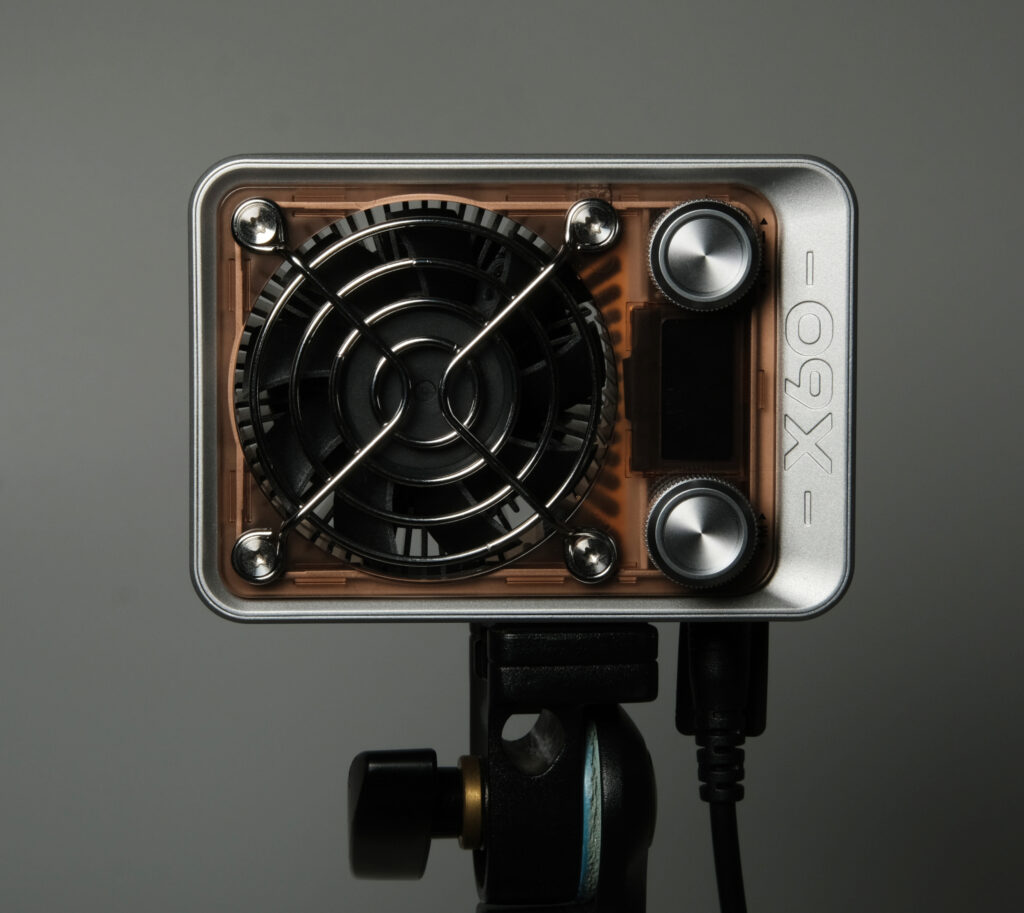
Controls
The controls are very simple. The Zhiyun Molus X60 has a power button, and two knobs for Power and Colour temperature (CCT). In the majority of situations, these are the only controls I use.
It’s worth noting that the power control is not linear. I tested this by taking the same photo with the light set to 1%, 50% and 100% power. In each case, I kept the aperture and ISO constant, while varying the shutter speed to match the exposure (using the histogram for reference). The shutter speeds were as follows:
1%: 1/30 sec
50%: 1/100 sec (+1.7 stops)
100%: 1/160 sec (+0.7 stops)
Having said that, the power adjustment feels intuitive, and in any case I think almost everyone relies on the camera LCD or light-meters (as opposed to percentages) for judging the exposure.
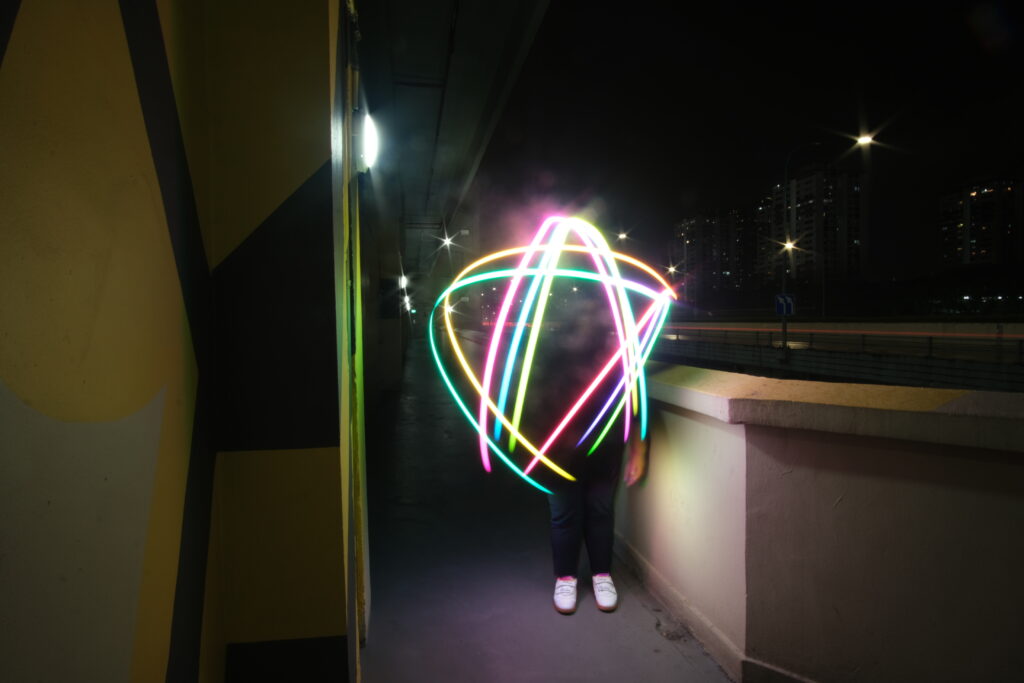
Pressing the CCT knob cycles through HSI (hue-saturation-intensity), RGB (red-green-blue), FX and Music mode. HSI and RGB allow for a range of different colours; they are only available on the RGB variant of the Molus X60, while the other modes are also available on the Bicolour model.
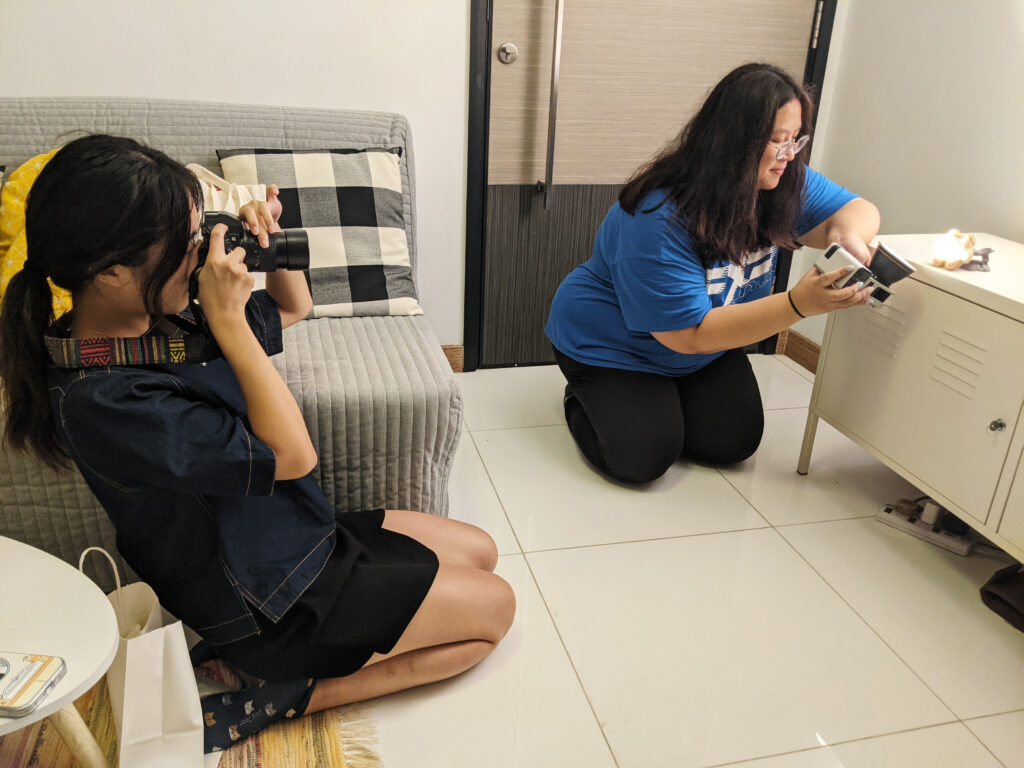
I tried out the RGB feature with my friends Elisa and Stacy who, in true GenZ fashion, are obsessed with coloured lights. In the long-exposure photo below, we used the Molus X60 to light-paint our initials.
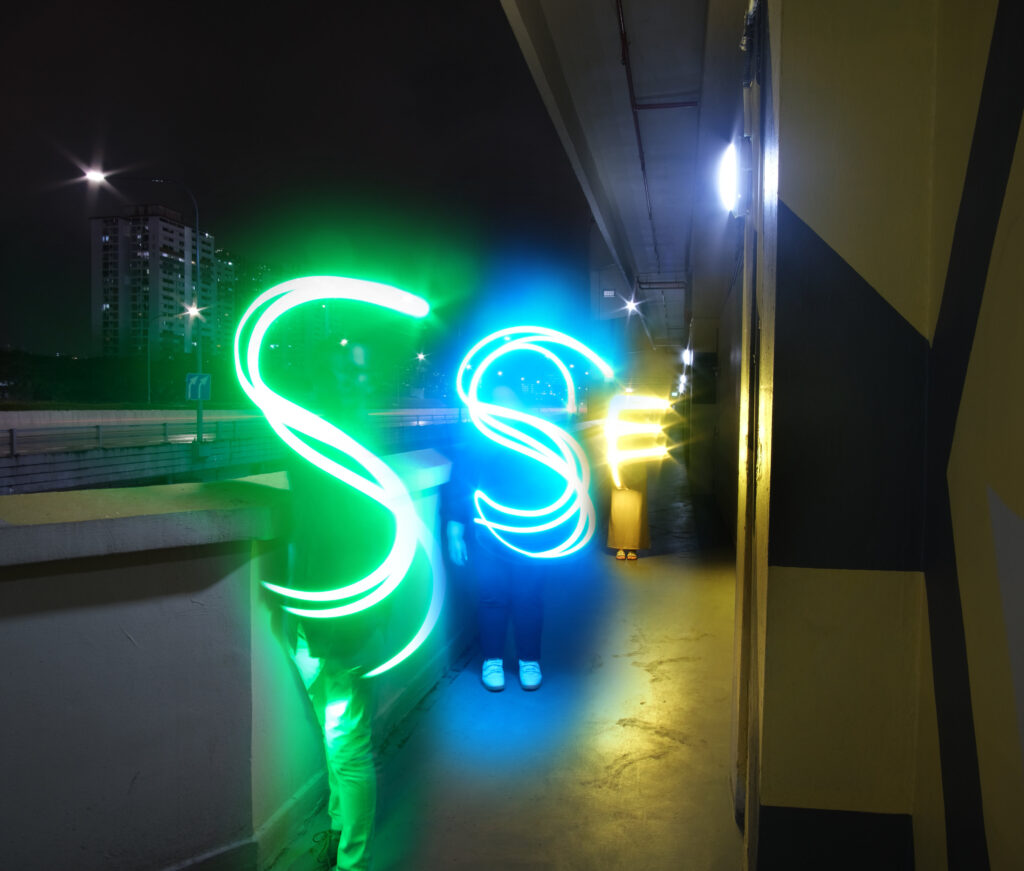
Here’s Elisa directing Stacy on where to stand. It was a whole thing.
FX mode has 16 different effects such as candlelight, lightning, strobe, police car and so on (you can adjust the brightness, speed and colour of each effect). Music mode causes the light to pulse to a beat.
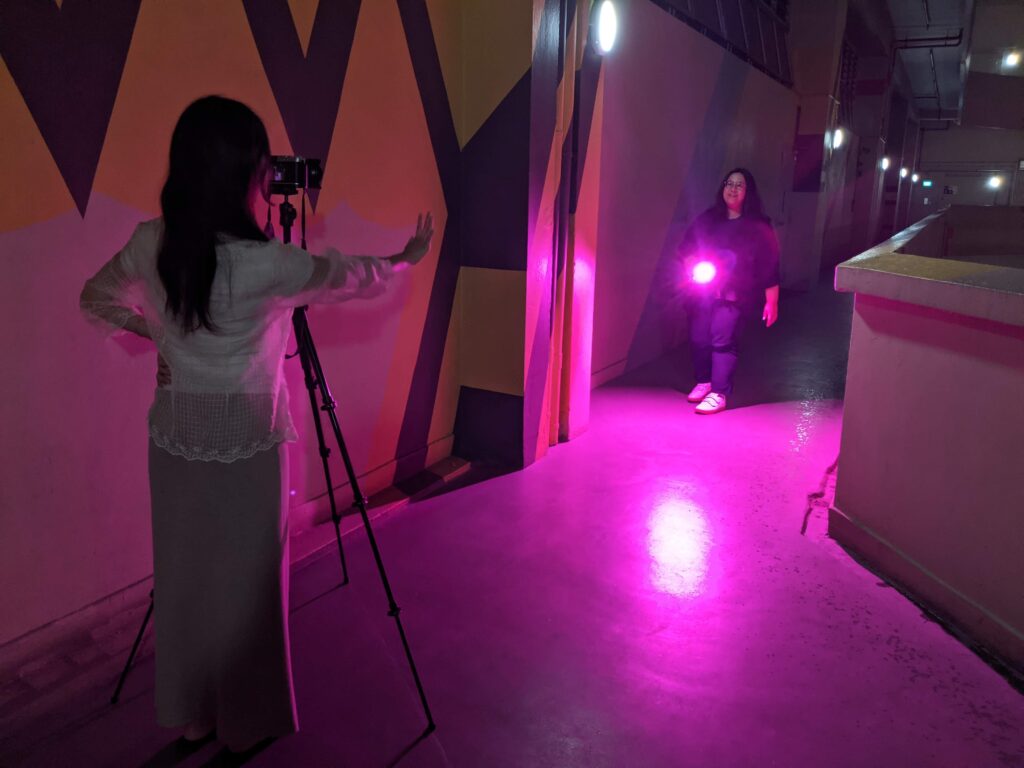
FX and Music mode can be useful if you’re shooting video or using the Molus X60 as a party light, but they’re not that relevant to still photography. However, some effects can be used with long-exposures, e.g. strobes for a multiple-exposure effect, or the hue loop for multi-coloured patterns:
I also tried out the ZY Vega app (iOS and Android). It seems intuitive and in my limited use, it worked fine. In practice I tend to use the physical knobs, but if the light is placed some distance away or inside a softbox, I can see how the app might be helpful. The app is also handy for choosing specific colours, and it has a Picker tool where it uses the phone camera to try and replicate a specific colour (I used this feature for my Instax photo, further down). If the colour is not quite right, you can use the app to make further tweaks and aim for a closer match.
Battery and power supply
The Zhiyun Molus X60 can be powered in three different ways:
First, using the DC power adapter, plugged into an AC socket:
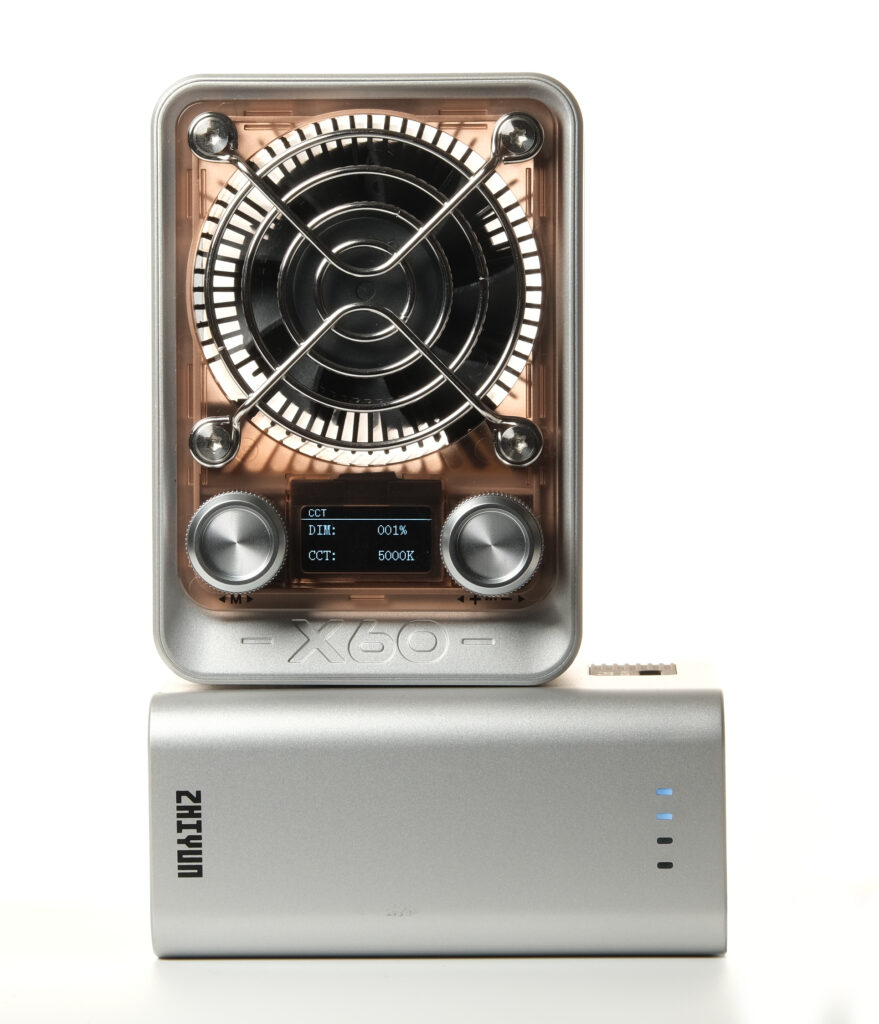
Second, using the grip battery, directly coupled with the light:

Third, using the supplied USB-C cable, with the other end of the cable connected to a power source, e.g. power bank, or AC socket with USB-C adapter (not provided), or the battery (included in the Combo and Pro kits, but not the Standard kit):
If you use an USB-C adapter plugged into an AC socket, Zhiyun recommends using an adapter which is ≥100W and supports PD fast charging protocol. The USB-C cable can be used even to power the light directly from your laptop, if it has a USB port that delivers ≥18W of power.
One thing to watch out for is that the USB-C and DC adapter sockets are located on the same side as, and quite close to, the tripod socket.
This is not a problem if your tripod mount has a relatively small base, as in my photo above. But if you’re using a quick-release plate, for example, it might block the USB-C and DC adapter sockets (the battery contact is on a different face, so issues there).
The grip battery has enough juice to run the light for about 50 minutes at full power. There are four charge-level indicators that light up when the battery is in use.
The battery has a USB-C port which is both an input and an output port. What this means is that the same port can be used to charge the battery, and also to deliver power via USB-C cable to the Molus X60 or other device (e.g. at a pinch, you can use the battery to charge your phone).
Light power, colour, effects
The Zhiyun Molus X60 is surprisingly powerful for its size, but it has its limits. If you want a key light which can compete with daylight, you want something more powerful, like the Molus G300 which I reviewed earlier.
For me, the Molus X60’s primary use case is as a key light for smaller objects (e.g. for product or food photography), or as a fill or rim light for portraits. Having said that, it can also be used as a key light for portraits, as you can see from the Buddha Shop photos above.
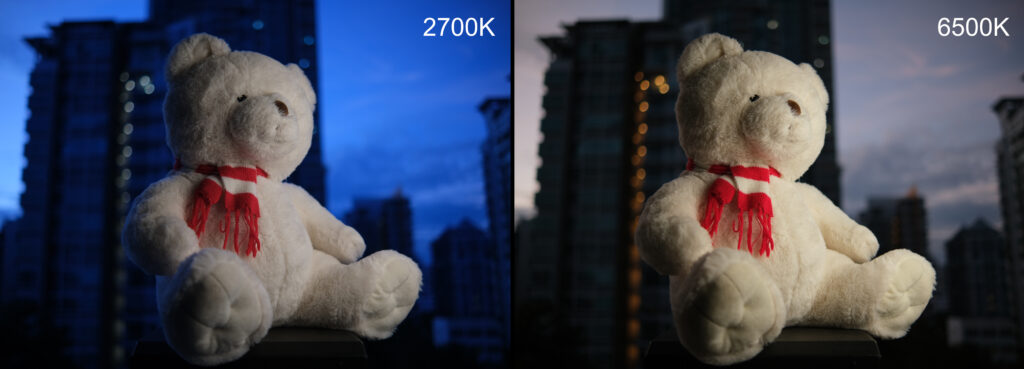
The Molus X60 has adjustable colour temperature, ranging from 2700–6500K. This bicolour feature is super useful because it can be used to match, or contrast with, the ambient light. In the photos below, which are SOOC except for some cropping, I set the light to 2700K (left) and 6500K (right), while keeping the camera white balance at a constant, neutral 5000K.

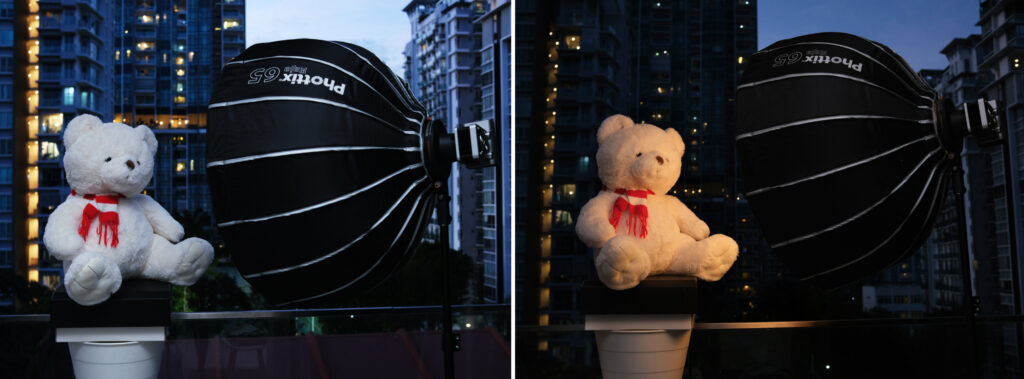
In the next two photos, I used the same white balance/colour temperature for the camera as well as the light – both were set to 2700K (left) and to 6500K (right). What this means is that, although the light goes from warm to cold (just like in the photo above), the camera white balance compensates, keeping the bear relatively neutral. But the background, as you can see, goes from very cold to warmish. So the bicolour feature can be used for creative effects too.
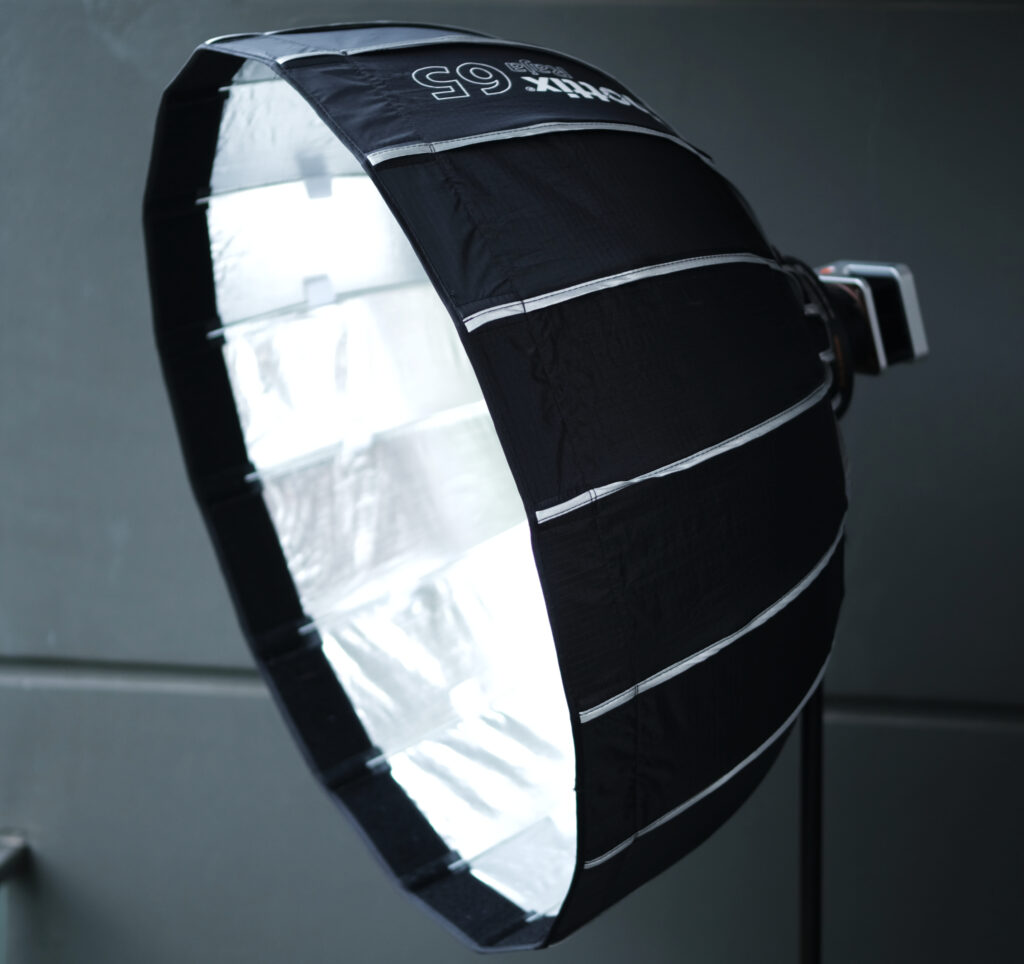
The photos below are just to show my behind-the-scenes setup, with the bear lit by ambient light only (left) and underexposed and then lit by the Molus X60 at 2700K (right). In this setup, the light is modified by a 65cm softbox, using a Bowens-mount adapter (more on that later).
In the teddy-bear shots, I used the Molus X60 as a bicolour light, but the RGB version can also do a wide range of colours.
In the top two photos below, I used a regular flash (without colour) as a key light for the Instax camera, and the Molus X60 as a background light. For these examples I chose a similar colour (orange) and a complementary colour (teal), but the HSI and RGB adjustments let you choose almost any colour you like.
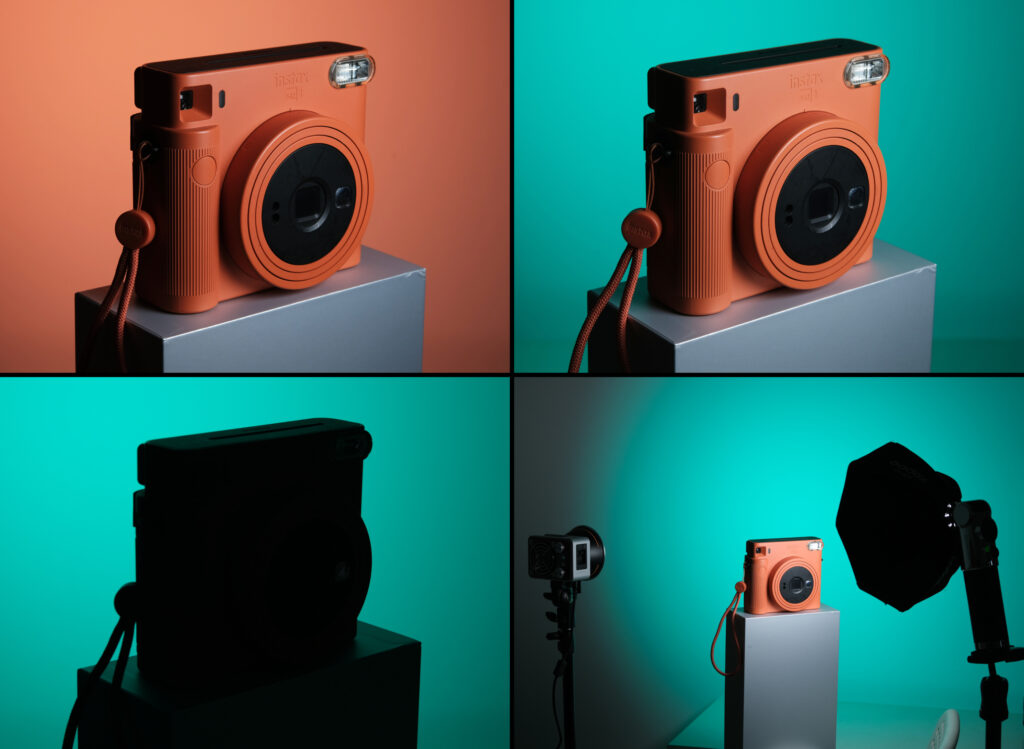
The bottom left photo shows the effect of the background light alone, without the key light. The bottom right photo shows my setup, with the Molus X60 on the left and the key light (flash) on the right.
Modifiers
The photos below show how the included modifiers change the texture of shadows:
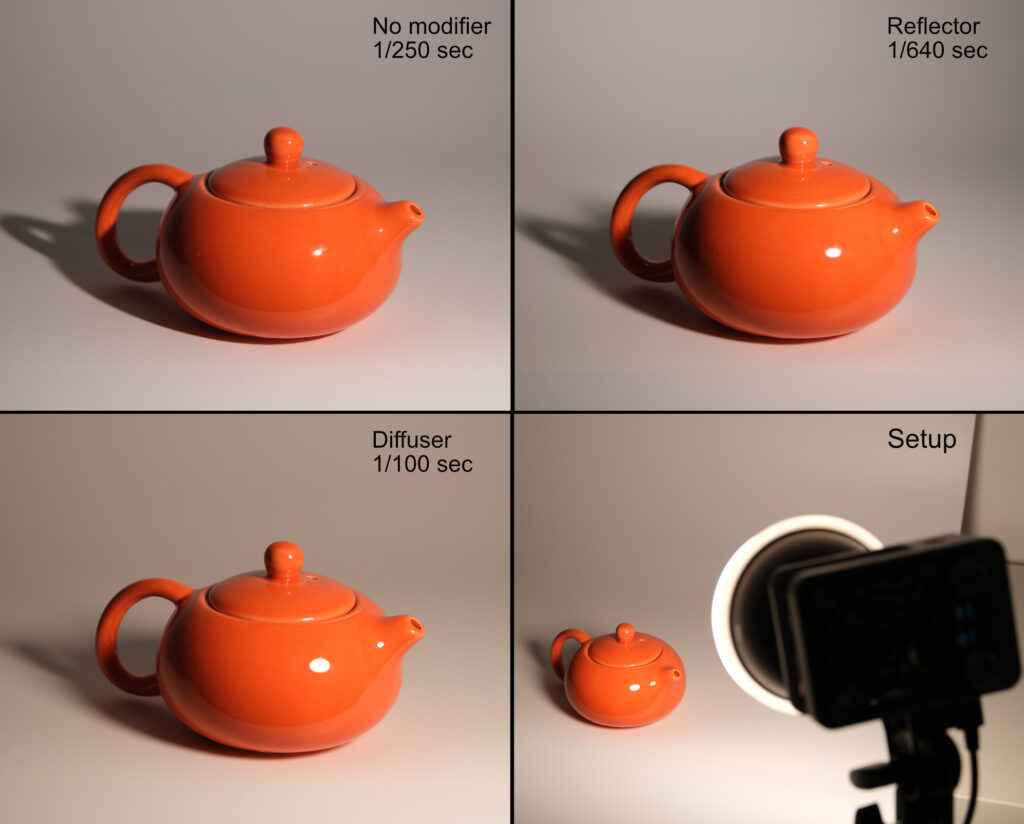
The top-left photo was without any modifiers.
At top-right, I used the mini-reflector, which makes the light more concentrated and therefore stronger. I kept all other parameters (ISO, aperture and light power) the same, but to get the same exposure, I had to make the shutter speed 1.3 stops faster to compensate. The mini-reflector also creates slightly softer shadows, at least at close range.
At bottom left, I used the mini-reflector plus diffusion dome. This creates the softest shadows (it also helped that my walls are white, so the diffused light bounces around even more). But it cuts 1.3 stops of power compared to the unmodified scenario (2.6 stops compared to the mini-reflector without diffuser).
The bottom right photo shows the setup, with the Molus X60 (with mini-reflector and diffusion dome) on camera right.
The next three photos show not just the shadows but also the overall shape of light.
Zhiyun also makes a ZY–Bowens mount adaptor for its Molus X60 and X100 lights. This is a high-quality piece of kit, with a reflective cone and metal screws and levers which feel reassuringly solid.
The adapter is rated for softboxes of ≤60cm and ≤1.3kg. I used a softbox, loaned from my friend Burke, which was slightly over spec (65cm and 1.6kg), but the adapter handled it like a trooper. (For sample photos, please see the earlier white balance test with the teddy-bear, where I used the same softbox.)
My example photos show how the light behaves with a few of the most common modifiers, but the Bowens mount adapter allows for any number of other accessories. If you are into lighting, you can probably imagine how it would look with a beauty dish, grid, barn-doors and so on.
More sample photos
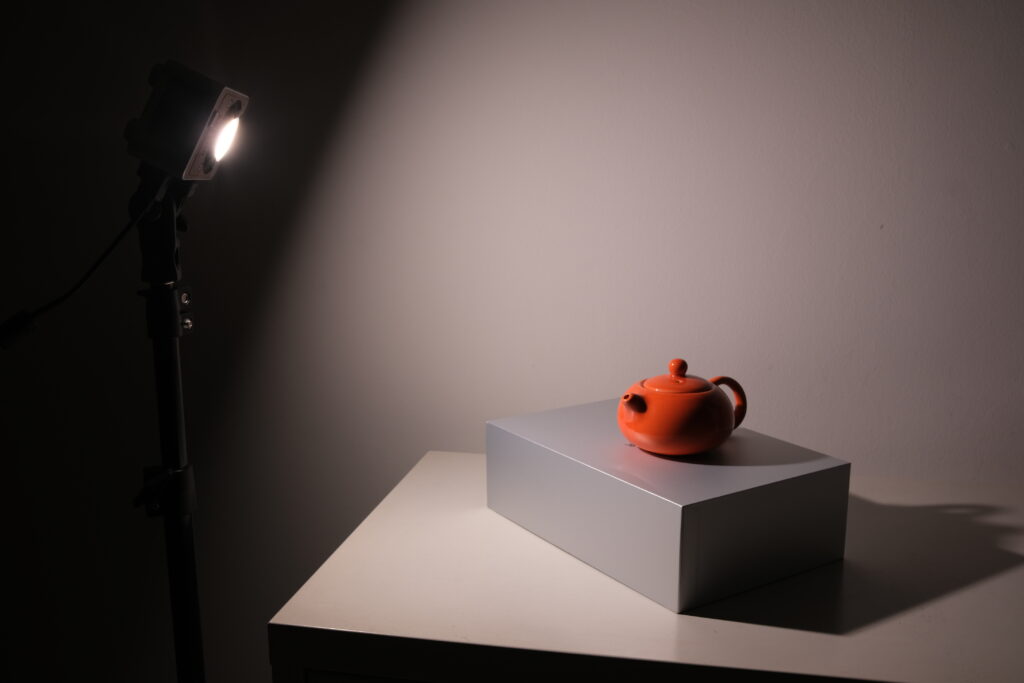
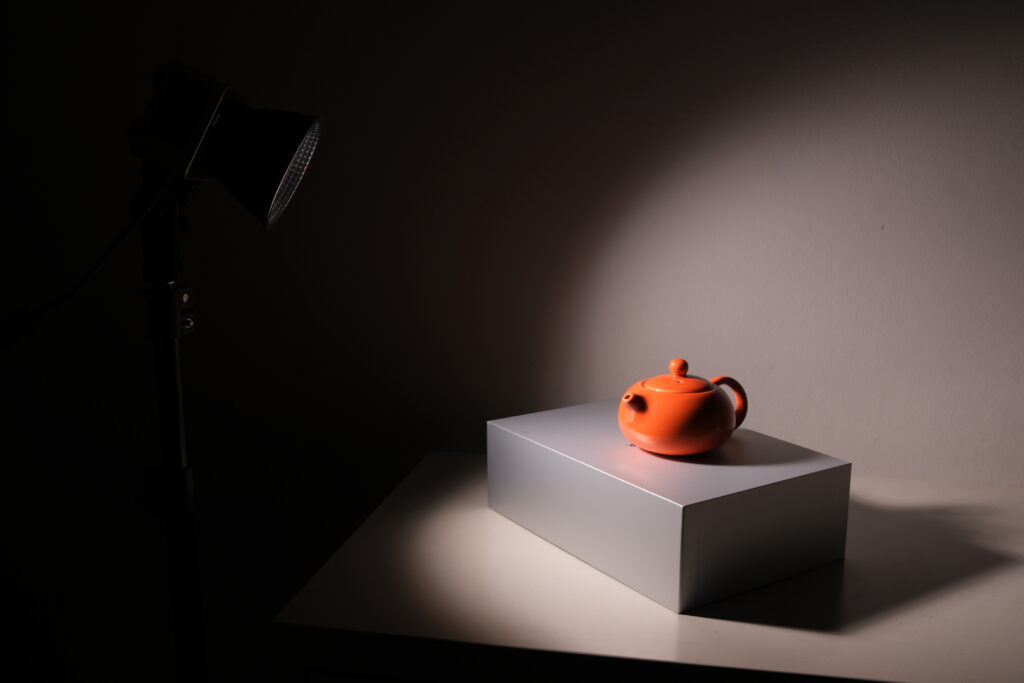
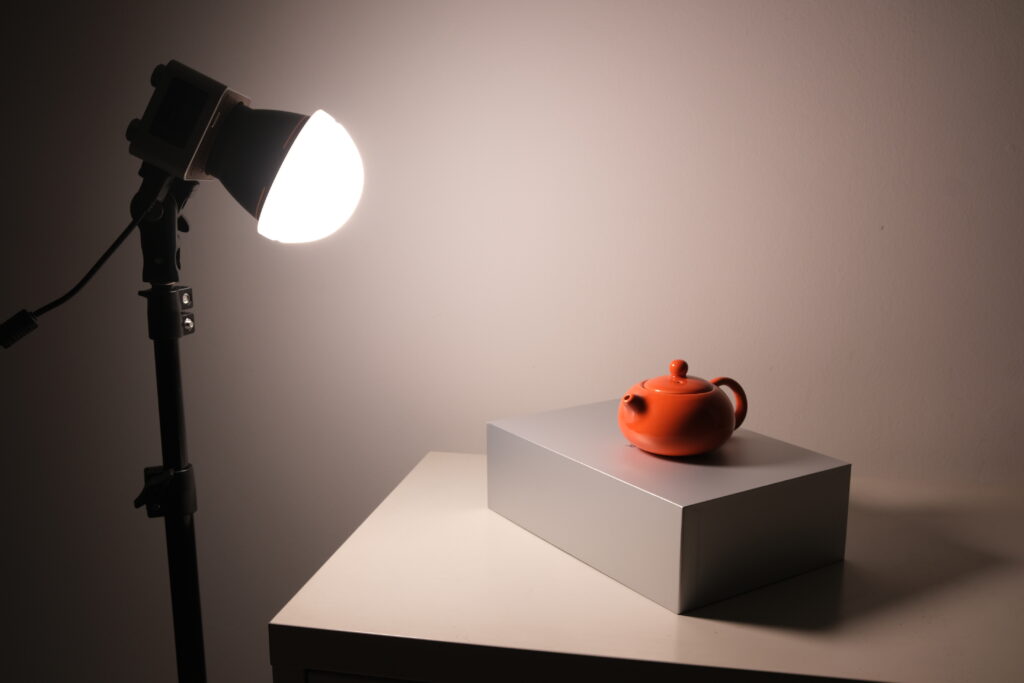
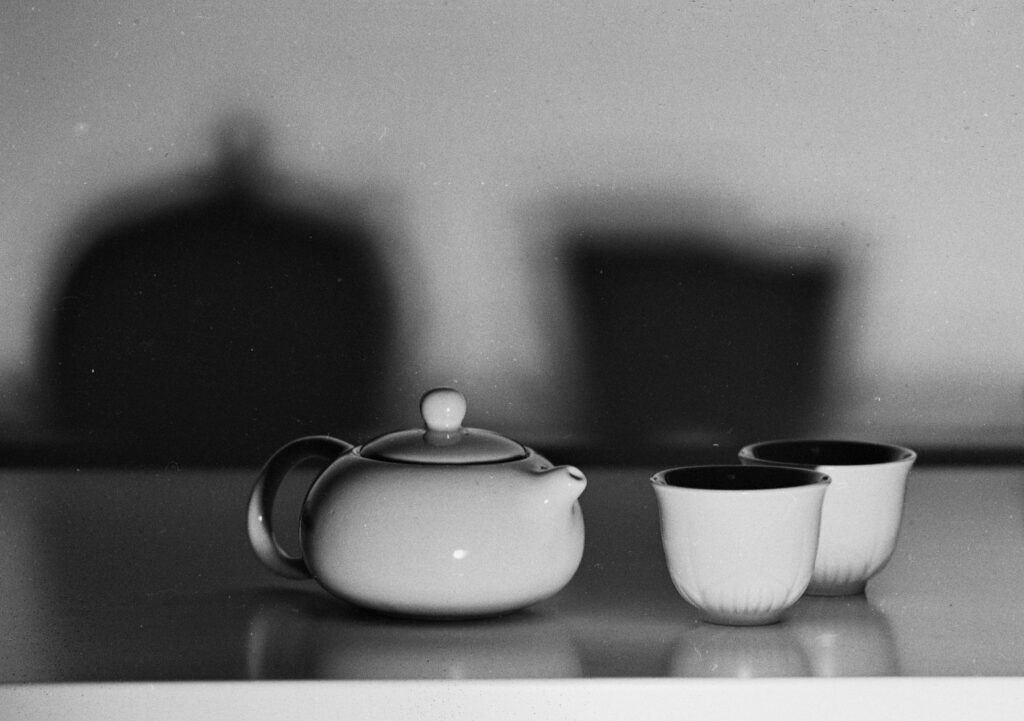
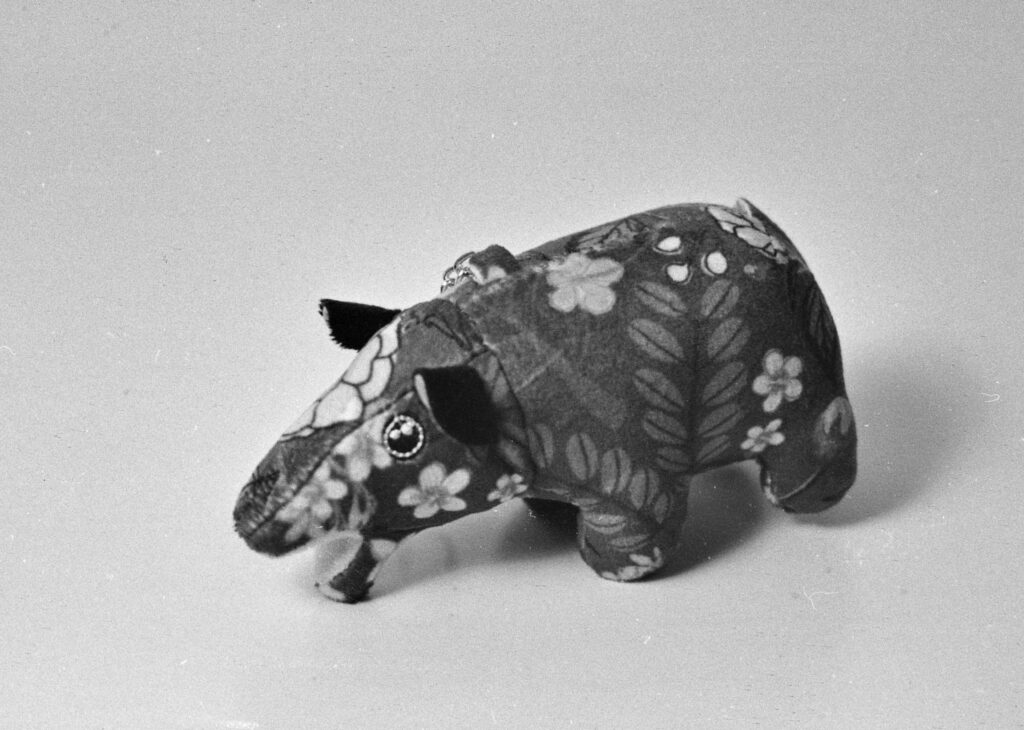
For still photography, I generally favour flash. But film photography is a bit of an exception, because without a digital LCD to fall back on, metering and pre-visualisation are a lot easier with constant lights (as opposed to flash). My friends used the Molus X60 to take photos on film (Lucky SHD 400), lighting small objects like a teapot and a stuffed tapir.
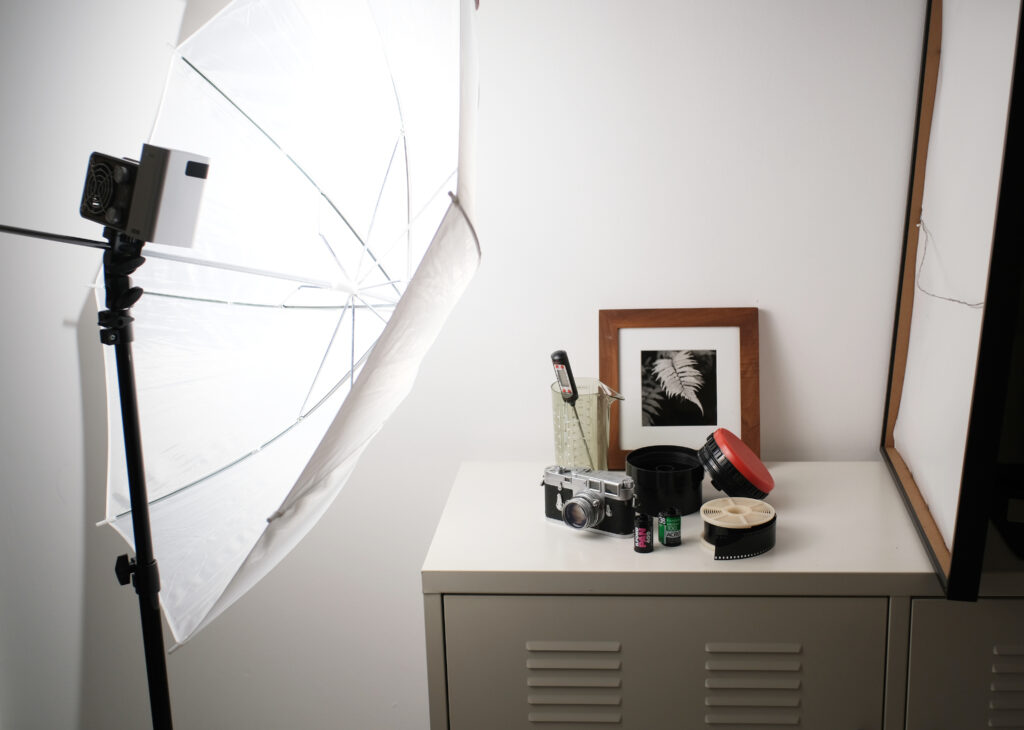
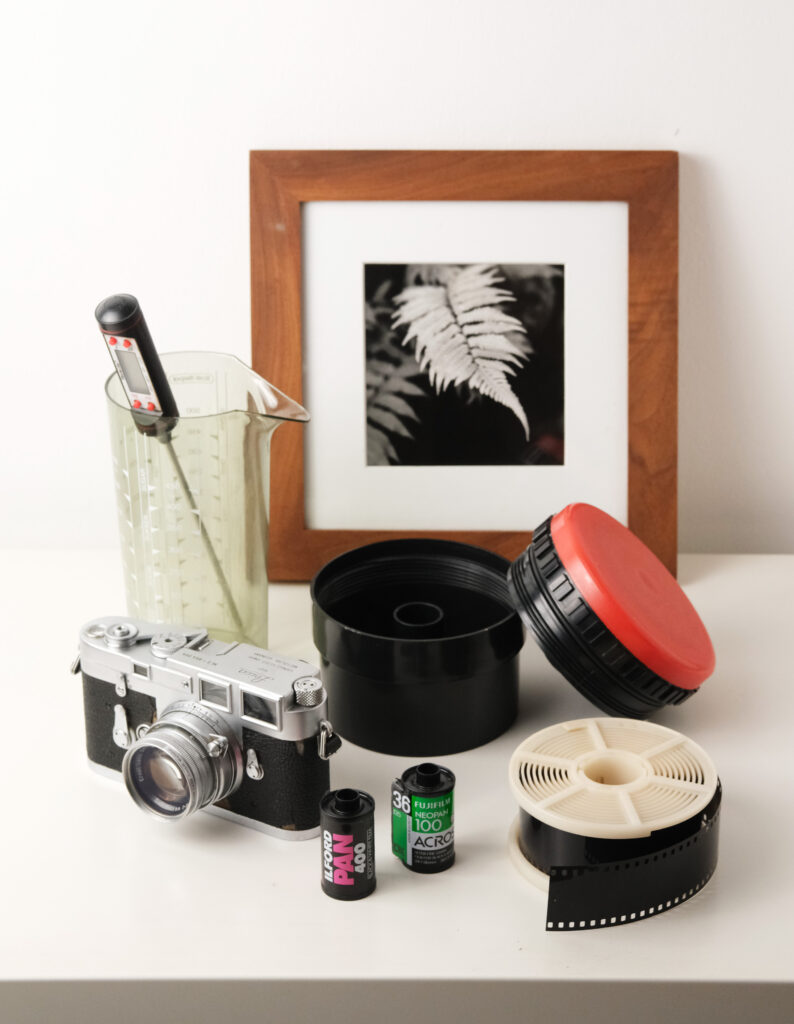
I also used the Molus X60 to take a photo of my film developing kit, for a workshop and exhibition at the National Library of Singapore.
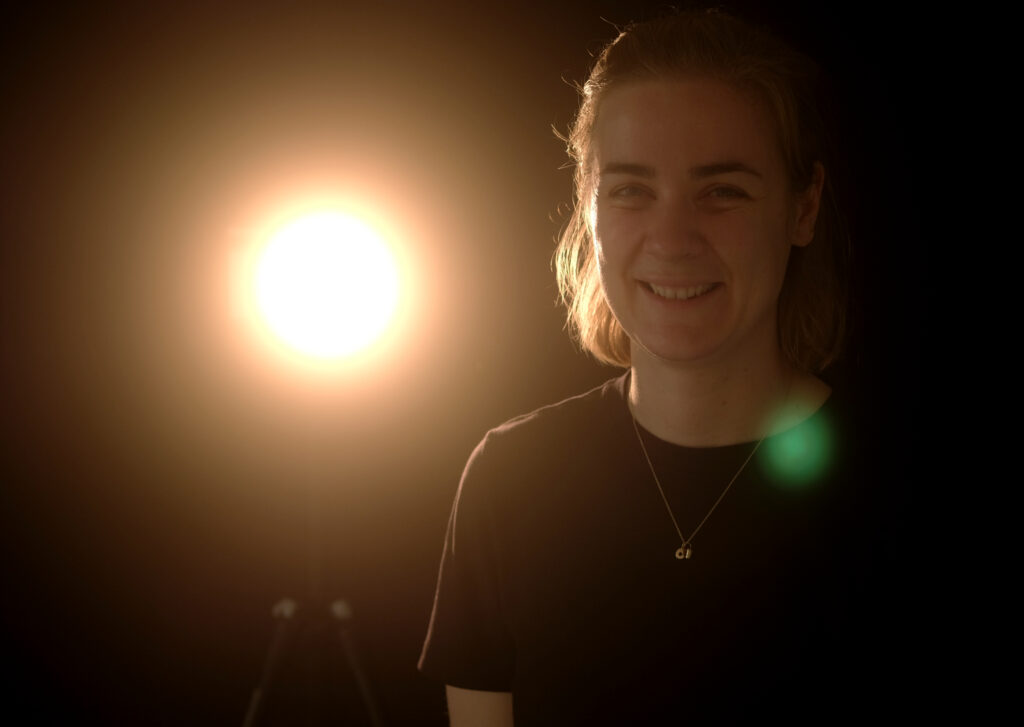
And finally, an example where I used the Molus X60 as a “practical”, which is cinema-speak for a light source that also appears in the scene itself. My friend and I were testing out a black mist filter, which is why there is more than the usual amount of halation and flare.
Final thoughts
A reviewer on YouTube described the Zhiyun Molus X60 as “the Swiss Army Knife light”, and I think that’s a great description. It’s similarly small, versatile and ingenious. You can carry it anywhere, use it as a secondary (fill, rim or background) light, or even as a key light for product or portrait photography. The only improvements I can think of are (a) a green/magenta tint feature on the bicolour menu, and (b) as I mentioned, a little more space around the tripod mount, specifically so that it can be mounted on a tripod plate without interfering with the DC power socket. However, the light is so small that I don’t know if this is physically possible.
When I fished the light out of my bag and switched it on, my friend said, “Wow, we should all aim to be like this. Unassuming, but shine bright when we need to.”
Not just a light, then, but a whole life philosophy. Okay, that’s stretching it – let’s just say, it’s a light, but a really good one. And often, one good light is all we need.
If you’re interested in purchasing this or any other Zhiyun product, feel free to use this affiliate link. I will get a small percentage, at no extra cost to you. For more of my work, check out my Instagram. Thanks for reading.
Share this post:


Comments
Paul Quellin on Zhiyun Molus X60 RGB Light Review – Documenting a Daoist Idol Makers’ Workshop
Comment posted: 13/12/2024
Comment posted: 13/12/2024
Comment posted: 13/12/2024
Comment posted: 13/12/2024
ºColor-Solinarº on Zhiyun Molus X60 RGB Light Review – Documenting a Daoist Idol Makers’ Workshop
Comment posted: 16/12/2024
Comment posted: 16/12/2024
Comment posted: 16/12/2024
Comment posted: 16/12/2024