Pacific Image XA Review – I Scan at home, and this is why – Guest Post by Mark Sperry

By marksperry

This is ostensibly a review of the Pacific Image XA 35mm film scanner (also know as the Reflecta RPS 10M). I say, “ostensibly,” because it’s just as much a diatribe about scanning processes and how to approach the film workflow from my perspective.

Leica M4 – 35mm F2 Biogon – Fuji Superia 400

Scanning is often the bottleneck through which film, a high quality imaging product, must pass. It frequently does not come through unscathed. Bad scanners can introduce poor color, soften details, a very high amount of noise, and or ugly digital artifacts. When I was shooting film and printing in the darkroom, digital cameras were these expensive experiments that were mostly to be avoided. I never said, “oh gee, 35mm isn’t that sharp.” But now, digital is for the most part a mature way to make pictures.

The conventional wisdom is that a digital capture makes a 35mm capture look like the film image has Vaseline on the lens. It’s certainly true that when you put that SD card in your 5k iMac, go into Lightroom and hit “Z”, those pictures look mighty sharp and smooth! The Sony 42mp BSI sensor is some kind of black magic pulled from the future when compared to some film scans in my library. So I wouldn’t blame someone for concluding that film, and specifically 35mm film, gives a (dare I say it) vintage look.

Leica M4 – 35mm F2 Biogon – Portra 160

On the other hand, this is not how I remember things. I remember the first time I shot a roll of Delta 100. This was a big deal to me because as a high school student I was told that HP5 was the ‘safe’ way to go. But I wanted it sharper, and that’s what Delta promised me. I specifically remember racking up that Bessler to produce an 11×14 print (that I made with the venerable Nikon 28-80/3.5-5.6 AF-S G). There was NO grain. At least, that’s how it seemed to me at the time! But I still have the print, and looking at it now, it’s still incredibly detailed, with at least a very low amount of grain visibly obscuring a detail. For the longest time none of my scans look like this! 35mm on screen is frequently just a mess of soft details and huge grain, I might as well have been shooting Super 8. So what is happening here?

Leica M4 – 35mm F2 Biogon – Superia 400

Well the answer to that is “market forces” happened. In truth I was able to achieve scans that rivaled my optical prints at one point. This was in college, when I had access to a Nikon Coolscan 9000. The Coolscans represented Nikon putting their full weight into making a proper desktop scanner. It was no flextight (and don’t even chime in Drum people), but it was very, very good. Sharp, detailed scans with a great DMAX for those dense chromes. But over the years, everyone decided to pitch their Hasselblad’s for cameras like the Canon 10D, embracing the dream of 6 megapixels. Investment in scanning technology has almost completely stalled about 10 years ago.

The current Hasselblad X1 and X5 scanners are literally a decade old, based on technology older than that, and still come with Firewire. Even the Coolscan is a cool $3000 dollars on the used market. Bah. Humbug. I just wanna shoot my M4 and bring those brilliant little pieces of Portra, Delta, or Fujichrome to the computer with all the potential I know they contain. Epson is a fine company and they make fine printers, but even their newest V850 makes film of most formats look just a little mushy. I can only imagine how good film scanning would be today if Nikon was still making scanners.

The Pacific Image XA

However, it’s not all dire. If you’re willing to take some chances on strange looking devices from brands you’ve never heard of, you may be surprised. I certainly was, after trying the Pacific Image XA. So lets talk about what it is.

– A dedicated 35mm scanner
– 5000 Optical PPI
– 4.2 DMAX
– Motorized Drive for Batch Scanning
– IR Dust reduction
– Auto and manual focus (GLORY BE HALELUJA!)

Leica M4 – 35mm F2 Biogon – Fuji Superia 400

It has other specs, you can read them on your website of choice. But those are the important ones. 5000ppi lets its produce a 30ish megapixel image from scans, big enough to cover my 13×19 max print size at greater than 300PPI (thumbs up). 4.2 DMAX, this allows it to do adequate scans of chrome film, even when the negatives are a bit dense. The Epson’s frequently lag in this area (Epson is known for inflating their specs).

The motorized scan allows you to scan up to full rolls of film, I stopped doing this, but it can do it, more on that later. It’s IR dust reduction system allows it to greatly reduce the amount of surface dust present on C41 and E6 films. Lastly, you can focus the damn thing! Why on earth other scan makers omit this critical function I have no idea. Epson scanners are notorious for forcing the users to jump through hoops to get their film aligned perfectly with the focus plane of the lens. I have manually focused the XA, and AF’d it too, and it makes a big difference in the resolution of the final scan. This definitely gives it a leg up on any other scanner in class made today in my opinion.

Nikon FE2 – 50mm F1.4 Planar ZF – Portra 160

Software Options

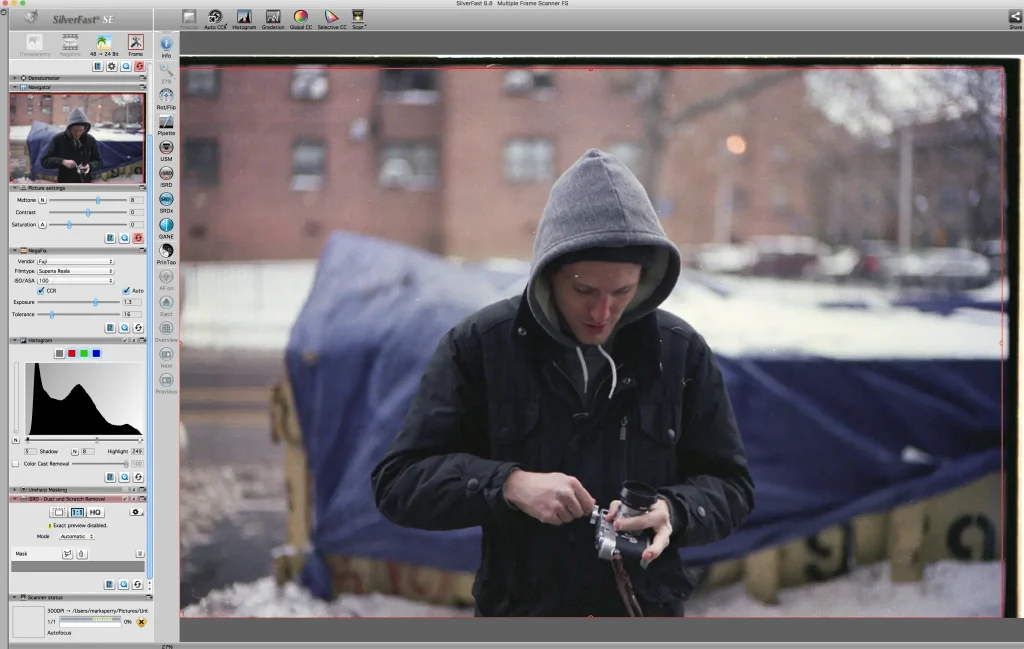
A scanner is often only as good as the software driving it, so let me lay out the options. It comes with something called Cyberview. I have this installed but I’ve never used it. It’s got a strange, clunky interface. Not for me. Most people use either Silverfast or Vuescan. Silverfast is correctly known as a very technically advanced piece of software that can take advantage of the XA’s many features.

It’s use of the manual focus function for instance, is far better than the one found in Vuescan. On the other hand, it’s incredibly overpriced. It costs hundreds of dollars. I pay less for a year of LR and PS than I would for Silverfast. That’s a non-starter. That leaves Vuescan! A scanning program that is not perfect, would make the UI design team at Apple cry or vomit or both, but does a generally pretty good job of enabling and controlling the XA’s basic functions

Interface, ugh. Results, pretty good!
Siverfast’s slightly fancier interface, results in my experience are no better.

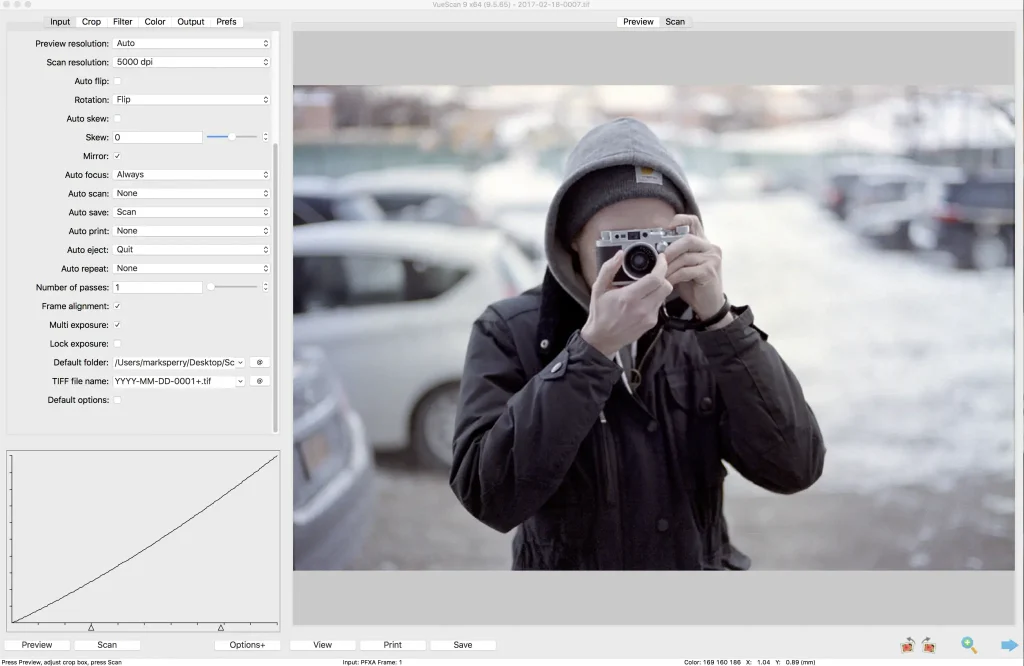
Vuescan’s features enable multi-exposure and multi-samples, batch scanning, and it has some rudimentary curve and color controls. It also has it’s own dust reduction IR scan system that works pretty well. One thing that has been surprising to me is the simple variation in performance of certain features between even pieces of scanning software. I suspect that some of the Silverfast features here, such as dust reduction, work better than in Vuescan. Still, given the price and overall performance, I’m pleased with it.

Just as a quick note, multi exposure is what it sounds like, 1 scan for the highlights and 1 for the shadows.  This is useful to bring out the most information from the latitude in your film.  Multi-sample on the other hand takes a series of scans and combines them to ultimately reduce noise.  You can do up to 16 samples, I’ve never gone quite that far.  On some chromes I’ll do 5 samples and I do think I see a difference at the surface level of the scan.  It’s subtle, but it’s a nice tool to have.

Of course the elephant in the room is that when you look at reviews of the Pacific Image (or scanners from Reflecta, Plustek, Epson, etc) on B&H or Amazon you encounter a pretty mixed bag. The reason for this is simple. Scanning is hard! It’s not simple. The machine doesn’t do all the work. Best practices ensure best results. This is something that the average user doesn’t understand, which contributes to everything from misinformation to bad reviews. Guess what, if Bessler 45C’s were cheap and sold to consumers they’d get pretty bad reviews too. Sometimes you need to learn to use complicated tools, and that’s ok. After using the XA, I can assure you that in the right hands it’s fully capable of professional results.

Workflow

The first question people ask me about scanners is always, “does it scan full rolls?” My answer, yes but…stop doing that. You don’t need a full roll scan!* Lets talk about the film workflow generally as it applies to this scanner. There are a couple ways you can go and I’m going to use this as a pulpit to preach to the way I think works best.

Let’s assume you’ve shot whatever it is, and developed it however you choose. So, you have a length of film. One way you can certainly go is to insert the film at frame 1, into the scanner. The motor will engage and from there you’ll work with the software. You have to tell Vuescan to “batch” scan. Now, if you hit preview, Vuescan will try to preview scan every frame on the roll. This is completely absurd in practice. It would take a long, long time. But, you can still batch scan without doing this preview. If you set the scanner in the color control page to use “auto levels”, it will apply a basic curve to each frame, and you can simply have the scanner go auto pilot through the roll of 36.

This is where things can get hairy. First of all, some users have reported incorrect frame spacing. This hasn’t really happened to me, sometimes it’s not perfect but it’s good enough for government work. The problem in my view is simply that sometimes, many times, the scanners settings are not a good representation of the frame. What’s more, even at medium resolution, the whole process will take well over an hour. The scanner also has no intake or exit spooling system, so the film will basically slink or slide over any surface near the scanner, creating scratches and collecting dust. But, you’ll have 36 TIFFs waiting for your inspection.

In my experience these do have some amount of latitude for processing in LR, but they’re never quite perfect. The edits often introduce a great deal of noise or other artifacts. Presumably, you could select your culled images, and then re-scan these images with more preferable settings to create the best possible file the scanner can create.  However, instead of going through all of that, you could simply look at your film with your eyeballs, think “this one, that one, and the other one” and go from there.  If the XA was a lab scanner like a Fuji Frontier, I might say go ahead and use it as intended. But in this case, I say take a slower, more considered approach.

Think of the scanner as an enlarger. It basically is that, only a digital version of one. When and if you worked in the darkroom, you may remember that enlargers didn’t print full rolls either. A big part of the process was editing, make your picks on a contact sheet, and enlarging what you like. This same workflow applies to scanners. A lot of film shooters believe that one of the benefits of using film is that it forces you to take your time when shooting. I believe that this also translates to the darkroom, even a digital one. One of the most powerful tools photographers have is their edit. Compared to other art forms, photographers are hopelessly prolific in their creation of new photographs, most of which are terrible. So really, don’t scan full rolls. Scan only your best work, show only your best work.

Testing

I wanted my tests to be simple and straight forward, focusing on actual results. I specifically did NOT want to do comparisons. Comparisons are an invitation to choice paralysis. Here’s the deal, most scanners can produce a version of your image that is acceptable in one way or another. NONE of them do this without a level of expertise on the side of the user. When well handled, a Plustek, Nikon, Imacon, Epson (etc) can produce great scans, and they’ll all be slightly different.

What matters more is whether you can make it work for you in the way you want it to work. Many users really will be fine with the output of an Epson (see above why I personally wasn’t). If my work was constantly going to pre-press for print publication you bet I’d have an Imacon to squeeze out that extra 10% between the halides. Some other people have it in their heads that only former Lab scanners can produce “good” color. I think that lab scanners do seem to optimize the color tone a little faster, but they do so at the expense of noise.  My overall perspective is that there is no perfect scanner and eventually you have to just get to work.

So I took my cumulative personal work that I happened to shoot on 35mm over a 6 month period. I shot with an F100 and Sigma Art lenses, a Leica M4 with Zeiss or Voigtlander lenses, and (because this IS 35mmC) I even got through a 2 year old roll of Ektar 100 that was in my Stylus Epic! I shot Portra 160, Delta 3200, Velvia 50, 100, Provia 100F, and even one of my hoarded rolls of Reala 100. I wanted to see how the scanner would respond not only to the different emulsions, but also how it would respond to pushed film, over or under exposed chromes, and high grain B&W film. So I’m going to show you what I found and I’ll try to annotate the results.

Leica M4 – 28mm 2.8 Biogon – Fuji Vevia 50 (a complicated scene for chromes, but Velvia retained just enough highlight and shadow information.  I metered this with a Sekonic L-308’s reflected mode too, pretty good!)
Leica M4 – 28mm 2.8 Biogon – Fuji Velvia 50 (Classic Velvia colors, look at the subtle tones in the far off clouds)
Leica M4 – 35mm 1.4 Distagon – Fuji Provia 100F
Leica M4 – 28mm 2.8 Biogon – Fuji Velvia 100

First we can start with some of the chromes, where I feel that the scanner really shines. These scans are full of detail, color, and the complete range from shadows to highlights is accurately represented. Frankly, images like these have made me move toward shooting chromes when I travel far more than I used to. There is simply nothing like looking at your chromes on a light table and picking your scans. This is when you go, oh yes, this is why I shoot film. These were shot with my Leica with a mix of Zeiss lenses.  Plus the great thing about scanning chrome is that you can easily reference the actual frame for color and exposure.  On these, I enabled multi-exposure & sample.  I am quite confident that these 33mp scans would print beautifully lat 13×19.

Nikon F100 – Sigma 50mm 1.4 ART – Fuji Provia 100F

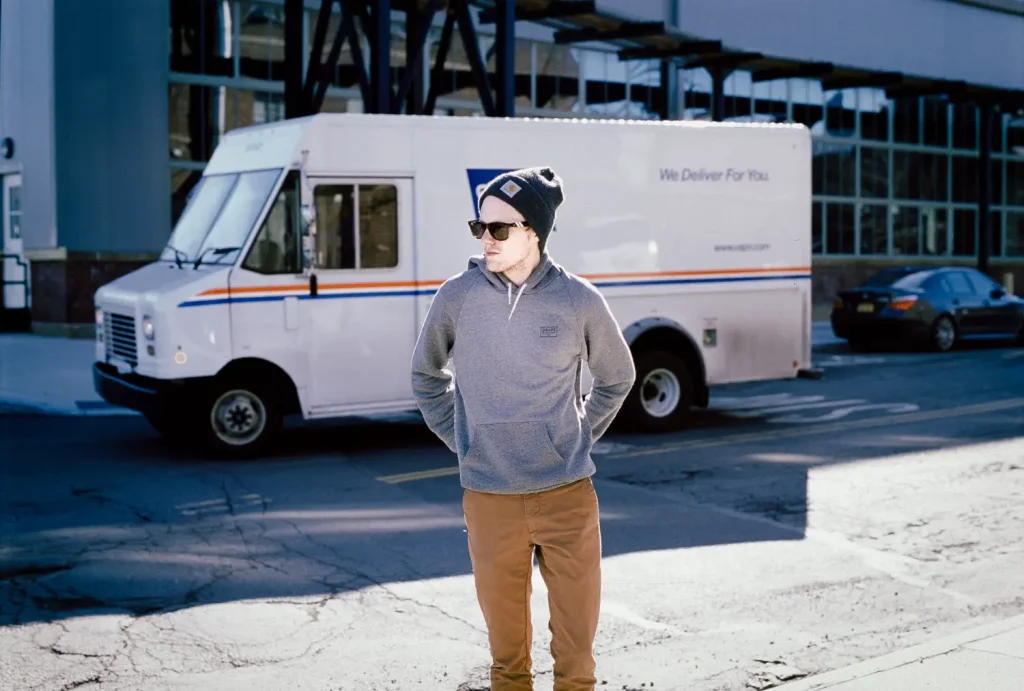
I wanted to see how good of a scan I could make, and whether my scan could rival a digital capture. I arranged for a quick-n-dirty shoot with my friend, Brennan. This was also an opportunity to test the new Godox bare-bulb strobe I recently purchased. I kept it super simple, Nikon F100, Sigma 50mm 1.4 ART @ F4. I matched the background with the strobe power and shot at 1/250th of a second. Here I also used Provia 100F. The results? Well there is less dynamic range of course, but there is plenty of detail, certainly more than you might need for a print of moderate size. Frankly, I’m not sure how an image captured with even a D810 would “improve” this image in any meaningful way. Based on a scan like this, I would absolutely shoot 35mm on select editorial jobs.  If you can already produce a double page spread that has adequate detail, what more do you need?

Leica M4 – 35mm F2 Biogon – Ilford Delta 3200

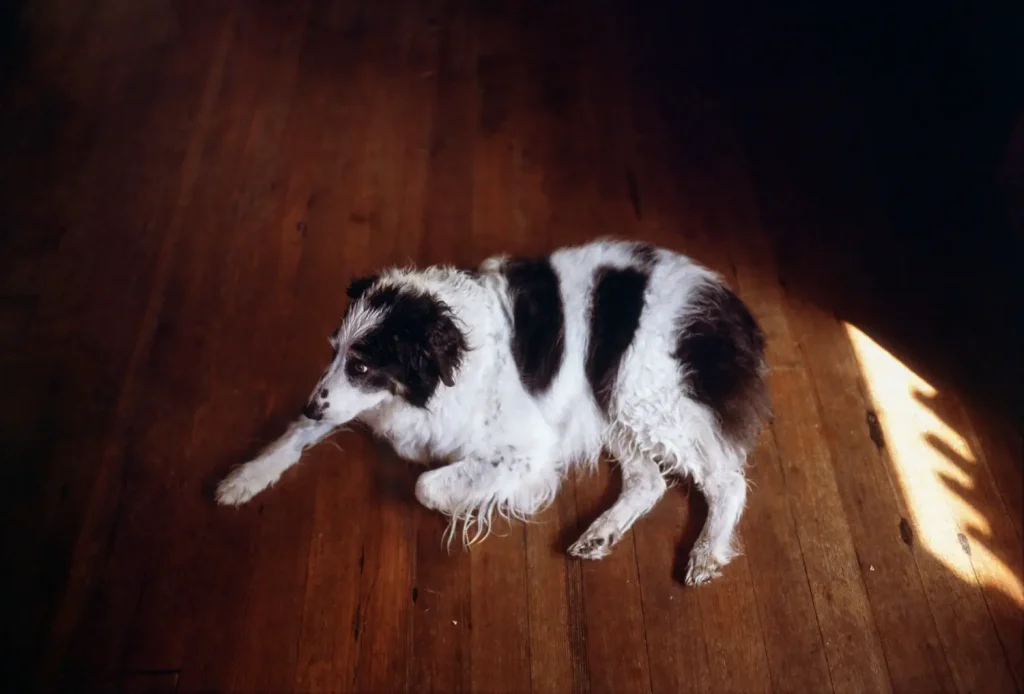
Next we can move on to various negative films. This (above) is how the scanner handled Delta 3200, a very grainy film. I think that grain comes through beautifully personally, and I’m very happy with the range of tones present.  I was also hoping to shoot some Delta 100, but just didn’t have time.  I think that the scanner fully captured the resolution present in the frame, and I wouldn’t hesitate to shoot this film more, or to make a large print of this image.

Olympus Stylus Epic – Ektar 100

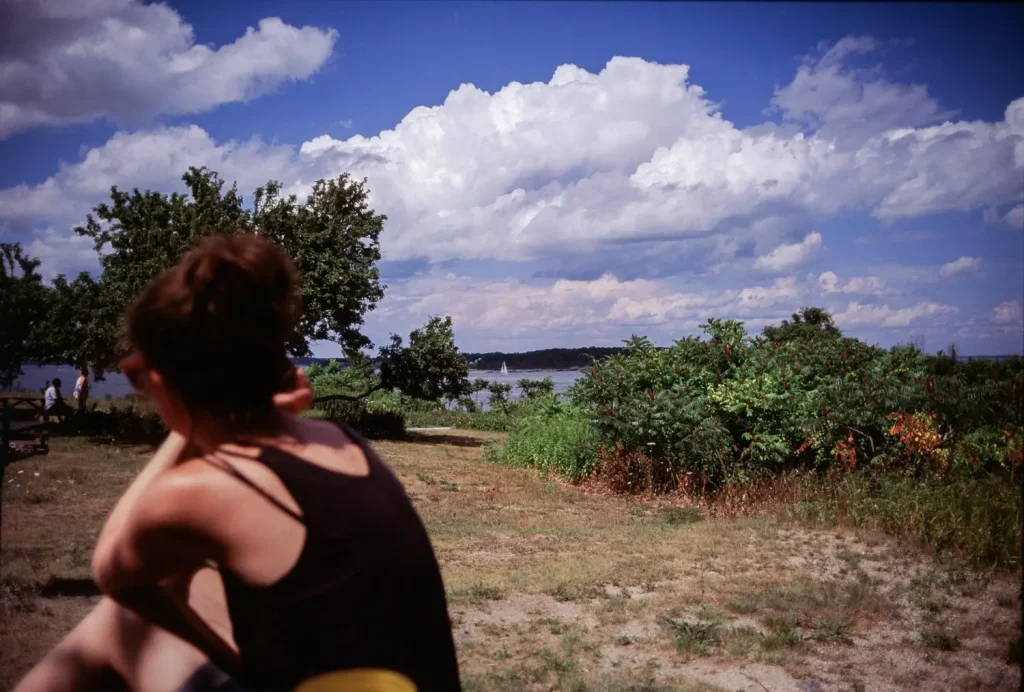
Here is an image from my Olympus Stylus Epic shot on Ektar 100. There may be a color cast in this image that I could remove in PS, but overall I think it’s an accurate representation of the colors I saw that day. It was a mix of storm clouds and sunshine on a beach in Tulum (Tulum is over IMO, don’t bother). Look at the detail present in the earring. That shows how good the little Olympus 35/2.8 is, and how much the scanner can really resolve.

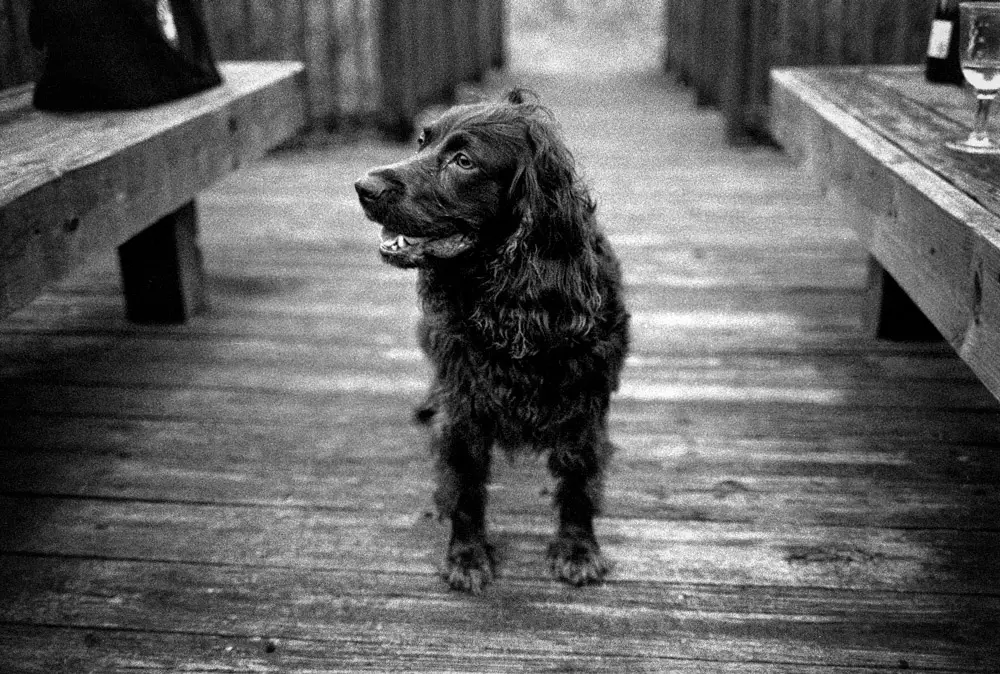
Below is another picture of Brennan (@brennan_mckissick) that I made wide open in soft window light. This came out grainer than I would have otherwise expected, but if you look past that grain you’ll notice that the fine patterns in his cap are rendered very nicely, and you can still count eyelashes, that Nokton is a gem.  I could probably tool the color a bit more but I think this is a good representation of the tones you get from Reala.

Leica M4 – Voigtlander 50mm 1.5 Nokton – Fuji Reala 100

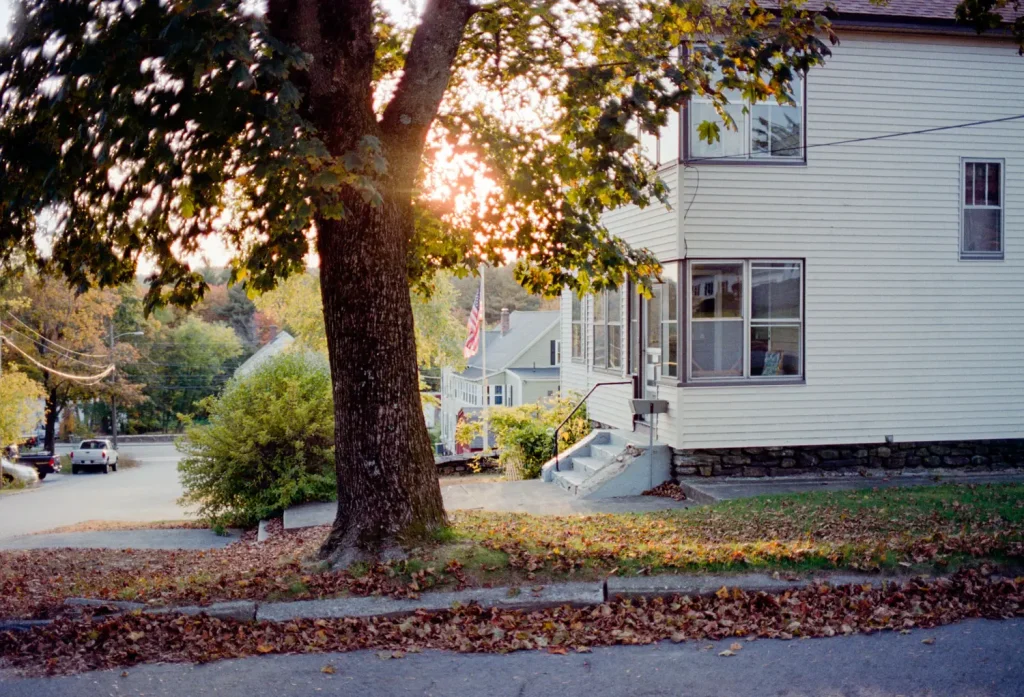
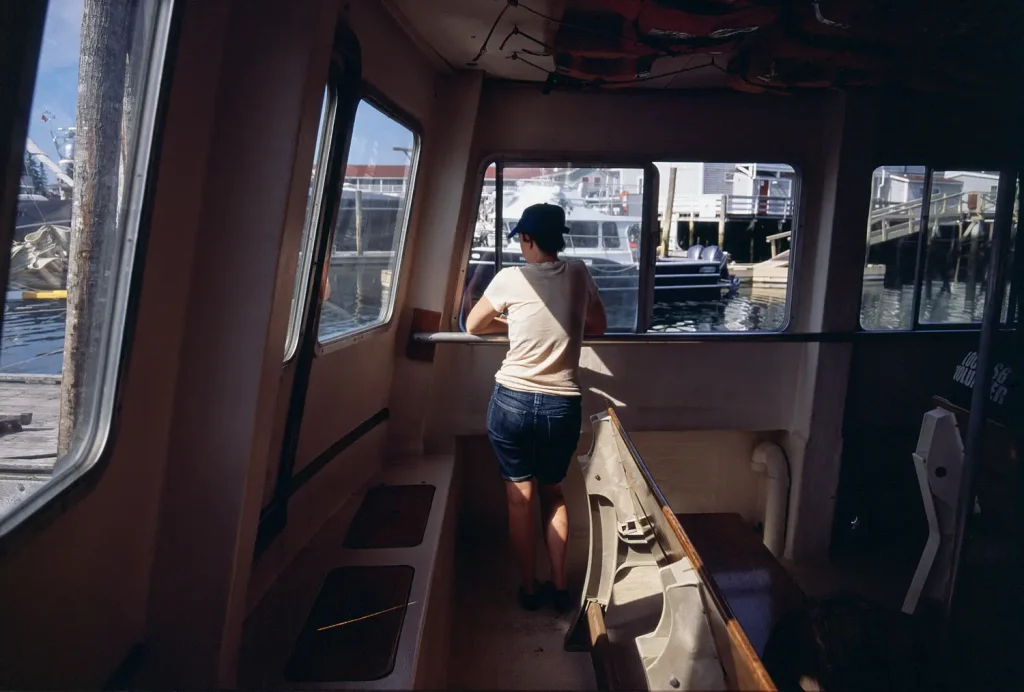
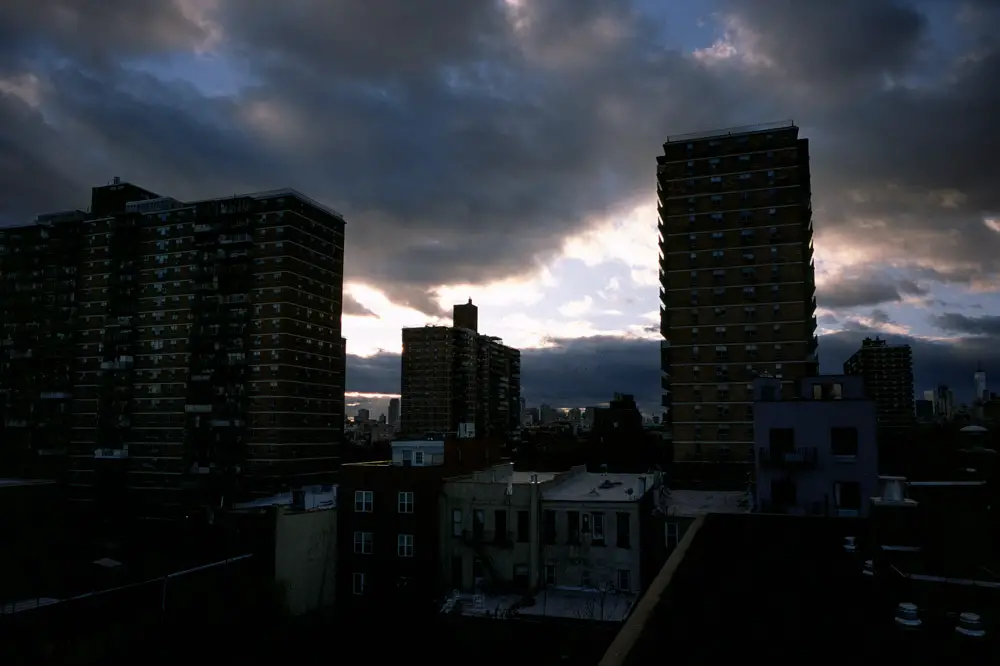
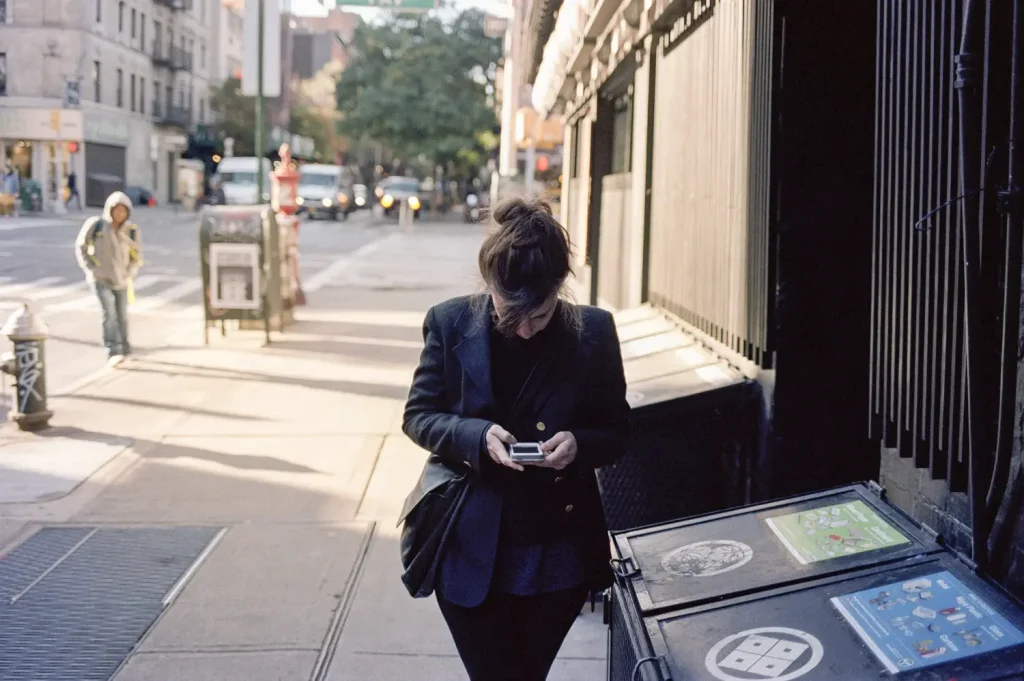
I wanted to show what I consider a challenging scan to see how the XA would do. A digital camera would render this scene with plenty of detail in the highlights and shadows. Negative film too would bring in some of those shadow tones. However here the Provia 100F could handle one range or another, certainly not both. I actually have a frame where I exposed for the shadows and all that beautiful sunlight color is totally gone.

While some might consider this an imperfect image, or an image that shows the limitations of positive film, I disagree. I personally think that on it’s face the image is beautiful, that it represents the feeling of the scene even though our eyes may have been able to see into those shadows with greater acuity. What’s more, if you look closely you can see a far off flock of birds moving between the buildings. It’s no masterpiece, but I think it’s a great representation of an autumn sunset here in Brooklyn.

Leica M4 – 25mm 2.8 Biogon – Fuji Provia 100F

The last image I’ll share is a great example of the muted tones you can get with you push Portra 160 +1. This image took a lot of color balancing to get it right, but I think it looks great. You can definitely see the grain showing through in the shadow tones, but there is plenty of detail present regardless.

Leica M4 – 21mm F4 Color-Skopar – Portra 160 (+1)

Final thoughts

Pros:
Output comparable to the late-great Coolscan 5000
IR Dust reduction
AF/MF
High DMAX
Fast (for it’s class)
Cheap!

Cons:
Cheap construction
Who are Pacific Image?
USB 2.0
Software is a game of what sucks least

Also Vuescan’s dust reduction system tends to miss light, horizontally running scratches.  Somehow I suspect this could be corrected with software refinement.  Also occasionally green noise will show up in very dense areas of slide scans, though this has not yet ruined an image for me.

Nikon F6 – 58mm 1.4G – Provia 100F
Nikon F6 – 58mm 1.4G – Provia 100
Nikon F6 – Sigma 24mm 1.4 ART – Provia 100F A great example of the F6’s excellent metering system, this is a tough situation for a slide film.
Leica M4 – 35mm 1.4 Distagon – Provia 100F – 81A filter.  This is another image where the detail present in a 35mm frame blew me away.
100% crop of above.
Leica M4 – 35mm F2 Biogon – Portra 160.  Heck of a lot of latitude.
Nikon F6 – 58mm 1.4G – Provia 100F.  The color was off here due to a strong tungsten source, but I used levels in PS to correct it back,.  To me this portrait has a look that’s straight out of another era.
Leica M4 – Voigtlander 50mm 1.5 Nokon – Fuji Reala 100
Nikon F6 – 58mm 1.4G – Fuji Provia 100F
Leica M4 – 28mm 2.8 Biogon – Fuji Velvia 100
100% Crop.
Leica M4 – 28mm 2.8 Biogon – Velvia 100
Nikon F6 – Sigma 24mm 1.4 ART – Fuji Velvia 100

My bottom line

If you consider the cost, output, and features of this scanner, it’s a hit in my mind. It’s the only way I can think of to get these features without spending thousands of dollars. The only thing that might be better is if you come across a new, in box Nikon V or 5000. But, still, no warranty on those. The XA can still be serviced in theory, or possibly better yet, swapped out.  What’s more, the mic-drop advantage of film is that you can at any time, have a better scan made by a better device.  Were I to do a gallery show I could always get a drum scan made.  My D700 files are never going to get better.

When will Kodak, or Epson, or Nikon realize that people still like shooting film, and deserve a scanner that has kept up with the times?

Film is important to me for many reasons, and therefore I need a scanner that can realize the potential that I know is there in the negative.  I love that the scanner forces you to take your time, like an enlarger.  I now have a very considered workflow. Re-evaluating old contact sheets is a joy, just like I would in a regular darkroom workflow.  If you’re serious about 35mm I’d recommend the XA with out reservations, except I’d say what you put into scanning is directly proportional to what you get out of it.  I was so impressed with the scanner that I bought their dedicated 120 scanner, the PF120.  That guy gives me 60mp images from 6×7 negatives.  Who needs a digital back?

If you enjoyed this review or these pictures check me out at www.sperryphoto.com or on Instagram @marksperry.

*My client work still goes to pro labs for the most part.  If I were to double down on 35mm for my weddings I’d probably get a Frontier or Noritsu scanner.

Share this post:

Find more similar content on 35mmc

Use the tags below to search for more posts on related topics:

Contribute to 35mmc for an ad-free experience.

There are two ways to contribute to 35mmc and experience it without the adverts:

Paid Subscription – £2.99 per month and you’ll never see an advert again! (Free 3-day trial).

Subscribe here.

Content contributor – become a part of the world’s biggest film and alternative photography community blog. All our Contributors have an ad-free experience for life.

Sign up here.

About The Author

Comments

Ori on Pacific Image XA Review – I Scan at home, and this is why – Guest Post by Mark Sperry

Comment posted: 15/03/2017

That scanner is simply a Reflecta RPS-10M http://www.filmscanner.info/en/ReflectaRPS10M.html and is cheaper in the US with SILVERFAST.
Reply

Leave a Reply

Your email address will not be published. Required fields are marked *

marksperry replied:

Comment posted: 15/03/2017

The silverfast that comes with scanners is not "AI Studio" meaning that there is no access to multi exposure/sampling. I live in the US and the Pacific Image was the option sold at B&H, I believe it is outside the USA where you can get Reflecta branded models.

Reply

Leave a Reply

Your email address will not be published. Required fields are marked *

Ori replied:

Comment posted: 15/03/2017

from my thorough testings, it seems that multi-exposure is really subtle and ultimately insignificant, tested with several BW and color negative films. However, I did not test it with slides. Generally speaking, a manual method might be better than the algorithmic one inside Silverfast. I would argue that most of the features inside silverfast are redundant. Its better to just use the basic scan and curve adjustments.

Reply

Leave a Reply

Your email address will not be published. Required fields are marked *

Terry B replied:

Comment posted: 15/03/2017

Is it not that the German made Reflecta's are re-branded Pacific in the USA? So Pacific's are Reflecta's?

Reply

Leave a Reply

Your email address will not be published. Required fields are marked *

Terry B replied:

Comment posted: 15/03/2017

Mark, I believe that that holds true for Canon flatbeds at least. They supply the scanner with Silverfast, but it is the SE version, and what is more, it is locked to the particular scanner it came with, so I can't use the SE that came with my 9000F with the far superior, but older, 9950F.

Reply

Leave a Reply

Your email address will not be published. Required fields are marked *

Alvaro replied:

Comment posted: 15/03/2017

SilverFast SE starts at $49.99 and even comes included with the scanner if you get it at B&H, so your statement that the software costs "hundreds of dollars" is incorrect. If you want multi-exposure, SilverFast SE Plus has it for $120. You can probably get it even cheaper by upgrading your licence at SilverFast's website.

Reply

Leave a Reply

Your email address will not be published. Required fields are marked *

marksperry replied:

Comment posted: 15/03/2017

If I recall correctly, they're made in Taiwan, and I think the points of contact are there too. Not totally sure of the chicken/egg relationship between Reflecta and PI. All I know is, where I can buy it, it's called Pacific Image. *shrug*

Reply

Leave a Reply

Your email address will not be published. Required fields are marked *

marksperry replied:

Comment posted: 15/03/2017

With negative film I would generally agree. With slide however I have seen some pretty big improvements over single pass.

Reply

Leave a Reply

Your email address will not be published. Required fields are marked *

Marc Usaurelius replied:

Comment posted: 15/03/2017

While I appreciate that 3 years have passed since your post, I don't believe the prices for SF have increased much in those three years, and as you can see from the SF website (https://www.silverfast.com/buyonline/en.html), the prices for their software versions (SF AI Studio 9 and SF Archive Suite 9) are a whopping $350 and $400 respectively. Even the "Upgrade" license is $280, and that is locked to the same hardware scanner that the original (pre-upgrade) SF software was licensed to. Ergo, I'd have to agree with the author (Mark Sperry) that SF is a very expensive software title (whether or not it's "incredibly overpriced," as the author asserts, is a judgment each buyer makes based on his or her own values and budget, but that it "costs hundreds of dollars," as the author also asserts, is demonstrably true and accurate (see link, above).

Reply

Leave a Reply

Your email address will not be published. Required fields are marked *

Terry B replied:

Comment posted: 15/03/2017

Mark, I suppose that's the way of the world today. Apple is Chinese on this basis, not American. Outsourcing production is very common so national credit has to be taken for where the product is designed. So Apple is American and Dyson is British. It's a funny old world.

Reply

Leave a Reply

Your email address will not be published. Required fields are marked *

Steve Gahan on Pacific Image XA Review – I Scan at home, and this is why – Guest Post by Mark Sperry

Comment posted: 15/03/2017

Real pleasure to read your work and enjoy your great images mark. Ive only recently started on my film journey and am waiting to recieve my first scans from the lab. Home scanning is something im very interested and youve given me another option to think about. Also im made aware that im going to probably be a bit disapointed with my efforts until i get the hang of it.
Reply

Leave a Reply

Your email address will not be published. Required fields are marked *

Wayne on Pacific Image XA Review – I Scan at home, and this is why – Guest Post by Mark Sperry

Comment posted: 15/03/2017

For what it is worth, I own Pacific PrimeFilm 7200. Reports to the contrary notwithstanding, I have found the company very responsive and helpful in those instances where I ran into difficulty.........which, without exception, have had their genesis in my ability, rather than scanner related problems. I say this because I did read some comments to the contrary before I made my purchase.

Thanks for taking the time to write this. I may have to purchase this scanner.
Reply

Leave a Reply

Your email address will not be published. Required fields are marked *

Rory on Pacific Image XA Review – I Scan at home, and this is why – Guest Post by Mark Sperry

Comment posted: 17/03/2017

Thanks for the review. And 100% agree with you about scanning being "difficult" (I have a Nikon 5000 ED). What you put in is what you get out. Spot on.

A question about evaluating your film on a Lightbox. You mentioned doing this for slide film, do you do the same for 35mm negatives?
Reply

Leave a Reply

Your email address will not be published. Required fields are marked *

marksperry replied:

Comment posted: 17/03/2017

Most of the time yeah. Obviously this is more challenging due to they being negatives, but most of the time you can see the content of the photo and have an idea of the density. You can tell whether it's a keeper or not. Another route would be to use a flatbed scanner to make a digital "contact sheet".

Reply

Leave a Reply

Your email address will not be published. Required fields are marked *

Ashley on Pacific Image XA Review – I Scan at home, and this is why – Guest Post by Mark Sperry

Comment posted: 17/03/2017

I'm surprised with these recent articles on scanning that no one has covered scanning negatives with a DSLR/Mirrorless digital camera and a good macro lens.

I've used many scanners over the years I've shot film, Minolta, Nikon, Plustek, a few flatbeds. By far......and I mean by a long way, scanning 35mm with a dslr/macro combo knocks the dedicated 35mm scanners out of the water. Also works great for medium format too. I can scan a roll of 36 exposures, in raw, in about 7 minutes and get much better files. The fact that I'm constantly being messaged on Instagram/Flickr about where I'm getting my scans from seems testament to this.

That being said you do need dslr/csc and a decent macro. I use an old Micro-Nikkor 55mm 2.8 Ai-s.
Reply

Leave a Reply

Your email address will not be published. Required fields are marked *

marksperry replied:

Comment posted: 17/03/2017

Well as you can see I went the scanner route here. I personally find value in dust reduction, and multi-exposure/sample functions. So since I don't actually do DSLR copy work I wouldn't write a review of those methods. Sounds like you have quite a system down though, if you want people to know about it you should write something and put it out there.

Reply

Leave a Reply

Your email address will not be published. Required fields are marked *

Malcolm Myers replied:

Comment posted: 17/03/2017

Hello Ashley, Any tips on scanning with a DSLR? I tried it for the first time today. Canon 5d with macro lens and a light box. Very flat contrast I found. If you have any tips on getting a good scan please let me know.

Reply

Leave a Reply

Your email address will not be published. Required fields are marked *

Rollin Banderob replied:

Comment posted: 17/03/2017

Since I have a a7R II and the 90mm macro I seriously considered the camera copy route, but was concerned about a full spectrum light source to get the most out of my color negs and transparencies - I'm assuming that is what a dedicated film scanner employes.

Reply

Leave a Reply

Your email address will not be published. Required fields are marked *

Richard replied:

Comment posted: 17/03/2017

no dust and scratch removal. Not worth it

Reply

Leave a Reply

Your email address will not be published. Required fields are marked *

Ashley replied:

Comment posted: 17/03/2017

Hi Mark, True, the multi sampling feature can be fairly useful in combating noise in the shadows but isn't that something unique to the CCD sensors that most film scanners employ? It's really not an issue with a CMOS sensor as commonly found in a dslr. As for dust management I just employ the methods I use for darkroom printing so it's not that much of an issue. I may indeed try and write something about this method of scanning just to throw it out there. Many people see r price of many scanners and it can be daunting especially if you want to scan medium format. If you've got the basic things at hand it's definitely worth a try before plonking down cash on a scanner. I'd dismissed the dslr scanning method for sometime thinking it can't be that good.....now I only wish I'd have tried it sooner.

Reply

Leave a Reply

Your email address will not be published. Required fields are marked *

Terry B replied:

Comment posted: 17/03/2017

Malcolm, Only a suggestion, but from my experience with cold cathode light sources for enlargers, and which have a fairly soft and flat, but even illumination, you could be experiencing something similar from the light box. As you know, light boxes for photographic use, should be colour corrected, so this won't be a problem and obviously very beneficial when copying slides, but they won't have much contrast. You should exclude all extraneous light, as simply photographing a slide on the light box as though it were a postage stamp will certainly reduce contrast. This technique isn't something I have tried, although having a Leica Visoflex, bellows, and slide copier attachment, I have often wondered what I could do with my Leica 60mm macro lens and with a digital mirrorless camera attached. But the weight of the complete outfit, and how fiddly it would be to use, always points me back to my Minolta scanner!

Reply

Leave a Reply

Your email address will not be published. Required fields are marked *

Ashley replied:

Comment posted: 17/03/2017

Hi Malcolm, If you're shooting your negs in RAW, which I'd strongly advise, you'll be treating it as you would any raw file by adding in contrast, saturation, sharpening etc when taking the file into your editor of choice. You will not be getting final images straight out of camera. For black and white scans I typically take the file into Lightroom to crop the image. I then open the file in photoshop, invert the image, then into curves to clip the white and black points. This gives me a starting point in which to tweak contrast etc. For colour work it's similar however I make sure I have a shot with some of the blank negative showing, I use this to white balance from the orange mask on the neg. then into curves again but this time trimming the highs and lows from the three colour channels (I have actions for this which I'm happy to share). This gets me to a really good starting point. Alternatively I can use a piece of software I used to use alongside Vuescan (when I used to use a dedicated film scanner) I'm not a fan of Silverlignt, I think Vuescan does a much better job. Then I can use 'colourneg' a paid for software that works with photoshop to correct colour negs from its extensive film profile. I'll talk to Hamish about perhaps putting together an article explaining all of this, with examples, in much more detail. I'm not much a wordsmith though so I'm not sure it will be legible!!

Reply

Leave a Reply

Your email address will not be published. Required fields are marked *

Paul replied:

Comment posted: 17/03/2017

Which raises the question: does the camera method produce an image with wider colour gamut? Scanner reviews and specs never seem to report on colour gamut. The old Canoscan flatbeds were not high resolution, but they were wide gamut (could capture all the colour depth of film). New models are sRGB only (35% of human vision), nowhere near enough to capture film which would require similar to a superset of DCI-P3 and Adobe RGB. Silverfast was/is able to extract wider gamut out of some scanners by direct hardware access compared to the manufacturers bundled software and default driver which was locked to sRGB. As for the scanner reviewed here, I have not yet found any information on what it can do regarding gamut. Reviews on the web have been good for revealing true resolutions, but never mention device gamut. So, if the camera method could obtain the resolution and wide gamut, that would be worth sacrificing noise removal for (which does not work for Kodachrome and monochrome anyway). This becomes even more interesting to me, as I am about to purchase some scanners, but it might be more cost-effective to buy a digital SLR instead as I do not have one yet (I'm replacing gear lost in a fire, and have many family photos on slide and negative to scan and archive, and scanners are going to take priority over owning a camera given limits of budget). I'm somewhat surprised that gamut is never covered in discussion of scanners, as I don't think there is anything that could be easily done in post-processing to restore the colours lost. A pleasing image can be made by adjusting saturation, but the colours of the original remain clipped, which for some subjects also means loss of detail (for example, a yellow flower with textures in many yellows becomes featureless with fewer shades of yellow because the that extra detail exists in gamut space not luminance). Perhaps it is because there are so few scanners to choose from it does not come into play. But if I could choose between two scanners of similar specification, I would choose the one with wider gamut, possibly consider sacrificing some resolution for better colour. I suspect this has benefits beyond aesthetics, it may mean having more raw picture information that allows for more successful restoration of colour film that has faded with age. As we are archiving for a future of family slide shows on 4/8K wide gamut HDR television sets, it seems a bit tragic to preserve wide gamut high contrast film as narrow gamut sRGB at low contrast to match the limitations of obsolete computer monitors from decades past. Some formats might even benefit from multipass scanning that yields HDR images (wide gamut and wide dynamic range). And I am not talking about the so-called HDR that does nothing more than squash multiple exposures flat into an SDR image for artistic effect and increased highlight and shadow detail, but I mean capturing and preserving the full range of contrast of the original.

Reply

Leave a Reply

Your email address will not be published. Required fields are marked *

marksperry replied:

Comment posted: 17/03/2017

Can't say I have enough technical savvy to answer the CMOS/CCD question. That 'sounds' right, but who knows... Looking forward to reading about your technique someday!

Reply

Leave a Reply

Your email address will not be published. Required fields are marked *

Graham Ashton replied:

Comment posted: 17/03/2017

Hi Ashley. My setup sounds similar to yours. I mount a 50mm f4 Takumar macro lens to my M43 digital body, put my negatives on a light table, and photograph them. By magnifying the image on the digital screen I can focus perfectly on the grain at f4, before stopping down to f8 to get a really crisp "scan". For black and white and E6, the results I get are wonderful. And as you say, it's really very quick to do. The bit I've struggled with is colour correcting C41 negatives. I'm keen to avoid Adobe software (largely on principle), so haven't yet tried the ColorPerfect plugin that's designed to do this. Do you have any tips?

Reply

Leave a Reply

Your email address will not be published. Required fields are marked *

Juanito replied:

Comment posted: 17/03/2017

But have you compared your color neg DSLR conversions to a good scan? I can't seem to nail the skin tones, or colors that a scanner provides. I have tried extensively. It sure provides beautiful resolution scans using a DSLR, but I think for color negatives you are sacrificing color. I would love to see your results if you are willing to link us.

Reply

Leave a Reply

Your email address will not be published. Required fields are marked *

Rollin Banderob on Pacific Image XA Review – I Scan at home, and this is why – Guest Post by Mark Sperry

Comment posted: 19/03/2017

Great post, and timely post, kind of. I bought the Pacific Image PrimeFilm XE (Reflecta Filmscanner ProScan 10T) at the beginning of the month from Adorama, choosing it over the Pacific Image PrimeFilm XA (Reflecta Filmscanner RPS 10M) because I did not see me using the auto-transport as I'd want to tweak each frame anyhow, just as you wrote. And thought it would be one more thing to jam up, and bonus save $70. Also, liked the idea of buying second set of slide and neg carriers so I could prep them while other in use. However, I missed that the XA has focus controls until I read your post!

The XE does not have focus controls, and I am still within my 30-day return window so now thinking of trading in - have you found the focus control truly invaluable, or is it just for the odd transparency with a wild bowed shape? I was a photojournalist in the film era, first making prints, then scanning so the grain not being sharp would drive me nuts. Thank you in advance.
Reply

Leave a Reply

Your email address will not be published. Required fields are marked *

marksperry replied:

Comment posted: 19/03/2017

That's a tough one. Personally, I see improvements nearly every time I manually focus. So, with that in mind I would say that it's worth it. But worth it enough to return a product and get another version? Not sure... My PF120 does not have focus capability and it hasn't really impeded me thus far, but who can say how good it would be with MF/AF? And I agree with you about the overal reliability of a system that uses film holders vs a motor that can burn out. For me...yeah I'd upgrade.

Reply

Leave a Reply

Your email address will not be published. Required fields are marked *

Terry B replied:

Comment posted: 19/03/2017

Rollin, I'm not surprised that your old loupe would now cost so much. Naturally, with the reduction in film usage, the overall need for such devices will have tailed off as well, but gear that worked well in the film era, still works well today! Quality counts, as they say. Regarding your other enquiry about fixed and AF/ manual focusing in a scanner, whilst I can't comment upon this specific scanner, I can say that having both is definitely an advantage, so if funds permit, I'd go for the other scanner. You may have picked up on other guest posts here about scanners that I have a Minolta Dimage Scan Elite II and which can do both. Now with flat negatives AF invariably focuses correctly, but when you bear in mind that the AF point is the centre of the negative and if the negative is not held absolutely flat, this can prove troublesome. With the Minolta I've found that I don't have to resort to MF that often with a good flat negative. However, with a slight bowing of the negative this can lead to AF being ever so slightly off and MF can help here. I'm not sure if it is unique to this Minolta scanner, but I can set the MF to any point in the image, especially useful if this is where focus has to be critical. MF can be more useful when scanning slides owing to the thickness of the slide mount, which can indeed vary from make to make. Differences here will position the slide film at a slightly different plane and if the slides are mounted in glass, even this can sometimes fool the AF.

Reply

Leave a Reply

Your email address will not be published. Required fields are marked *

Rollin Banderob replied:

Comment posted: 19/03/2017

Mark - Thank you for the insights!

Reply

Leave a Reply

Your email address will not be published. Required fields are marked *

Rollin Banderob on Pacific Image XA Review – I Scan at home, and this is why – Guest Post by Mark Sperry

Comment posted: 19/03/2017

Completely agree with your points in the workflow section - photo editing means make critical selections, not manipulate it until passable. For those just starting out get a decent loupe so you can judge the sharpness and really look over the frame, or use the lab scans. I still prefer my Peak square loupe (Peak 8x Variable Focus 35mm Format Loupe) from last century when I was a newspaper Photo Editor, but can not believe they are now $70!

Anyone have recommendations for a light table that can handle a full page of negs? I like the look of the LED tracing tables that I see on Amazon for $35 - anyone try them out? At the photo shops I only see ones over $100
Reply

Leave a Reply

Your email address will not be published. Required fields are marked *

marksperry replied:

Comment posted: 19/03/2017

I'm dying to get an 8x loupe! My 4x really cannot show focus... Personally I'm holding out for one of those big lab light tables used. I'd love to have on in my office.

Reply

Leave a Reply

Your email address will not be published. Required fields are marked *

Graham Ashton replied:

Comment posted: 19/03/2017

I've got a MEDALight whose lit area measures 12"x8". Does the job. I think it cost me about 80 GBP.

Reply

Leave a Reply

Your email address will not be published. Required fields are marked *

Nipon on Pacific Image XA Review – I Scan at home, and this is why – Guest Post by Mark Sperry

Comment posted: 21/03/2017

Hi, Thanks for the shared experience.
I have the same scanner but missing some experience I am struggling to figure out the best of it so far.
I use Silverscan, and didn't found the manual focus with it. Any idea how to us it?
Regarding your workflow approach, I can understand the selection of your photo with a light table and a loupe, but when lacking experience in the darkroom like me (and the material that goes with it), I think using the bulk scann of a full roll of film with low setting (JPEG @ mid resolution goes quite fast) is a good option to use as a contact sheet. I select the frame I would like to work in more depth like that. I am building an home made system to store the film during the process and avoid the dust.
Reply

Leave a Reply

Your email address will not be published. Required fields are marked *

David Heintz on Pacific Image XA Review – I Scan at home, and this is why – Guest Post by Mark Sperry

Comment posted: 28/03/2017

Good article! I have this scanner, along with an Epson v800. I have found that the Epson scanning software does the best job with black and white film, and, you need the Epson for 645.

Two things that need more elaboration: conversion of negatives to positives, and general Photoshop workflow. I have found it best scan a "raw" file with VueScan and convert the negative with ColorPerfect in PS. I then actually use the PS CameraRaw filter to set the white balance and tone. Then I reduce noise (grain) with NeatImage, and sharpen with one of a variety of plugins etc. Currently favor the sharpening in Lumenzia.

ColorPerfect is a bit clunky, but it is really the only game in town. I certainly have tried them all...
Reply

Leave a Reply

Your email address will not be published. Required fields are marked *

Erik on Pacific Image XA Review – I Scan at home, and this is why – Guest Post by Mark Sperry

Comment posted: 13/10/2017

Thanks for the awesome review. Especially love the sample scans, color looks quite good out of the box.

Have you seen scans w/ Fuji 400h? Or how well the color tone compare to lab's Frontier scanners?

Will be picking one up, thanks to you. Wish you have B&H referral link

Erik
Reply

Leave a Reply

Your email address will not be published. Required fields are marked *

Eric on Pacific Image XA Review – I Scan at home, and this is why – Guest Post by Mark Sperry

Comment posted: 11/06/2018

If one has the time, and a little money to spend researching the DSLR route to 'scan' 35mm film, then I heartily recommend you do just that.
Most of my images on flickr are sourced through the (DX sensor) DSLR route. Both B&W and colour here ... https://www.flickr.com/photos/jamese007uk

PS - some colour 35mm film copies near the end of the listings.
Reply

Leave a Reply

Your email address will not be published. Required fields are marked *

Johnny Kao on Pacific Image XA Review – I Scan at home, and this is why – Guest Post by Mark Sperry

Comment posted: 30/11/2018

Check out the new PowerFilm automatic batch negative scanner from Pacific Image.
http://www.scanace.com/scan_pd_1.php?id=50
Reply

Leave a Reply

Your email address will not be published. Required fields are marked *

Richard on Pacific Image XA Review – I Scan at home, and this is why – Guest Post by Mark Sperry

Comment posted: 25/01/2019

How fast can this scanner do an entire roll of uncut film at lowest resolution. All I want is to create fast contact sheets. I do not care about quality really in any size larger than the actual 35mm frame.
Reply

Leave a Reply

Your email address will not be published. Required fields are marked *

Richard on Pacific Image XA Review – I Scan at home, and this is why – Guest Post by Mark Sperry

Comment posted: 31/01/2019

and yes, you absolutly need a full roll scan. I already spend 2 hours of my day developing the rolls. I am not going to sit an spend another 2 hours scanning in individual frames an babysitting the machine. But the rolls in, press scan go do something else. I have sanned frames from probably 200 rolls over last 2 year on a nikon coolscan that does not do full rolls and I can tell you right now, besides digital ice, its the only thing you should look for in a scanner.
Reply

Leave a Reply

Your email address will not be published. Required fields are marked *

Mark Sperry replied:

Comment posted: 31/01/2019

Your 100% hit rate on a roll of 36 must be quite impressive to see. Buy a Noritsu LS-600 or Fuji Frontier equivalent if you want fast full roll scans. Different scanners have different intended purposes.

Reply

Leave a Reply

Your email address will not be published. Required fields are marked *

Richard replied:

Comment posted: 31/01/2019

I am not sure what you mean by 100% hit rate? It takes me longer to scan my 2 keepers in a non-batch scanner than to press scan and do 36 at once. You know why? Because in order to scan my two keepers I have to do a preview scan of 36 which is about 1/2 as long in total as actually scanning each frame in full anyway. Putting the roll in and pressing scan and walking away takes up 2 minutes of my time, even if the actual scan takes an hours. In terms of my time required, its 2 minutes as im free to do other things. to scan just my 2 keepers on another scanner would take me 2 hours.

Reply

Leave a Reply

Your email address will not be published. Required fields are marked *

Mark replied:

Comment posted: 31/01/2019

Oh I see, you're a crazy person. Carry on then.

Reply

Leave a Reply

Your email address will not be published. Required fields are marked *

Richard replied:

Comment posted: 31/01/2019

My comment is a valid one. The biggest barrier to shooting negative film is previewing your negatives to know which is your keepers. I am sorry, but normal people do not have time to sit around for an hour or two to play with their scanner. I like taking photos and printing and spending time away from the computer. I will gladly press scan and walk away and go spend time with my friends and family in the evening and then come back in the morning quickly review all the frames and then delete 35 of them. In total that look me 2 minutes, even though the scanner was probably going for 1.5 hours. That is not crazy, that is practical. Should your really be calling me crazy as the author of the article haha? Oookay. I am taking the time to ready your article, and then I disagreed with you, and still do. Why do I care about responding? Because I do not want new film shooters to miss this point, as this step in the process is annoying and not everyone has the time or desire to push through. Is where people stop shooting film. And I want more people shooting film because I like having film around to buy! I cant keep things going on my own even though my monthly film budget may say otherwise... If at all possible, if you can swing it, buy a scanner that will do a full roll all at once and do it well...if you value your time spent not scanning that is. If you cant, then buy a flatbed with an 8x10 scan area and lay all your negatives out there first and make a contact sheet in one scan. Not all scanners will let you do this. This can be done at 300ppi as it will just create one individual image with small frames. The contact sheet is the key to the film process, and it documents your roll. It is very helpful to review your work this way first. This is how it has always been with film. You can also lay a large light table on top of your scanner and try that to make a contact sheet. I have tried this with a few scanners circa 2008 and it worked fine, but it must be able to scan an 8x10 area. From there, then choose the frame to scan at 2500ppi. The other method is run all your uncut rolls through the xas, the nikon 4000, nikon 5000, nikon 8000, nikon 9000, pakon 135, pakon 235, pakon 335, noritsu ls600 and walk away. Sometime later come back and select them all in your folder and tell windows to "print contact sheet". You will have a PDF of small images that is portable that you can print or send to friends. Review them, and then delete ones that are not keepers if you so wish., scan your one keeper. This is what I do. My purpose here is to share what I know to be the best and most painless process for scanning after 15 years of doing this. Which is slightly different that your recommendations here. Previewing your entire roll, somehow, with the press of 1 button no matter if it takes 2 min or 2 hours (walk away and come back later) should be your goal as a film shooter when working out what process works best for you. It frees up your time to, and the lab scanning fees.

Reply

Leave a Reply

Your email address will not be published. Required fields are marked *

Richard replied:

Comment posted: 31/01/2019

no mark. I am a hobbyist with no time to spend scanning. I spend my time shooting film and printing in the darkroom. For film shooting to actually be sustainable people need to free themselves from ridiculous scanning fees that labs charge. They charge you for prints, but then again for the scan which are used for the prints anyway haha. Its crazy. And what scanner to labs use? Well they use one that will scan a full roll in 5 min. As someone that has a lab I find it surprising you are recommending people to not use the process you use? For film to survive, people need to cut off a dependence on labs to do their scanning. And for normal people to do this at home it has to take 10 minutes. I have done your process, and it is annoying. The end result is that well, Ill just take it to the lab instead. Looks like you have a lab. Interesting. Full roll scans, or full sheet flatbed contact sheets are the key to shooting film at home for hobbyists Do not rely on the lab to do this for you and do find a way to automatically to preview an entire roll at once with a press of one button while you are making dinner.

Reply

Leave a Reply

Your email address will not be published. Required fields are marked *

Illya Swan on Pacific Image XA Review – I Scan at home, and this is why – Guest Post by Mark Sperry

Comment posted: 24/04/2019

Thanks for writing the article. It was one of the few resources I could find on XAs when deciding if I should get one.

Now that I do own this scanner, I was wondering about adjusting curves and other image settings in scanning software and their affect on the output. Once you adjust image settings (e.g. curves, colour hue, etc), does the software use your scanner's hardware in a way that creates the desired outcome or are these image settings applied digitally once scanning is complete?

The question came up once I started getting very dark scans of Ektachrome 100E, and losing a ton of detail after adjusting exposure of those files in Lightroom. Do you know how adjusting curves and other settings in scanning software is implemented during scanning?

Also, do you find AF to be as good as MF on your PacificImage XA?
Reply

Leave a Reply

Your email address will not be published. Required fields are marked *

André on Pacific Image XA Review – I Scan at home, and this is why – Guest Post by Mark Sperry

Comment posted: 18/08/2019

Hi Illya, Im looking into buying the XAs and was wondering how you're liking it so far and if you've been able to figure out your question above. Thanks in advance!
Reply

Leave a Reply

Your email address will not be published. Required fields are marked *

Illya Swan replied:

Comment posted: 18/08/2019

Sorry, Andre. I just saw your question. XAs is a great scanner for most occasions if it's paired with the right software. To answer my question from 2019, correct scanning settings (exposure, curves, etc) can indeed create much better output that will be superior to trying to adjust a bad scan in post (e.g. Lightroom). I recently updated to SilverFast's AI Studio 8 and it drastically improved the auto functionality of the scanner due to the addition of "Job Manager" features that applies re-calculates Auto settings for each scan. You'd think this features should be available with the software version you receive with the scanner, but it's not. The AI Studio version also offers ME and sharpening features that can dramatically improve the quality of your scans. In my experience, the difference in most noticeable in colour scans due to the reduced noise and improved dynamic range. There is still one issue that I haven't resolved yet, and it's described here if you are interested: https://www.reddit.com/r/AnalogCommunity/comments/eoawpp/scanning_film_thats_curled_across_the_horizontal/

Reply

Leave a Reply

Your email address will not be published. Required fields are marked *

pbass wil on Pacific Image XA Review – I Scan at home, and this is why – Guest Post by Mark Sperry

Comment posted: 15/01/2020

Mark, I came for the scanner, but stayed for your photos. :^) I doubt there's anything here you'd submit to a photo competition, but they're enjoyable – tasteful, well composed, and well-exposed. And they remind me of how different digital looks than the classic film that I grew up with. Since we're immersed in digital imagery, we forget. I especially prefer the more subtle colour response of film.
Reply

Leave a Reply

Your email address will not be published. Required fields are marked *

Oliver Thomas Lison on Pacific Image XA Review – I Scan at home, and this is why – Guest Post by Mark Sperry

Comment posted: 24/02/2020

Who is still scanning?
I have two scanners but I am thinking to switch to take pictures of the scans using a light table. What are the pros and cons?
Pro
I like scanning because of the IR channel to remove dust and specks.
Con
it is a slower process.
Reply

Leave a Reply

Your email address will not be published. Required fields are marked *

Ed on Pacific Image XA Review – I Scan at home, and this is why – Guest Post by Mark Sperry

Comment posted: 06/04/2020

Fantastic review. I'm wondering if you could comment on the reliability of this scanner over time. Does still work as advertised? Also, how about the PF120 you referenced at the end of your post? There aren't many online reviews on the latter, but a non-trivial fraction mention banding issues developing over time.
Reply

Leave a Reply

Your email address will not be published. Required fields are marked *

Anton on Pacific Image XA Review – I Scan at home, and this is why – Guest Post by Mark Sperry

Comment posted: 12/07/2020

I'd just like to add some information that I think is missing from your brilliant review of this brilliant scanner:
Load the film emulsion side up!
Reply

Leave a Reply

Your email address will not be published. Required fields are marked *

AwesomeDad on Pacific Image XA Review – I Scan at home, and this is why – Guest Post by Mark Sperry

Comment posted: 17/08/2020

What is the difference between the Xe and Xa? just focus and the ability to scan an entire roll?
Reply

Leave a Reply

Your email address will not be published. Required fields are marked *

Skip on Pacific Image XA Review – I Scan at home, and this is why – Guest Post by Mark Sperry

Comment posted: 29/09/2020

What are the hardware supported resolutions of the XAs scanner? I would prefer to scan at one of these resolutions and rescale in Lightroom if necessary. I do not want the scanner software to rescale the image.
Reply

Leave a Reply

Your email address will not be published. Required fields are marked *

Leave a Comment

Leave a Reply

Your email address will not be published. Required fields are marked *