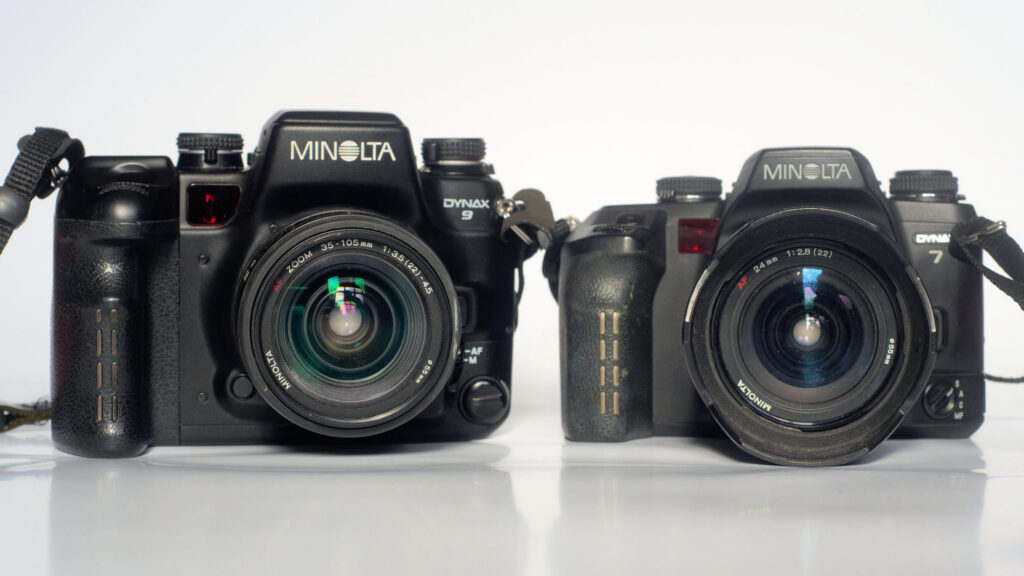
This is a review of the Minolta Dynax 9. It was Minolta’s third (and last) ‘professional’ Autofocus system SLR. At the time, Minolta used different brandings in Asia (Alpha), Europe (Dynax) and the Americas (Maxxum). As the copy I have is branded as a Dynax, I’ll be referring to it as the ‘Dynax 9’ or simply as ‘the 9’.
The story so far..
Minolta released their first ‘professional’ AF model, the ‘9000‘ in 1985. Seven years later, in 1992, Minolta released a radically different take on the ‘Pro’ AF camera – the distinctive and futuristic 9xi. It used ‘Creative Expension Cards’ and featured what Minolta called Expert Intelligence (which tended to be labelled ‘fuzzy logic’ by reviewers).
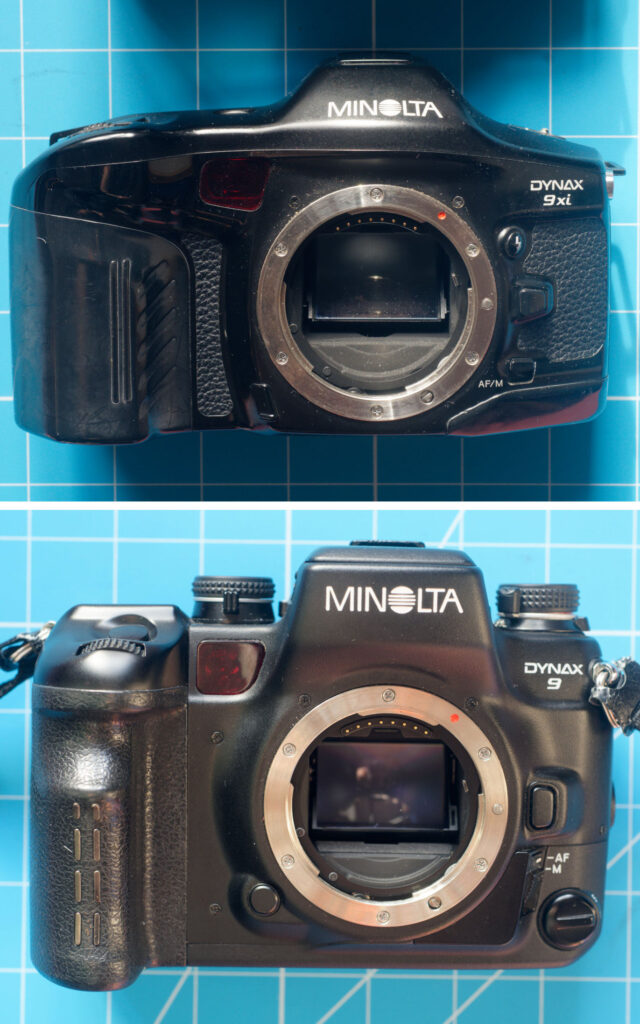
In 1998 Minolta released their third take on the professional 35mm SLR, this was the Dynax 9.
The last few years of the 1990s were an interesting time for photography. Autofocus systems had matured, Honeywell had made a lot of money over licensing infringements (not just from Minolta), the APS film format had been released, and a digital shake-up was visible on the horizon.
A look at the Dynax 9
With the Dynax 9, Minolta took the cutting-edge technology that had featured in the 9xi and combined it with the ergonomics and features of two of the previous generation’s cameras. The Dynax 600si of 1995 had moved away from the modal control used so extensively on the 9xi and opted instead for dedicated dials and switches. The Dynax 800si from 1997 took features that had previously been accessed via Minolta’s card system and integrated them into the camera as customized settings (Custom Functions in later cameras).
A view around the camera
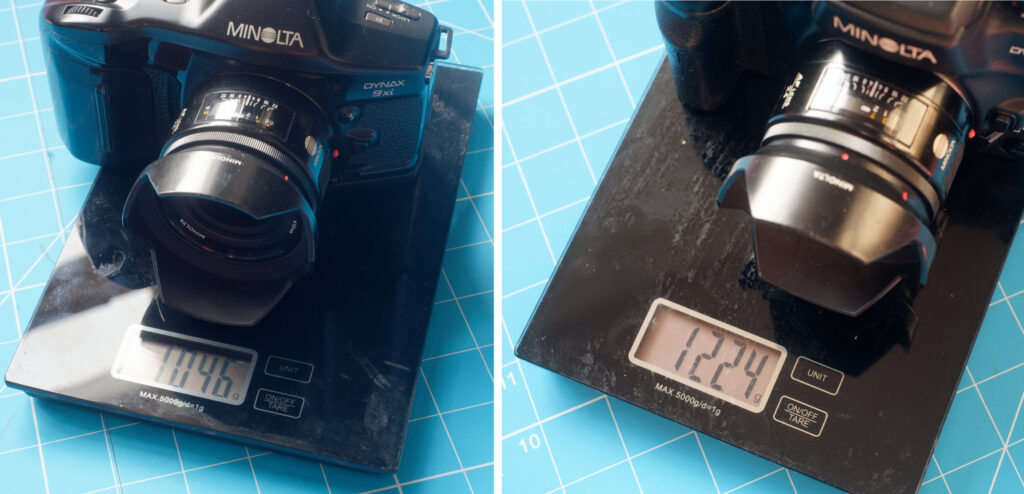
The Dynax 9 makes extensive use of stainless steel in the body, along with zinc alloy for the base and ‘deck’ (which I assume to refer to the top-plate). Its official dimensions are 155x111x75mm with a weight of 910g without batteries.
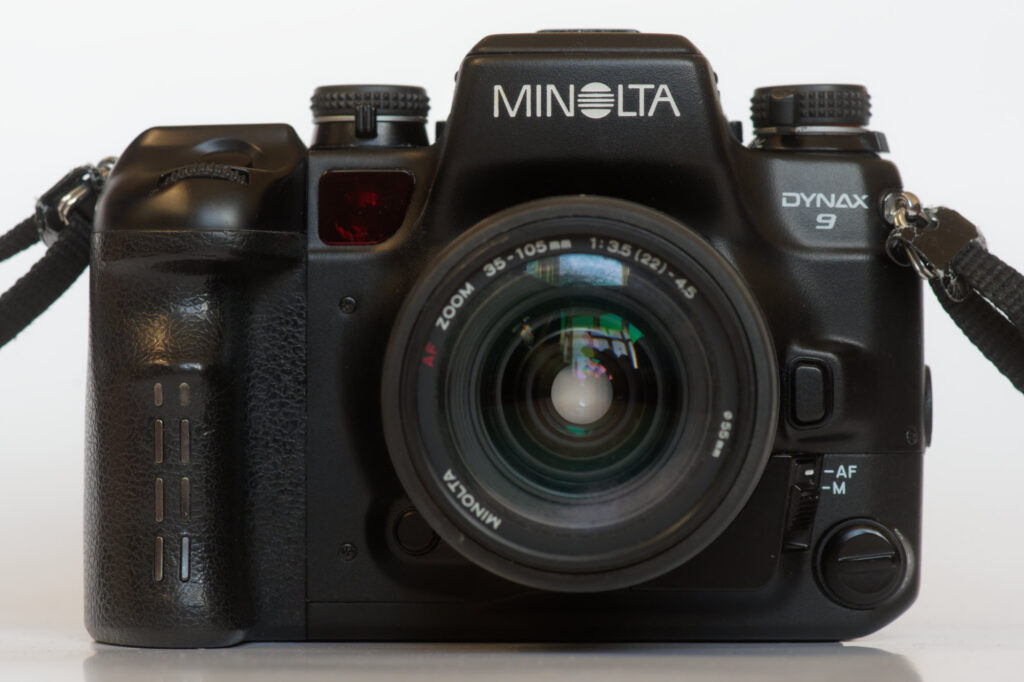
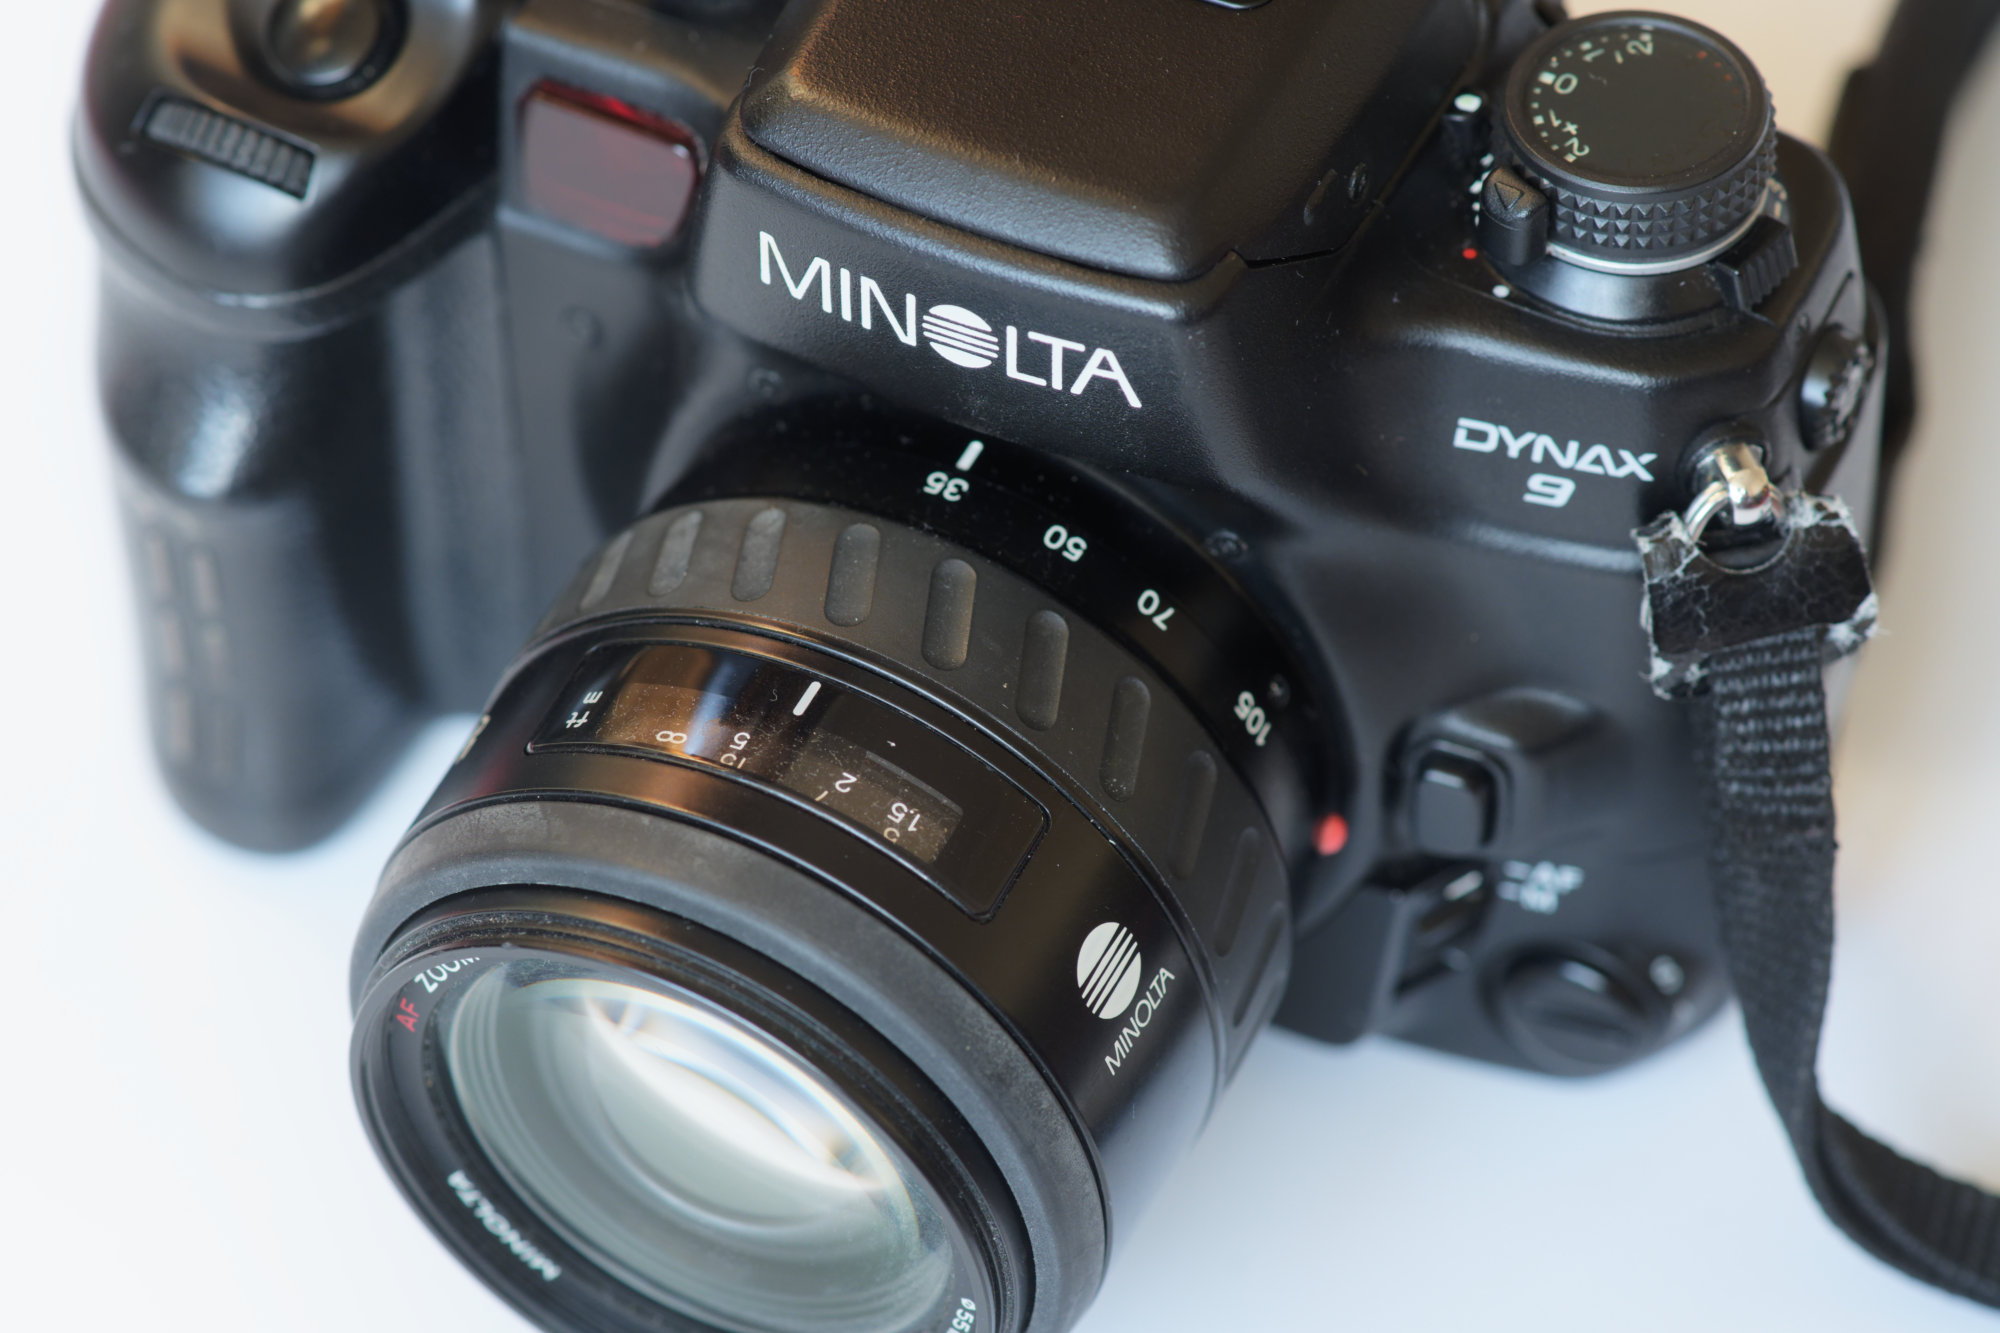
On the front of the camera we have grip sensor that can be set up with eye-start to speed up shooting response without running down the batteries unduly. Also visible beneath the mode dial on the top plate is the AF illuminator, and down at the 7 o’clock position is the depth of field preview button. At 3 o’clock we have the lens release button, with the AF/Manual switch below it. The circular dial to the right of that is a rotary switch – this can be set to continuous focus (which limits you to 4.5 frames per second), single focus and lock (which will allow 5.5 frames per second) or auto (where the camera decides what is appropriate).
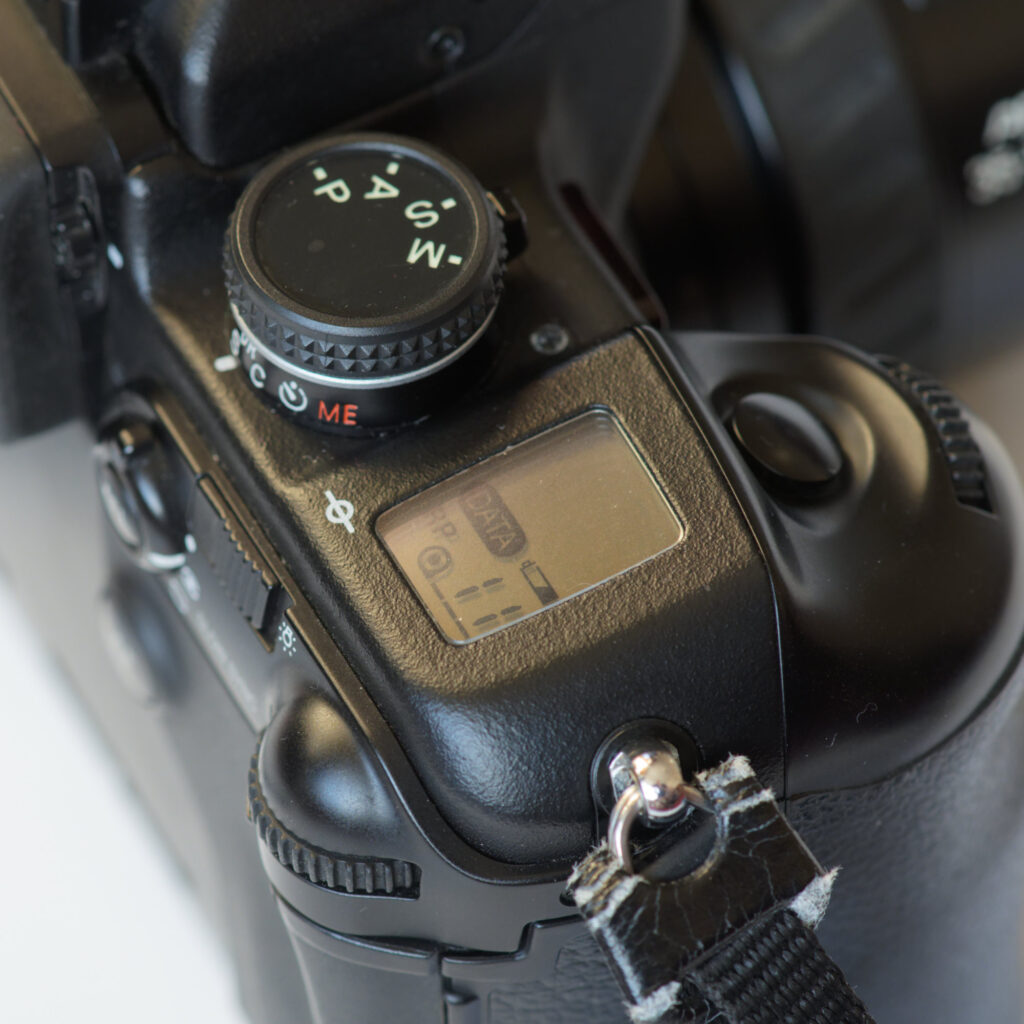
In the above picture, you can see the compensation dial for ambient and flash exposure (with a lock for ambient compensation on the front edge), iISO shoe, Exposure mode dial with drive selector tab, front dial, shutter release, top-plate display (RP shows it is set for release priority, so will take a shot without getting a confirmed focus hit) and rear dial. The strap attaches via rings to sturdy posts.
The drive mode dial is set with a little tab on its front edge. It has options for bracketing, single or continuous drive, self-timer and multiple exposures. My one criticism of this dial is that you can’t set the self-timer when using multiple exposures, so the only way to activate the camera without touching it while taking multiple exposure shots is to use a cable release.
The compensation dial is a clever design. You can lift the dial and select the scale for 3 stops of half-stop correction or 2 stops of 1/3 stop correction. Both scales are transparent to allow the luminous paint underneath to shine through when they are selected.
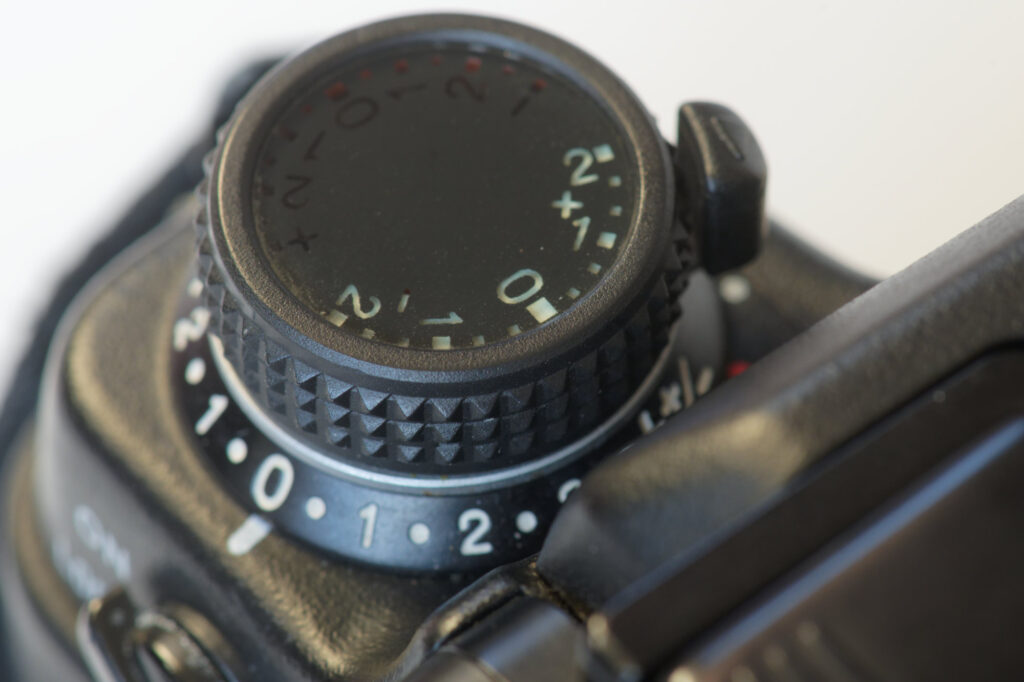
Whoever thought this nifty bit of design up must have been slightly gutted when it was pointed out that luminous paint might cause fogging in a darkroom. The 9 user manual suggests putting black electrical tape over the compensation and mode dials in darkroom situations, but it is notable that the 9Ti went for the simpler option of embossed characters.
The left edge has a PC socket for wired off-camera flash and a nice rotary film door release catch, which rather reminds me of the one on the Contax G cameras.
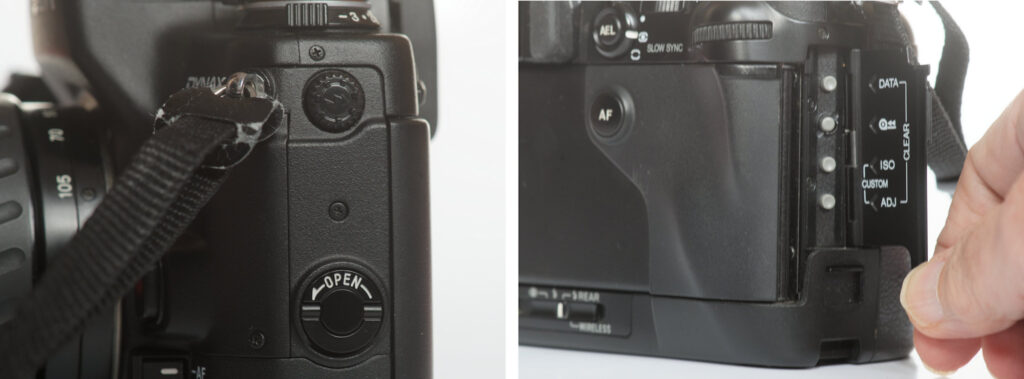
A door on the right edge of the camera allows access to buttons for less-frequently used features, such as data access, manual film rewind, manual ISO setting and access to custom function options. The spring-loaded door also acts as a brake on the film door, slowing it down as it swings open.
Beneath the door is a sliding plate that covers the wired remote terminal and a bar to attach a strap to.
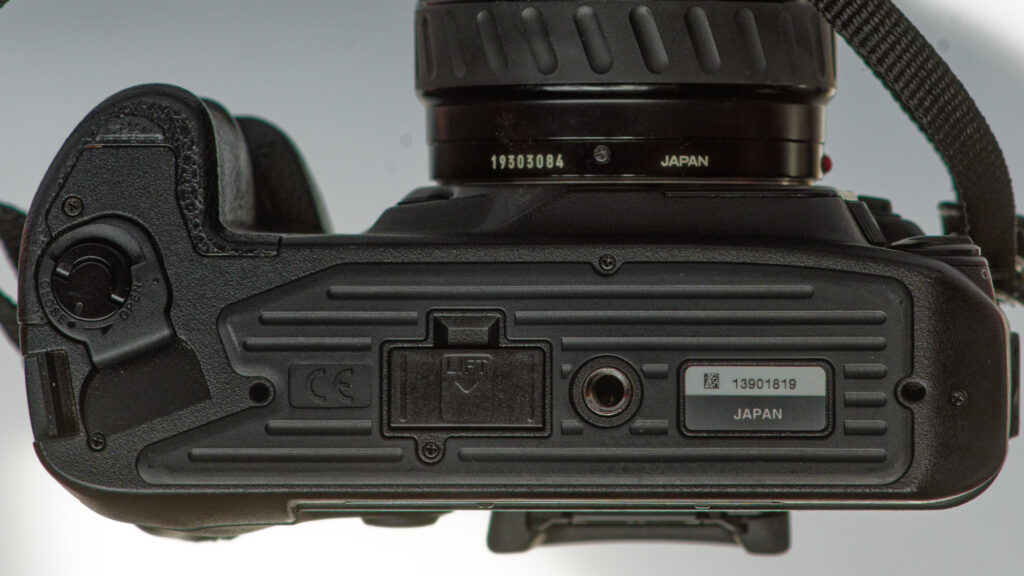
The base of the camera has a rubber surface to prevent scuffing and features a battery chamber door with the same sort of rotary catch as the film door. Another door protects the vertical grip contacts. The tripod bush is in line with the centre of the film gate.
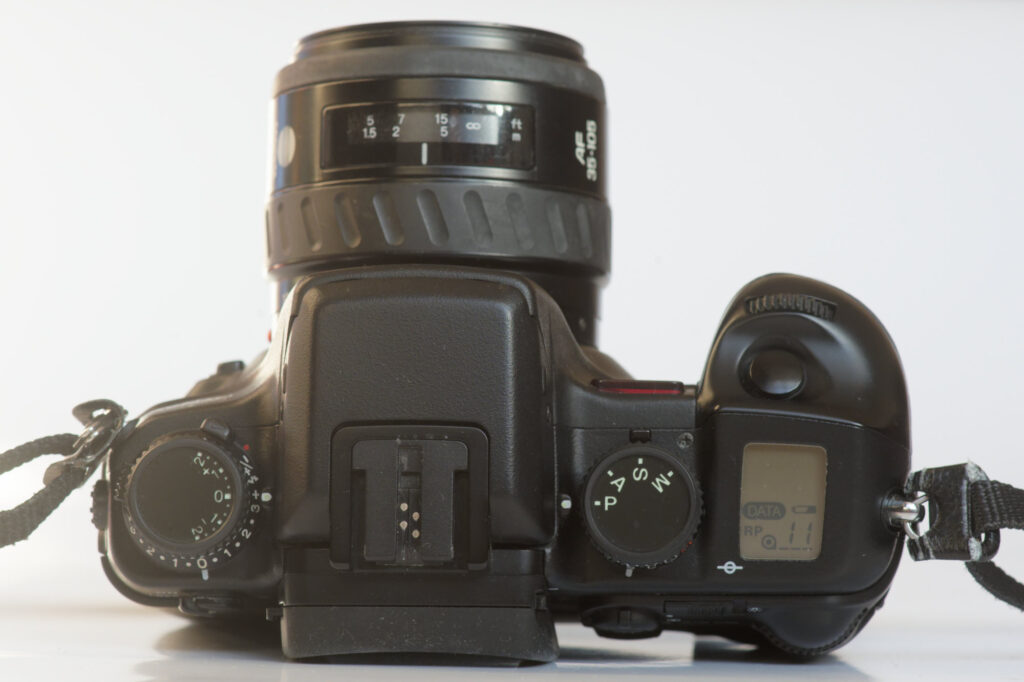
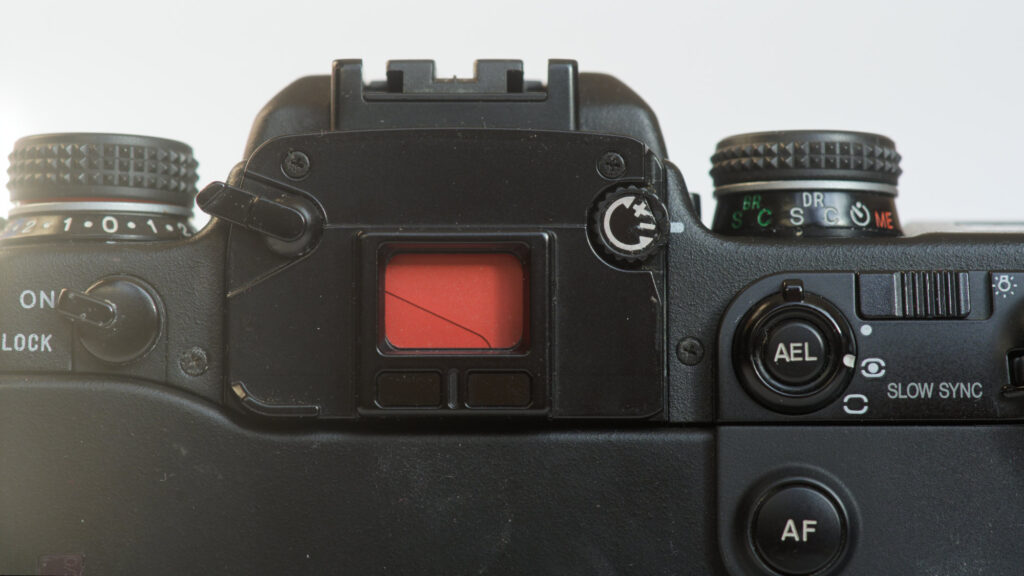
In back, the top edge of the camera has a rotary power switch, a rubber eyecup (with viewfinder blind lever on one side and diopter wheel on the other), the viewfinder (complete with eye-start sensors), an AE lock button with metering selector surround (choices of spot, honeycomb or average), a switch to illuminate the top panel LCD and the rear control dial.
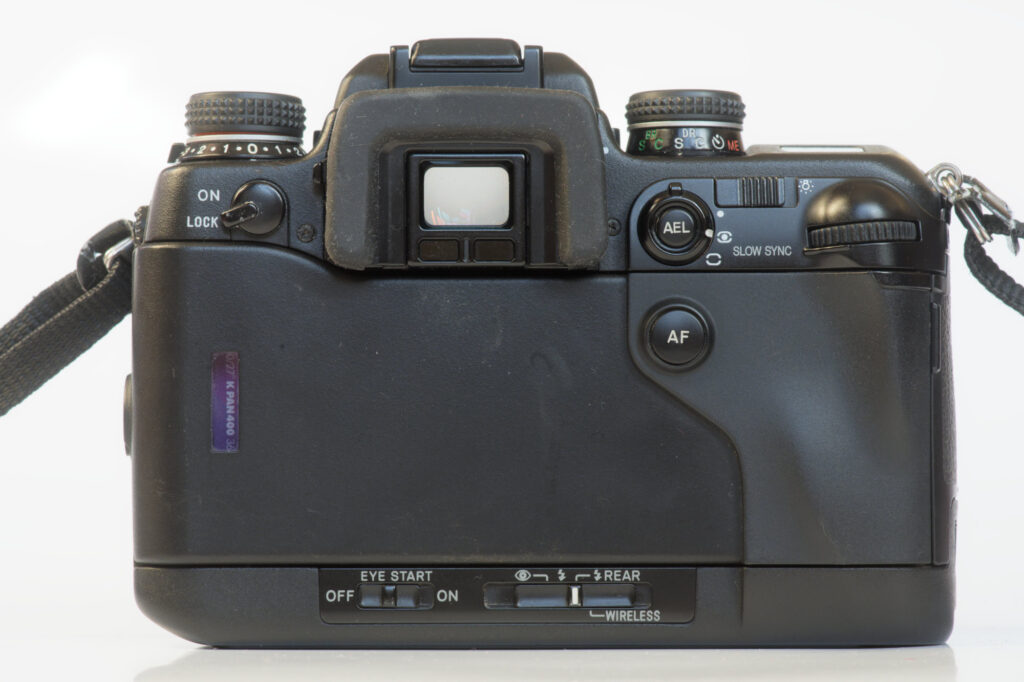
The right ride of the film door seems to be covered in the same sort of rubberised coating that often ends up becoming tacky over time, but here it seems to be weathering well. The back of the film door has a single button to control AF, which can be set to focus on the centre spot for focus-and-recompose. A small window on the left shows what film is loaded.
The (deep) bottom edge has a switch to set eye-start on and off and a slider to control flash settings.
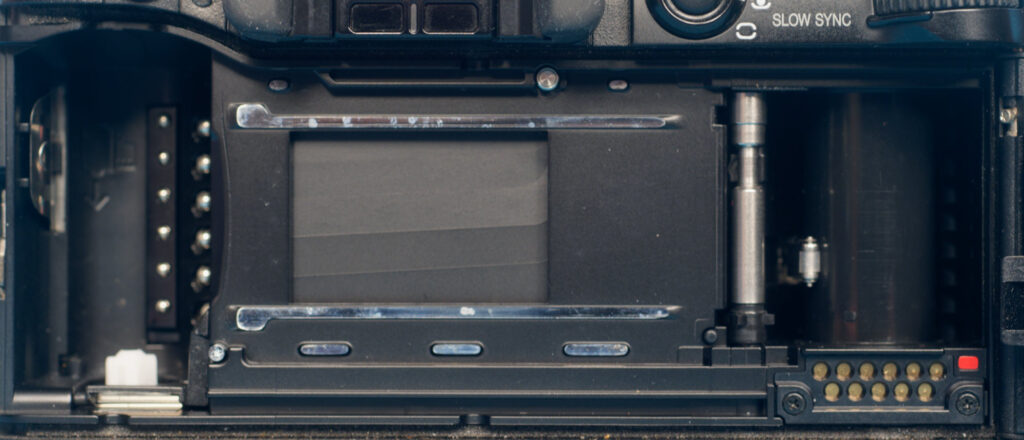
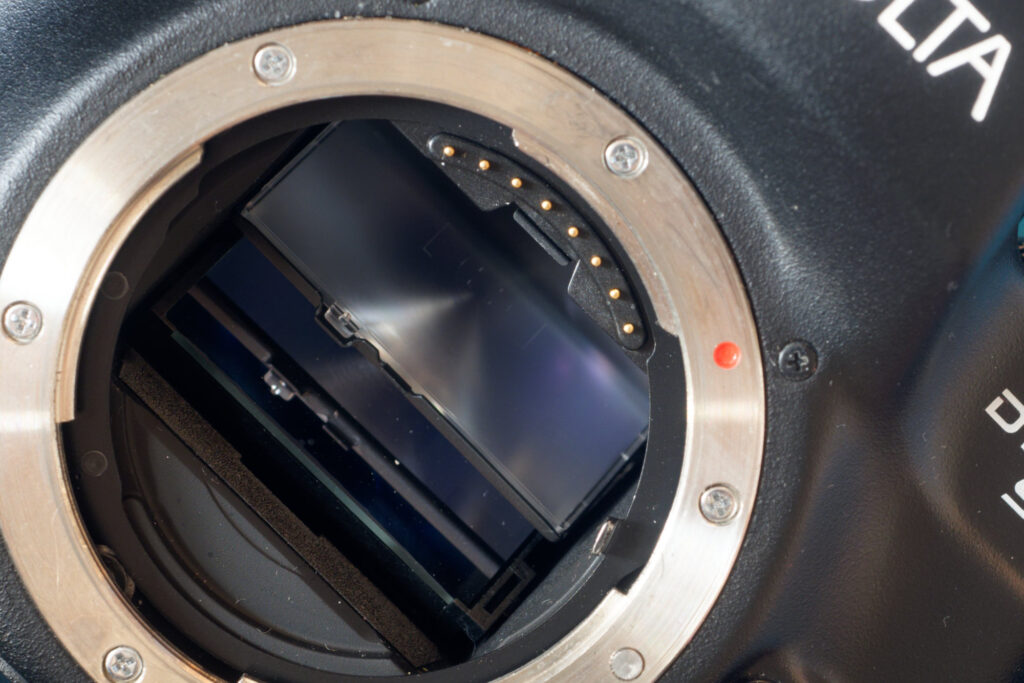
The above photo shows the inside of the film chamber, featuring sensors to read DX coding off 135 cassettes, the shutter, the drive sprocket, the take-up spool and the contacts that allow communication with whatever back is fitted. The standard back only uses 4 or the 11 contacts.
Flash
The manually deployed pop-up flash has a guide number of 12 and covers a 24mm angle of view. It can control compatible off-camera flashes from Minolta and Sony via IR signals (flash synch limited to 1/60 for off-camera flash). Flashguns can be mounted on the propriatory iISO shoe, which locks them in place. Other flash modes include fill-flash, red-eye reduction, slow-synch and rear curtain synch, as well as High Speed Synch (HSS).
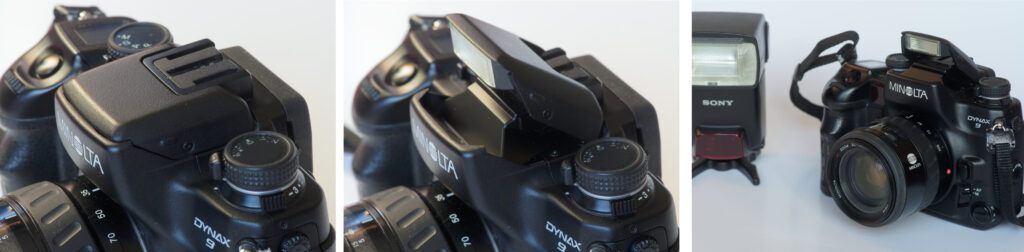
Sometimes criticized on a ‘Pro’ camera, the pop-up flash is certainly useful in a pinch for direct or fill-flash and is great for wirelessly controlling remote flashes. If you want to avoid any direct illumination in a shot, you can cover the flash tube with a bit of fogged film – the IR signal will then get through to the off-camera flashes, but no visible light will.
Shutter
The shutter has the same basic specifications as the one in the Dynax 9xi. It ranges from 30 seconds to 1/12,000 plus B, with a flash synch speed for connected flashes of 1/300. I’m not aware of any other 35mm-sized physical focal plane shutter that matches it.
Autofocus
Notably, the Dynax 9 only has three AF sensors, the left and right ones being line sensors, with the middle one being a cross-type.
The comparatively low number of AF sensors almost put me off acquiring a Dynax 9. However, I remembered how well the 9xi focused with a similarly limited focus area.
As it is, the AF button on the rear of the Dynax 9 can be set up (via a custom function) to give a focus-hold on the centre spot. If you want to focus on something off-centre, the ergonomics of the camera make focus-and-recompose natural and fast. AF works down to EV -1, while the 9 also has an AF illuminator, which uses a combination of three beams and works out to 7m.
Viewfinder
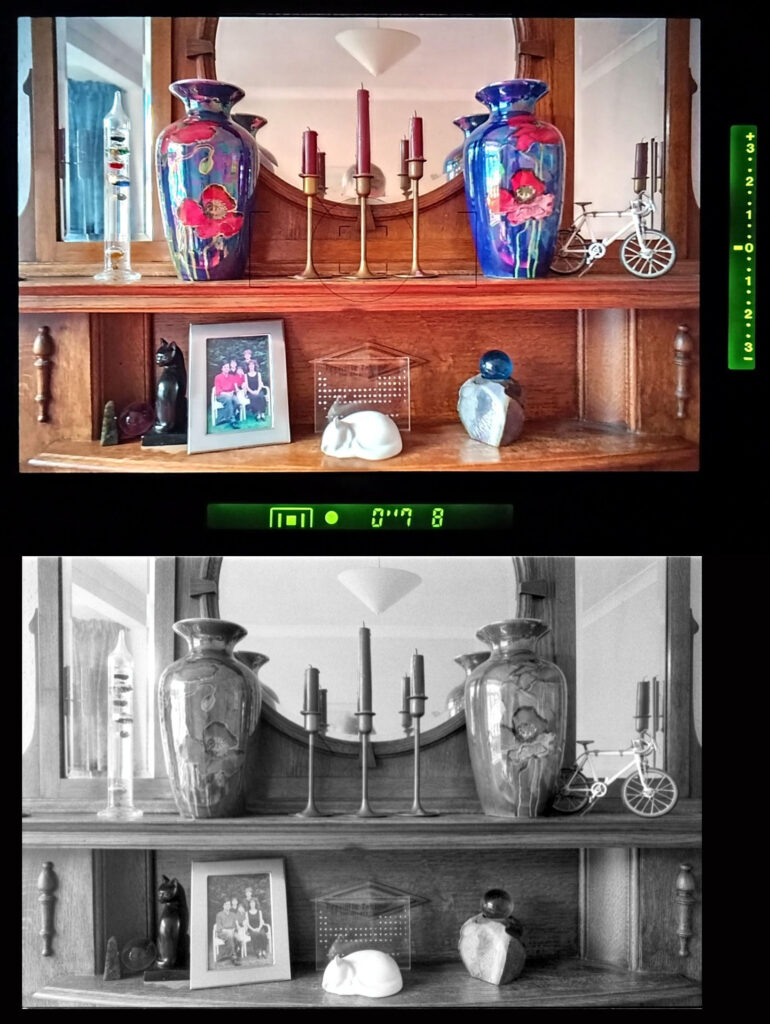
The viewfinder is clear, bright and gives you all the exposure information you need. Flash status, metered shutter speed, metered aperture and AE Lock status are all shown at the bottom of the screen, along with an indicator that shows when you are coming to the end of your film roll (it counts down the last 9 frames of DX coded films). A meter index, showing how many stops over or under the metered exposure the camera is set up for, is displayed on the right. That meter index can also act as an LED match-needle (match blob?) if you use the camera in manual metering mode.
The camera lights up a red box around the active focus point on the screen when focus is locked.
The viewfinder is calibrated to show 100% of the image that gets recorded on the filmstock.
The viewfinder is suitably large (0.73x mag with a 50mm lens), bright and clear. Eye relief is excellent (as it needs to be with information bars at the bottom and side of the screen). I wear glasses to compose and don’t have a problem seeing the edges of the screen or displays.
The eyepiece has simple dioptre correction with a range of -3 to +1. It also features a shutter blind that can be brought down to stop the camera’s metering from being affected by light entering through the viewfinder when used on a tripod. The visible part of the blind is coloured red so it is very obvious when deployed.
Screens
The Dynax 9 takes interchangeable focus screens. The standard one supplied with the camera is the G screen. Of the others, the S has a graticule, while the L has grid lines (5 across the long edge and and 3 across the short). The M screen has a ‘super spherical acute matte surface for greater light dispersion and sharper focus control’ – which I think is marketing-speak for ‘a bit darker but easier to judge focus on’.
I don’t know why they selected those letters for those screens, but I guess it could go General, Sight, Lines and Manual focus. There is no official split-image/microprism option, although third-party versions of a 9-compatible screen with focus aids are available. All available replacement screens are a little ‘niche’ and appear quite expensive.
AF is so good that the lack of focusing aids on the standard screen is no problem.
Metering
This camera comes into its own when switched into programme mode, with its excellent Honeycomb Metering (a buzzword on from Intelligent Auto and less likely to be labelled as Fuzzy Logic), offering a sensible combination of shutter speed and aperture for the subject, lighting conditions and lens focal length as a starting point and then allowing you to swiftly shift the exposure to your preferred shutter speed/aperture combination using either the front or rear control dials. EV range for matrix metering is EV 0-20. Spot metering is also available with a range of EV 3-20.
If you prefer for the camera to keep hold of the last settings you dialled in, you can switch to your choice of aperture or shutter priority. I tend to use A when I’m shooting a set of pictures that need a certain depth of field (the shots of the 9 for this article being an example). I use S when I want a particular amount of motion blur (such as the moving propellers on vintage planes, or to get rotation in the wheels of moving cars). Manual TTL metering is also available if you prefer.
The standard setup is that the front dial controls shutter speed while the rear does aperture. The 9 allows you to shift with either dial in P, A or S modes. This is unlike the 9xi, where the front dial was disabled in A mode and the rear in S mode. The only mode where shutter speed and aperture are controlled distinctly on the 9 is M (manual), but if you don’t like the shutter speed being on the front dial with aperture on the rear, you can swap them around with a custom function (Cust 19).
ISO setting is automatic by default for DX coded films, with a range of ISO 6 to 5000, but can be overridden or entered manually for non-DX films. The camera has both an AE lock and a compensation dial. Various bracketing options are available.
Film transport
The 9 does a good job of automatically loading films. Film transport is single frame or continuous advance at 2, 4.5 (with continuous AF) or 5.5 frames per second. The camera allows unlimited multiple exposures, and has a self timer for 10 seconds or 2 seconds with mirror lockup. Rewind can be automatic or manual, at high speed or ‘silent’. The 9 has a nice system allowing you to unload a film mid -roll (you need it set up to leave the film leader out) and then reliably reload it to the same point later.
Sealing
Both this camera and the Dynax 9xi are often held up as examples with regard to environmental sealing. It should be pointed out that, in both cases, the user manual makes it very clear that while they are ‘dust and moisture’ resistant, they are not water, rain or splash proof. People who have taken the Dynax 9 apart have said that there are no special gaskets or seals. On the plus side, there is also an absence of tales of woe with regard to water ingress and damage.
Customization
Gone are the cards of the ‘i’ and ‘xi’ system. Many genuinely useful features previously available only through cards are incorporated into custom functions (similar to what had been done with the Dynax 800si) or are built into the camera itself. The standard Dynax 9 has 21 customizable functions that allow you to set up the camera to your preferences. To me, the most interesting/useful are:
- Set whether the shutter will wait to fire only when AF has locked focus (Cust 1)
- Rewind manually or automatically (Cust 2)
- Leave the film tip out after rewinding (Cust 3)
- Set the frame counter to count up or down (Cust 8)
- Set the AE lock button to toggle or not (Cust 10)
- Allow release of the shutter without a lens being detected (Cust 16)
- Choose between fast or silent AF – although neither setting is slow or noisy (Cust 17)
- Set control dial functions in different exposure modes (Cust 18)
These, along with all the other custom functions of the Dynax 9, should be able to satisfy the setup preferences of even the pickiest of analogue photographers.
Recording of shooting information
As well as the whole ‘focusing/exposing/transporting’ of photographic film, the 9 also has the option of recording a set of shooting information for each frame of the last 7 films shot. This is similar to a feature previously available through the ‘Data Memory’ cards, but is expanded in capacity (7×36 exposures against 40 exposures) and is contained within the camera itself.
Effectively, it stores a limited amount of EXIF-like info for each exposure. Recorded information includes: shutter speed, aperture, lens focal length, exposure compensation, metering pattern/mode and flash compensation. The big difference between this and EXIF is that EXIF is more extensive and is attached to the RAW or JPG files it is associated with, while with this feature, you need to manually match the information the camera has stored with a particular frame number of a particular film. You also have to read this information from a relatively small screen on the camera top-plate.
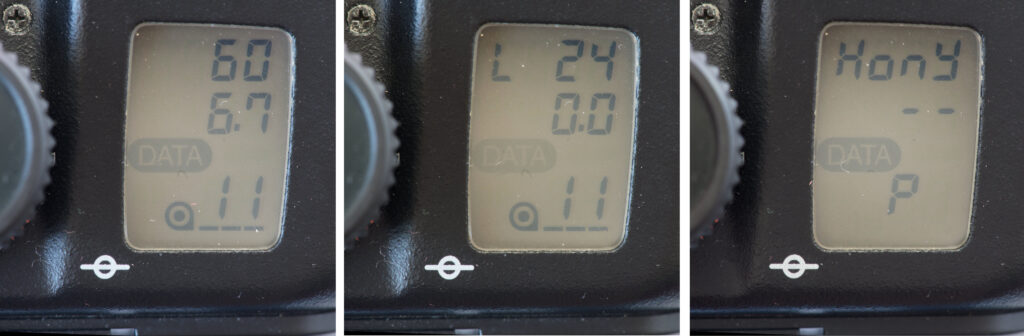
You might not want to go to the bother of looking out this information for every shot you take, but when you do need it, it is there (providing you don’t want to go back more than 7 films).
There is a potential performance cost – top drive speed with data collection on is limited to 5fps. For myself, with the price of film as it is, I’m reasonably happy to take the hit.
Titanium
The Dynax 9 was released two years before the next of the ‘single digit’ series (the Dynax 7). It actually overlapped with a couple of tail-end ‘si’ budget models that were released after it.
In the hiatus between the 9 and the 7, Minolta produced an enhanced version of the 9. The 9Ti has titanium body plates on the front, back, top and left-hand end of the camera, along with a magnesium alloy base-plate. It also uses a different material for the grip and features redesigned top-plate dials. The original Dynax 9 dials have luminous markings under a flush transparent plate (as noted earlier, a potential problem in the dark room), while the revised ones have raised markings.

The use of Titanium shaves a bit off the weight of the camera, which weighs in at 825g without lens or batteries (85g less than the original Dynax 9). The 9Ti has a smooth ‘champagne’ finish similar to a Contax G camera. I get the impression that the designers of the 9 may have been quite impressed by the Contax G series.
The Dynax 9Ti also gets modified custom functions. Cust 18, which is for Control Dial tasking, gets an extra option to assign exposure compensation to the rear dial, while two new functions are added. ‘Cust 22’ allows some control of the behaviour of the AF Illuminator, while ‘Cust 23’ allows you to lock the front and rear control dials while the camera is not metering.
The original serial numbers for the 9Ti only have 4 digits, which gives an idea of how exclusive they are. Some later 9Ti cameras turned up in Germany with 8-digit serial numbers. It is thought these might have been assembled by service centres from spare parts.
Upgrades
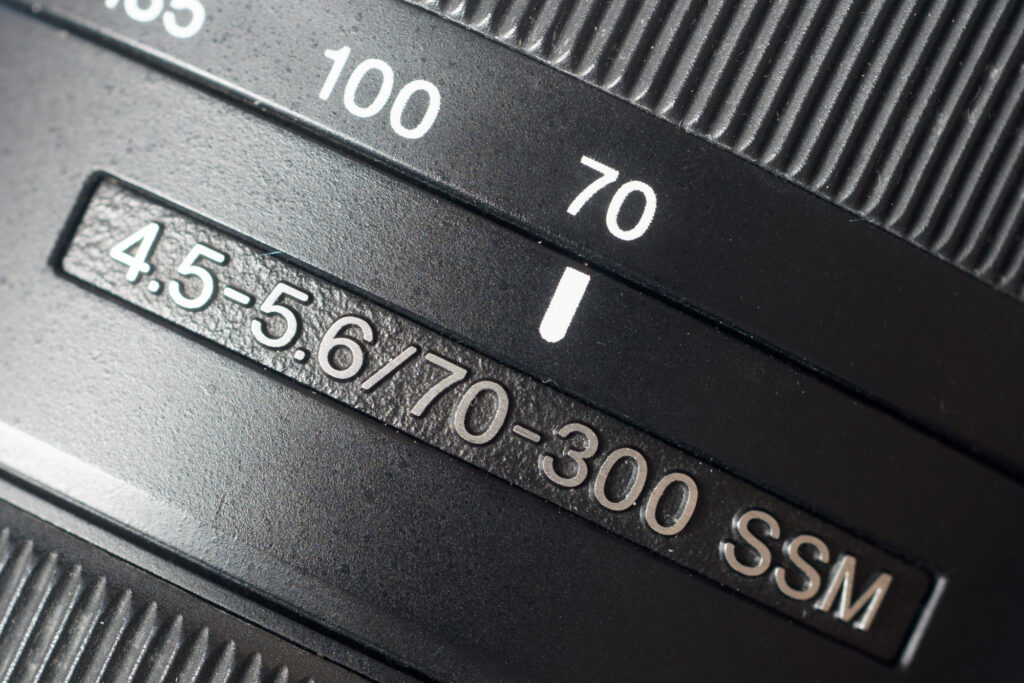
In the time between the release of the 9Ti camera and the Dynax 7, Minolta introduced two new features to lenses. These lenses tend to have ‘SSM’ (Super-Sonic Motor) and ‘D’ (Distance encoding) suffixes in their descriptions.
SSM was a design of ring shaped motor that works very smoothly and silently. The 7 was designed to use SSM lenses from the start, but if you mount one of these lenses on an original Dynax 9 you will be limited to manual focus. A ‘D’ suffix on an A-mount lens shows it can use Advanced Distance Integration (ADI). Effectively, D lenses can report back precise focus distance settings to the camera, allowing it to judge how long the flash needs to fire to accurately expose a subject at that distance.
As part of an upgrade package (free if you were buying a 9 along with one of the two SSM lenses that were available at the time – Thanks to Neil for the full explanation in the comments), Minolta produced replacement circuit boards that enabled the 9 to focus SSM lenses and use ADI for direct flash exposure when used with ‘D’ lenses. As the board needed to suit both the 9 and 9Ti, upgraded cameras also gained the extra Custom functions of the 9Ti (these might require unlocking), as well as an extra option in Cust 20 (Flash metering), to choose ADI as a flash exposure option. The presence of this ADI option in Cust 20 indicates whether a 9 or 9Ti has had the upgrade and can focus SSM lenses.
Many years have passed. Back in 2009 a post on Dyxum revealed that Konica Minolta and Sony had got the last available boards and the components necessary together, and passed them to Runtime/RTC (a camera maintenance/repair specialist in Germany) so they could produce new boards. The upgrade was reported to cost something like €280. In 2015 Runtime/RTC were taken over by another company. At that point, they withdrew from camera repair and stopped offering the upgrade. Although there were supposed to be some unused boards in stock, installation and calibration were said to be complex and required specialist tools, so any prospects of 9 SSM upgrades effectively ended there. If a Dynax 9 doesn’t have the upgrade already, it’s not going to get it now.
Not being able to focus lenses with in-built motors is not the end of the world, as there are a lot of very good screw-drive A-mount lenses out there. Of the 453 different lenses available for A-mount, 335 have screw drive, so choice of lenses is not overly restricted by not having the upgrade.
In a separate upgrade, Minolta would replace the original top dials and grip of normal Dynax 9 cameras with the ones used on the 9Ti.
Dedicated Dynax 9 accessories
As well as the standard Minolta AF system infrastructure, there are a couple of backs and a vertical grip that are specific to the 9 and 9Ti. I don’t have access to any of them, but I’m including what I know of them in this review for completeness.
QD-9 Quartz Date Back
The QD-9 back sounds like a fairly standard date back. When fitted It allows you to record the date and time of exposure in the bottom right-hand corner of each frame. The manual notes that at drive speeds faster than 5fps, the date may only be imprinted on the first shot of the burst.
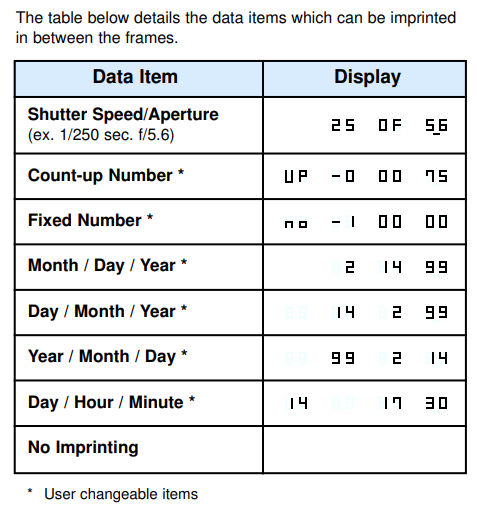
DM-9 Data Memory Back
The DM-9 back enhances the recording of shooting information. It can record the data from up to 100 films on a 2MB SmartMedia card (about the most compact memory card option back in 1998). The SmartMedia card could then be read on a PC.
Now, however obscure the storage media might be (at time of writing, used SmartMedia cards are available and USB readers for the format do exist), transferring info digitally is a lot easier than making pencilled notes from a small top-plate display.
Intriguingly, the DM-9 could also print information about exposures onto the gaps between frames using an 8 matrix characters. A code identifying the individual film was printed on to the film leader, followed by information about individual frames in the space just before them.
The frame info is presented in four groups of two matrix characters (so presumably 1/12,000 at f22 would be shown as ’12 00 0F 22′), and can be set to show a choice of information as shown below:
I’ve no idea how practical this was, whether it intruded into the frame at all, or how readable the information was from the negative, but it is definitely interesting. If anyone has practical experience of using this back, please feel free to give details in the comments section.
The manual notes that imprinting data on the film limits maximum drive speed to 4.5 fps.
VC-9 Vertical Control Grip
The VC-9 grip provides a set of duplicate controls (shutter release, front and rear dials, power switch, AE Lock and AF button) to ease shooting in a portrait orientation. It also allows you to power the camera from a variety of batteries other than the 2 CR123A batteries in the base of the camera. The grip takes 4 AA batteries, 2 CR123A batteries or one 2CR5 battery. It looks like you can choose between two lots of batteries loaded into the grip or to use the batteries in the camera. The grip itself is one of Minolta’s nice ergonomic ones, with the grip positioned so that your right hand isn’t held too high in the air. Oddly, although the camera’s batteries stay in place, the battery compartment in the base of the camera has to be opened to give access to a set of contacts, but the door does not have to be removed. Note that there is a variant of this grip, made with magnesium alloy, that was produced for the 9Ti. I’ve not seen anything about compatibility issues, so I assume both variants work on either camera.
What goes wrong?
Relatively little, and certainly nothing that prevents the camera from operating.
There are reports of the plastic on the grip surrounding the grip sensor becoming cracked and breaking away. The copy I’ve been using shows no signs of this, but the internet reveals that it is ‘a thing’ with various fixes and repairs put forward, including tape and the application of plastic fillers. Some entrepreneurial soul has even had replacement grips 3D printed. Installation seems to involve quite a bit of disassembly of the camera’s outer shell.
It isn’t clear if the problem applies only to the original grip, the revised one as fitted to the 9Ti or both. Environmental factors may also come into play. The major effect of the grip deteriorating would seem to be to uglify an otherwise quite handsome camera.
There are reports that the lower LCD display in the viewfinder can become dim, making it difficult to see exposure settings in bright daylight.
As mentioned earlier, the Dynax 9 has an exposure compensation dial that can either be set to adjust 2 stops by 1/3rd of a stop increments or 3 stops by half-stop increments. You select which you want by lifting the dial and rotating it 180 degrees before dropping it back in place – all quite neat.
However, there is a warning in the user manual that doing this operation when the dial is set to a value other than zero may damage the camera. No further information about what the damage might amount to is given. I note that, on my copy, when the lock on the exposure compensation dial is set and the dial is set to 1/3rd of a stop compensation, my dial can still be moved from 0 to values up to +1. I wonder if this is the result of someone, at some time in the last 28 years, switching from one set of values to the other while not on zero? I stress this is supposition, but if this is the extent of the damage, it is hardly the end of the world. The service manual for the 9 mentions a strengthened part, which may be intended to overcome this weakness.
Common to other cameras with a soft rubber eyepiece surround, the rubber can end up wearing poorly and/or tearing over time.
At time of writing a downloadable service manual was available on-line at https://archive.org/details/minolta-alpha-9-2098-a-service-manual
Compared to the Dynax 9xi
Put side-by-side the Dynax 9xi and its 9 successor look like very different cameras. Six years had passed and the smooth black finish and asymmetric/irregular fluid lines of the 9xi had been replaced by the textured ‘splatter’ finish, straight lines, regular shapes and square jaw of the 9.
The strange thing is that, on one important level at least, these two cameras feel very similar.
All the things that really impressed me with the 9xi are still there in the 9. Exposure is nailed, even in difficult situations. Focus is accurate and is stunningly fast. Both cameras are utterly reliable picture-taking machines. Minolta really managed to refine their ‘pro’ camera. Gone are the annoyances and gimmicks. Gone too is the need to carry the manual with you (other than possibly to adjust some of the more obscure custom functions). The 9 is just as impressive as the 9xi, but is much more intuitive and enjoyable to use.
In particular:
- It gains a better viewfinder;
- It gets a pop-up flash that can wirelessly control off-camera flashes;
- It has dedicated controls (including both control dials working in A and S modes)
- It brings expansion card functions in-camera.
- The camera no longer gets overwhelmed and cries ‘Help’.
- There are no flexible circuit boards to fracture over time.
All the controls work like a charm.
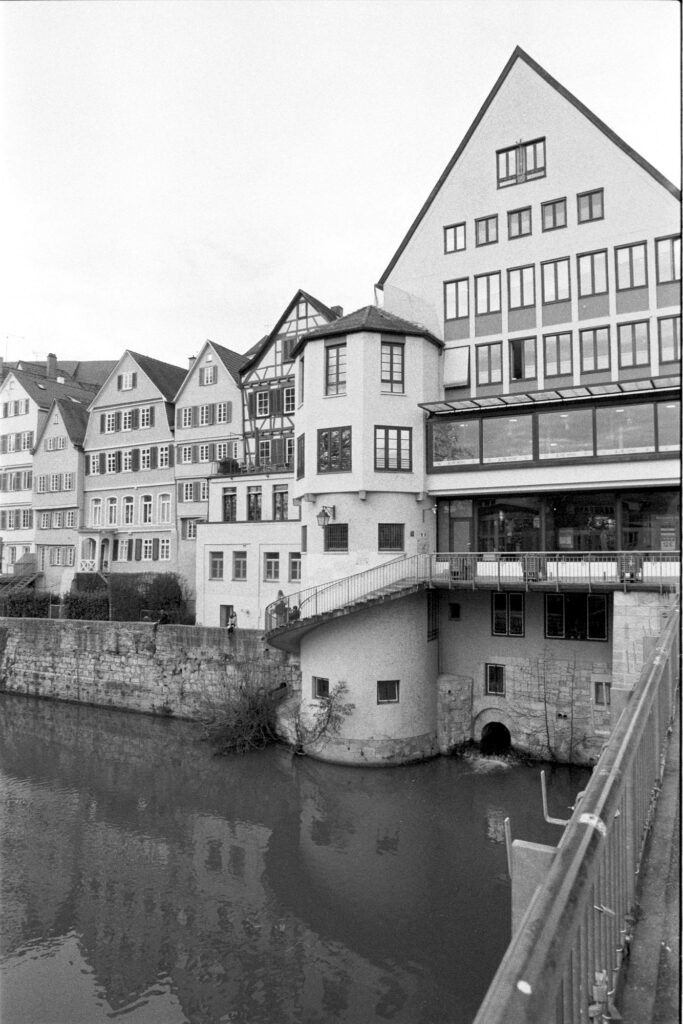
Pictures


The shooting experience
The Dynax 9 combines an almost uncanny ability to accurately meter and focus with a total absence of anything of consequence to draw criticism. It gives the feeling that you are working with a quality photographic tool. Yes, it is a heavy camera, but the mass of the thing, combined with the lightness of the shutter blades, makes it an incredibly stable platform.
It is the sort of camera that gives you confidence and makes you want to go out and shoot. The Dynax 9 doesn’t get in the way between you and the subject. It doesn’t limit you. It just gets the job done without fuss or flamboyance. It feels incredibly reliable. A consummate professional.
Gripes
No matter how good something is, there are always going to be some details that are going to at least impress less.
As has been mentioned, there are only three focus sensors. Auto Focus is therefore limited to the centre portion of the viewfinder. However, as has also been mentioned, AF is swift and accurate, and the camera suits ‘focus and recompose’.
The lens release button works very well, but requires a bit more ‘push’ into the camera body than I’d ideally like. It is the sort of thing that would have had my father (an inveterate modifier of cameras) adding an extra bit to the top of the lens release button.
Depth of field preview is a welcome feature, even if you don’t get a real idea of depth of field with modern AF focus screens – however, the stopping down of the lens and opening up again, is a little more attention seeking (ie noisy) than I’d ideally like (releasing it almost sounds like the shutter is firing).
Is the Dynax 9 worth seeking out?
Yes. The Dynax 9 is a quality bit of kit. I tried hard, but the gripes above are definitely on the petty side. Even without the SSM upgrade, there are lots of good lenses available in A-mount. I guess if you have a big investment in SSM lenses, a non-upgraded Dynax 9 might seem less appealing than the Dynax 7.
If you already have screw-drive lenses in A mount, the 9 is seriously tempting. If you are buying, it may be an idea to check out the state of the grip plastics, operation of the compensation dial lock and the visibility of LCD displays in the viewfinder early on and use any potential faults to negotiate the price.
For those without a collection of A-mount glass, consider that, with an inevitable focus on mirrorless cameras and lenses that can be used with them, quality lenses with screw drive and no dedicated aperture dials are less adaptable and so are likely to be in less demand (so more affordable) than some others.
Sony has sought to keep people on board for their mirrorless cameras by producing adapters for E-mount to take A-mount lenses. These contain linkages to operate the mechanical diaphragm and focus drives, but those adapters come at a price and the best one (the LA-EA5) only works with the newer bodies. Adapting A-mount to other brands is more difficult.
A lot of A-mount lenses (both the original Minolta versions and their Sony rebadged versions) have very good reputations and are likely to give long and sterling service. Many of the lenses that were current at the time the mount was finally discontinued (in 2022), including a lot of the primes, were still screw-driven.
Details of A-mount lenses, together with details of whether they are screw-drive or not, are available at Dyxum.com.
The Dynax 9 isn’t invulnerable, but it is very well built and it should last a good long time. The other thing that will last is the smile on my face when I’m shooting with it.
The postscript bit…
Minolta merged with Konica around the same time as the film Dynax 7 was released. At the time, the camera business was very volatile, and I guess it must have seemed risky to the corporate mindset.
In January 2006 the merged Konica Minolta Corporation announced they were getting out of camera and film manufacture in order to concentrate on photocopiers and printers. It has to be said they were not the only ones to quit cameras around that time, as Kyocera (Contax/Yashica) had pulled out of camera production the previous year.
Minolta were involved in camera production for 70 years before they produced the Dynax 9. To mark their 70th anniversary, they produced a poster showing the cameras they regarded as their highlights, ending with the 9. The poster content is documented online at David Kilpatrick’s PhotoClubAlpha site.
In their time, Minolta produced some really great cameras. With the Alpha/Dynax/Maxxum 9 they produced a professional-grade camera that is genuinely acknowledged as being one of the finest 35mm SLRs ever produced.
///~~***~~\\\
If you think anything in this article is inaccurate or misleading, let me know in the comments. I’m keen for these articles to be as useful and informative as possible for our community.
Share this post:


Comments
Ibraar Hussain on Minolta Dynax 9 (Maxxum 9/Alpha 9) – Three Steps to Heaven
Comment posted: 16/02/2026
Very nicely laid out and clearly summarising each of this amazing cameras capabilities and features.
And as usual your photography is beautifully composed with tones to die for
Alas I no longer have a 9. I sold it as I just missed the more compact lighter 7. I was supposed to take it to a trip abroad I’ve written about here but left it behind because of the bulk and weight.
It’s a beautifully made and engineered camera - but I couldn’t just keep it for keeping sake, the electronics had started to fault and it no longer was able to AF in any other mode and the eye start stopped working, it was on its way to becoming a beautiful paper weight.
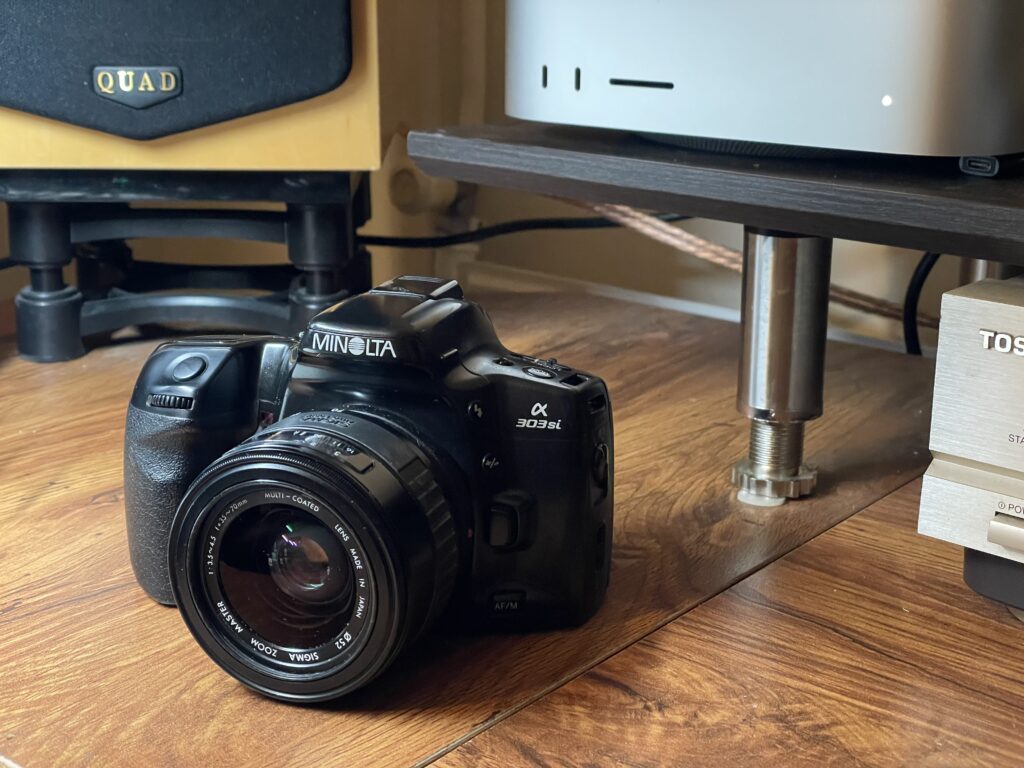
I’m not completely Minolta-less, while on the lookout for a Japanese domestic Alpha Sweet II at a reasonable price (to shoot Panoramic) I came across the older Japanese a-303i which has the Panoramic option. It’s a poor replacement; all plastic with a small dim finder.
Thanks again
Comment posted: 16/02/2026
Comment posted: 16/02/2026
Comment posted: 16/02/2026
Comment posted: 16/02/2026
Comment posted: 16/02/2026
Comment posted: 16/02/2026
Comment posted: 16/02/2026
Comment posted: 16/02/2026
Reinhold Graf on Minolta Dynax 9 (Maxxum 9/Alpha 9) – Three Steps to Heaven
Comment posted: 16/02/2026
I like mine the same, as the 7 and I would appreciate reading your comparison.
Did you notice the dim LED in the viewfinder making it hard to see in bright daylight?
It seemed to be one of the very few downsides of this camera.
Keep on taking photos … and writing about the good old stuff :)
Comment posted: 16/02/2026
Comment posted: 16/02/2026
Comment posted: 16/02/2026
Comment posted: 16/02/2026
Comment posted: 16/02/2026
Ibraar Hussain on Minolta Dynax 9 (Maxxum 9/Alpha 9) – Three Steps to Heaven
Comment posted: 16/02/2026
Thierry on Minolta Dynax 9 (Maxxum 9/Alpha 9) – Three Steps to Heaven
Comment posted: 16/02/2026
Gary Smith on Minolta Dynax 9 (Maxxum 9/Alpha 9) – Three Steps to Heaven
Comment posted: 16/02/2026
Comment posted: 16/02/2026
Chris on Minolta Dynax 9 (Maxxum 9/Alpha 9) – Three Steps to Heaven
Comment posted: 17/02/2026
I have a great 7 from Japan, but was always curious about the brick of a 9... Sure thing both are great examples of Minolta's sublime engineering.
Being a Minolta Aficionado, I recently got myself a Hi-Matic 7sii to test out, maybe I will do (another, there are already reviews up on 35mmc) a review.
My question is, which lenses everyone likes the most on the Dynax's, Maxxum's and Alpha's the most...
My go-to lens on the 7 would be the Sigma 28-105mm f2.8.... what's yours?
Comment posted: 17/02/2026
John Duder on Minolta Dynax 9 (Maxxum 9/Alpha 9) – Three Steps to Heaven
Comment posted: 17/02/2026
These days, I use the Contaxes (they're still going) in preference - they will make use of frames 37 and 38 (the 9 stops at 36, always), and they are smaller, lighter, and nicer to use.
I have needed a repair once or twice: the shutter release button dropped off, and the complex dials and levers on top are relatively fragile, I think.
It's an impressive camera, rather as a BMW X-7 is an impressive car: in many circumstances, something smaller and lighter will run rings round it, in practice.
Walter Reumkens on Minolta Dynax 9 (Maxxum 9/Alpha 9) – Three Steps to Heaven
Comment posted: 17/02/2026
I can only congratulate you on your work; I would never be able to do anything like this. No matter what camera it was, I wouldn't have the patience for it, let alone the technical knowledge. Really impressive, Bob.
During the sales pitch before I bought my first SLR camera in the 1970s, the Minolta SR-T 303 also came up, but unfortunately I opted for a Fujica ST901, which had received very good reviews in tests but didn't prove itself in practice and which I quickly sold again. Yes, after that came a Nikon FE, and I have remained loyal to the brand to this day, both analogue and digital. As a pensioner, I got GAS and now I have two Minoltas in my collection, the SR-T 303 and X500, plus a couple of Rokkors, including the MD Zoom 36-70mm F3.5, which Leica sold as the Elmar 35-70 f/3.5. I didn't follow the whole period with the introduction of automatic functions, autofocus and motorised film transport by other SLR manufacturers in detail, but remained loyal to my favourite brand. However, I've only heard good things about Minolta.
Thanks for sharing, Bob. I read the article with interest.
Bilbo Baggins on Minolta Dynax 9 (Maxxum 9/Alpha 9) – Three Steps to Heaven
Comment posted: 17/02/2026
Comment posted: 17/02/2026
Neil T on Minolta Dynax 9 (Maxxum 9/Alpha 9) – Three Steps to Heaven
Comment posted: 18/02/2026
Anyway , I have two Dynax 9's even though the 7 is my favorite 35mm AF camera .
One I got a good number of years ago , and the other , an alpha 9 , I got a couple of years ago that's had the ADI & SSM upgrade .
I enjoy using that one with my Sony SSM and SAM lenses .
I've just picked up a Sigma 100mm macro with HSM drive and optical image stabilisation, so looking forward to trying that out on it .
Regards the SSM upgrade being free , and you don't think it was as more people would have took it up , it wasn't quite like that .
IIRC the free upgrade on the Dynax 9 was obtained only when you bought that along with a Minolta SSM lens .
The only SSM lenses then were the 70-200mm f/2.8 APO G SSM and the 300mm f/2.8 APG G SSM .
So it comes down to how many people bought one those Minolta SSM lenses , and a Dynax 9 ?
If they'd also brought out a walk around lens such as the Sony CZ 24-70mm f/2.8 , a lot more would have been upgraded .
The walk around zoom then would have been the screw driven 28-70mm f/2.8 G lens even the later KM 28-75mm f/2.8 was screw driven .
It didn't get a motor in it until Sony took it on and put the SAM drive in it .
I think that's why you don't see so many already converted.
Comment posted: 18/02/2026
Christian Hogue on Minolta Dynax 9 (Maxxum 9/Alpha 9) – Three Steps to Heaven
Comment posted: 19/02/2026
learned a few things i didnt know about my 9 and 7!
awesome set of lenses as well, including the 300 2.8 and the 500mm reflex f8!! Some very unique images can be captured with with both!
i posted a s \tory here a few months back after shooting at Angkor Wat early 2025!
Omar Tibi on Minolta Dynax 9 (Maxxum 9/Alpha 9) – Three Steps to Heaven
Comment posted: 19/02/2026
The luminescent paint is a clever idea! But I guess they quickly understood why nobody had done it before... :)
Something that I find curious is that, by the late 90s/early 00s, it feels like SLR design seems to have coalesced towards a single point. While there are differences of course, the shapes of this Minolta are not too dissimilar to the Contax N1 or Nikon F100. I wonder if it was just a feature of the times - I remember everything feeling smooth and round in my childhood! - or if, at that point, SLRs have become completely optimized in form.
Looking forward to reading more of your reviews!