When Part 2 of this three-part series went online, reader Stephen Meese made a comment that said it all:
“Wait, you experimented with a different film format, AND shot without a meter, AND shot with expired film, AND you’re developing your film using an experimental method? That’s a bold move Cotton!”
He had an impressive series of “ANDs” there… and I added one more! The last time I developed my own film was in 1980, and 43 years on, I seriously needed to relearn the art of slipping 35mm film into my basic Nikor reels. And after a lot of practice, in a pitch black room:
- I had already arranged everything I’d need where I could easily find it in the dark.
- Cut the film away from both film spools, using the spool flanges as guides to “square off” the scissors.
- I’m right-handed, so with my left hand, I felt for the bent, V-shaped wire tongue in the middle of the reel’s “M”-wire.
- With the thumb and index finger of my right hand holding opposite surfaces of the film-strip’s end, I pushed it as far as it would slide in between the “M”-wire tongue and the reel axis it pressed against.
- I then made sure that the other free end of the film was neatly rolled up and let the roll dangle freely.
- Then, as I slowly rotated the reel counterclockwise with my left hand, I slightly increased the film’s side-to-side arch with my right hand’s thumb and index finger… which lightly touched the reel’s outside rails.
- As the film wound into the reel, I frequently stopped and gave it tiny push-pulls. If it moved slightly in the reel slots, all was well. But if it didn’t, I’d unspool it until it did move again… and resume spooling/testing from that point on.
The Pesky Caffenol “AND”
Then came one of those other pesky “ANDs”: Trying Caffenol development for the first time. True confession: This wasn’t as bold a move as one might think. Months earlier, I shot the expired Tri-X with a Kodak Retina IIa and took the roll to Walgreens for processing. I did receive images back (two months later), but they were nearly black.
It made me think they’d been exposed to light or otherwise mishandled. So while my first Caffenol attempt would be risky, I’d see its results sooner… and was pretty sure they’d be better than the drugstore’s!
Toward a More Perfect Recipe
The official Caffenol site and their Caffenol Cookbook are great starting points for learning how to develop all kinds of film with an eco-friendly mix of coffee, vitamin-C, iodized salt, and soda ash. The internet is also awash in Caffenol recipes and procedures, and after a ton of research, I decided to try this one. I made a few adjustments, though, based on the fact that my film had expired nearly a half-century ago.
Here’s my kitchen-counter Caffenol development kit:
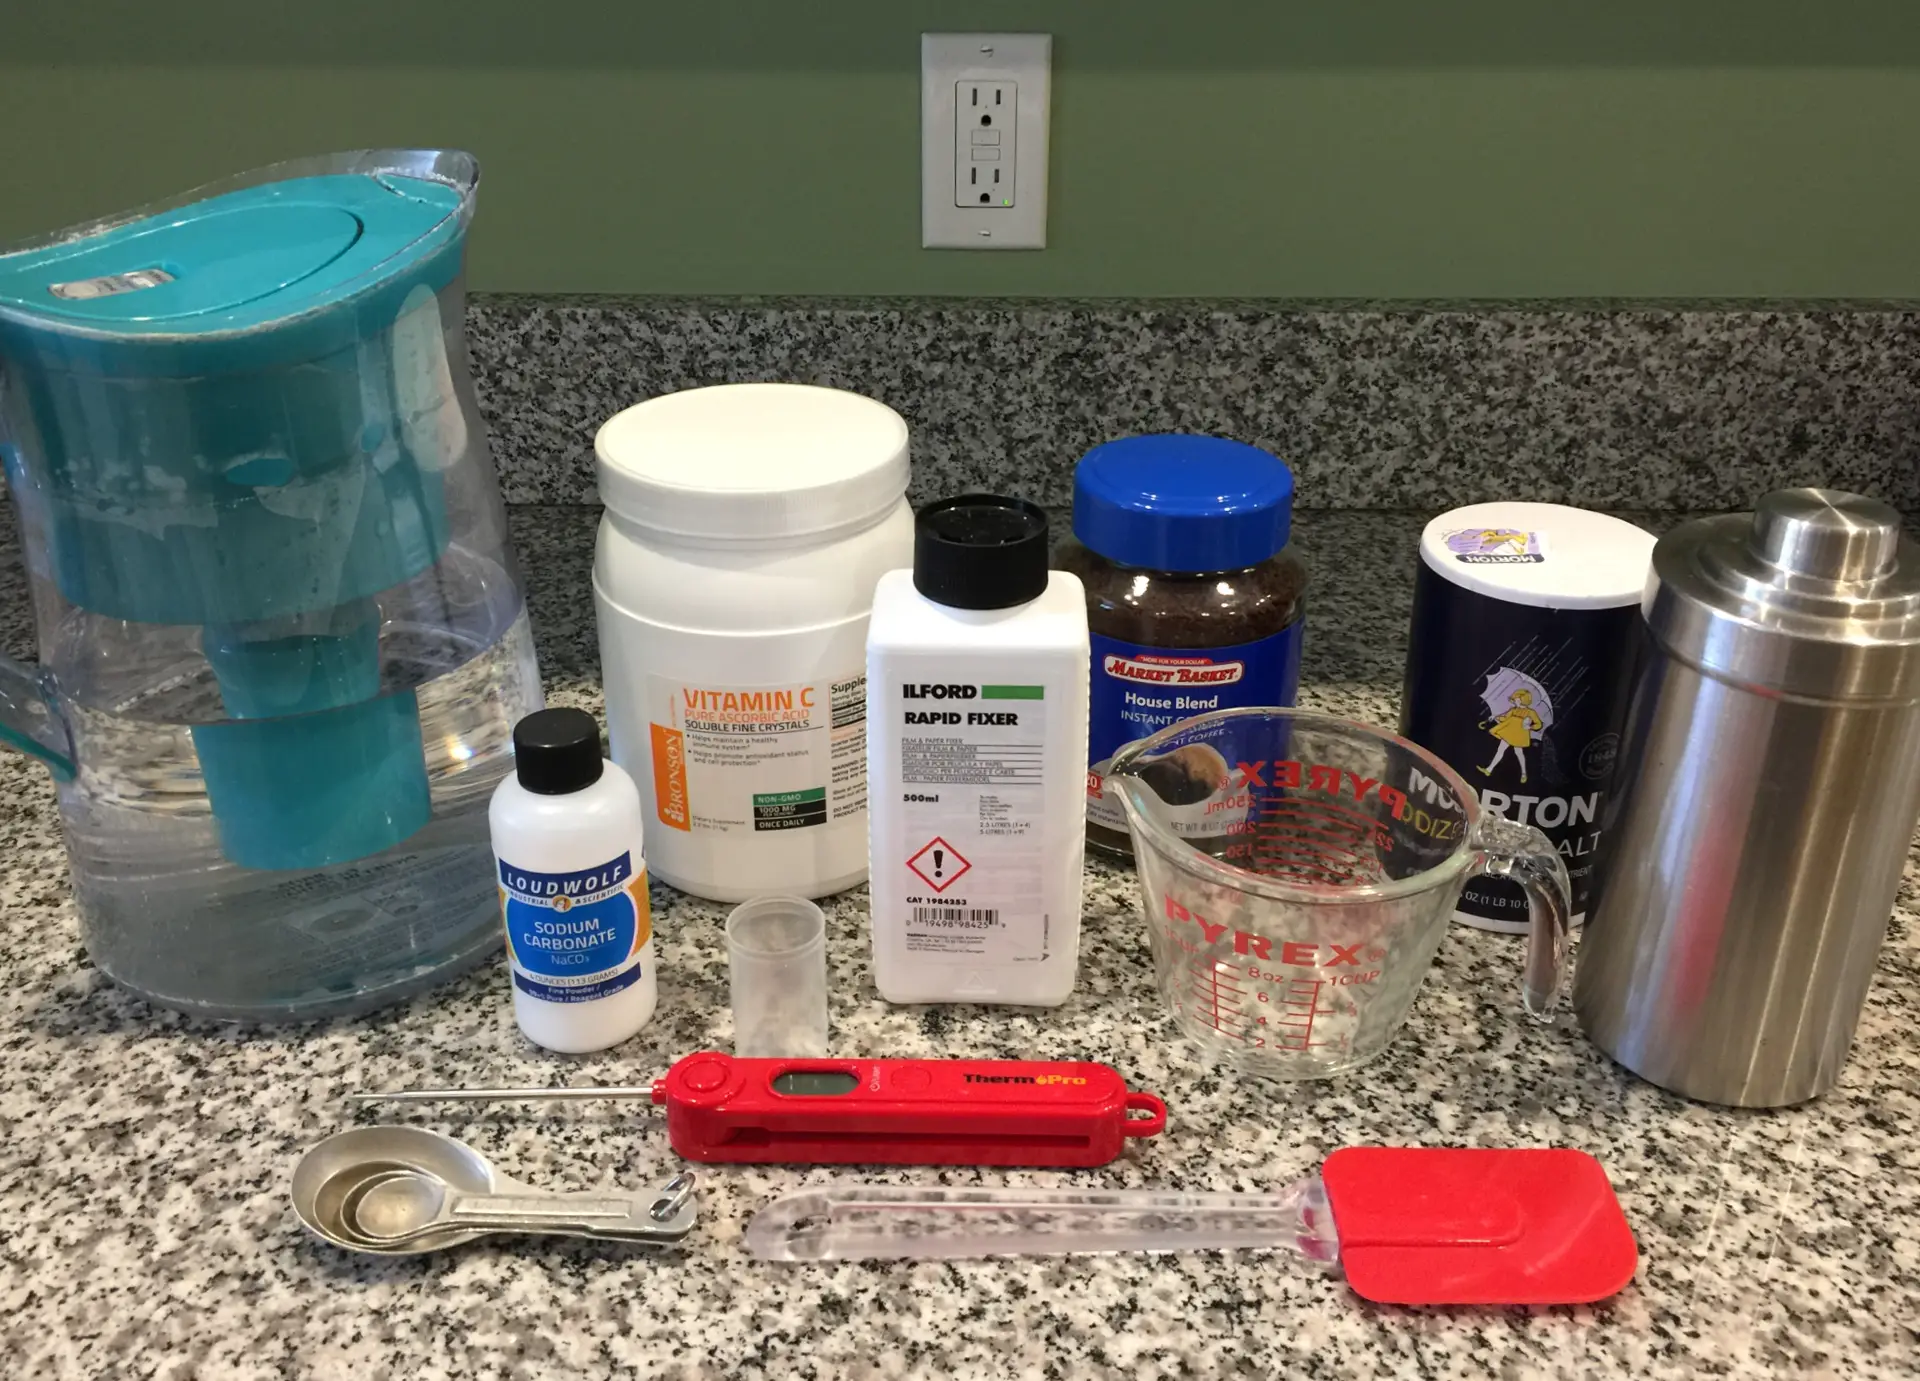
And here’s the “tweaked Peter Bjerg high-quality and fool-proof Caffenol 35” procedure that I tried. It makes 250ml of developer… enough for one 35mm reel:
- Since emulsions can “harden” with time, I softened the film for 5 minutes with filtered water in the Nikor canister.
- While the film soaked, I prepared the Caffenol developer in the small PYREX measuring cup. First, a film-canister’s-worth of non-decaf instant coffee went into 60ml of boiling filtered water, and was stirred for 5 minutes until fully dissolved. Note: I boiled the water in a measuring cup labeled “PYREX” (all upper-case) because they’re safer to microwave than newer cups labeled “pyrex” (all lower-case).
- I then added 65ml of cold filtered water, and constantly stirred in 2 tsp (10ml) of non-hydrous soda ash for approximately 3 minutes, or until fully dissolved. Note: Bjerg’s procedure used “crystal soda,” which contains water while “soda ash” does not. I had already purchased the latter, and accordingly reduced the amount that I used.
- Next, I added 1 tsp iodized salt (to reduce “fogging” in the higher-speed film), and stirred until the liquid was free of soda and salt crystals.
- Topping up the developer with the balance of needed water (125ml), I stirred until everything was mixed.
- Then, 1 tsp (5ml) of vitamin-C powder was stirred in until it fully dissolved and quit fizzing.
- The liquid was warmer than the recommended 20C (68F), so I added an ice cube, which I removed when the fluid reached 68F.
- After giving the mixture a 5-minute rest, I poured it into the Nikor canister containing the film.
- I did an initial 1-minute agitation, followed by 10-sec agitations every minute for 25 minutes. Note: I lengthened Bjerg’s development time from 15 to 25 minutes because my film was long expired, and I didn’t want the negs to be overly faint. Also, after each agitation, I tapped the Nikor canister lightly on the counter to dislodge any air bubbles that may have formed on the film.
- After 25 minutes, the Caffenol went down the drain and I poured water into the canister to “stop” development. I did that three times (until water dumped from the canister was colorless).
- And I fixed the negs with a 5-minute agitation of 1 part Ilford Rapid Fixer to 4 parts water. And per the manufacturer, I saved the used fixer in a sealed jar for future use.
- As recommended elsewhere on the web, I poured clean water into the canister and inverted it 5 times to rinse out remaining fixer. I then replaced the water and inverted it 10 times more… and finally replaced and inverted the water a final 20.
- And I hung and weighted the film with large binder clips, and gently squeegeed it front and back with the soft-edged silicone spatula (to remove water drops).
Pictures!
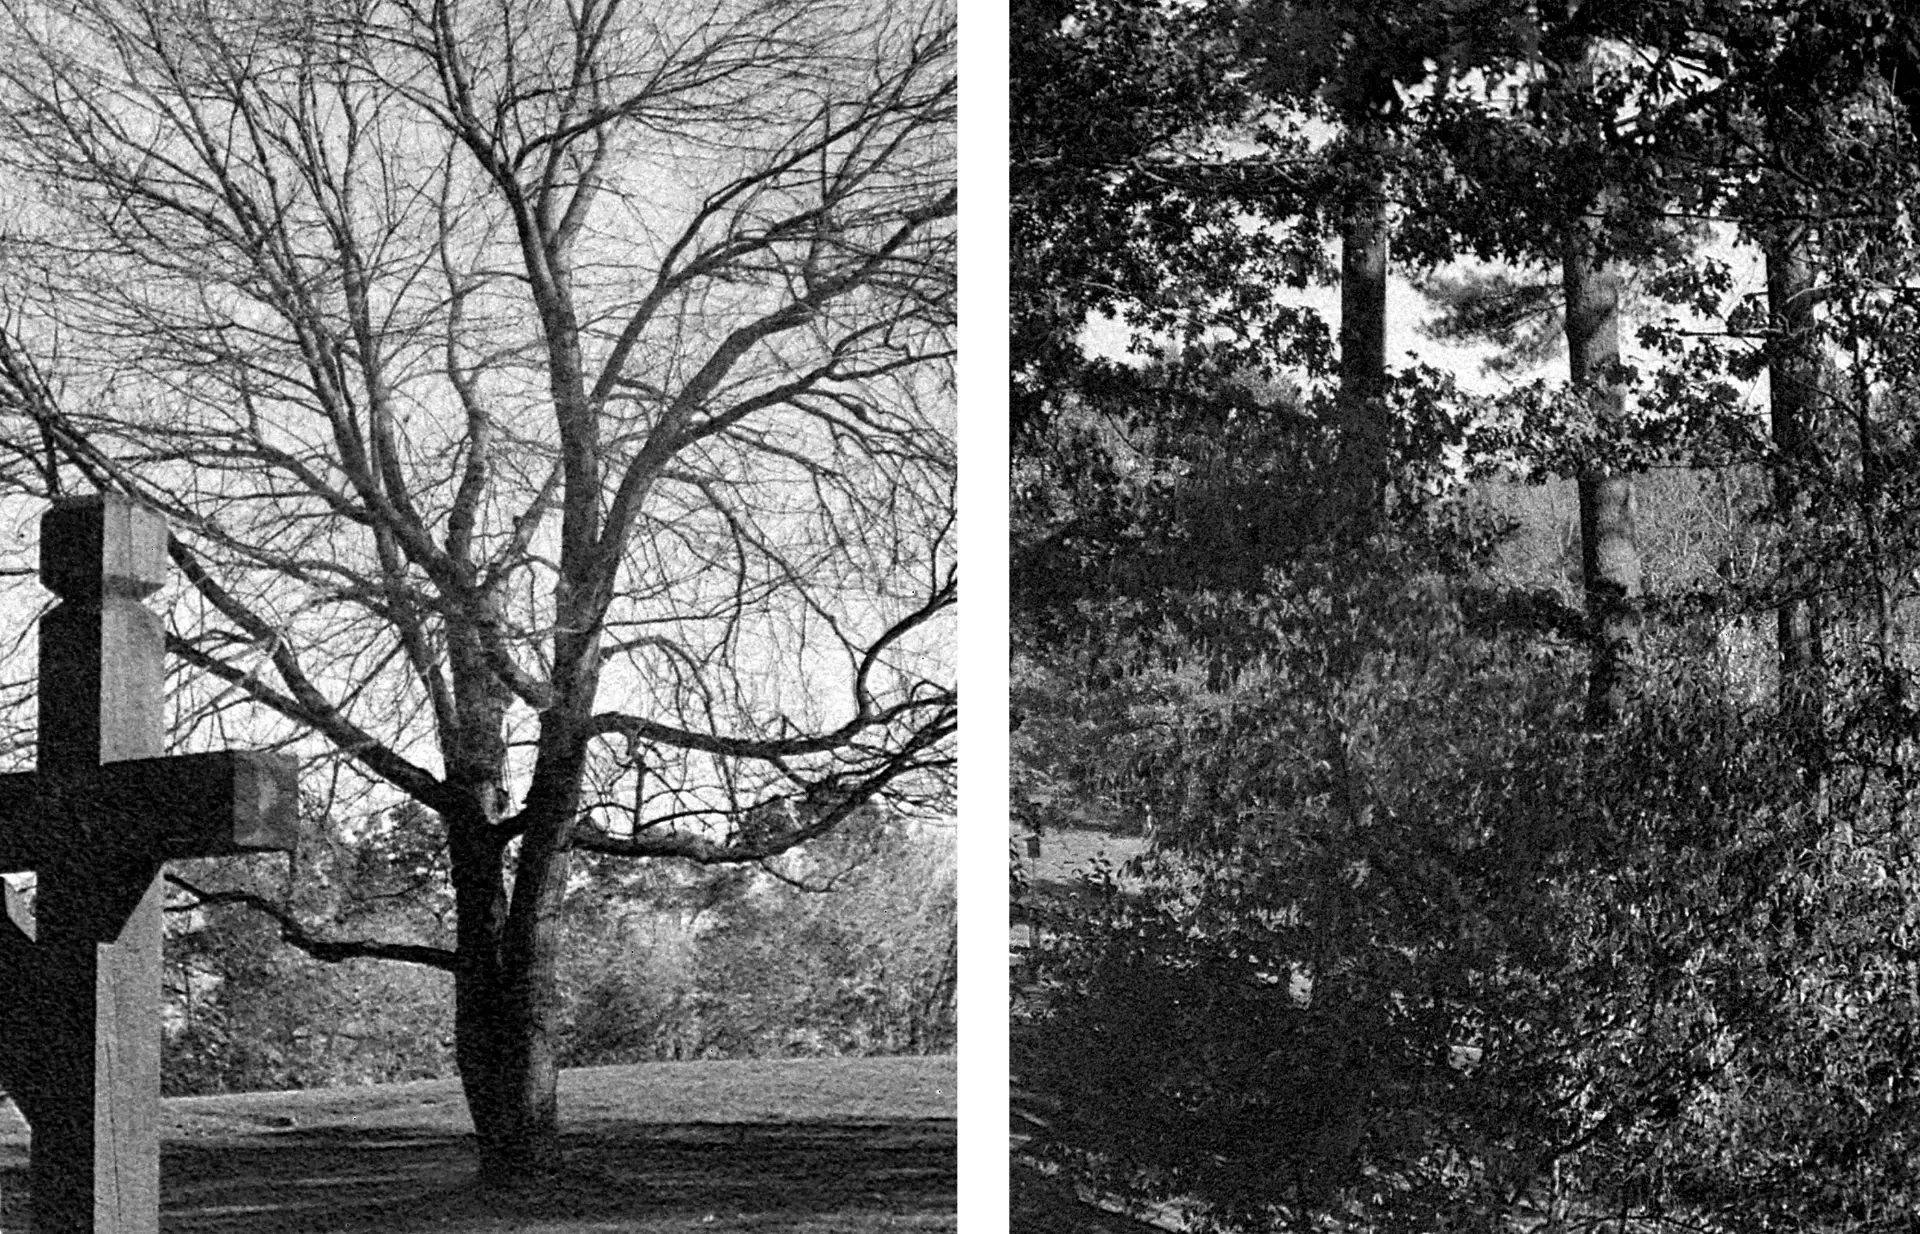
I was elated to see images on the developed strip. It reminded me of how much like Christmas film developing used to feel. Here are two of the better sections of negatives:
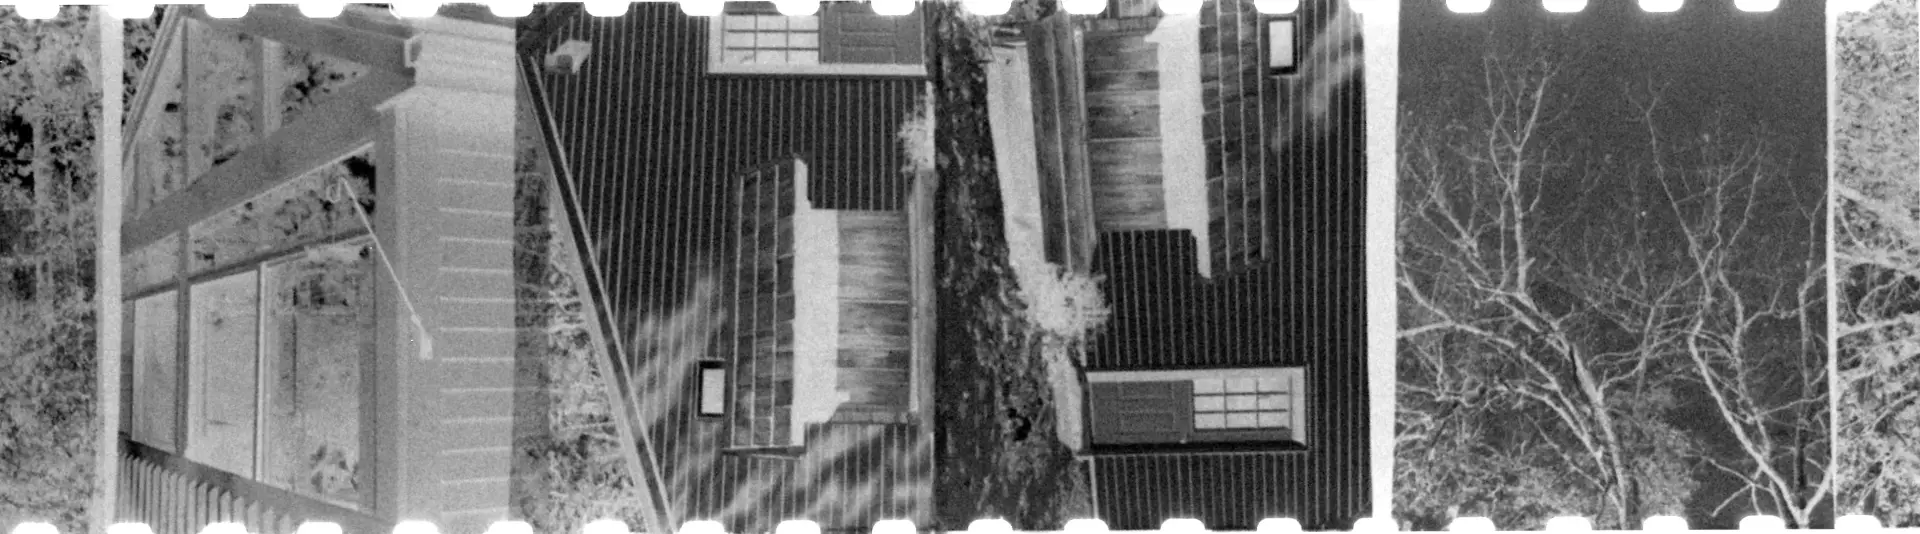
And while the results from Hyperfocal Focusing and Sunny-16 metering seemed OK, the negs looked a little dark. But I’ll never again shoot the Bantam with “f/8-and-be-there” exposures. They came out mostly blank. And when I thought about it, I remembered that “Weegee” (one of the guideline’s most ardent followers) frequently used flash. And I never do. (Perhaps not coincidentally, the only parts of my “f/8-and-be-there” frames that contained any image at all were table lamps that were turned on at night.)
Here are four of the better half-frame images. Not too bad actually!:

Another Try
My original lens-cleaning/collimation efforts appeared to be successful! But the grain from the long-expired film and/or my modified development procedure may have overwhelmed the Anastar lens’s native sharpness. In compensating for the film’s age with BOTH extended exposures AND longer development times, I may have overdeveloped and amplified the grain.
So in a second test, I decided to let the film “speak for itself” by:
- Shooting everything at f/8 for optimum image sharpness,
- Bracketing each shot with shutter speeds of 1/200, 1/100 and 1/50 sec, and
- Using the timings in Bjerg’s original Caffenol procedure.
But instead of “winding three-quarter turns between the first 12 to 16 exposures, and half-turns between the rest” as I did before, I tried “full turns between the first 12, and three-quarter turns between the rest.” It worked better.
Here’s the revised development procedure (with Bjerg’s original timings and a few of my own minor adds):
- Put 60ml of boiling filtered water in a Pyrex measuring cup.
- Add a film-canister’s-worth of non-decaf instant coffee and stir for about 3 minutes or until fully dissolved.
- Add 65ml of cold filtered water.
- Continuously stir in 2 tsp (10ml) of non-hydrous soda ash (for about 3 minutes or until fully dissolved).
- (For higher-speed films) add 1 tsp iodized salt to reduce fogging, and stir until the liquid is free of soda and salt crystals.
- Top up the developer with 125ml of cold filtered water and stir until everything is mixed.
- Add 1 tsp (5 ml) of vitamin-C powder and stir until it fully dissolves and quits fizzing.
- If the liquid is warmer than the recommended 20C (68F), add one or two ice cubes. Gently stir until an instant-read thermometer shows 20C (68F) and remove any remaining ice. You should have 1 cup of Caffenol developer (or slightly more)– enough to develop one reel of 35mm film.
- Immediately pour the Caffenol into the developing canister with the film and securely close the top.
- Agitate continuously for 1-minute. Then stand the canister on the counter with a good tap (to dislodge any air bubbles that may have formed on the film).
- Follow with 10-sec agitations every minute for 15 minutes. (And continue tapping the canister on the counter after each agitation.)
- After 15 minutes, pour the Caffenol down the drain.
- Fill the canister with tap water to “stop” development and pour down the drain. Repeat 2 or 3 times until the discarded water is colorless.
- Fix the negatives with a 5-minute agitation of 1 part Ilford Rapid Fixer to 4 parts water– and save the used fixer in a sealed, light-tight container for future use.
- As recommended elsewhere on the web, pour tap water into the canister and invert it 5 times to begin rinsing out any remaining fixer. Fill again with tap water and invert 10 times. And finally, fill with clean filtered water and invert 20 times. (I use filtered water for this last cleaning because our “hard” tap water has very high mineral content.)
- Then, I hung and weighted the film with medium-sized binder clips, and gently squeegeed it front and back with a soft-edged silicone spatula (to remove water drops).
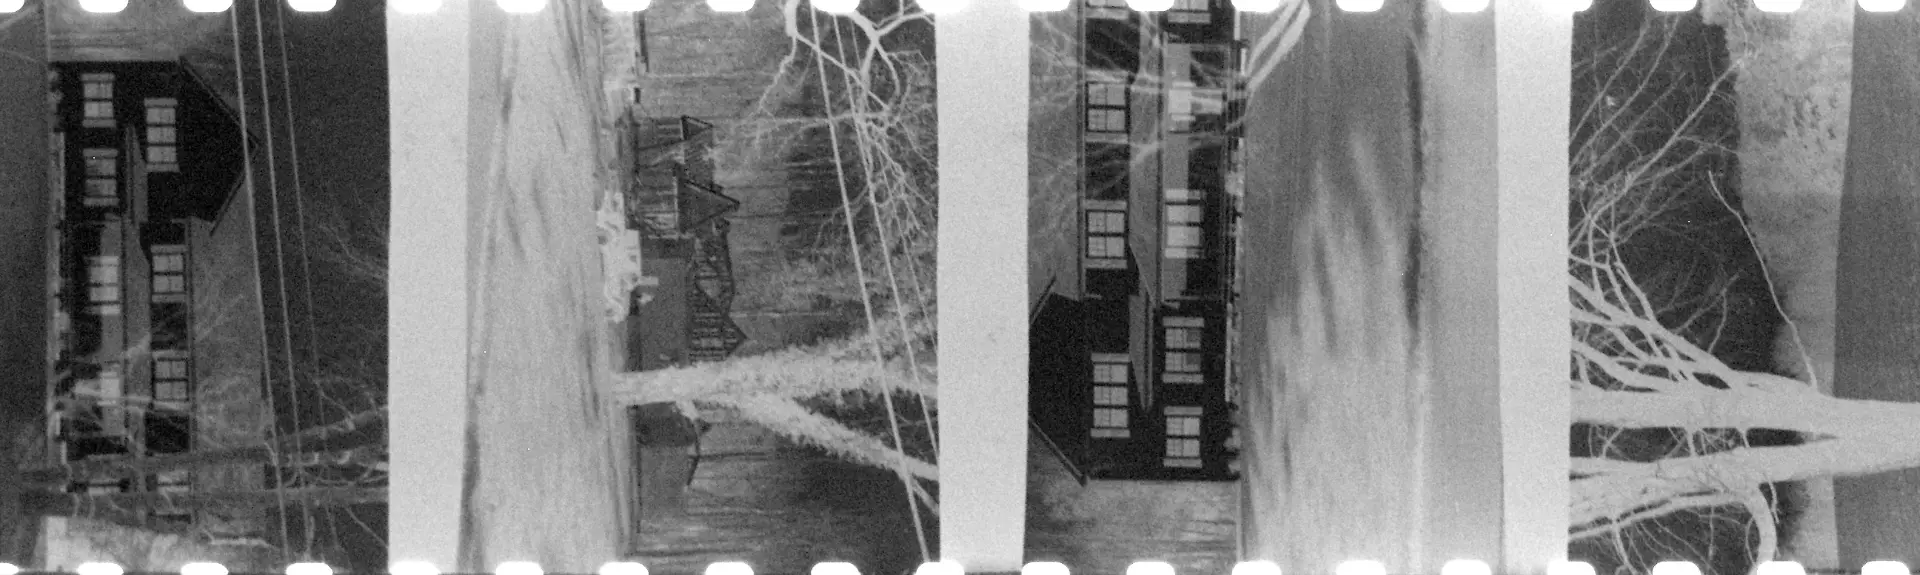
The negatives didn’t look as dense and dark as before. And here are four of the new images (which I again cropped into areas of visual interest):
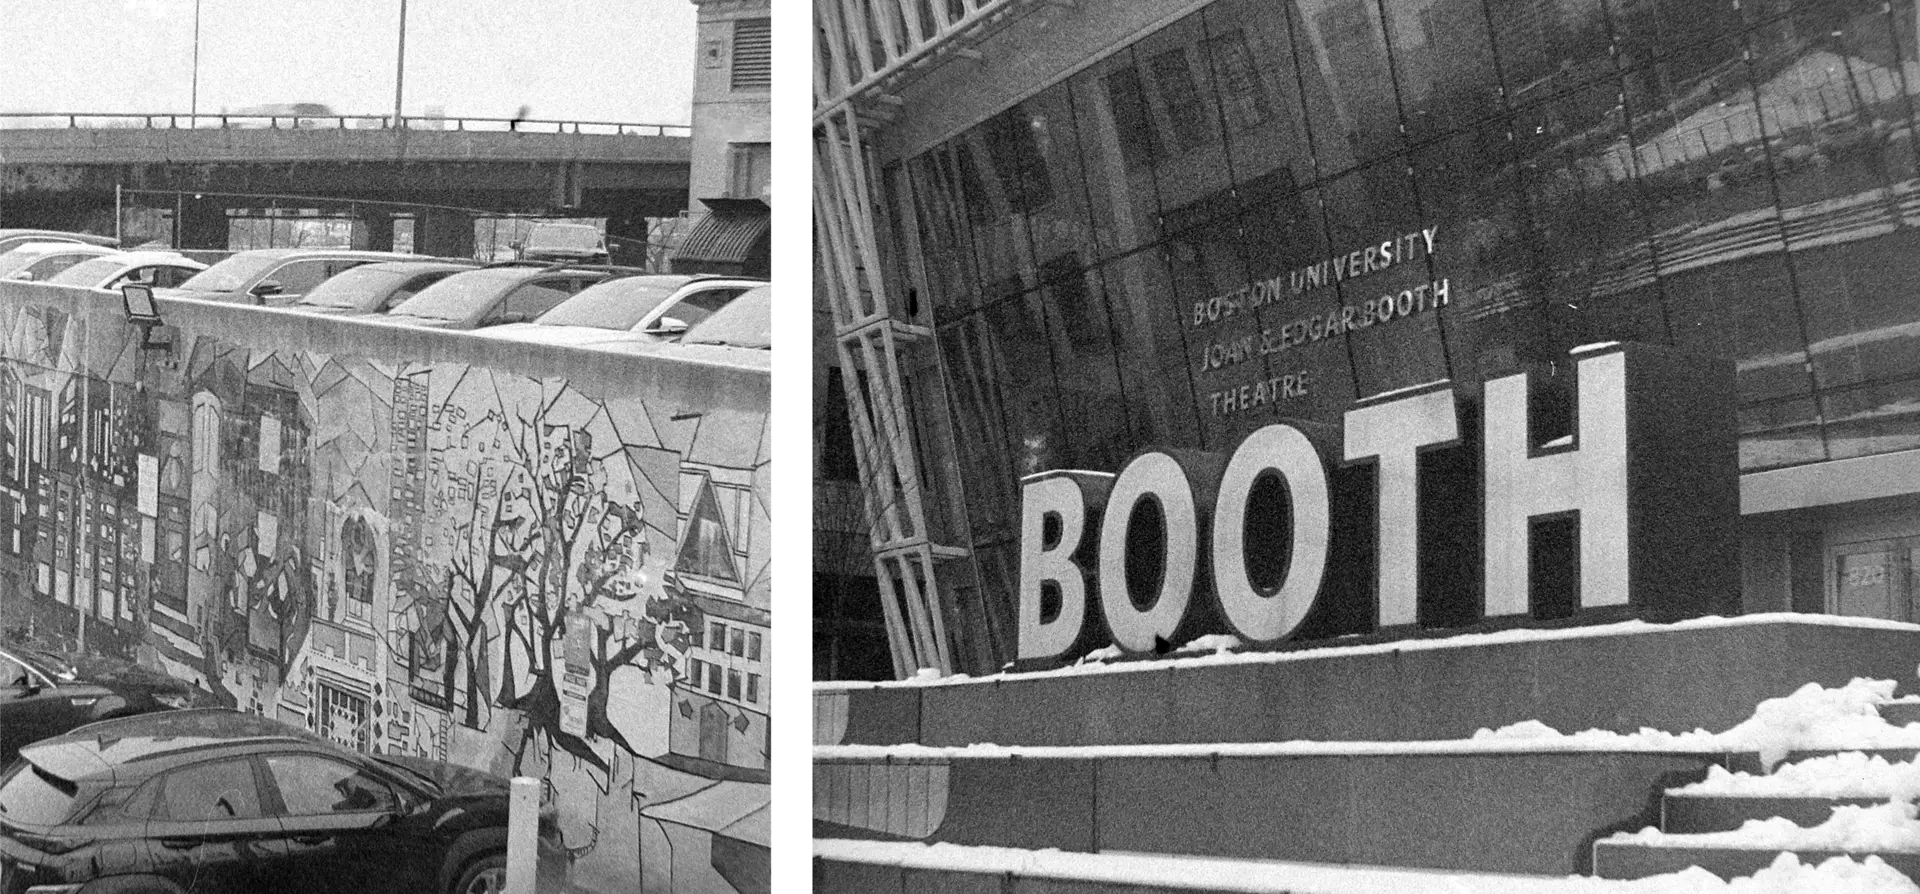
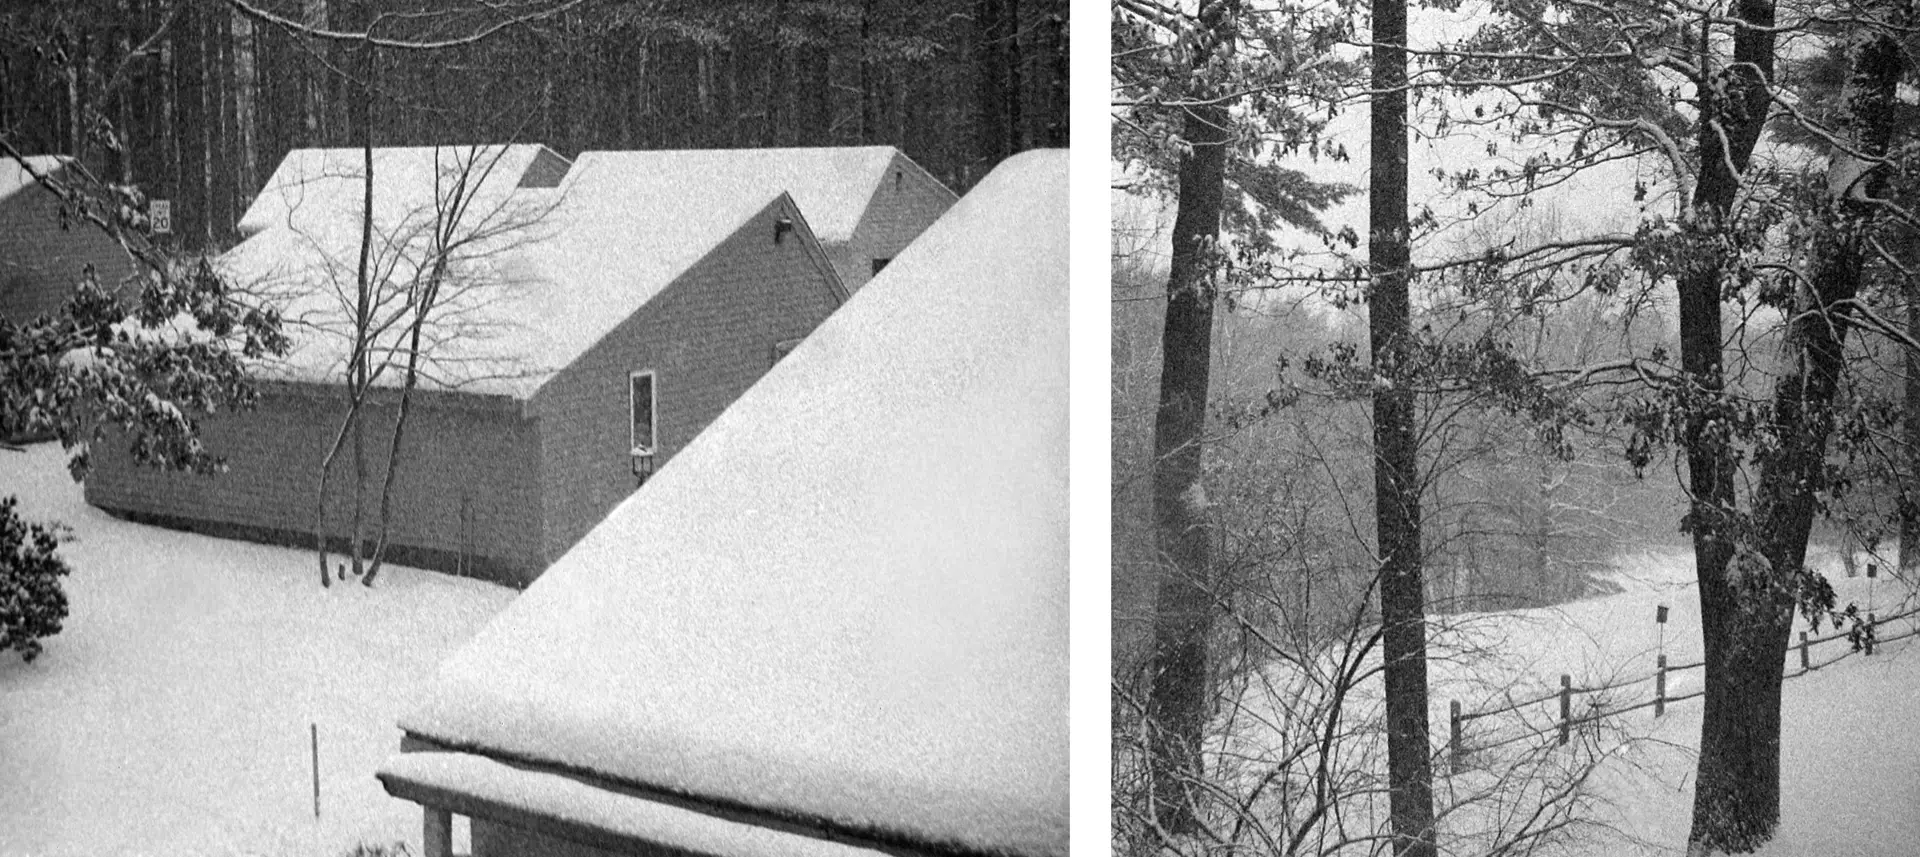
These were scanned and processed as I had the earlier shots. And I think the photos taken outside the Booth Theater look better because I didn’t shoot them through windows and falling snow. In fact, I think the two “Booth” shots are the best of the eight images in this article. Their grain seemed better controlled. And yet, the other six– all with more obvious grain– have their own charms.
Interesting Discoveries
I also made some interesting discoveries:
- It was important (for me anyway) to have a shooting mantra that kept me from overlooking steps. I always did mine (“Wind… Set… Prime… Shoot”) just before each shot. Note: “Set” meant to set focus, shutter speed and aperture as desired; and “Prime” meant to cock the camera’s shutter lever.)
- According to many web reports, Caffenol smells bad. So I was surprised that my mixture had only a very faint aroma of coffee! There may have been a couple reasons. First, I used soda-ash powder and not “Washing Soda,” which contains extra water. And perhaps more important, I mixed in the vitamin-C at the very end. Peter Bjerg recommended this “to avoid frying the ascorbic acid in a liquid too alkaline.” I don’t know if these minimized the mixture’s odor, but I had warned my wife that the kitchen might smell a bit when she returned from shopping. And when she did, she thought I hadn’t developed the film!
- The 828 film gate is so much larger than 35mm’s that “half-framing” it actually resulted in negatives the same size or larger than APS-C sensors (like the one in my Fuji X-Pro1). My Bantam half-frames were 20X28mm in size, while APS sensors typically range from around 17X25 to 19X29mm. (Compare that, too, with the smaller 18X24mm images from traditional half-frame cameras.)
- And on top of that, if I get a Flash Bantam with a working film-stop mechanism, I’ll try to use it (as described in Part 2 ) to equally space images along the entire strip. Without backing paper, I was able to roll a whole yard of film onto the skinny 828 spool. And at 25mm per image (including 5mm spaces between frames), I should easily get 36 APS-sized negs from a camera that originally cast only 8 pictures onto its paper-backed rolls.
Not too shabby for half-frame aficionados!
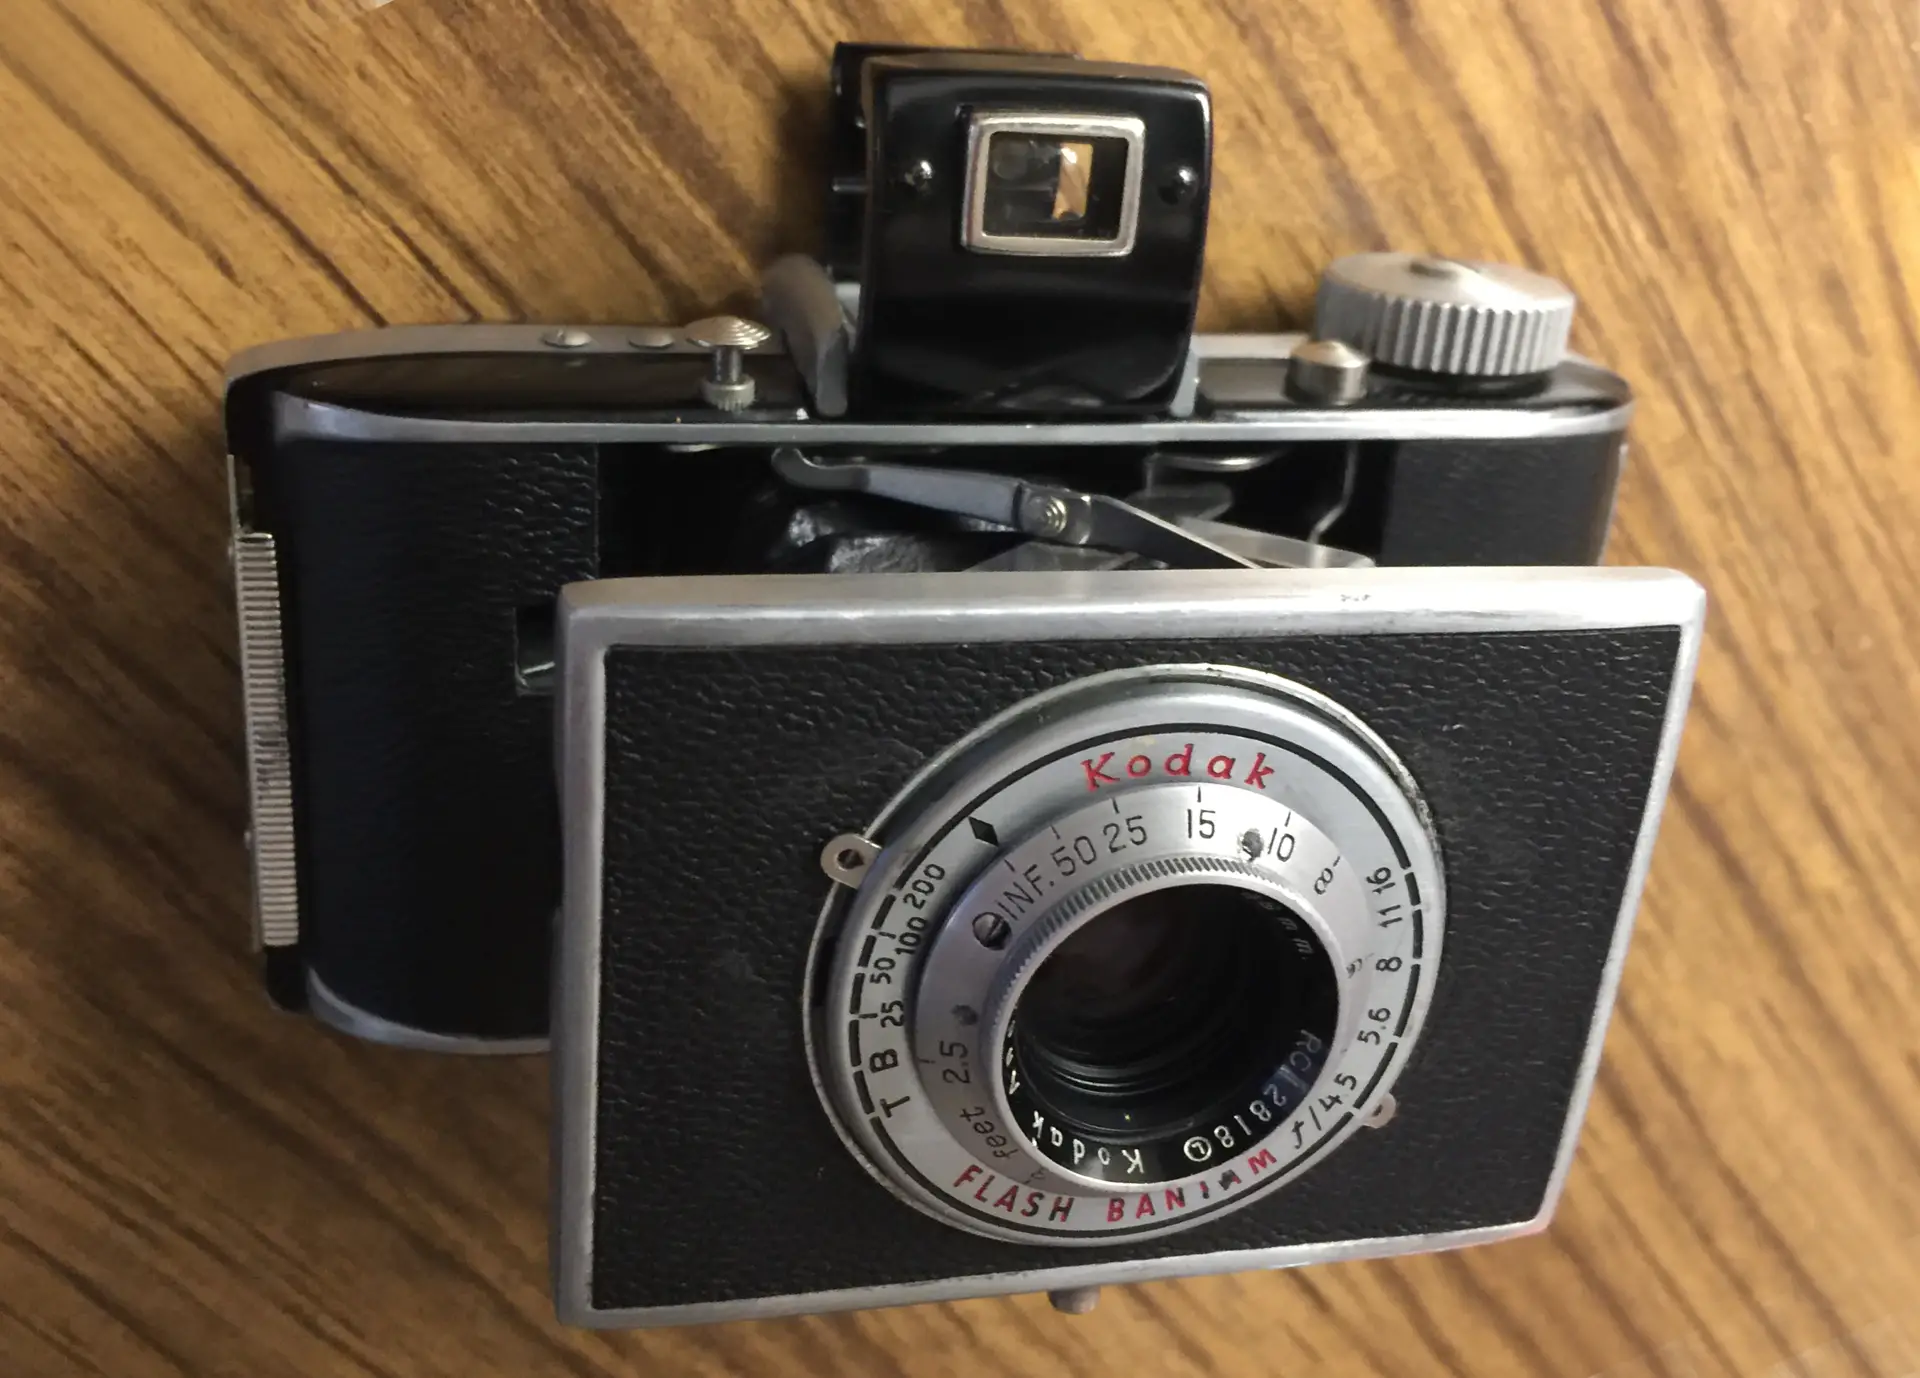
“Is That a Leica?”
Though its shutter and winding are more than quiet enough to shoot in streets, museums and concert halls, the Kodak Flash Bantam still attracted attention. It looks so sleekly elegant that two strangers asked if it was a Leica. You can imagine their surprise when I showed them its faceplate!
Next, I may try newer, fresher film. It may take better advantage of the camera’s excellent lens. But despite my expired film’s grain, it was wonderful to shoot, develop, scan, post-process, and add some of my photos to this article within just one day. Nearly as quickly as if I’d shot digital!
And the cute, pocketable Flash Bantam was a true joy to use. I can’t remember ever having as much fun shooting and developing film.
–Dave Powell is a Westford, Mass., writer and avid amateur photographer.
Share this post:


Comments
John Furlong on That time I “half-framed” a cute Kodak Flash Bantam camera (Part 3 of 3)
Comment posted: 18/04/2023
Here's an alternative 'mantra' which I use for cameras without interlocking shutter / wind on facilites - it's SAFE
Shutter
Aperture
Focus
Expose
Cheers,
John F.
Comment posted: 18/04/2023
Walter Levy on That time I “half-framed” a cute Kodak Flash Bantam camera (Part 3 of 3)
Comment posted: 18/04/2023
A pleasure to read.
Dave Powell on That time I “half-framed” a cute Kodak Flash Bantam camera (Part 3 of 3)
Comment posted: 18/04/2023