Most things in photography – indeed, most things in life – are a trade-off. And trade-offs are subjective. So when I say that the Godox AD100 Pro, the flash that I’m reviewing in this article, is the “perfect off-camera flash for my needs”, I am really saying two things.
First, that it’s the perfect trade-off for me. There are flashes – both from Godox and other manufacturers – which are cheaper or more expensive, lighter or heavier, less or more powerful. The least expensive flash will never be the most feature-packed; the lightest flash will never be the most powerful. So at the end of the day, you have to choose. You make a trade-off.
Second, it’s the perfect trade-off for me. Later on in this article, I’ll describe how I use the flash, and why it fits my needs so exceptionally well. That, hopefully, can help you decide whether it might fit your needs – and your camera-bag – as well.
Review notes
Godox kindly sent us the AD100 Pro for review, but I was not paid for this review, nor do we have affiliate links. As always, my goal in this review is to be honest and objective.
The photos in this article were shot with a Fuji X-E4 camera and various lenses (if you want more details about gear, just ask me in comments). The Godox AD100 Pro flash was triggered with a Godox XPro II wireless flash trigger. I will also review the trigger in next month or so.
Specs
| Compatibility | Nikon, Canon, Sony, Fujifilm, Olympus, Panasonic (with the appropriate Godox wireless triggers) |
| Power output | 1/1 (maximum) to 1/256 (−9 stops) |
| Colour temperature | 5800±200K |
| Stroboscopic flash | Yes (upto 90 times, 99Hz) |
| Sync mode | High-speed sync (up to 1/8000 sec), first-curtain sync, second curtain sync |
| Modeling flash | 1.8W. Adjustable brightness: 1 to 10 levels |
| Wireless options | Wireless radio (2.4G transmission). Optical receiver: S1/S2 |
| Radio range | 100m (approx) |
| Power | Lithium battery pack (7.2V/2600mAh) |
| Full-power flashes | 360 (approx) |
| Recycle time | 0.01–1.5s |
| Dimensions | 170×76×76mm |
| Weight | 524g (with battery) |
The AD100 Pro in the Godox ecosystem
So what is the AD100 Pro and where does it fit into the Godox ecosystem? Let’s start at the very beginning.
There are two main types of photographic lights: flash (instantaneous) and continuous. Godox sells both, but for now, flash is what we are interested in.
The Godox AD100 Pro is marketed as an ‘outdoor flash’. In brief – if you want a full overview of the Godox ecosystem, this Hypop article is an excellent resource – Godox sells three categories of flash: camera, outdoor and studio (besides specialist devices like macro and dental flashes).
Camera flashes – like the V and TT series, and the Retro flashes which I’ve reviewed before – are designed to be mounted on the hot-shoe of a camera (though they can be used off-camera too).
Outdoor and studio flashes are bigger and more powerful. They are designed to be used off-camera, for example on a light-stand. I don’t use studio flashes myself, but I believe the main difference between outdoor and studio flashes is that the latter are generally bigger, heavier and more powerful, and also AC mains powered (as opposed to outdoor flashes like the AD100 Pro, which are powered by batteries).
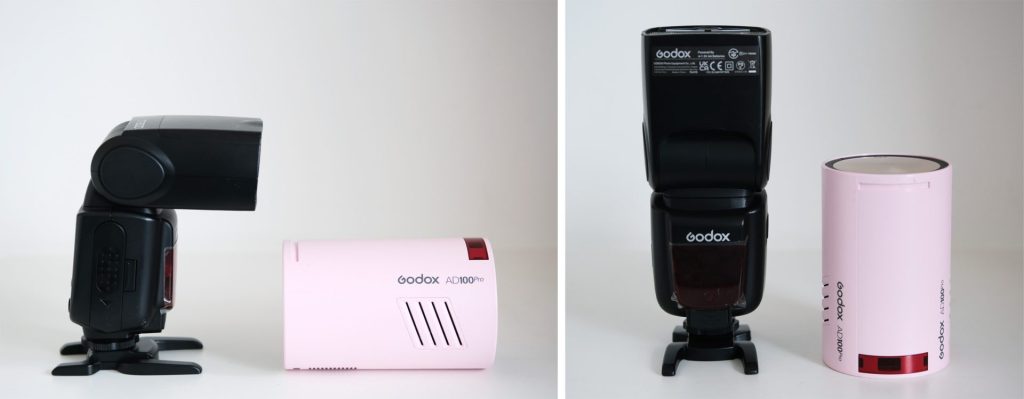
Of the Godox studio flashes, the AD100 Pro is the smallest, lightest and cheapest. It’s also the least powerful (though least powerful is relative; it’s still packs a lot more power than camera flashes).
Unlike the popular AD200 which has two native options – rectangular Fresnel head and bare bulb – the AD100 only has a round Fresnel head. A Fresnel – as explained in this article – is like a lens. Without it, light rays from the bulb would fan out in all directions. The Fresnel concentrates them into a front-facing beam of a higher intensity.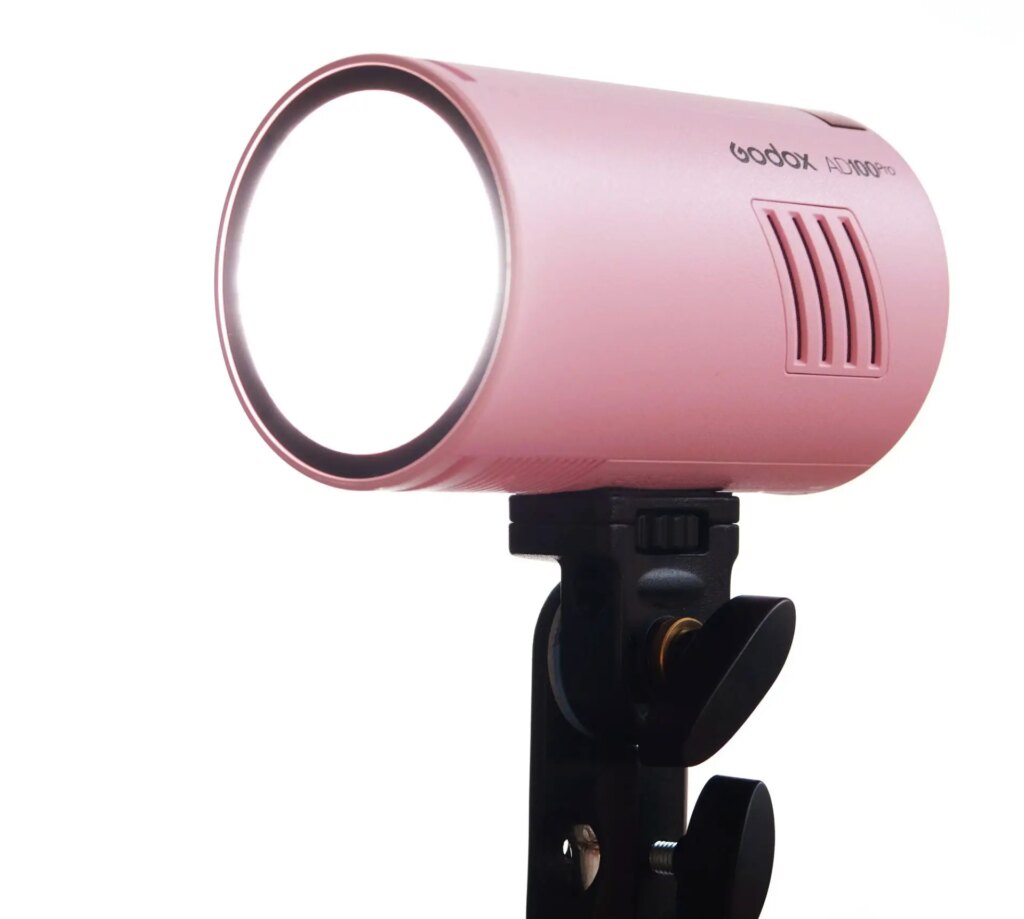
In short, if you need a flash which can also be mounted on the hot-shoe, you should go for a camera flash (but then you have to make do with lower power and fewer features). If you need more power or the bare-bulb option, then you should consider the higher-end outdoor flashes (but these are bulkier and more expensive). For me, the AD100 Pro is the Goldilocks choice – powerful enough, while being relatively cheap and compact.
Colours and packaging
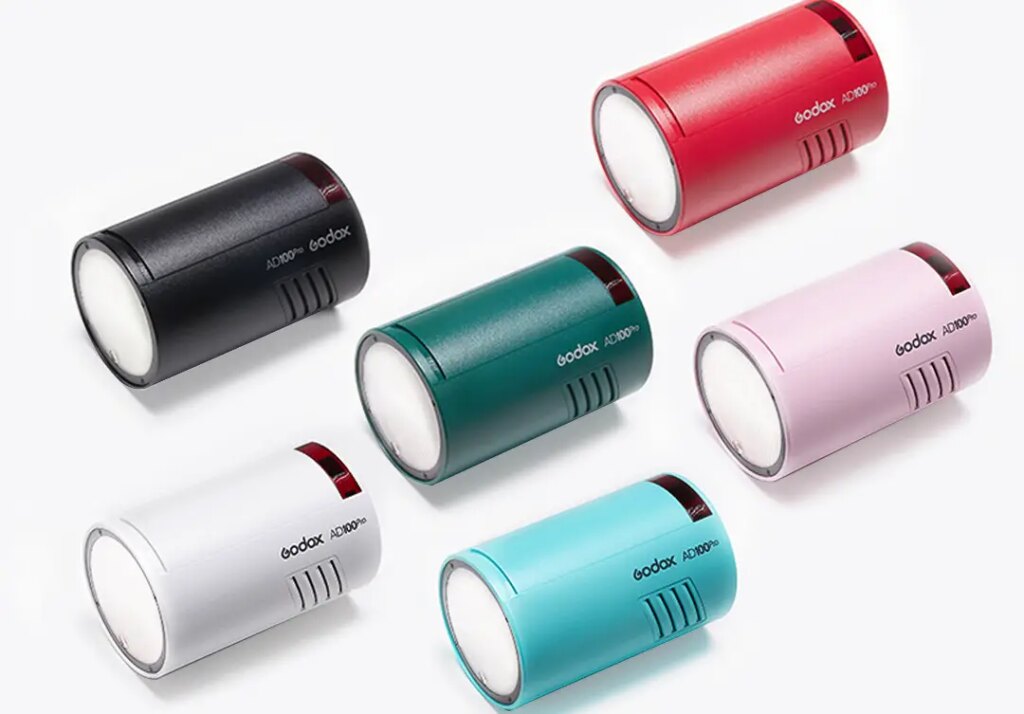
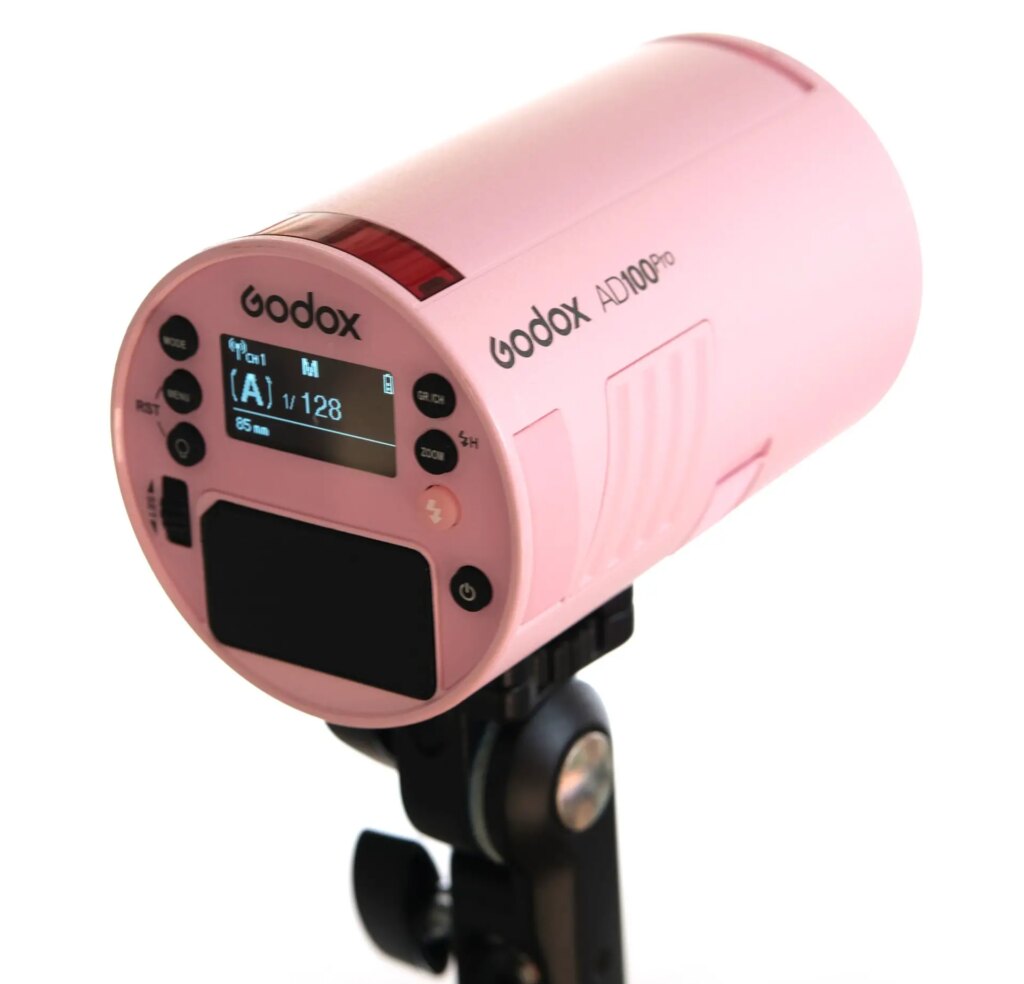
Godox sells the AD100 Pro in a range of colours: black, white, red, dark green, pink and mint green. I told my friend I was leaning towards the pink, and asked for her opinion. She said “the pink feels like Douyin influencer” (Douyin being the mainland-Chinese counterpart of Tiktok). Undeterred by this gibe, I got the pink.
“OK, it’s not as ugly as I thought,” my friend said when she saw it in person. I actually think the pink looks amazing. Having pretty gear makes all the difference.
The Godox AD100 Pro comes in a nice cardboard box, with a sleeve matching the colour of the flash inside.

It also comes with an AD-E2 bracket, high-quality travel case, battery, charger and instruction manual.

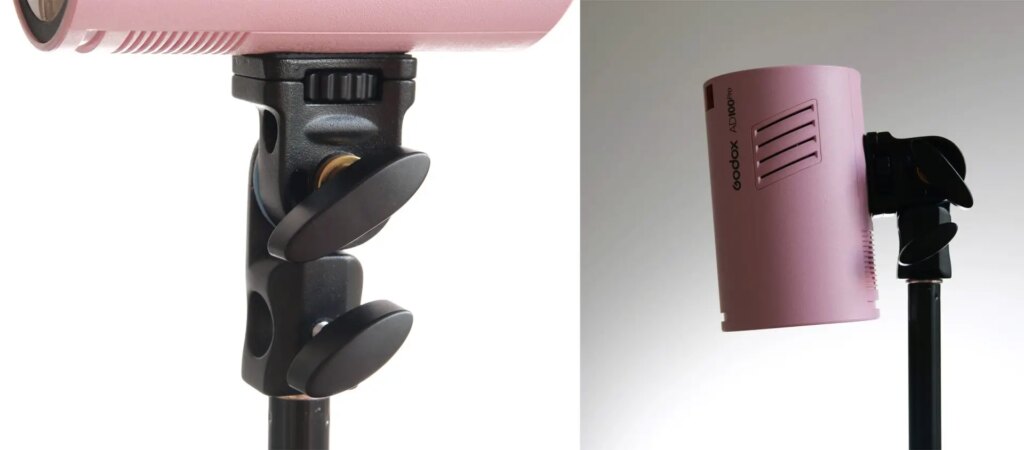
The AD-E2 bracket feels robust and very well-designed. It has one screw-knob for mounting it on a light-stand, and another to steplessly adjust the angle from straight up to straight down. It also has a hole for mounting an umbrella or similar modifier. The bracket attaches to the flash via a ¼” screw; a thumbscrew makes it super convenient to mount and detach.
Body and construction
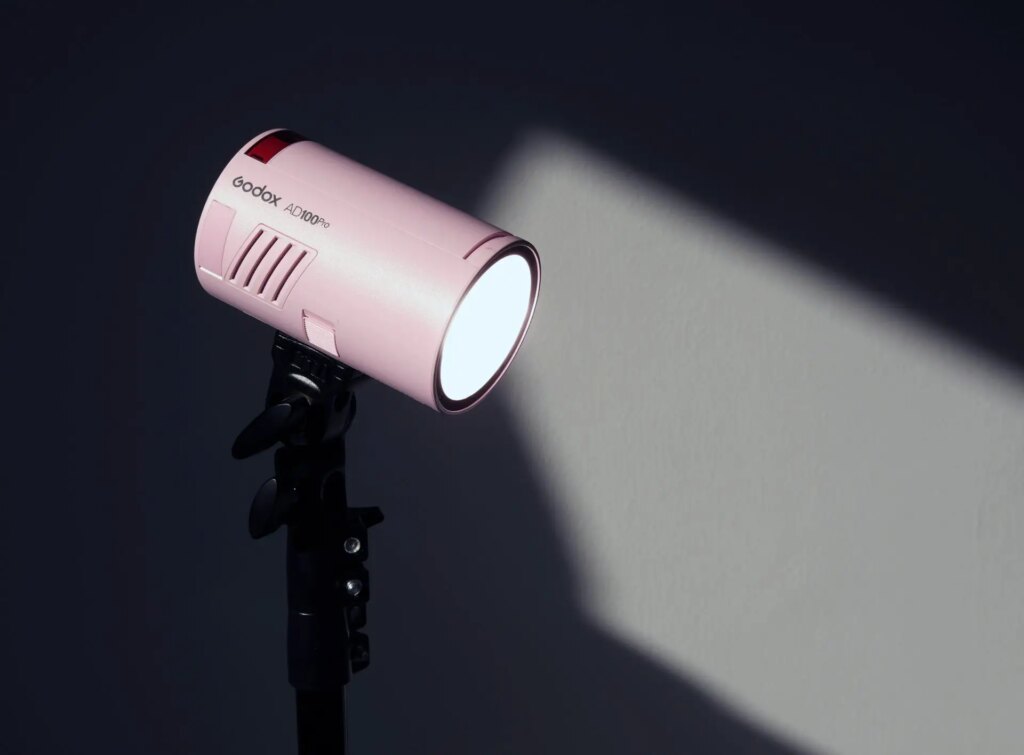
The Godox AD100 Pro has a simple cylindrical shape. The front has the Fresnel flash and modelling light. The back is where the battery slots in, and also where the LCD and all the controls are located.
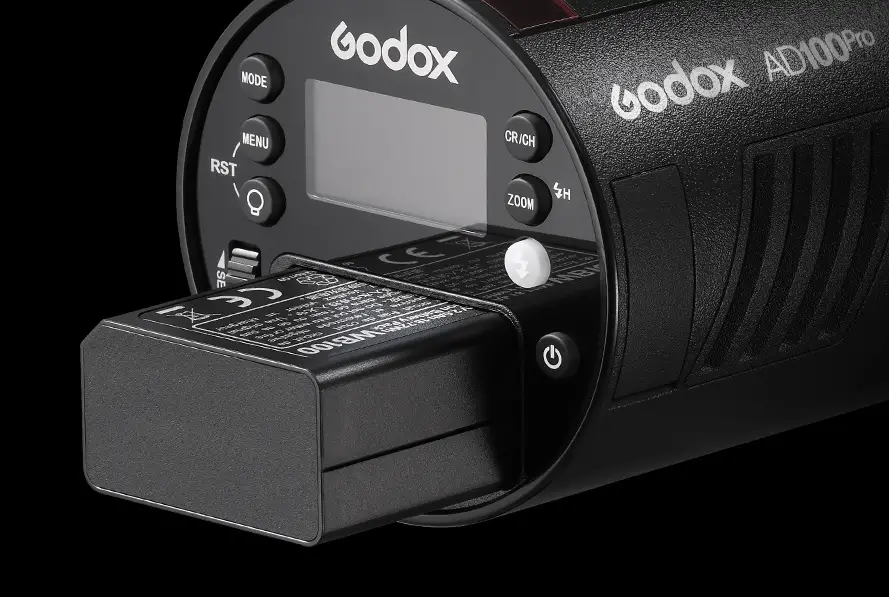
On the sides, there are air vents, and a switch to release the battery. There are also two ports, hidden behind a plastic cover: one for charging (USB-C) and another for sync cable (3.5mm).
The bottom has two ¼” screw holes for fitting the AD-E2 bracket: one near the middle (for when the flash is on a light-stand) and one closer to the rear (I found this more convenient when the bracket and flash are to be handheld). Given the cylindrical shape of the flash unit, it’s more convenient to hand-hold with the bracket attached (like how you would hold a hair-dryer).
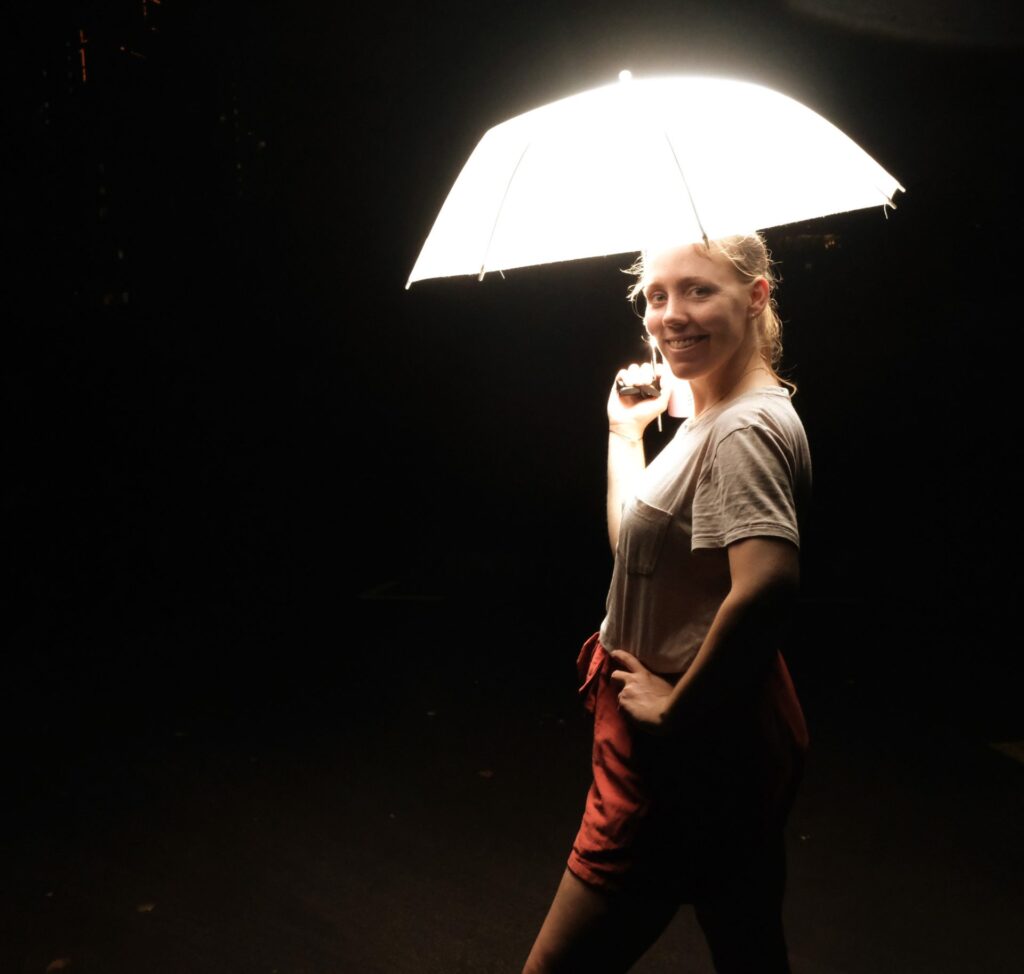
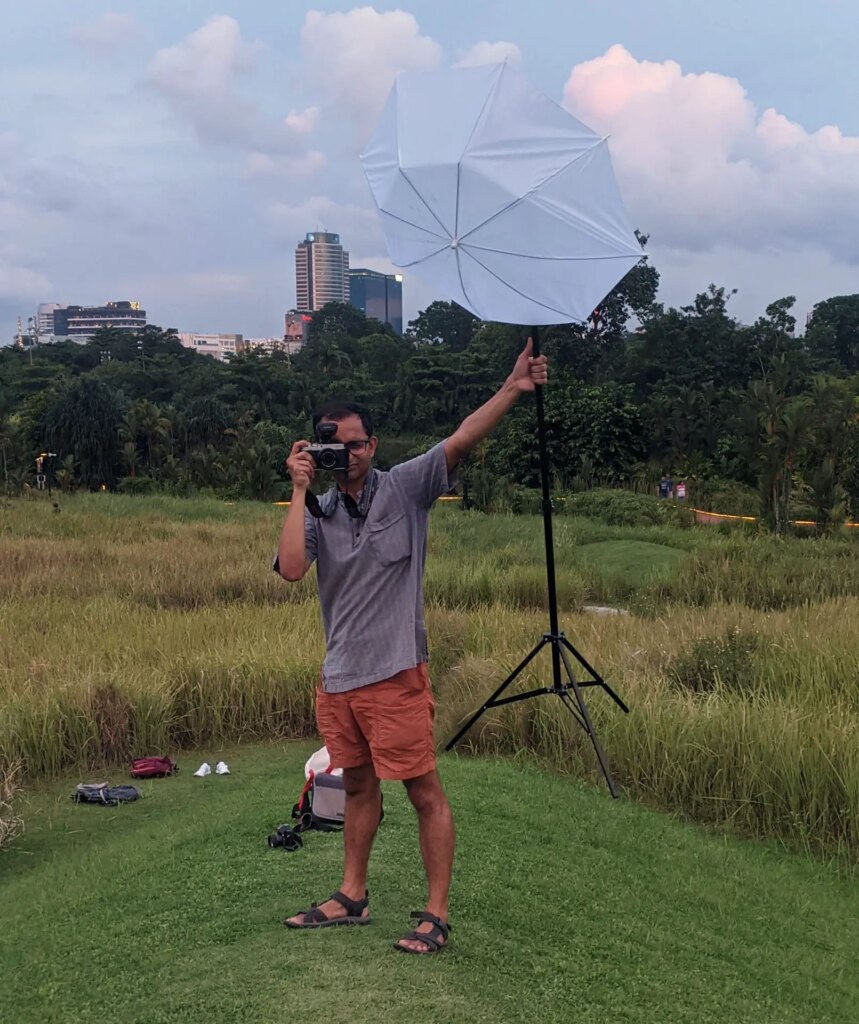
Here’s my friend Annika demonstrating the “hair-dryer grip” – with an umbrella diffuser for good measure.
The build-quality is excellent; we not only tested this (unwittingly) but also captured it on video. My friend Kwang and I were shooting in a sheltered spot, where I thought there was low risk of the light-stand being blown over. So I didn’t bother to weight it down, as I normally would when shooting outdoors.
Sure enough, a gust of wind blew it over, and the flash toppled from 6 feet onto hard concrete. The video below (and the dramatic gasp) are courtesy Joern, who was shooting behind-the-scenes footage:
But the flash carried right on working, no problem whatsoever, and we got the shot we wanted.
Controls and features
The LCD is bright and easy to see even in daylight, as befits an outdoors flash. Most of the buttons are self-evident, so I won’t spend too much time running through them. I like that Godox managed to keep the interface relatively simple (not too many buttons) while also managing to restrict most of the buttons to a single function. Some of their on-camera flashes have multiple functions assigned to each button, which can be a bit confusing.
MODE cycles through Manual, TTL and Multi (stroboscopic flash). TTL, as usual, requires a compatible trigger and camera.
MENU gives you access to various settings like optical receiver mode (where the flash is remote-fired not by a wireless radio trigger, but when it “sees” another flash) and standby time.
BULB is for the modelling lamp. Pressing MENU and BULB simultaneously resets the settings (RST).
The wheel, which can be scrolled and clicked, is used to change the power level (1/256 to 1/1, in 0.1 increments), and to navigate the menus. To turn the flash on, you have to press the power button and then scroll down the wheel, which I suppose is a safety feature to avoid turning it on accidentally and wasting power.
GR/CH is for changing group and channel, to make sure your wireless trigger is talking to your flash. Finally, ZOOM cycles through 28mm, 35mm, 50mm, 70mm and 85mm.
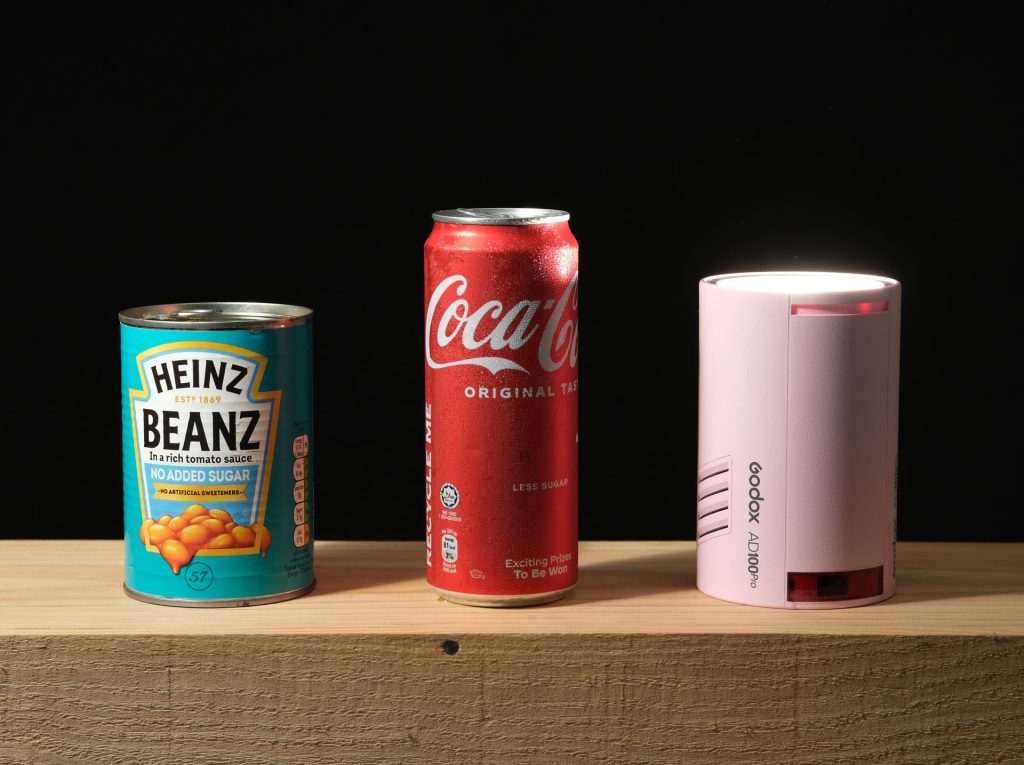
Size and portability
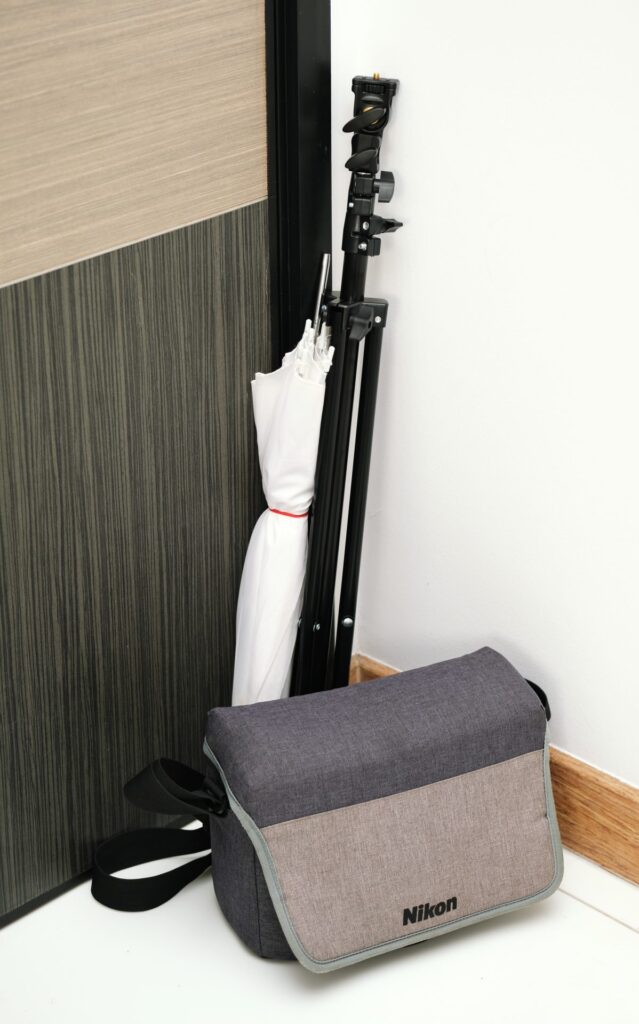
Compactness is the AD100 Pro’s major selling point, and a big reason why I like it so much.
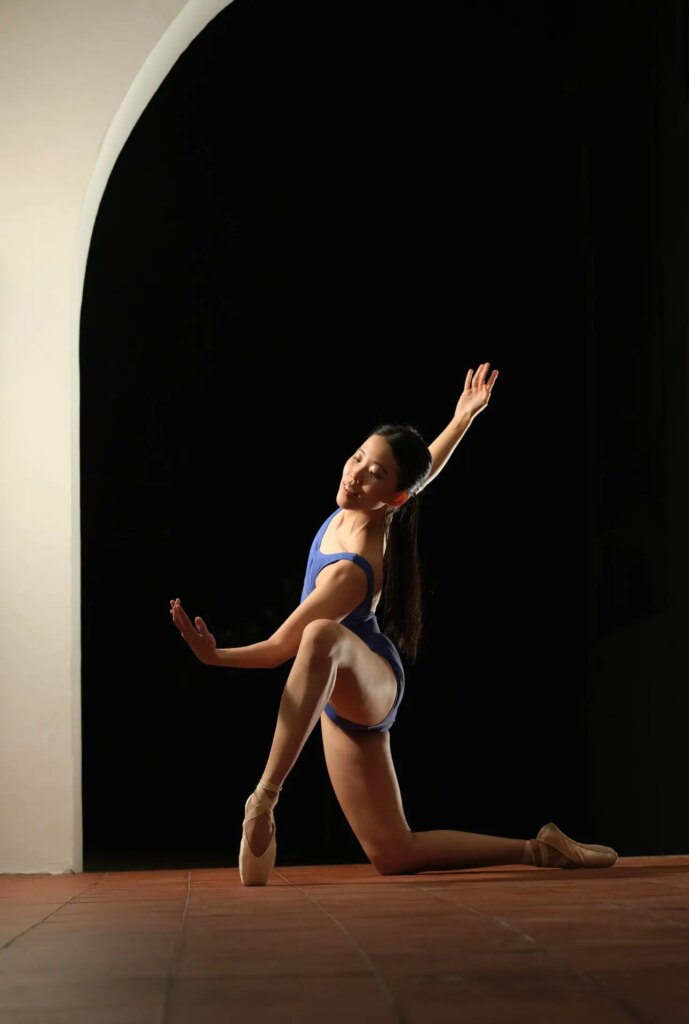
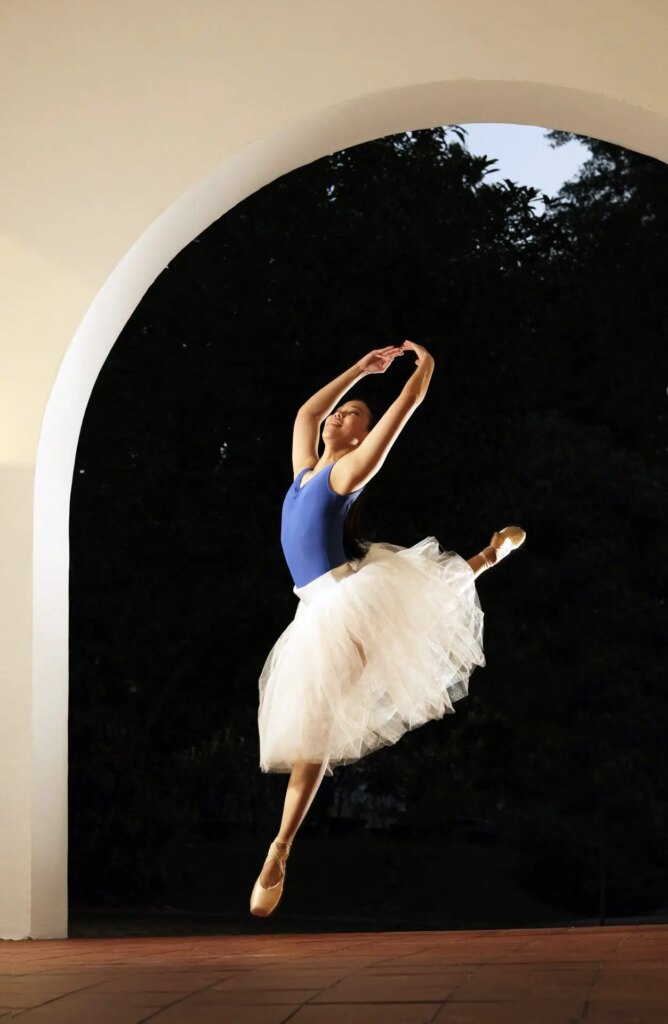
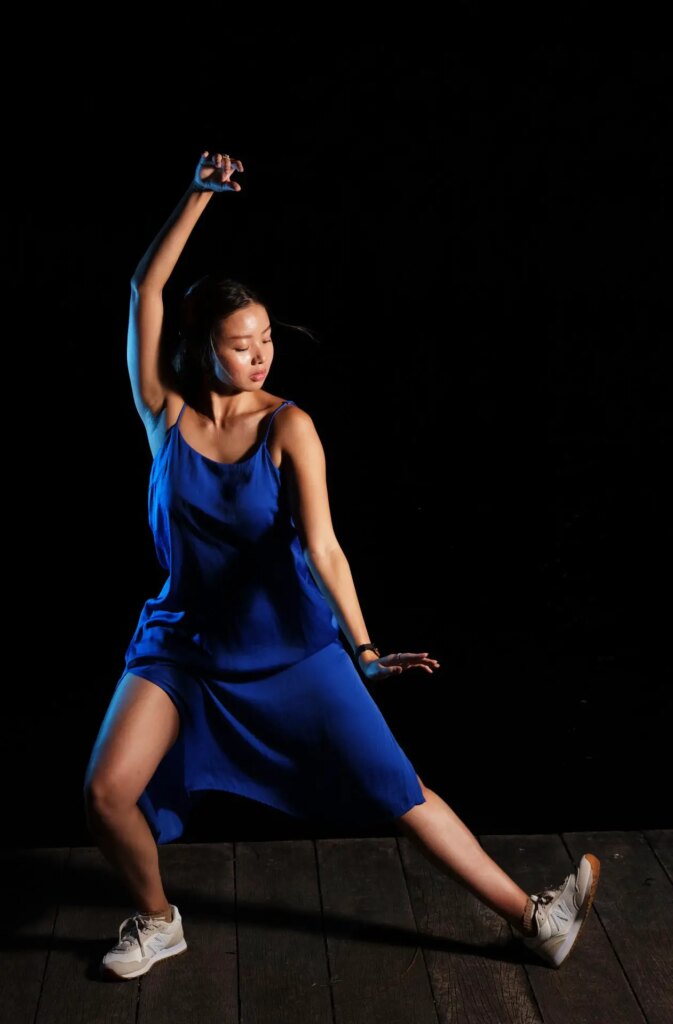
Having a small and light kit is particularly useful because I often shoot on location, especially for dance photography. With my Fuji digital camera system and the compact Godox AD100 Pro, I’ve managed to reduce my location-photography setup to a bare minimum – a kit which is almost ridiculously small and light.
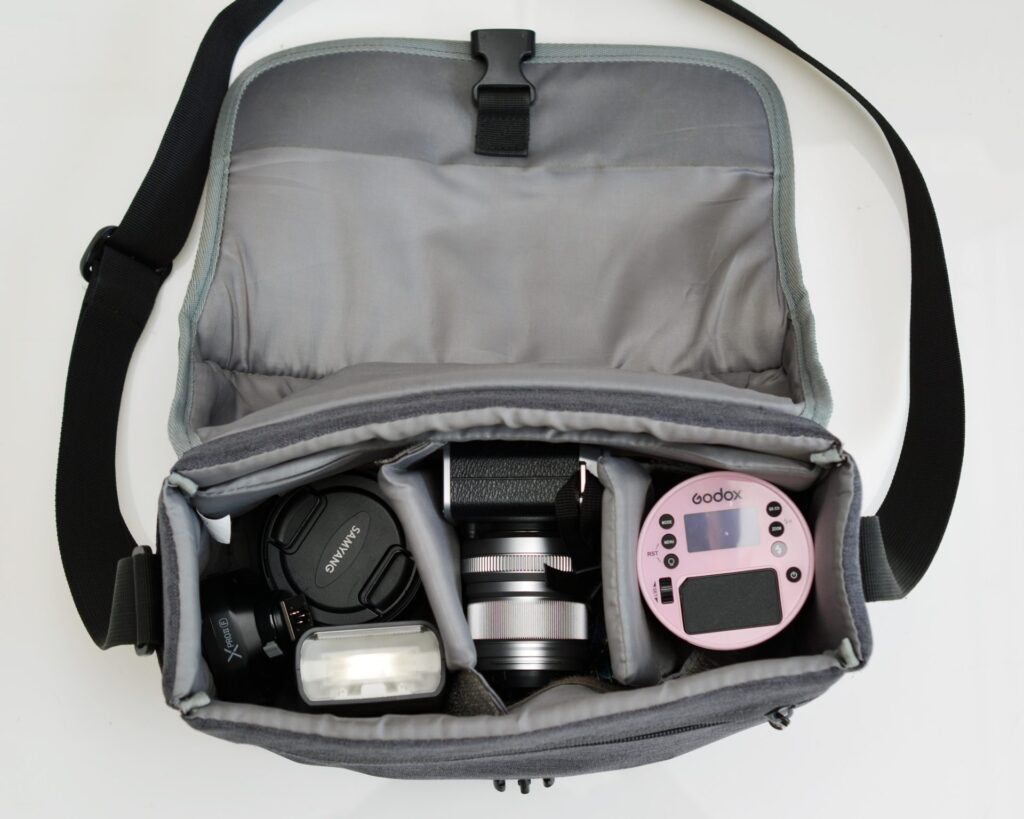
The bag above contains:
- Fuji X-E4
- Two lenses: Fuji XF 50mm f/2 and Samyang 12mm f/2 (manual focus)
- Two flashes: Godox AD100 Pro and Godox TT350 (hotshoe flash)
- Godox XPro II wireless trigger
- Spare battery, memory cards, ND filter, colour gels for flash, etc.
In addition, I carry a light-stand and a cheap umbrella diffuser:
Location shoots
If you mostly do studio photography, size and weight are less of a concern. But if, like me, you’re shooting on-location, without an assistant, taking public transport or bike to a photoshoot, walking around looking for good locations and so on, you really don’t want to be carrying a ton of gear.
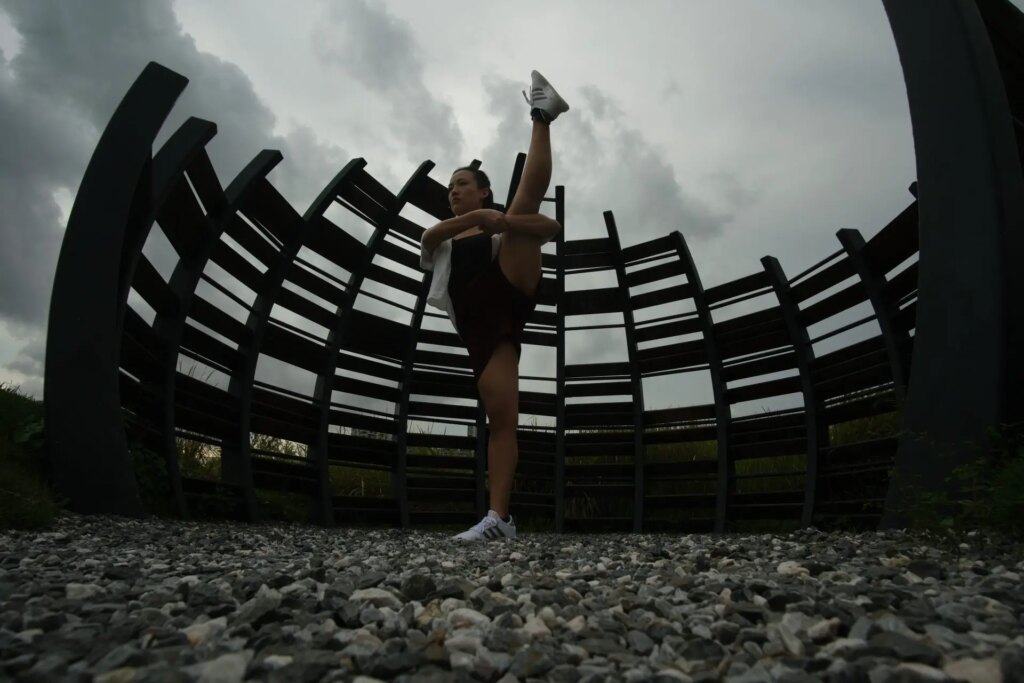
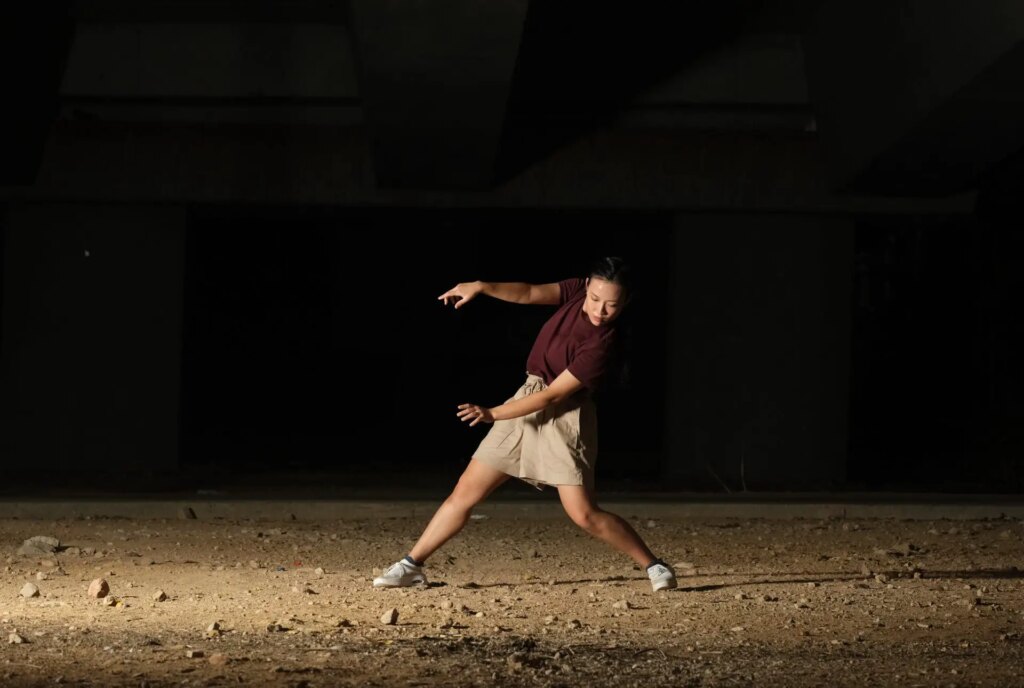
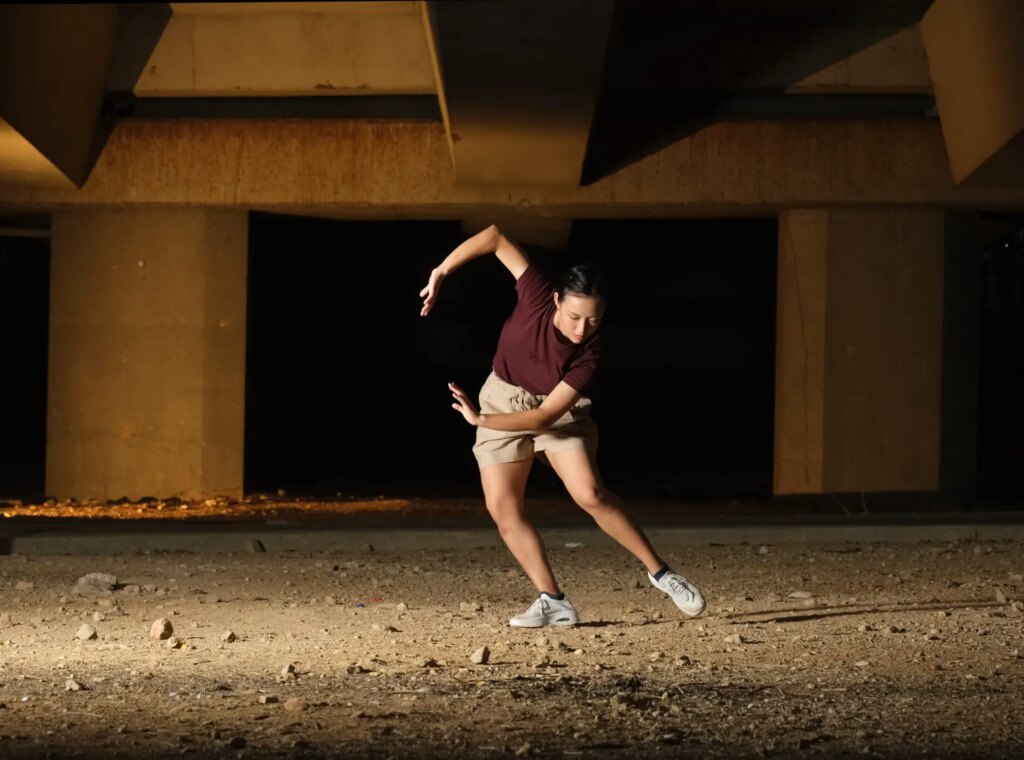
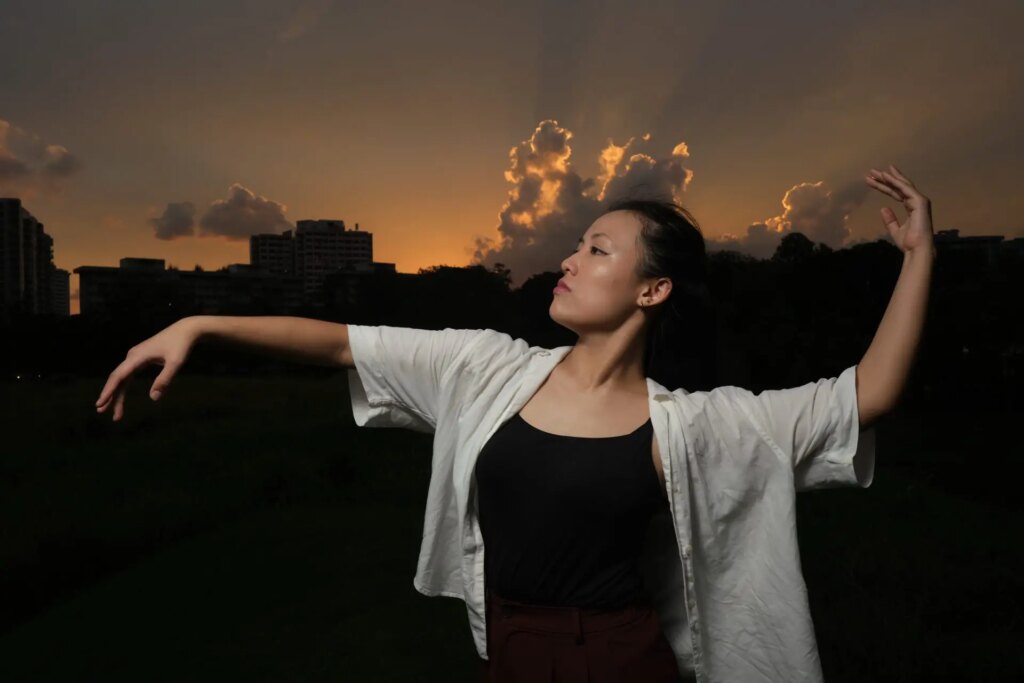
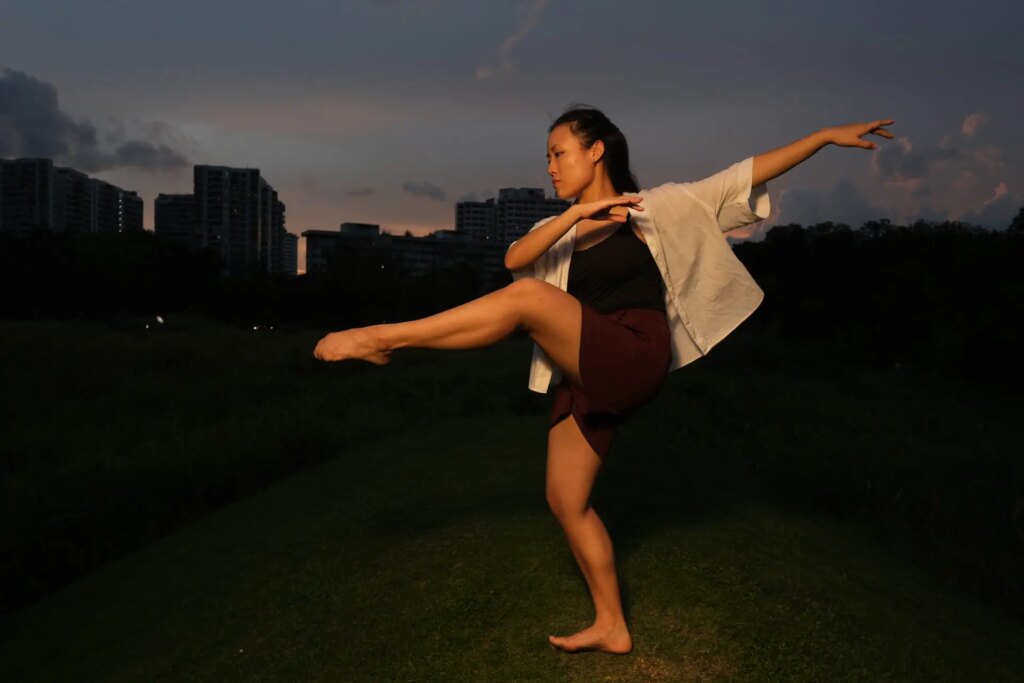
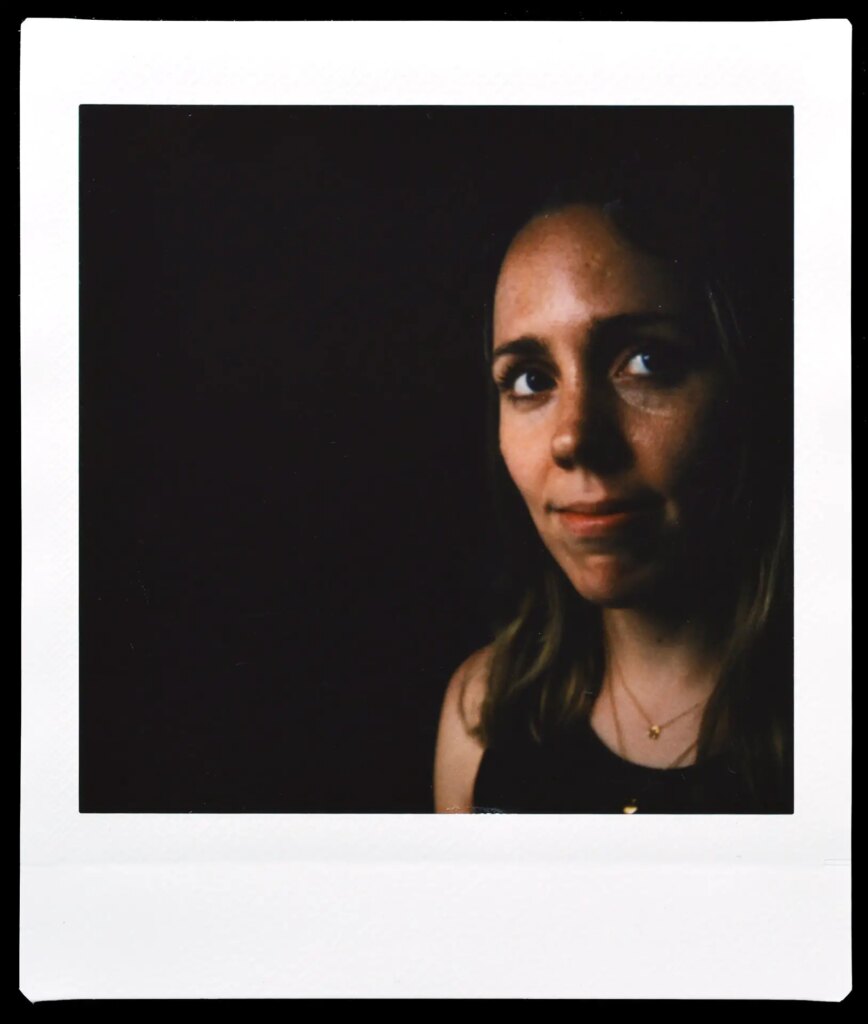
If you use it well, the little Godox AD100 Pro with a cheap ($5!) umbrella diffuser can produce studio-like results. The photo below, of my friend Olivia, was shot without flash, underexposing for the moody sky.
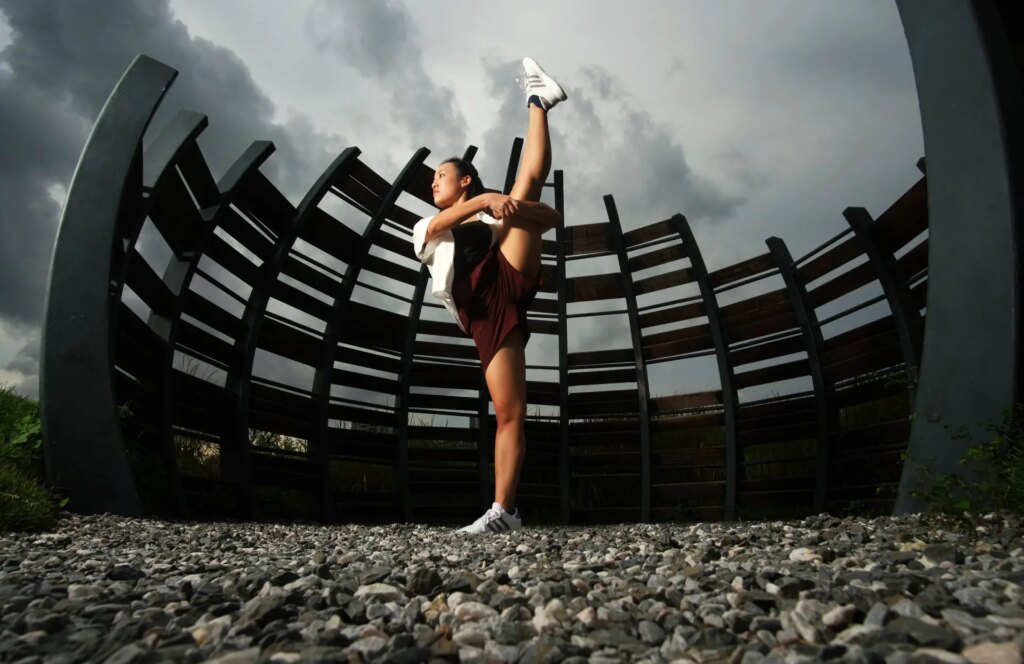
The next photo is with flash.
Finally, here’s a look behind the scenes. One-light setup: Godox AD100 Pro with an umbrella diffuser.
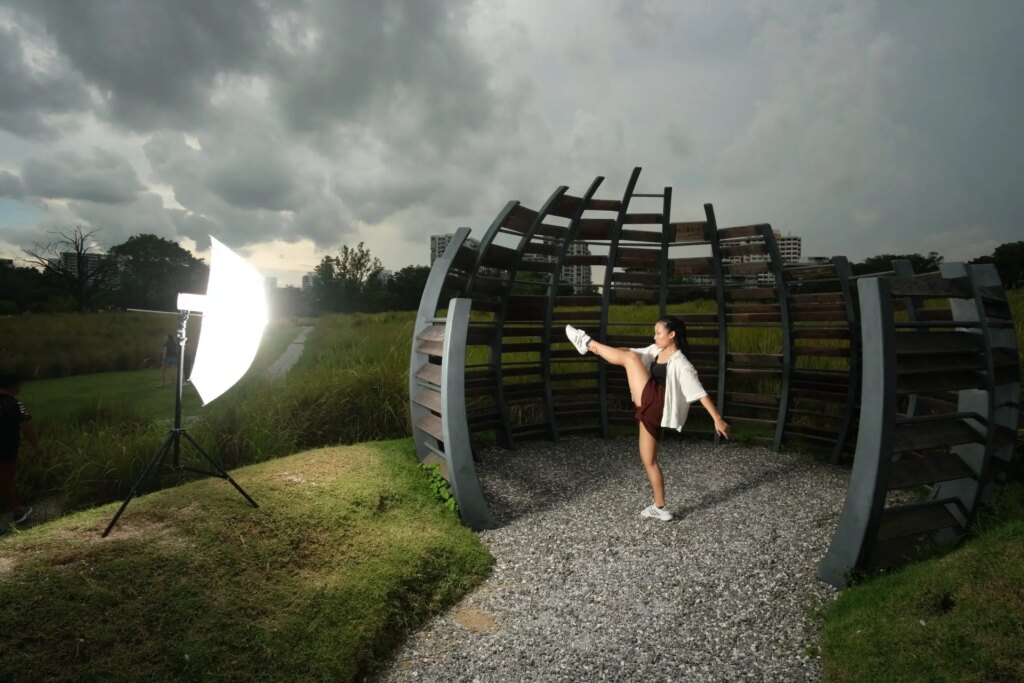
When I listed my gear, I mentioned that I generally carry a hot-shoe flash as well. But the photos in this section were all shot with a single Godox AD100 Pro flash. (In the next section, I’ll share some examples using a two-light setup.)
Here’s another behind-the-scenes photo with my friend Joern. As you can see, I learned my lesson from the aforementioned toppling light-stand incident, and am using my backpack for additional support.
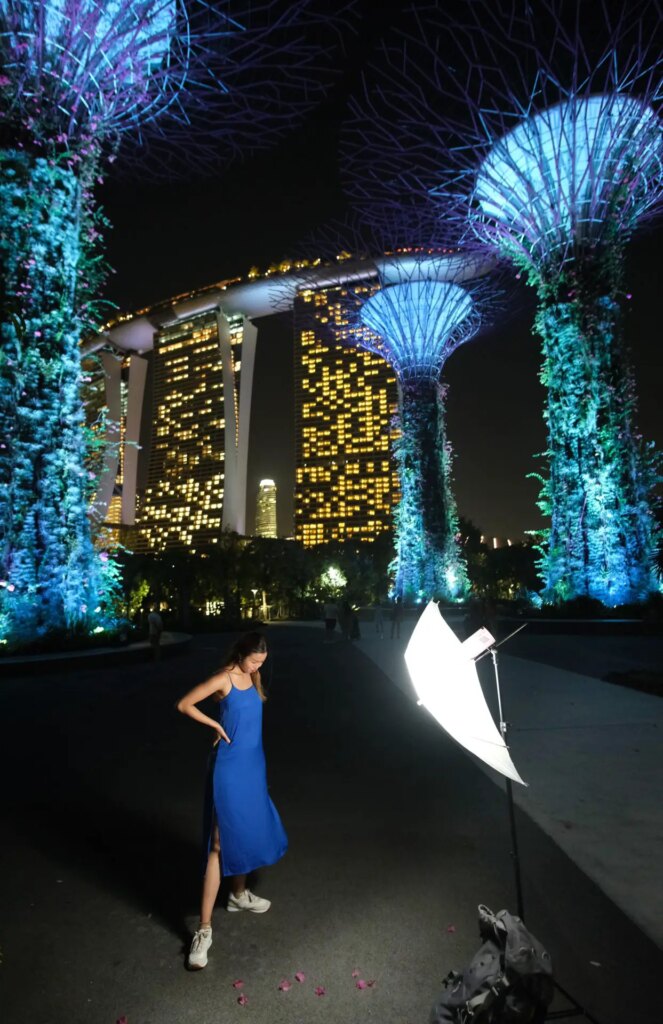
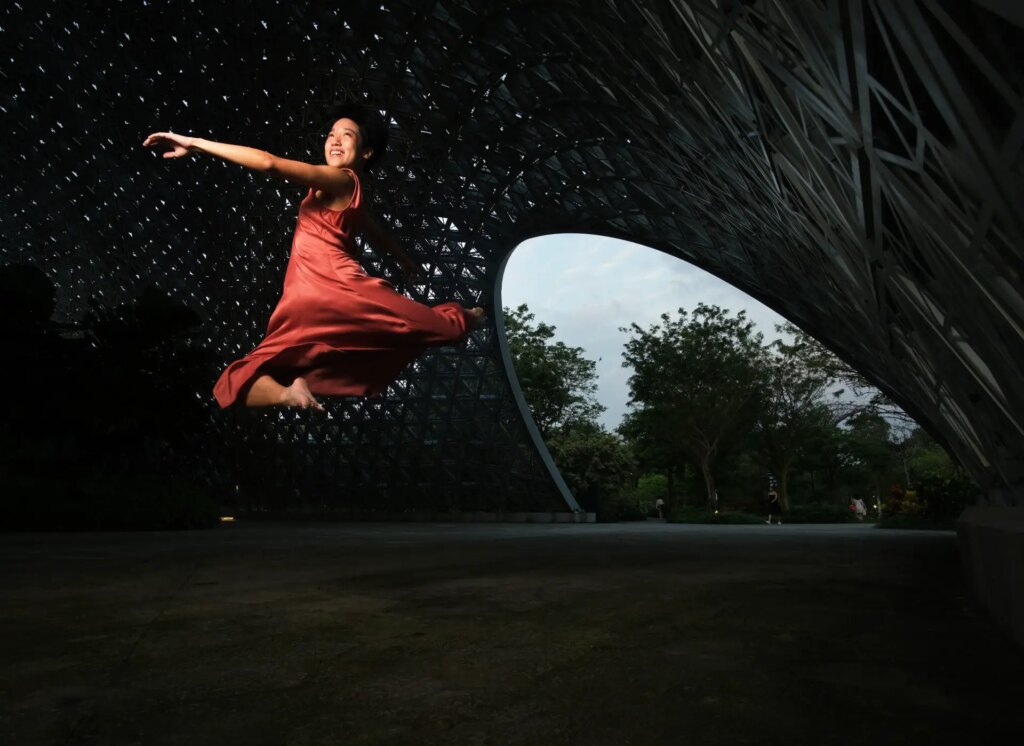
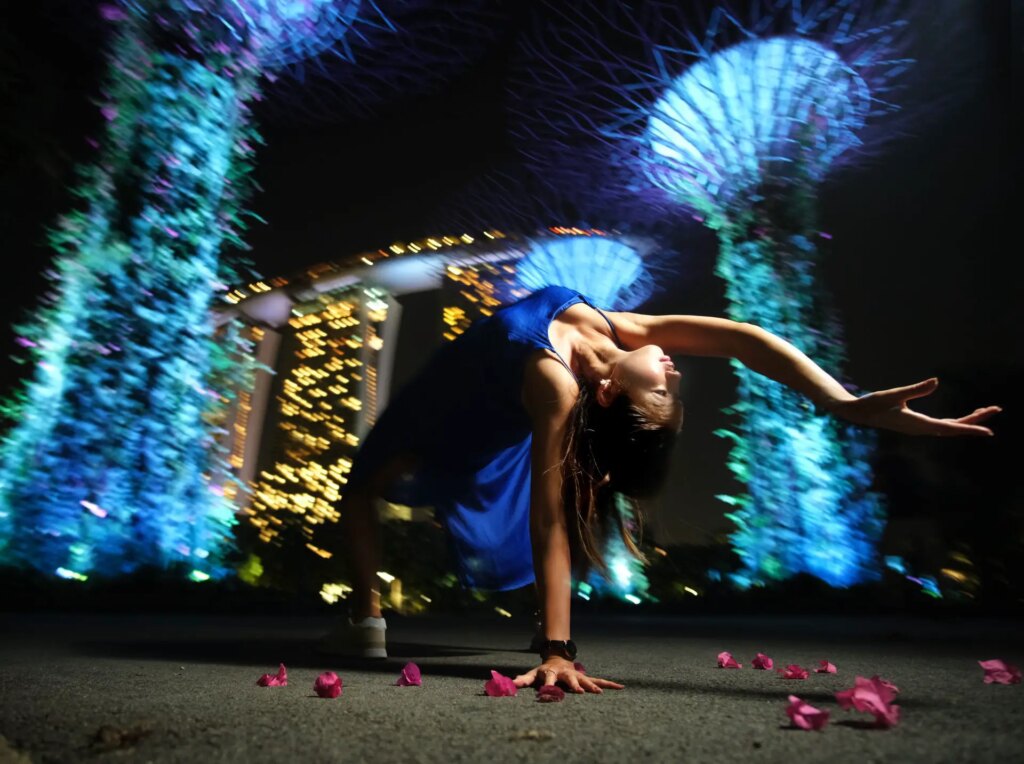
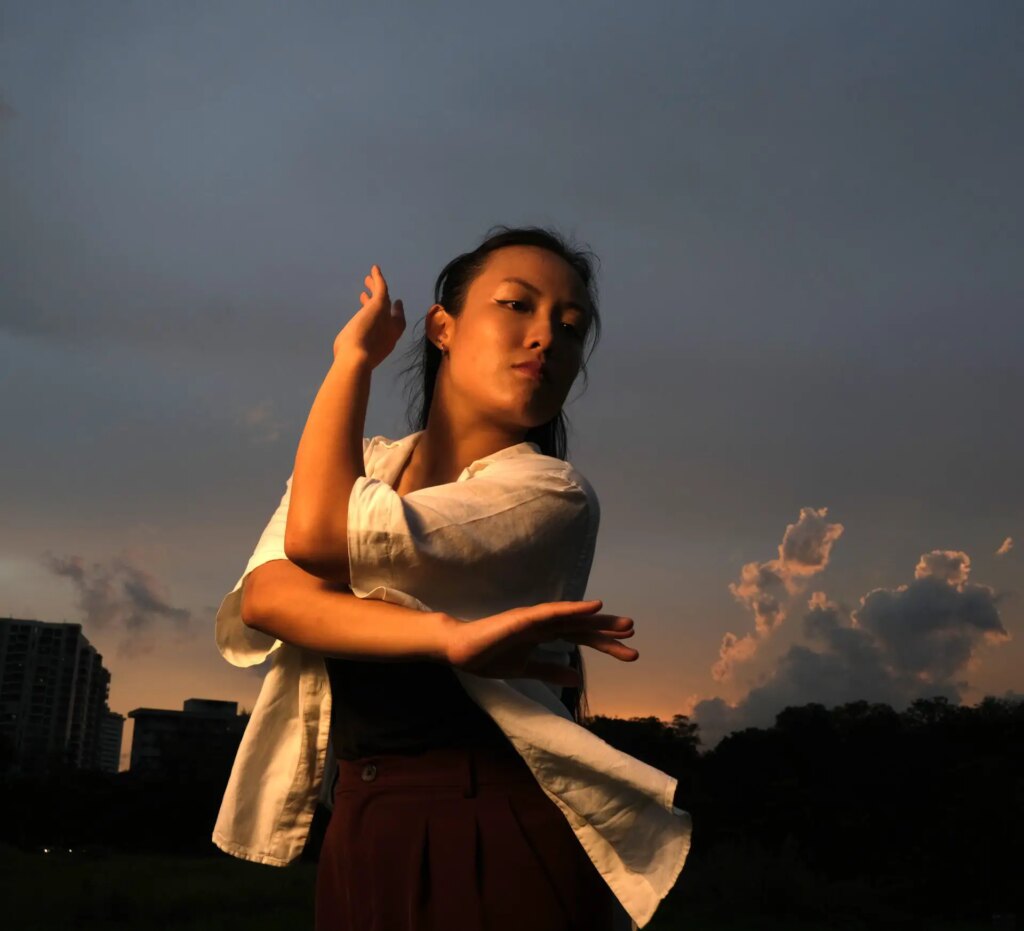
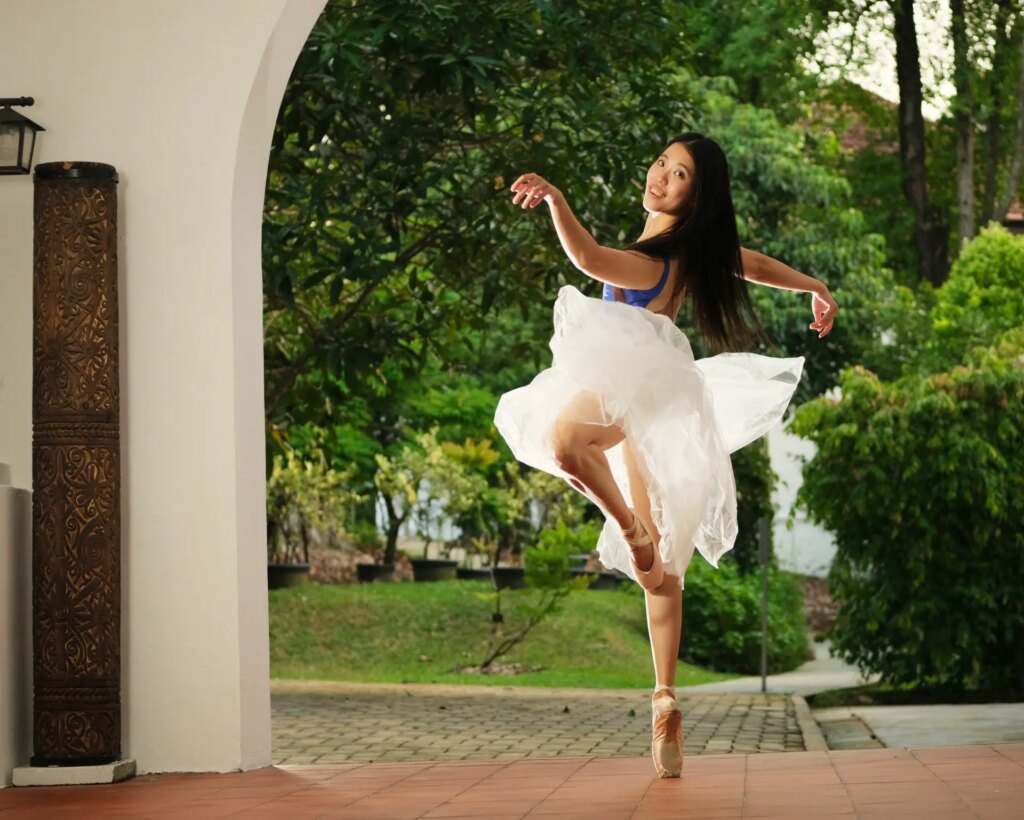
Using a slightly long shutter-speed (1/15 sec) and deliberately moving the camera during the exposure, I introduced some motion-blur for an edgier look. Rear-curtain sync froze the subject, making sure she is sharp (this technique – long shutter-speed and flash – is often referred to as “dragging the shutter”).
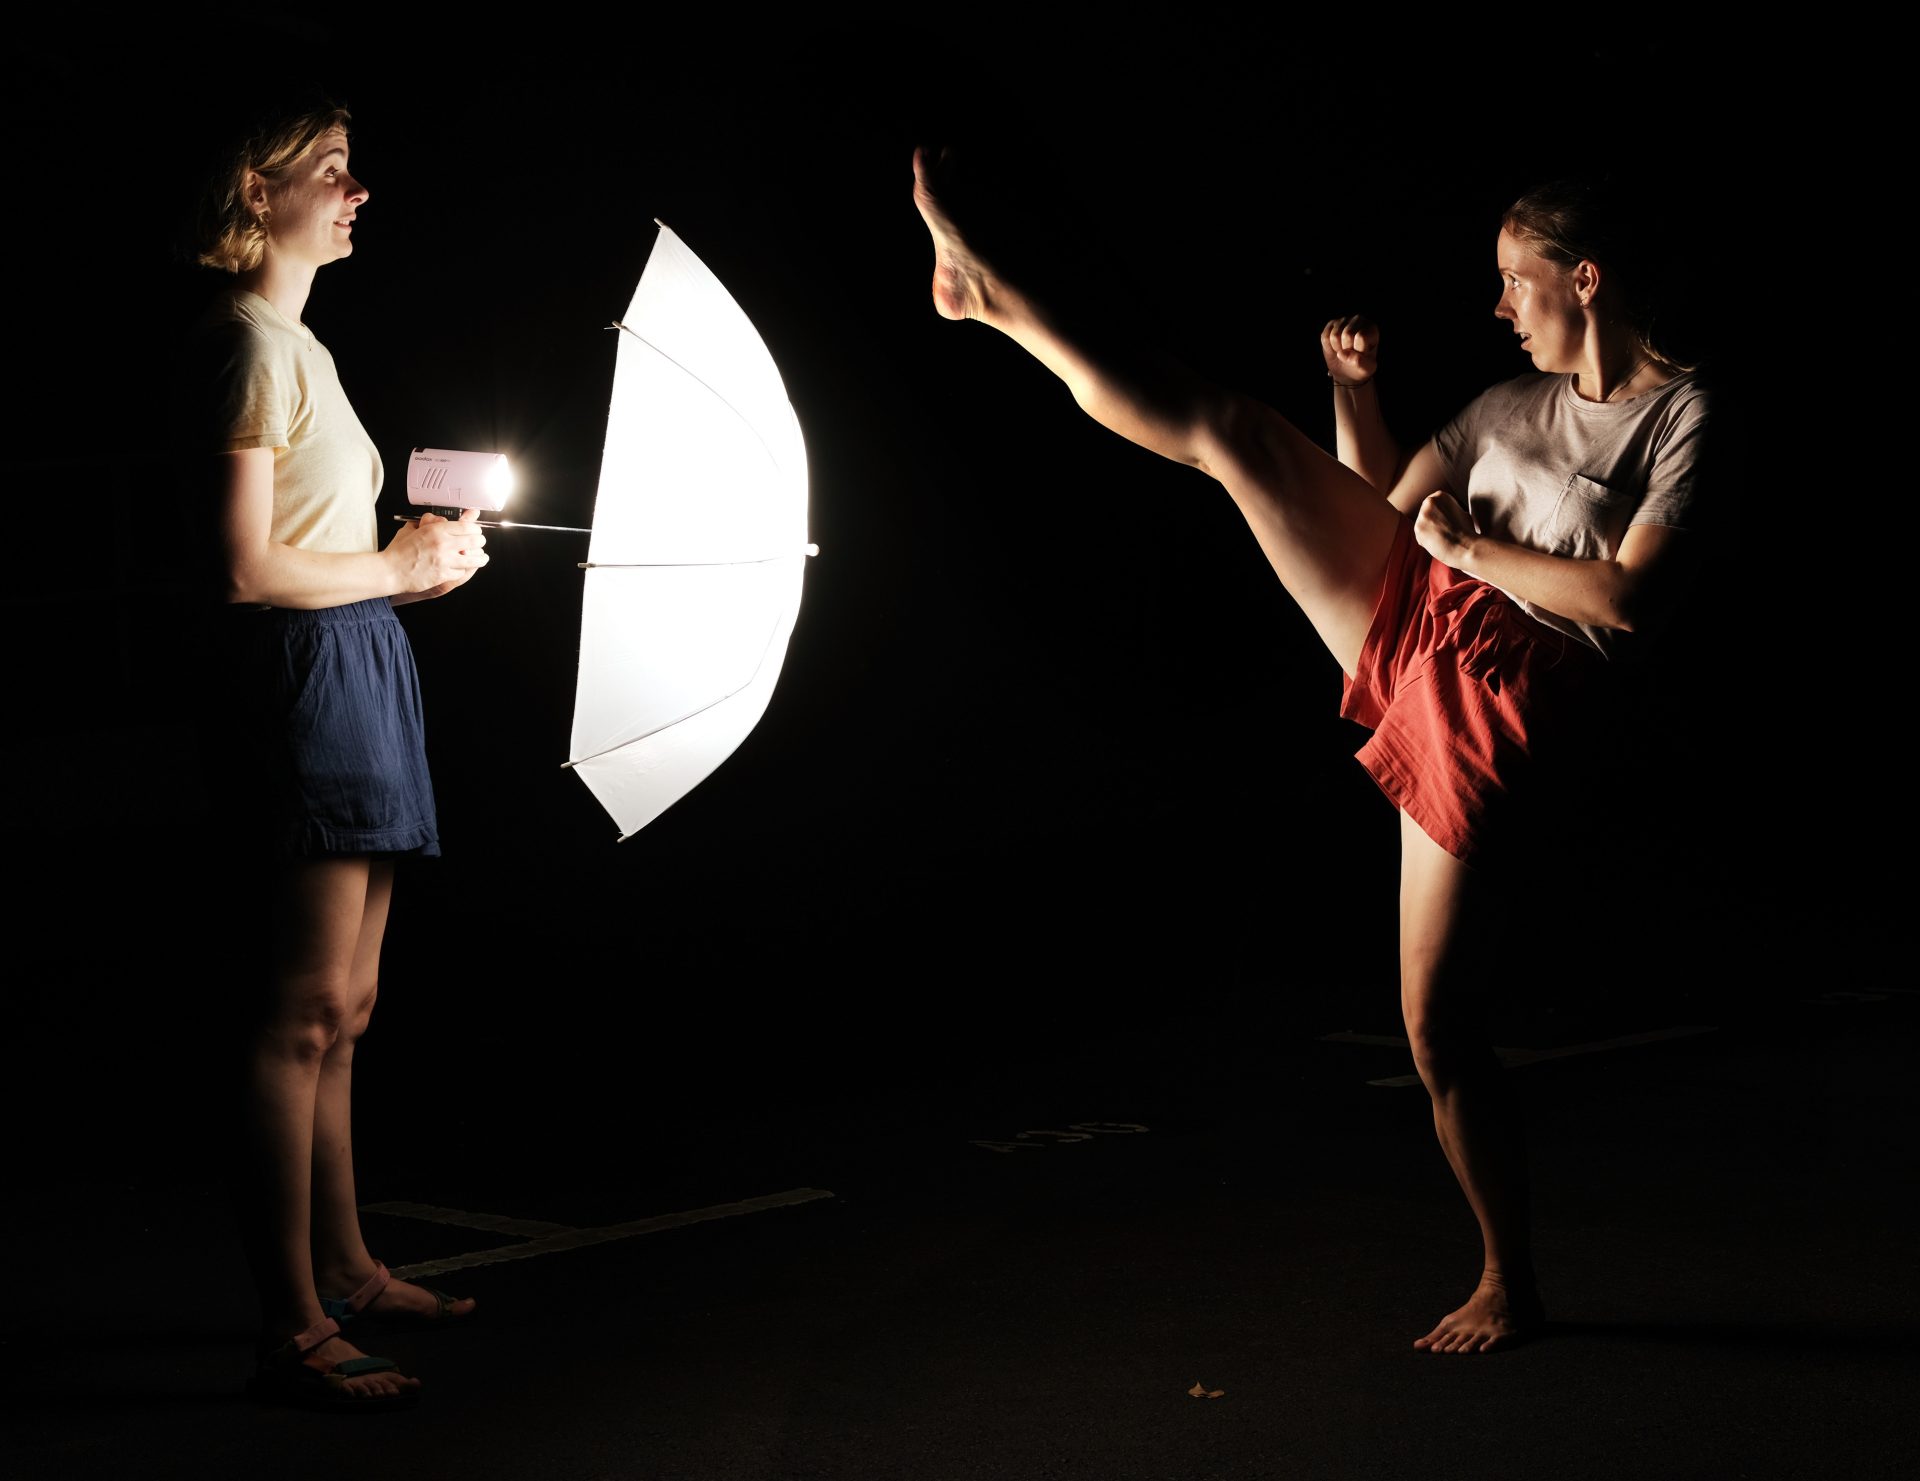
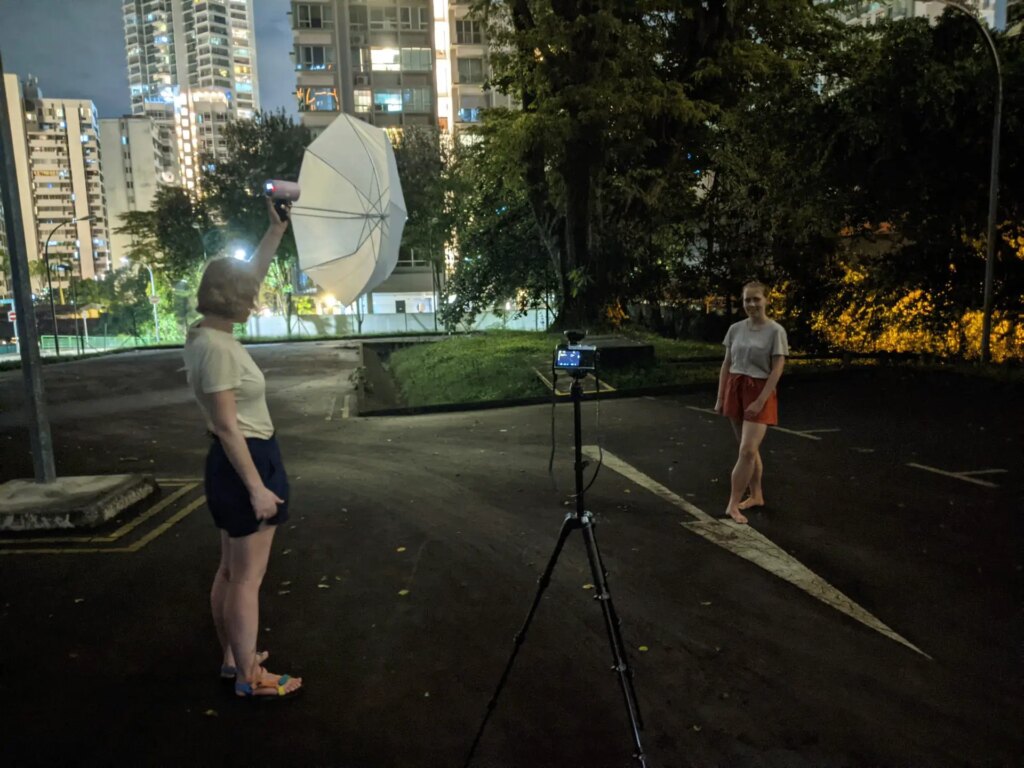
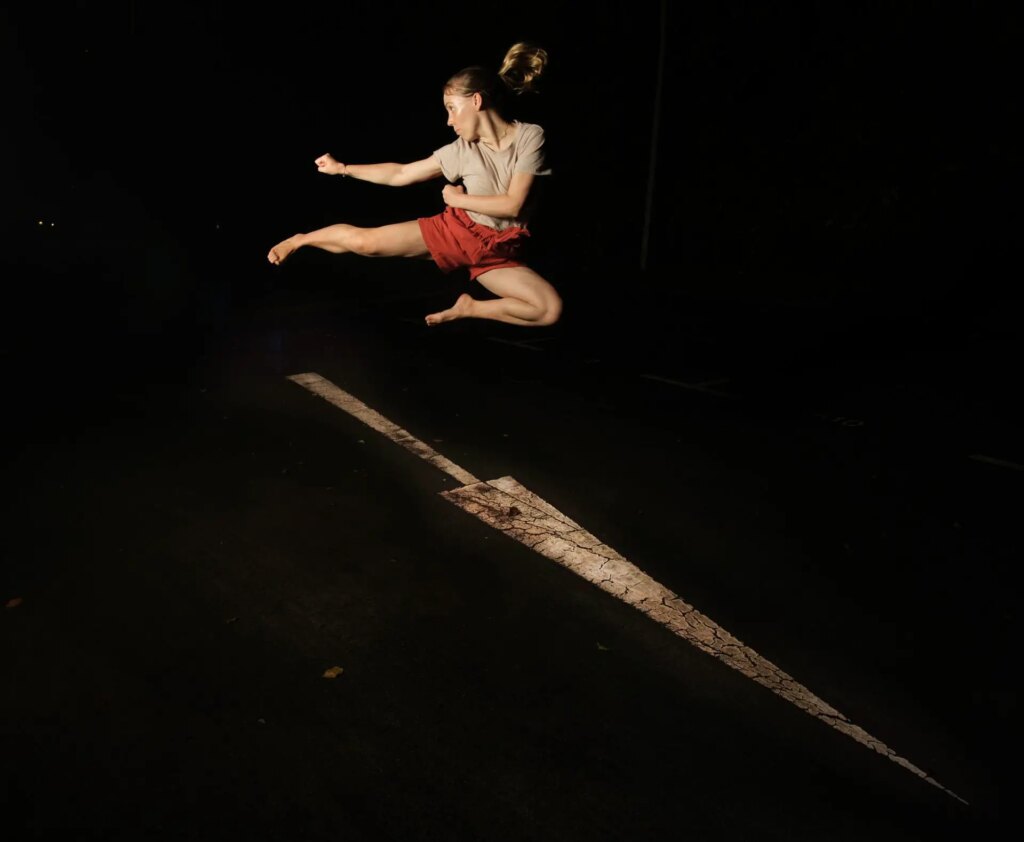
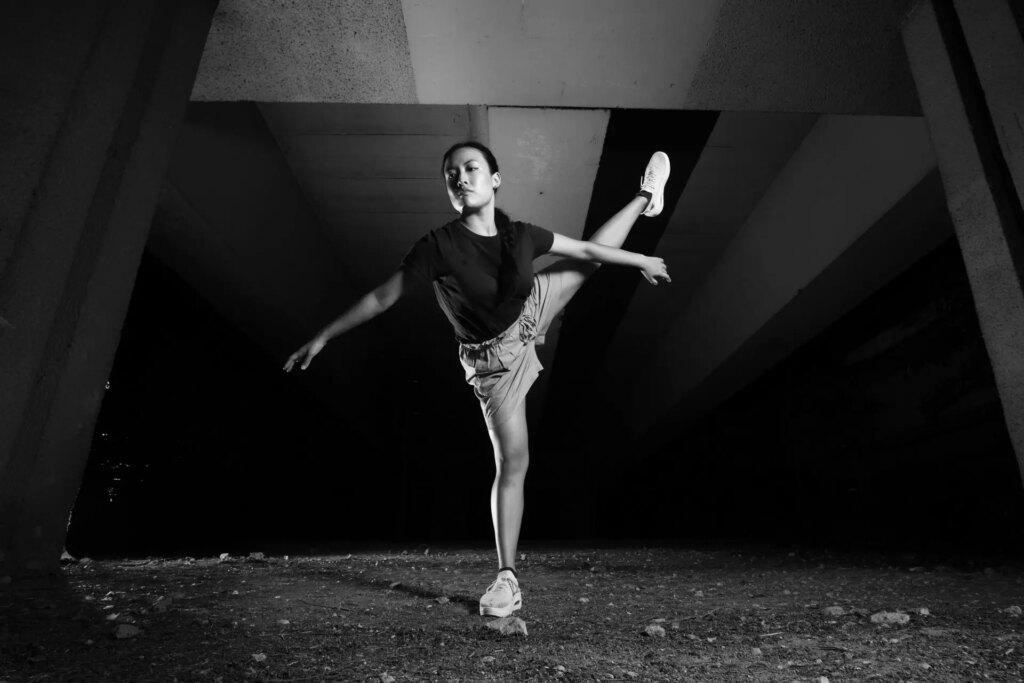
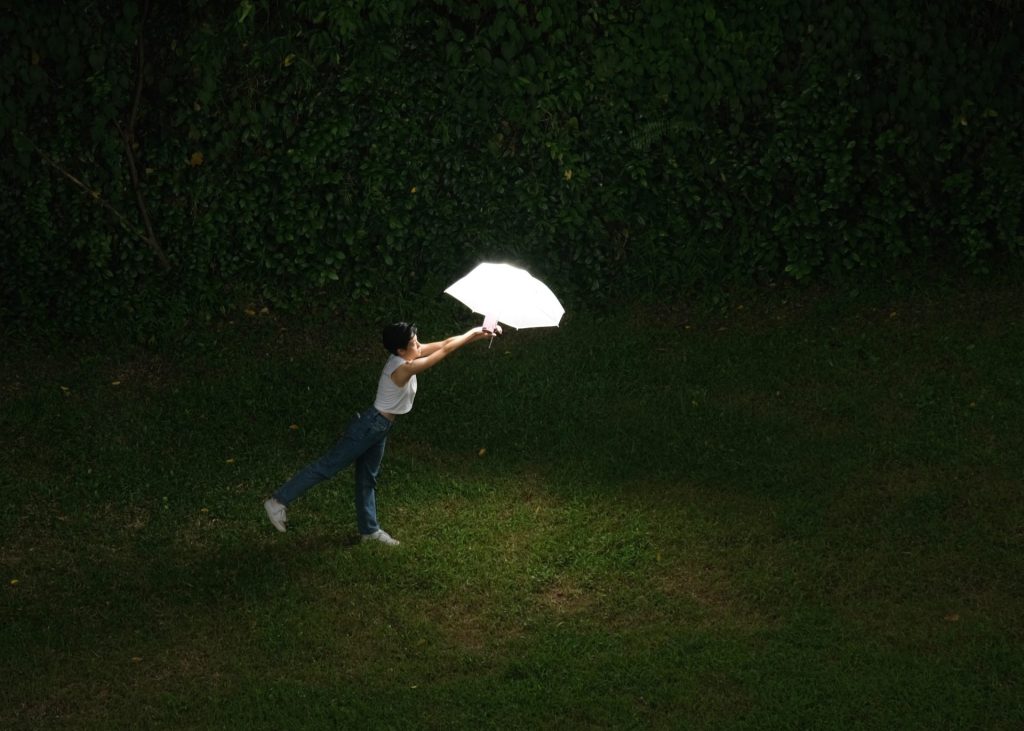
Most of the time, as you can see, I mount the flash on a light-stand. But friends make the best possible light-stands. The Godox AD100 Pro is relatively light, and (with the AD-E2 bracket) convenient to hold. So it’s not as annoying as holding up a big, heavy flash unit. Here’s my friend Anne in an empty parking lot, lighting Annika who is a taekwondo instructor.
…and the resulting photo:
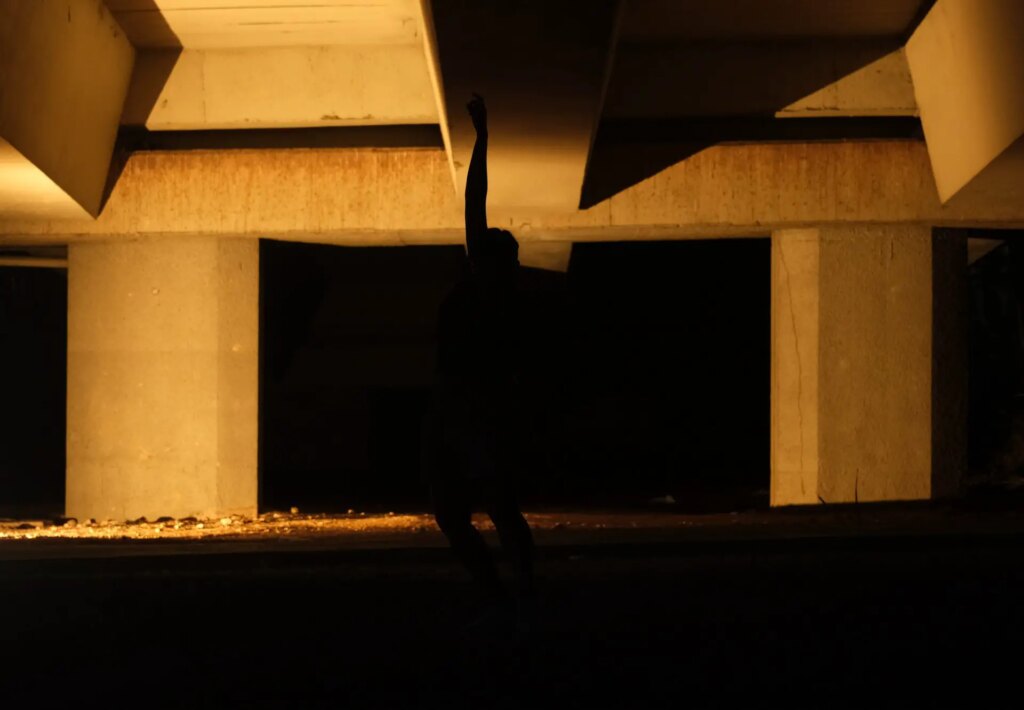
Sometimes I am my own light-stand. Here I’m holding it up to gain a little more height.
…and here’s the resulting photo of Olivia.
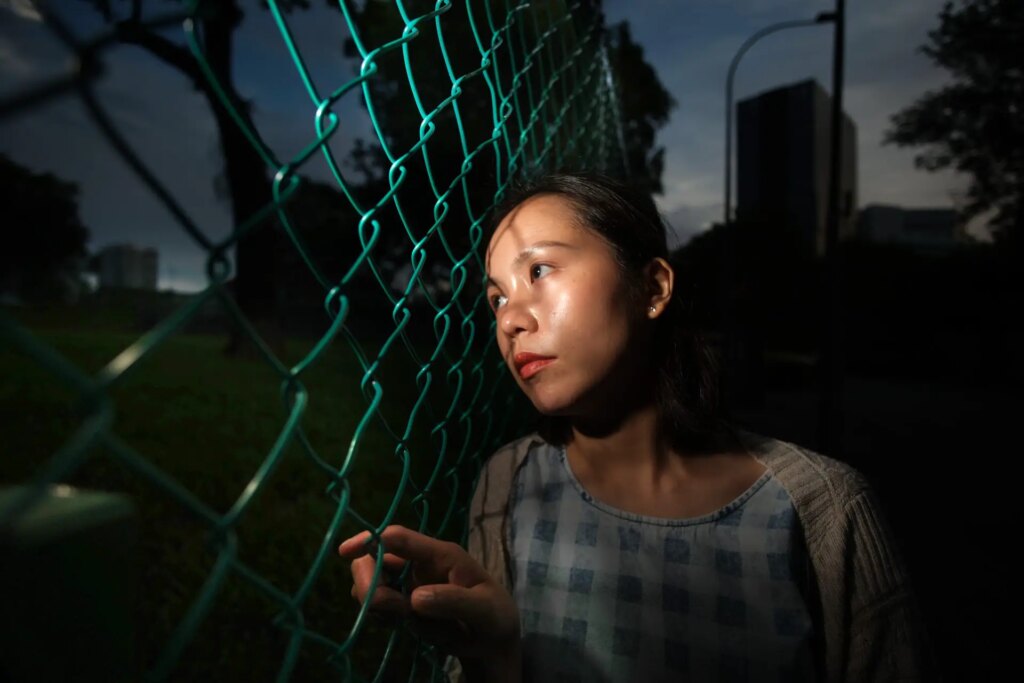
Finally, the AD100 Pro’s small size means it can go where bigger flashes can’t. For the photo of Pearl below, I held the flash in my left hand and poked it in through a hole in the fence, to point back at Pearl.
Two-light setup
For the photo below, also from the taekwondo shoot with my friend Annika, I used two lights: Godox AD100 Pro with umbrella diffuser (camera-left) as the key light, and unmodified Godox TT600 as the fill light.
The fill light ensured that the shadows also have some detail. By contrast, see the photo below (a single Godox AD100 Pro, no fill) where the shadows are completely dark.

In the two “demo” photos below, Angelina is lit with a Godox AD100 Pro with umbrella diffuser on camera-left as the key light (first photo), and an unmodified Godox TT600 on camera-right as rim light (second photo).
In the next photo, the two lights come together.
I used the same setup for the photo below – Godox AD100 Pro with umbrella diffuser (camera-left) as key light, and unmodified Godox TT600 (camera-right) as rim light.
Of course, the second flash doesn’t always have to be unmodified. For the next photo of Joern, I used a Godox AD100 Pro with umbrella diffuser (camera-right) key light, and a Godox TT600 with blue gel (camera-left) as rim light.
The next three photos with Olivia show how I go about “building” a shot with colour gels. The first photo below is lit with a Godox AD100 Pro with umbrella diffuser on camera-left.
In the next photo, I used a Godox TT600 with orange gel – placed on the ground, facing up – to light up the bridge.
Finally, the key and background lights are combined in a proportion that looks subjectively “right” to my eyes. The light levels on the Godox AD100 Pro – 1/256 (min) to 1/1 (max), adjustable in 0.1 stop increments – give you a lot of flexibility. Adjust to taste. It’s like cooking, but with light.
Finally in the photo below, the second light (camera-left, hidden behind the pillar) functions both as a background light and rim light.
Power, recycle time and zoom
The Godox AD100 Pro produces 100 watt-seconds at full power. For comparison, the V1, Godox’s most powerful camera flash, produces 76 watt-seconds. The AD200 Pro, the next model up in Godox’s outdoor flash range, produces 200 watt-seconds, but it’s also less compact and slightly heavier.
I don’t have an AD200 to test, but Rob Hall (Sharpen) compared the output and found that, although the jump from 100 to 200 watt-seconds sounds like a lot, in practice, the AD200 with the H200R round head is actually 0.2 stops less powerful than the AD100.
With the Fresnel head, the AD200 is 1.5 stops more powerful than the AD100. However, the AD200’s Fresnel head is rectangular, which produces a different (often considered less ideal) light shape compared to the round-head AD100.
In a 51″ softbox, Rob Hall found that the AD100 is 0.7 stops less powerful than the AD200 with bare bulb. Depending on how you intend to use it, this may or may not be significant.
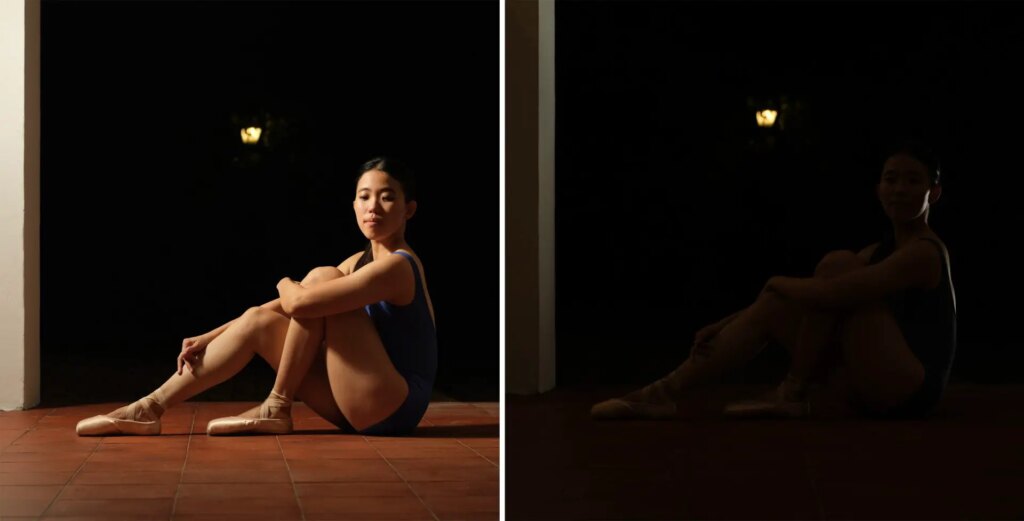
Also, 100 watt-seconds is a lot of power. The photos below were taken from my balcony at identical camera settings (IS 6400, f/2, 1/30 sec). The first one is without flash, and the second with the AD100 Pro at full power and 28mm zoom.
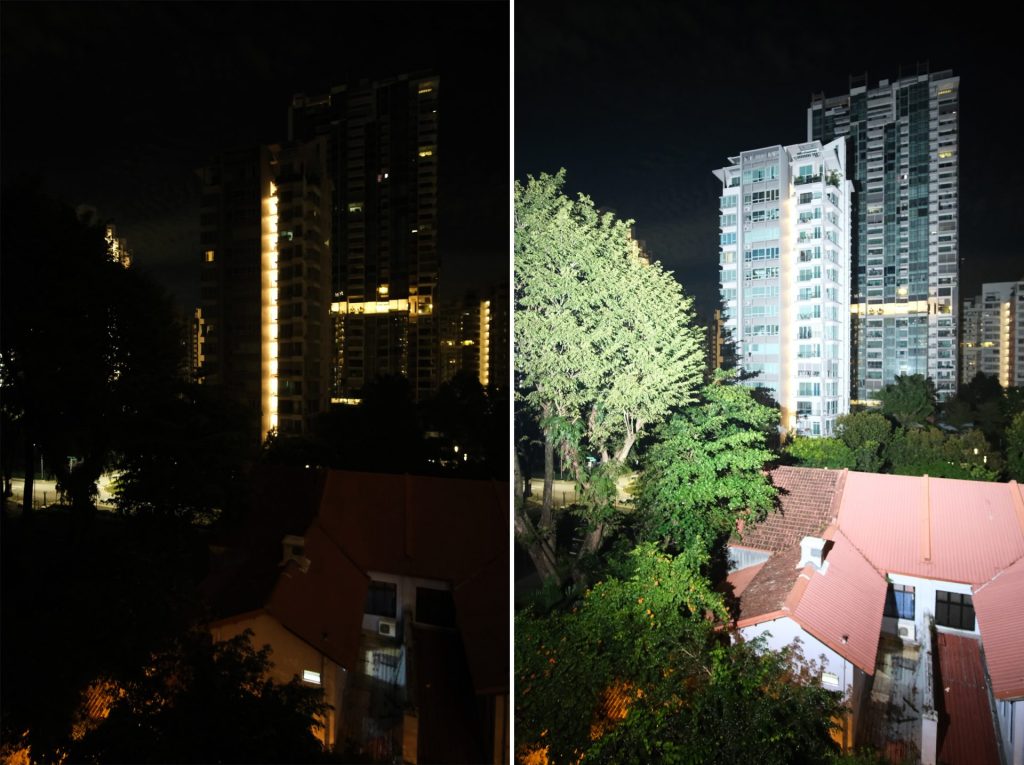
I was amazed at how it even lights up the buildings in the distance. If you zoom to 85mm, you can squeeze even more power out of it, though the light spread will be narrower.
As you can see from the various sample photos in this article, I regularly use the AD100 Pro outdoors and with modifiers. In the morning or late afternoon, and of course at night, it’s powerful enough. But if you plan to deploy it in bright daylight, especially with softboxes or other modifiers, it may not be powerful enough. In that case, you may be better off with one of the more high-powered outdoor flashes, perhaps using the AD100 Pro as a background or rim light.
The Godox AD100 Pro’s recycle time, according to the spec sheet, is 1.5 seconds at full power. I found this to be accurate; slightly conservative if anything. Rob Hall timed it at 1.2 seconds, which seems about right.
The power, as I mentioned, ranges from 1/256 (min) to 1/1 (max), adjustable in 0.1 stop increments. In my testing, I found the increments to be accurate.
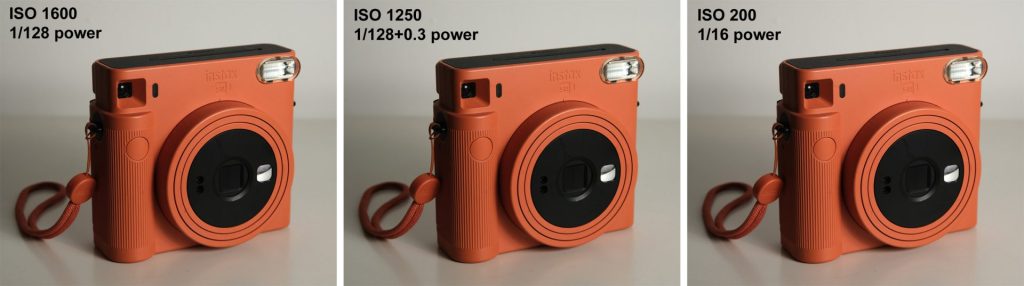
For the second photo above, I decreased the ISO by 0.3 stops and increased flash power by the same amount to compensate. The exposures are identical, which shows that the power levels are accurate in smaller increments.
For the third photo, I decreased the ISO by a further 2.7 stops, and increased flash power by the same amount. Once again, the exposures are essentially identical, this time over a larger increment (3 stops).
As you would expect, the recycle time is significantly faster at lower power levels. The first photo in the series below, from a shoot with Angelina, shows how the scene looked without flash.

For the next four photos, I used burst mode on my camera (5 frames per second) and at 1/8 power (if memory serves), the AD100 Pro fired every time, giving us a few options to choose from. The photo below is the one we liked best.
The AD100 Pro is Godox’s only off-camera flash with a zoom feature. The available settings are 28mm, 35mm, 50mm, 70mm and 85mm.
The first two photos below (top row) show the light spread and shape at the widest and narrowest settings, at the same power level (1/128). The light is more concentrated, and therefore brighter, at 75mm. You can also see that although the AD100 Pro has a round head, the light spread is elliptical. This makes sense to me, since most photo formats are rectangular, not square.

The two photos in the bottom row show the light spread and shape from the Godox TT350, a camera flash with a rectangular Fresnel head. Without a modifier, the light shape is more rectangular and hard-edged. With the built-in diffuser panel, the light is evenly spread, but at the cost of a not insignificant loss of power.
Colour balance
Two years ago, when the AD100 Pro was new to the market, PetaPixel wrote an article called ‘The Godox AD100 Flash is Unusable for Pro Photography‘. The title is a bit clickbaity and hyperbolic, but the issue they identified is a real one – early versions of the AD100 Pro had a slight green cast.
This is normally not a major issue in itself. The green cast was easily fixable with in-camera custom white balance, or in post – if you even notice it, that is. But it was more of a problem when using the AD100 Pro in conjunction with other Godox lights which don’t have such a cast.
However, Godox has since fixed the green cast issue. This has been noticed and flagged up by users – for example, in this Reddit post, and the highlighted comment by @t4haughton on this YouTube video. My contact at Godox confirmed this too: “Yes, the Fresnel head of the AD100 Pro was indeed changed to fix the colour cast issue. Now it’s all new heads.”
It’s worth noting that according to the spec sheet, the Godox AD100 Pro has a colour balance of 5800±200K, whereas most other Godox flashes are rated at 5600±200K. So even with the fix, the AD100 Pro is slightly cooler (bluer) than other flashes. But a discrepancy in warmth (yellow/blue) is generally less obvious than tint (green/magenta). In any case, 200K is a small difference, and in real world use, it’s not noticeable. In fact, it’s not really evident even in tests; see my light-shape comparison above with the TT350, which is rated at 5600±200K (all four photos are straight out of camera, with the white balance set to 5800K).
However, for some reason, the light emitted by high-speed sync (HSS) is warmer. You can see this in the comparison below. Both photos (other than the compositing) are straight out of camera, with the camera white balance set to 5800K.
For reasons explained in the next section, using HSS results in a slight loss of flash power. So to achieve the same exposure with HSS, I had to dial up the flash power from 1/128 to 1/16+0.7. But that doesn’t explain the warm cast, because with standard sync, the colour balance is consistent across different power levels.
Here’s another example, again with the camera white balance set to 5800K:
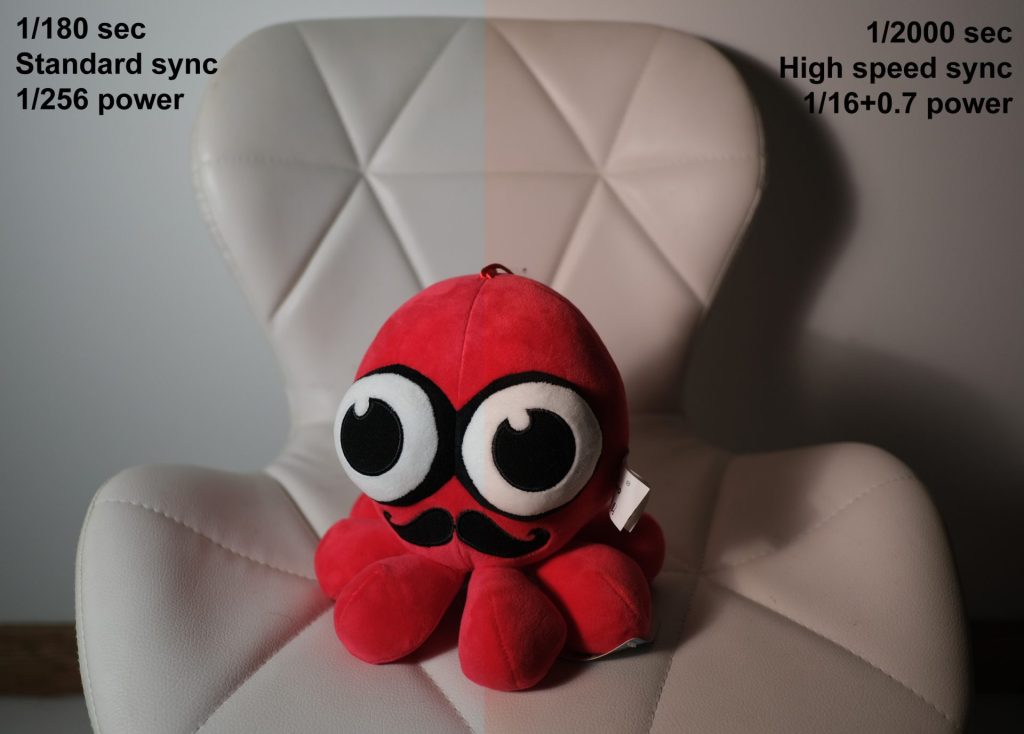
The cast is more evident on lighter surfaces; on the red toy, you don’t notice it at all. Anyway, this is not a major issue for me, as I rarely use HSS. And if necessary, I can compensate with custom white balance, colour gels or in post. But if you use HSS a lot, and want very accurate colours, this may be something to think about.
High-speed sync
The fastest flash sync speed of the Fuji X-E4, which is the camera I used for this article, is 1/180 sec. But with a compatible wireless trigger – I used the Godox XPro II F (the ‘F’ stands for Fuji) – you can get flash sync at much higher speeds.
The Godox AD100 Pro’s limit is 1/8000 sec, but the Fuji X-E4’s mechanical shutter tops out at 1/4000 sec. Of course, that’s still significantly (4.5 stops) faster than the “regular” sync speed, opening up more possibilities for creative lighting, and for fine-tuning the ambient exposure to shoot your needs.
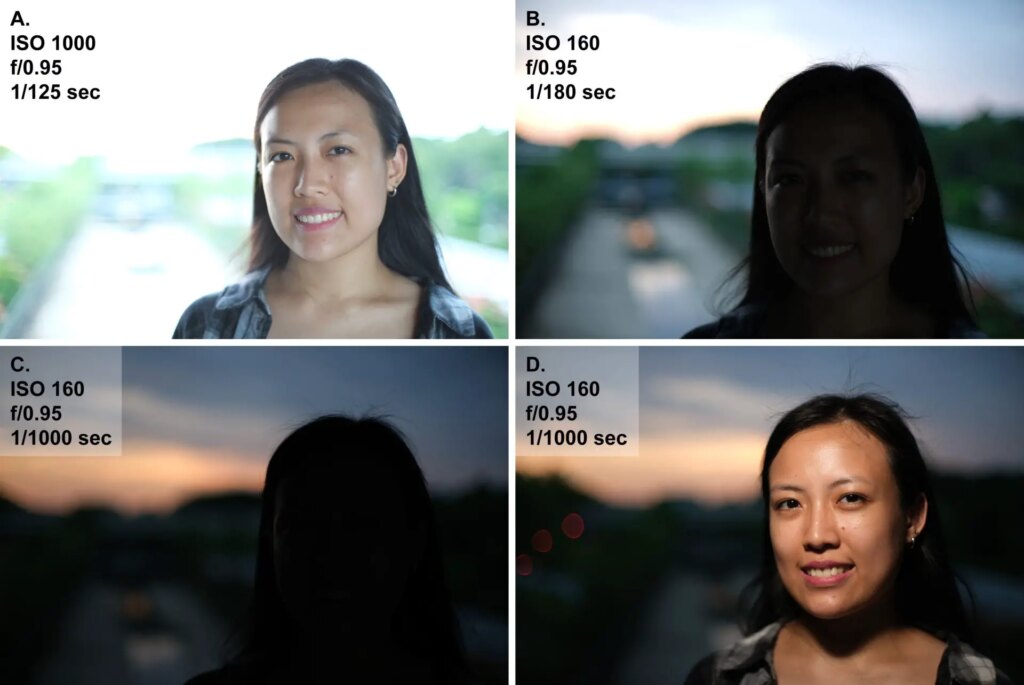
In the photos above, [A] was shot without flash, exposing for the subject (Olivia). For [B], I dropped the ISO to 160 (the lowest native ISO on my camera) and upped the shutter speed to 1/180 sec (the fastest sync speed). Now Olivia is way underexposed, but that’s okay – we can fix that with flash. However, the background is still not as dark as I would like.
I could, of course, stop down the aperture, but I wanted to shoot at f/0.95 to get as much background blur as possible. (Yes, I know bokeh is overrated, but it’s good to indulge yourself sometimes!)
For [C], I increased the shutter speed further, to a point where the background has the darker, more saturated look that I wanted. At this point, we have far exceeded the camera’s native sync speed, but thanks to HSS, it was possible to get get a good exposure (D). I simply held the AD100 Pro flash in my left hand, with a small (30 cm) softbox for diffusion.
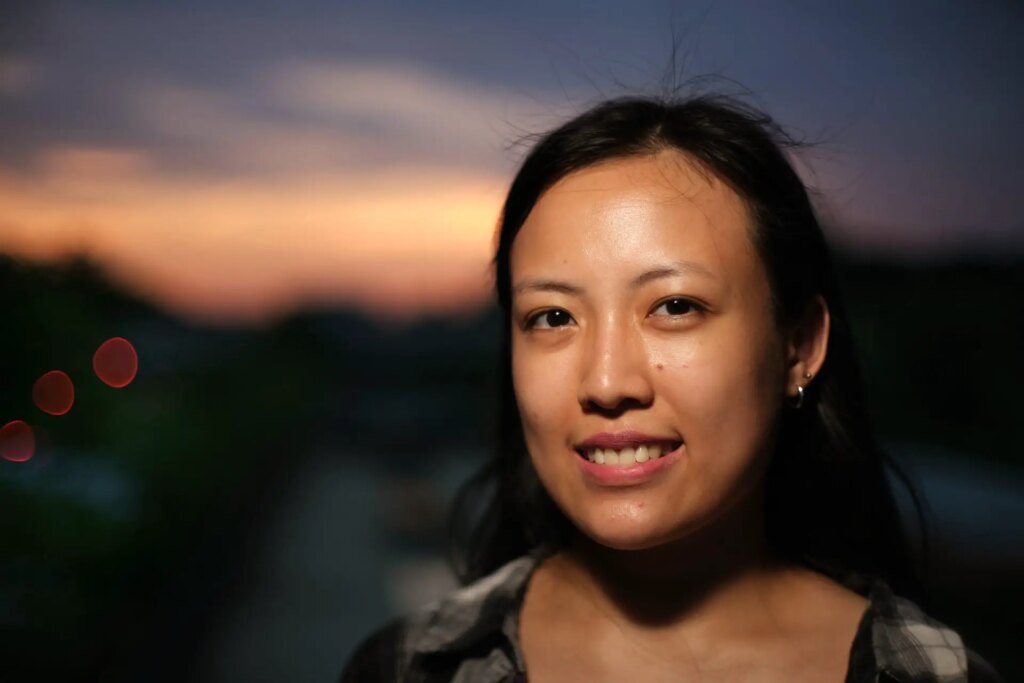
[A] through [D] are straight out of camera. The photo below is a lightly edited version of [D].
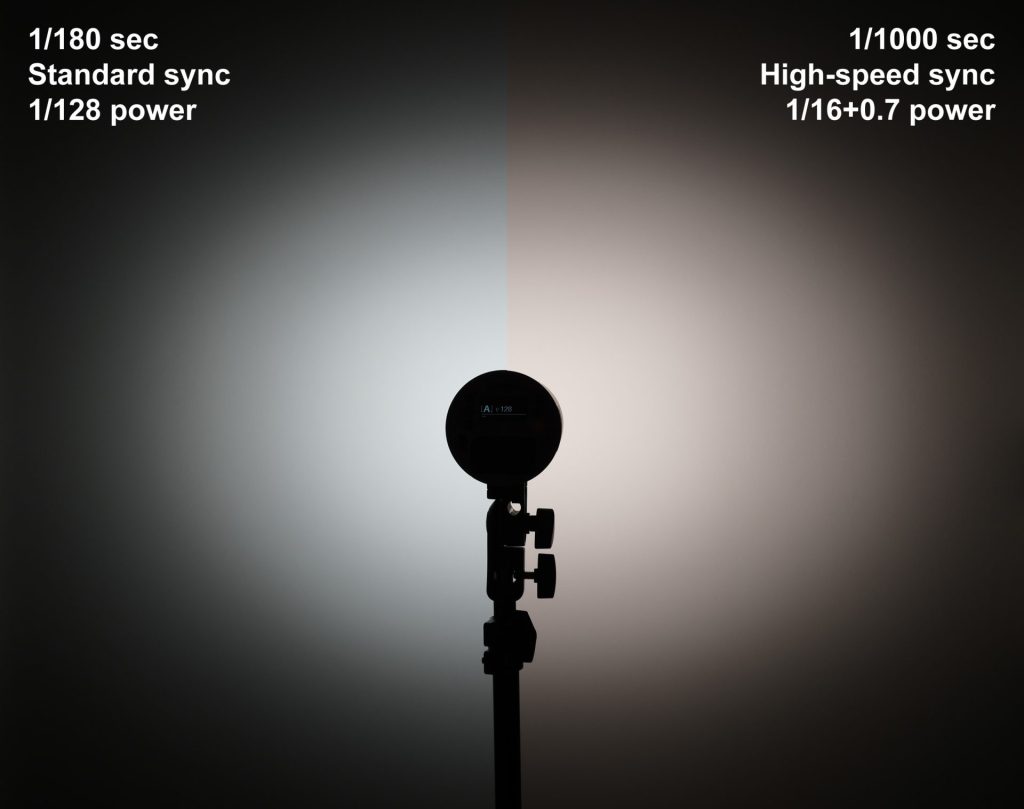
The main downside of HSS is that you lose a bit of power – a little over 1 stop, in this case. This is because when using HSS, somewhat counter-intuitively, the flash has to fire for a longer duration (the entirety of the exposure), unlike with standard sync where the flash duration is typically much shorter than the exposure. You can see the light loss in the four photos below.
[A] and [B] are essentially the same exposure; just that for [B] I used a slower shutter speed, and reduced the ISO to compensate.
[C] has the same exposure settings as [A], but I used flash – HSS, since we’re at 1/4000 sec. The flash was at full power, but reflecting off a wall some distance away. (I could have got much more flash power by, say, using a softbox closer to the subject, but this is for demonstration purposes.)
[D] has the same exposure settings as [B]. Again, I used flash, but since we’re at 1/180 sec, I could use regular sync rather than HSS. As you can see, we can get the flash same exposure as [C], but at only 1/4+0.7 stops (1.3 stops below full power).
This goes back to what I was saying, about how we lose some flash power when using HSS (this is true of all flashes, not just the AD100 Pro). Or to put it another way, with regular sync, you can get the same flash exposure at a lower power setting. This means you conserve power, and have a faster recycle time. Also, if you want to drop the ambient even further, you can stick an ND filter on your lens and increase the flash exposure, which you can’t do with HSS if you’re at full power already.
On the other hand, you may not always have the right ND filter to hand (as was the case when I took the photos of Olivia, above). Or you might want a fast shutter speed – that is, faster than your regular sync speed – for purposes of freezing motion. In such cases, if you can live with the slightly reduced power output, HSS is a very useful feature indeed.
Other features
Modelling light
The Godox AD100 Pro has a modelling light (continuous light) with adjustable power level (1 to 10). At 1.8W, it’s not particularly powerful, but you can still use it to get a quick preview of the direction of light, to help with autofocus in dark conditions, or even for video if you’re okay with a low-powered light.
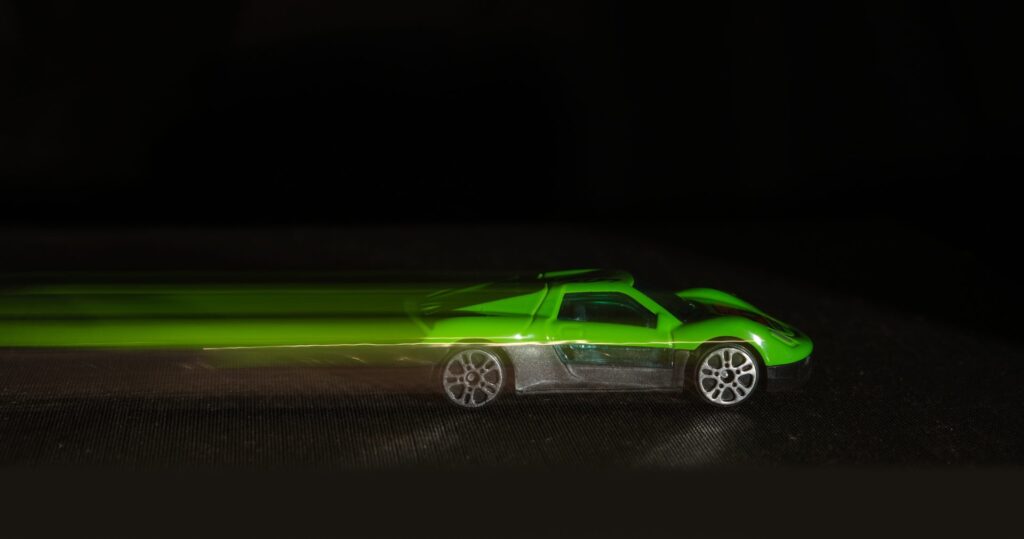
I hardly use modelling lights, but for the photo below – a 1/4 sec exposure of a toy car – I used the modelling light (at maximum power) as ambient to create the streaks, and flash (1/256 power, rear-curtain sync) to freeze motion.
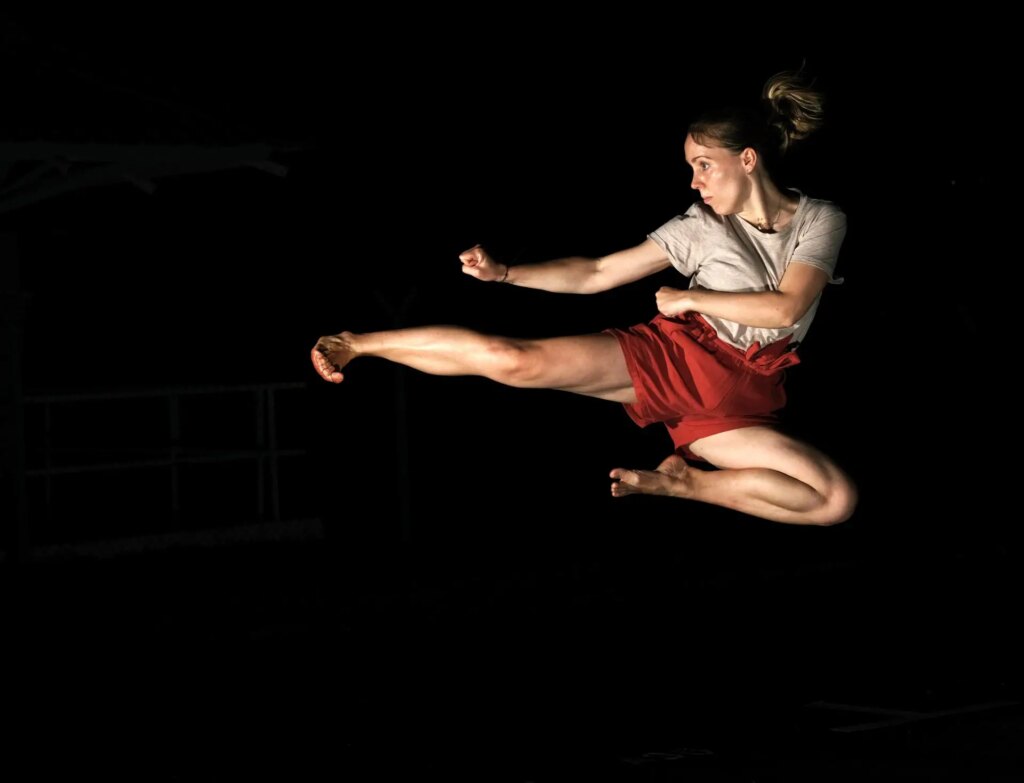
Stroboscopic mode
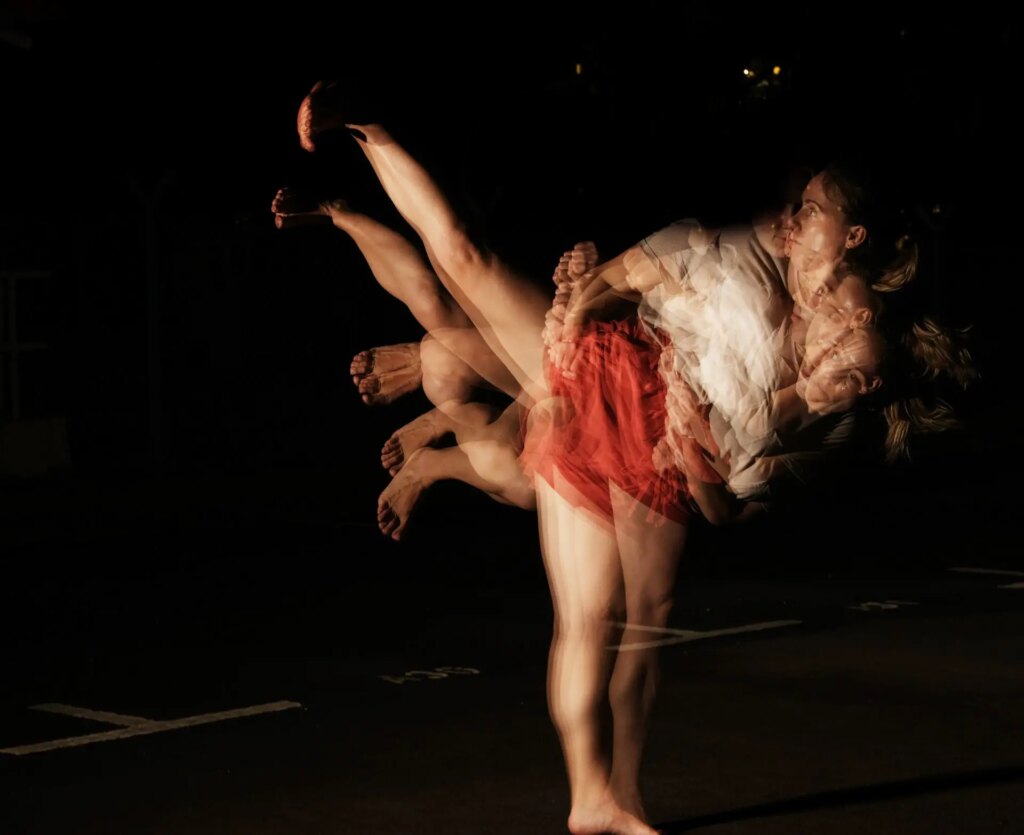
The Godox AD100 Pro also has a stroboscopic (aka “multi”) mode, where it fires a rapid series of flashes, as shown in this photo of Annika demonstrating a taekwondo kick:
You can set the frequency (Hz, i.e. flashes per second), number of flashes, and the power output. These variables are related, so for example, if you need higher frequency, you might need to dial down the power.
The highest frequency is 99 Hz, but of course, you have to compromise on power and total number of flashes fired. The product manual has a table showing the the limits for each variable, which you can use to plan your shoot.
TTL
For flash photography, I personally tend to use both my camera and flash in manual mode. But the AD100 Pro also has TTL mode which can be useful for certain types of photography.
For example, if you’re a photographing an event, you can leave the flash on a table, pointing up at the ceiling. This leaves you free to roam the room taking pictures. Of course, the illumination won’t be even throughout the room, but as long as you are within the power range of the flash, TTL will compensate on the fly.
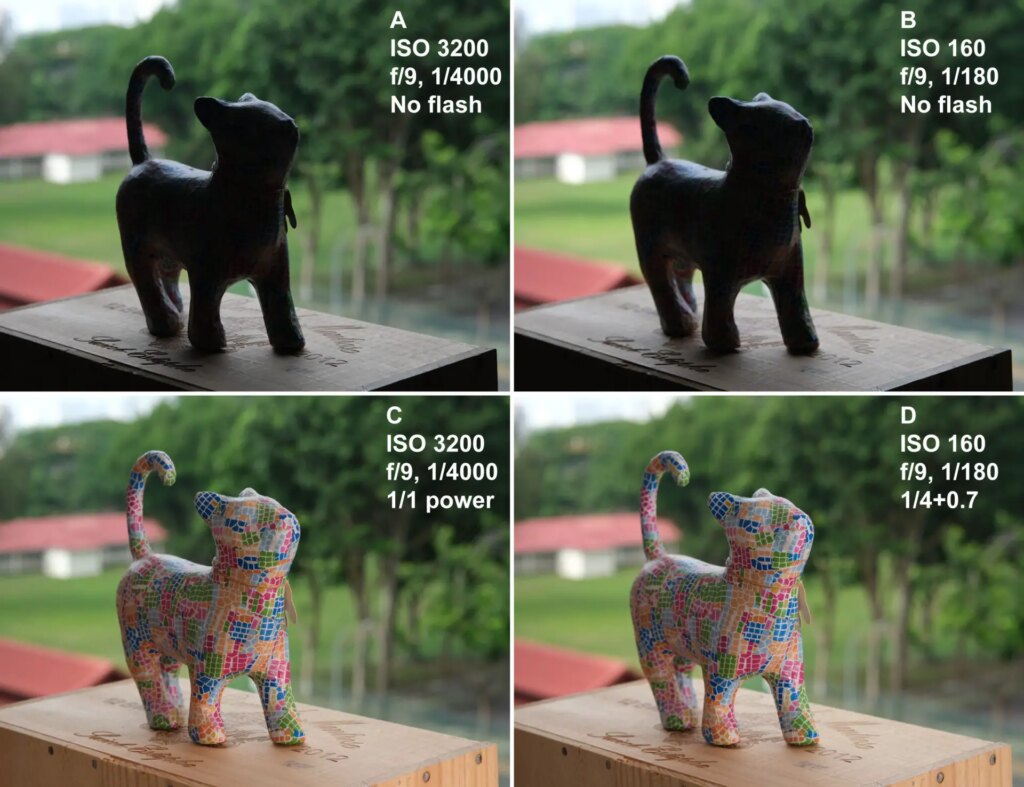
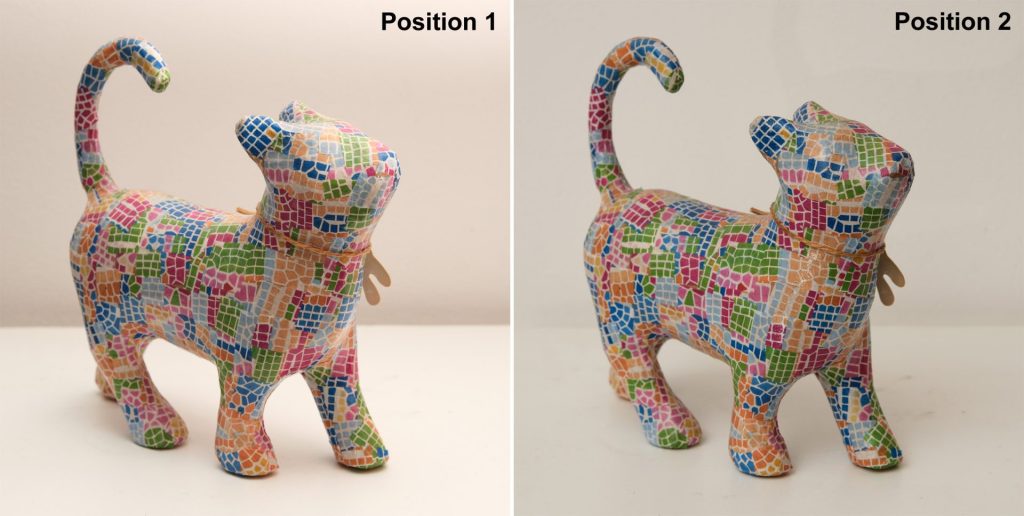
The photo below shows my test setup, with a papier-mâché cat on the corner table. The light-stand shows the location of the camera. I placed the flash in two places: Position 1 (on the corner table, close to the cat) and Position 2 (coffee table, further away).
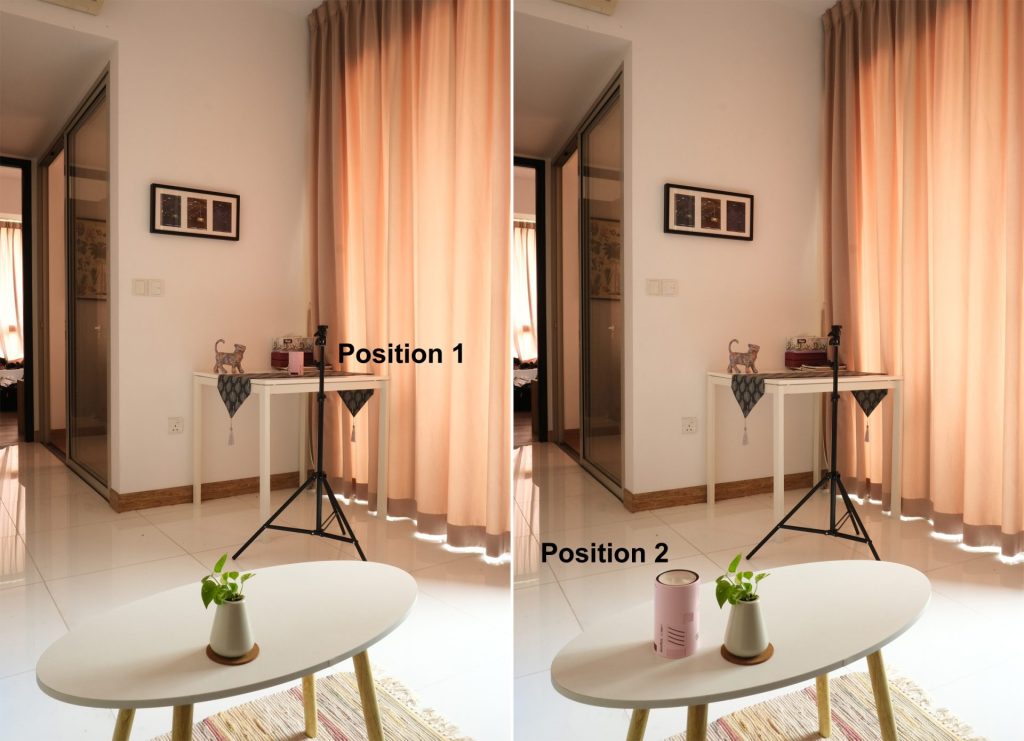
In both cases, as you can see below, the cat is well-exposed. TTL automatically dialed up the flash power from 1/4 (Position 1) to 1/2 (Position 2).
Light modifiers
In the photos below, you can see the shape and quality of light from the Godox AD100 Pro – both unmodified and with a variety of light modifiers. In each case, I adjusted the power output to get approximately the same exposure on the red box on the right. The numbers (in stops) represent the amount of compensation needed (modifiers tend to cut flash output, so you have to increase the power level to compensate).
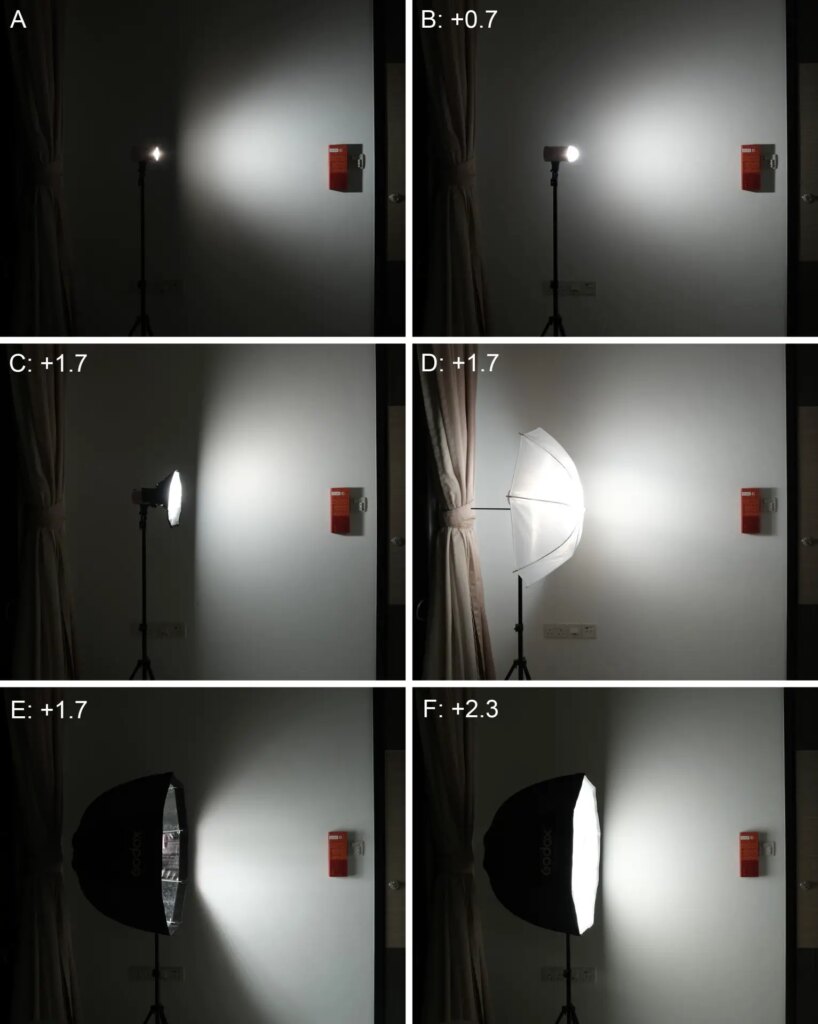
| A | Unmodified (28mm zoom) | 0 |
| B | Godox AK-R11 dome diffuser | +0.7 |
| C | 30cm softbox | +1.7 |
| D | 85cm shoot-through umbrella | +1.7 |
| E | 80cm softbox (no diffusion, flash pointed backwards, i.e. to camera-left) | +1.7 |
| F | 80cm softbox (with diffusion, flash pointed backwards, i.e. to camera-left) | +2.3 |
The dome diffuser and 30cm softbox were attached directly to the flash. For the umbrella and 80cm softbox, I used the AD-E2 bracket which has a hole for mounting certain accessories.
The umbrella, which I got for only SGD 6 (£4) is the one I use most. The 80cm softbox has a smoother, more even quality of light, but it’s bulkier and also cuts a bit more power.
The little 30cm softbox which I got for SGD 9 (£6) is great too, being tiny and super light. For portraits, I sometimes hold the flash with small softbox in my left hand. Since the flash is close to the subject, it acts like a relatively large light source, producing a softer light.
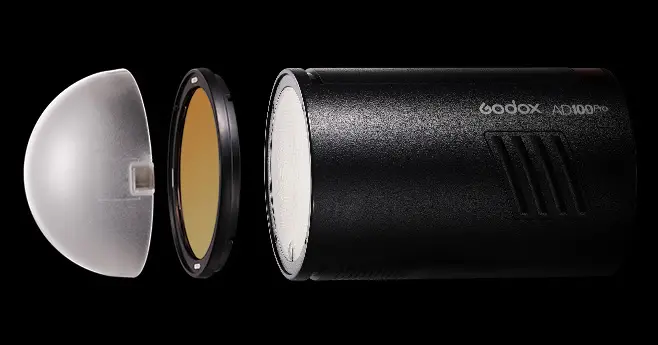
The AD-100 Pro, being a round-head flash, is natively compatible with the Godox AK-R1 accessory kit (unlike the AD200 Pro, for example, for which you have to separately buy and attach the H200R round head). I don’t own the whole AK-R1 set, but I bought the two accessories that I find most useful – the aforementioned AK-R11 dome diffuser and the AK-R16 colour filters.
For the first photo of Olivia below, I used the AD100 Pro with a shoot-through umbrella. The flash is daylight balanced (5800±200K), so the light looks a little cold compared to the sunset sky in the background.
In the next photo, I used an orange filter from the AK-R16 colour filter kit, which I think produces a better effect.
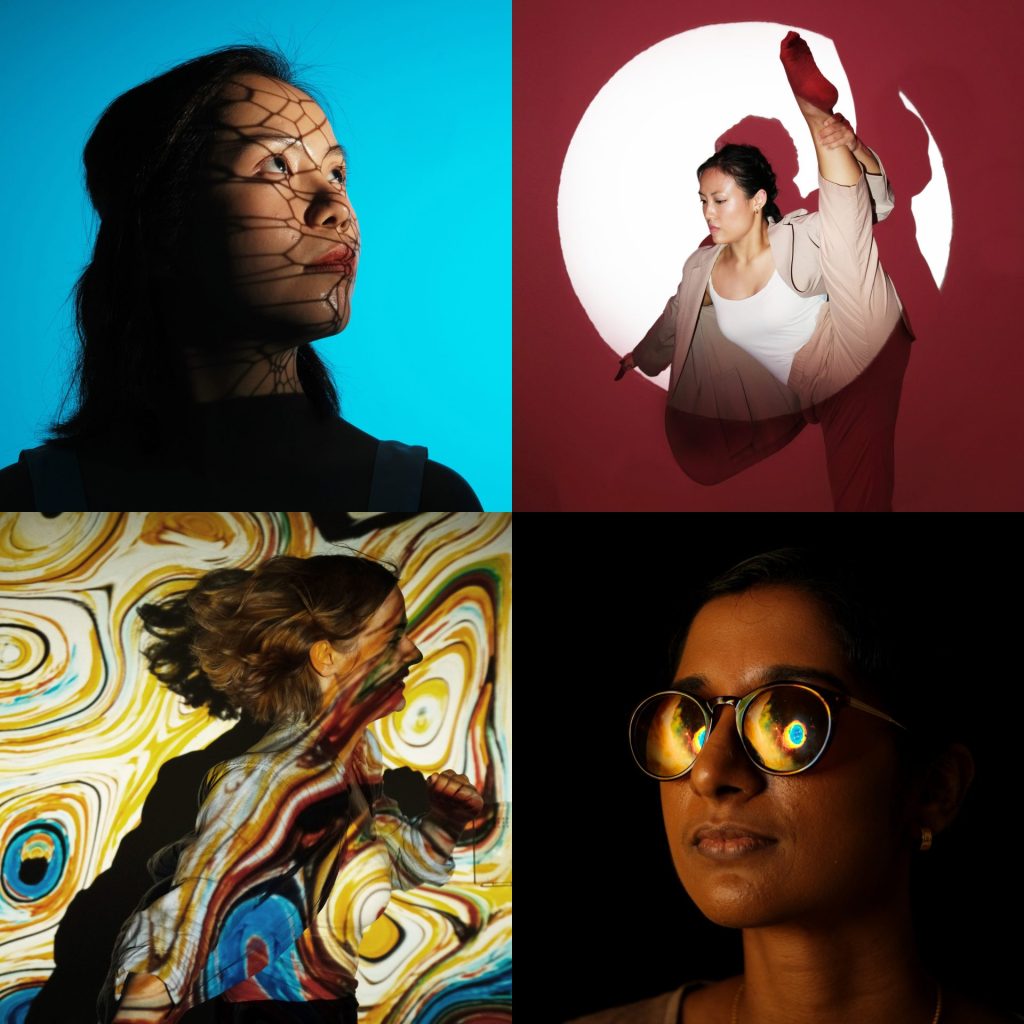
The AD100 Pro is also compatible with the Godox AK-R21 projection attachment and AK-S slide set, which I reviewed here.
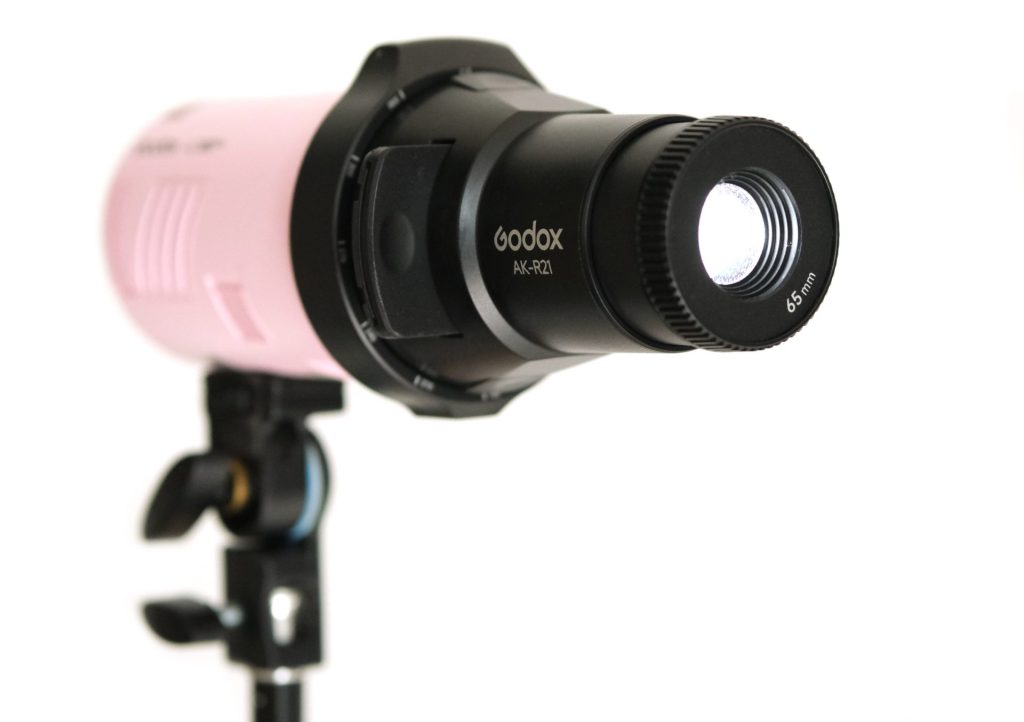
Here are a few samples of what you can do with that kit, but there are more images and information in my review.
The AD-E2 bracket, as I mentioned, has a hole for mounting umbrellas and umbrella-style softboxes. The Godox S2 bracket (sold separately) also allows you to use Bowens-mount accessories.
Film cameras and compatibility
The Godox AD100 Pro, as I mentioned, is designed to be used off-camera, typically fired by a 2.4GHz wireless trigger such as the Godox XPro or X2T, or by another flash with transmitter capability. For most of the photos in this article, I used a Fuji camera and the Godox XPro II F wireless trigger (the ‘F’ stands for Fuji).
According to the specs, the radio range is ~100m, but in my tests I found that the range is an underestimate, if anything.
The photo below was taken with a wide-angle lens, and it shows just how far away my friend Kwang – who was helping me test the flash – was standing. I went up a 20-storey building, and she was at ground level, on the far side of a field (indicated by the yellow arrow).
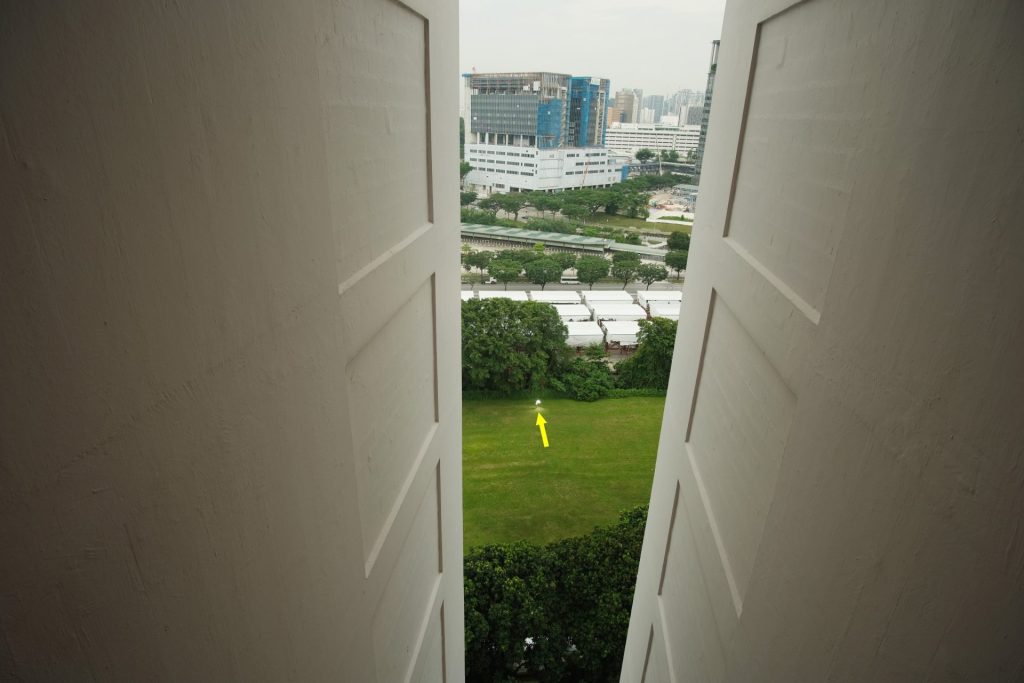
Nevertheless, the flash fired with no problems. The photo below was taken from the same position with a telephoto lens, and further cropped.
I mentioned that the Godox AD100 Pro is compatible with Nikon, Canon, Sony, Fujifilm, Olympus and Panasonic, with the appropriate Godox wireless triggers. In other words, the flash itself is agnostic to camera brands, but you would need a Godox trigger for Nikon (N) if you have a Nikon camera, Canon (C) if you use Canon, and so on.
However, compatibility is only an issue if you need to use the HSS or TTL features (and your camera would need to allow for those features too). If you don’t need HSS or TTL, you can, for example, use a Fuji camera with a Godox trigger for Nikon, and it would still work fine. You can even mount a trigger on a film camera (as long as it has a hot-shoe), and control the flash that way.
Besides wireless transmitters, there are at least three other ways to trigger the AD100 Pro.
The first is using the optical receiver function, where the flash fires when it “sees” another flash. The photo below was taken with an Instax SQ1 camera. I held the flash with umbrella diffuser in my left hand, and it fired when it saw the Instax flash. With the softer, directional light, you get a photo which is quite different from the typical on-camera flash Instax look.
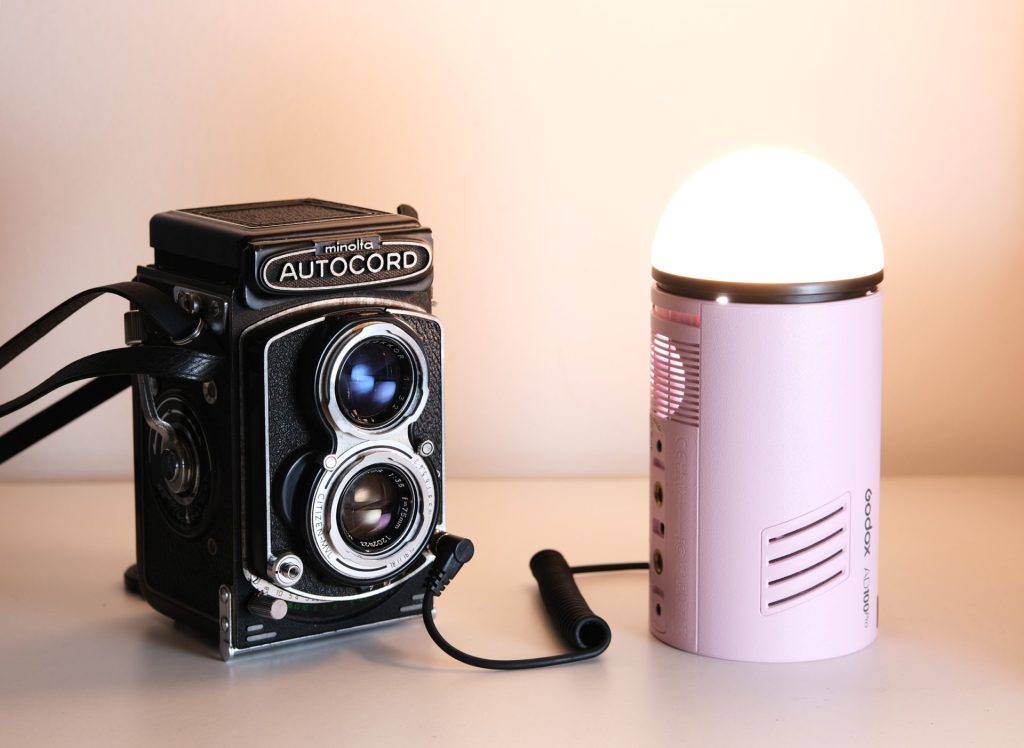
The second way is using a 3.5mm PC sync cable. Many older cameras have a PC socket, and you can buy a cheap cable which connects such a camera to your AD100 Pro flash. The downside is that you have a wired connection, unlike with radio trigger or optical receiver which function wirelessly.
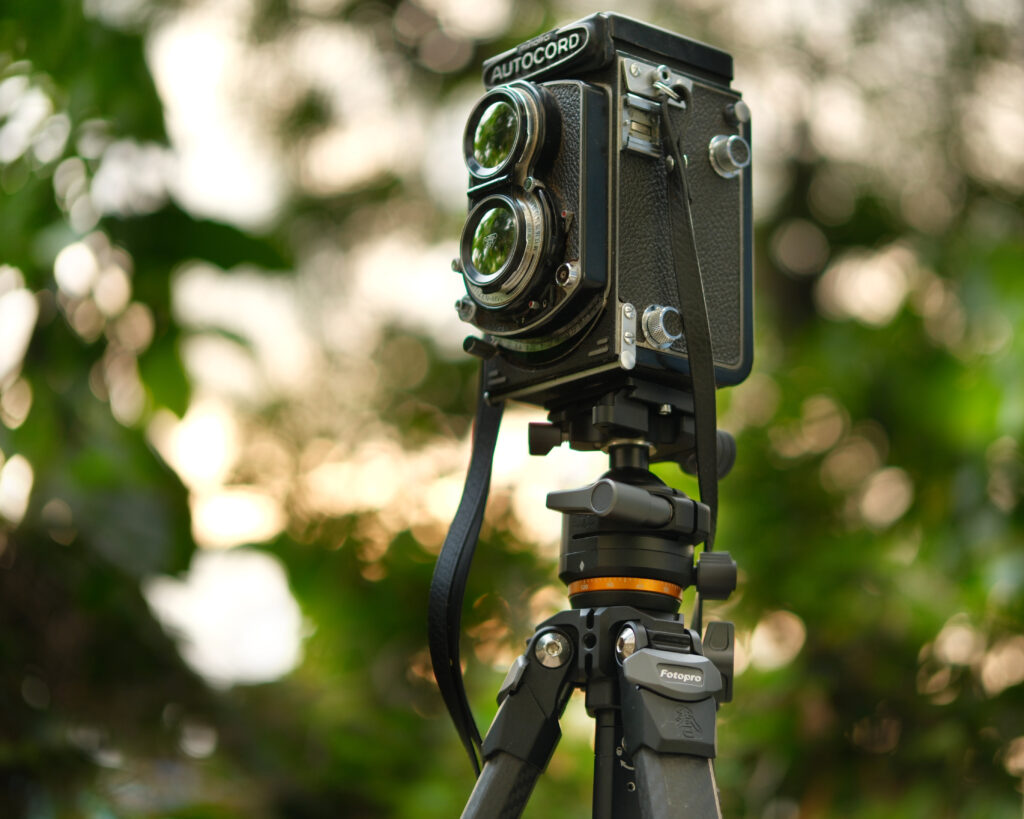
The photo below shows the AD100 Pro connected to my Minolta Autocord with a PC sync cable. The Autocord has a “cold shoe”, so it can’t be used natively with a hot-shoe flash. (I gratuitously accessorised the AD100 Pro with orange gel and dome diffuser from AK-R1 set.)
The third way is to use a long shutter speed and manually triggering the flash – a technique known as open flash. Since the “sync” is manual, you need a long shutter speed (good luck trying to do it at 1/500 sec).
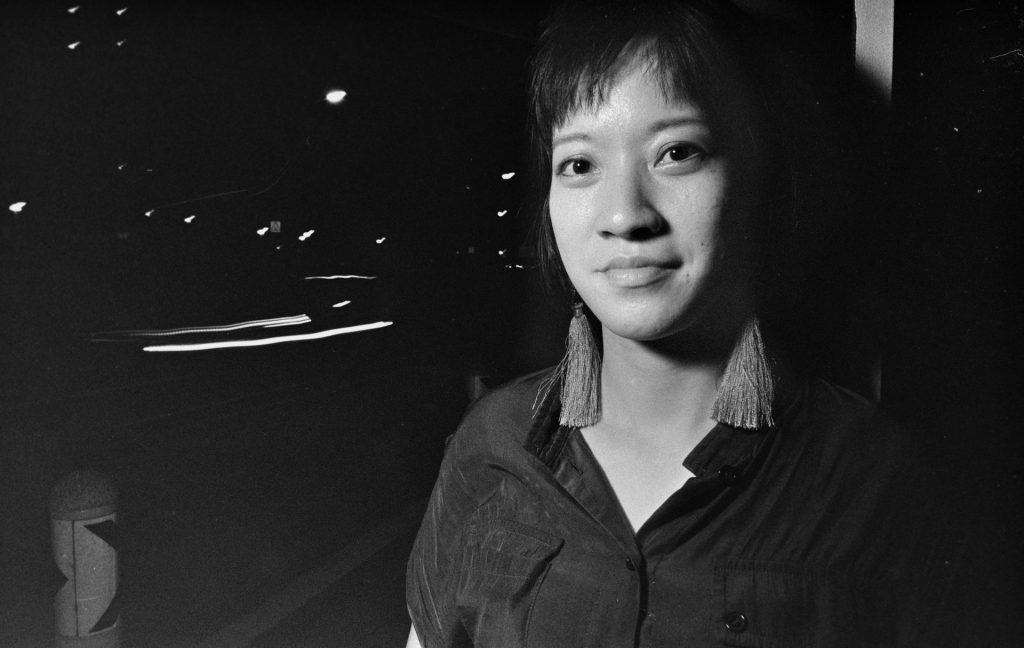
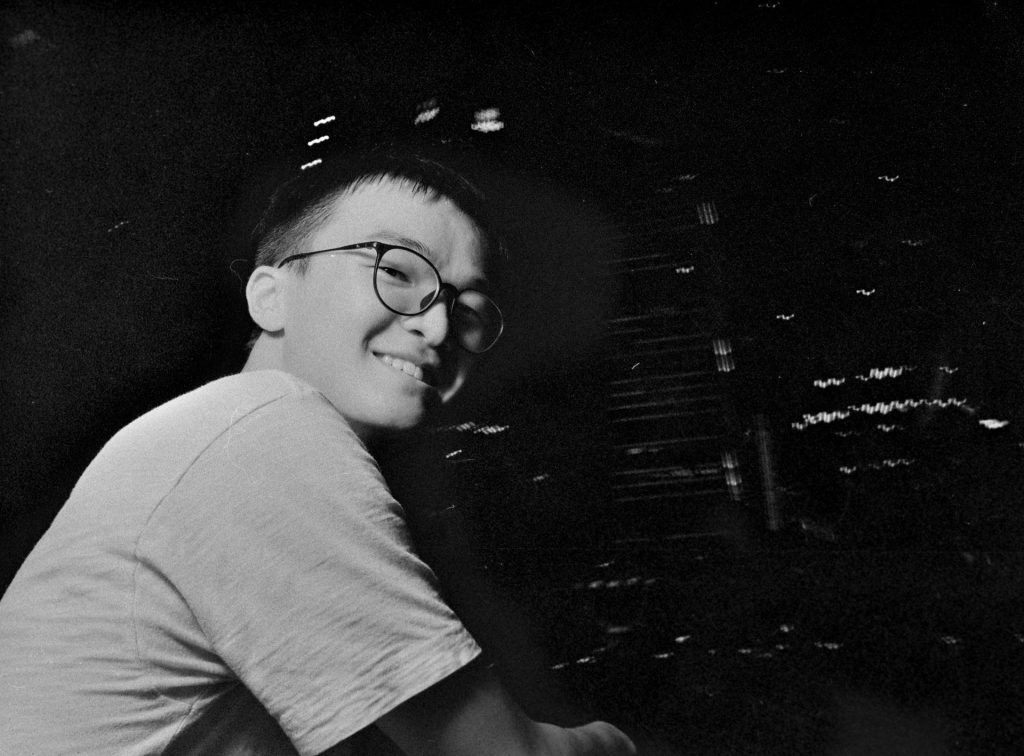
For the photos below, taken with a Leica M3 and CatLabs X film, I used a shutter speed of 1/2 sec. The flash, with a 30cm softbox, was held in my free hand and triggered manually (open flash).

Final thoughts
If you plan to do location shoots – or if you do them already, and especially if you’re already invested in the Godox system – the AD100 Pro is practically a no-brainer. It takes up negligible space in a kit bag, and is powerful enough to be used as a key light in open shade. If you’re shooting in full sun, you might want a more powerful strobe as your key light, but the AD100 Pro can still come in handy as a background or rim light.
It’s as compact as a hotshoe flash but significantly more powerful, cleverly designed, and packed with features that are typically the province of higher end flashes. The round head shapes the light nicely, and is compatible with a range of useful accessories. TTL, HSS, strobe, zoom and the modelling light are great features, allowing us to use the flash in a variety of creative ways.
When choosing a flash, you can never have everything. The perfect solution, in a sense, is the best possible compromise. For me, the Godox AD100 Pro is the perfect compromise.
I’d like to thank Godox for sending us the review copies, and my friends for helping me test them. For more of my work – with and without flash – feel free to check out my Instagram.
Share this post:


Comments
No comments found