That Time I Shot with Ilford Multigrade RC as film.

By Tony Warren

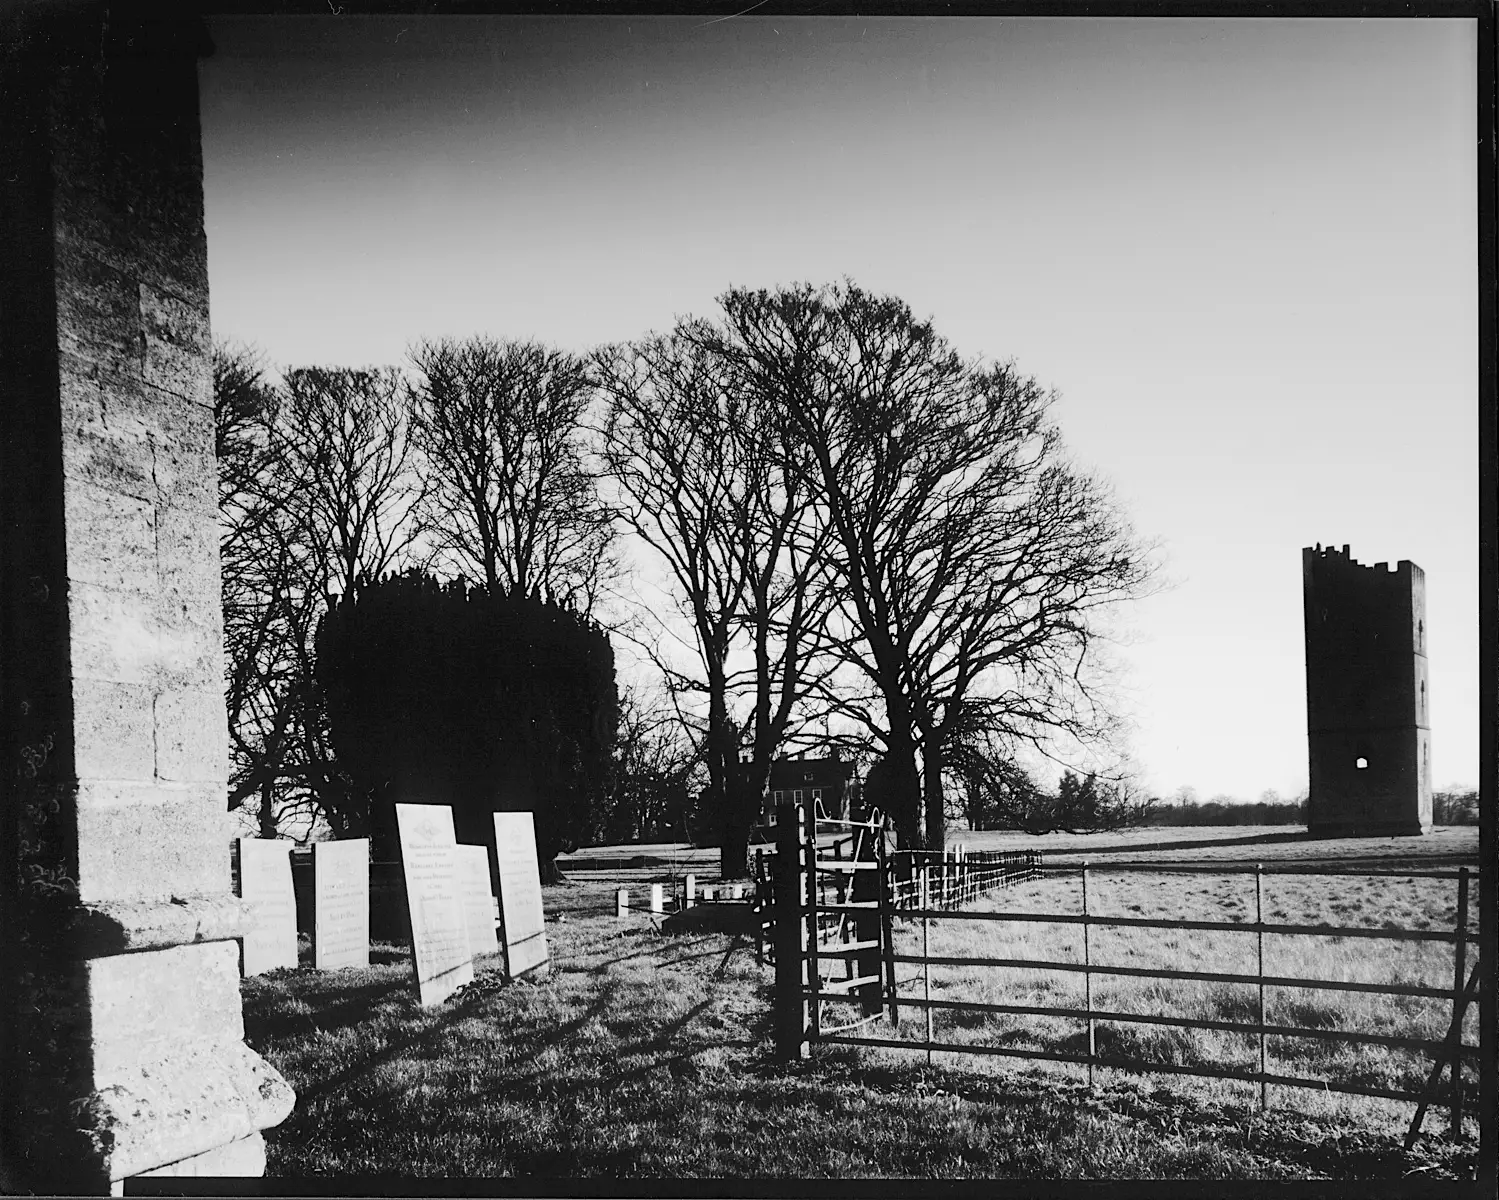
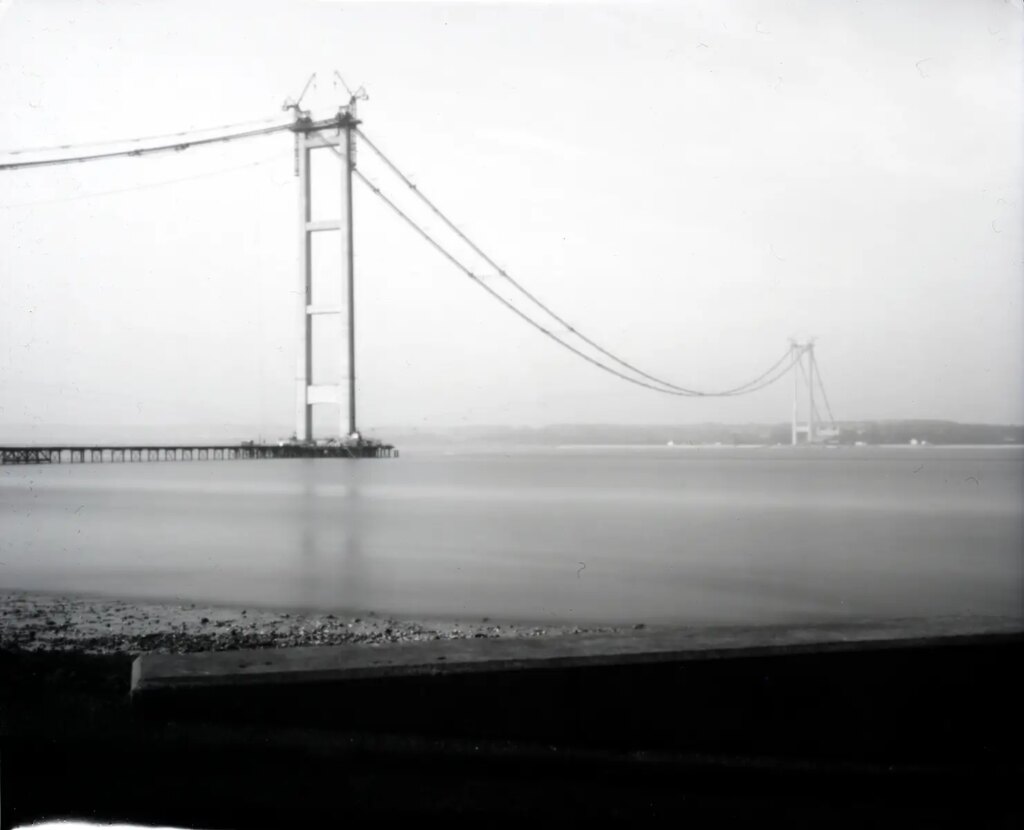
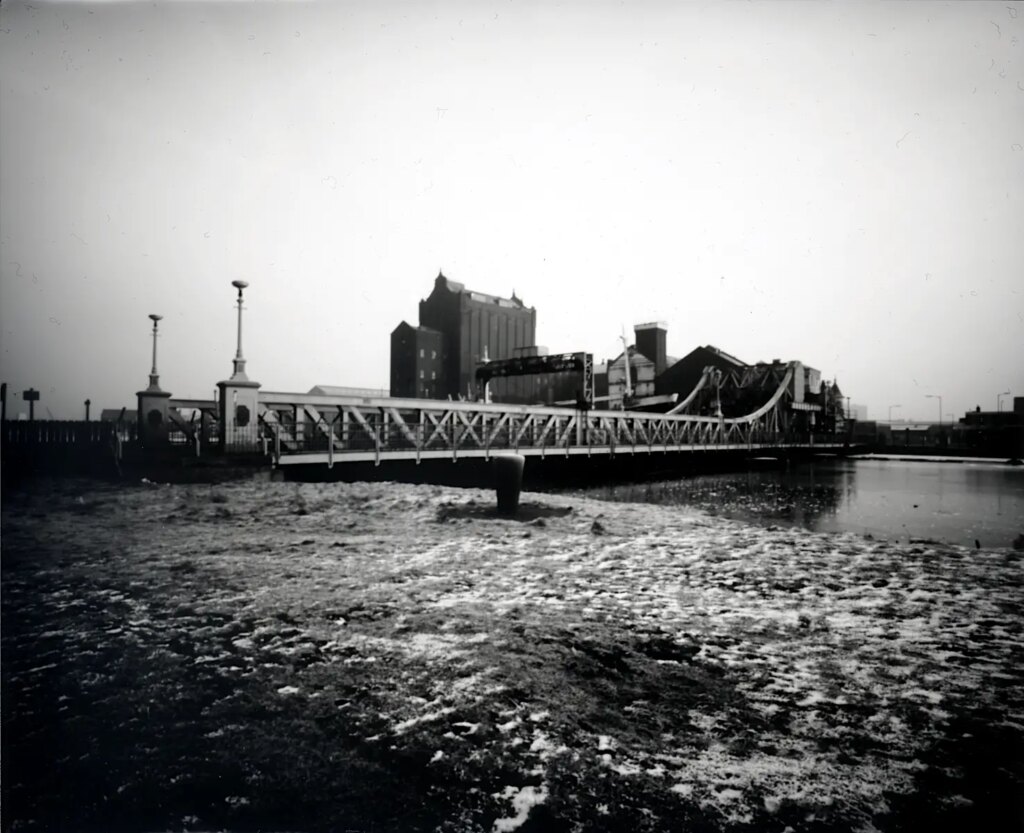
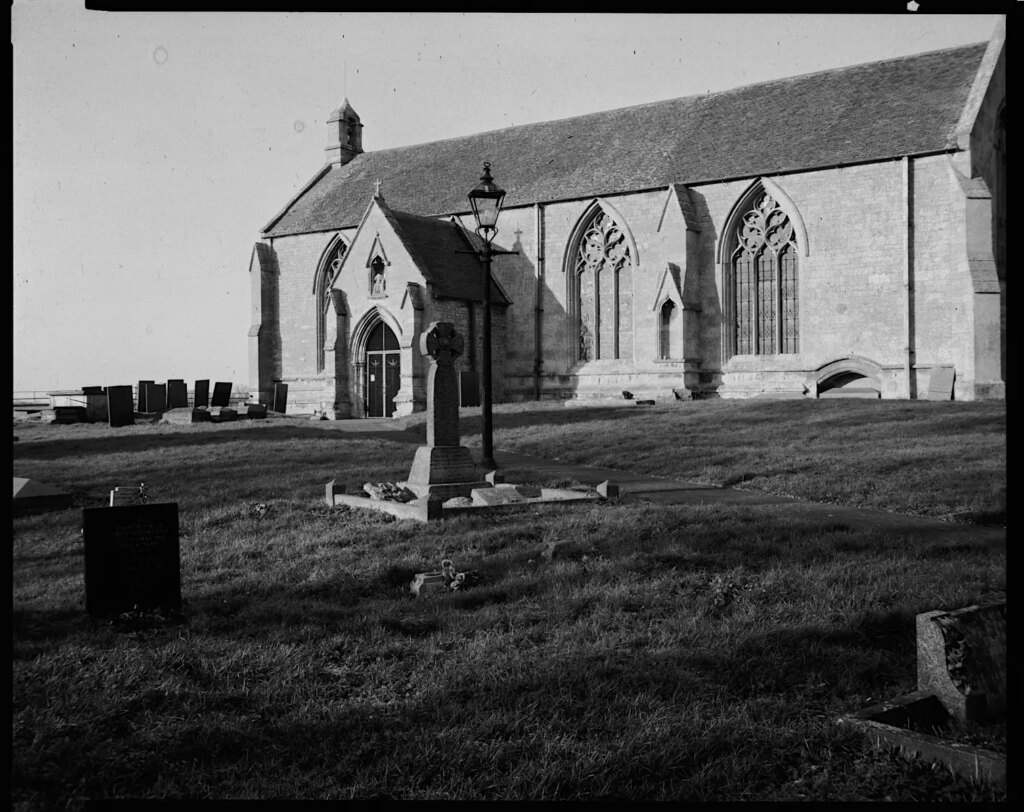
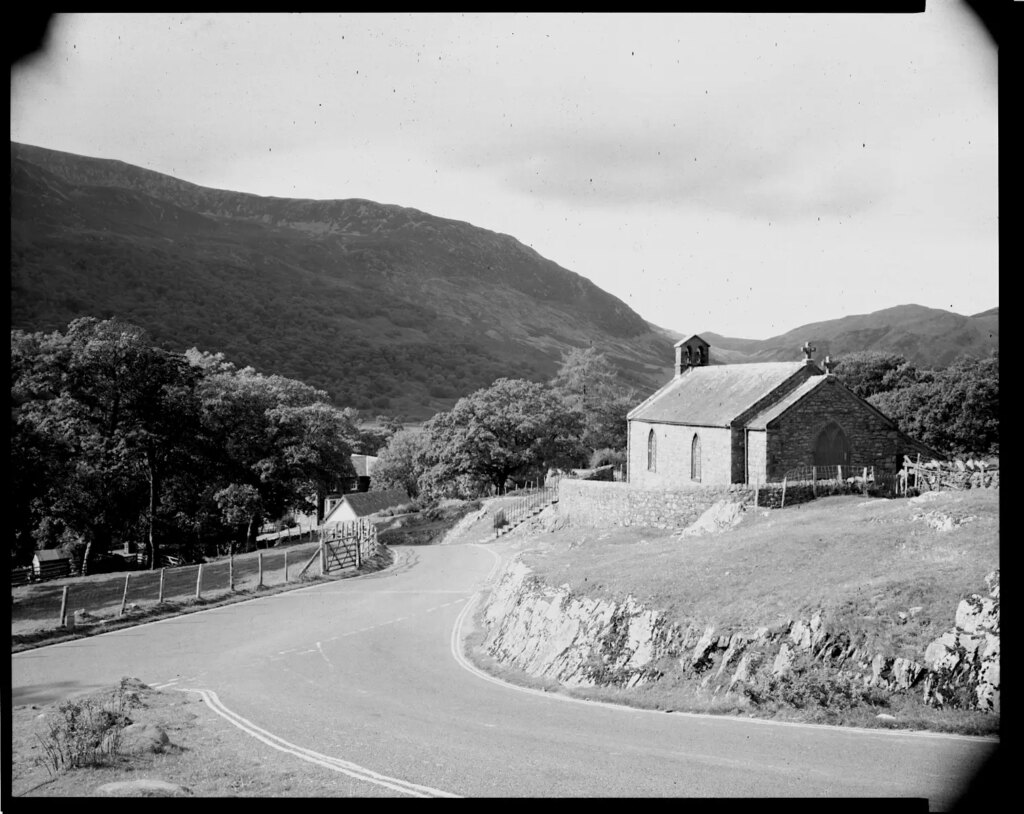
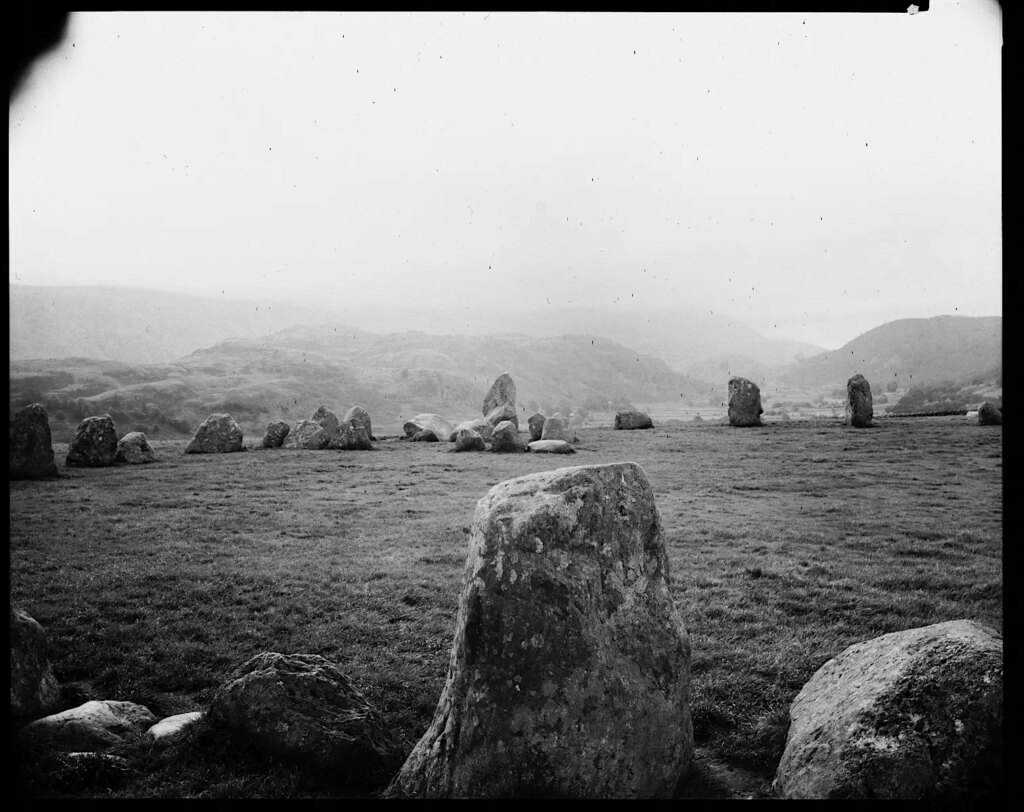
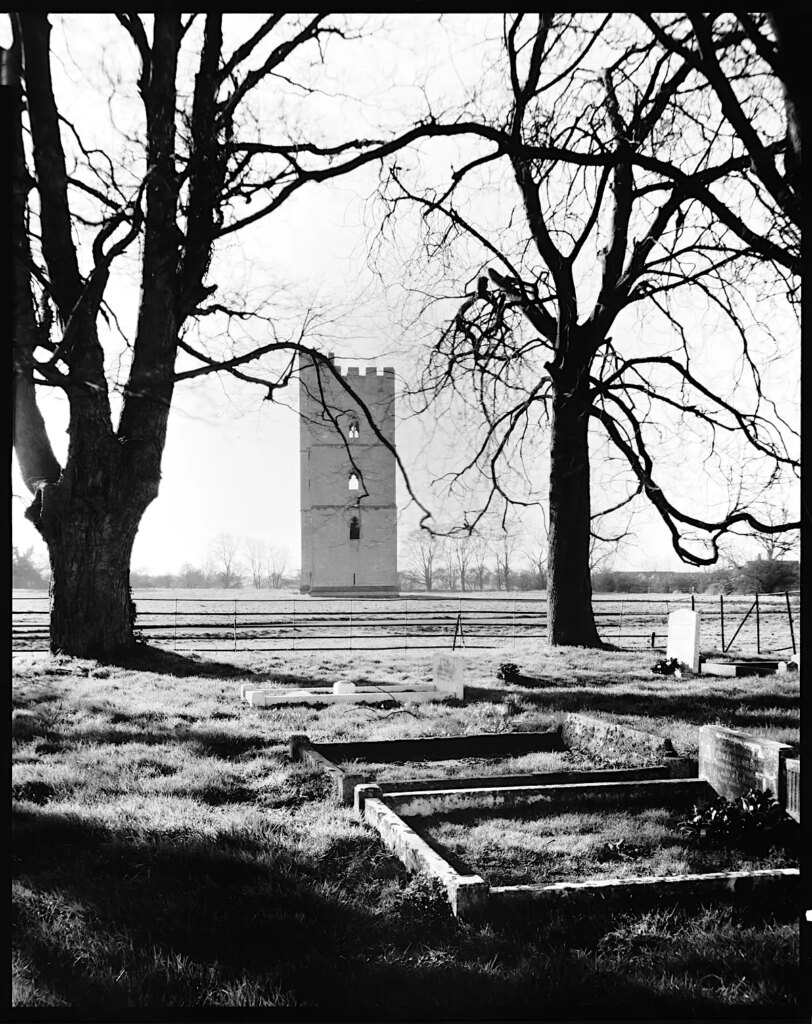
Many moons ago I was keen to try my hand with large format, as large as I could manage, 10 x 8 seeming a good choice. You can tell how long ago from my pinhole shot of the Humber Bridge in the UK which shows it under construction some 50 years ago! Since large format film was way beyond my means at the time I thought I would try enlarging paper to produce paper negatives which I would then contact print onto more enlarging paper to produce a positive image, just like Fox-Talbot.

Why Multigrade?

Enlarging printing paper is coated with a light sensitive emulsion in similar fashion to camera film, but the formulation varies to take into account the different contrast grades required. This can work to advantage with Ilford’s Multigrade papers because they address this need in one paper by means of filters in the enlarger light path and three emulsion layers, each with a different response to blue light which produces the variable contrast grades. Yellow filters will therefore control the blue content of the light, modifying the degree of contrast in the image.

Cameras.

pinhole camera base box
Spacer and film box base for pinhole camera.
Completed parts of film box pinhole camera
Completed parts of film box pinhole camera with blu-tak to hold film.
Film box pinhole camera showing pinhole 'tape shutter'.
Film box pinhole camera showing pinhole ‘tape shutter’.

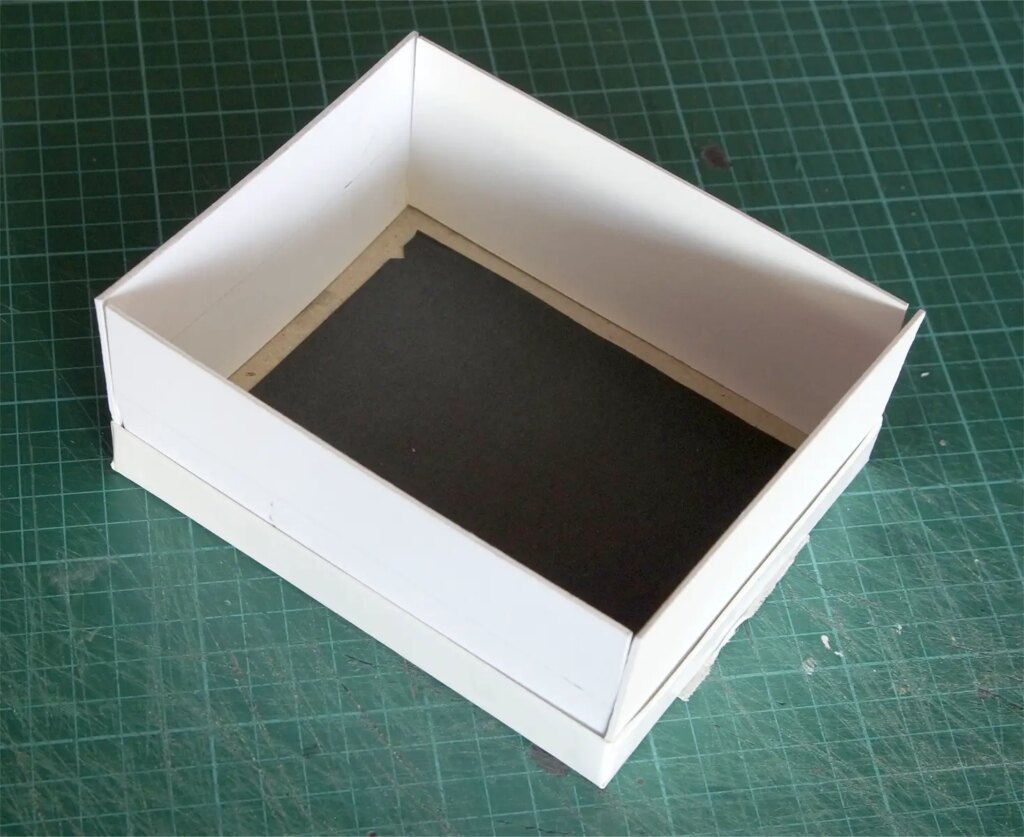
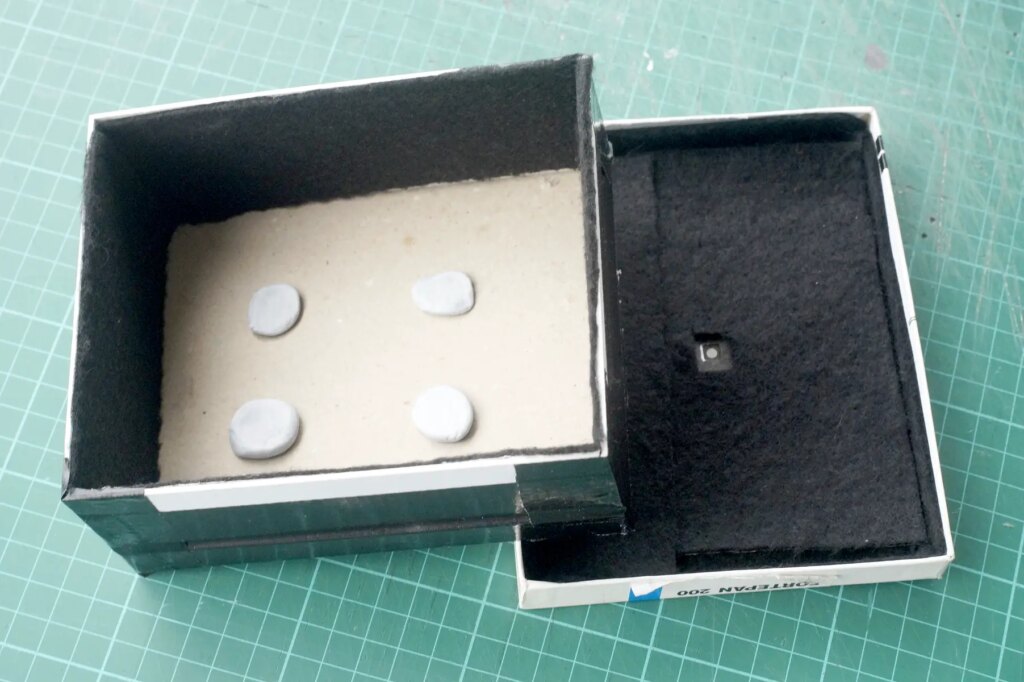
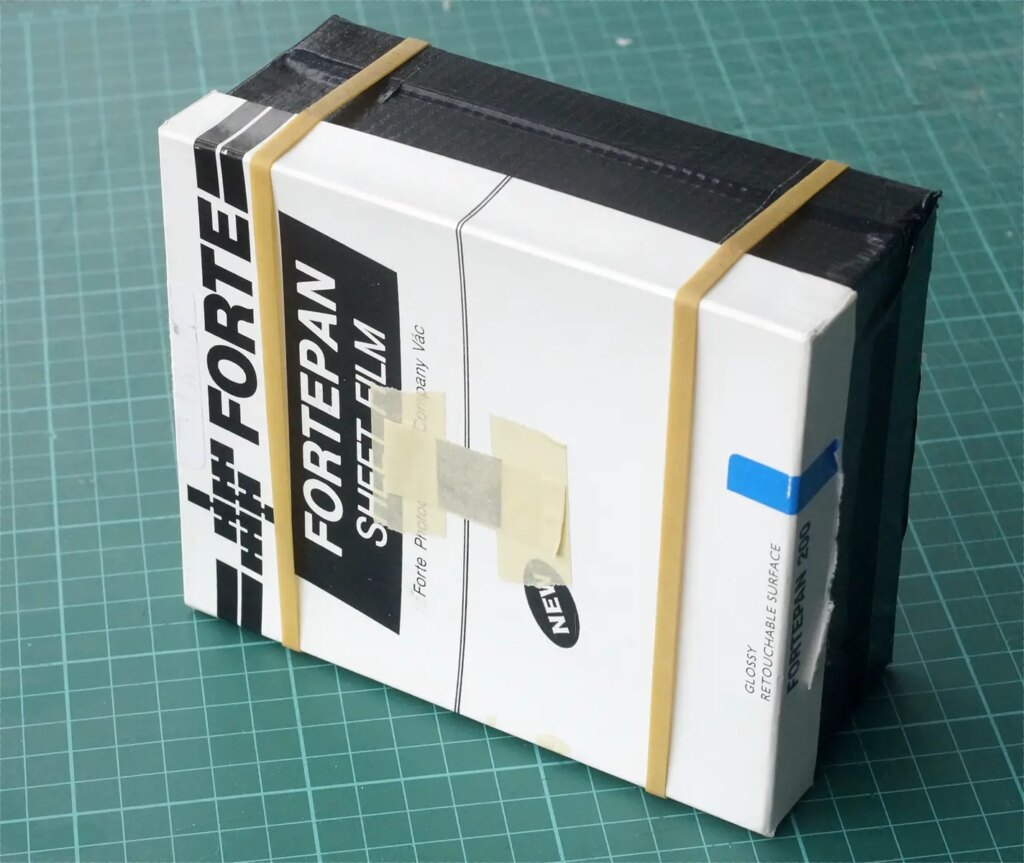
I started out by making pinhole cameras from Ilford Multigrade enlarging paper boxes with a card tube spacer taped between top and bottom to give me the focal length I required. A home made pinhole from kitchen foil punched out with a sawn off needle and a cork was taped over a hole in the box top, with a tape “shutter”. The recent example shown made from a 5×4 film box is made the same way. The whole thing was held by rubber bands onto a projector stand which fitted onto the tripod I had at the time.

Pinhole image in Lincoln, UK.
Pinhole image in Lincoln, UK taken on Multigrade with yellow filter.
Pinhole image of Humber Bridge under construction.
Pinhole image of Humber Bridge under construction taken on Multigrade with yellow filter..
Pinhole image of Grimsby Commercial dock.
Pinhole image of Grimsby Commercial dock taken on Multigrade wit yellow filter.
Pinhole image of Grimsby fish dock taken at Christmas when all trawlers in port.
Pinhole image of lifting bridge once used to allow ships closer to town centre.

Multigrade RC resin coated paper does not curl and naturally lies very flat unlike fibre base paper, so the paper box cameras only needed blobs of Blu-tak to hold it in place. I did need multiple cameras for more than one exposure when out and about though.

Image taken on Multigrade with card and plywood camera and close up lens objective.
Card and plywood camera to take 8" x 10" Multigrade paper.
Card and plywood camera to take 8″ x 10″ Multigrade paper.
Lens and mount for card and 8" x 10" plywood camera.
Lens and mount for card and 8″ x 10″ plywood camera.

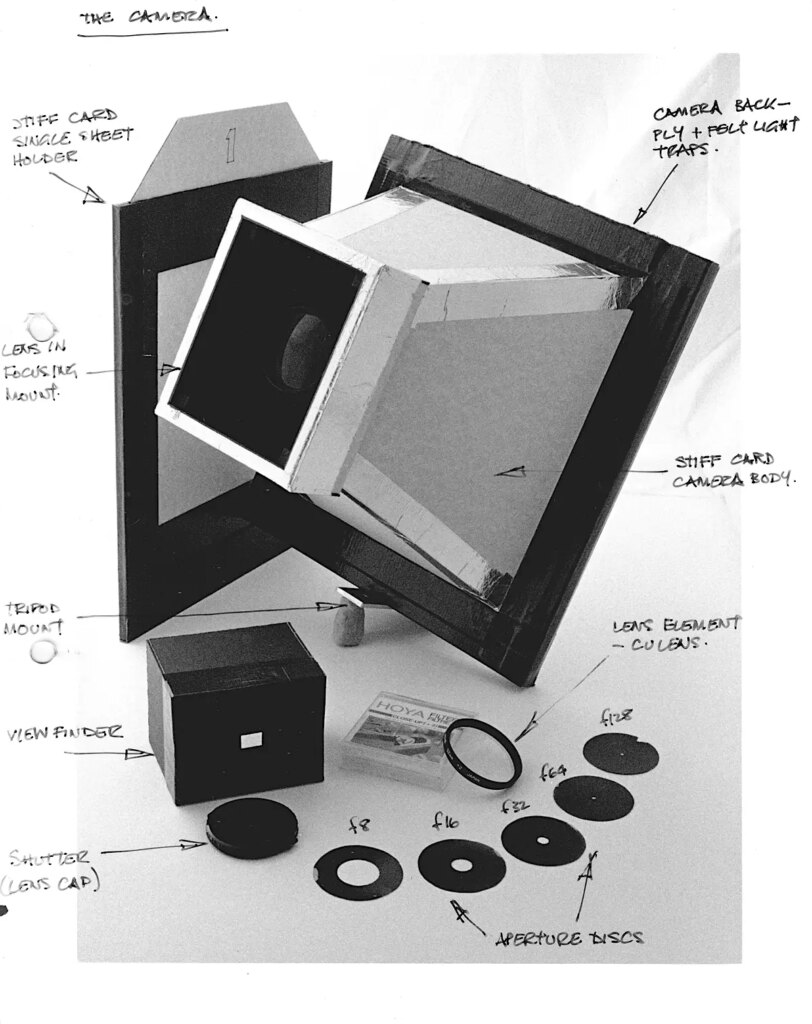
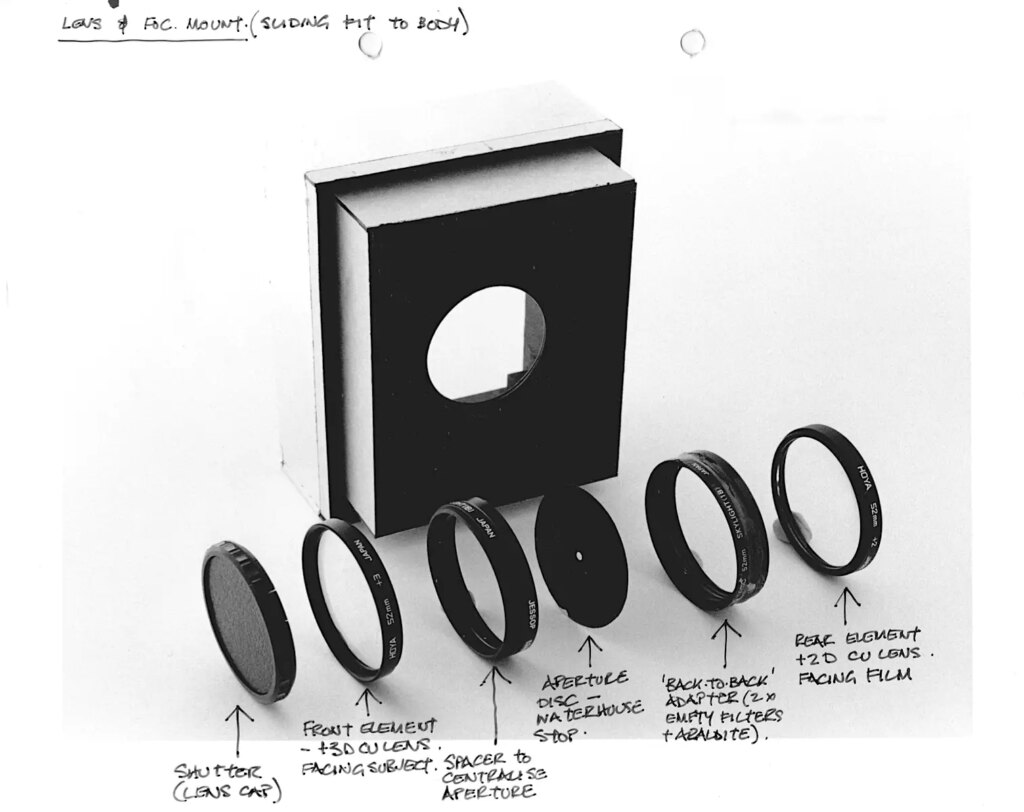
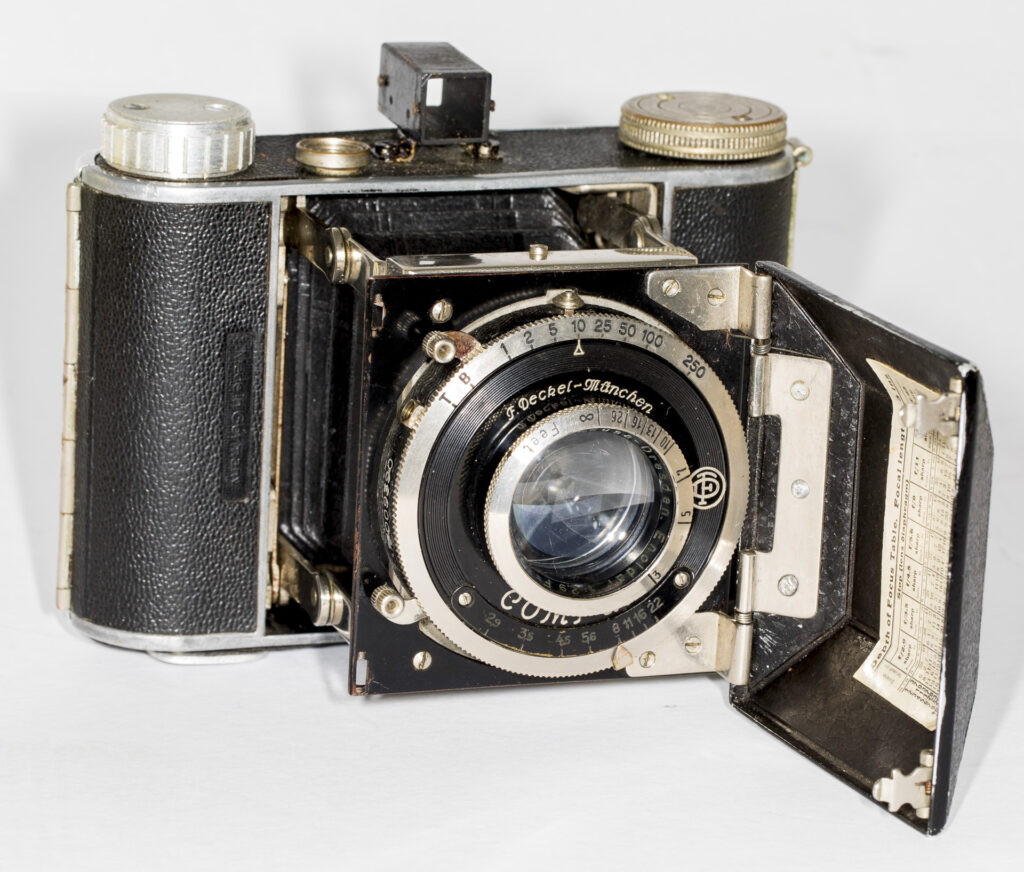
A plywood, cardboard and tape device came next with single dark slides also made from card and a simple meniscus lens in the form of a close-up lens used alone. This was improved with a doublet lens, constructed from two close up lenses mounted back to back on pairs of empty filter holders epoxied together. Waterhouse stops were made from thin brass discs drilled to provide a selection of apertures and cut to fit into one of the filter holders before screwing in a close-up lens.

Sliding box image of South Kyme church, Lincolnshire, UK on multigrade with double menicus lens.
Sliding box image of South Kyme church, Lincolnshire, UK on multigrade with double meniscus lens.
Sliding box image of window decoration on Multigrade with double menicus lens.
Sliding box image of window decoration on Multigrade with double meniscus lens.
Sliding box image Buttermere Church, Englsh Lake District on Multigrade with double menicus lens.
Sliding box image Buttermere Church, Englsh Lake District on Multigrade with double meniscus lens.
Sliding box image of Cstlerigg Stone Circle, Englsh Lake District on Multigrade with double menicus lens.
Sliding box image of Castlerigg Stone Circle, Englsh Lake District on Multigrade with double meniscus lens.

Later still I built a plywood, sliding box, focussing camera using the doublet lens I had made for the previous version but with the major advance of having two 8×10 DDSs I picked up on a visit to Vancouver in Canada. The “ground glass” was tracing paper lightly tacked to a glass sheet with spray adhesive which was quite workable in practice. Apertures were pretty small so depth of field was very generous and focus not critical.

Exposure.

As mentioned, a 2x yellow filter taped over the pinhole or added to the close-up lens combination greatly improved the tone range and contrast so one was used all the time.

Speed rating was ISO 6 from memory. Exposure was normally as long as I could manage because of reciprocity so it wasn’t critical and processing was by inspection in the darkroom so could be adjusted sheet by sheet.

Out of doors the wind could cause problems because the cameras were very light and easily disturbed, even the ply box version, which presented a large surface area to the breeze, being roughly a 12”/30cm cube.

Processing.

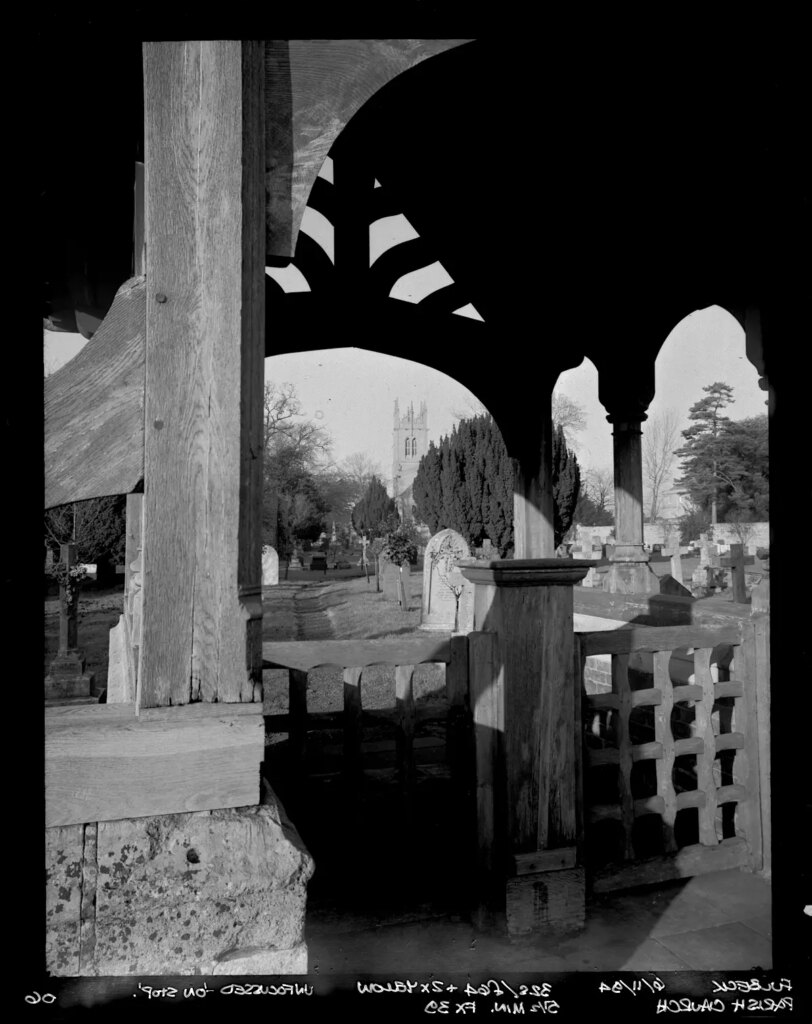
The negatives were processed under darkroom safelighting and contact prints made from them under the enlarger. Nowadays I scan the original paper negs using a flat bed scanner and invert and edit the files in Affinity Photo. This was the method used for most of these examples.

Sliding box image of South Kyme medieval tower, Lincolnshire, UK on Multigrade with double menicus lens.
Sliding box image of South Kyme medieval tower, Lincolnshire, UK on Multigrade with double meniscus lens.

Conclusion.

I really enjoyed my large format experiments and learned a great deal into the bargain which I was useful when a decent 5×4 outfit came along later.

If you fancy giving it a try, using Multigrade paper as film is very workable even today. A pinhole camera and a processing drum would be an economic way to try it out or a dark room of some sort even better allowing for inspection during tray development.

Share this post:

Find more similar content on 35mmc

Use the tags below to search for more posts on related topics:

Contribute to 35mmc for an ad-free experience.

There are two ways to contribute to 35mmc and experience it without the adverts:

Paid Subscription – £2.99 per month and you’ll never see an advert again! (Free 3-day trial).

Subscribe here.

Content contributor – become a part of the world’s biggest film and alternative photography community blog. All our Contributors have an ad-free experience for life.

Sign up here.

About The Author

By Tony Warren
In my 60 or so years of serious involvement in photography I have seen the demise of the viewfinder, the rise of the SLR and the eclipse of them all with the meteoric development of the digital camera. Through it all, however, and above all else, the image is what it is all about so I now use film alongside digital. Whatever is the most appropriate or practical. My contributions will hopefully be useful for anyone interested in using film and also how a died-in-the-wool antique like me is continuing his life-long addiction in the digital age, using both platforms. The major benefit of an extended retirement is that I can spend most of my time nowadays with photography and writing about it.
View Profile

Comments

Alexander Seidler on That Time I Shot with Ilford Multigrade RC as film.

Comment posted: 29/05/2023

Beautiful pictures ! Thank you Tony
Reply

Leave a Reply

Your email address will not be published. Required fields are marked *

Tony Warren replied:

Comment posted: 29/05/2023

Thank you Alexander, I am glad you enjoyed them.

Reply

Leave a Reply

Your email address will not be published. Required fields are marked *

Hank on That Time I Shot with Ilford Multigrade RC as film.

Comment posted: 28/05/2023

A great and inspiring read. I made a 5x7 pinhole camera many years ago and shot it with Ilford MG. It was really fun. I later purchased a beat up 5x7 camera with an eye on continuing as such, but with a better lens. The camera is missing bellows, so it is a rainy day project away from actually being used. Your article has prompted me to finish it and see what sort of images I can get. Thanks!
Reply

Leave a Reply

Your email address will not be published. Required fields are marked *

Tony Warren replied:

Comment posted: 28/05/2023

Thank you Hank. Well worth doing - bellows are quite a patience tester I gather - hope you get it finished.

Reply

Leave a Reply

Your email address will not be published. Required fields are marked *

Geoff Chaplin on That Time I Shot with Ilford Multigrade RC as film.

Comment posted: 27/05/2023

Excellent article and I love the ingenuity making a lens camera, well done and thanks for writing up. I've made several pinhole cameras including an 8x10 with a carrying handle which doubles as a lunch box!
Reply

Leave a Reply

Your email address will not be published. Required fields are marked *

Tony Warren replied:

Comment posted: 27/05/2023

Thank you Geoff. Why not - ingenious.

Reply

Leave a Reply

Your email address will not be published. Required fields are marked *

Jayden on That Time I Shot with Ilford Multigrade RC as film.

Comment posted: 26/05/2023

How interesting! I enjoyed the images at the docks, and appreciate the diagram with the camera and all accessories labelled. I wonder if you could solve the single sheet to a camera issue with the use of a Graphmatic 4x5 cartridge? load it with pre-cut paper and be able to reload the next shot with ease in the field with the multiple sheets and use of darkslide.
An enjoyable read!
Reply

Leave a Reply

Your email address will not be published. Required fields are marked *

Tony Warren replied:

Comment posted: 26/05/2023

Thanks Jayden and yes, using the Graphmatic would be useful if one is to hand. It is a very clever device and would have been a boon to the early press guys.

Reply

Leave a Reply

Your email address will not be published. Required fields are marked *

Matthias on That Time I Shot with Ilford Multigrade RC as film.

Comment posted: 26/05/2023

This does look pretty need and I will definitely get back to read the whole thing caeefully when I have a bit of time. One question springs to mind: as far as I know any B&W film can be processed a slides. Is that true for paper? This would obviate the need for contact printing.
Reply

Leave a Reply

Your email address will not be published. Required fields are marked *

Tony Warren replied:

Comment posted: 26/05/2023

I am afraid the paper support for the emulsion would get in the way of projection but I guess you could process bromide as reversal. Someone may know a bit more about that - not something I have ever tried. There is a direct positive paper available these days which would presumably do what you suggest. Might be Harmon product not not certain.

Reply

Leave a Reply

Your email address will not be published. Required fields are marked *

Karen McBride on That Time I Shot with Ilford Multigrade RC as film.

Comment posted: 26/05/2023

Thanks for a very interesting and enjoyable article. I would like to learn more about your plywood and cardboard camera and especially about the lens you created and your thinking behind the design. Great photos too BTW.
Reply

Leave a Reply

Your email address will not be published. Required fields are marked *

Tony Warren replied:

Comment posted: 26/05/2023

You are very kind Karen, thank you. I made that camera about 40 years ago now. The only ply part was the back which was a sandwich of two pieces with the aperture cut out and a 'U'-shaped piece in between which fitted the darkslide and a tracing paper focussing screen I believe from memory. There would also have been some sort of light trap where the dark slide was inserted. The lenses were simply close up lenses as mentioned in the text - initially made with a single meniscus, then a double meniscus for better definition with stops and empty filter rings. The lenses were screwed together back to back (weakest towards the emulsion) onto the empty rings fixed back to back with epoxy to take the lenses. As to my thinking at the time, I suppose it was just to get into larger formats with the least expense.

Reply

Leave a Reply

Your email address will not be published. Required fields are marked *

CP93 on That Time I Shot with Ilford Multigrade RC as film.

Comment posted: 26/05/2023

I don't think I've ever seen pinhole images that sharp!

Interesting article and intriguing images, thank you.
Reply

Leave a Reply

Your email address will not be published. Required fields are marked *

Tony Warren replied:

Comment posted: 26/05/2023

Thank you. The definition comes from the size of the original. At 10x8 it is a contact print so there is no enlargement whereas my first pinhole with an APS-C SLR, for example, needed 10x linear enlargement for the same size image. Needless to say I didn't make many with that camera.

Reply

Leave a Reply

Your email address will not be published. Required fields are marked *

Martin JONES on That Time I Shot with Ilford Multigrade RC as film.

Comment posted: 26/05/2023

Great article and describes exactly what I’m doing for the Frugal Film Project this year.

I found an old Vectis MDF pinhole camera kit and made it out of curiosity. Added a cold shoe, a tripod thread, 40.5mm filter thread, a properly drilled pinhole, spirit level and some Ilford MGRC 3” x 3” paper and off I went. Loading is a single sheet at a time, in a dark bag, so a slow process.

Took advice from the good folks over on the “Using photo paper as a negative” FB page about controlling contrast. For those that haven’t tried it, photo paper has relatively little latitude compared to film, so it’s easy to blow out the highlights and the sky.

Their advice was:-

Yellow filter – reduces blue light as Tony says above
Pre-flash the paper – pre-expose the paper to a small amount of light, helps the shadow detail a lot
Develop by inspection with alternating dilute developer and water bath – like stand developing

It’s early days, but I’ve been really pleased with the results. So much so that I’ve invested in a commercially made large format pinhole camera that takes 4x5 double film backs. No more grovelling on the floor with a dark bag for me.

There is a significant cost advantage in using photo paper compared to film. Photo paper at 4x5 comes in from about 15p per sheet compared to at least £1 for B&W film. It’s also easier to handle because it’s orthochromatic, so you can load and develop it under a safe light.

Photo paper is a fascinating negative medium to work with and I thoroughly recommend trying it :-)
Reply

Leave a Reply

Your email address will not be published. Required fields are marked *

Tony Warren replied:

Comment posted: 26/05/2023

Thanks for the comments Martin. I must investigate the Frugal Film Project you mention, sounds interesting. Also very impressed with your Rolls Royce of a pinhole camera. I bought some laser drilled pinholes which were much better than my home grown versions for the smaller format cameras, 6x6 and 6x9, which I made from worn out folders after trying pinhole with APS-C digital - very impressionistic. Never tried pre-flashing as contrast didn't give me problems but I have read how it can be helpful. Developing by inspection alone seemed to work for me. As a Yorkshireman I also thoroughly endorse your comments on relative costs. Best of luck with the project.

Reply

Leave a Reply

Your email address will not be published. Required fields are marked *

Leave a Comment

Leave a Reply

Your email address will not be published. Required fields are marked *