My father-in-law is a bit of a packrat. He loves people and he’s always got relevant questions, stories, and of course stuff in his hoard. Tell him what you’re interested in, and he can find an on-topic decades-old postcard, or calendar, or a book. When I got back into film photography over the past couple of years, he dug into his trove and started hauling out cameras. Boxes of cameras, really, some from as far back as World War II. The one featured in this article is a bit later in the century, but still what most people would consider obsolete: a Polaroid Land Camera Pathfinder model 110.
The Pathfinder 110 is a series of bulky folding viewfinder cameras from the 1950s and early 60s. It’s an instant camera, built for Type 40 roll film that consisted of two separate rolls crushed together as you pulled on the tail, to develop a 3¼x4¼-inch (7.2cm by 9.5cm) print inside the rear cover in about a minute. This film hasn’t been available for decades, and unlike expired negative film, any old stock you might find is no longer usable.
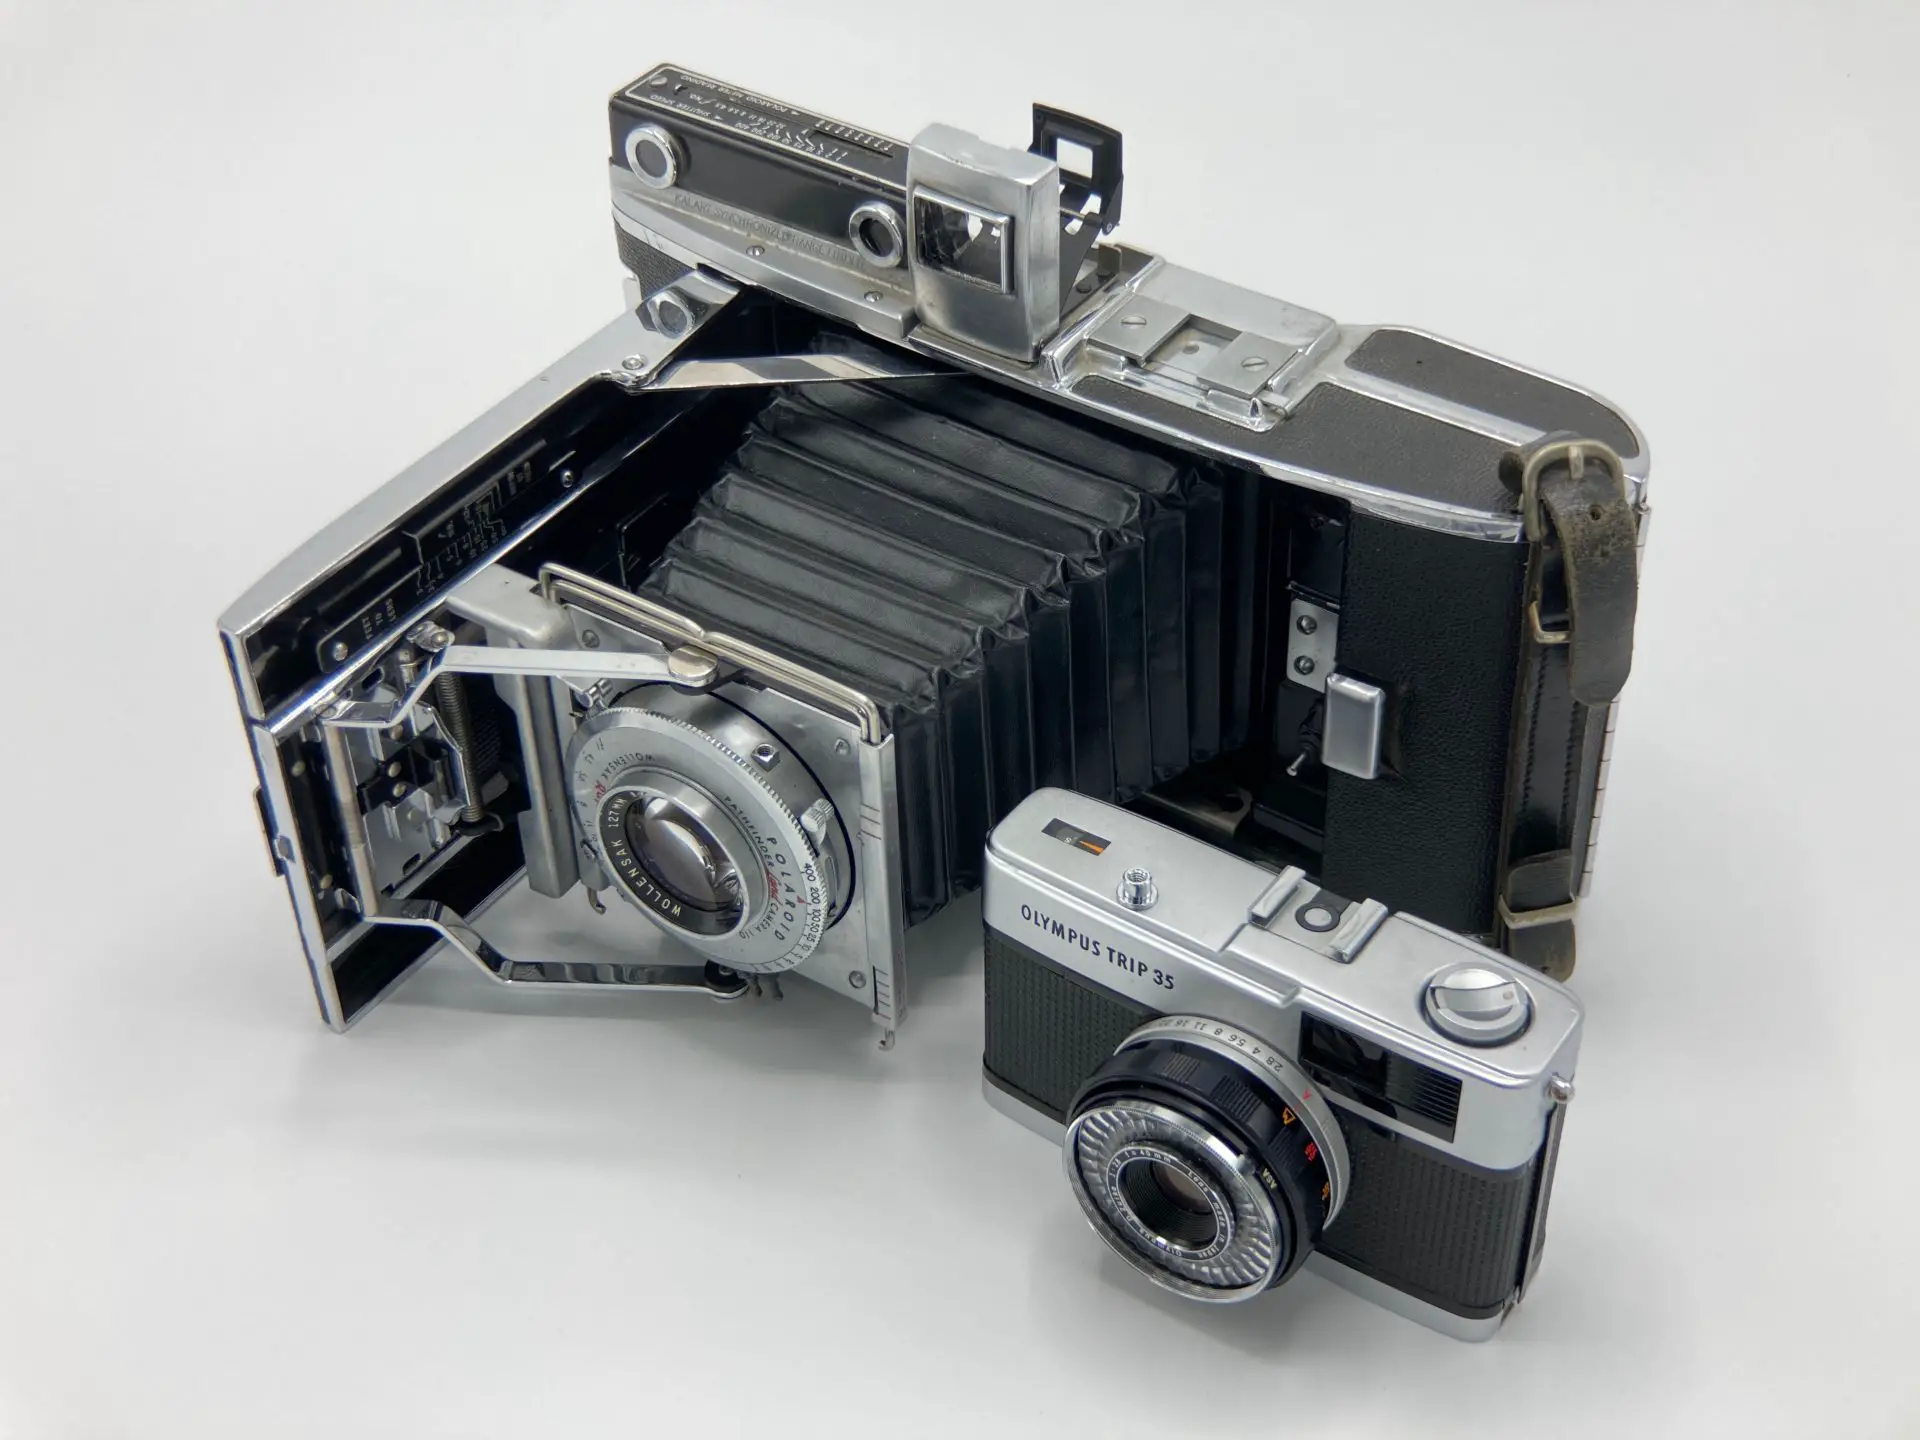
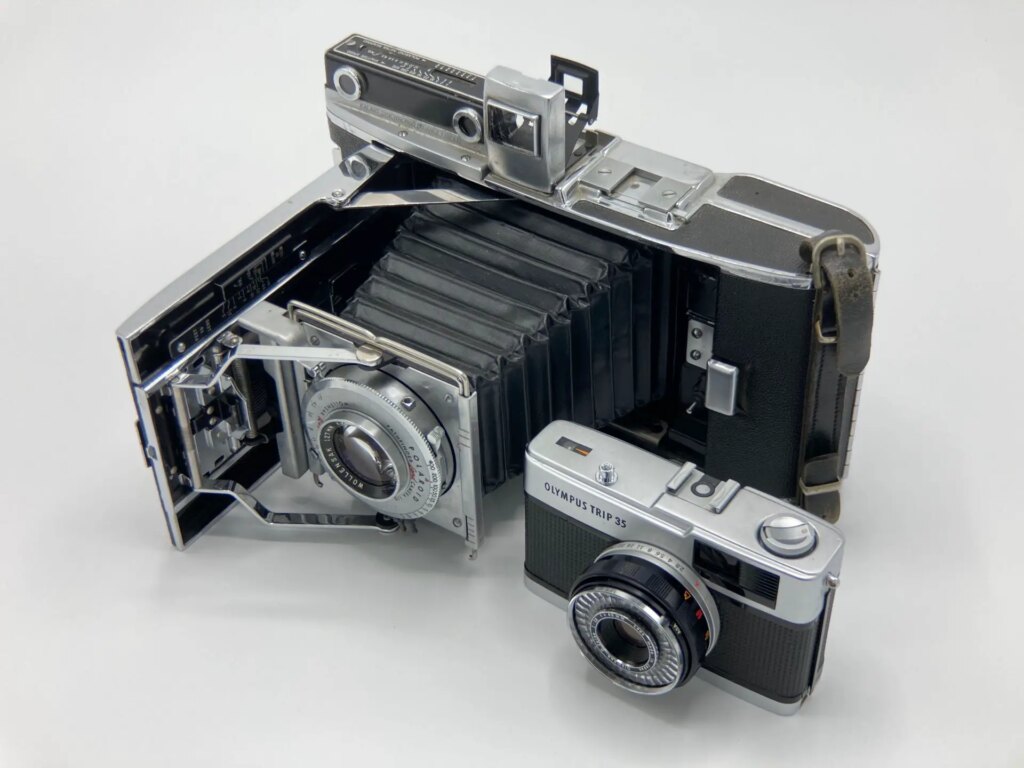
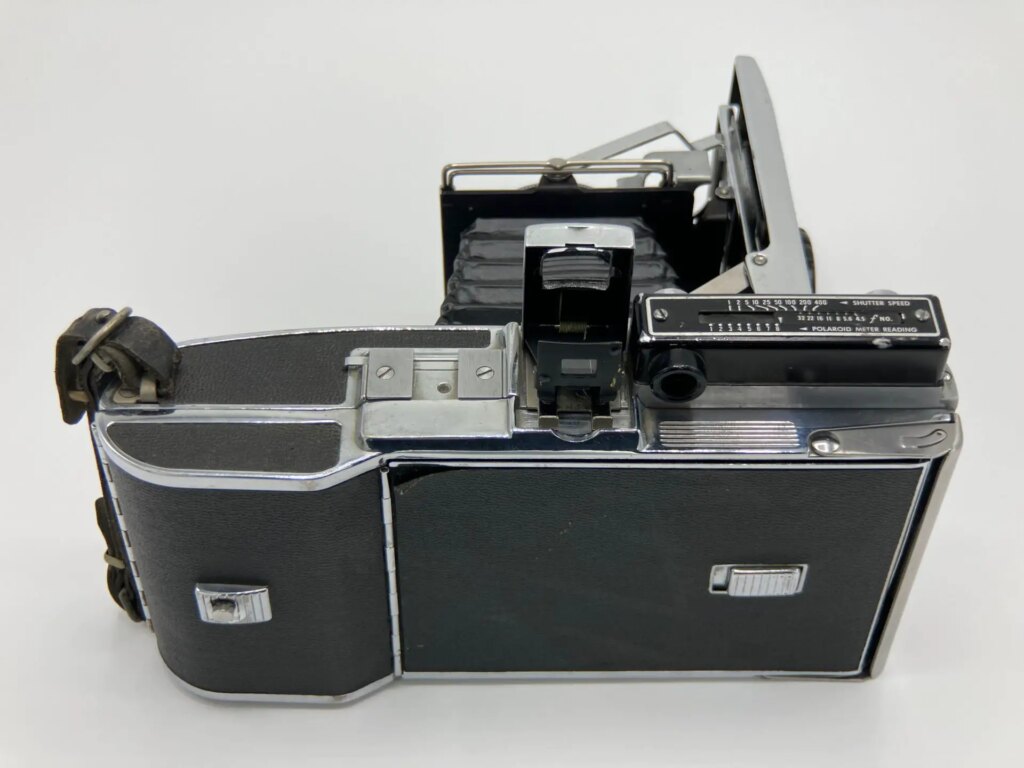
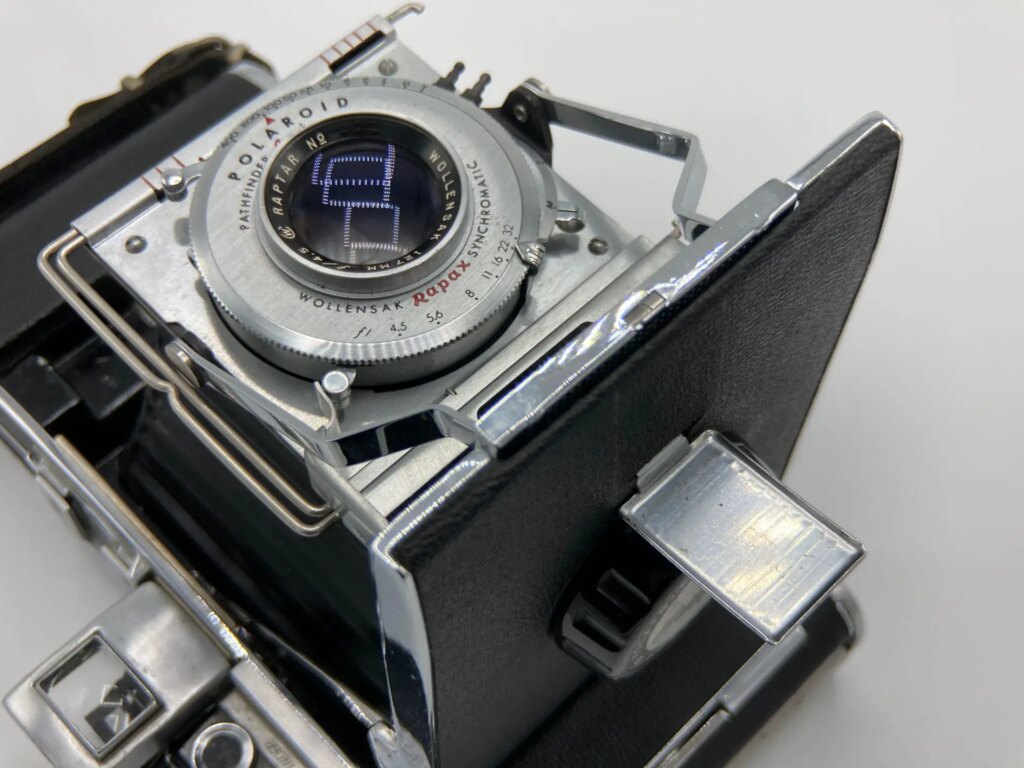
Polaroid made millions of folding roll-film instant cameras in multiple sizes. The Pathfinders were the premium, professional cameras. There were a few models with variations in some features and specs, but all quite similar in the fundamentals. My father-in-law gifted me his Model 110, the base Pathfinder model with a 127mm f/4.5 lens that I think, from counting reflections, is a four-element design. In “35mm equivalent” terms it’s a normal field of view, approximately similar to a 45mm lens. The shutter tops out at 1/400th and there’s a pop-up viewfinder next to a separate, but coupled, rangefinder. The camera is fully manual, and the photographer must set the shutter speed and aperture on the front of the lens. The shutter is cocked with a lever, and released with a button at the side; focus is via the big knob on the center of the front cover. There are two tripod sockets, but the one on the front cover seems all but useless to me, as it’s too close to the focus knob.
To say the Pathfinders are solidly built is an understatement: they bring to mind farm equipment, or perhaps a midcentury domestic appliance like an old KitchenAid mixer. They’re the opposite of the “35mm compact” for which this website was originally named. They’re physically large, but even more so, they’re heavy. The camera weighs in at 2180g empty — nearly five pounds. When you think “no plastic here, all-metal build,” think one step further. The camera is made of sheets of metal, but they’re so thick and heavy, the phrase “plates of steel” probably gives a more accurate mental image. And not single plates, either; there are two doors that fold across the back, each with a massive apparently-solid stainless steel roller (no weight-saving tubes here, bah humbug!) and one of the doors has another sub-door built within it. Ironically, there are plastic parts; the curved side of one of the film chambers is formed from something like Bakelite.
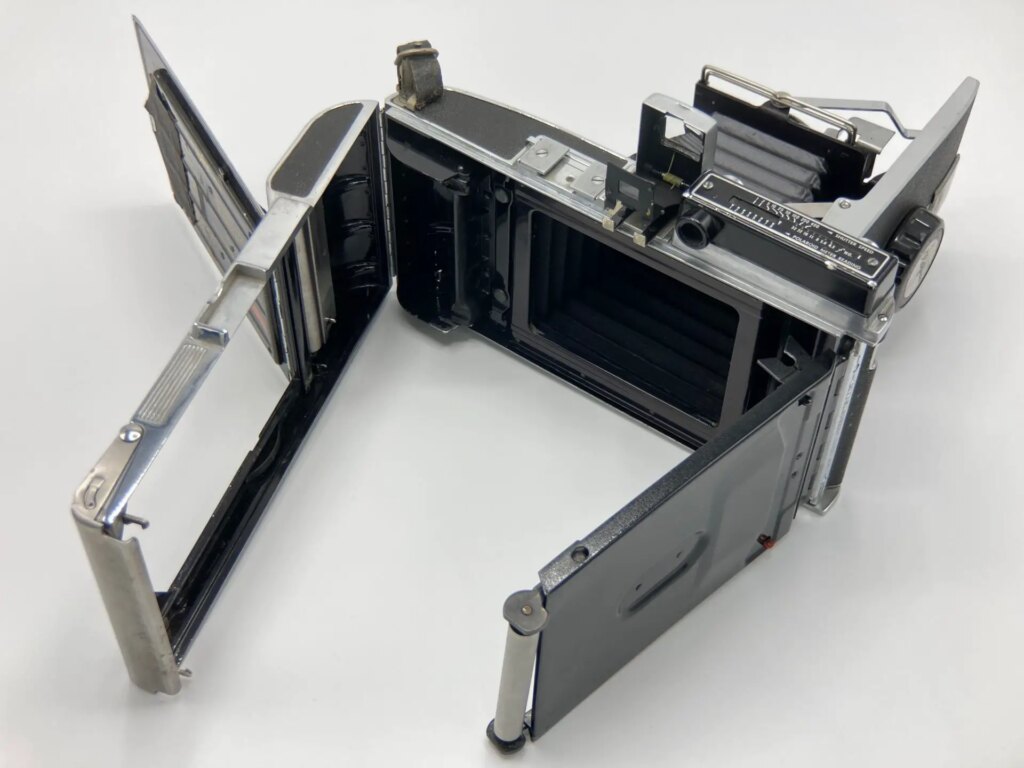
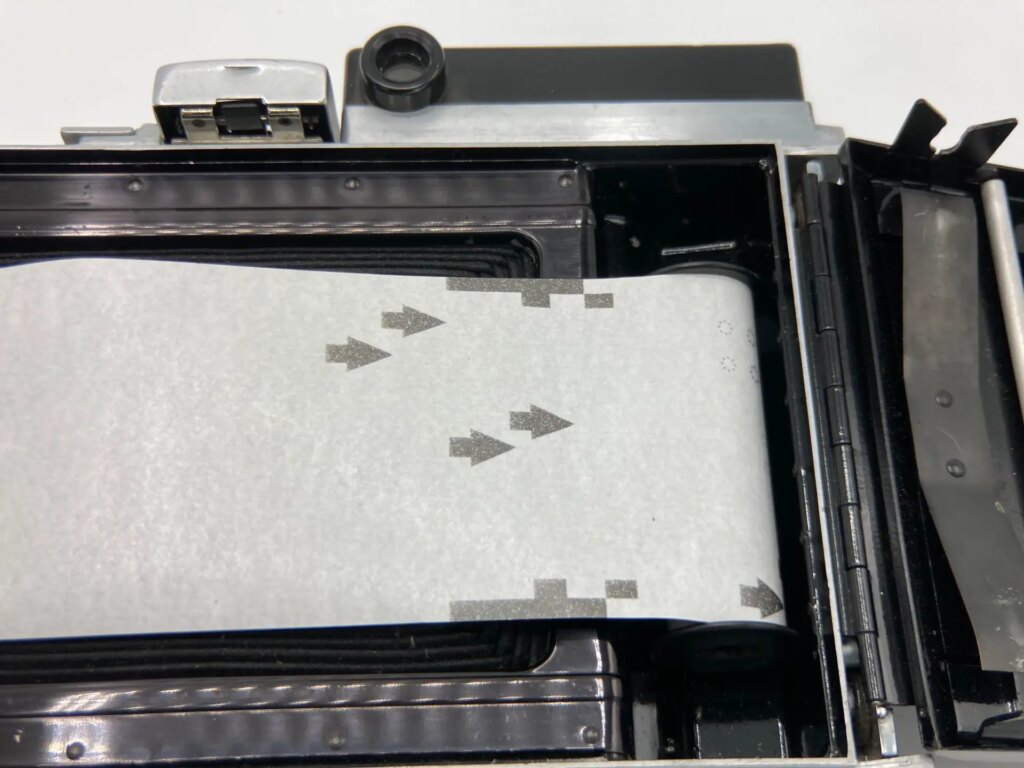
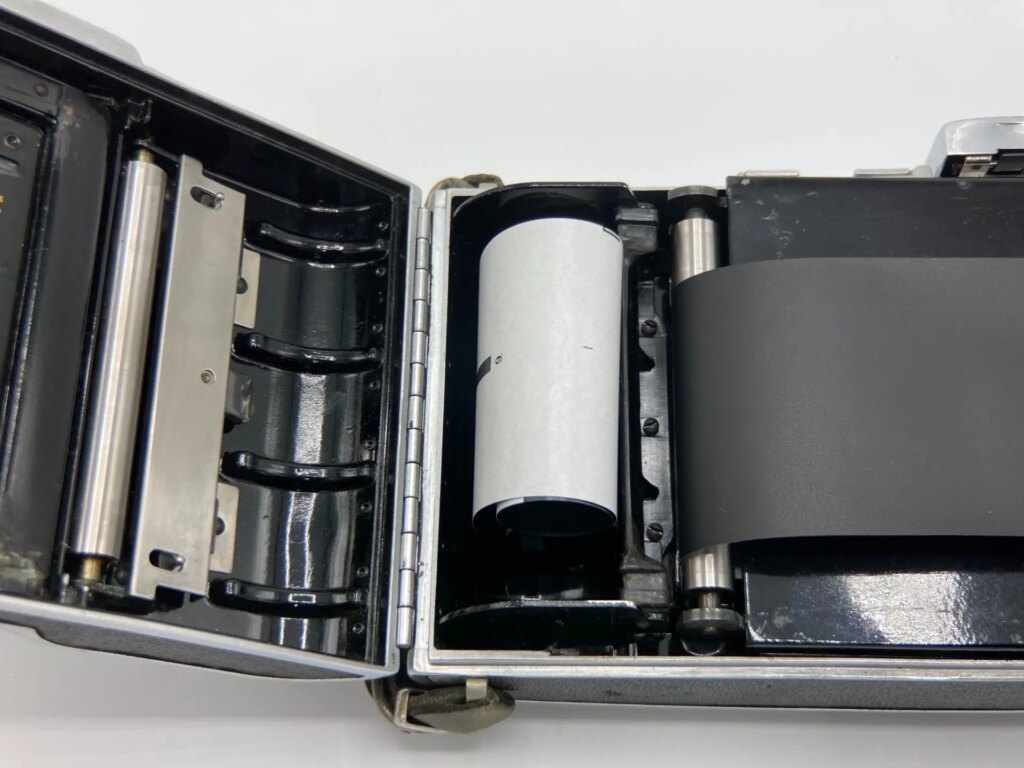
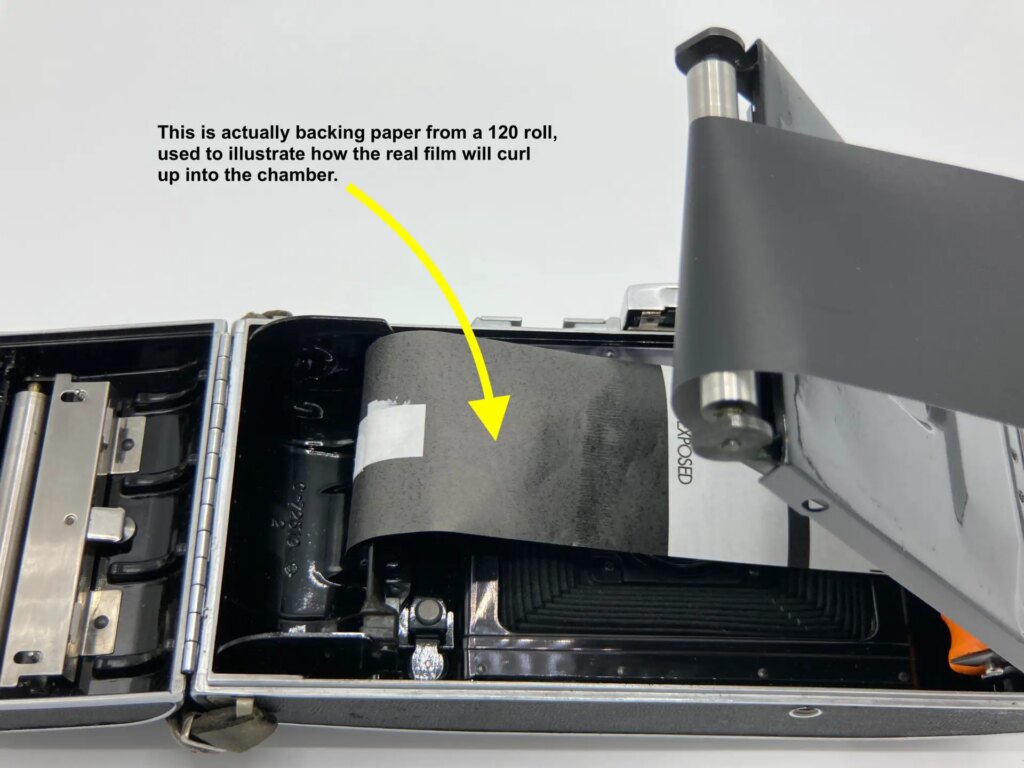
The film path is complicated. One roll of Type 40 film went into the rightmost chamber and traveled across the film gate behind the lens, where it met the other roll. The first door would swing closed from the right, and then both rolls traveled together across the back of the first door, covered by the second door, whence they came out a slot on the right of the camera. I’m using two rolls of backing paper from modern 120 roll film to demonstrate here. As you can see, the 120 film is notably narrower than the camera was designed for; it doesn’t cover the film gate completely.
When I first started learning the history of these cameras, I didn’t think I’d use it. “This is too much even for me,” I wrote my brothers in a chat. I’m the one constantly repairing and using old cameras and lenses, seemingly the more painfully the better. But this one seemed like a shelf display unit at first. Still, a couple of things I’d read stayed in my brain, tickling: the lenses on these Pathfinders were said to be quite good, and the bellows are reputed to have aged much better than your usual folding camera from 60-70 years ago.
I’d come across a number of articles from people physically modifying the cameras to take 4×5 sheet film, Fujifilm Instax Wide, and so on. None of that interested me. But I’d also seen passing mentions of using the camera as-is with 120 film, and one day curiosity got the better of me and I started reading in more depth and searching for more information. I turned up a number of more-or-less descriptive articles and videos about that. The short version is that with some effort and care, you can load 120 film in the dark, and advance it by pulling the backing paper while the exposed film curls into the leftmost chamber. Some got it to work, others didn’t.
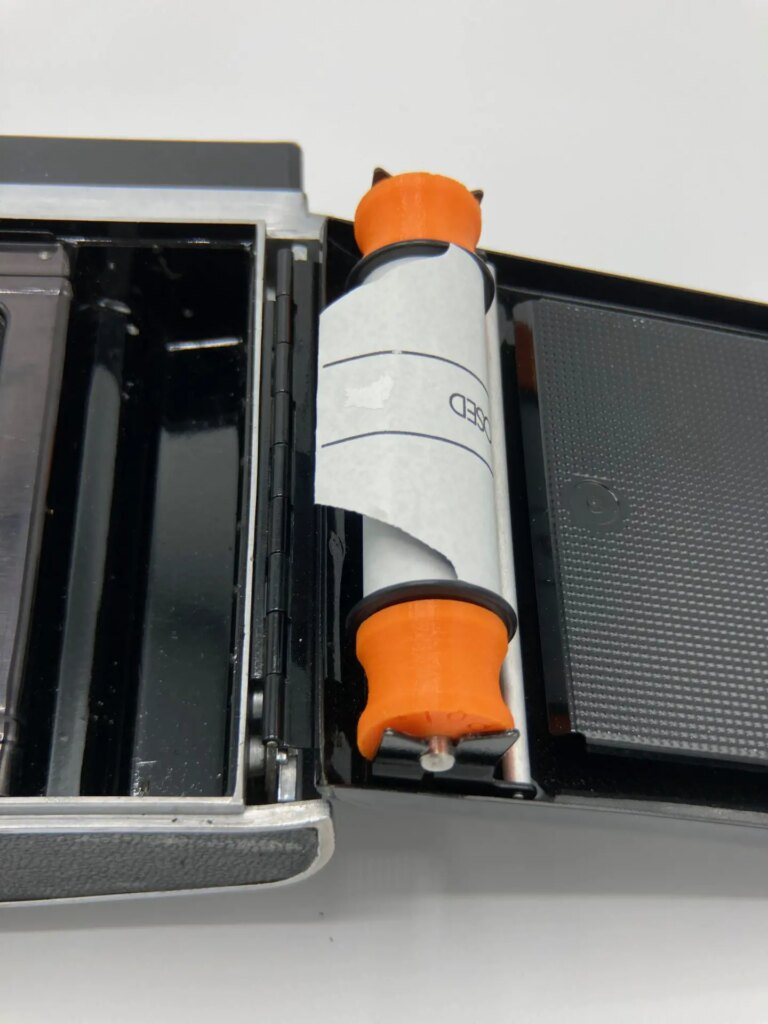
After examining what they did and why it worked or didn’t, I was convinced I could do it. But I also thought an adapter to hold the 120 roll correctly in place was the key; the Type 40 film was on a spool with a metal axle that clipped into a pair of prongs in the supply chamber. I found an eBay seller who’s 3D-printing adapters with small metal pins. The adapters are high quality and the metal pins are crucial.
Next, I gave the camera a bit of love before using it. I didn’t touch the lens or shutter, which were clear and sounded accurate, respectively. But I cleaned the viewfinder and rangefinder, which had the usual decades of grime. The rangefinder was frozen, so I disassembled and lubricated it, then roughly calibrated it. In a dark place, I held a small bright LED flashlight inside the bellows and found each pinhole, which I sealed with a tiny dab of black liquid electrical tape, and let it cure overnight before closing the bellows again. Other than that, the camera was in good condition. I think one of the reasons these cameras are still sought by a small cadre of enthusiasts is their durability.
Once the basic repair was done, I was ready to try it out! I thawed a roll of Ilford HP5+, my go-to black-and-white film. Loading the camera is a bit of a process. You need to work in total darkness. First, spool the film onto another spool, as if it’s been used and is ready to develop; you can do this in a changing bag, or load the film into another 120-format camera and wind it onto the takeup spool. This lets you run the film backwards to expose it, which is important because unlike normal usage of 120 film where the paper and film are designed to stay together as they go onto the takeup spool, you need the film to spring away from the backing paper and curl up in the camera instead of following the backing paper as it travels out the side of the camera. A roll of 120 film is taped to its backing paper on the leading end. By winding it onto another spool, you reverse it so that when it unspools as it’s used, the unattached “trailing end” comes first, and the natural curl of the film will do the rest.
To actually load your respooled film, put the whole camera into your changing bag or another totally dark place. (I was grateful I’d bought a jumbo changing bag. This camera isn’t easy to fit when open, even in my oversized bag.) Open the rear of the camera. Slip the adapters into the ends of the 120 spool, and feel the V-shaped prongs mounted to the door next to the rightmost film chamber. Clip the axle pins into that, with the film oriented so that the paper comes out next to the pressure plate. (I practiced in daylight first with an empty spool, which I recommend.)
Now comes the part that shorted my brain circuits and took me a solid ten minutes to figure out. You need to pull the backing paper and film across the film gate, just far enough that the leading edge goes over the lip of the leftmost film chamber. I did that — but then when I felt about for the film, it wasn’t there! It was… how was this possible… between the backing paper and the pressure plate! Had I mounted the roll in the wrong orientation so the film came out on the wrong side of the backing paper? I took the roll out and wound everything back onto the spool, then carefully put it back and tried again. Same thing! What the…?
Because of the disorientation of doing this by feel, and the surprise of not finding what I expected, my spatial reasoning seemed to be impaired, and I didn’t realize at first how this could be happening. The roll was correctly oriented both times. But the film’s curl was making me miss its leading edge, as it hugged tight to the spool, and thus instead of extending across the film gate, it wrapped around the back of the spool, behind the backing paper and against the pressure plate. Once I figured out that mistake, the rest was easy. I grabbed the film as it unrolled into reach of my fingers, held it straight, and pulled it across until I could feed its tip into the chamber on the left. Then I closed the first door, pulled the backing paper across to the right, and closed and latched the second door. (Fortunately, the film held up pretty well to the undue amount of handling, and I didn’t see any significant damage to the negatives. Just a minor scratch in one place, likely from the pressure plate.)
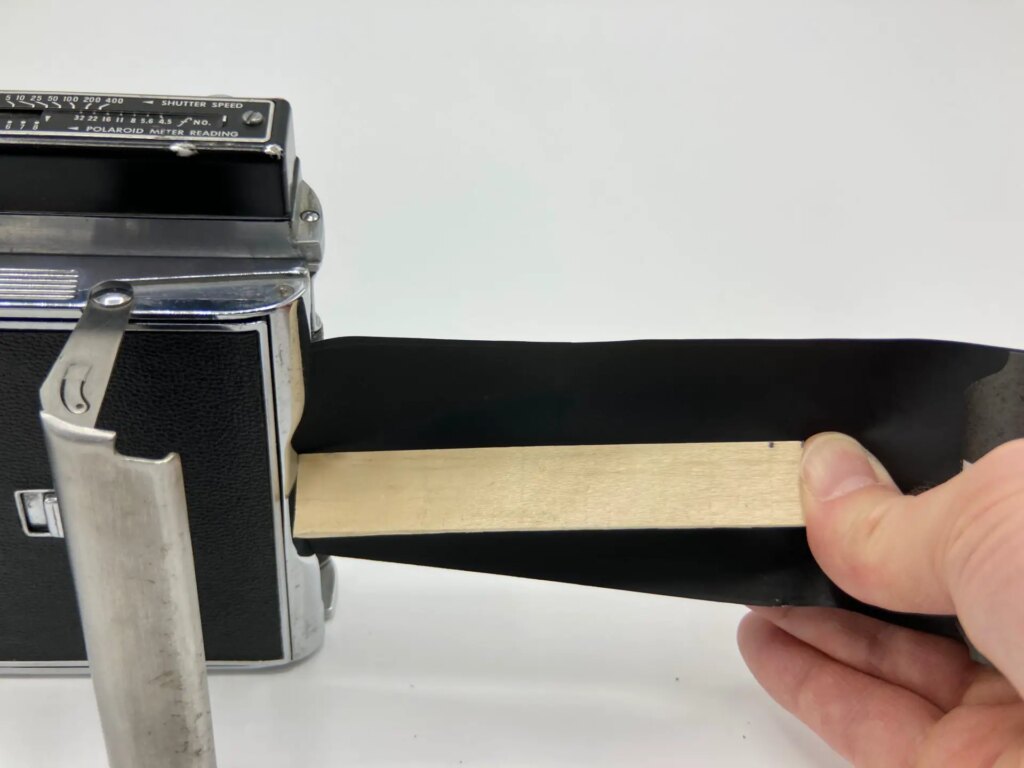
From here, the process of using the camera with 120 roll film is pretty simple in concept: make a photo, pull the paper to advance, rinse, repeat. You should get six frames on a 120 roll, each slightly larger than 6×9 format. In reality, this process requires a little skill and care. First, you have to figure out how far to pull the paper every time you want to advance a frame. Some online sources point out that you can just advance a little farther than the 6x9cm frame markings already printed on the backing paper, but I was afraid I’d lose my point of reference and mess it up. So I cut a popsicle stick to the exact length I wanted to advance — the width of the film gate, plus some space between frames — and used it as a ruler.
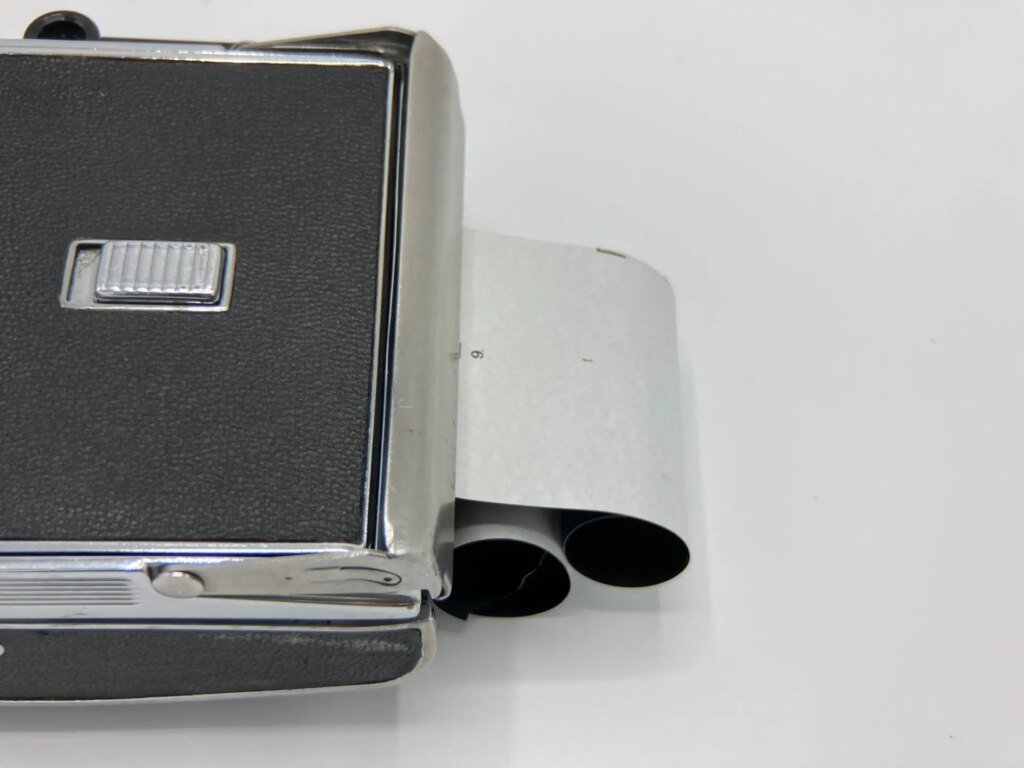
I also kept a small piece of low-adhesive masking tape stuck to the back of the camera. Whenever I advanced the film, I stuck the masking tape onto the paper’s current position to keep my spot and see how far to go. I cradled the camera in the crook of my elbow and used both hands. I braced the popsicle stick against the edge of the camera with my left hand, and pulled with my right hand levering my thumb against the stick, to help me advance the film smoothly without jerking too far, which mostly worked; I got a biggish gap between two frames once. It’s a pretty stiff pull: the adapter’s axle pins are held kind of tightly, and there’s a spring providing some pressure against the spool, as well as the pressure plate and all the friction from travel along that long winding film path. At one point I wasn’t pulling the backing paper evenly, and it started to tear along one side, so I’d advise some care with that. The backing paper will grow long as you go, so figure out how to cope with that. I rolled it up and used more masking tape to stick it to the back of the camera.
All ready to go, I set out into some fields near my hometown on the ancestral land of the Monacans in Lexington, Virginia in the USA, feeling inspired by trees! It was dead midwinter in midday. I looked for lonely trees, poignant trees, proud trees, gaunt trees… and soon I’d shot the whole roll. I was a little afraid of light entering the camera as I advanced the film, so I shaded it with my body. I also knew the viewfinder would include a strip at top and bottom that my narrower film wouldn’t capture, so I tried to estimate what would be visible, and I think I got it about right, although the resulting images are even wider side-to-side than what I thought was visible in the viewfinder.
Eager to see the results, I hurried back and put the camera back into the changing bag, where I spooled the film straight out of the camera onto a reel and into the development tank. Then I developed the film right away in Ilfosol 3. I was happy to see nice dense negatives as I hung the roll to dry — maybe even overexposed. I’d used the Sunny 16 rule to estimate exposure, and shot all the frames at f/22 and 1/200th. The dark negatives might mean the shutter is a little slow after all. That night I “scanned” the roll with a digital camera and macro lens, taking three sideways shots of each frame and stitching them in Photoshop. The only post-processing I did was touching-up a couple of dust spots and a bit of levels adjustment, no different from what I might do if I were making prints. I also think Photoshop merged one of the photos incorrectly, making it a lot less panoramic than its true aspect ratio, but I didn’t notice that until later and I don’t care to redo it. What’s missing is just blank sky.

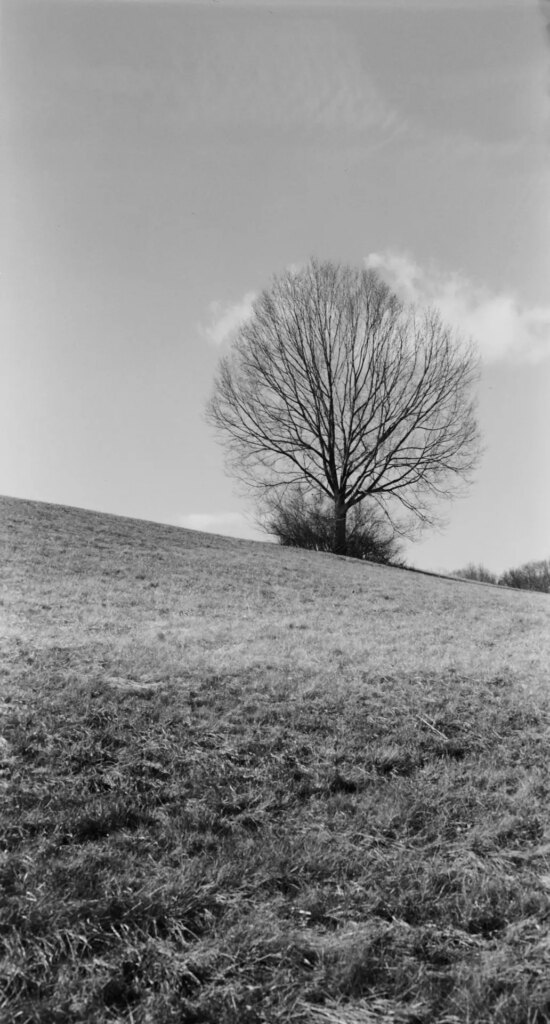
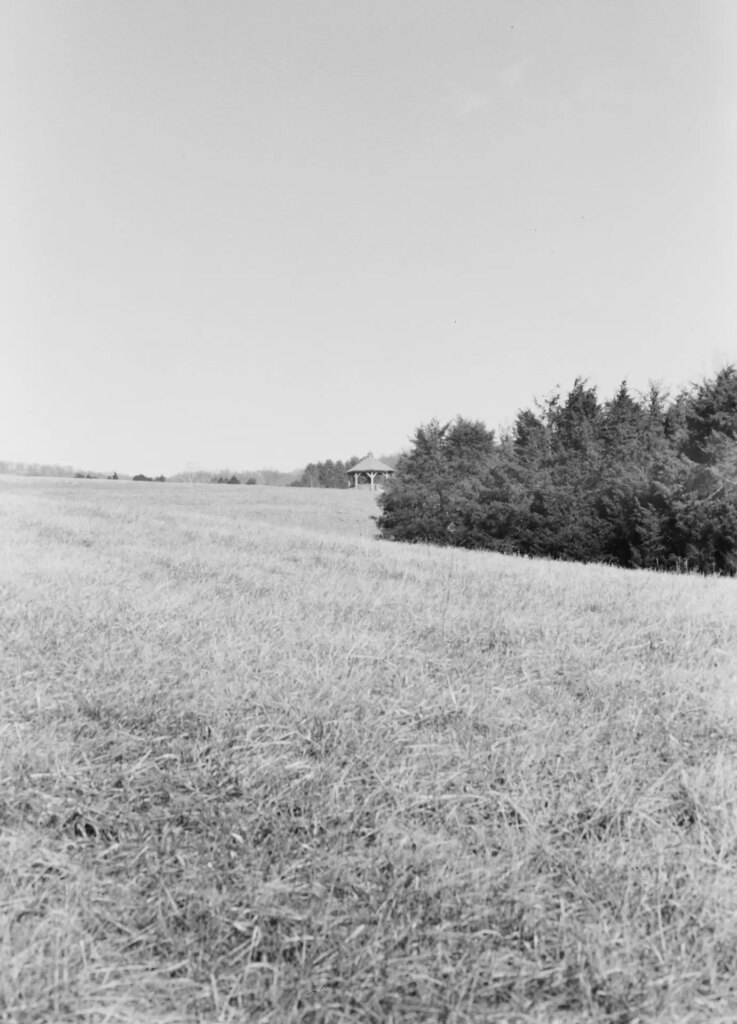
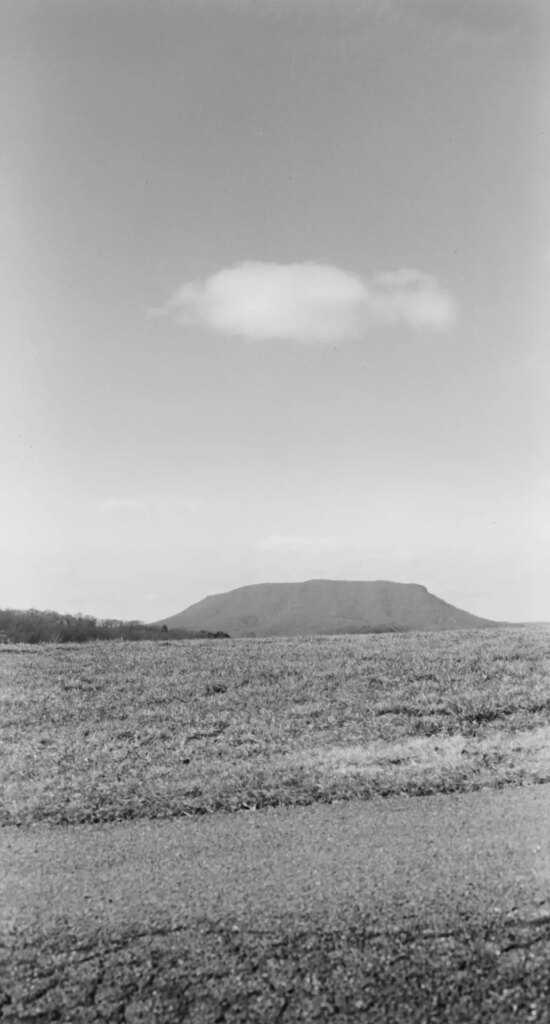
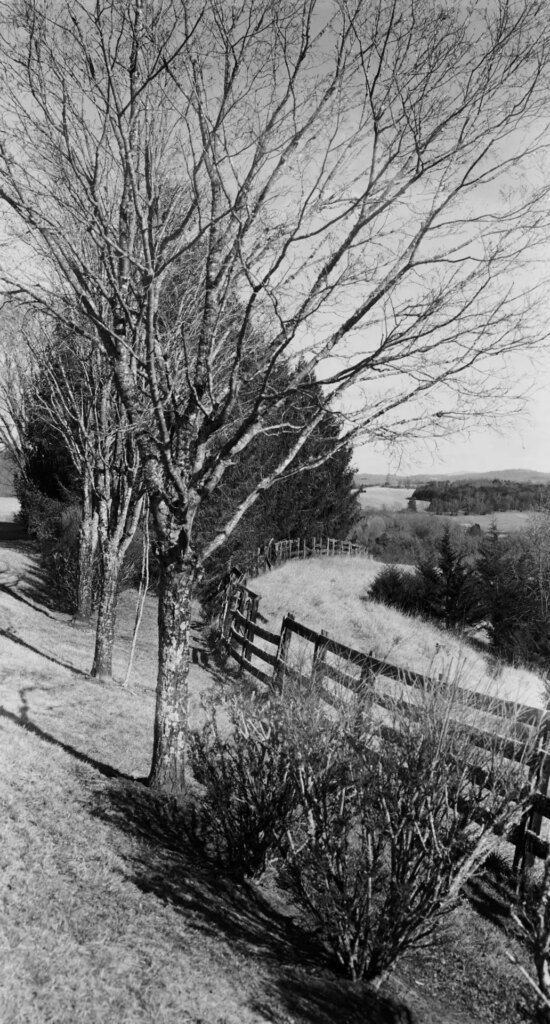
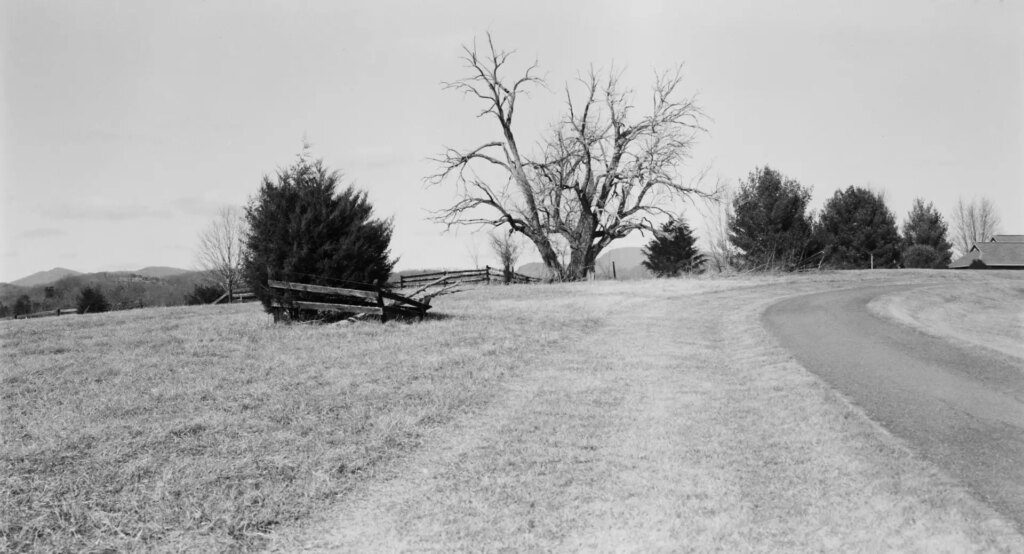
To me, the results look very good (especially in full resolution, which this blog doesn’t show), corroborating the online opinions that this camera’s lens is somewhere between “not bad, not bad at all” and maybe even as much as “quite a good lens.” I noted that when focused to infinity the rangefinder didn’t quite align, so I was just focusing by estimating distance — and at f/22, most things should be in focus. But perhaps there’s a touch of defocus in some of the shots, I’m not sure. If I were shooting this camera regularly, I’d service the shutter and properly calibrate the lens and rangefinder. That aside, though, I think the lens is more than sharp and contrasty enough, and I wouldn’t be surprised if it could do quite well with color film.
Will I do that? I’m not sure I will. Although it’s a special kind of fun and gratifying to use a camera like this, especially with the family connection, it’s sort of a labor of love. Loading, shooting, and unloading are pretty awkward. This isn’t a camera you can take into the field and just shoot and pop in a new roll and shoot again. And it’s a behemoth. The night before, as I finished my repairs, I chatted to my brothers “well, I’ll see if I can load this thing up and put it in a wheelbarrow and go for a walk tomorrow!” and that’s not far off the mark. At the end of my walk, my shoulder was telling me there was something really heavy in my bag. And it was the only thing in my bag — I couldn’t fit anything else in there with it, really. In comparison to the other options available, such as 6×9 folders that make almost the same size negatives, use 120 film natively and conveniently, and are literally pocketable, there’s nothing rational or sensible about using this camera.
I shot it for the pleasure, and that’s why I shoot film anyway. I have digital cameras that are objectively superior in every possible way except for the fun of it. They don’t cause me this kind of hassle, but they also don’t bring me this kind of joy. Still, one needs (or can handle) only so much joy, I guess is how I’d put it. But if you have one of these, or if you find one affordably, and you’re tempted: I’d say go for it. Do it at least once. What have you got to lose? You never know how you’ll like it until you try it. Happy shooting!
Share this post:


Comments
Dave Powell on Polaroid Pathfinder – Shooting 120 Film In My Father-In-Law’s Essentially Obsolete Camera
Comment posted: 27/03/2023
I actually had a chance to use my father's Pathfinder when I was a lot younger, and the weight of its camera bag hurt my shoulder then. Now, it would be a big Nope!
Congratulations too on the quality of your images. They're even larger and sharper than the family snaps I remember dad taking. Well done!
Scott Gitlin on Polaroid Pathfinder – Shooting 120 Film In My Father-In-Law’s Essentially Obsolete Camera
Comment posted: 27/03/2023
Jim Scheffler on Polaroid Pathfinder – Shooting 120 Film In My Father-In-Law’s Essentially Obsolete Camera
Comment posted: 27/03/2023
I remember when the Polaroid 110 and later 195 models were highly prized in both using and collecting circles and briefly owned one of the latter in the 1960's before selling it at my table at a camera show. In retrospect, a poor decision.
I also remember re-spooling 120 film onto 620 spools for use in my Kodak Medalist, an even older, all metal classic of the 1940's. This was a much simpler process, however, requiring a changing bag and some practice. Wish I had also kept the Medalist!
Comment posted: 27/03/2023
Kurt Ingham on Polaroid Pathfinder – Shooting 120 Film In My Father-In-Law’s Essentially Obsolete Camera
Comment posted: 27/03/2023
Thanks
Michael Malyszko on Polaroid Pathfinder – Shooting 120 Film In My Father-In-Law’s Essentially Obsolete Camera
Comment posted: 29/03/2023
Great case, too.
John Biskupski on Polaroid Pathfinder – Shooting 120 Film In My Father-In-Law’s Essentially Obsolete Camera
Comment posted: 16/04/2023
I have a couple of these, adapted to use 120 roll film and to take 4x5 sheet film holders. Relatively straightforward, and great fun to use, for urban, landscape, or portraiture. Painterly but sharp images with the great little shuttered lenses. I have the standard 127mm, and a 150mm for portraits.
For portraits you have to guesstimate parallax correction, but easy to get the hang of it.
For those interested, these converted Polaroid cameras are covered on the Large Format Photography website forums.