A few years ago I remember I was scrolling through Instagram when something caught my eye. It was seemingly a video of a black and white paper negative being rocked in a tray of chemicals in broad daylight. Within seconds, the monochrome negative turned to a full-colour positive image before my eyes. I was astonished and set about discovering how this magic trick was done. I had discovered the strange world of RA4 reversal.
Basic Method
The basic method is surprisingly straightforward. A piece of colour enlarger paper is loaded into a camera and exposed to make a photograph. The latent image is developed in black and white chemicals to make what looks like a low-contrast black and white paper negative. At this stage, instead of fixing the image, it is re-exposed to light and developed a second time in colour chemistry before a final bleach & fix stage to remove the black and white negative image. The results can be extraordinary… But, I soon realised it was not quite as simple as it had been made to seem.
As I dug deeper into the subject, I got into long conversations with people like Ethan Moses (@cameradactyl), Brendan Barry (@brendanbarryphoto) and Mat Marrash, trying to pick up any tips or nuggets of understanding that would help me when I got around to trying it out myself.
Colour Balance
The main issue with getting good colour revolves around the fact that this paper is designed for printing colour film negatives (with their dark orange mask), lit by a tungsten enlarger lamp. In other words, a normally-lit scene will produce an image that is very blue/green in appearance unless the light is balanced to the response of the paper in some way.
The traditional way to achieve this is through heavy filtration in front of the lens, to remove most of the blues and greens from the image and bring them down to the same level as the reds. Thick stacks of magenta and yellow filters will get you there, but at the expense of very long exposure times. The paper is only about ISO 3 to start with and if you throw away most of the light before it hits the lens, it can be a very slow affair.
Ideas For Improvement
I wondered for a while if it might be possible, instead, to pre-flash the paper with red light to balance out the response before the exposure. The idea was that this would allow shooting at the full speed of the paper, without heavy filtration. I still haven’t tried this seriously but I do think it has merit, so it’s one for the back burner and future experiments!
The reason I haven’t tried it is because I recently found two people on Instagram who seemed to have made significant breakthroughs in the process. The first was Mindaugus J. (@jcameraworks) who was showing incredible images of perfect-looking colour charts and studio portraits.
Breakthrough Clues
Talking to Mindaugus on the subject, he revealed that an aspect I had assumed was irrelevant might actually turn out to be quite crucial. Over the years in a niche forum discussion on Photrio, it had been discovered that the formulation of black and white paper developer can have a strong impact on the final colour balance. In the worst case, it fails to properly develop the red-sensitive cyan layer, which makes a bad situation even worse and leads to an overall cyan cast in the eventual positive image that can’t be filtered out at the initial exposure stage.
I was recommended a couple of off-the-shelf developers to try, but warned that I may end up having to mix my own. Interestingly, I think I’ve found one myself, quite by accident, that works as well as any other I’ve seen. It’s even cheap, surprisingly!
His other tip was that a UV cut filter would help to keep the colours true to life.
Washing The Paper
The second breakthrough came from James Skelton (@hackaninstant), who had noticed that RA4 paper from the box looks blue, whereas the final prints can be pure white… So that blue must be getting removed somewhere in the development. He did some experiments and found that the blue surface dye can easily be washed out in tepid clean water, leaving the paper white.
The result of this washing is that the paper is now two stops faster (ISO 12) and approximately tungsten balanced, massively reducing the filtration needed for the process.
Practical Issues
By this stage I was itching to try it out myself, but the only RA4 paper I had was in an odd size (12×16 inches) and without a fully blacked out darkroom, cutting it down to 4×5 would be difficult. I made some attempts in a dark bag but they were pretty rough and didn’t fit my double dark-slide holders well. I also had the problem of having no easy way to wash and dry the paper in darkness, either.
Pinsta, And What It Can Do
Enter the Pinsta Camera (@pinsta_camera). This marvellous contraption was released a couple of years ago and it is a kind of combination camera, darkroom, enlarger and developing tank in one! I had followed the project with interest, but hadn’t yet seen one in the flesh. I had been seeing people using them to make direct positive black and white pinhole images, which were developed in-camera to make a near-instant photography experience.
I contacted Ollie at Pinsta and asked if he’d ever known anybody to use the camera for RA4 reversal images. He hadn’t, but liked the idea. I explained how it worked, to the best of my knowledge, and happened to mention that I’d love to try it out if I could afford a Pinsta. Ollie was excited by the possibilities and very kindly offered to send me a slightly damaged camera free of charge (on the proviso that I figure it all out and put my results online…)
The camera arrived and it was time to put the years of theory into practice at last! I had to get good at it quickly to repay the kindness, else I’d feel forever guilty for taking the freebie! This turned out to be a great motivator.
Gathering The Materials
By now, I had a box of 10×8 RA4 that I’d picked up at the closure of the late John Whitmore’s Dark Shed. With the Pinsta being 4×5, this made it very easy to tear the 10×8 into four equal parts in a dark bag.
I’d bought an Adox RA4 kit, and some extra Bellini RA4 developer, and checked my garage to see what black and white paper developer I had. I had an open bottle of Champion Suprol universal developer that’d been there for years. This was the unexpectedly excellent first developer that I mentioned earlier.
Years ago, when I first got excited about the process, I’d also bought a box of Cibachrome filters on eBay, which I managed to find and add to my kit.
I was all set.
First Attempt
I was excited to get going so I just went for it. One of the nice things about the Pinsta is that it’s designed to allow you to introduce liquids directly into the camera, and to remove them again afterwards without mess or a darkroom.
This meant that I could wash the paper *in the camera* directly before exposure and I didn’t have to find a way to do it in the dark beforehand. This was a huge advantage.
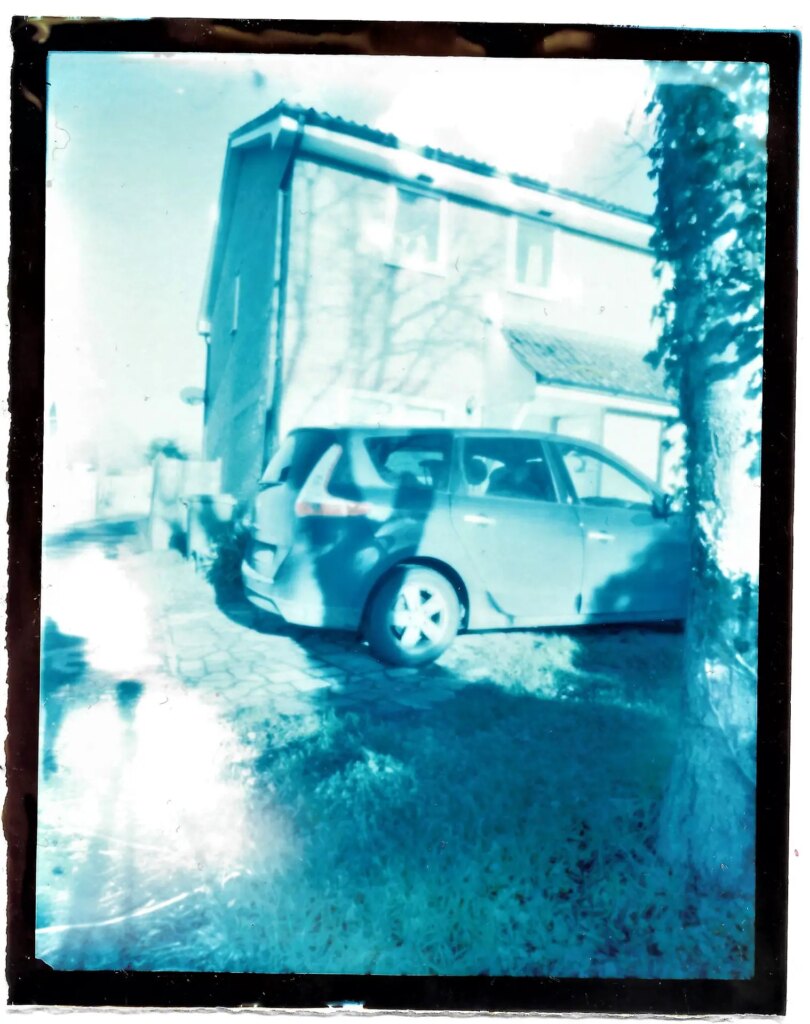
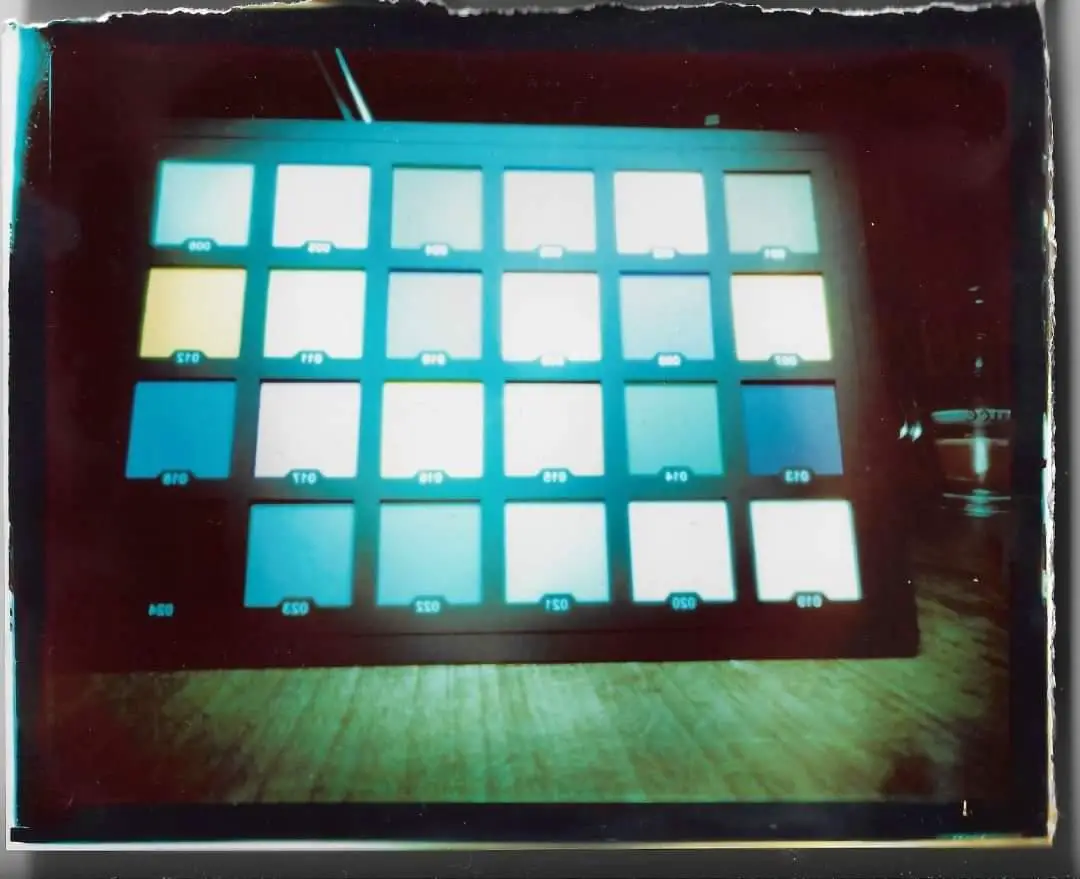
My first attempt was just washed paper, with no filtration, to see what happened. What happened was that I got a very washed out image that was about 90% cyan! If you look closely, you can see a little bit of green and a littler bit of red, but it was not a good colour image. That said, for my first Pinsta image, I was thrilled to get a positive at all.
Trying To Science It Out
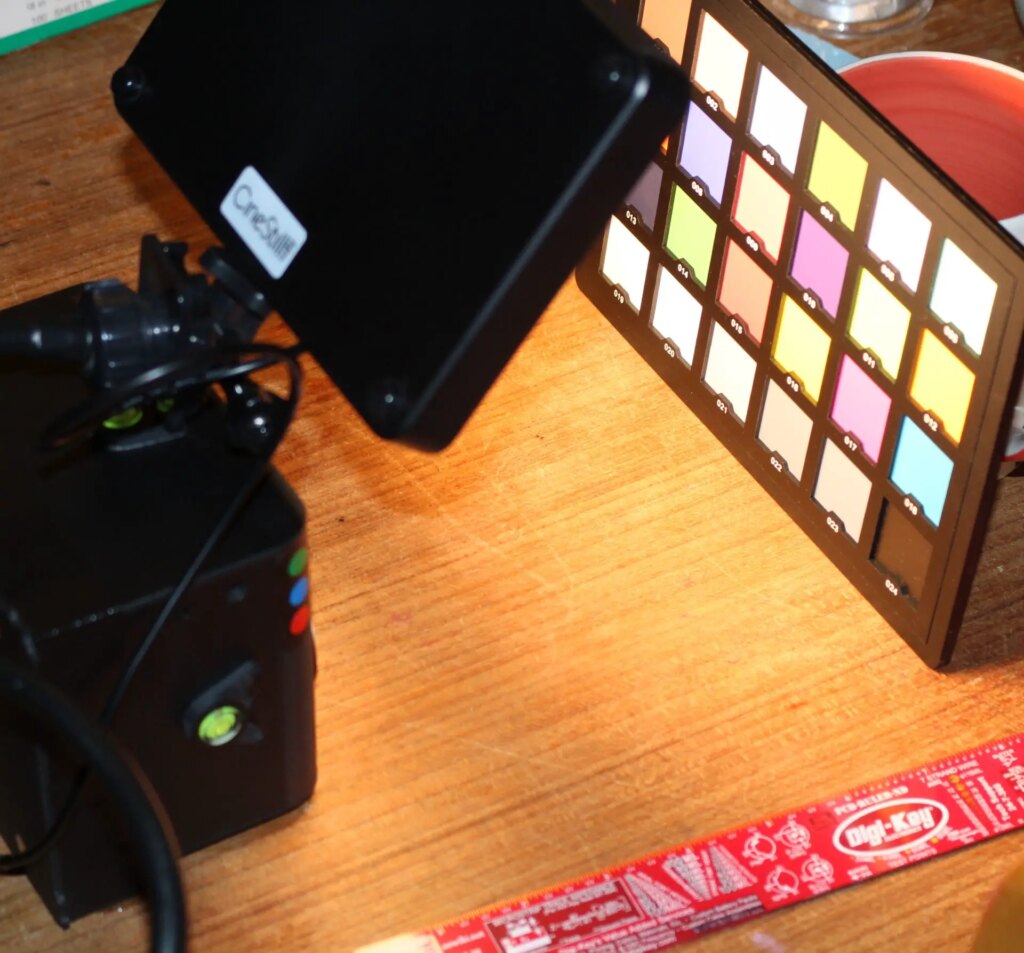
It was Winter and the weather was bad, so I decided to use a colour chart and an LED camera light to run some more methodical tests. The lamp had a tungsten-balanced mode, but it was still quite far from a real incandescent light.
Searching For Colour Balance
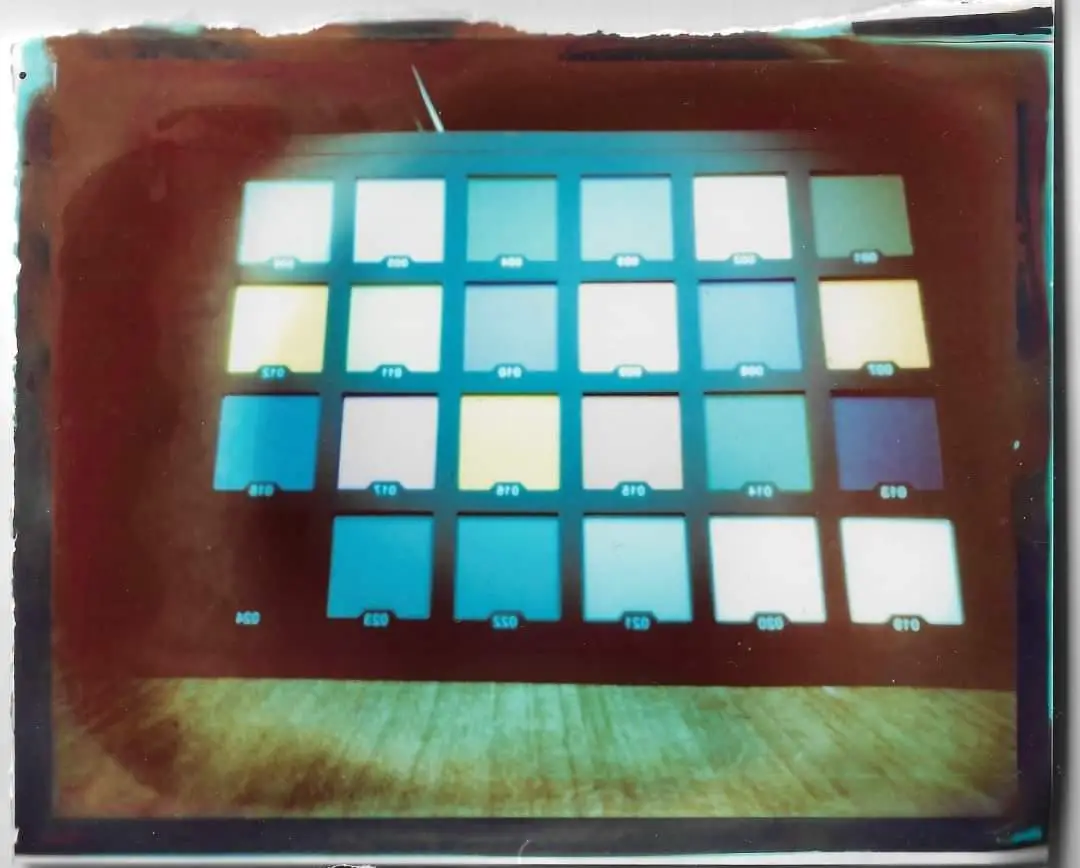
I ran a number of tests, using different timings, an 85B warmup filter, pre-flashing paper, and even dyeing the paper after development! Eventually I realised that the light I was using was too far from what the paper wanted and I decided to return to natural light.
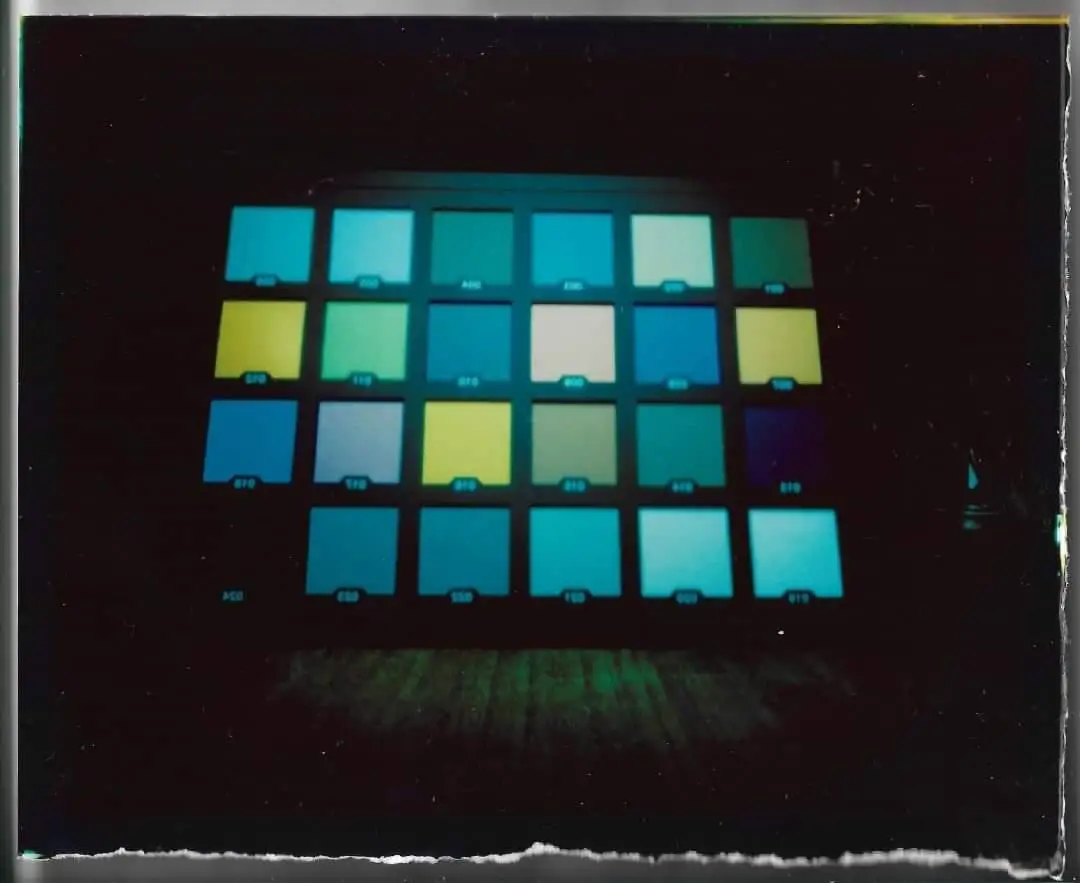
Getting The Exposure Right
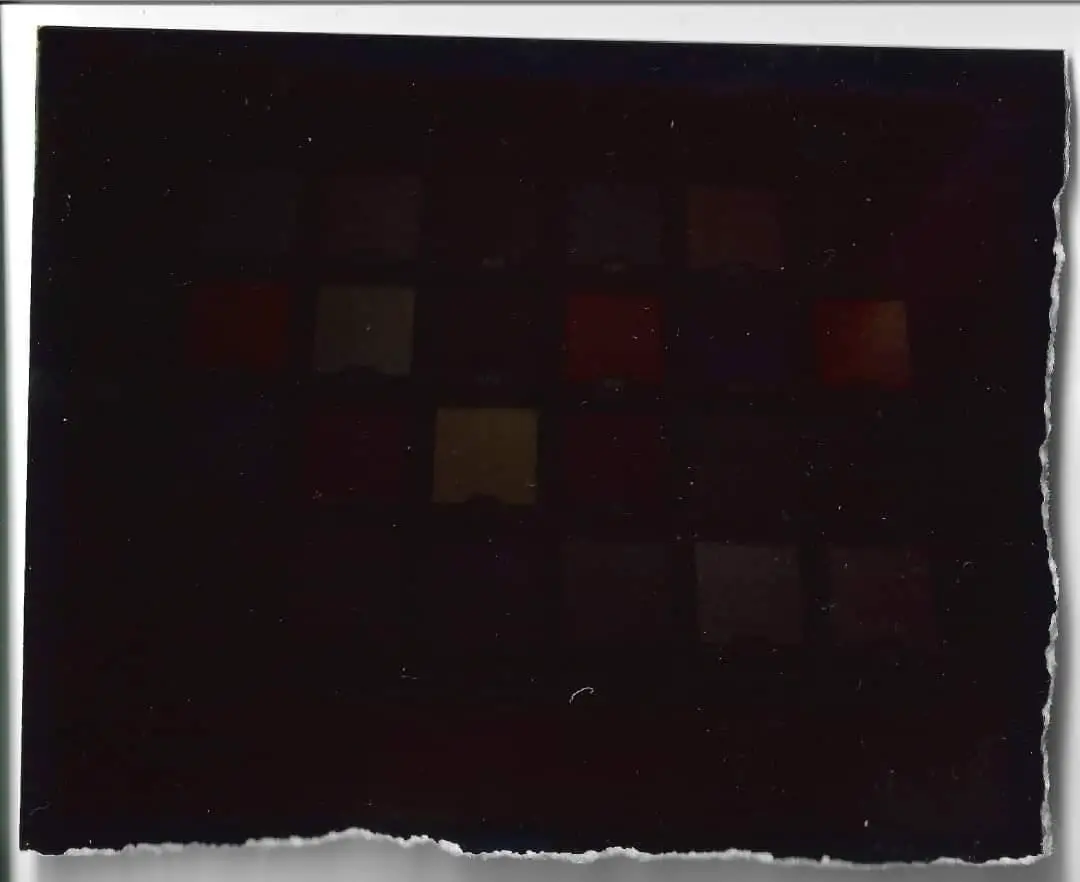
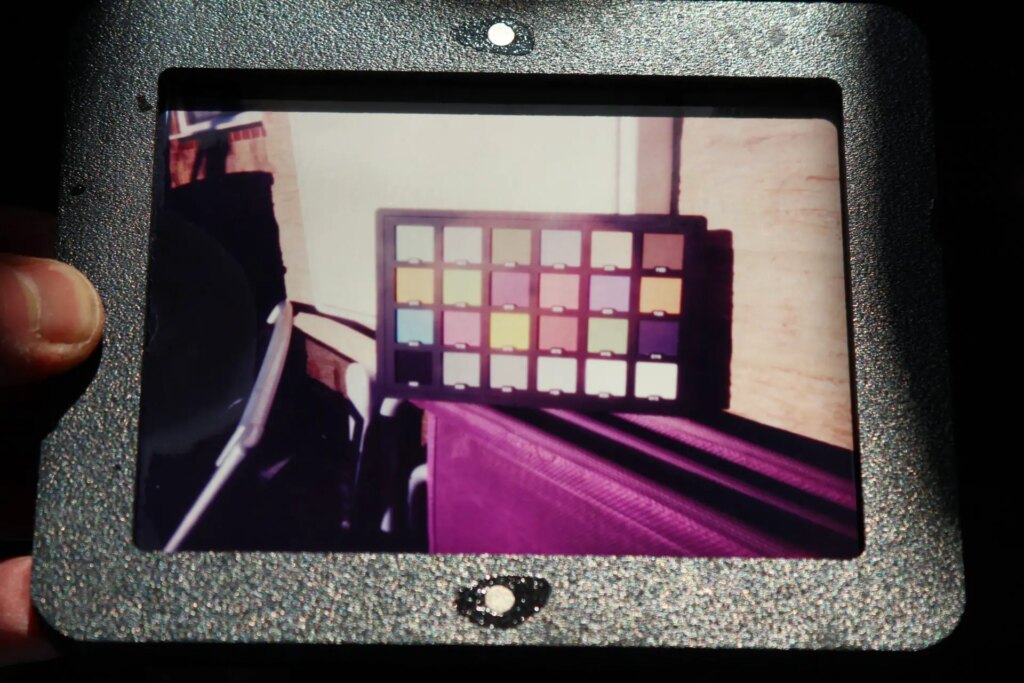
I revisited my box of Cibachrome filters and pulled out 50Y, 40Y, 50M & 40M and stacked them all together. I metered with a digital camera through the filters, which absorbed about 2 stops of light, taking me back from ISO 12 to about ISO 3. This was still significantly better than I’d be able to achieve with a thicker filter pack and unwashed slower paper. The sun was out that day and low in the sky. I propped the colour chart up on a purple garden chair, taped the filters to the Pinsta and took the shot.
First Outdoor Colour Chart
When this image was developed, I knew I was onto something! There’s no cyan cast, the colours are pretty neutral. If anything, I’ve slightly overcorrected (though it seems that this may be down to a slight overexposure)
Could I Do It Again?
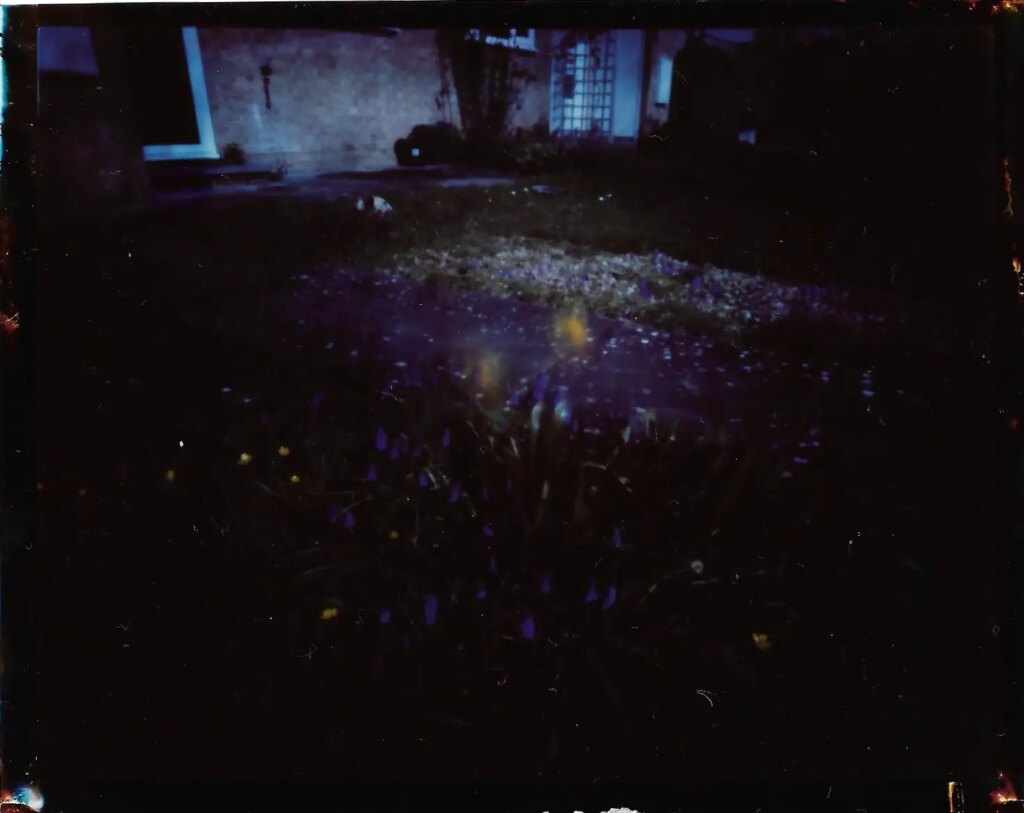
Since then, we haven’t had many sunny days where I was free, but last week I got out again for some more tests. My first attempt to capture daffodils on the lawn was woefully underexposed. I’d metered the scene in overcast conditions, but the sun kept peeking through the clouds during the exposure so I reduced the exposure time… I clearly overcorrected! No matter, let’s try again.
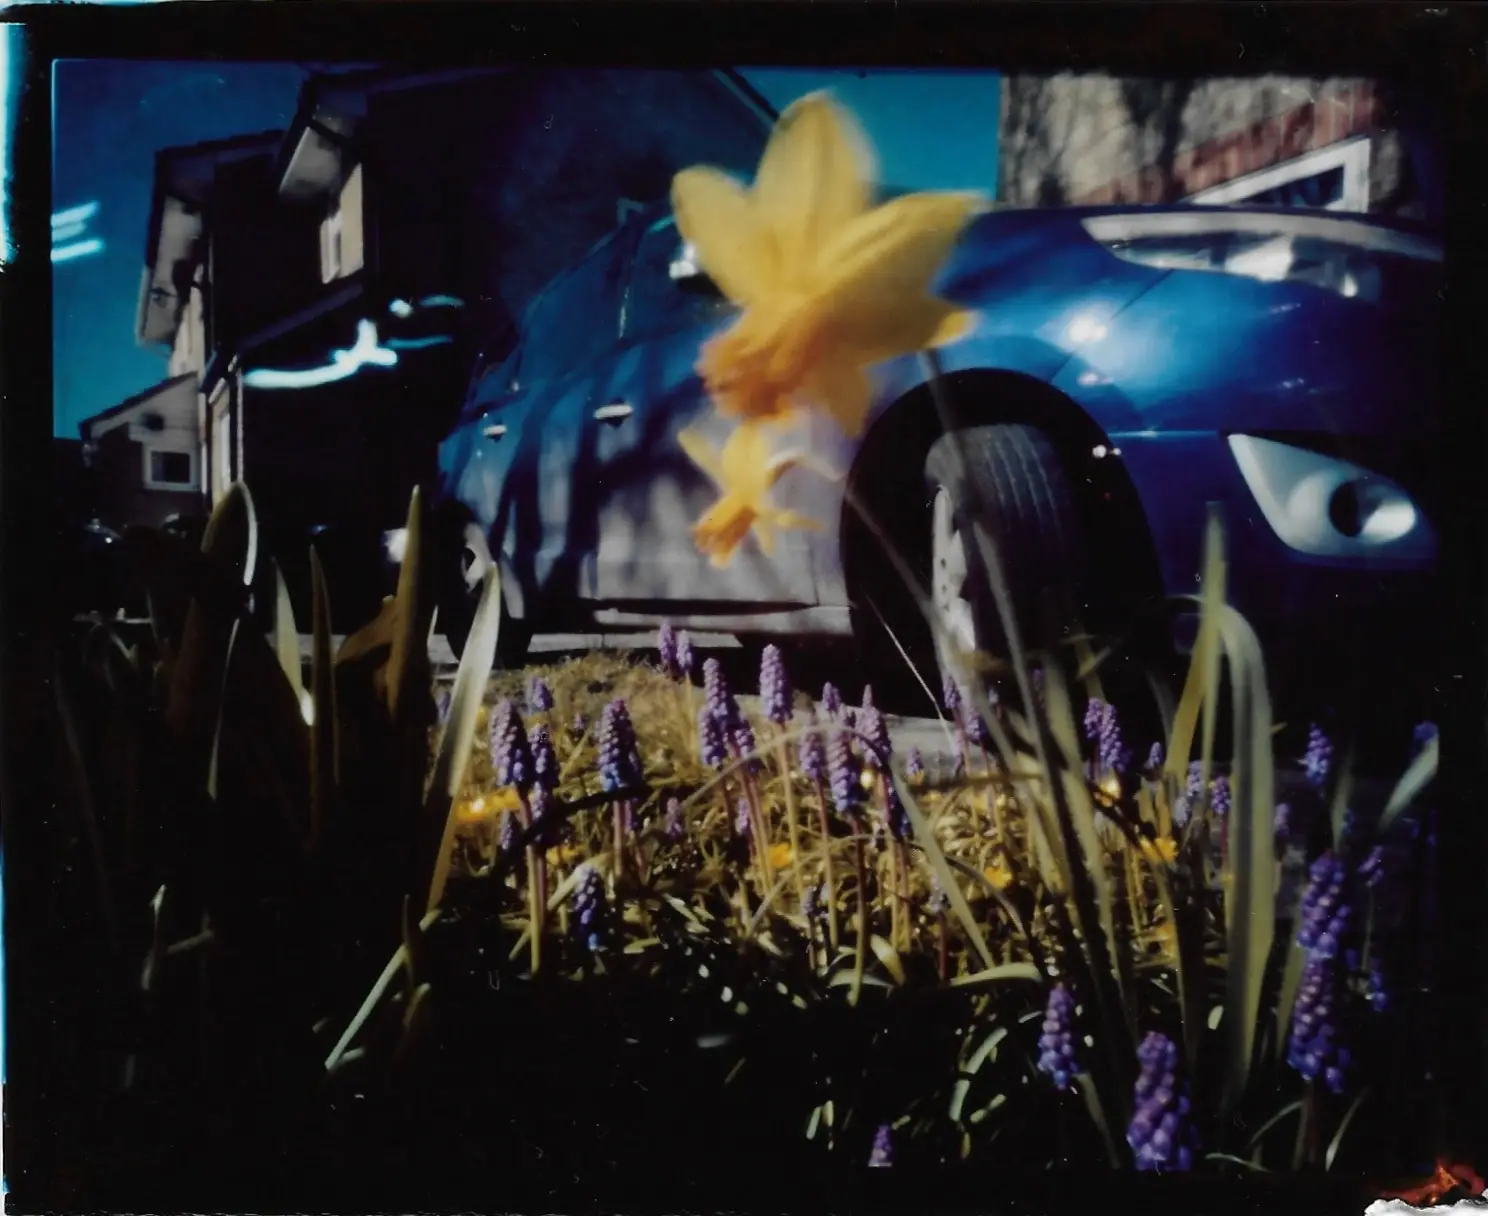
A Host Of Golden Daffodils
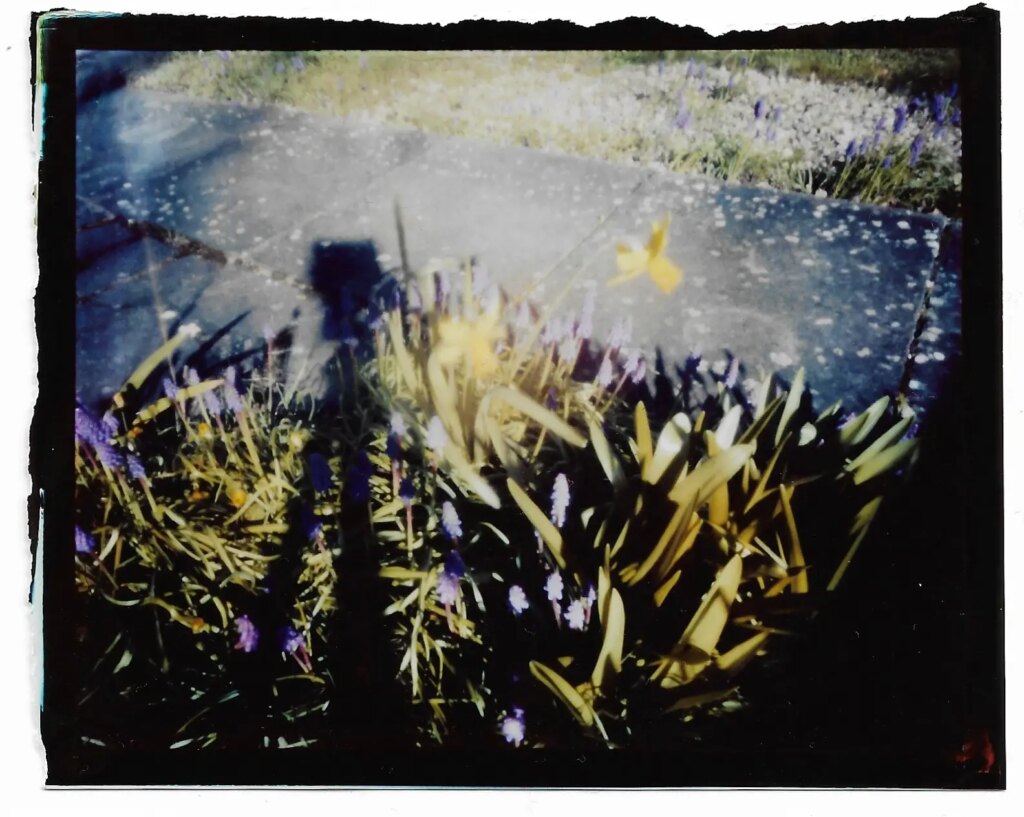
The next opportunity I had was a few days later. I remembered to add the UV filter to the pack, which I figured would be more important in sunshine. The Spring sun was more consistent this time and I was able to capture this shot of the daffodils and grape hyacinths in the sunshine. It’s tricky to get the exposure just right, especially in direct sunshine, and it’s slightly overexposed. The latitude of colour paper is surprisingly narrow… I couldn’t let it lie, and I had the chemicals all mixed up ready so I took another shot from a different angle…
Triumph

The result absolutely blew me away. I had to remind myself that this was a full-colour instant 4×5 print, shot and developed in a pinhole camera (which is just a box with a hole in the front) without any film or a negative. The original is on display in my living room and the colours are so vibrant. I’d love to see what others can do with this process, now I’ve got it under some semblance of control. All in all, I’ve only ever used about 4 or 5 sheets of 10×8 on this project and the difference between the first and last images is amazing.
The pinhole in the Pinsta is just fantastic, and this is the cheapest 4×5 colour process by a mile! Yes, it’s quirky, but who shoots pinhole cameras looking for perfection?
Step-By-Step Instructions
If you want to try it yourself, here’s my current method in detail:
- In a dark bag or darkroom, tear a sheet of 10×8 Fuji Crystal Archive paper into four equal 4×5 pieces.
- Fit one piece into the back of the Pinsta camera and put the rest back into the paper box. Close the camera and the paper box.
- You can now remove the camera from the dark bag. Make sure the pinhole is closed.
- Use a syringe to wash the paper. Use warm water and introduce a syringe-full to the camera back, agitating gently for about 60s. Remove the (blue) water and discard. Repeat twice more. The water should be very nearly clear by the last rinse. If not, do it another time for luck.
- Set up the Pinsta on a tripod at the scene you wish to photograph. Meter using a digital camera set to ISO 100 and f/16, through the filter pack (50Y, 40Y, 50M, 40M, UV). Double the exposure time 11 times (3 stops for the ISO, 8 stops for the aperture) to get the correct exposure time.
- Tape the filters to the Pinsta, in front of the pinhole, and take the shot. Close the pinhole.
- To develop, mix up Champion Suprol 1+9, acid stop 1+19 and RA4 developer and blix as per manufacturer’s instructions.
- Introduce a syringe-full of room-temperature Suprol solution and agitate for 3 minutes. Remove the developer and discard (store for safe disposal).
- Introduce stop solution and agitate for 1 minute. Remove the stop and discard or keep for next time.
- Open the camera!
- Wash the paper thoroughly. There should be a pale black and white negative visible on the paper.
- Re-expose to white light (daylight is ideal) for at least 30 seconds.
- Pour in RA4 colour developer and agitate for 2 minutes. After a few seconds you should see positive colours appear in the image, but develop to completion. Pour the RA4 developer back into the bottle.
- Pour in Blix and agitate for 2 minutes. This should brighten the image as the negative is washed away, but you can’t tell because the blix is so dark… Pour the blix back into the bottle.
- Wash the image thoroughly and dry.
- Swoon at the beauty of your direct positive print
Next Steps
There’s a lot left to try with this process, and I’d like to return to the idea of pre-flashing with coloured light, to avoid the need for the filters altogether (apart from the UV cut). I’d also like to try using the Pinsta to print colour enlargements on RA4 paper so I’m working on that idea, too. I’d love to do this in lensed cameras as well but I need a method of washing and drying the paper before use. I’ve tried it with unwashed paper and the results are far from ideal so far.
Appendix
Since sharing my method, others have asked for my help in getting up to speed in this fascinating process. Most notably, Dave Shrimpton has been getting extraordinary portraits within just a few days of trying it for the first time. Check out his work on Instagram for inspiration (@dave_shrimpton).
Share this post:


Comments
Stevenson G on Pinsta & Full-Colour Instant 4″x5″ Pinhole Prints Without A Darkroom
Comment posted: 31/05/2023
Comment posted: 31/05/2023
Comment posted: 31/05/2023
Martin Siegel on Pinsta & Full-Colour Instant 4″x5″ Pinhole Prints Without A Darkroom
Comment posted: 31/05/2023
Phil Snaps on Pinsta & Full-Colour Instant 4″x5″ Pinhole Prints Without A Darkroom
Comment posted: 31/05/2023
I wonder if it could be done in a practical way outside, far from the lab? Even with a Pinsta, the picture needs to be washed so running water seems to be a must.
Comment posted: 31/05/2023
James Wilson on Pinsta & Full-Colour Instant 4″x5″ Pinhole Prints Without A Darkroom
Comment posted: 03/01/2024
Comment posted: 03/01/2024