Today I am going to review a new piece of software, or rather a plugin to Adobe Photoshop called Grain2Pixel, which can convert scans of negative film into positive images. It can be downloaded from this website: www.grain2pixel.com.
Before we get to the actual review, I want to talk about negatives and conversion in general for you to keep in mind when looking at the comparison. If you are JUST interested in the review you can skip ahead. But, I do think most people interested in photography will find the stuff before that interesting too.
Background Information
Scanning processed film into a digital format is necessary for most photographers shooting film. Even reasonably priced professional scanning services can get expensive if you shoot a lot – possibly stopping you from shooting as much film as you would like. Naturally, at one point or another many film photographers seek more affordable means of obtaining quality film scans. Like most things in life, if you want to do it right and affordably – you’ve got to do it yourself.
There are two real options for scanning at home: Using a scanner, such as the flatbed scanner, or using a DSLR or mirrorless camera for camera scanning. The latter option has become more and more popular as digital system cameras have gotten cheaper and better. Today, I would say that the best camera scanning setups have surpassed the best of film scanner technology and that even mediocre setups can surpass the quality and speed of flatbed scanners. When you are looking for software like Grain2Pixel, you are likely to be interested in camera scanning.
‘Scanning’ with a camera is achieved by positioning the film you want to scan between a camera with a macro lens and a light source. If you are unfamiliar with camera scanning an introduction on the concept can be found here. The website is for a previously unannounced holder of mine with an automatic motorized 35mm forwarding for scanning a whole roll in less than 2 minutes. You can keep up to date on that here.
After scanning, the image is saved to the camera’s memory card and can then be converted on a computer to achieve a result comparable to scanning. It is the final stage that we will concentrate on here. For, though cameras have allowed us to capture the film in detail, we still only have a negative.
– But couldn’t you just invert the negative directly, surely photo editing software can do that?
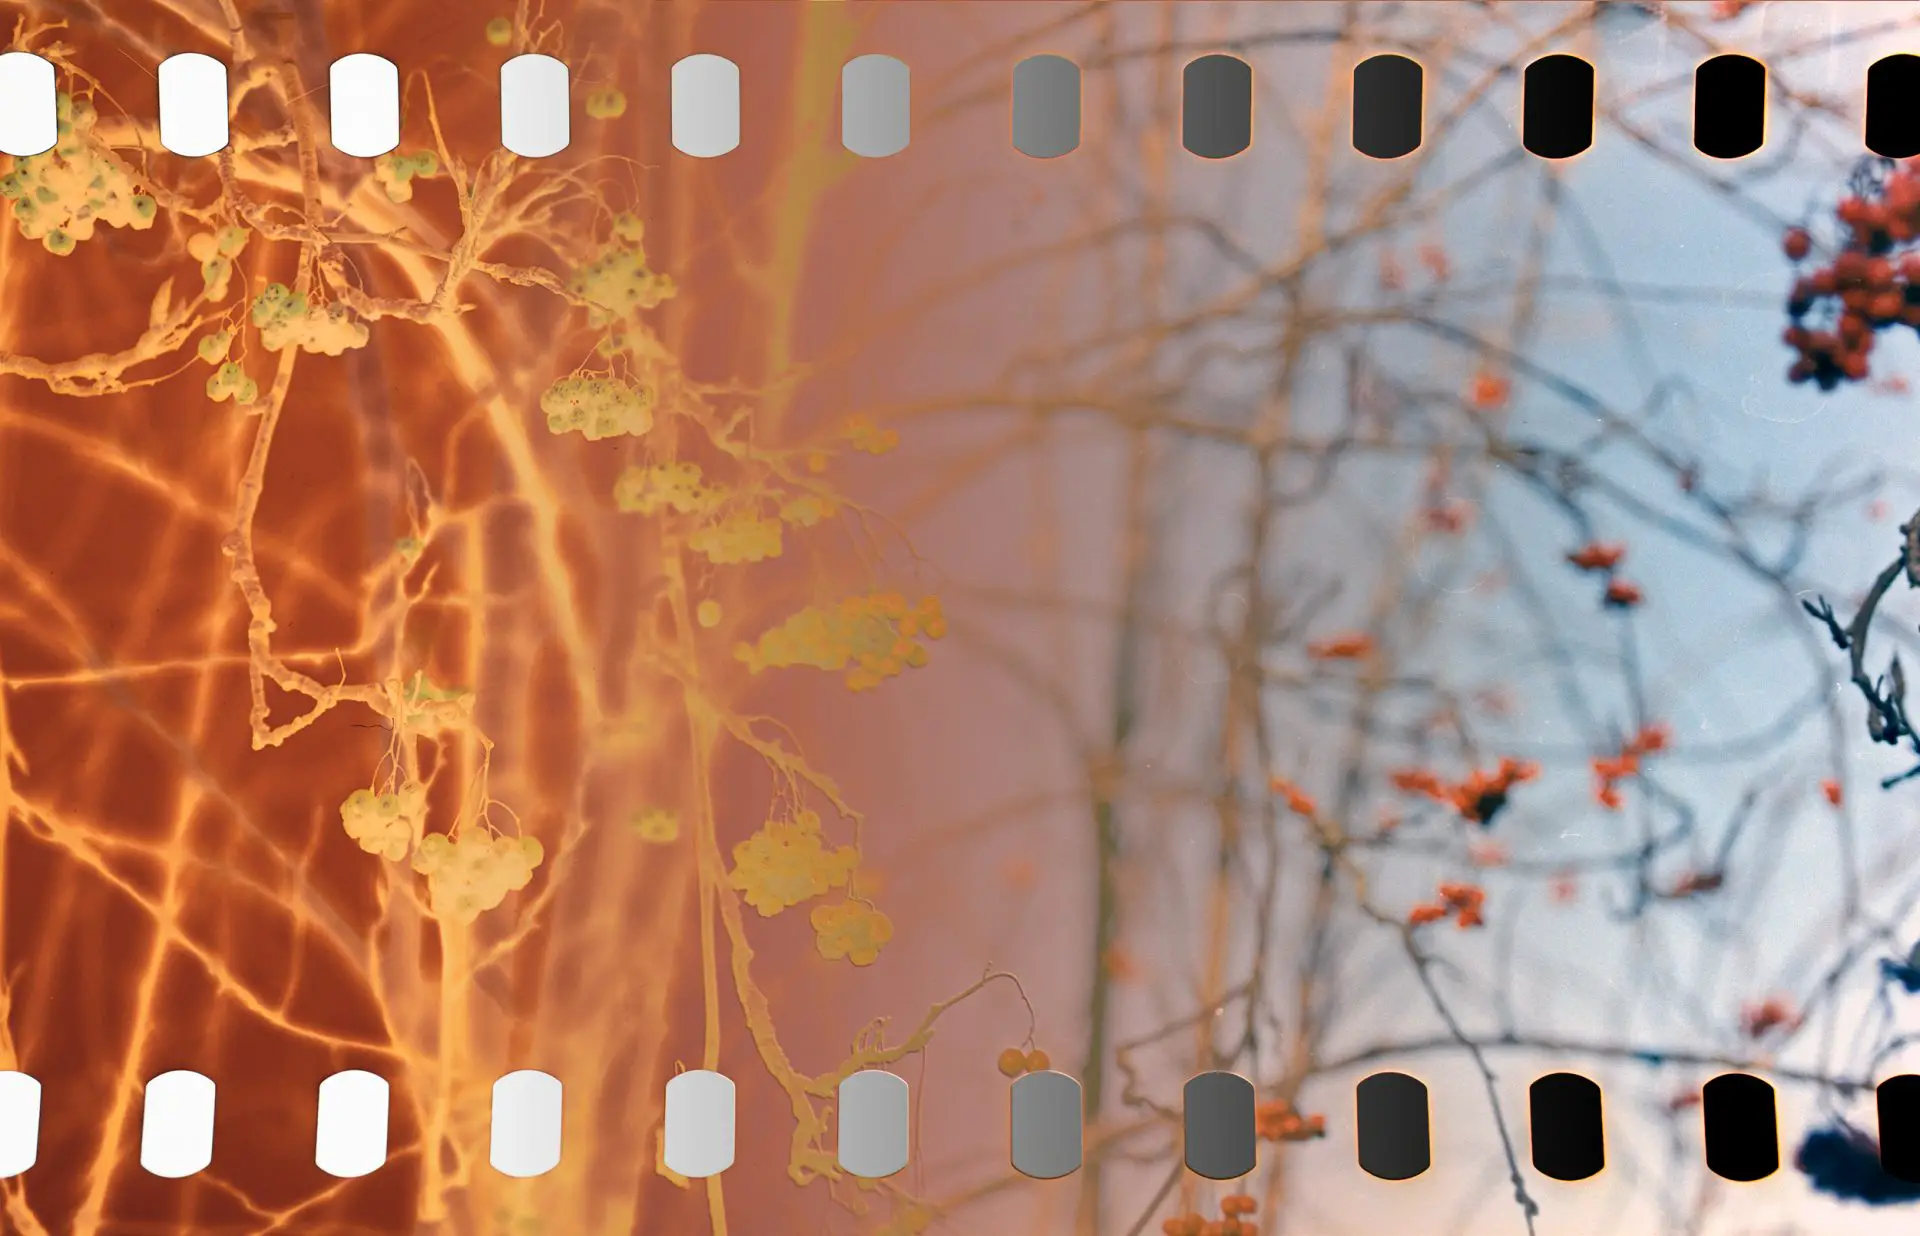
Well, yes, and no. Below you see an example of what happens if you do that. As you can see, it is not exactly pleasing. You can then start applying corrections, playing with the curves and changing the colour balance. However, as you will experience if you should try it, the results will probably leave something to be desired, despite your best efforts – and a lot of time spent.
As it happens, the name “negative” is somewhat misleading. For while it is indeed a negative image, it records the scene in extremely low contrast and with rather dull colours, as well as being imposed on a background with a strong orange mask – the base of the film. All these have good reasons but we won’t dwell on them for too long here.
The low contrast and dull colours are, primarily, there to allow for a wide range of exposure and colour: It is part of the reason why they say negative film is so hard to mess up. Therefore, converting a negative into a pleasing image is an interpretive process. This brings us to something I like to call “negative purism”.
Negative Purism
As we have seen, a negative converted 1 to 1 into a positive, is not a desirable image. The image I showed earlier is a scan of the famous Portra 400. This is not to say that Portra 400 is a bad film, of course, it is not – it is a film made as only a component in an imaging system. An imaging system usually consists of several components that come together so that the original scene is rendered in the desired way.
When it comes to slide film, also called transparency film or positive film, the film stock itself encompasses a larger part of the imaging system than a negative does – both capture, and the viewing. For while a positive is a pleasing result in itself once it comes out of the processing chemicals, a negative film is meant to be further processed.
Negative film used to be called print film because you printed it in the darkroom. This involves shining light through your negative onto a piece of photosensitive paper, which you then develop and fix, just like film. By making a negative from the negative you end up with a positive – sounds simple.
However, all papers are made with certain clever inherent characteristics – balanced through the manipulation of the sensitivity of each layer of the emulsion. Essentially, what it means is that if you took the negative and printed with two different kinds of paper, let’s say a Fuji paper and a Kodak paper, then you would get two very different images, even if you tried to make them look similar. They would, for example, have different contrasts, different hues of colours and different saturations. All this is to say that making a positive from a negative film is an interpretive process where your materials and your skill plays a vital role. It is not a ‘correct’ or ‘incorrect’ way of doing it – only ‘pleasing’ and not.
You can look at it this way: If two language translators were asked to translate the same paragraph, they would, most likely, translate slightly differently, using different words and different sentence structures, based on their training, background and mindset. Just like interpreters and translations the conversion of a negative can be done in many different ways. This is where we get to the review: For while some people will claim that a good conversion of Fujifilm has that ‘Fuji look’, I argue that there is no ‘true’ conversion of negative film. It is all a process of interpretation based on various biases put into the system by its maker and its operator – in the case of the Fuji look, it was a result of what the engineers and operators of these scanners thought would be pleasing to people in the 90s and early 2000s.
All that is to say that you should make your colours – the colours that you like and find pleasing. You can make it part of the creative process, just like film (movie) makers do. This brings us to conversion software and the new Grain2Pixel, which has helped me do exactly that.
Grain2Pixel – Standard Edition
Grain2Pixel, also called Grain2Pixel, is a plugin for Photoshop that takes your scans of negative images, analyses them and spits out as (hopefully) nice images. It is made by a one-person hobbyist in Romania that knows a lot about film photography and colours, called Bogdan – TheDude.
Converting negatives digitally has been done since the first digital scanners came out in the 80s. However, dedicated scanners have one crucial advantage: They can control their hardware – they know the output of their sensor, the quality and colour of their light source and the properties of the lens used to focus the image. Therefore, converting a negative is a relatively simple process. With camera scanning growing in popularity the conversion software is, in many ways, blind to these factors. It doesn’t know what the sensor actually means, or what the light is trying to tell it. Making a good piece of software that can do this rather complicated task of taking an unknown image from any type of hardware and outputting a pleasing image is difficult.
One of the first to do this was a Photoshop plugin called ColorPerfect. Perhaps the most well known today is the Lightroom plugin called Negative Lab Pro (NLP) – this will be the main point of comparison for this review. Like with ColorPerfect and NLP, G2P is primarily for people who do camera scanning and need to convert their negatives. However, more and more people are using software like this to convert negatives from their scanners because they either want better workflow, better results or because it gives them more control. G2P can do both scans from cameras as well as scanners.
Pricing
Here is the pricing (in Euro):
Negative Lab Pro: 88€ for the plugin + access to Lightroom classic
ColorPerfect: 60€ + local taxes in some areas + access to Photoshop
Grain2Pixel SE: FREE + access to modern Photoshop (requires relatively modern PS)
Yes, that’s right – the standard edition is free. I’m not sure how to emphasise the huge price difference between those: With the money that the most expensive option costs you could buy a good macro lens for scanning used, such as the Sony 30mm f/3.5. G2P costs nothing – though you can choose to donate if you wish to. The maker behind G2P has informed me that he wants to release a Pro version that will cost money, but the spec-list, which we will see shortly, tells me that the standard, free version will cover most people’s needs by performing the same tasks that NLP or ColorPerfect do.
Good conversion will probably never be totally free. Grain2Pixel relies on some advanced algorithms that only Photoshop can offer right now. The Adobe Photography package is about 10€ per month. Camera scanning at large is getting more affordable and better. Currently, the most affordable film holder with most functionality is the pixl-latr holder.
Combining cheaper and better holders with G2P and using your digital camera (it is a rarity not to own one, even as a dedicated film photographer) gives you the ability to produce scans that rival literally any other scan – including drum scans.
You can read more about affordable camera scanning in my article over at Camera Rescue.
Without further ado, let’s take a look at how Grain2Pixel works and looks.
Features
Standard Edition
- Takes files from all modern digital cameras OR linear TIFFs from scanners, such as a flatbed scanner (choose this option at the top of the menu before you click run)
- TIFF or JPEG output files
- Colour or black and white negatives
- Contact sheet option (creates a digital contact sheet of your roll while it’s working)
- Colour cast removal options for expired film or poorly stored old negatives: off, smart (applies only where it’s needed), extra (applies it to all pictures selected)
- Option to create and add a custom vignette correction for your lens and camera
- Batch crop and single crop, or option not to crop
- Custom naming before saving
- Post-conversion action groups: Create your own commands to apply a preset for contrast and colour, add your own watermark or anything else you can do with a Photoshop action
- Between 10 and 30 seconds per image depending on your computer
Extra Pro Edition (not yet released, subject to change)
- Dust removal using IR channel (digital ICE)
- SRDx plugin support (plugin to remove dust)
- Support for trichromatic support (scanning each RGB channel separately and combining them for super high-quality colours)
- ¼ resolution output for quicker preview or good sharpness at small file sizes
- Roll analysis for a more consistent look and to bring out odd lighting situations, such as sunset or night scenes, without post-processing
- Support for external conversion engines, applying your own LUT to a known negative and setup – very good for high-volume professionals
User interface
Running Grain2Pixel is essentially as easy as opening a script in Photoshop. If you’ve never done that before, don’t panic – on the G2P website you will find down to earth, careful instructions on how to install and use everything.
When you first open the plugin, you are met with a small window where you do all your settings.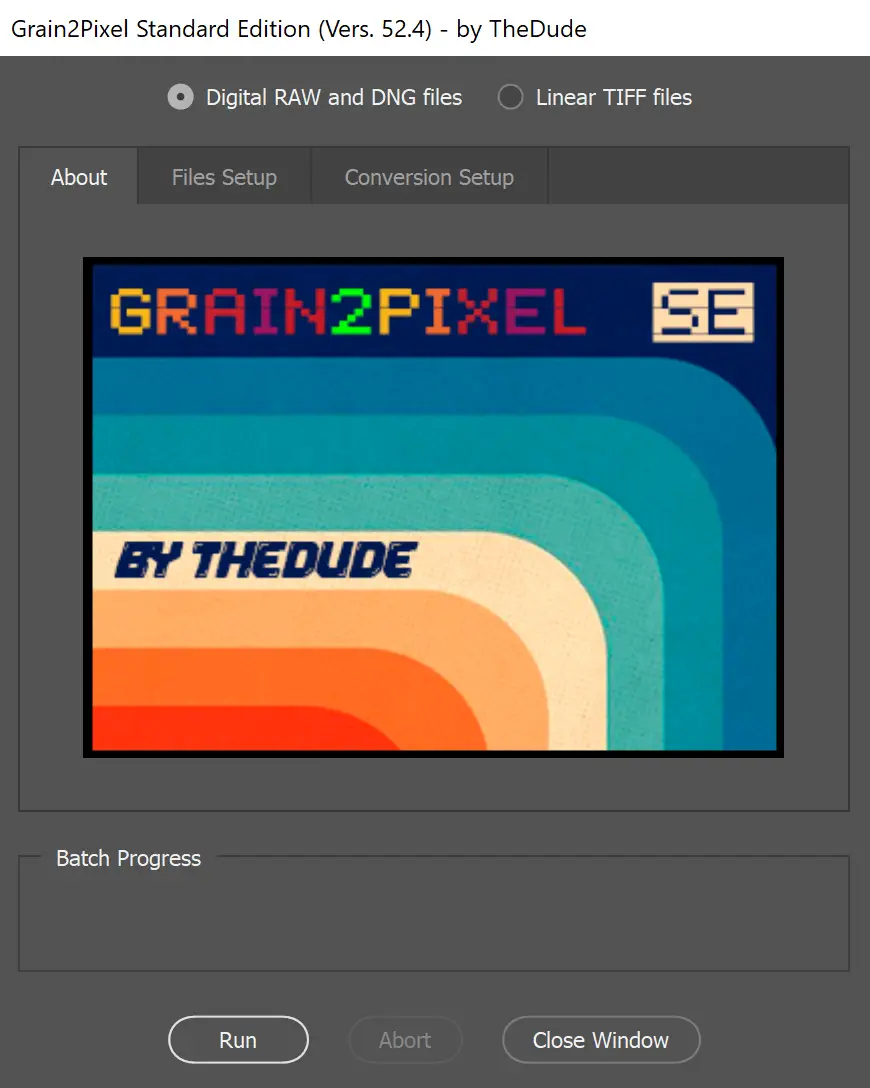
At this stage, I suggest you go and check out an example of the operation in the below 1-minute video, alternatively you can head over to the front page of grain2pixel.com. The 1-minute video will give you more insight than my waffling.
The Grain2Pixel user interface is simple enough. There are quite a few options, but they all serve an important purpose and you usually only have to choose a few things. When you press “Run” it will start converting negatives, and, if you chose the option for cropping, it will ask you to select a crop, either for every image as it opens it if you choose interactive crop, or once on the first picture if you choose single (batch) crop. You will also be asked if you want to reuse the film base analysis or if you want to apply it across all frames. If you scanned the whole roll on the same settings (ISO, shutter speed, aperture), the latter will be the better option because it saves times and processing power.
The Grain2Pixel conversion itself involves quite a lot of movement on-screen – you will see layers be created and deleted, but don’t worry about that. It also takes some time. Depending on your computer and the settings you choose it can take anywhere between a few seconds to half a minute. Make sure you give Photoshop enough RAM to work with, and it might help you to close down stuff in the background such as internet browsers as Photoshop is quite RAM hungry. You might also want to go into preferences and play around with the performance settings – I was about to halve the time my little Surface Pro 4 spent on an image.
What you are left with is a folder at your specified place (defaults to a subfolder of where you have the negatives), as well as the untouched negative files (so it doesn’t delete or change the original scans, meaning you can go back and redo the conversion if you’re not happy), and a folder within that folder of saved files – either TIFFs or JPG.
While there are small things that annoy me about the interface, for example how it prompts you AFTER you start the conversion about reusing the film base sampling or not, the overall experience is nice. I like not having to sample the white balance of the base myself (though you can if you want) and I like that the files are automatically saved in a folder without any extra work. I enjoy things like batch cropping in the conversion and how you can add your own actions in post-conversion – I have made my own preset to add a bit of contrast and warmth to my images because that’s the look I enjoy.
You might think I’m old fashioned, but I always preferred working with Adobe Bridge and Photoshop instead of Lightroom. Importing to the LR catalogue was never enjoyable to me, particularly for tasks like this where you possibly want to go back and forth between negative and conversion and edited file. The big argument with LR was that it was non-destructive, but by just leaving the original scans alone and saving converted copies, Grain2Pixel effectively does the same. After it has done its job, I usually open them in Camera Raw and do most of my editing there instead of importing them into LR (they have almost the same functionality anyway).
In the next part, we are going to talk about the results that G2P produces, comparing them to JPGs from a professional scanner, the Noritsu HS-1800 and to conversions done with Negative Lab Pro.
Comparison of results
First, we will take an overview of colours and contrast, comparing Grain2Pixel to NLP and a pro scanner. Below are digital contact sheets from the same roll of Portra 400, scanned using an old Canon 350D (yep! Announced 2005 – I’ve written an article about it HERE. I am showing you digital contact sheets so you can compare the colours on each roll instead of on just individual images. At the bottom is the same roll scanned in the Noritsu HS-1800. Note that in all my comparisons I have used the default settings on all types of conversion. Yes, all of these could produce different results with tweaking of settings, but we all want the default to be as close to usable as possible without any tinkering.
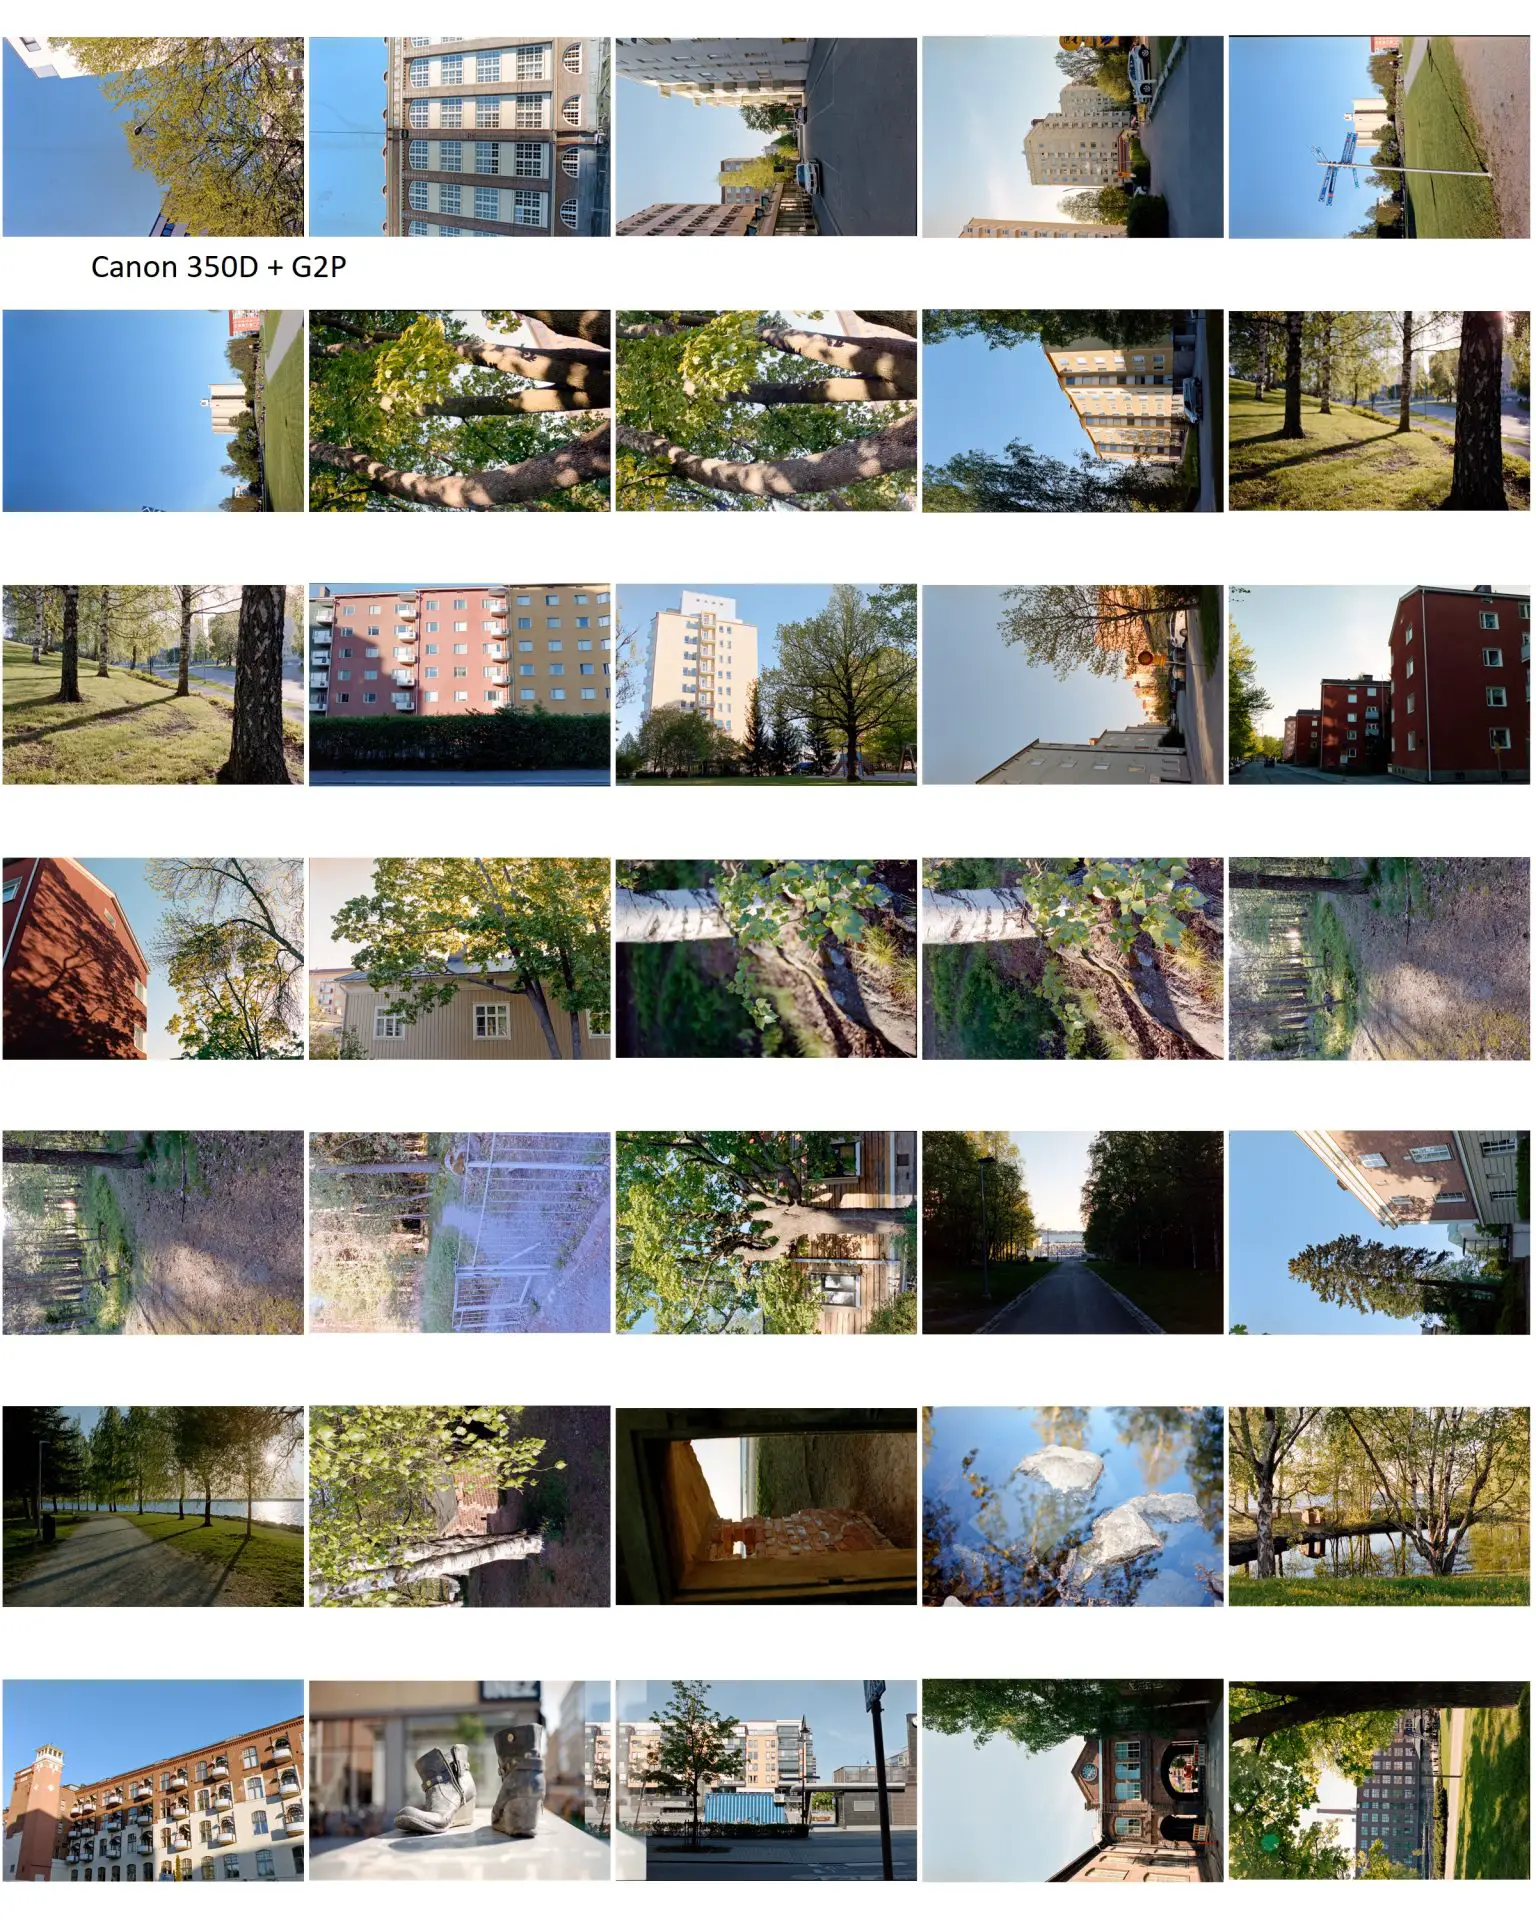
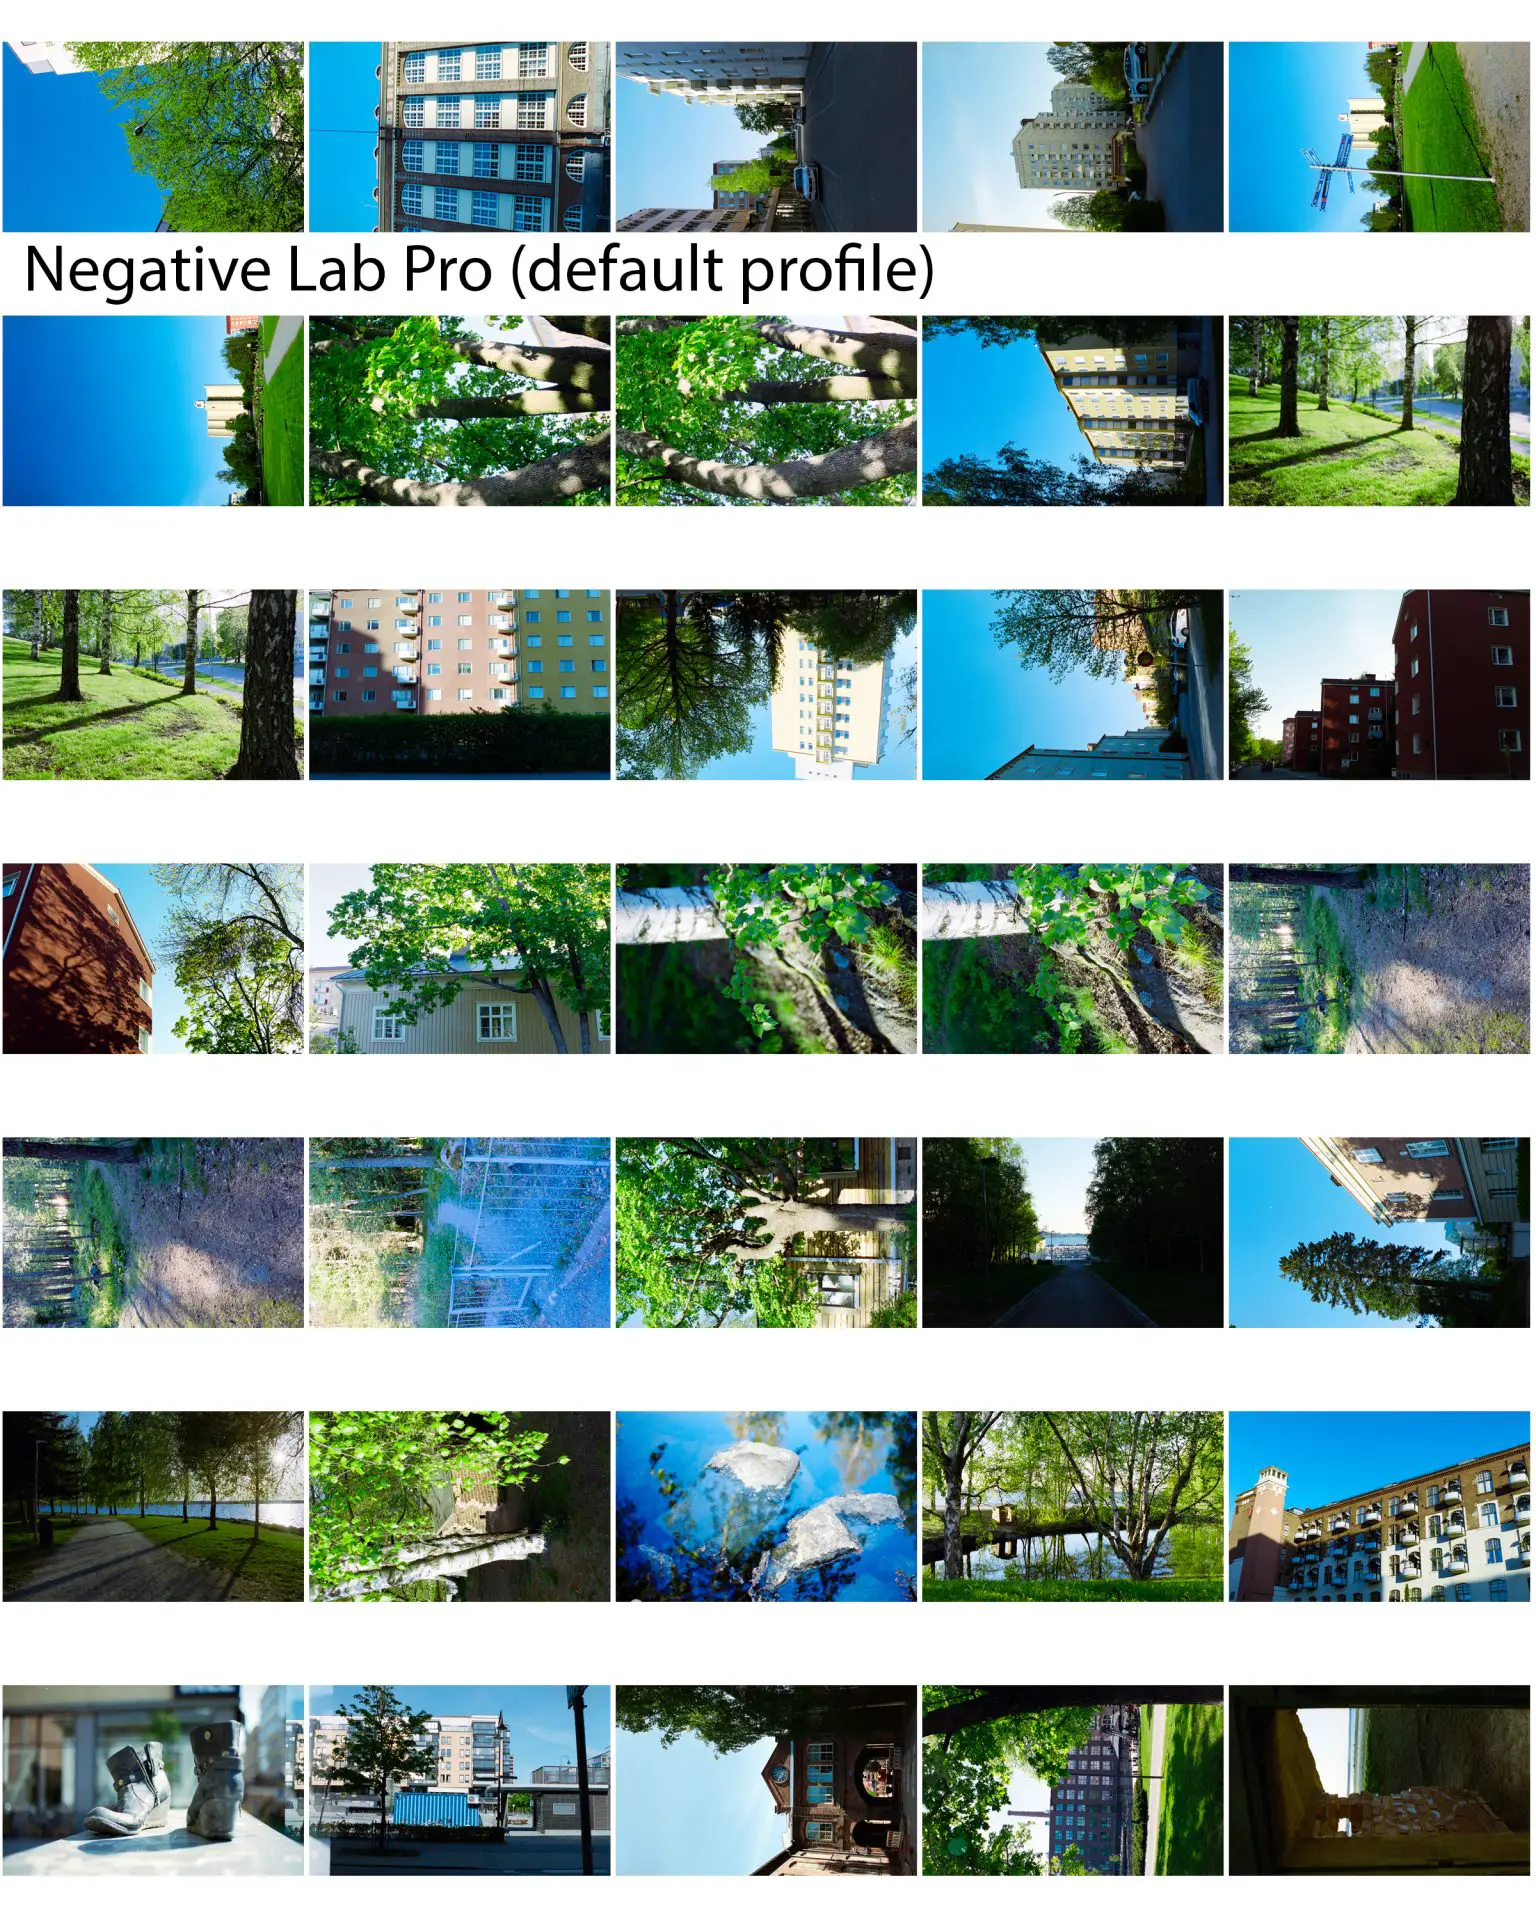
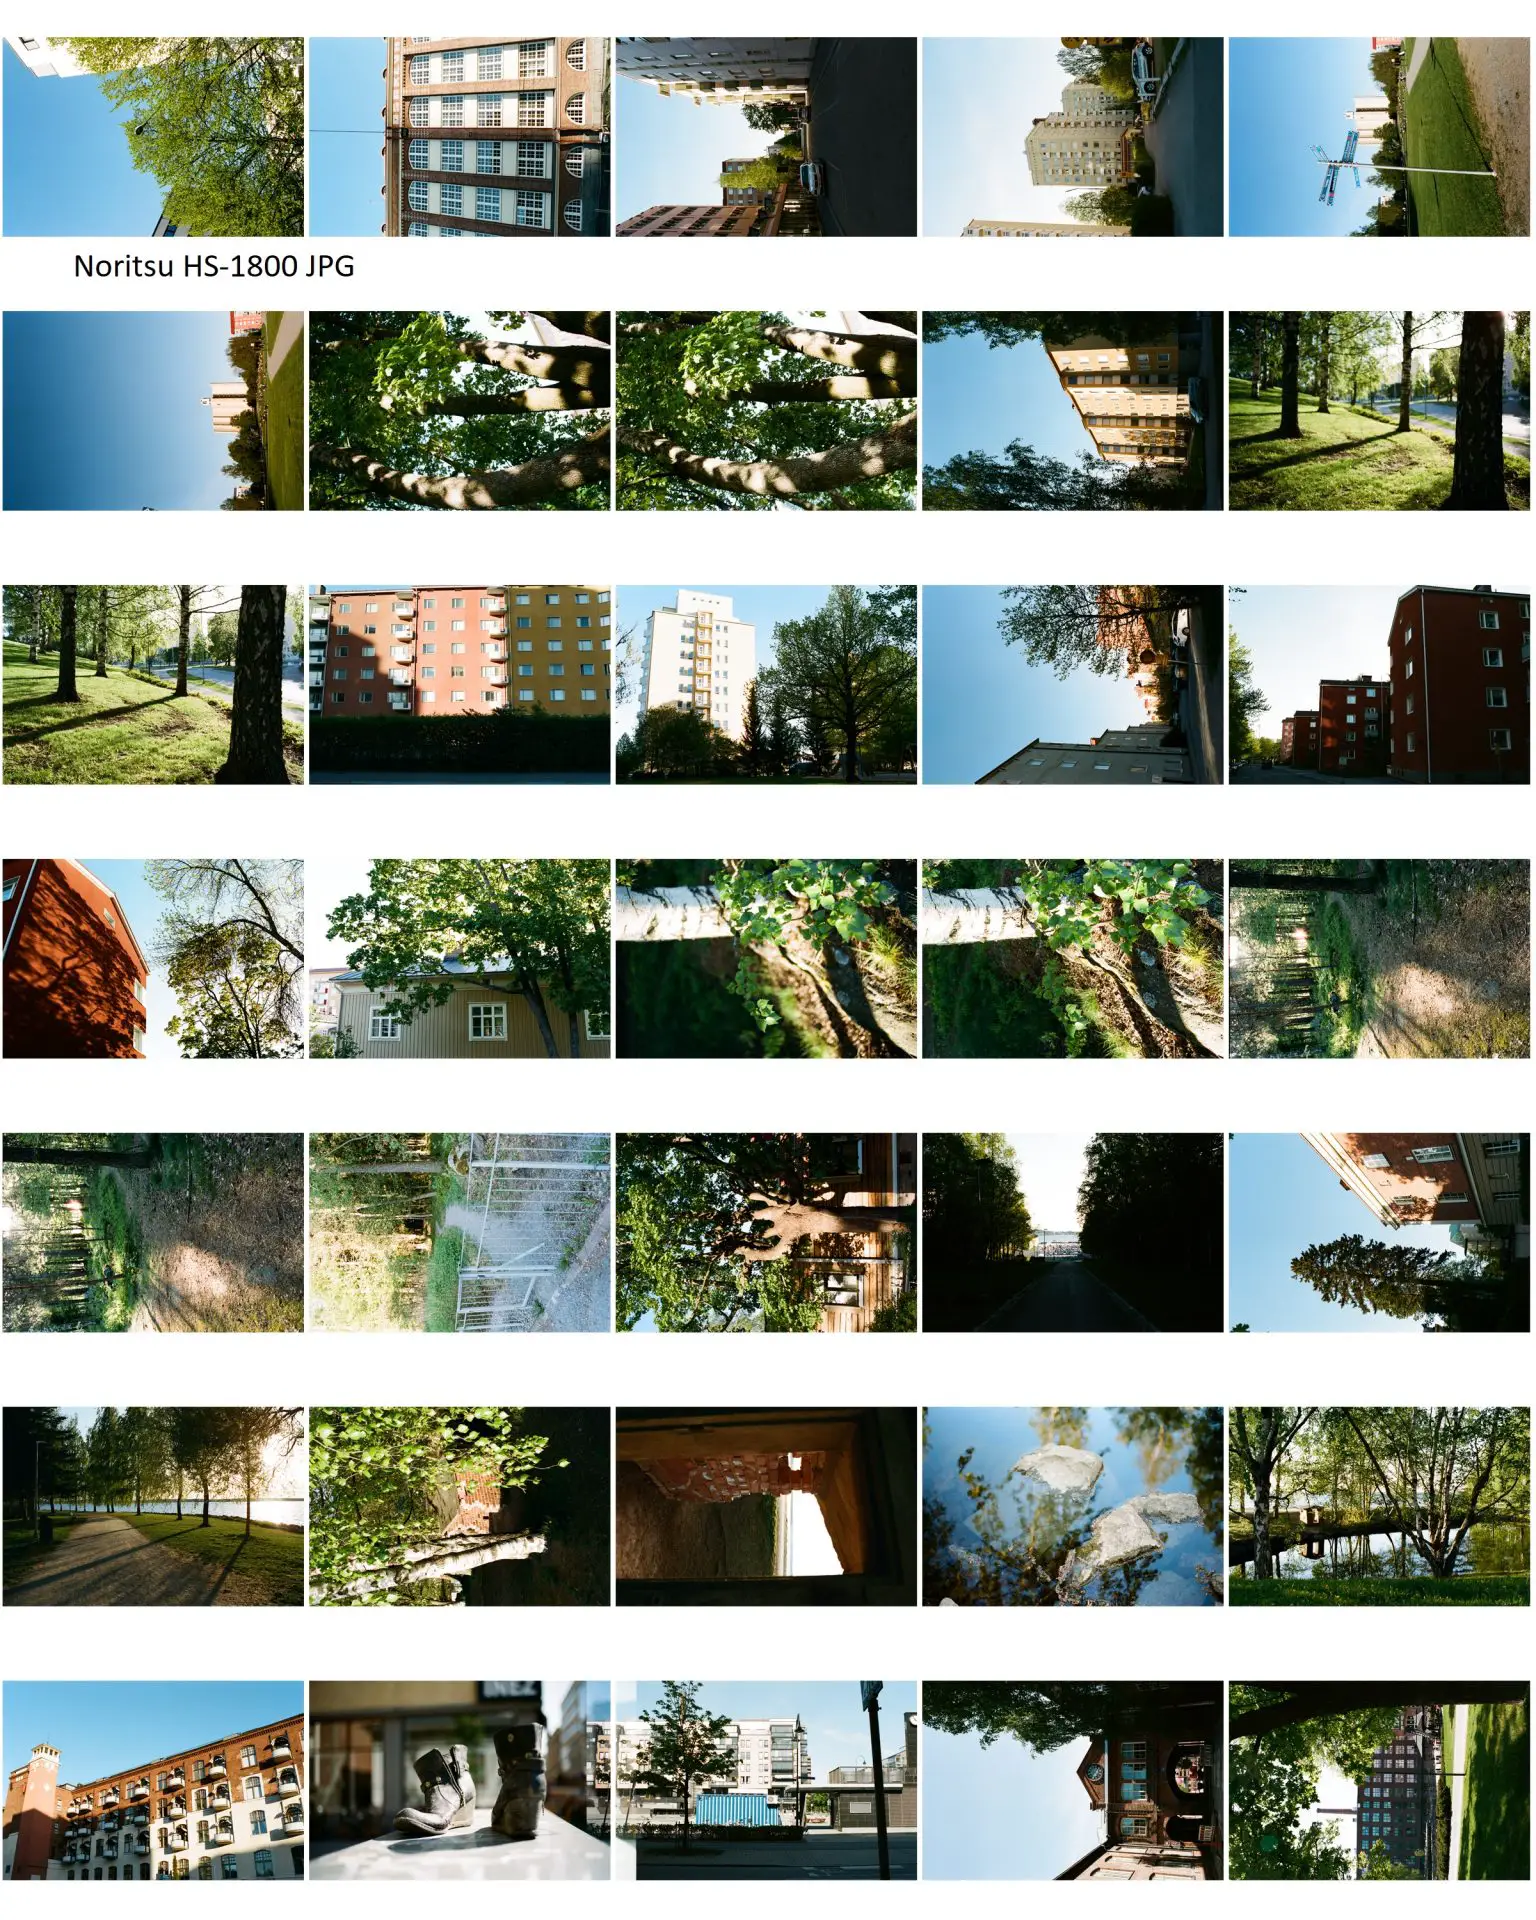
You will obviously draw your own conclusions about these but I think Grain2Pixel produces pleasing, neutral images without anything crazy. I would shift the green hue slightly away from yellow, add some contrast and add a tiny bit of saturation: All of which I have an action group set up to do automatically now.
To my eye, NLP produces strangely saturated greens and blues but the reds are not equally saturated for some reason, making reds look washed out in comparison to the other channels. On the bottom left picture of a pair of shoes, it gives a strong greenish cast that G2P avoids.
I think many will prefer the Noritsu for the colours, and I would agree. However, the standard output is way too contrasty for me, killing much of the shadow detail. I have mostly put it there as a reference but since it is not a home alternative, I won’t spend much time discussing it.
Now we have seen a relatively standard roll of pictures that should be easy to convert. Let’s move on to look at some different scans, which might apply to you even if you don’t shoot these films. You or your lab might have messed up the development, or you happen to have over or under-exposed. Looking at how well Grain2Pixel and NLP handle outlier frames tells us something about how robust their algorithms are.
In all the comparisons below, the left image is G2P and the right is NLP
Comparison 1
Kodak Vision3 50D cine film developed in ECN2. It should be low contrast and have low saturation. Camera scanned with a Sony a6300.
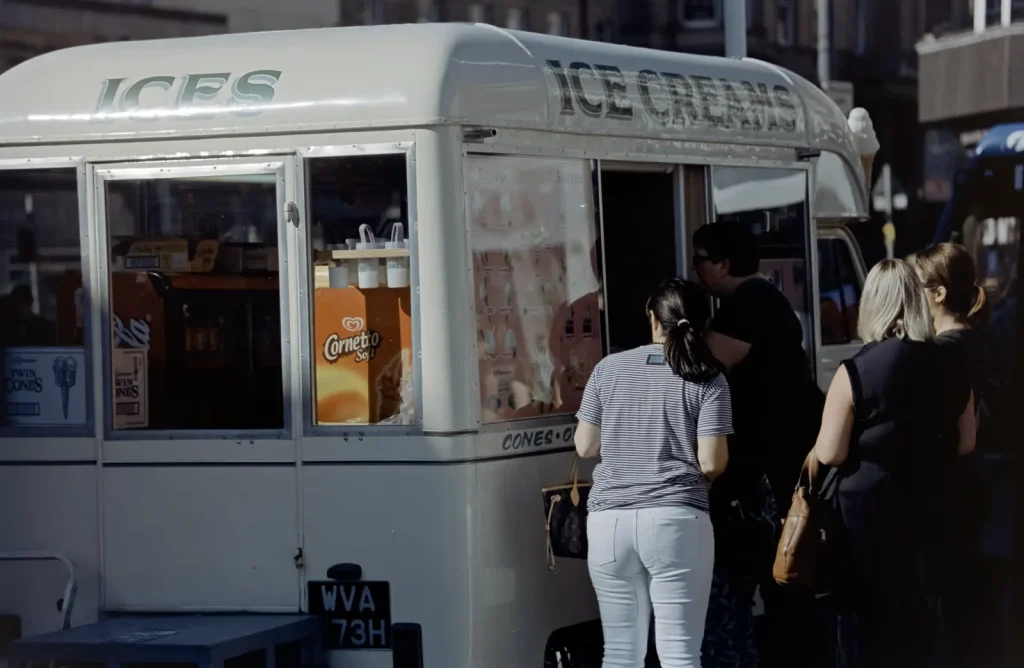
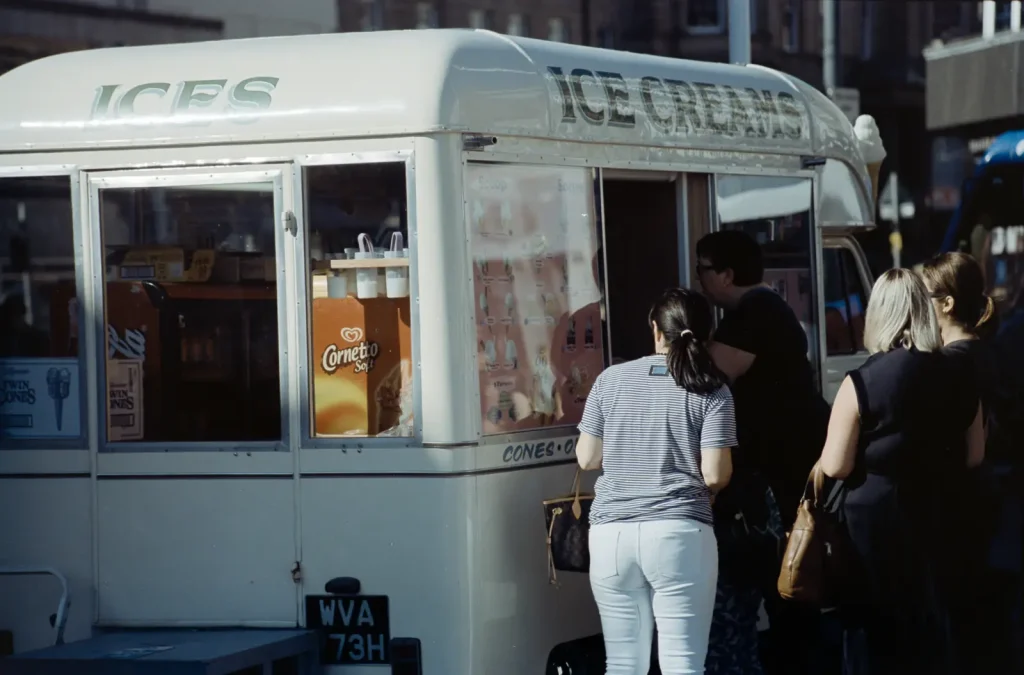
Here we see that the colours are quite similar, but Grain2Pixel is a bit more subtle. The contrast is the same: NLP is more aggressive. This is starting to be a trend.
The negative is underexposed by a bit and so lacks shadow detail and loses some brightness. G2P reflects this more while NLP cleans it up a bit more.
Comparison 2
Again, Kodak Vision3 50D. Note that the big streak across the frame is a deliberate flare from shooting straight into the sun without a lens hood.
Grain2Pixel is producing a warmer tone, reflecting the scene better. However, I would add some contrast. NLP has put a strong blue cast on the background but has nice contrast.
Comparison 3
Again, Kodak Vision3 50D.
Grain2Pixel gives lower contrast and slightly lower saturation, again, but it avoids the terrible magenta in the shadows that NLP has. The skin tone is a bit too red on NLP in a way that it shouldn’t be on the soft colour palette of Vision3 if you ask me, but that’s a matter of personal preference.
Comparison 4
Again, Kodak Vision3 50D (I’ll get to something else in a minute). This negative was poorly developed, which is why I’ve chosen it as a test.
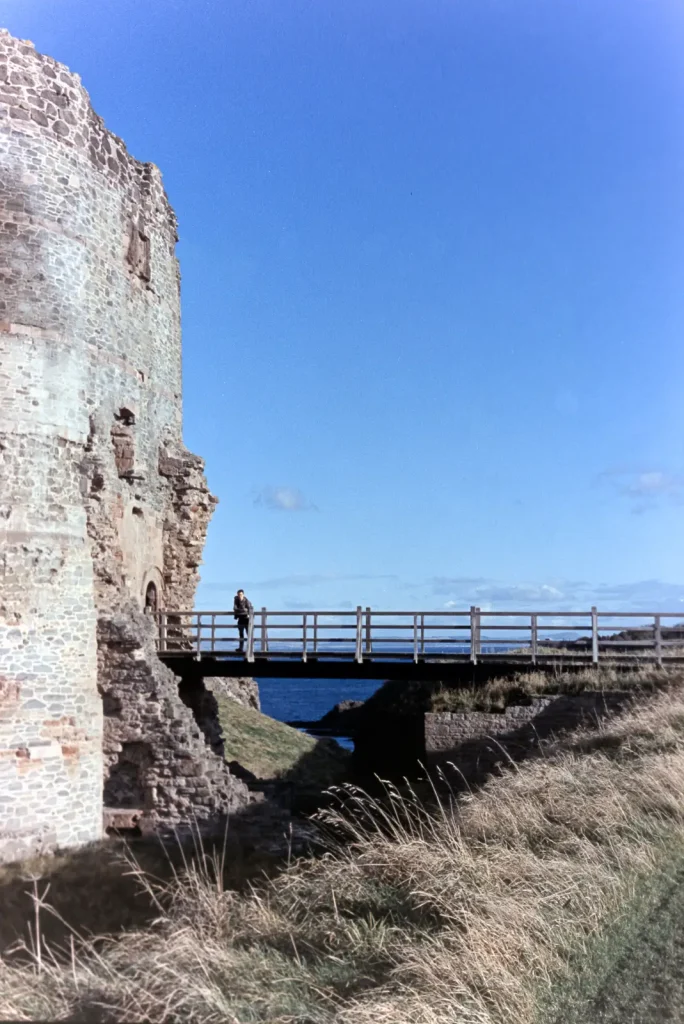
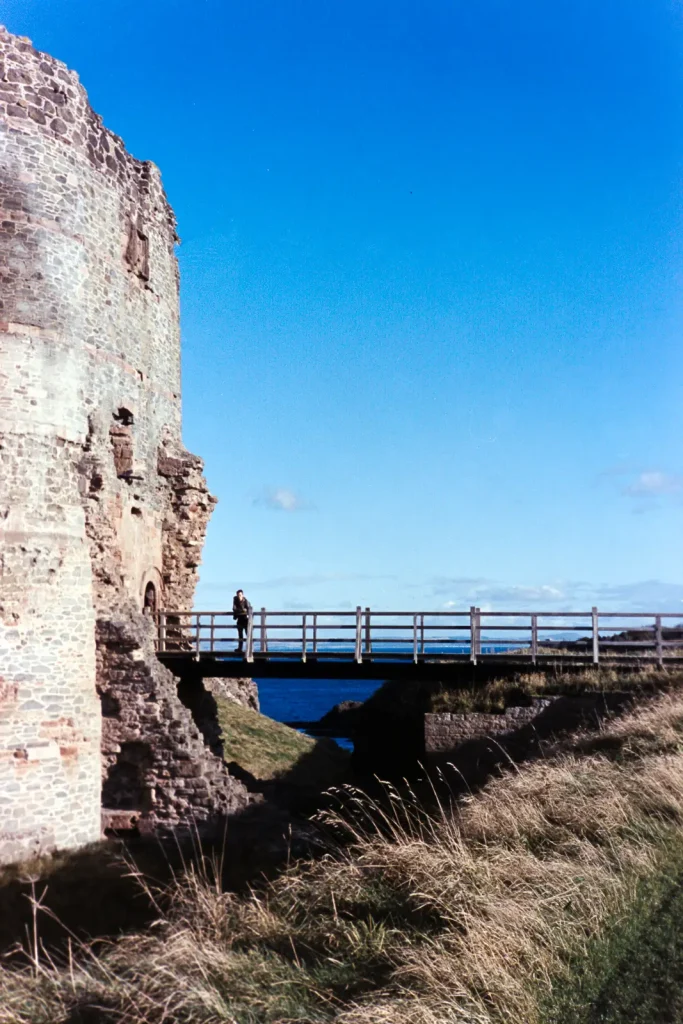
Grain2Pixel has produced very washed out greens – probably a result of underdevelopment of the negative. The sky is nice and the castle wall looks good. I would increase the contrast a bit on this. NLP has produced a nicer green but has oversaturated the sky and given the castle wall a strange magenta cast. It has produced the right amount of contrast.
Comparison 5
This is a special negative – shot on a medium format camera without a mask so that the picture is exposed over the sprocket holes. Neither plugins deal very well with the sprocket holes because they rely on picking the lightest point of the image to sample the film base colour. They have different approaches to handling this:

In Grain2Pixel you choose manual sampling of the film base, which gives you a dot to move around to the film base, sampling the lightest point on the actual film.
In NLP you crop the picture in Lightroom before processing, then convert it, then go back to Lightroom and ‘un-crop’ it, then go back to the plugin to export it as a TIFF.
I probably prefer the Grain2Pixel approach of manually sampling the base once, then follow the normal process since you don’t have to go back and forth between the plugin and Lightroom but for people who love working in Lightroom, it might be fine.
When it comes to the colours, I don’t know what NLP did to the blue sky that was there in reality. It is just white. G2P straight out wins here for actually rendering the colours that were in the scene.
Comparison 6
The next two comparisons are Ektar 100 medium format negatives, which is a notoriously difficult film to scan. These scans are also camera scans on the Sony a6300.
In this picture, Grain2Pixel produced a relatively cold look that is not quite accurate to the scene but is easily adjusted. The shadow areas are definitely on the colder side. The greens and yellows outside of the shadows are very nice – quite similar to how it looked when I printed it in the darkroom.
NLP produces an image with extremely magenta mid-tones and shadows – much more so than Grain2Pixel. It has also killed off some of the highlight detail in the top right of the image. I have very little positive to say about this conversion, sadly. Even trying to adjust it is hard because the highlights, mid-tones and shadows have different colour shifts, so it’s not a simple colour cast. The negative was professionally developed at a lab I trust and printed fine in the darkroom, so I am led to think that the conversion software just didn’t handle the scene very well.
Comparison 7
Roughly the same applies to this as to the last: Neither conversion is fantastic, but NLP has that blue-magenta cast in the shadows and mid-tones while G2P has less of that. Again NLP has pushed the highlights too far into the whites, losing detail. It could still be recovered in post-processing, but it’s a bit annoying that it keeps doing this. It has a setting for ‘soft highlights’, but I’m not sure why the default option should be to blow out the highlights.
Grain2Pixel wins for the same reason as the last comparison.
Comparison 8
Now I will show you the same image scanned on 5 different methods and converted with G2P and NLP respectively.
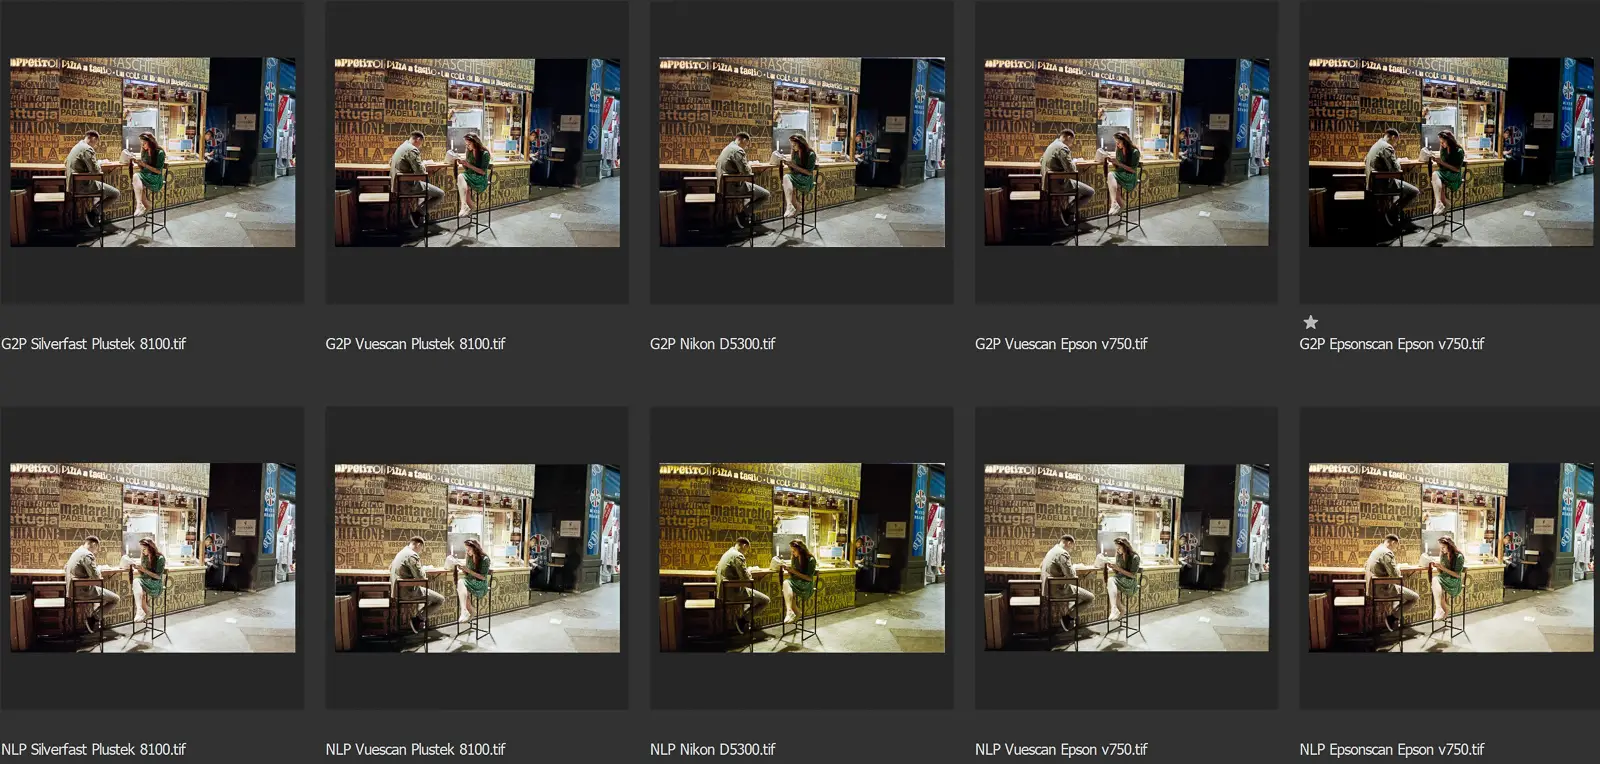
As you can see the results are quite different. G2P produces relatively consistent results with overall nice balanced contrast and good colours. I prefer the colours and contrast in the Vuescan Plustek version, but your mileage may vary. The differences are also small. I think Grain2Pixel has done a good job with a difficult scene, accurately representing how it looked like.
NLP has produced less favourable results. The highlights are again pushed too far towards the whites, blowing out some areas. The most obvious outlier is the camera scan from the Nikon D5300. At first, I thought I had done something wrong with my white balance adjustment, so I tried reconverting it with the same results. Then I had a friend convert the same file with the same results. For some reason, it is extremely yellow in the highlights and whites. Furthermore, the Vuescan Epson scan is very washed out, and the other three are fine besides the odd harsh highlights.
Conclusion
Having compared the two plugins, for me, the only conclusion I can make is that Grain2Pixel is a step forwards for home scanning, providing realistic and pleasing results right out of the box, packed into the environment of Photoshop. Some people will think otherwise – particularly if you don’t want to adjust contrast yourself. Though the conversion itself is somewhat slower than Negative Lab Pro, I much prefer the workflow – being able to do everything within the plugin menu and having the automatic sampling of the film base is wonderful.
All that and it’s FREE. Again, it’s hard to emphasis just how big that is for many people. Both plugins require that you have access to Adobe products, but G2P doesn’t require the $99 upfront shell-out. I hear that Grain2Pixel requires a relatively recent version of Photoshop, but you should get that anyway, with an Adobe subscription.
From my personal use in the past year, it seems that NLP tries to force every negative into the same template, using the full spectrum of colour and contrast. The problem with this is that not all scenes you photograph have the full range of contrast from white to black, nor will they have the full range of colour saturation. I don’t know how it works technically and it probably isn’t this way, but the result makes it seem that way. After using NLP for over a year and not quite understanding why I didn’t like my photos, resulting in shooting more and more slide film, I have now finally started using negative colour film again, converting with Grain2Pixel.
I get that this can be hard for some that spent quite a good chunk of money on a piece of software, and I expect some push-back on this review. We do after all like to defend our investments. That’s fine – if you get results you like using whatever you like, that’s all good. Continue doing that! A lot of credit should also be given to Nate, the maker of NLP, for making it in the first place – it has helped camera scanning grow. I also hear that a new update (released after I made the tests for this review) seems to fix some of the problems we have seen.
However, if you are thinking about converting negatives using Adobe products, I see no reason not to try out Grain2Pixel and see if it’s for you. If you’re not happy with it you can always try other alternatives. NLP is also free to try out for the first 12 negatives, so you could even do your own comparison if you wanted to.
Here are the links I’ve mentioned, in case you missed them:
- Grain2Pixel: grain2pixel.com
- Negative Lab Pro: negativelabpro.com
- Affordable camera scanning: camerarescue.org/camera-scanning-vs-pro-scanners
- pixl-latr: pixl-latr.com
- Nord Fotographic motorized film holder: www.nordfotographic.com
- If you don’t know what camera scanning is: www.nordfotographic.com/camera-scanning/step-1-camera-scanning-what
- Nick Carver – Camera scanning vs Drum scanning: www.youtube.com/watch?v=Q9d8BukUgzI&t=3s
Share this post:


Comments
Grain2Pixel Review – A Photoshop Plugin for Converting Negatives – By Arild Edvard Båsmo — 35mmc - https://jakhala.com a Blog on Healthy Life Style, Markets, News India, Sports, Wildlife-Nature, Entertainment, Photography, Food on Grain2Pixel Review – A Photoshop Plugin for Converting Negatives – By Arild Edvard Båsmo
Comment posted: 31/07/2020
Comment posted: 31/07/2020
Comment posted: 31/07/2020
Comment posted: 31/07/2020
Richard on Grain2Pixel Review – A Photoshop Plugin for Converting Negatives – By Arild Edvard Båsmo
Comment posted: 31/07/2020
Mani on Grain2Pixel Review – A Photoshop Plugin for Converting Negatives – By Arild Edvard Båsmo
Comment posted: 31/07/2020
On the other hand, (I know this won't be popular) I'd rather pay for the Grain2Pixel software, than just download it as freeware. There's a much higher chance of updates (for future compatibility), improvements, and general support if the developer is earning an income from their efforts, than if it's provided as freeware.
Otherwise this does look really good.
Comment posted: 31/07/2020
Comment posted: 31/07/2020
Noel Roque on Grain2Pixel Review – A Photoshop Plugin for Converting Negatives – By Arild Edvard Båsmo
Comment posted: 31/07/2020
Adrian Cullen on Grain2Pixel Review – A Photoshop Plugin for Converting Negatives – By Arild Edvard Båsmo
Comment posted: 31/07/2020
Alexei on Grain2Pixel Review – A Photoshop Plugin for Converting Negatives – By Arild Edvard Båsmo
Comment posted: 31/07/2020
I have a Noritsu scanner but unfortunately my scans don't look good all the time. Sometimes they have weired color casts that I struggle to correct. I'm not even talk about positive scans (they look bad). Noritsu can scan in raw files and I've been thinking to make them usable. I tried NLP but I didn't like tge workglow nor the results. G2P is much better! Yes, the G2P scans must be heaviky corrected but at least they can be corrected! Not like straight Noritsu scans or NLP conversions. After editing the G2P scans look amazing!
Now I wish that G2P could also handle positive scans as well. The slides themselves look so beautiful...
Comment posted: 31/07/2020
Comment posted: 31/07/2020
Huss on Grain2Pixel Review – A Photoshop Plugin for Converting Negatives – By Arild Edvard Båsmo
Comment posted: 01/08/2020
They make a very real difference.
Once in NLP there are 11 different tone bases, 10 different colour profiles, let alone all the adjustments you can make within those (mids, highs, shadows, hue, brightness, contrast etc etc).
They all make a very real difference.
I think it is remiss not to mention any of those, because they are there to optimize the conversion result to your liking.
This comparison does not show these conversion programs at their full potential, but just at an arbitrary baseline setting,
I want the best results possible, and NLP allows you to get there.
I'm not knocking GTP - it obviously is a fantastic product and the price is right! But using NLP in a way that does not utilize its capabilities does not make sense to me.
Comment posted: 01/08/2020
Comment posted: 01/08/2020
Comment posted: 01/08/2020
Heiko on Grain2Pixel Review – A Photoshop Plugin for Converting Negatives – By Arild Edvard Båsmo
Comment posted: 05/08/2020
It' s a great tool. To be honest - I got the best results I ever had. And I tried a lot. NLP was my latest step in getting more pleasant colors. But with G2P I even got mastered my most challenging negatives - typically the combination of red (lips) and blue (sky) with skin tones.
It's magic ;-)
tostl on Grain2Pixel Review – A Photoshop Plugin for Converting Negatives – By Arild Edvard Båsmo
Comment posted: 02/04/2026
AI Image Creator on Grain2Pixel Review – A Photoshop Plugin for Converting Negatives – By Arild Edvard Båsmo
Comment posted: 03/04/2026
What strikes me is how similar this challenge is to what’s now happening with www.aiimgcreator.com . Just like converting a negative, generating an image from a text prompt or a rough sketch is fundamentally interpretive—there’s no “correct” output, only what feels pleasing or useful to the photographer/artist. Tools like Grain2Pixel and Negative Lab Pro are essentially applying a form of guided interpretation, much like how modern AI models learn stylistic biases from training data.
It makes me wonder: could an AI model be trained to replicate specific “darkroom paper looks” or scanner profiles (Noritsu, Frontier, etc.) directly from raw camera scans? That feels like the next frontier—where interpretive conversion becomes customizable and learnable, not just algorithmic.
Either way, G2P being free is incredible. Thanks for the detailed work here.