Last year I reviewed the first light meter from the Chinese company TTArtisan. Even though it had some shortcomings, I kept it as a core part of my camera kit and I still consider it to be a great piece of gear at an affordable price. Now, TTArtisan released a second generation of the lightmeter, the TTArtisan Lightmeter II, coming with a few changes to its design and some functional improvements. Let’s see how it compares to the original, and if the team at TTArtisan learned from their small mistakes and if it still stays such a good choice among its rivals.
The second generation of the lightmeter is available directly from the TTArtisan website for 62 USD + shipping. This puts it around the same price as the original version, keeping the TTArtisan lightmeter as probably the cheapest “analog” lightmeter (no screens, just dials) on the market.
Construction
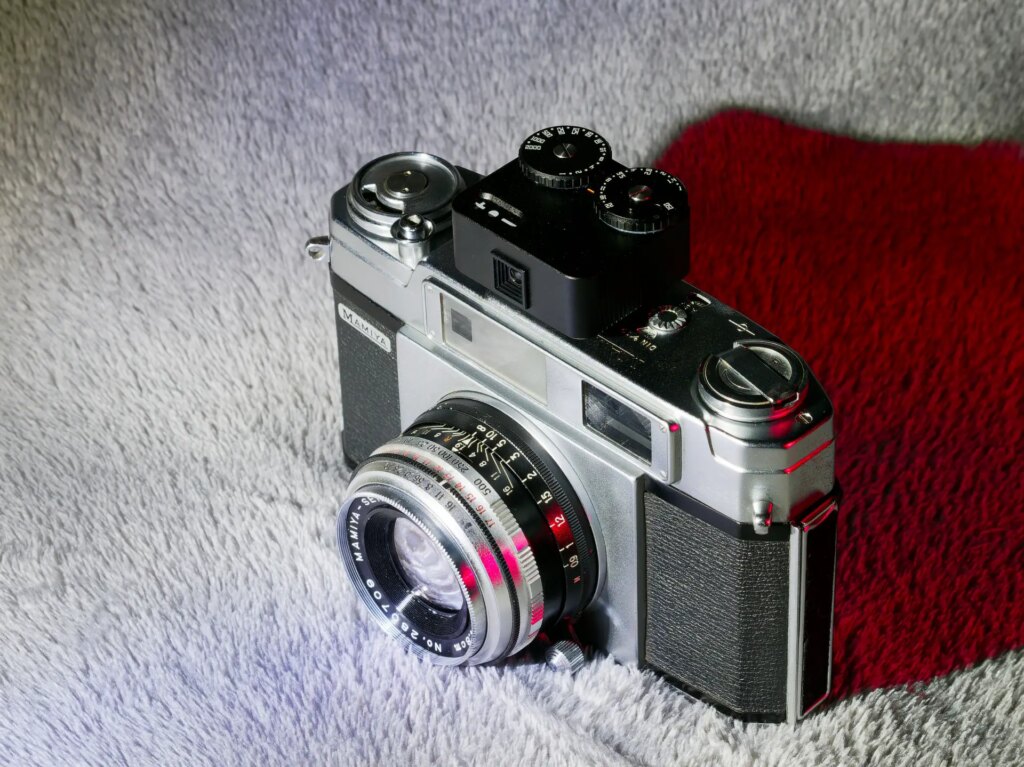
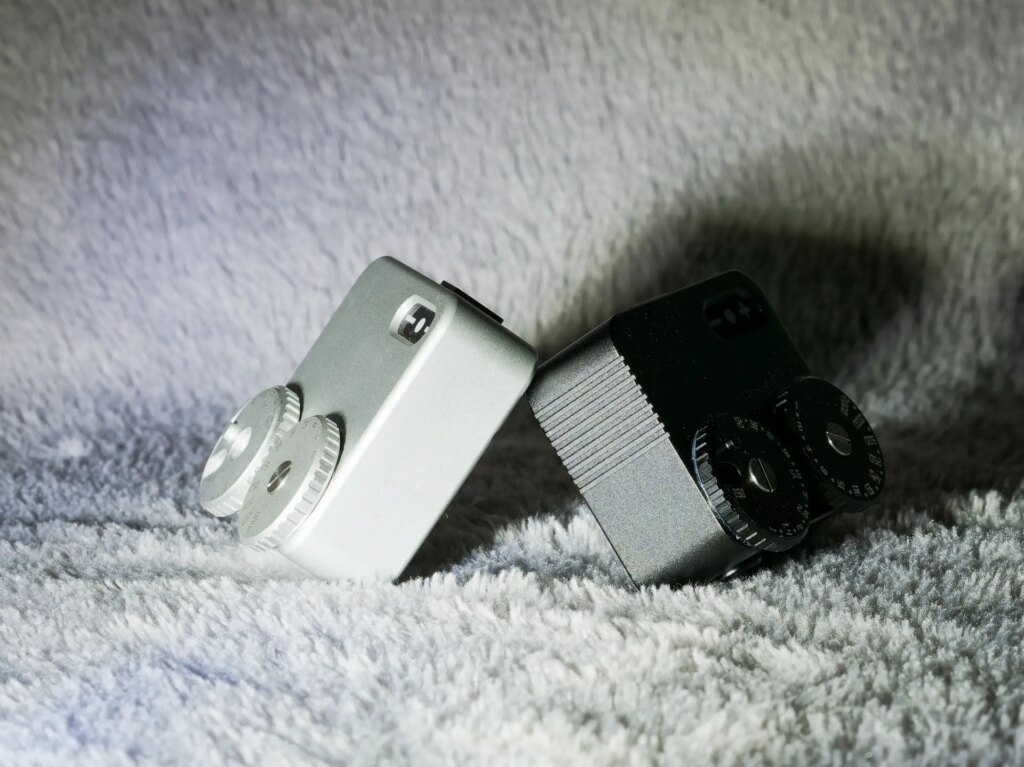
The new TTArtisan Lightmeter II model brings three noticeable changes in its construction, the most obvious being the altered dimensions. While the original was a square 40 x 40mm, now it shifted to a more rectangular 40 x 35mm, matching the size of the higher-priced Doomo lightmeter. It’s not that significant difference, but you can appreciate it on narrow bodies of the compact rangefinders, Canonet QL17 or Leica III being the prime examples. The new version also got slightly bulkier, with 1 extra millimeter in height, but that seems pretty meaningless when placed on top of the camera. And I don’t think I even noticed any difference when carrying it in my jean’s pockets.
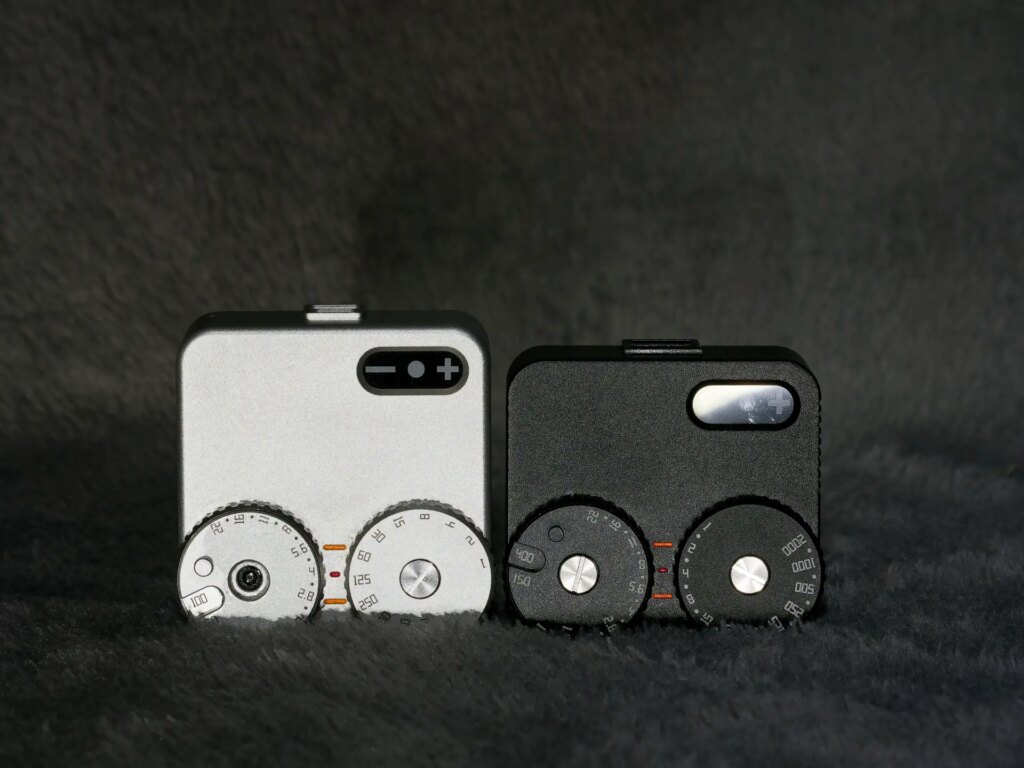
The second change is the new grooves on the sides of the lightmeter, the company calling them the “non-slip” enhancement. They can help a bit when putting the lightmeter on cameras with very tight hot shoes, but I especially appreciated them when using the lightmeter handheld. It will just need cleaning from time to time, as even my fairly fresh unit started to collect small pieces of dirt and dust in the grooves.
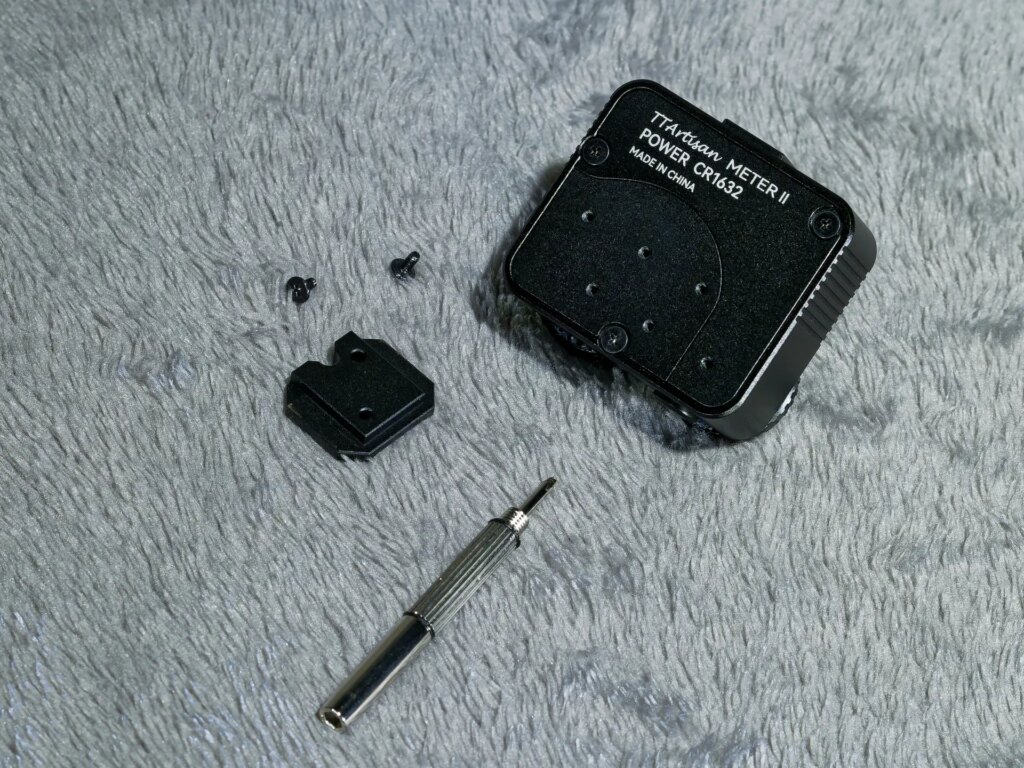
The final change is hidden on the inside, with a switch from a basic CR2023 battery to a less common CR1632. Once again this makes the new TTArtisan Lightmeter II closer to the Doomo version. I got confirmation from the company that this change had to be done due to the smaller dimensions of the lightmeter, while the stated battery life stayed at the same 60 hours. Just keep in mind the limited availability of these batteries and make sure to pack extras for any significant trip (and don’t forget the tiny screwdriver to go with it).
The overall build quality of the lightmeter follows its older brother, with machined aluminium and matt anodized surface, making for a premium and robust construction. The only part that doesn’t feel completely solid is the small activation button on the rear side, as it can slightly rattle in its place. But checking the inside construction, there is nothing to worry about, it’s just a meaningless quirk of the inner construction.
On the bottom, the hot shoe mount stayed movable between three positions, such welcomed customization for left-eye shooters like myself. And so far, it seems the mount is significantly more stable than on the original version, as I haven’t faced any issues with the screws loosening themselves due to vibrations or movement. I would still like to see some extra pairs of these tiny screws included in the packaging, as they are fairly easy to be lost or stripped.
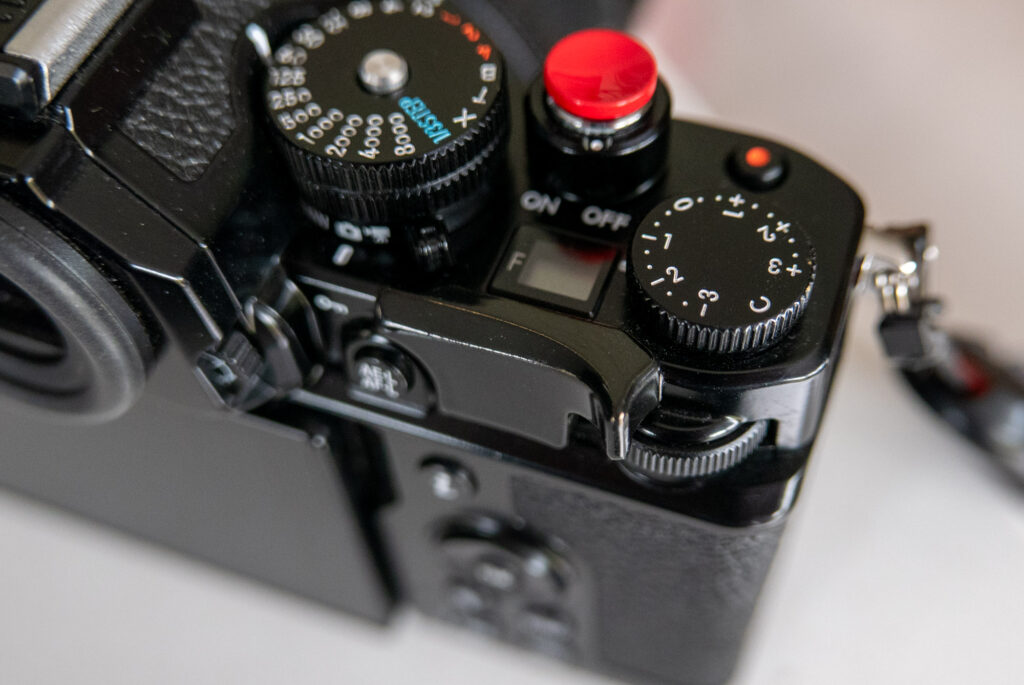
Controls
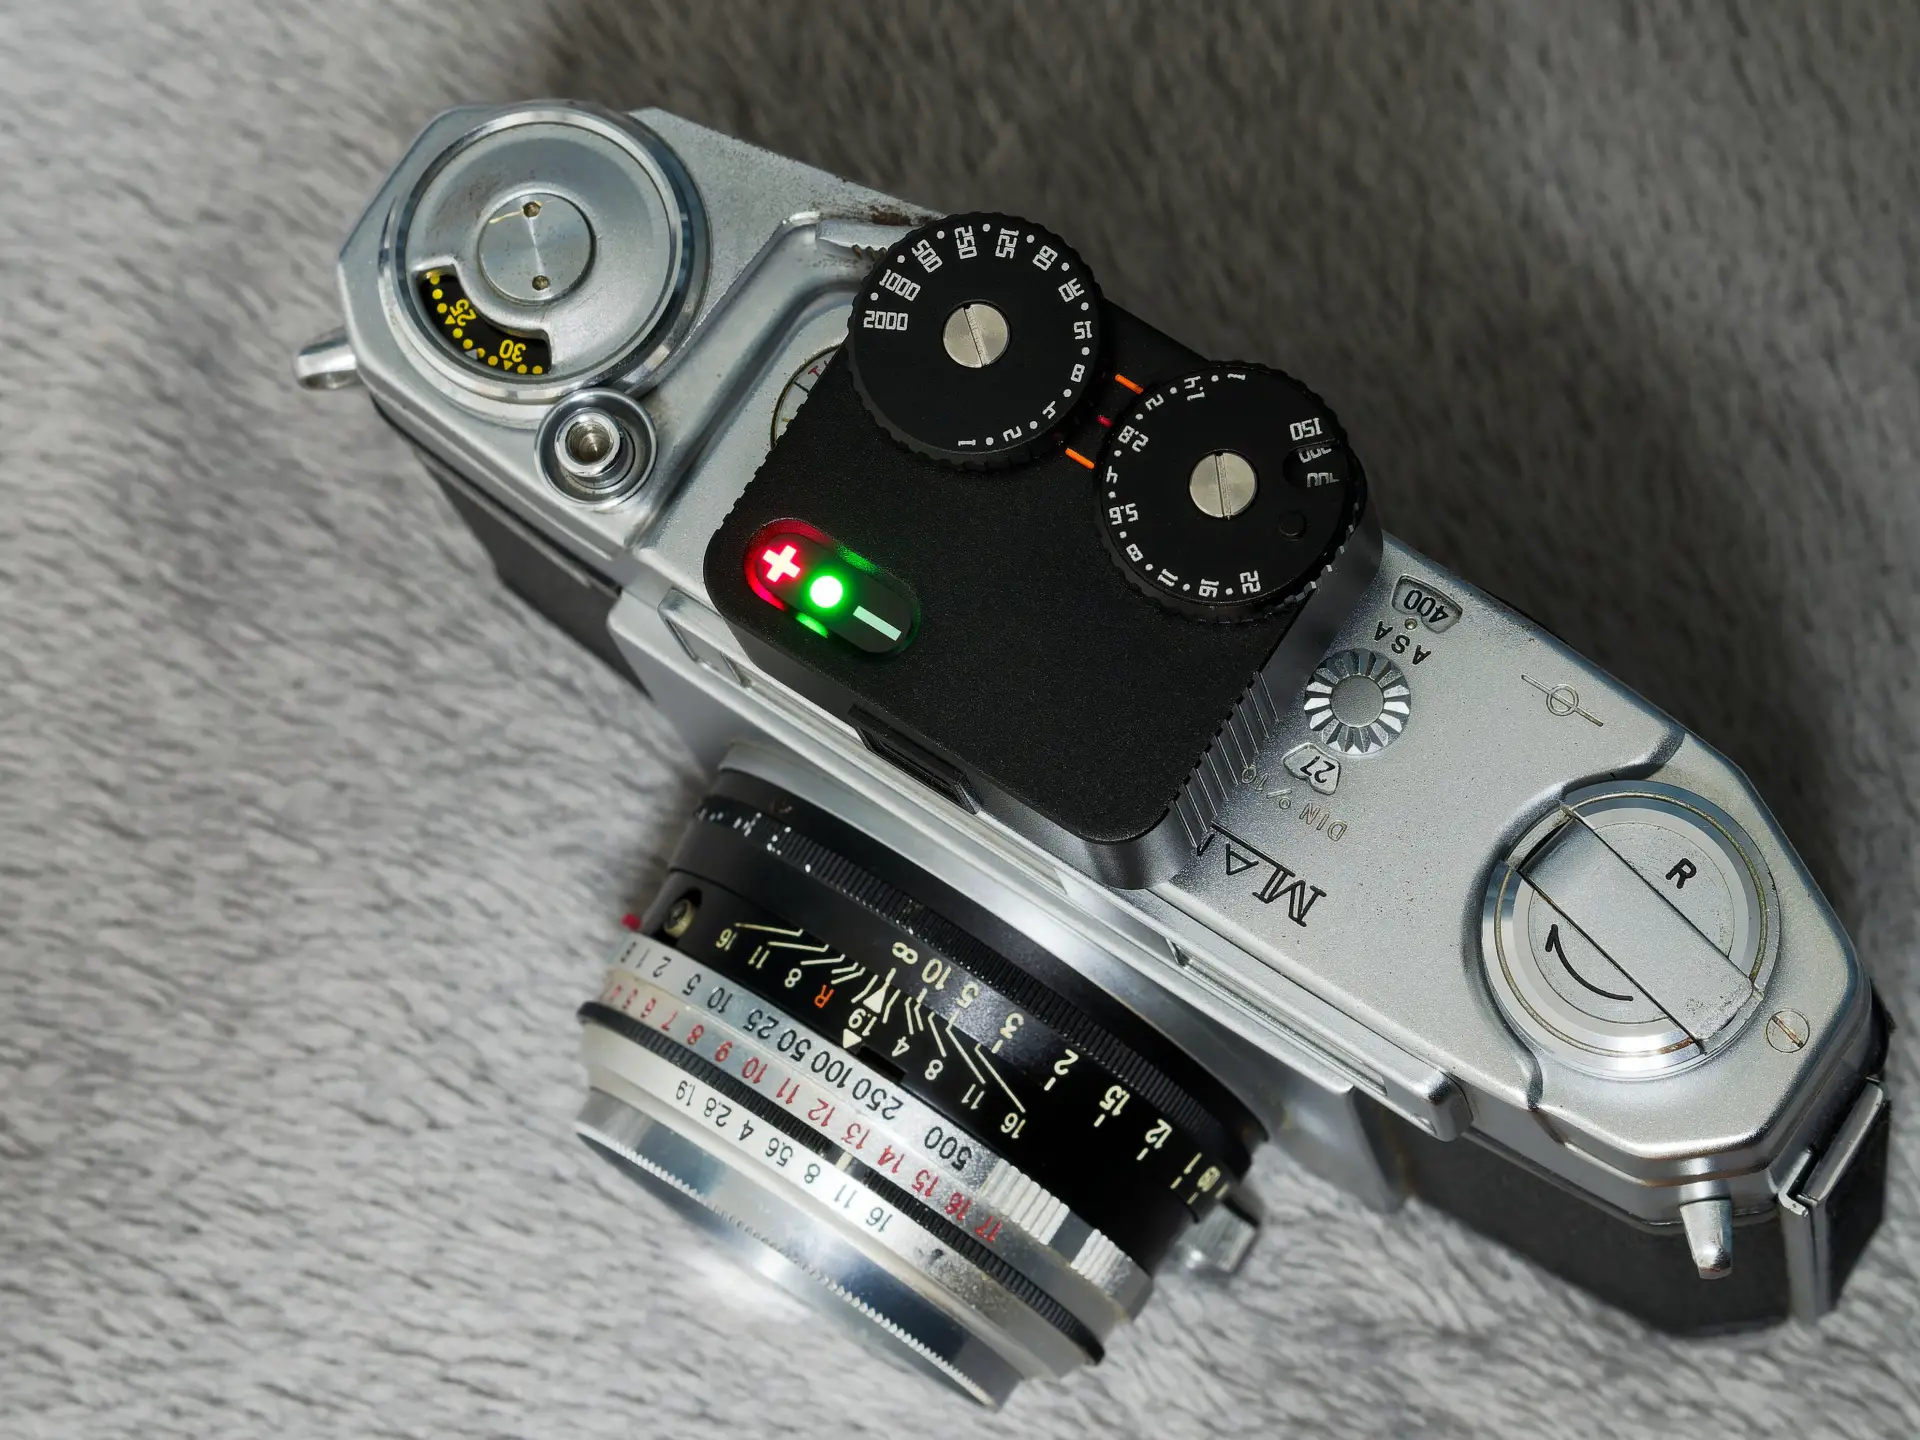
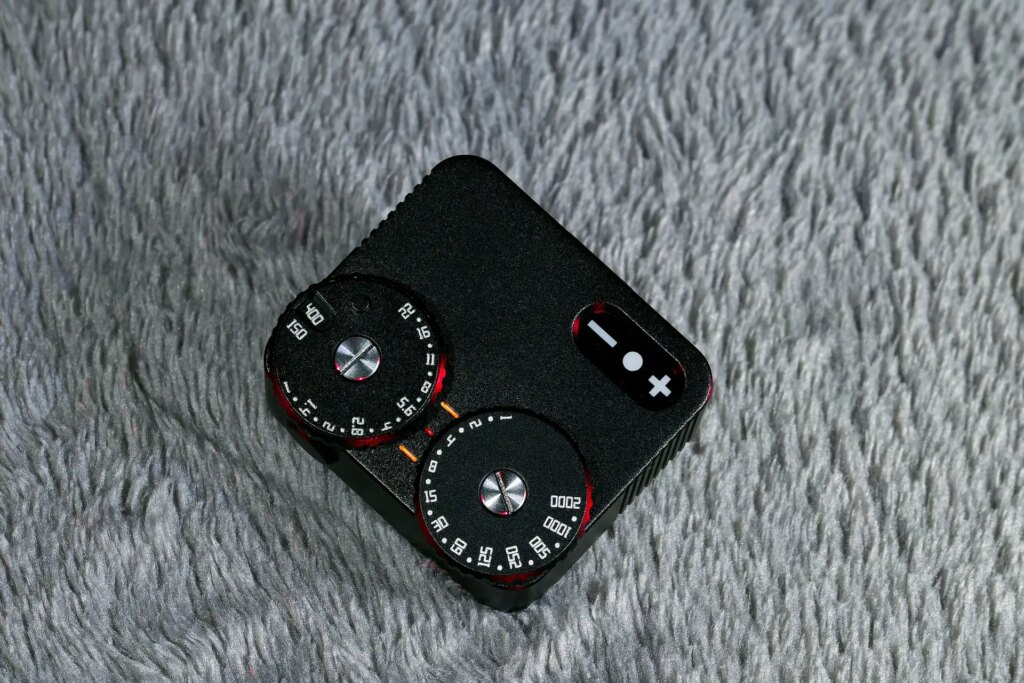
On first look, there is still the same combination of the ISO / Aperture dial and shutter speed dial, but both of them were actually improved in the new version.
The shutter speed dial is still clicked, but now with added extra half stops, making for higher accuracy and better compatibility with certain cameras. But while TTArtisan now claims “23 stops” in their marketing materials, it actually stayed at the same range from 1/2000 to 1 second.
A bigger change comes on the aperture wheel, which now also gets a clicked mechanism! And it’s as well for each half stop. Good job on this improvement, finding the correct exposure is now even more satisfying, with a great tactile response of both wheels.
But one wheel still spins freely, the inner ISO setting. I guess it allows for further fine-tuning to the preferred ISO setting (looking at you, 250D), but it makes it much more likely to be changed by accident. The same issue plagued the original model and I can’t count how many times I had to reset the ISO setting in the middle of the day. If they ever fix this, ideally with 1/3 clicked stops for ISO, it would be the perfect lightmeter in my eyes.
Accuracy
I need to be clear on this, the original TTArtisan lightmeter had problems with accuracy. You could find comments from a range of users complaining about this online and even my unit was out of the box underexposing by about 1.5 stops. And while I managed to fix this by simply opening the unit and installing a tiny flash gel filter in front of the lens, I was hoping for an improvement from the TTArtisan. And seems they did it.
The new TTArtisan Lightmeter II keeps the 45-degree angle, but now utilizes a bigger opening and a different lens, with TTArtisan claiming higher accuracy thanks to these changes. And I can confirm it so far, with my unit being spot-on accurate right out of the box, closely matching readings I’m getting from a mix of other devices and cameras. In the first two weeks, I kept comparing and checking on it, but now I got to the point when I fully trust it on pretty much all occasions.
Only a few times have I noticed an issue in harsh full-on sunlight, when the meter might show 1 stop overexposure. Not sure if it’s due to some limits of the sensor (I encountered a similar issue on some phone lightmeter apps) or if it was just a random error caused by objects in its view. But harsh sunlight is not something I really need a lightmeter for, as I fully embrace the Sunny 16 at these moments.
Conclusion
The second generation TTArtisan Lightmeter II brings a nice combination of improvements, both in the overall construction and accuracy. Yet the price was kept at pretty much the same level, making this lightmeter once again a great value and the most affordable option for this style of simplified lightmeter. Well done TTArtisan.
If you wish, you can check my photos on Instagram
You can also read Hamish’s big comparison of lightmeters in here
Share this post:


Comments
Philippe Andre on TTArtisan Lightmeter II Review – Gradual Improvements
Comment posted: 07/09/2023
Comment posted: 07/09/2023
Cormac on TTArtisan Lightmeter II Review – Gradual Improvements
Comment posted: 07/09/2023
Comment posted: 07/09/2023
Dan Mountin on TTArtisan Lightmeter II Review – Gradual Improvements
Comment posted: 07/09/2023
Regarding the shoe mounting screws, I used a dab of LocTite thread locker on mine, (something I always do when I don't want screws backing out). A tiny drop of cheap nail lacquer would also work I'm sure.
Comment posted: 07/09/2023
Dan Mountin on TTArtisan Lightmeter II Review – Gradual Improvements
Comment posted: 08/09/2023
Steve on TTArtisan Lightmeter II Review – Gradual Improvements
Comment posted: 04/10/2023
Comment posted: 04/10/2023
Dolf Kockelkoren on TTArtisan Lightmeter II Review – Gradual Improvements
Comment posted: 09/10/2023
But I'm switching to a Doomonor voigtländer bv meter. They should have moved the on button to the right. If I use in on my camera's I have to take my eye away from the viewfinder to push the button. Now you notice why on the Doomo and original VC meter the button is on the right.
A shame because I quite like it.
Kind regards
Dolf Kockelkoren
Comment posted: 09/10/2023
Gary Smith on TTArtisan Lightmeter II Review – Gradual Improvements
Comment posted: 12/04/2024
Comment posted: 12/04/2024
Comment posted: 12/04/2024