Front view of Plustek scanner

Plustek OpticFilm 8200i Review – A case for home scanning – by KJ Vogelius

The black box at my side gives of a mechanical moan. The screen flickers and an image gradually appears. The moment preserved on silver and gelatin is now displayed on my laptop. Low contrast and fuzzy the photo doesn’t exactly look appealing. With a few preset commands contrast is increased, sharpening applied, and exposure balanced. Now a finished original – ready to be printed, backed up and shared in an instant to friends and family across the globe.

Lately I’ve been enjoying a return to film photography. The more methodical approach, excellent tools and delayed gratification have made the experience immensely rewarding. But there’s been one aspect I’ve felt lacking – scans.

There’s a lot of appeal in having a good lab scan your photos at development. Good looking, finished results of adequate quality without doing anything more than asking when dropping off the roll. There’s no denying the convenience. Frank recently wrote a good summary of the advantages here (the comment section is also full with insights and experiences).

However there’s a price to pay. Lack of control for one. Another major issue is cost.

Frontier lab scan

For development and scanning of a roll I’ve paid close to €40 at Crimson – my local pro lab. I’ve been reasonably satisfied with the 8 megapixel results but at times I’ve felt that the scans have looked a bit harsh and overly processed. This, as well as the cost and two week delivery time has made me look into alternatives.

After looking into lab offerings both locally and abroad I was disheartened. None of the labs were significantly better, cheaper or faster as a whole. However I soon concluded that if I scanned myself I could get my cost down to a third and cut delivery time to days instead of weeks – a compelling proposition indeed.

KJ Vogelius - Plustek sample

Into a new rabbit hole I went – what scanners are good, how good is the image quality, what’s a reasonable cost, how long does scanning take, and so on. There’s a lot of information out there, but it’s hard to find anything comprehensive that’s not either very theoretical or utterly subjective.

Never mind that there’s no clear cut best option when it comes to scanners. The choice instead boils down to balancing a number of advantages against a number of disadvantages. Much like with cameras or phones or cars or toasters.

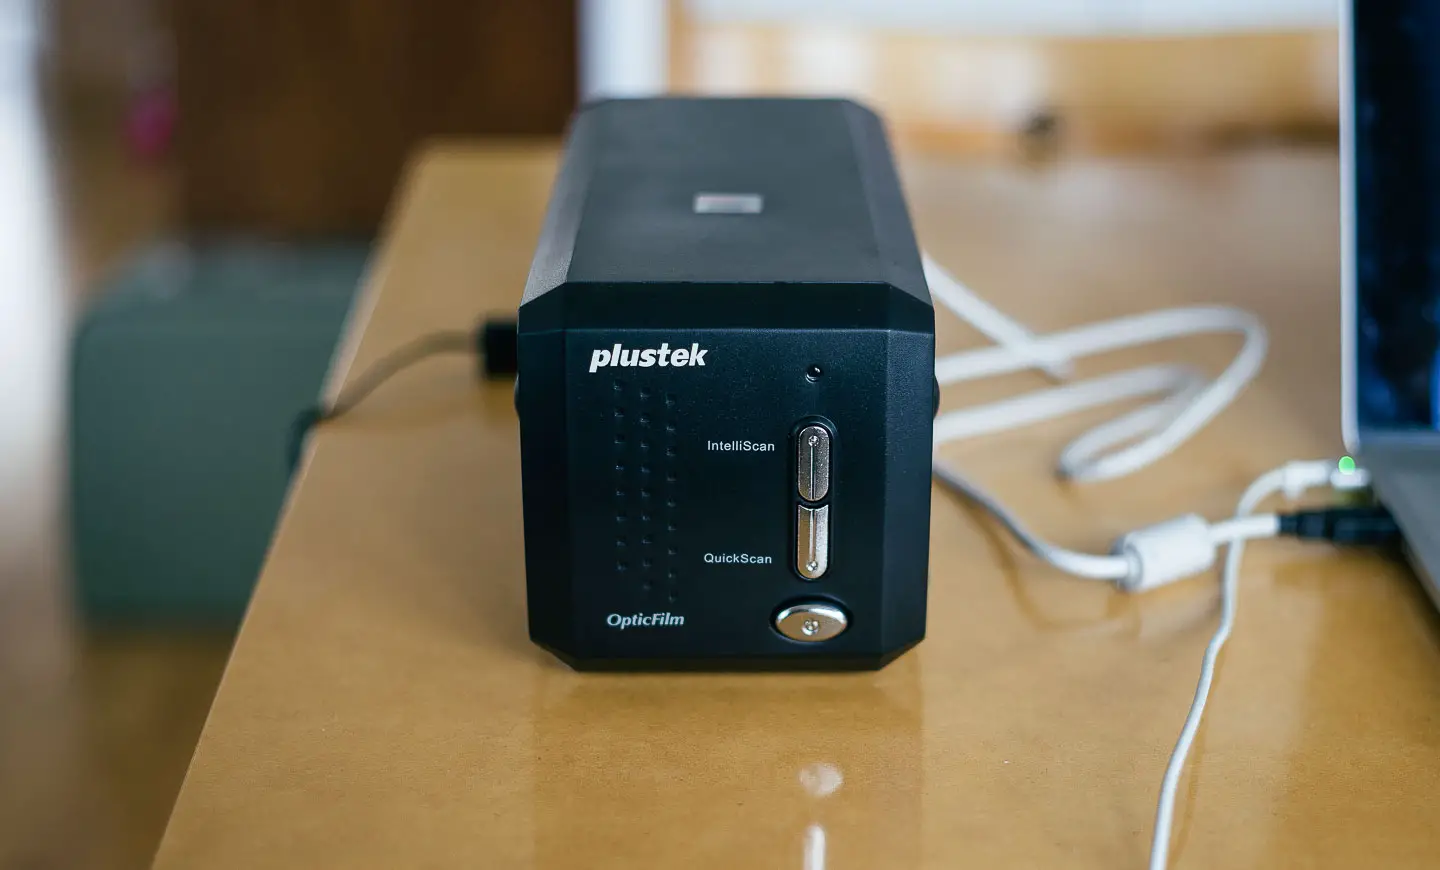
After looking into pretty much every option on the market as well as a bunch of discontinued ones I decided on the Plustek Opticfilm 8200i. It’s a current production dedicated 35mm film scanner.

Plustek 8200i

Feeding negatives into the 8200i

It’s a compact unit and very reasonably priced. It scans negatives or positives at up to 7200dpi, resulting in huge 60 megapixel files.

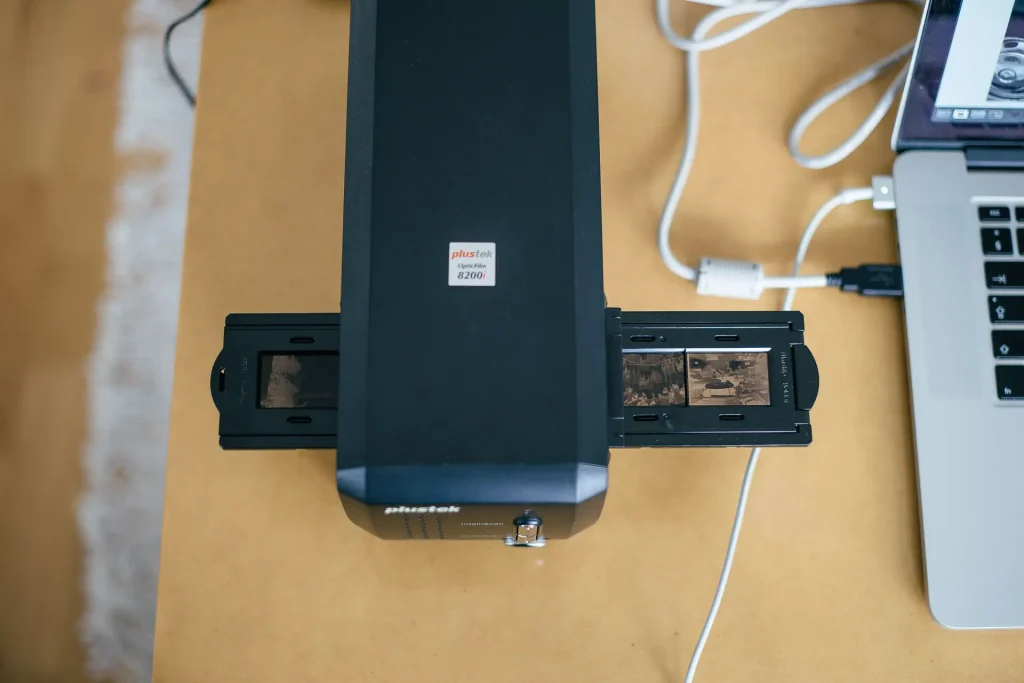
The main disadvantage of the scanner is that each frame needs to be manually fed and scanned individually.

There are three options in the Plustek Opticfilm 8000-line. The two 8200i models, called SE and AI, differ only in software. There’s also the lower priced 8100, lacking infrared dust reduction but is otherwise identical. The preceding models in the 7000 series are based on the same hardware, but there’s again some differences in software and features.

All versions come with Silverfast – generally referred to as the Photoshop of scanning software. The cheaper 8100 and 8200i SE comes with a slightly pared down version of the software that lacks some features, but the differences seem mostly academic. All versions are plenty capable but also a bit eccentric at times. There’s a lot of detractors and much has been written about how hard it is to use. I actually found it easier than expected with most settings pretty straight forward.

Frontier lab scan

Plustek vs Frontier

The first thing I did when I bought the scanner was to rescan a number of negatives that I’d previously had scanned by my lab. I wanted to see how hard it would be to get a similar result and if there were any gains or losses in image quality. I figured that the best way to find out was to compare it to a known quantity. Maybe these tests can be of use to others as well so I decided to share my findings.

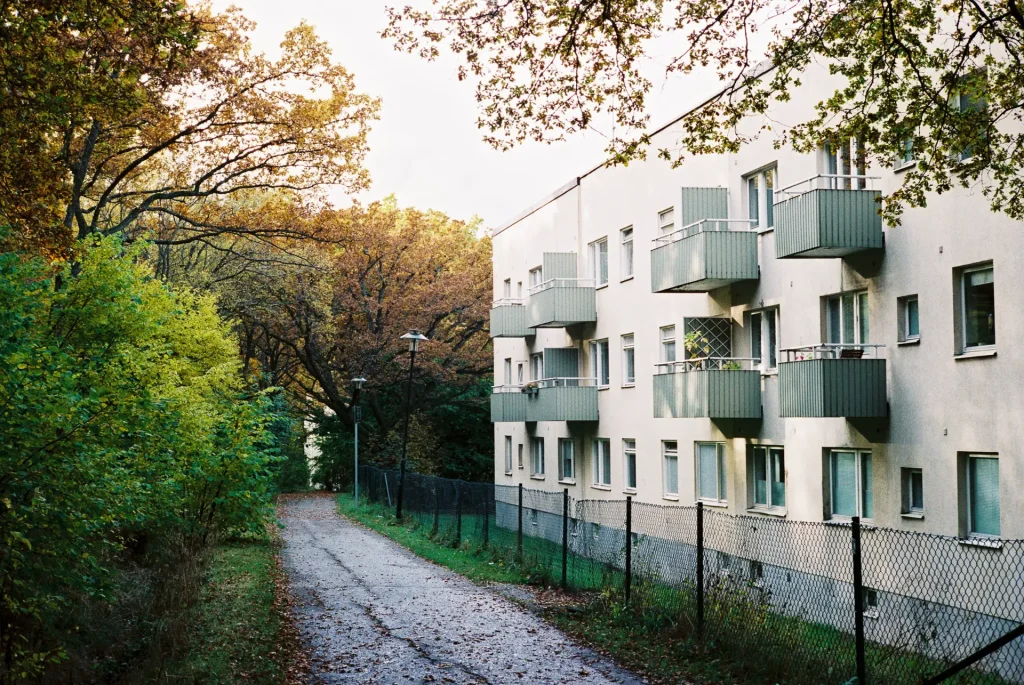
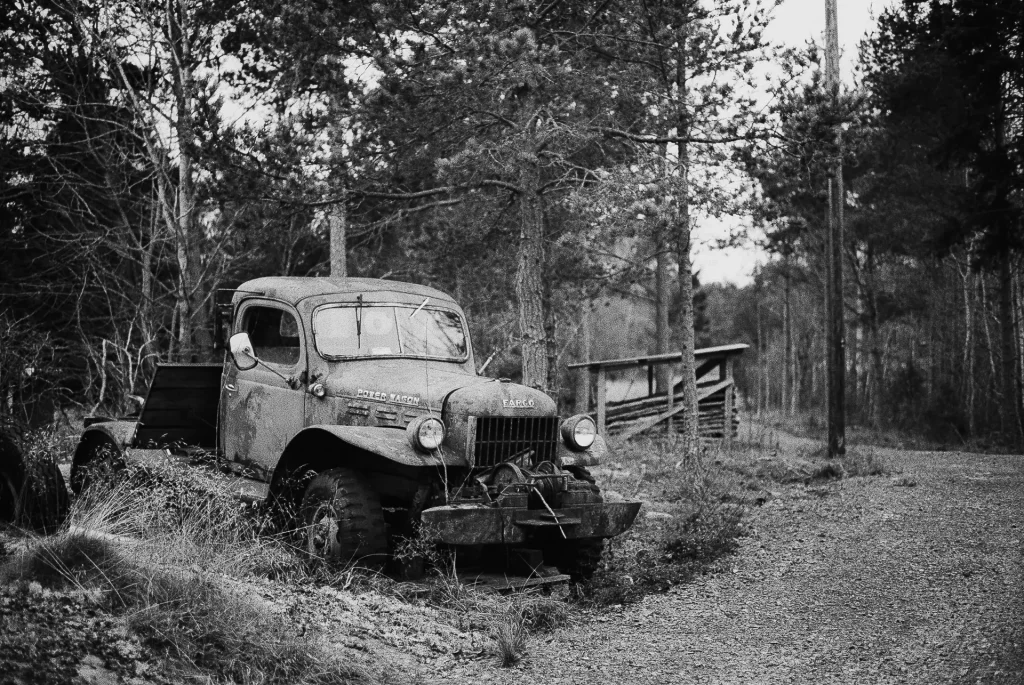
In this first comparison I’ve edited the Plustek scans to look similar to the output from the Frontier. I also tried scanning at a few different resolutions to find out what the sweet-spot is. The pixel dimensions of the Frontier scan is around 8MP, the 3600dpi Plustek scan is around 20MP and the 7200dpi one is over 60MP. The full frame is displayed below.

Frontier comparison scan

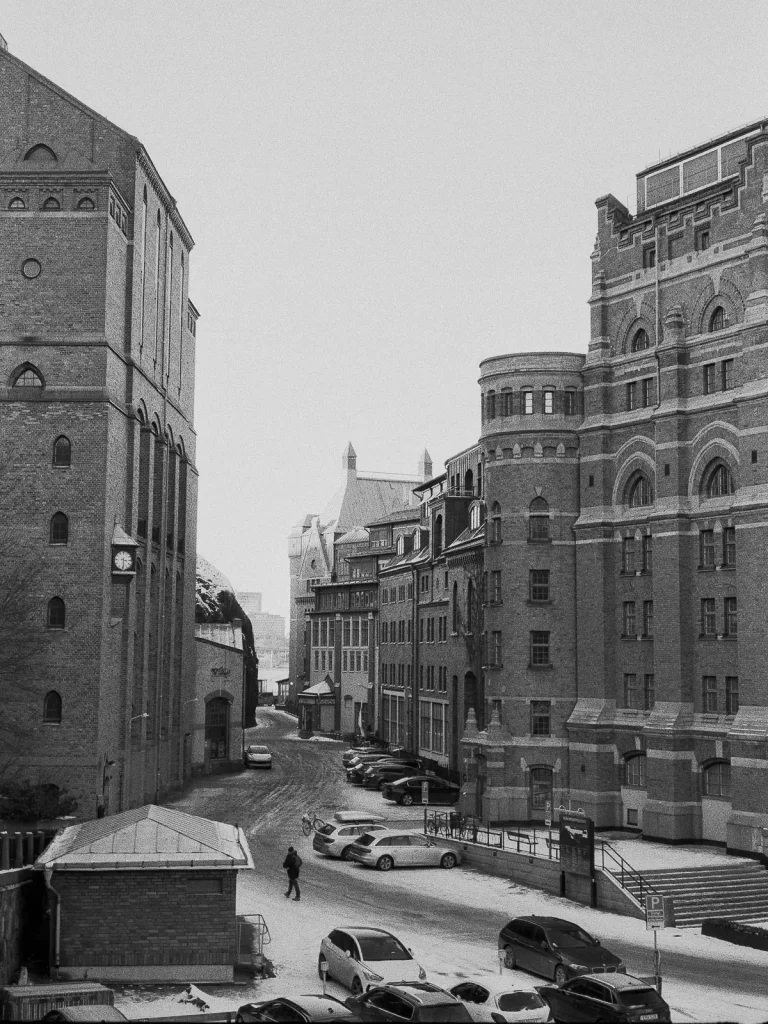
The image was made using my Leica M4P and Summicron 50 V at f/5.6 and shot on Fuji Superia 400.
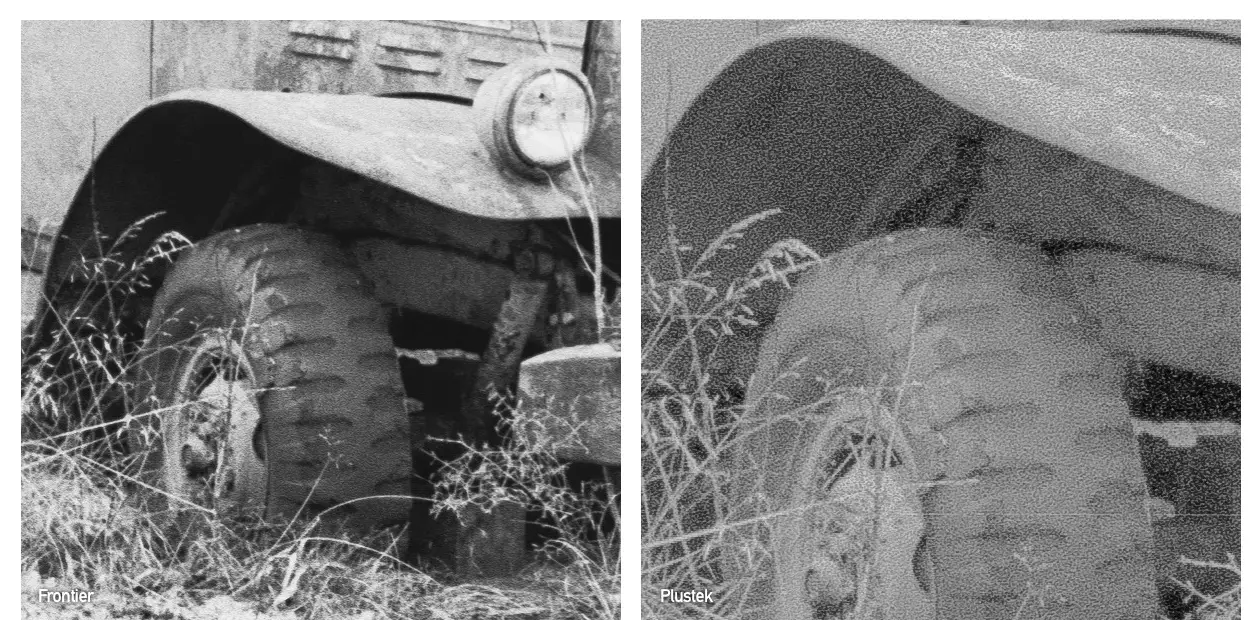
Below is a few crops from each scan. Click to view in full 1:1 resolution.

Plustek-vs-Frontier-1 plustek-crops-2
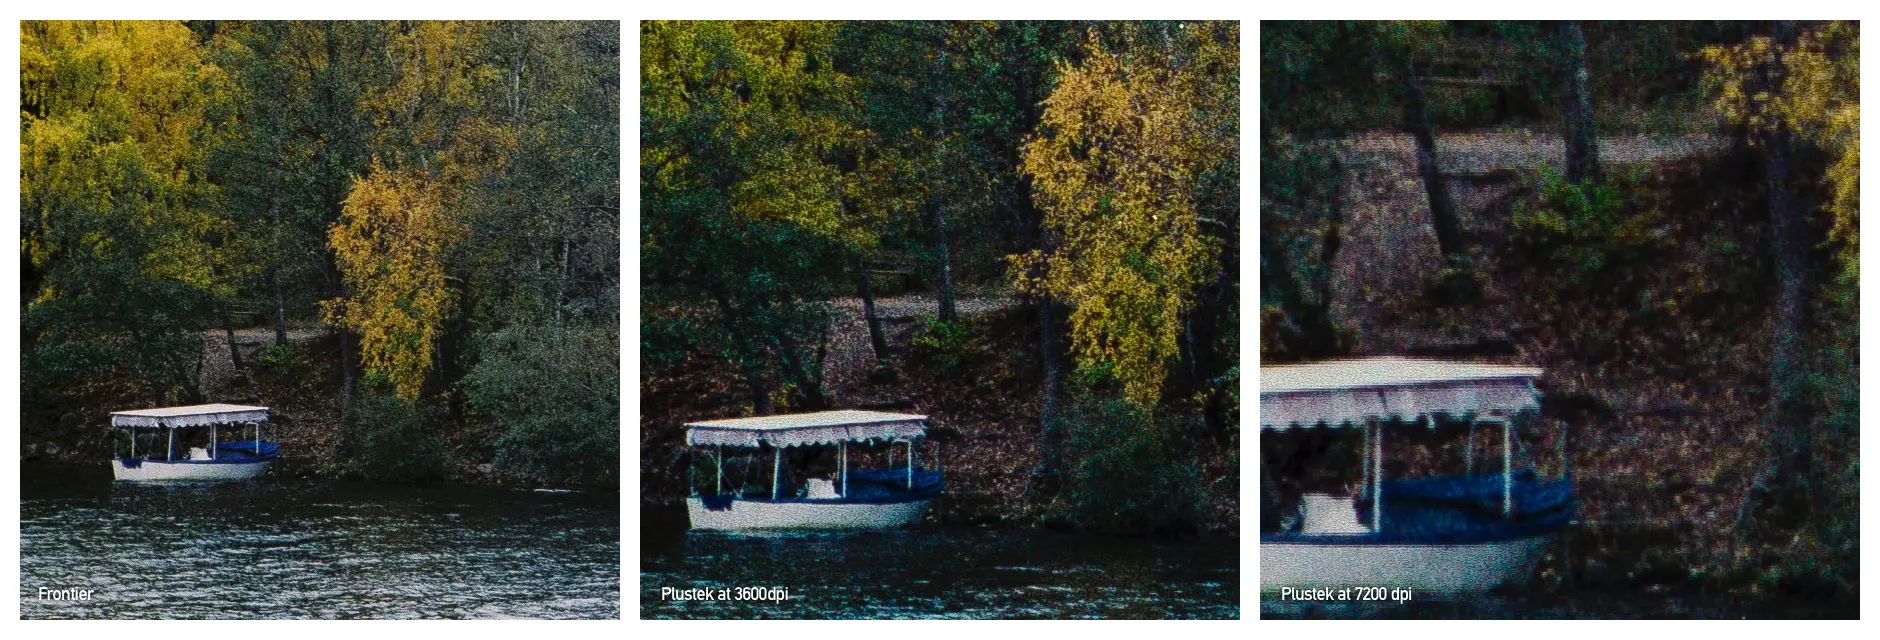
You’re welcome to draw your own conclusions from these crops, but to my eye all three scans really look quite good and I’d happily print either. Both Plustek scans show a bit more detail than the Frontier. Pushing and pulling the files there’s also more dynamic range in the Plustek ones. The 7200dpi scan is visibly massive but also a bit overkill, at least for ISO 400 film, as there’s little additional detail. I’ve done most scanning at 3600dpi after this test.

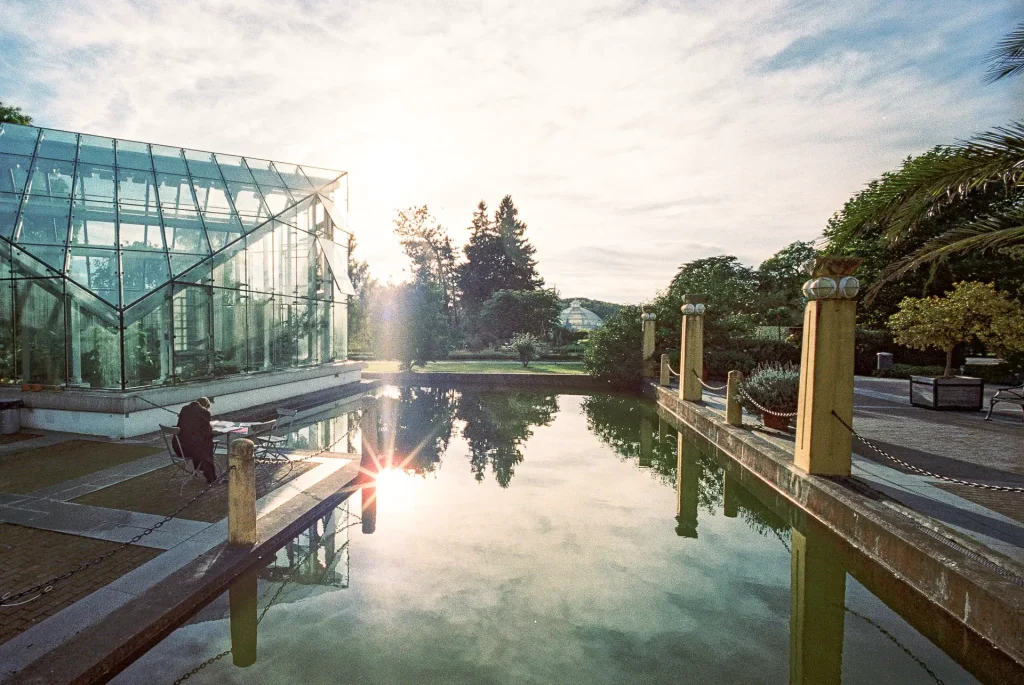
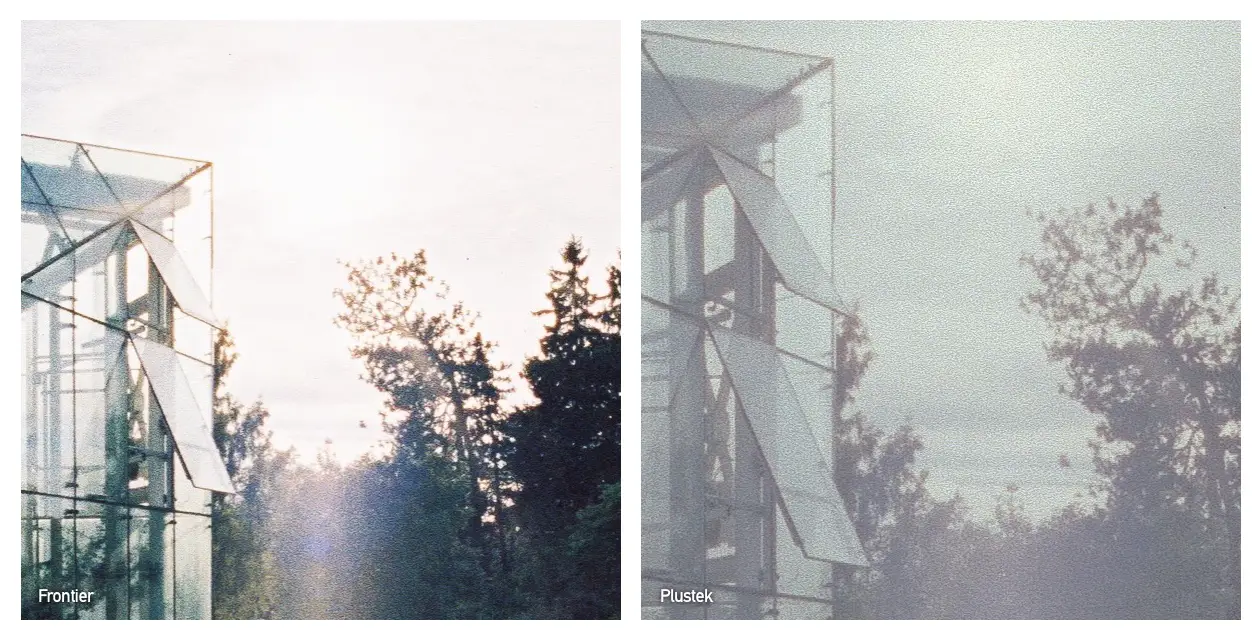
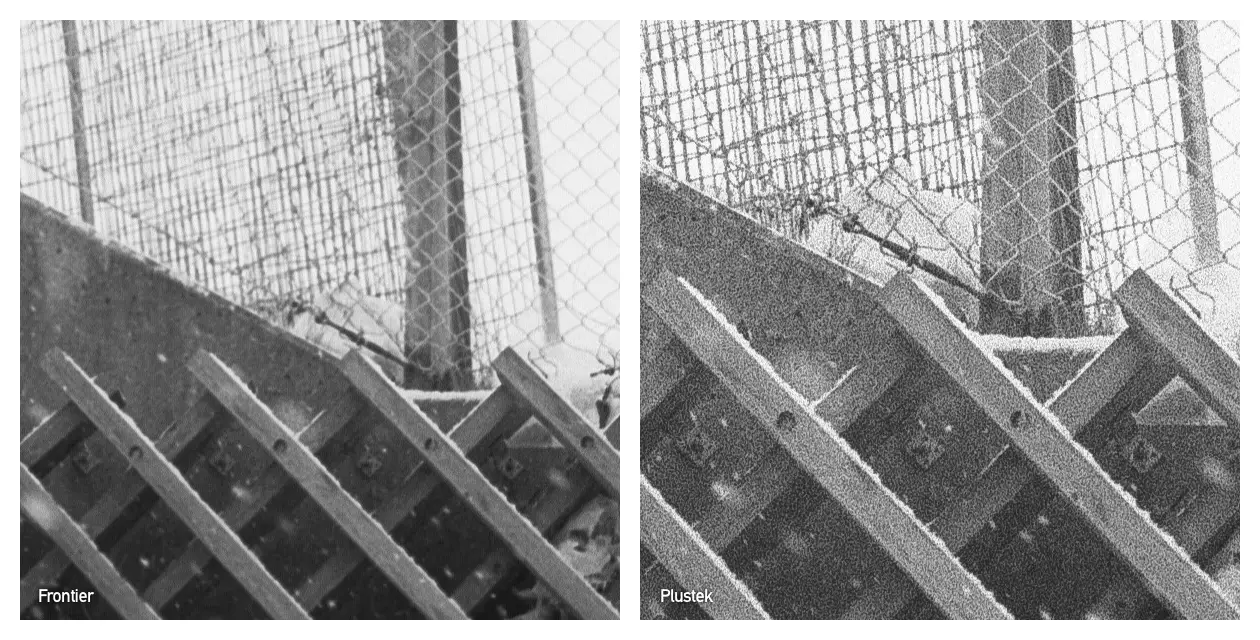
Below are a few more comparisons. All scanned at 3600dpi. Here the full image is edited to taste, but the crops left pretty much as they look straight out of each scanner. This leaves the Plustek ones looking washed out, but keep in mind that it’s easier to add contrast, saturation and sharpening than it is to remove. To my eye the edge definitely goes to the Plustek scans as there’s more detail and more dynamic range. Editing the files I can get the Plustek ones to look like the Frontier scans, but not the other way around.

Make sure to click the crops to view the comparisons at 1:1.

Plustek vs Frontier - Sample 2

Plustek vs Frontier - Crop


Plustek vs Frontier - Sample 3

Plustek vs Frontier - Crop


Plustek vs Frontier - Sample 4

Plustek vs Frontier - Crop


Plustek vs Frontier - Sample 5

Plustek vs Frontier - Crop


Scanning full rolls of B&W

Since getting the scanner I’ve gone through a good number of full rolls of black and white for my 366 project. I figured that it’d be interesting with some practical experiences and tips from scanning those as well.

Scanning a 36 exposure roll has generally taken me around two hours. While that might sound like a lot I tend to process the previous frame while the scanner is working on the next one. So I’m pretty much done with the full roll after those two hours. Overall I don’t find I spend significantly more time per roll than I do processing digital photos or editing lab scans. I also find I get a bit faster with each roll, figuring out what settings to tweak to get what outcome.

KJ Vogelius - Plustek sample

As for settings I scan everything at 3600dpi and output as an 8-bit tiff. I generally regard the scan as a piece of raw material, for later editing in Lightroom. As such I want to maximize the data captured and saved at scanning, so I set contrast to a minimum, disable sharpening and use a generic inversion profile. I initially had a few issues with clipped highlights and shadows. I found the best workaround to be to scan tricky negatives with the software set to a colour negative image instead of a monochrome one. This means three times as much information and the automated black/white-point picker also becomes a bit more forgiving. Choosing 16-bit output gives better quality by a very slight amount, but the RGB method gives me a simpler workflow and far smaller files.

I give each negative strip a few blasts with a simple bulb air blower before and after mounting them in the film holder. This cuts down on the dust to a level where I don’t generally feel it’s an issue. I’ve also begun wearing cotton gloves while handling the negatives, simplifying getting them in and out of the holder and negative sleeves a great deal.

KJ Vogelius - Plustek sample

Bottom line

I definitely appreciate the appeal of having a lab scan your images, the convenience and easily attained quality. But it all hinges on what lab offerings are available. To me, the trade-offs are simply not worth it. Scanning at home has given me more control and higher quality files. It’s significantly reduced both cost and time waiting for results. I couldn’t be happier with what this small black box helps me achieve.

.

I go into more detail and continue to add my findings with the 8200i in a running article on my site.

Thanks for reading & thanks to Hamish for having me. Let me know in the comments if you have any questions.

Another interesting review of this scanner can be found here on EMULSIVE


Contribute to 35mmc for an Ad-free Experience

There are two ways to experience 35mmc without the adverts:

Paid Subscription - £2.99 per month and you'll never see an advert again! (Free 3-day trial).
Subscribe here.

Content contributor - become a part of the world’s biggest film and alternative photography community blog. All our Contributors have an ad-free experience for life.
Sign up here.

About The Author

84 thoughts on “Plustek OpticFilm 8200i Review – A case for home scanning – by KJ Vogelius”

  1. Great article! I’ve found scanning my negatives at home to be tricky as well. I currently have been experimenting with the Epson v700 flatbed scanner without much luck. It’s as if all my scans are out of focus so to speak. Maybe I should try this one.

    1. Thanks Teddy!
      I don’t have any experience with flatbeds, but from my understanding the tricky part is getting the film holder to hold the film the right distance from the glass. I know some people use custom holders or spacers. Maybe worth trying before getting a new scanner?

      1. Hmm I haven’t tried adjusting that yet. I’m using the film holders that came with the scanner but maybe it could misaligned somehow. I’ll play around with it and see what I can find!

    2. I have a v700 as well. I started using vuescan instead of the epson software that the scanner came with and it has made a worlds difference. In vuescan i save each image as a “raw” tif file. I also have another plugin in photoshop called colorperfect. Pretty accurate with film types. It takes the negative image and converts it to whatever film you used. Try it out.

  2. Nice article, and totally agree about home scans. I am curious if you thought about the Pakon scanner. It’s not as high resolution as the plustek but speed & simplicity is it’s best attribute in my option.

    1. Thank you Shawn!

      I did think a lot about the Pakon. It looks like a great scanner. Speed and colour both look amazing. It’s become a lot more expensive lately though. More than twice what the Plustek goes for new. You also don’t get any warranty or support and the resolution is far lower. But it’s two nice scanners. To me it’s down to the balancing of features that I mention in the article, with the slight edge going to the Plustek for my preferences.

  3. Hi KJ, thanks for this nice writeup on the Plustek scanner. I considered it too, and I have some remarks to your post. I think 40€ for a scanned film (even including development is extremely expensive. Other labs are rather in the 12 to 19€ price range, depending on resolution and 35mm film type. My lab is in this price range and delivers files with a size of about 10 to 12 Megabytes (jpeg files) and pixel counts of 19,5 Megapixels (3600 x 5440 pixels).

    You write :”The pixel dimensions of the Frontier scan is around 8MP, the 3600dpi Plustek scan is around 20MP and the 7200dpi one is over 60MP”, and I think you don’t mean Megapixels but rather Megabytes!

    The Plustek files look very much OK, though they lack contrast in my opinion – easily remedied in Photoshop though.

    As for scanning full rolls, that was a point that speaks against the Plustek in my eyes, but honestly, if it’s possible to scan and process a roll in 2 hours I’d be happy with it. Quality looks good – similar to your lab scans, and those last weeks I have been pondering a return to home scanning. I considered the Plustek, the Reflecta RPS 10T and 10M that has automated scanning of a whole roll but is about 650€…. not in the Plustek league. And some reports say it has problems recognising the individual frames – does anyone have information on this scanner?

    Of course you are absolutely right: Home scanning (and developing) gives you full control over your pictures. Now if I would be able to learn really good home printing on a not too expensive printer…..

      1. Ah yes, forgot scanning software…. I don’t like (hate) Silverfast with a passion. It never gave me good results, is too complex, too convoluted…. not for me. I used Vuescan – once you get the hang of it it really delivers anything you want out of it.

    1. Thanks Frank! I’ve been enjoying your recent articles too!
      – I agree that €40 per roll is very expensive. I probably wouldn’t have bothered scanning at home if I’d been paying €10-15. But all the local alternatives have pretty similar prices for scanning. I did look into options abroad as well (eg AG, Mein Film Lab, Camencita etc). They offer cheaper prices but when factoring in shipping to and from Sweden the prices were still too high for my taste.
      – I do actually mean megapixels when referring to the image sizes. The 7200dpi scan is for instance over 10000 pixels wide. It’s over 200MB in 8bit. I personally feel that pixel dimensions easier to relate to than megabytes.
      – I agree that the Plustek crops above are low contrast, but as I mention that actually means that they are a better starting point for processing. With the lab scans there’s not much room for adjustment, but with the Plustek ones I can work quite freely.
      – I average at two hours for scanning full rolls (37-39 exposures) in B&W. A single frame takes around a minute in 3600dpi on my computer.
      – I also looked in to the Reflecta scanner you mention, but came to the conclusion that if the batch scanning didn’t always work I’d rather get something cheaper and do the frame advance manually.
      – While I sometimes miss the convinience of getting lab scans, all the advantages of home scanning outweigh that for me. I understand if you’re considering returning to it.
      – Regards /KJ

      1. OK, my error with the megapixels – but that are impressive file sizes…

        That’s my opinion for the automatic Reflecta too, but they have a manual model, the 10T that works like the Plustek but apparently has a better resolution already at 5000dpi. Hard to say which one is better but the Plustek is definitely cheaper. And as I would primarily scan B&W the IR dust removal of the Plustek 8200 would not get me any advantage. The 8100 without dust removal is only 228€ on Amazon.de

        Will have to think about all this a bit. Last Month I had 5 films developed and scanned for about 95€ including shipping. That’s almost half the price of the scanner….. ouch

        1. Ouch indeed 😉
          I agree that the IR version probably isn’t worth it. After a few air blasts I rarely get more than a few spots per image. They are corrected within seconds in Lightroom. Faster than the extra pass scanning in IR.

  4. I have both the Plustek and an Epson Perfection model. I use the Epson regularly because you can scan 18 frames at a time. Cuts down on the manual labor. However, the cool thing about the Plustek is that is its portability. I took it with me over Christmas while visiting family, and was able to develop and scan while away from home.

    1. That’s a good point Steve! We don’t have too much space in our apartment. So when I’m done scanning I pack the Plustek in the included bag and put it in a cupboard. It only comes out again the next time I need it.

  5. Thanks for a great article. My only problem is that I shoot a lot of medium format film, and I have yet to find a cost-effective medium format scanner. The price is frankly ludicrous – over £1500.

    1. Thanks Amro!
      I do shoot MF occasionally too and initially I wanted to get something that could handle both formats. That quickly got ruled out due to cost though. If I was shooting MF more often I would probably get a flatbed to scan it with. From what I’ve seen the quality they manage would probably cover about 90% of my needs. The last 10% I could then get drum scanned professionally. But for now I’m mostly focusing on 35mm, so another scanner won’t happen for some time.

  6. An interesting review. But there one aspect that potential buyers of a Plustek should be aware of: the actual scan resolution claimed of 7200dpi is not achievable. In reality, one would be lucky to get even half of this, and in one German review, where I gleaned this info, the max dpi with this setting was only around 3250dpi. Here is the full review:

    http://www.filmscanner.info/en/PlustekOpticFilm8200i.html

    For scanning 35mm film, dedicated film scanners are a must. Flatbed scanners are notoriously poor doing 35mm, but can do remarkably well with 120 and 5×4. At least this is the case with my ageing Canon 9900F, and which I keep for accessing my 6×6 and 5″x4″ negs, now that I don’t do my own enlarging. The quality of these scans is absolutely amazing.

    For my 35mm scans I use an old, but far from obsolete, Minolta Dimage Scan Elite II. This scans at a mere 2820dpi, but defies modern thinking in producing sharp scans from colour and black and white. And it comes with its own extensive scan software to get the best out of each scan. The downside to the Elite Scan is it is XP only, so I keep a little Toshiba Satellit Pro 12″ just for this purpose and then copy the scans over to my main pc for working on.

    I understand that the Kodak Pakon is an excellent scanner, but is now prohibitively expensive. There is one on ebay.uk at the moment at £699!

    1. Terry, on filmscanner.info the Reflecta 10T scanner, which is nominally 10000 dpi but does only reach 5000 seems a good alternative. It is said to achieve 4200 dpi even at the 5000dpi setting. Compared to 3250 for the Plustek when scanning at 7200 and producing much larger files. But who knows – I liked the >Plustek I had – seemed solid and reliable!

      I think if I start scanning again it will be a Plustek

      1. Frank, that Reflecta looks very interesting indeed. At a UK price, the least expensive I’ve found on-line from an established photo shop is just £409, so a comparative bargain and definitely worth it over the Plustek, IMO. But I would have to consider how much more I would get from it over and above my Minolta to justify the expense. But the good news is if my Minolta should die on me, it’s getting on for 13 years old now, this would be the model for me, and it runs natively on W7 64 bit.

        Just a thought “…but does only reach 5000 seems a good alternative.” I’d say bloomin marvellous! :D)

        1. Terry, 35mm film does not need more than 5000 dpi resolution…. mostly.

          For 400 ISO Tri-X or HP5 2900 dpi seems to be overkill and hardly any 100 ISO film resolves at 5000, if the scanner really delivers that much.

          Just my opinion, I might be wrong

          1. I tend to agree. It is not easy to find any reliable information regarding the scanning dpi needed to extract the most from film, as the grain structure is probably the limiting factor and once the scanner res can reproduce the grain, nothing is to be gained by using a higher resolution scan. But at what point does this occur?

            I have seen comparison scans at 4000dpi and 2820 and indeed the higher res was apparent, but not by much. But this was using a Nikon scanner with a high quality 6 element lens. And filmscanner.info seems to imply that 4000dpi is the highest practical number.

      2. With both my PlusTek and Epson, I scan at 3200dpi. I think 7200dpi is theoretical. In reality, both scanners can only do up to about half that with noticeable results. In any case, for 35mm film, I have little use for any greater resolution.

    2. Some very good points in this thread! The filmscanners site is quite a good source of information, if slightly academic at times. I enjoy hearing people’s experiences a lot. My gut feel is also similar to Frank’s and Steve’s in that there’s probably not much point in scanning at higher resolution than around 3000-4000dpi unless you’re using slow, fine grained film.

  7. Well, I wet print my photos after choosing from a contact sheet, the traditional way. I have thought about getting a scanner, but after thinking that would just mean more computer work and less photography.
    I have yet to get one.

    1. Agreed, you can’t beat the original darkroom print. But in my own case, for example, I did my own B/W d&p from about 1961 right up to the time I adopted digital in 2002. And since then I have no means to produce any more prints from the thousands of my negs, ranging from 35mm up to 5×4. And in all honesty, would I really want to, just to print a few selected negs? At my age now, working with a pc is far easier, and I have to say, it is rather fun scanning negs and slides that I haven’t viewed or printed in years.

  8. Nice article and the scans look fine but there is no way the Plustek or any other desktop consumer scanner can scan better than the Frontier. I own one myself and the difference between what you get at the local lab and what it is actually capable of when you use it yourself are very different.

    My Fuji is capable of very sharp scans up to 5300px wide with great dynamic range. The Frontiers sold for $25-30k or higher so they’re on whole different level. Like the author I preferred more control and also scanning is very expensive in Australia as there are few options left.

    I see these issue with the Frontier everywhere online and it’s a shame as it really is only because the lab decides what quality to output – the Frontier can pump out 36 frames blindingly fast (frame a second or faster) or you can set it to go much slower and more carefully with of course far better results.

    On fast and automatic you get that classic blurry Fuji scan with jpeg artefacts removing most of the detail up close or it can bring out plenty of detail – the thing that changes is the scan settings. Most soccer mums won’t see the difference and on a 6×4 print everything looks fine.

    I owned a Pakon back when they were going for US$200 and they scanned pretty well, fast but the colour was a bit off. IMHO nothing at all beats the Fuji in terms of scan quality, colour quality out of the scanner and overall workflow. They are going very cheaply these days with labs closing down across the world – I got mine for the price of a brand new Plustek 🙂

      1. Nice one Hamish. Would be really interested to see how you go with getting up and running and seeing what sort of interface their software provides for scanning. Like the Fuji – it’s almost impossible to see how these scanners actually work online anywhere. If you need any help setting up a VM let me know as I’ve been through the pain several times with these old scanners 🙂

        1. Cheers buddy, I think I’m actually going to build a dedicated windows machine for the job… makes me feel a little sick typing that … But … I shall definitely be in touch if I do a sick on it and need to revert to the VM option 😉

    1. Thanks Rollbahn!

      I’m sure most Frontier models is capable of great scans, but as a lab client that performance is only hypothetical – you’re left with whatever they supply.

      What you suggest sounds awesome though. Would love to find out more! Is it really possible to get one at a reasonable price? Do all the models have comparable performance? How big is it? Do they need additional, dedicated hardware? Any good resources to read up on? Do you have any samples up?

      Really looking forward to your experiences with the Noritsu too Hamish.

  9. In the close up crop of the woman holding the baby, you can see all the color noise in the Plustek scan. This is from Silverfast. I have the Pacific Image Primefilm XA ( branded as reflecta in Europe) and I was getting the same noise with Silverfast 8SE and the XA. I’m using the bundled Cyberview software and I’m getting superior results, over Silverfast 8 SE & Vuescan. I’m scanning slides only and mostly Kodachrome from the 1960’s. I had a Plustek 7600i with Silverfast 6.6 SE plus about 4 years ago and I didn’t get the color noise problem, so visible in the blacks of that crop. If Anyone is thinking of getting the XA, I’m getting the best results with only Auto Color & Multipass Exposure enabled in cyberview.

  10. Hi KJ,

    I can’t help but notice how you have good color in the scans you posted. I too use a Plustek (7600i, though), but I’ve always had difficulty getting good color on the scans. I use Vuescan, but I don’t have ColorPerfect. It would be awesome if you could share your workflow and input to Vuescan. Things like locking film base color, what settings in the “Color” tab, etc. I’m embarrassed, but I’m kinda getting a bit desperate running the color accuracy race.

    Admittedly, I’ve head so much good things about the Pakon and it’s legendary abilities (speed-wise and color-wise) so I’m considering replacing it with that if I still have no results. Thoughts?

    1. Hi Nathann,

      I think KJ uses Silverfast, not Vuescan. I personnaly don’t like it and used Vuescan bevore sourcing out my scanning.

      I scanned color film as RAW file (negative) without any adjustments. Loaded them into Photoshop ant treated them to Colorperfect to get accurate colors.

      Then a bit of contrast, clarity etc and I’m done.

      1. Hey Frank and KJ,

        Thanks so much for the replies. However, I don’t actually have ColorPerfect nor can I afford a copy of Photoshop in the first place. This unit I have now is a second hand one, so I also don’t have the copy of Silverfast. Would you have any other suggestions? Locking film base color and exposure on Vuescan help sometimes, but I get inconsistent results. Greetings from the Philippines, btw! (Yes, this site does reach quite far. Heh.)

        1. Post processing can definitely be done on a budget. If you’re on a Mac Pixelmator is an excellent and affordable option. It does everything I need from Photoshop for my home use.

          Gimp is also an option – free and available for Mac, Windows & Linux. I’ve not used it much myself but it seems to do all the important things for colour adjustments.

          As an aside I’m not convinced that it’s possible or even a good idea to always get “finished” looking images straight from the scanner. It’s probably better to scan pretty flat and neutral and do colour and tonality adjustments in a dedicated tool.

          / Greetings from Sweden 😉

          1. KJ is right, there is less expensive software out there as Photoshop – you might even try an older version of Photoshop Express you can sometimes get for very little money. Or Pixelmator seems fine – Affinity Photo is another option for 49€.
            ColorPerfect is unfortunately quite expensive for a plugin – about 67$ – but it’s simply the most powerful tool to accurately convert color negatives. Now does it work with Affinity, Pixelmator or Gimp??? No Idea.
            And as KJ said, always scan flat – no adjustments in the scanner software if possible. This gives you the best starting point for getting the most out of your scans.
            / Greetings from Luxembourg 😉

    2. Thanks a lot Nathann!

      Frank’s right – I use Silverfast as that was supplied with the scanner. I’m guessing a lot of the approach is similar regardless of software though. As I’ve mostly scanned B&W so far, with only occasional single frames in colour, I’ve not settled into a final workflow yet. So far I’ve used the film specific inversion profiles in Silverfast and then made further adjustments by eye in Lightroom. I plan to do some more shooting on colour film this spring, so maybe keep an eye on my site or on Twitter? I’ll try and write an update when I’ve scanned a few colour rolls.

          1. Frank. Ha. Ha. But surely once the negative has been scanned it becomes 100% digital? Just wondering but have you tried it yet,? :D)

          2. Yep, I own it and use it. Just that my scanned negatives, being now digital and all, still maintain the goodness of film.

            I don’t have to emulate Tri-X digitally, it IS still a copy of Tri-X!

            Apart from that, NIK Collection is a formidable tool for my digital pics.

            Scanning my film I just try to retain the soul of those fine film emulsions and their look, I don’t have to create it.

  11. KJ, I owe you a deep apology!

    I said that Silverfast was simply crap…. and I guess I was wrong, at least for color negatives. I bought a scanner, a Plustek 8100 – yes, you did convince me….. 😉

    And I tried Silverfast once more…. and the results are not bad, really – much better color accuracy that Vuescan. Just right fresh out of the scanner.

    Well, it’s still a mess to use…. if you change some settings, it resets others that are normally not directly related – if you don’t pay attention you mess up your whole setup this way…

    1. Frank, agree about Silverfast. The SE version came with my Canon 9000F flatbed but it is a right pain in the butt to use. It is much easier to use Canon’s own software and post edit in my usual editing program.

  12. Thanks for the review of the new Plustek. I am using the previous model, the 7600i. If you have film negatives, I just do not see how you would not want your own scanner because this way, you can control cropping as well as minor contrast, exposure, and rotation individually for each frame. In my experience, the now-discontinued Nikon Coolscan scanners did a slightly better job with shadow zones and with scanning Kodachrome slides. But the Coolscans are not supported by Nikon any more, and to use one, you may need a dedicated Windows XP computer (that is how I used a Coolscan 4000 at the office until it failed and we surplussed it). It is odd that there is not enough of a business case for a major company like Nikon or Konica (i.e., Minolta) to make a new 35mm scanner. Possibly if the film revival continues, there may be hope. The Minoltas were excellent, too, but also a orphaned technology. To use a Minolta medium format scanner, I had to get an old WIN 7 Dell box, install SCSI cards and drivers, and install the Minolta scan software. And the Minolta software still does not work 100%, but at least it scans.

    1. I see you have had fun getting your old Minolta medium format scanner to work. Now, I am not sure if the link below will work, but I’ve always wondered if there was any way round getting my scanner to work on an unsupported OS. With Minolta models its XP or nothing, unless one buys Vuescan. And it was this latter that set me thinking. If Hamrick can somehow produce a driver that works on W7, what is technically stopping an OS accepting an old driver?

      Now whilst I consider myself a proficient computer user I am by no means an IT technician. My trawling of the internet located this site, and I thought I’d give it a go. And it worked for my Elite Scan II as well on W7. Success was followed by dismay when a couple of weeks later my W7 laptop suffered a terminal failure and buying new, I am left with W10.

      I’ve also wondered why so little attention has been given to scanning by the likes of Nikon and Konica/Minolta and who have had a reputation in the past. Perhaps you may be right that if the somewhat unexpected take up of film could create a demand we might see some interesting developments. But, there already exists a library of millions of negatives and slides such that we who post here obviously feel a need to produce quality scans of. The problem is that Nikon, for example, is heavily into digital imaging capture and whilst the uptake in film is encouraging a company like Ferrania to re-enter the market, would Nikon see any point in producing a product what could make inroads to its camera devision and which is heavily reliant at present on its dslrs? Who knows.

      http://wiki.vitorfonseca.com/(S(21yjpc45a3x5weau3ykppm55))/Default.aspx?Page=Installing-Minolta-DiMAGE-Scan-Elite-5400-under-Windows-7&NS=&NoRedirect=1&AspxAutoDetectCookieSupport=1#C_Installation_1

      1. Continuing on the theme of discontinued film scanners, at least in USA, the Nikon Coolscans sell for a serious price on eBay. The Minoltas are cheaper, so maybe this is the time to buy one or two and acknowledge that they will only have a finite life. When some component fails, that is the end. For someone in a house with a bit of spare room, and old WIN 7 or XP computer to drive these scanners is not too much of a problem, but in an apartment, it is just that much more junk cluttering your valuable space. I was lucky because my former employer had junk rooms full of cables, SCSI cards, and various old cards, connectors, and peripherals. And they had genuine copies of XP and 7. Someone in a non-technical field would have more trouble. This problem of running a scanner that is only 15 years old demonstrates the dilemma of digital data. Ultimately, reading or retrieving all our digital data will depend on (a) hardware, (b) operating system, (c) the device that reads that media, and (d) the survival of that digital storage thing (CD, floppy, Bernoulli disk, etc.). I thought about this when I scanned some of my father’s 1942 negatives from New York City. They were scratched, but the data was still there 7 decades later:
        http://worldofdecay.blogspot.com/2016/04/from-archives-new-york-city-in-1942.html
        Anyway, this has been an interesting discussion. Cheers.

  13. My Plustek 8200i SE was broken recently, and it will cost 180 € + tax + shipping to fix it. In the same time I am at the crossroad to go digital or analog, yeah a spring in my Om-2 broken down too, the return spring in film advanced lever. Still got my Om-4 with not so reliable electronic.
    I do like the workflow of analog/hybrid system, handle the film in a mechanical camera, develop it, scan it, and work with the files. But I probably must invest in a new camera and a Leica M-A with some lens would fit my needs for the next 30-40 years (as long as film exist). Yes my Olympus cameras are 33 years old now so I am in a dilemma. Put some money in the analog system or sell my soul to the digital-devil.

    Best K

    1. And a nice CLA’d M2 or 3? Plenty of use left in them, as long as film exists, as you say.

      As for the scanner, a new Plustek 8100 on Amazon goes for 200€ (got mine from Amazon Italy, much cheaper than Amazon Germany!).

      Just stay with film, pleeeeez ?

  14. I fully agree with you since I had the very same experience with a pro lab. I dropped off a few rolls at a pro lab for developing and scanning. The returned scans were not usable. Poor dynamic range, lot of dust, shadows details were pitch black and not to recover etc. Spending money on that was a waste. Luckily I got refunded after complaining without a lot of do.

    With the money in my pocket I started to hunt down an used dedicated film scanner. At some point I saw a Minolta Dual Scan III. Searched the internet up and down for reviews. Tested it and perfect. 80€. It is good enough for black and white scans. It has autofocus. Works well with Vuescan.

    The resolution might be low with around 11MP but when comparing and looking at 100x66cm enlargements I can get off my Fujifilm S5Pro I am more than pleased. The scanner should play within the same league. The good thing is that photoshop is become better and better over the years.

      1. Terry,

        The review you mentioned I came across at some point but I was reading a Dutch and German one too. Just to be sure.
        I think there was an interpretation error. I was writing 11MP meaning 11 mega pixel and not mega byte. A 16bit black and white Tiff-file @ 2820 dpi has around 19 mega byte which is plenty. Scanning a 35mm negative at full res (2820 dpi) delivers around 11 mega pixel. A 16bit colour Tiff-file is around 54 mega byte as far as I can remember.

        The Minolta DS3 does a decent job on black and white. My clients don’t notice or never asked where I do the scans.

  15. I’m late to the party but i sure hope you are still monitoring this. there is one thing that is missing from this article is the output type. silverfast has 16b->8b (lossy), 16bit RAW files and 32bit RAW files for bw, and for color 48->24, 48b RAW 64b RAW.
    I assume you are using 16->8 and 48->24 for bw and color, respectively, because the file sizes you mention are not RAW file sizes by any means. so technically you are only comparing lossy data to lossy data, instead of comparing full res, full bit depth.

    You cant base your conclusions like that if you did not scan in 7200 & RAW.
    This is important!

  16. Hi,

    Thanks for this very interesting article. I’m still trying to figure out what method should provide the best scan quality: dedicated scanner vs DSLR with macro lens. Have you guys already compared the 2 methods?

    Thanks,
    Pierre.

    1. Pierre,

      Not something I’ve tried, but if you simply google “copying slides with a macro lens” you will find many leads to those that have. And it would seem that, done correctly, high res dslr’ are more than capable and up to the job, What is more, you get the advantage of speed of throughput, which scanners can’t match.

      However, I noticed that in the selection I looked at, they were using conventional flat bed scanners that have film adapters. In my own experience, a flatbed with film capability, is not up to a dedicated film scanner with 35mm.

      For example, 35mm using my Canon 9000F, first model, is incapable of producing truly sharp images although it fares much better with medium and large format. The 35mm scans are slightly soft.

      What is important is what you propose doing with the scan. Are you scanning your negs/slides for posterity and will not print, say, larger than 7×5 inches, or will you need to print larger and at higher quality? If your aims are modest, I wonder if you have tried using one of the many slide copiers that you can now pick up cheaply on ebay? I bought one of these decades ago to copy slides to colour neg film which I then got cheaply processed at the local mini-lab. I thought about using it again to do direct digital copies when I first got my FF Sony A7. Given just how basic these items are, they are not renowned for top quality optics, I was quite surprised at the results. Far better than I was expecting.

      These items simply attach to your camera mount via a T-adapter in place of the lens. They have quite small apertures and critical focusing takes getting used to but they do allow for fast throughput and you don’t have any of the alignment issues using a separate camera, lens, slide holder, light source will give you if you wish to experiment with a dslr. For my light source I use an inexpensive 5×4 battery powered light box.

      One advantage of using one of these cheap copiers or a dslr set up is being able to copy Kodachrome which is notoriously problematic for many scanners.

    2. Hi Pierre,
      Hope you will still able to read this – I have part-engineered a DIY 35mm film copier using a Rodenstock APO-D 75mm f4 lens. Many of the results results can be viewed on my flickr pages. Some colour shots too at the end of the library of online files.
      https://www.flickr.com/photos/jamese007uk/

      Regards
      Eric.

  17. Great article. I’ve the entry level Plustek 8100 and find it far more liberating than relying on a process lab to scan, which is prohibitive in both time and cash (in the long run). I love the results. However, my biggest gripe with the scanner is the feeder. It’s not unknown to have to give it a bit of a wiggle after a prescan, to correct the sharpness. So, if it doesn’t nail the sharpness in the first, it’s a wiggle, then another prescan until it’s correct (or until I finally realise my focusing is off!)

    Another suspicion because of this is, how much does curvature to a film affect overall sharpness, If the feeder is being less than reliable usually. Some film, as we all know, just wants to curl up and hibernate when given the chance, whilst others are happy laying flat. I wonder if there’s any curvature issue on the vertical plane as well.

    Other than that ‘manageable’ issue, I couldn’t do with my Plustek. And yes, Silverfast is a dog to use. But I don’t like Vuescan either.

    1. Never had the sharpness issue with the 8100. Have to wiggle the feeder sometimes to get the frame right, but sharpness is OK.

      Though I sold it to get a Reflecta 10M with automatic feeder. I scan a lot and still regret my Nikon LS4’s automatic film strip feeder so I thought why not give a new scanner a try. Resolution is said to be great too but the 10000 dpi are pure marketing. Above 5000 there’s no improvement.

      I’ll see if that automatic feeder really works….

      1. Frank, you have to leave a review or some sort of how you use it. There is not a lot of reading about Reflecta 10M.
        Batch scan is very interesting for me, my plustek is slow to handle, like watching paint dry, well you know.

        1. Sure, I’ll write something up when I get it and used it for some time. Will be here any day and there’s some rolls waiting!

          Good it’s bought on Amazon so no trouble returning it when it does not deliver. In that case, well shucks, already sold the Plustek to fund the Reflecta…. so that might be a bad move.

  18. Frank, take a good look at the bundled software cyberview. After extensive testing with cyberview, Silverfish 8SE & Vuescan, I worked with cyberview with only Auto Color & Multipass Exposure enabled in cyberview. Vuescan had the best dust removal and cyberview the worst. In the end, cyberview gave me a good baseline to start and with minor and fast tweaking in LR , I was able to get the best results.

      1. Cyberview is the driver for the Reflecta Scanner AND it’s dedicated scanning software. Silverfast needs Cyberview to run. Vuescan on the other hand uses it’s own drivers which is, I think, quite a feat from Ed Hamrick. Creating drivers working with all the scanners around and capable of addressing all their features. Most of the time faster and better than the original software!

        Take that into account and pitch it against the 79€ / $ price point of the pro version with unlimited updates!

    1. If only Cyberview did not crash every time I try to scan a strip of negs….. Don’t know what’s the problem yet but all my software is strictly up to date and the scanner works with Silverfast which means that the Cyberview drivers are correctly installed…. got to try some more. But the Cyberview interface is no very inspiring… or inspired!

  19. We’ve nailed the scanning. Too bad there’s not an economical processing solution. Except for the all important control of our images, the cost difference from processing to scanning is not that outrageous. At least 80% of the cost is hung up in the processing.

  20. Wow, lots of reading on this thread. All good reading with many good and knowledgeable points. Pertaining to Plustek having to be fed frames manually . This is generally not an issue for me. I bought the Plustek for its price point and the Silverfast AI software. Most of the work I need it to do is to digitize my B&W negs from the archives which have contact sheets attached to the neg files. Typically I only scan the negs deemed worthy of printing. So that usually no more than 3 frames out of 36. So batch scanning is not needed as the contacts tell me straight off which frames to scan. Ive used the Nikon Coolscans in the past and for my workflow I did not find it any faster, generally speaking. Great thread and article. Cheers

  21. I love the info, that is share here. I am now encountering a problem with scanning. I wonder if any of you know a solution to that.
    I bought a Minolta Dual Scan III which generally speaking does a good job. I use this scanner for black and white film only. I only do portraits on film and I experience that parts of the (black) hair looks washed out or milky. The film I mainly use is Ilford Delta 100 or Delta 400. The film is correctly exposed and developed. It is not on all images. Any Ideas? I know I should upload the image.

  22. Excellent write up, I have this scanner and had a few questions about your workflow, you said you scan everything at 3600dpi and output as an 8-bit tiff do you do this in work flow pilot or in custom boxes for negative or the output colour format? I only seem to get a small dimensions 3.37cm side x 2.24cm hight with the preset “photo quality 1 300ppi”

    Many thanks

  23. Pingback: Scanner review: OpticFilm 8200i SE 35mm film scanner - by Olli Thomson | EMULSIVE

  24. The Plustek scans shown in this post reveal all you need to know – Frontier beats it every time. For colour there is just no contest but even for black and white the Frontier is easily superior. But then again it should for the cost.

    I think its great that Plustek offer dedicated film scanners, and who knows, hopefully one day fuji and kodak will again see the merit in making professional quality film scanners.

  25. Pingback: Scanner review: OpticFilm 8200i SE 35mm film scanner - by Olli Thomson | EMULSIVE

  26. Bit late to the party but I bought one of these as I had hundreds of old negs from the 80s (B&W) to scan. I worked out the cost of getting someone else to do it was in excess of buying the machine. It’s done a great job, negs I’d tried to print the old way but never managed came out great. I stick with about 3600 dpi as, at the resolution, old HP5 and FP4 have grains which occupy several pixels. My only criticism of the machine is actually the software which is less than user friendly. Getting the right compensation for the neg substrate I find awkward too. I estimate I’ve scanned well over 100 complete negs with it now. Have a project under way which will require me to do a similar amount (if all goes well)

  27. Pingback: Digitising Negatives and Slides - A Primer - By Bob Janes - 35mmc

  28. I just read your rolling long term review and I wonder why you choose not to use the IR scratch dust removal tool? I just ordered the same unit you are using.

Leave a Comment

Your email address will not be published. Required fields are marked *

This site uses Akismet to reduce spam. Learn how your comment data is processed.

Scroll to Top