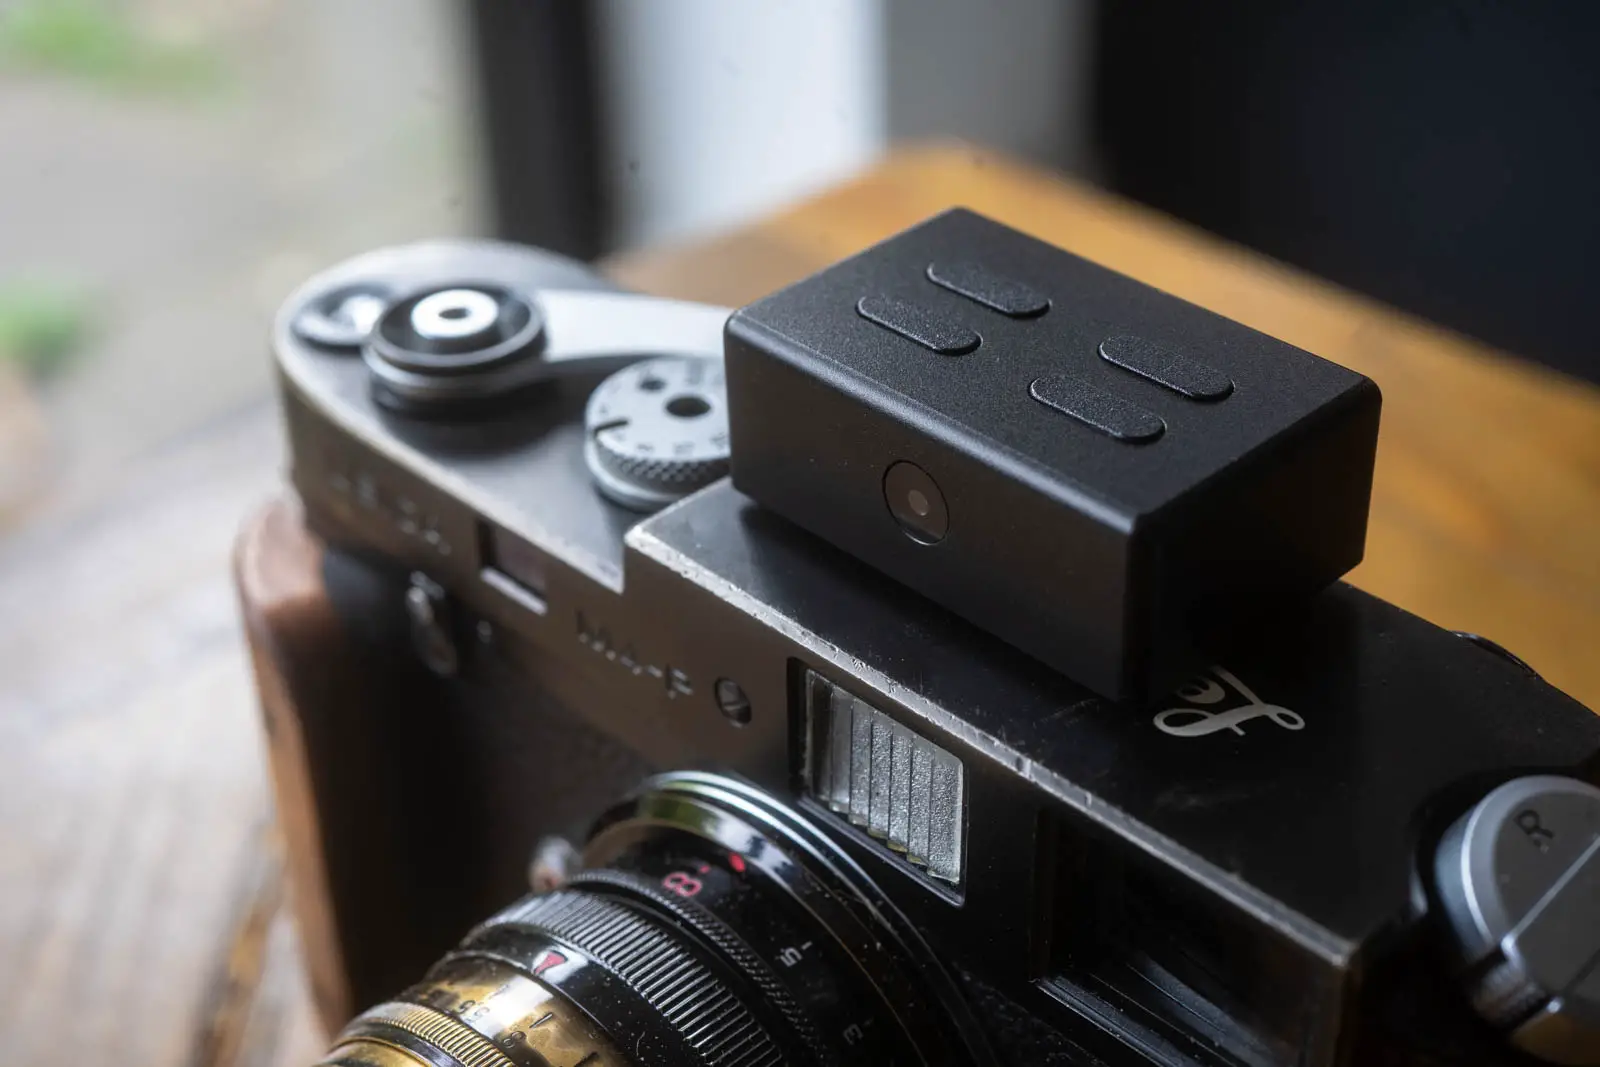
Keks have recently released a new light meter, the Keks KM02. This new meter has whole load of new features compared to the previous Keks EM01 (reviewed here). It’s also smaller and lighter than the previous model, has a fractionally longer battery life and is supposedly more accurate than the EM01 (which seemed pretty spot on to me). All in all, on paper it sounds like it could be a winner. I was certainly very interested in reviewing it!
With the exception of the TTArtisan meter (which has still also been reviewed for 35mmc here), I’ve actually reviewed most of these shoe mount meters now – I have also published a round-up comparison pst here. They all have their pros and cons, but the original Keks EM01 was one that stuck out as being quite appealing to me. As I said in my review, I really felt I had to nitpick to find fault, and really the only nitpicking I could do was around the fact that I found it to be a little large compared to some of the other shoe mount meters out there. I also suggested that some people might dislike the built in battery, but that actually I quite liked not having to worry about buying button cells. Finally, when compared to the Hedeco meter, I commented that it was slightly slow to use. Other than those comments though, I was really impressed. Overall, perhaps even more impressed than I had been with the other OLED light meters… at the time at least.
Since then, I have also reviewed the Doomo Meter S – a meter that a reviewed as being essentially nothing particularly unique, but despite that being really quite compelling. In actual fact, I would say I possibly liked the Doomo Meter S slightly more than the original Keks meter. It is smaller, also had a built in battery, was quicker to use and didn’t have any features that felt superfluous to me.
Unlike the Doomo Meter S which relies on simplicity of function, features and design, and doesn’t really have a USP (unique selling point), the new Keks KM02 has a stack of features that I’ve not seen on other meters. In short, it seems that Keks felt that their original EM02 didn’t stand out from the crowd anymore, so to attempt to make it do so – taking the opposite approach to Doomo – they have squeezed a bunch of unique features into it in the hope that this will attract buyers who’re looking for a more feature packed meter. Of course, as someone who has already expressed a preference for simplicity, you might wonder if this meter could, on that basis, appeal to me. Well, I shall save my opinion for the end… for now, let me tell you about the features this new little meter has up its sleeve.
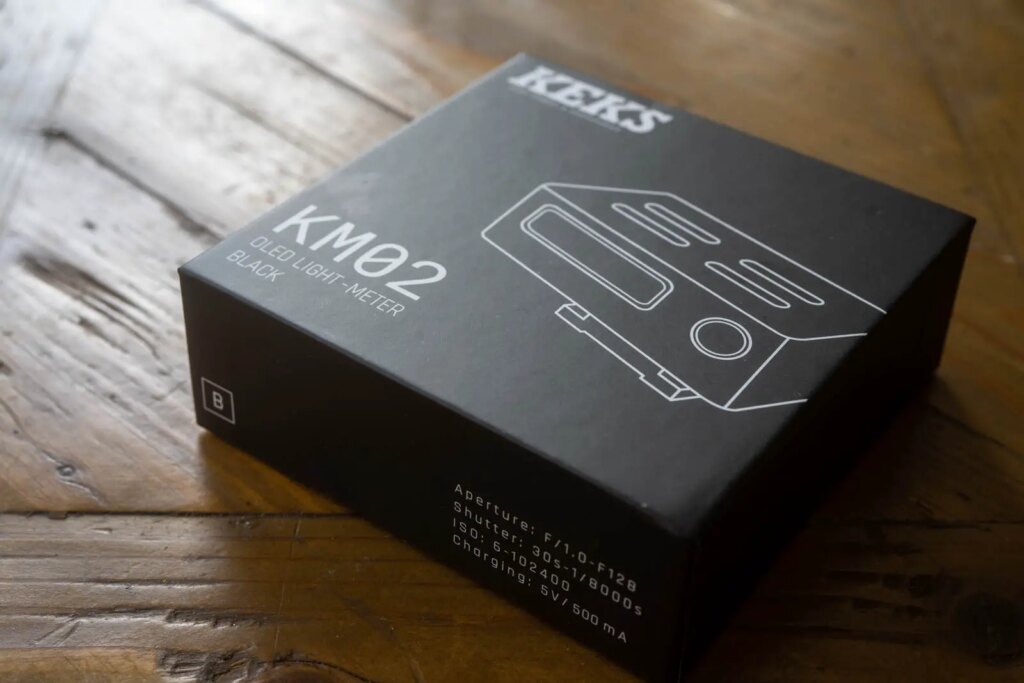
Keks KM02 Specs and Basic Features
To kick off, I shall run through the specs and the basic modes. This is all the stuff that is most comparable to the rest of the shoe mount meters on the market.
The Keks KM02 has a 30 degree metering angle which is pretty standard for these meters. Readings can either be taken with a single metering mode by clicking the button on the back of the meter once, or in a continuous mode. To enter the continuous mode, the button on the back needs to be clicked and held for a couple of seconds. The meter will then continuously update its reading until the button is clicked again. In fact, once continuous mode is activated, the light meter seemingly stays switched on indefinitely (at least until the battery drains), ignoring the time set in the ‘Auto power off’ setting in the menu (I’ll come back to that in a mo). For my money, I slightly prefer the more simple press and hold for continuous mode, but I suspect many others will prefer this way of functioning – certainly the fact that it doesn’t switch off until you tell it to will I’m sure find favour with some!
Like all the other OLED meters, the Keks KM02 can be operated in either a shutter or aperture priority mode. To switch between the two, press the top left button as you look at the top of the meter. The right up and down buttons change the settings. I should say, I initially found the up and down button to work the opposite way to how I expected, but I soon got used to it.
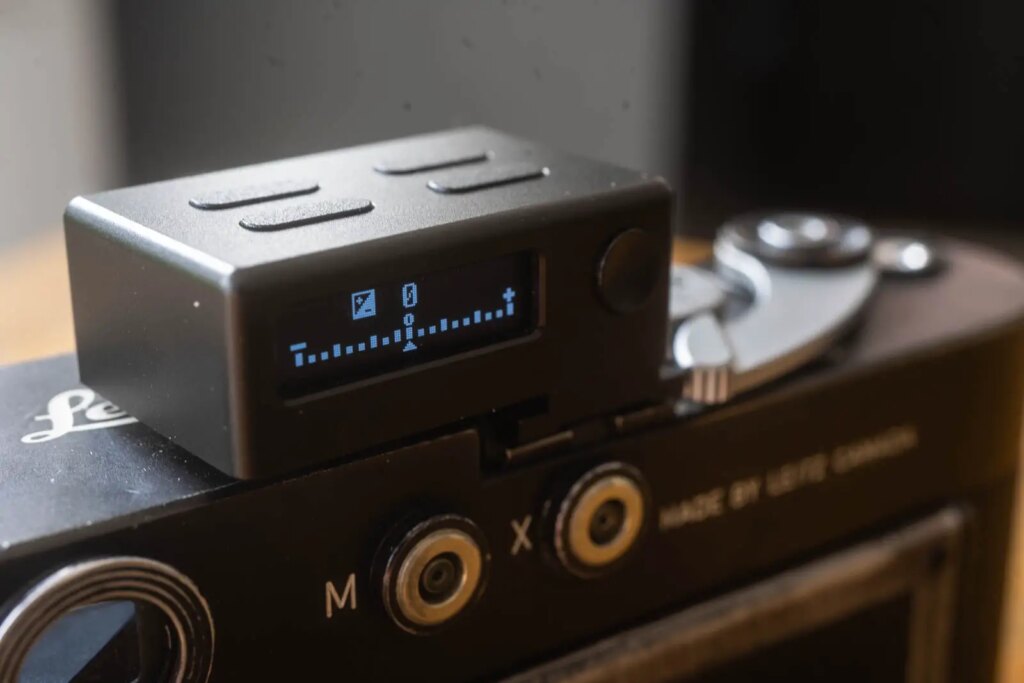
There’s also an exposure compensation mode with a -3 to +3 range in 1/3 stops. To access this, press and hold the top left button for a few seconds. I thought it quite nice that this is accessed without having to go into the menu – though, I did have to check the manual a couple of times before I remembered which of the buttons I had to press and hold.
The Keks KM02 has a nice wide 1-20 EV range. I didn’t test how accurate it was at the lower range properly, but it seemed to work ok. The aperture settings range from f/1.0 to f/128. Shutter speeds from 30s to 1/8000th and ISOs from 6 to 102400.
Additional features
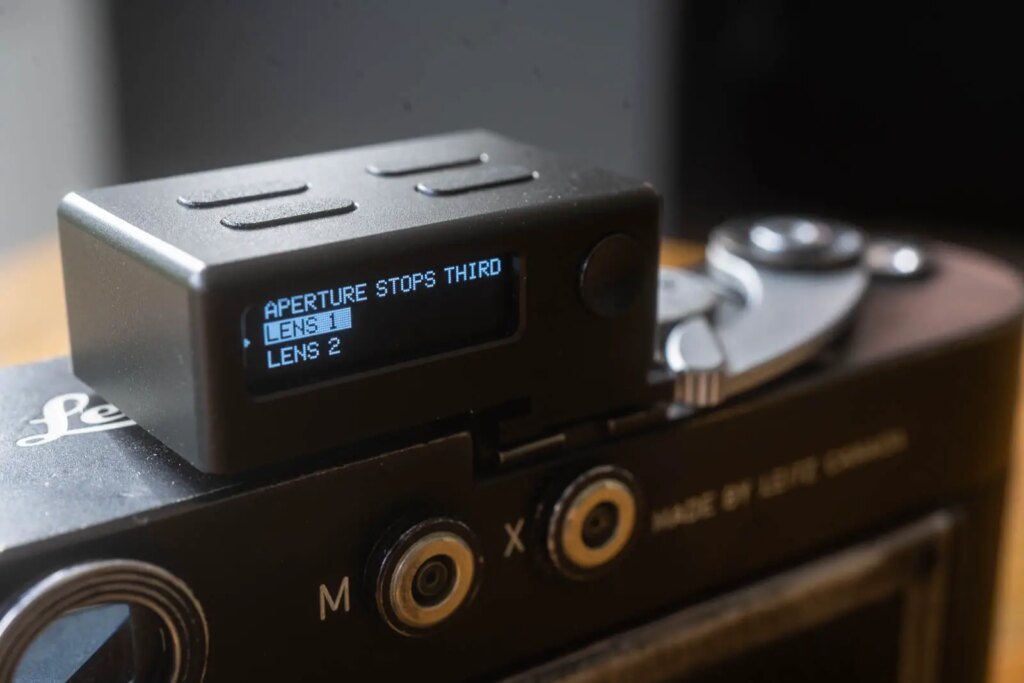
Additionally to the above, the Keks KM02 has, as I’ve said, a few tricks up its sleeve. Possibly the headline feature though is the ability to create custom sets of settings for 3 different cameras and 3 different lenses. Within these custom memory banks, lenses can be set to have either full, 1/3rd or 1/2 aperture settings. The maximum and minimum settings can also be set. So for eg for my ZM Sonnar, I set the ‘lens 1’ memory bank to have a minimum aperture of f/16 and a max of f1.5 with 1/3rd settings. For cameras, the minimum and maximum shutter speeds can be set, so for ‘camera 1’ I set the minimum shutter speed to 1 second and max to 1/1000th with whole stop settings to match my Leica M4-P.
My initial reaction to this was a little bit of disappointment that you can’t then name each bank. But on reflection, I suppose it’s more about remembering which bank has what preferences. So actually, the shutter settings I applied to my Leica M4-P are the same for my M3 and indeed the likes of my Pentax MX. And if I added 1/2000th they’d be right for my Nikon F2 too and would only add one superfluous setting when using the rest of the cameras I’ve just mentioned. The same goes for the lenses. My ‘lens 1’ settings with the minimum aperture of f/16 and 1/3rd settings is perfectly fine for all my other Zeiss ZM lenses. Ok, the fastest aperture settings don’t apply to all of them, but the rest of the settings would be correct. In short, for the way I work, I can see me setting the memory banks to a set of preferences that either match a range of cameras or lenses, or just match how I might like to shoot differently sometimes. Or at least that’s how I would use it if I could ever be bothered to set it up any more than I have with just the ‘lens 1’ and ‘camera 1’ banks… but I shall come back to that point later.
There’s more features and options too. The ISO setting can also set to work in full, 1/2 and 1/3rd stops. The brightness of the screen can be changed and the information can also be inverted so the meter can be mounted upside down. Keks state the Rollei 35 series cameras as being the most obvious that this is applicable too… though, of course, all of those have meters built in. There’s also a ‘standard mode’ and ‘detailed mode’ that allows the switching between a simplified information display that just shows the metering mode, ISO, shutter and aperture and a mode that additionally shows LUX and EV but doesn’t show the metering mode so explicitly. Me being difficult, I’d like a 3rd mode that shows the metering mode and EV, but that’s definitely nitpicking.
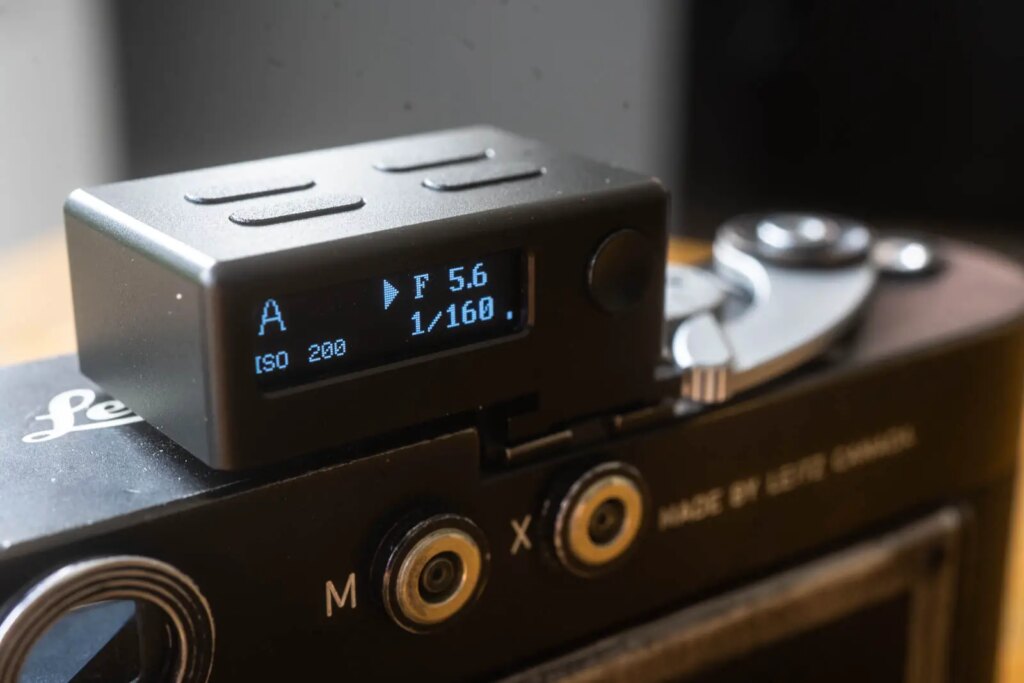
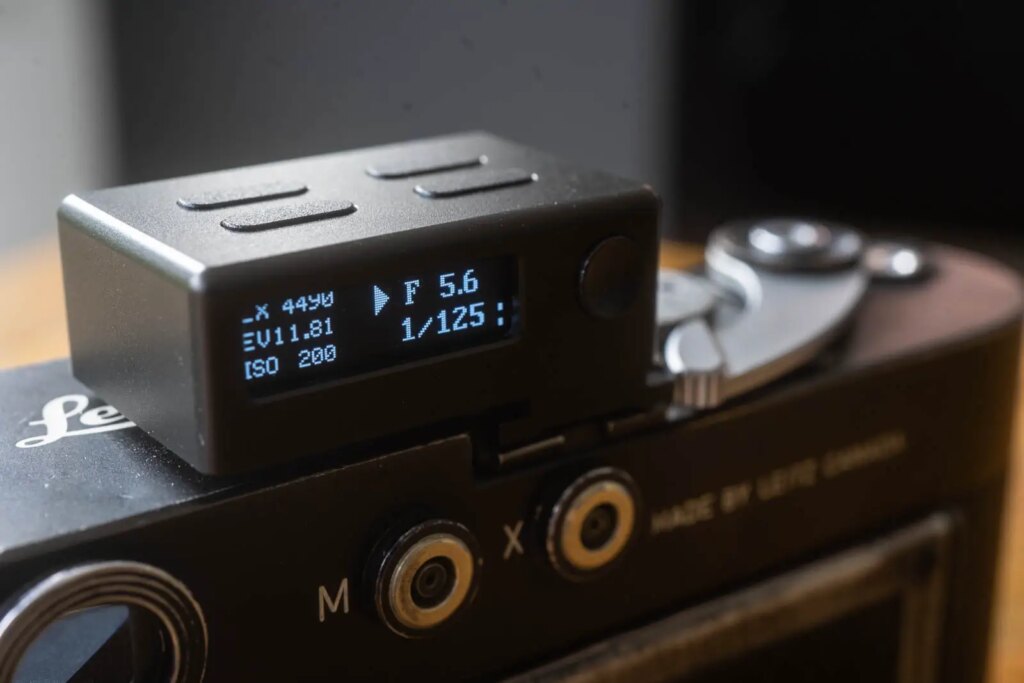
Standard vs. Detailed mode. As an aside, I took these two images a little bit apart and you can see that in the detailed image which I took first I had 2 out of 4 bars of battery and in the first image I had one out of 4 bars.
As mentioned before it also has an option for setting how long the meter takes to automatically power off. Combined with the continuous mode that seems to stay on indefinitely, this gives users much more control over how long they have to take a reading and transfer it to the camera.
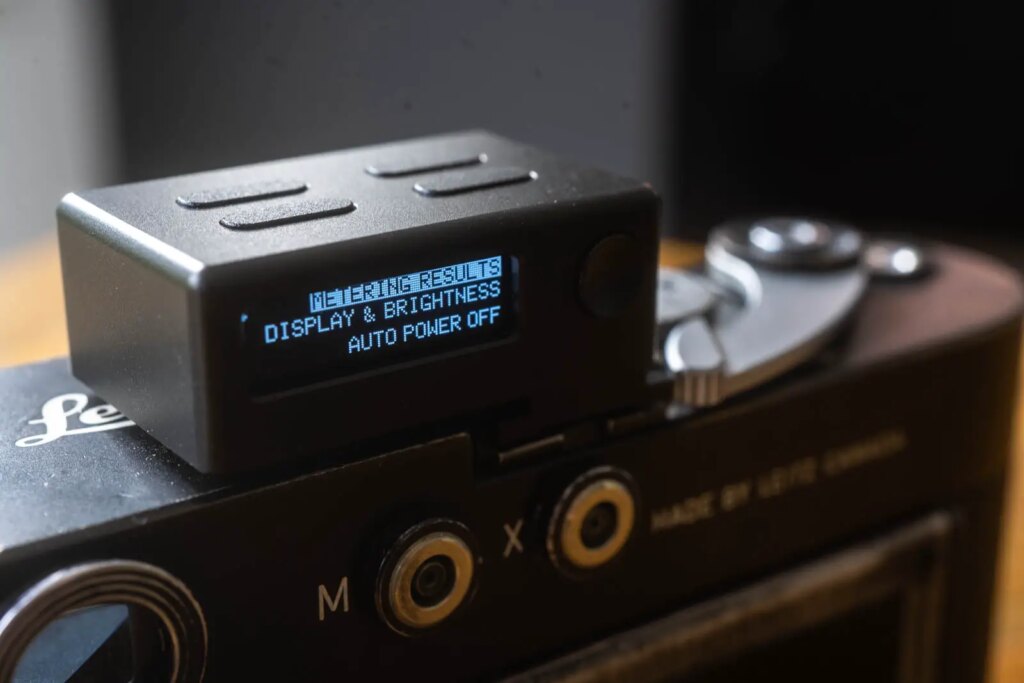
Finally, my Keks KM02 has a mode that doesn’t seem to be mentioned in the manual. ‘Metering Results’ is a similar feature to exposure compensation. It allows the setting of a bias toward over, under, or correct exposure. Setting it to overexpose or underexpose sets the meter -/+ a stop in either direction. What I found interesting about this is that on some of the other meters I have reviewed, the Reveni for eg, there is adjustment to tweak the meter if the user feels like it doesn’t meter to their taste. Some meters like the Doomo Meter D on the other hand, just feel like they don’t meter quite correctly and there’s no way of adjusting beyond setting the exposure value incorrectly. In the case of the Meter D, I found that it slightly underexposed – less than ideal for film.
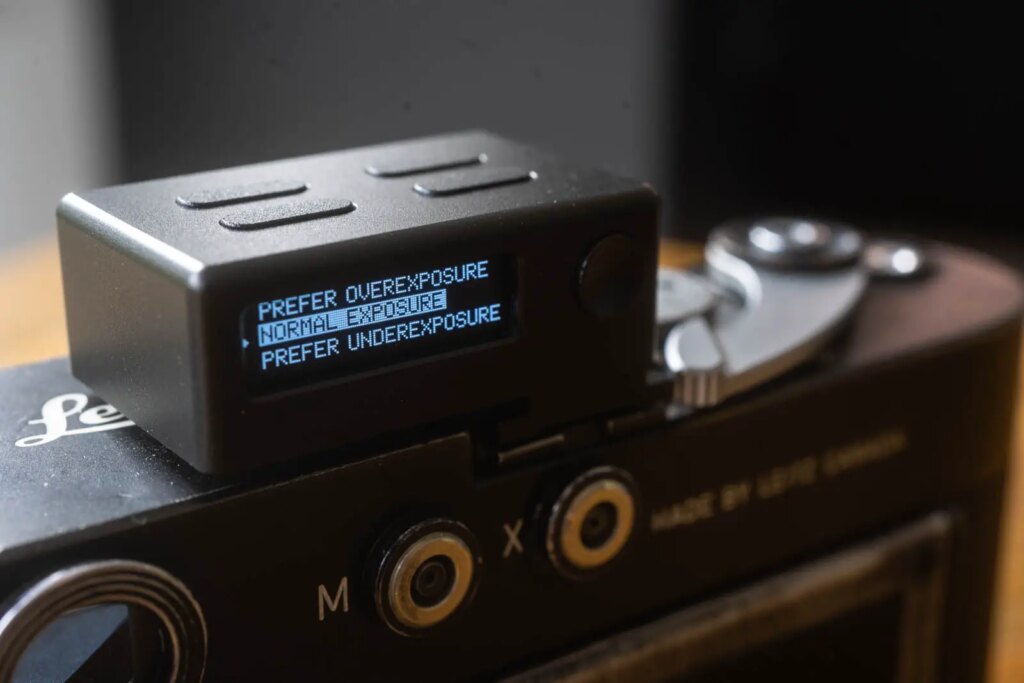
Keks don’t include an option to user adjust the settings, but by adding this ‘metering preference’ mode they do give an additional option to the exposure compensation for users that might either find the meter to not read quite to their taste, or indeed those who just like to slightly under or overexpose all the time. This, I feel, might be quite popular with todays film photographers who often rely on latitude and slight overexposure to ensure good results.
User Interface
To make way for all these new features, the user interface has had to change quite significantly from the previous EM01. Initially I felt that this was a little bit of a shame. I really liked the simplicity of the 4 top buttons and how and what they controlled on the original EM01 meter.

In fact, the new Keks KM01 meter has exactly the same button layout, though this time the buttons do different things. Despite this, for the most part at least, I found it almost immediately intuitive to use. There are a few settings and options I had to refer to the manual to remember such as which button to press and hold to access the exposure compensation and to change the ISO. Aside from that though, it’s easy enough to just click the buttons and follow your nose into the menu.
The lower left button on the top is the button for accessing the menu. The right hand buttons then move up and down through the menu, and the meter read button selects the option that’s high lighted. Once highlighted, the right up and down buttons move through the options again. It’s as easy as that really.
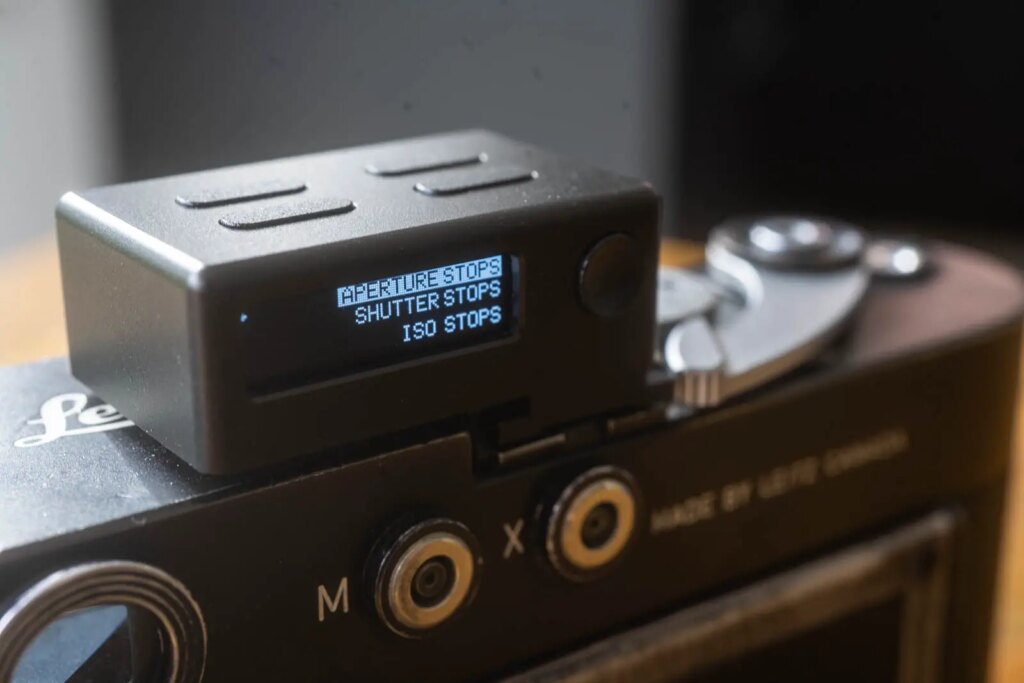
Above you can see two of the screens of menu items – there is a third, but it only has ‘about’ and ‘reset’.
Build quality and design
Similarly to the original EM01, the Keks KM02 feels like a really nice bit of kit. It’s made of metal and feels, in every respect, well made. Even the buttons have a nice click to them. I think I ever so slightly prefer a top facing reading vs. the rear facing reading that this meter provides, but that’s a very small personal preference, and is probably just born out of being used to the Voigtlander which I used for years before this new batch of meters came along.
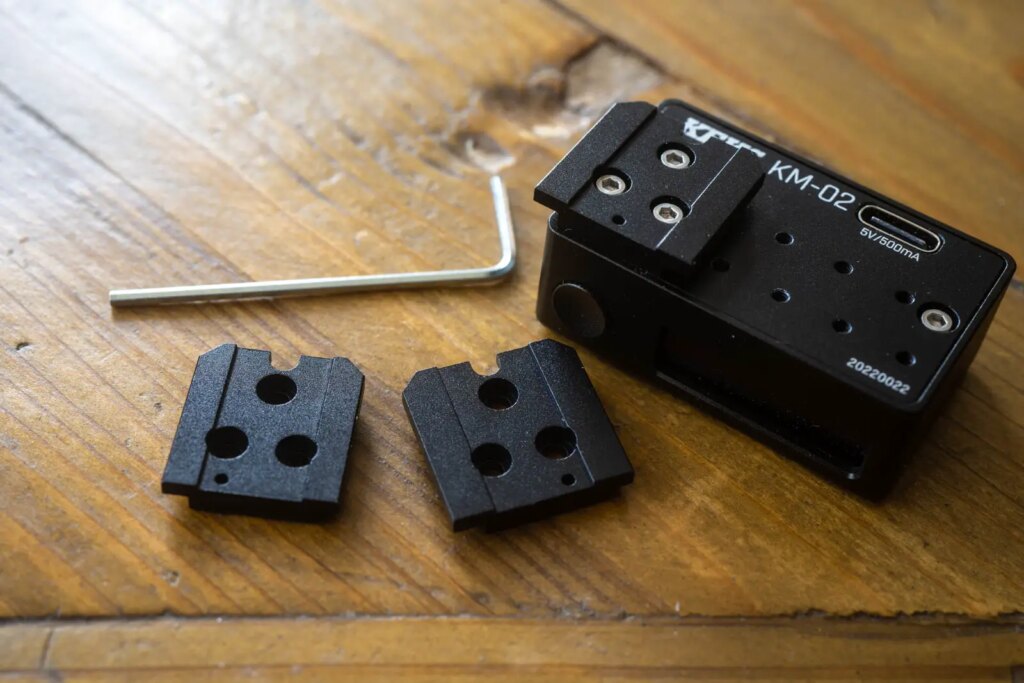
I also really like the fact that it comes with a selection of different shoe mounts in slightly different sizes to match your camera, and really appreciate the fact that there’s 5 positions for the shoe mount to be attached thus increasing compatibility with more cameras. Admittedly, nothing is as compatible as the tiny Reveni, but that as discussed in that review and my roundup, that really is the Reveni’s key USP and comes with its own compromises.
I also like the smaller size compared to the original. It’s a bit blocky in terms of its shape, but apart from that it’s certainly more low profile and looks pretty smart on the camera. Finally, as with the previous model, and indeed the Doomo S, I think it’s a good move having the USB charge point on the lower face of the meter. Must be the best place for keeping dust and water ingress to a minimum and it also keeps the design clean. Overall, the impression this meter gives is definitely one of a quality product.
Keks KM02 Accuracy
For my money, this meter reads accurately. I haven’t really got anything else to say on that subject… I’ve tested it the ways I have the rest of these meters, and I can’t find fault.
A Couple of Niggles with the Keks KM02
I had to nitpick about the EM01 and if I’m going to report anything negative at all I’m going to have to nitpick about the Keks KM02 meter too. Firstly, as I’ve already said, it did take a little bit of time to remember which button to press and hold to change the ISO and bring up the exposure compensation mode.
Like the EM01, I also find scrolling through the setting a little slow compared to some of the other meters, especially the Doomo Meter S and Hedeco which can be used very quickly. Also, once you to the extreme ends of the settings, 1/8000th of a second, for eg, you can’t just keep scrolling in the same direction to the other extreme end, you have to reverse and scroll all the way back through the settings. As I say, these are minor things and actually would be less of an issue in real life use I think – especially once set up to work with a specific camera or lens which are very unlikely to have all the settings on offer anyway.
Finally, I have to come back to a point I left hanging earlier on about the camera and lens memory banks. Having tinkered with the meter a fair bit, I find myself wondering if I would actually use these properly. I suspect the answer is no. In reality, I think I could do with just one setting for each shutter and aperture range. In fact, I manage perfectly well without these options at all. This begs the question as to whether or not I would class these additional features as superfluous. Possibly, for me, they are slightly. Of course, your mileage may vary, and actually it’s hard to argue with the fact that they are really well thought out, not to mention being quite impressive for such a small meter.
A quick note on Keks as a brand
Now, call me a sucker, but I have also been sucked in by these guys. If you read my previous EM01 review, you will know that I borrowed it off Will at TLI. Well, just after I reviewed that meter Keks got in touch with me to ask me my thoughts about what features I would like to see on future meters. I pitched a couple of thoughts at them, with the main comment being about size. When they came back to me they commented that they had some ideas including the memory banks they have ended up including in this meter. I thought at the time this sounded interesting, but I wondered then if I might find it superfluous – I said as much to them too. Their comment back was that they would take this on board and that perhaps they would introduce two new meters, one with the memory banks and one more simple yet still smaller meter. Well, when I showed them a preview of this review, they went on to tell me that they are in fact bringing a second less complicated and less costly version of this meter to maker to sit alongside the KM02. In short, not only do they listen to feedback, but they also act on it. Now I should say, that’s not me taking any credit for the ideas. If they asked me for feedback, they no doubt asked a lot of other people… and that’s what I am crediting them for here; I have a lot more time for brands that communicate with their user base, ask for feedback, and act on it.
Final thoughts
Becoming this familiar with so many of these shoe mount meters is what continues to make them interesting to me. There’s quite a lot of them on the market now, and with each new serious contender at least, it’s interesting to see what the brands bring to the table to separate them from the crowd. With this new Keks KM02, they really have made an effort to separate it from the crowd, and objectively speaking I think they’ve done a really great job.
Subjectively, I can’t help wondering if I would be happier if the Keks KM02 just allowed the setting of a single lens and single camera’s parameters. I think I would feel like the implementation of these features was a little neater and more suited to how I personally will use this meter. But, I should add to these comments that I appreciate that I’m really being super picky here.
In reality, I really do think that Keks have upped the ante here. They were one of the first to bring an OLED meter to the market, then witnessed a whole load of others bring meters to market with a wide variety of different features and subtly different sets of selling points. They then seemingly went back to the drawing board, consulted the community about what would improve their offer, and came back with a new and improved meter that manages to be nearly as intuitive to use, smaller, lighter and with a bunch of features otherwise not seen on similar meters. The result, in my opinion, is a well rounded shoe mount light meter that whilst still has some compromises, balances them with some really well thought out functionality.
In short, I’m impressed. And just as I found myself with an overall preference for the EM01 when I tried it, I now find myself with similar feelings to the the Keks KM02. Of all the OLED meters I’ve tried to date, this one is the winner for me!
You can find more about the Keks KM02 on their website here.
Share this post:


Comments
Jacob Christiansen on Keks KM02 Shoe Mount Light Meter Review
Comment posted: 12/09/2022
Comment posted: 12/09/2022
Markus Hainz on Keks KM02 Shoe Mount Light Meter Review
Comment posted: 12/09/2022
Thanks!
David on Keks KM02 Shoe Mount Light Meter Review
Comment posted: 12/09/2022
LUISZW on Keks KM02 Shoe Mount Light Meter Review
Comment posted: 12/09/2022
John Todd on Keks KM02 Shoe Mount Light Meter Review
Comment posted: 12/09/2022
Baladino on Keks KM02 Shoe Mount Light Meter Review
Comment posted: 23/09/2022
Comment posted: 23/09/2022
David on Keks KM02 Shoe Mount Light Meter Review
Comment posted: 26/09/2022
Comment posted: 26/09/2022
Rob on Keks KM02 Shoe Mount Light Meter Review
Comment posted: 27/09/2022
For the most part, I use it with one camera - a Fuji GW690ii - and so having the aperture and shutter ranges limited to those on the camera (and in steps to match the camera) has already made the device more pleasant to use.
Which dovetails with your point about the "metering results" menu option. I haven't done a detailed side-by-side with the EM01 but it *feels like* that option defines which way the meter will "round" the exposure if you haven't left it the full range of 1/3 stop increments. It removes the (granted, small) cognitive lift of working with the EM01 and getting a result "in between" settings available on your camera and having to decide whether to round up or round down depending on personal preference.
Baladino on Keks KM02 Shoe Mount Light Meter Review
Comment posted: 30/09/2022
Comment posted: 30/09/2022
Jérôme on Keks KM02 Shoe Mount Light Meter Review
Comment posted: 26/10/2022
Thank you first of all for your very good site, which is very well supplied with 35mm, and very educational.
I am French. I am a street photographer with the famous Ricoh GRIII. I just bought a Konica C35 from Japan to start a small 35mm collection. It is in perfect cosmetic condition, but the cell (light-better) does not work at all. It moves, but doesn't get out of the red under-exposure zone. I changed the batteries, and nothing makes it (LR44).
My question is the following... I am very interested in the Keks KM02, is it possible to couple it to the Konica C35, after having defined the film in ISO, define my limits (Speeds 1/30 to 1/650) to know my over/under exposure?
I am a beginner, thank you for your answer.
Robert Deming on Keks KM02 Shoe Mount Light Meter Review
Comment posted: 14/12/2023