
A friend recently asked if I could digitize some 35mm slides of a coastal Maine motel her family once owned. I decided to use an Olympus C-8080 WZ (Wide Zoom) bridge camera that I’d just purchased from another friend. It takes superb “Super Macros” and since its “scans” were going to be shared via email, the camera’s 8-megapixel files would be more than sufficient. Running some quick tests, I discovered that it was truly excellent for quickly and easily digitizing film.
NOTE: I considered using my Epson flatbed scanner, but past efforts produced somewhat “milky” results. And the process was slow.
Equipment
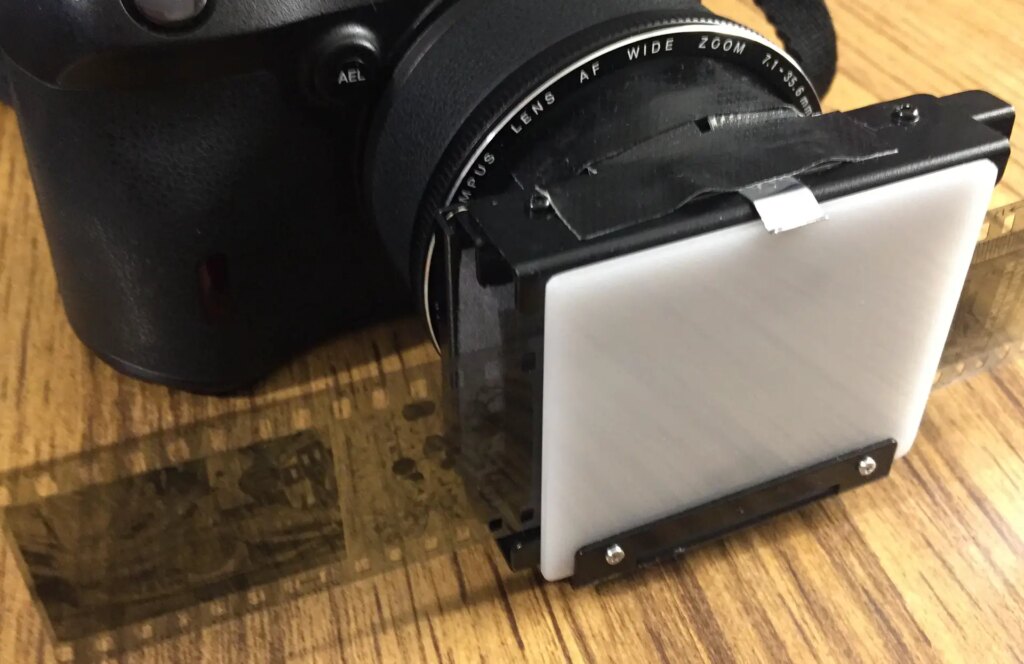
Here’s what I used. Beside the camera is a vintage Accura Duplivar slide-copier device. I also used a small light table (not shown):
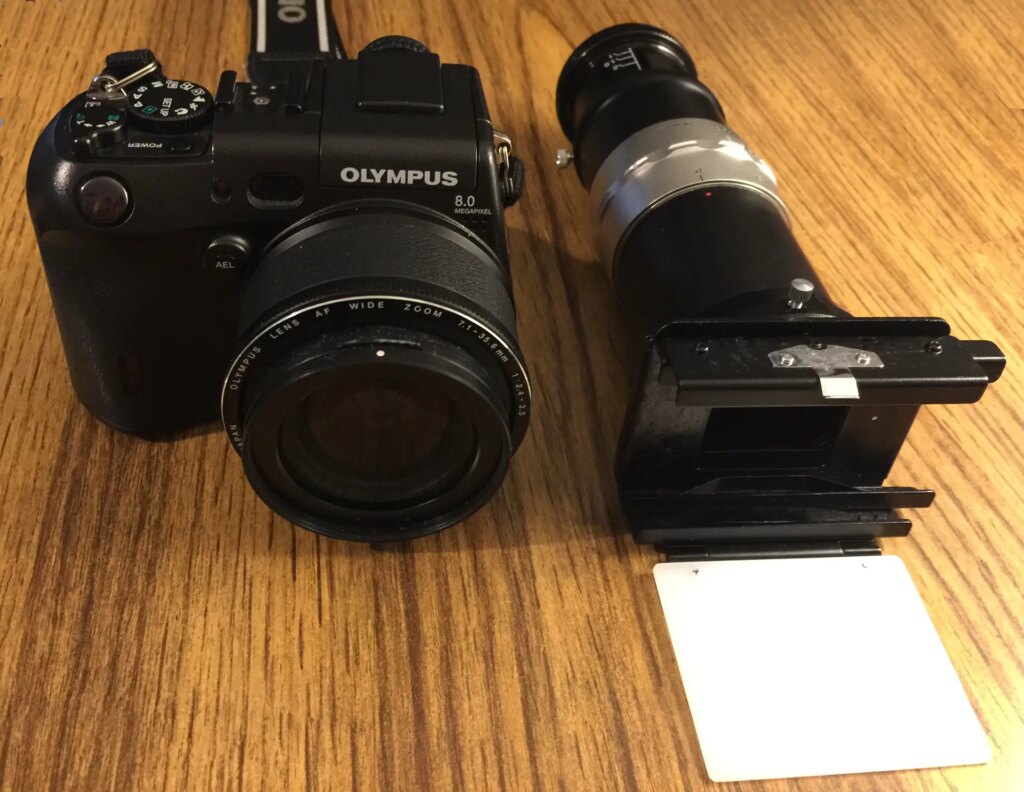
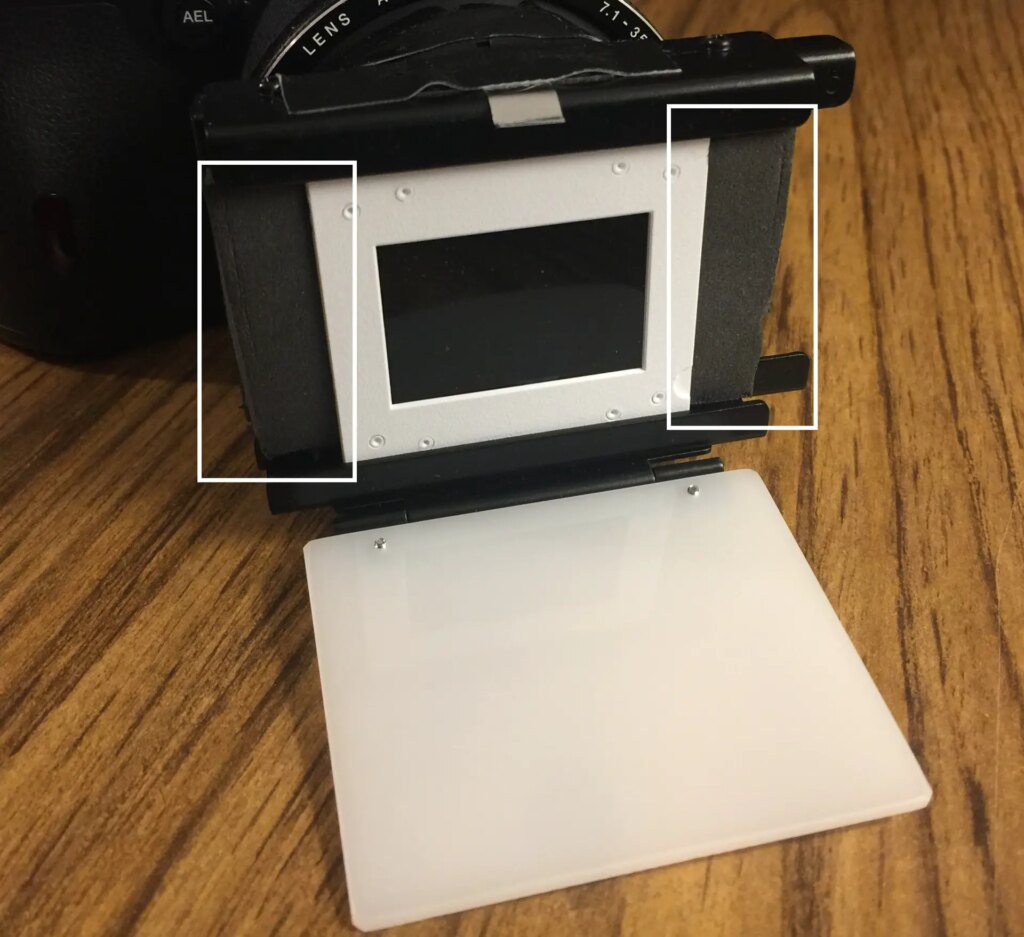
I didn’t need the Duplivar’s main tube and slid the slide-holder frame off of its front. Then I glued two blocks of memory foam (outlined in white below) into the sides of the holder frame… and taped the holder to the front of the camera’s lens housing (also shown below):
This setup:
- Automatically keeps the camera sensor and slides/negatives parallel, no matter how I move the camera.
- Allows me to point the camera at any light source, and at any angle. without slides/negatives moving around in the holder.
- Eliminates camera shake, even during longer hand-held exposures, and
- Reduces light intrusion into the sides of the frame (to maximize the contrast of scans) … thanks to the memory-foam blocks.
Camera Setup
To prepare the camera, I:
- Selected its lowest ISO (50) to minimize digital noise. (The camera’s circa-2004 ISO range– 50 to 400– means that digital noise really starts to creep in at around 200.)
- Set the camera to Super-Macro mode.
- Turned its command dial to aperture priority.
- And selected its smallest aperture (f/8) to maximize depth-of-field and image sharpness.
Scanning 35mm Slides
To digitize each slide, I:
- Removed dust from its front and back with a soft lens brush.
- Slid the slide into the tracks at the front of the Duplivar holder (with the transparency’s duller emulsion side facing the lens). TIP: I inserted both landscape and portrait images in a horizontal orientation (as shown in the above photo)… so that the camera wouldn’t cut off the tops and bottoms of vertical images.
- Flipped the holder’s white diffuser plate up or down, depending on the light source. If shooting up toward a bright sky, I flipped the diffuser plate up in front of the slide… to keep clouds and trees from also appearing in the scan. And if shooting down toward my light table (my usual source), I flipped the plastic diffuser down out of the way because the light table has its own built-in diffuser.
- Pointed the camera toward the light source, and
- Took the shot. The camera often “hunted” for focus, but always locked on.
The process was fast and easy. It took mere seconds to digitize each slide.
My biggest surprise, though, was how closely the C-8080 WZ actually focuses! Its Reference Manual says that Super-Macro mode shoots down to 2 inches from the lens. But slides in the holder are only 0.75-inches away! This did prove to be a problem if I set the aperture wider than f/8. But at f/8, the lens’s depth-of-field expanded to include the slide location.
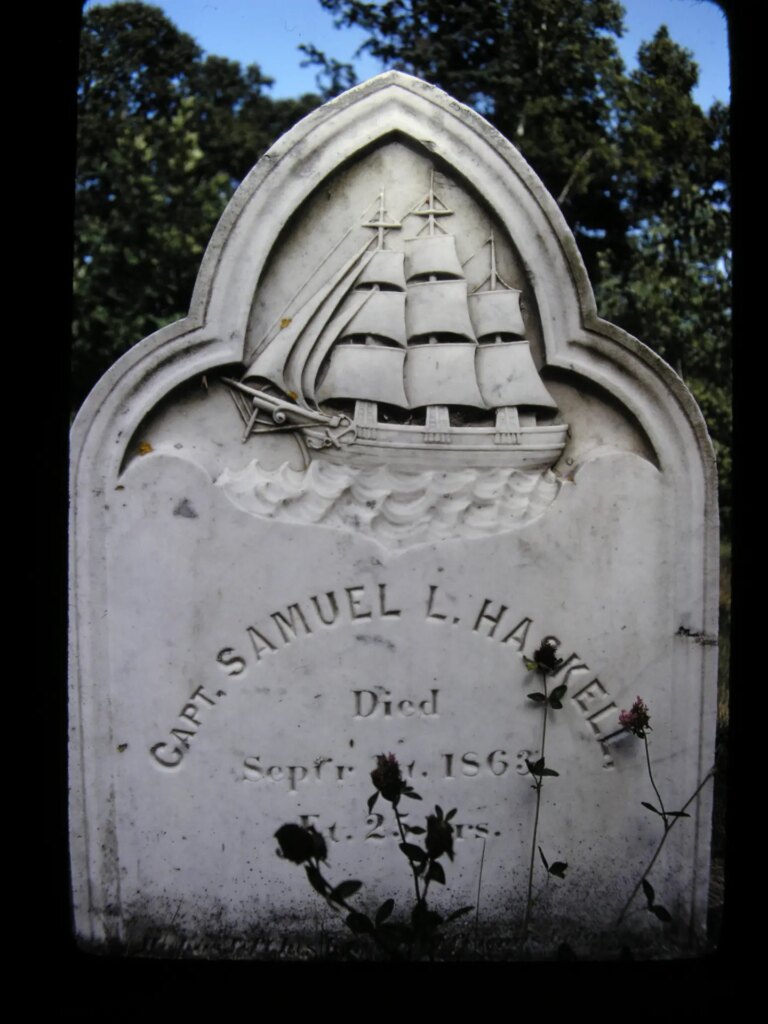
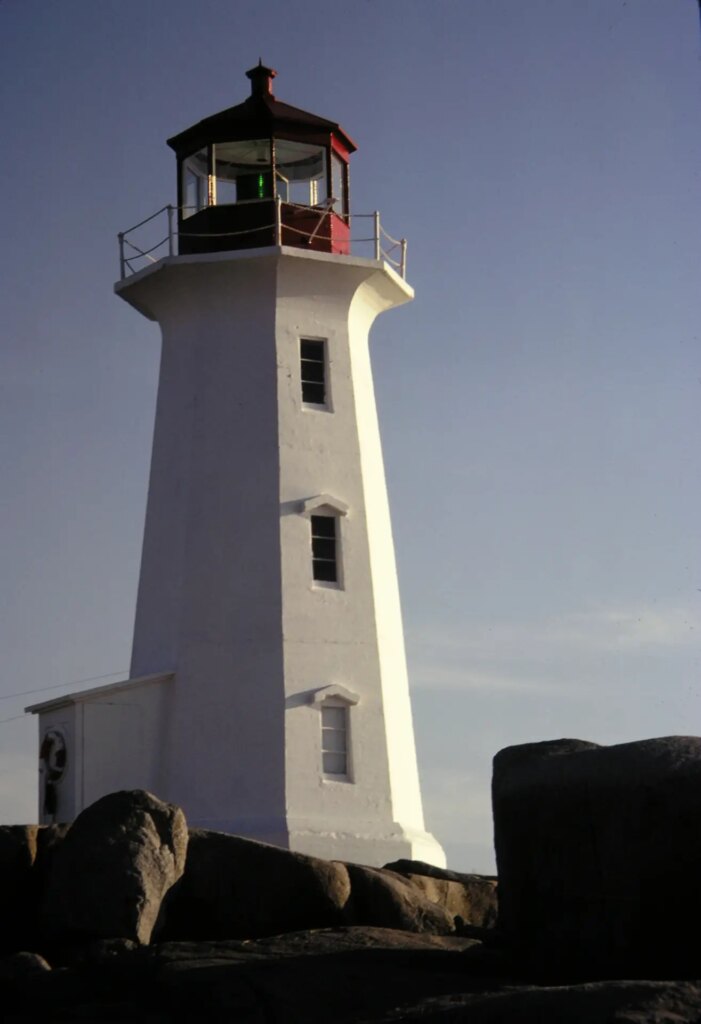
Sample Slide Scans
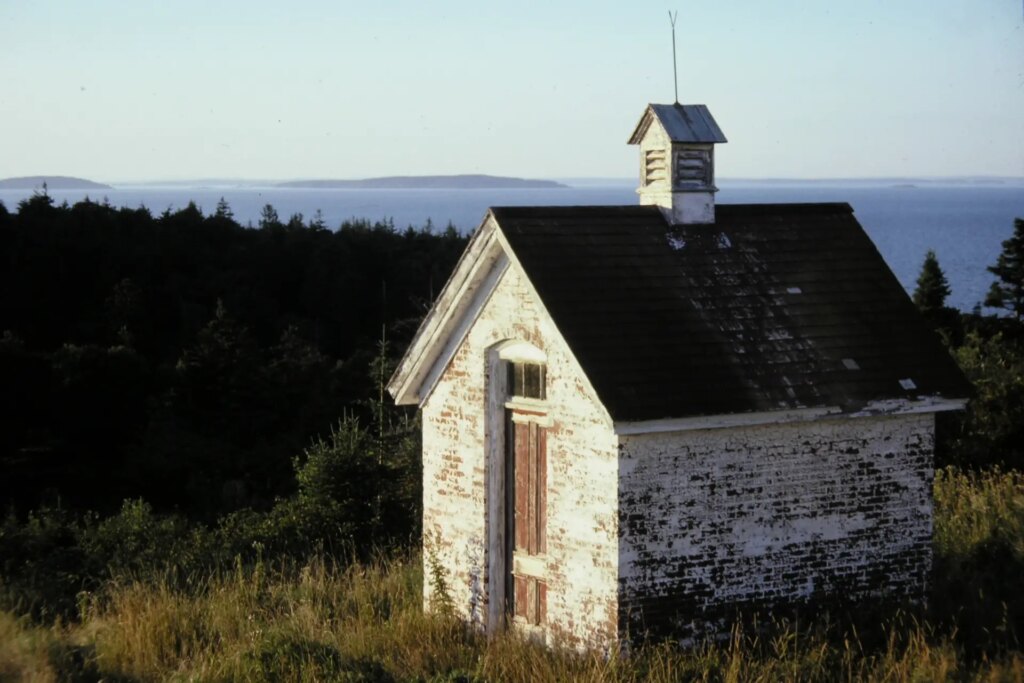
I wouldn’t post someone else’s family photos. But here are a few of my own Kodachrome memories! All but the last slide are as the camera captured them (with only minor rotation and cropping). My last slide promised to be difficult enough to require special processing, as you’ll see:


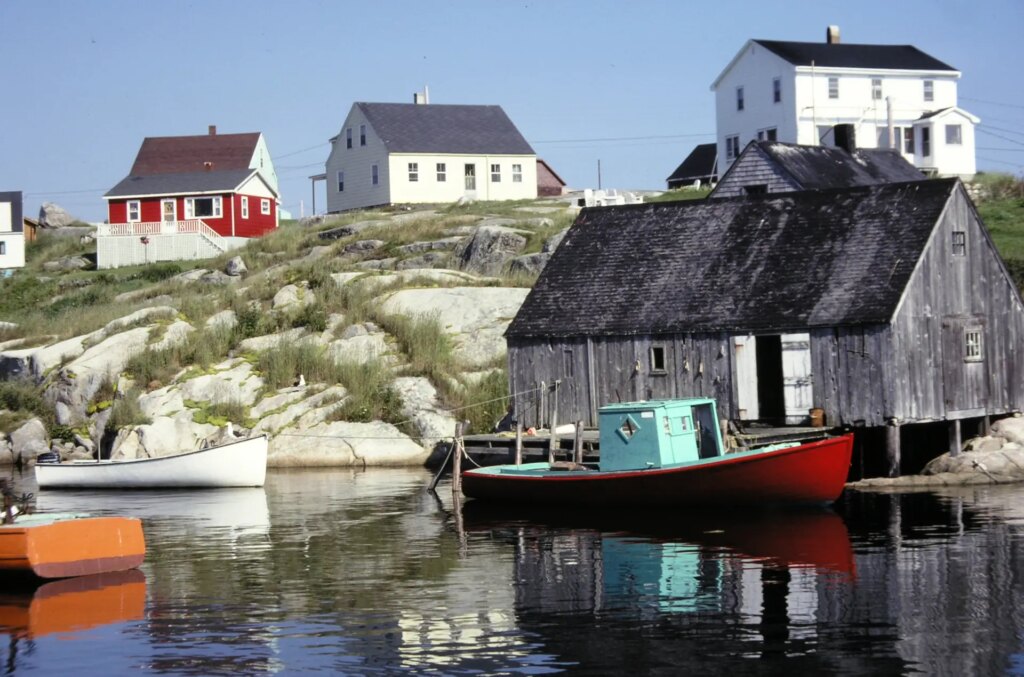


A Girl in a Tree!
But the hardest slide to scan was one of the first photos I took in 1977… with my first SLR. I’d taken the Canon AE-1 for a walk in a park near my home, and as I entered, a girl called to me from a backlit tree:
“Are you a photographer?… Take my picture!”
Understandably distracted, I shot without checking focus, framing, shutter speed or aperture. And the slide turned out to be so dark, I could barely see the girl’s white jumpsuit in it… let alone her face. In fact, I kept it to (someday) digitize into a RAW file for intensive post-processing. Though I never saw her again, forty-five years on, this lovely young lady is finally sprung from her slide’s shadowy prison:

This girl in a tree may be hazy and out-of-focus. But she’s also beautiful… like many memories as one grows older!
Scanning 35mm Negatives
The physical process of digitizing negatives was almost the same. The biggest difference was that I extended the memory-foam blocks forward just enough to press negatives up against the white diffusion plate. This both held film strips firmly in place and flattened their frequent curvature. Like this:
Here’s a scan from the above strip of “Kodak Safety Film 5063” (AKA Tri-X):
And here’s a circa-1976 “historical” photo:
Next is a severely cropped color negative:
Smaller Formats Too!
Since 35mm film worked out so well, I decided to try smaller APS and 110 negatives. Bob Janes’ excellent 35mmc article about shooting, developing and scanning APS showed me how to draw the film out of its canister, and then reel it back in after scanning. The following sample turned out better than expected, considering that APS negatives are about half the size of 35mm:
And here’s a 110-film scan (of a negative only around one-quarter the size of 35mm):

Great Camera, Great Scans
These generally excellent results didn’t surprise me. In 2004, reviewers widely praised the efforts Olympus engineers put into creating the C-8080 WZ’s “Zuiko quality” 5x macro zoom– with 15 elements in 13 groups (2 elements aspherical and 3 of ED glass). The lens was built to the company’s highest standards. In addition, the camera uses both xD and CF cards, which is good if… like I… you prefer one over the other. But one can insert both in the camera simultaneously… and switch between them on-the-fly.
Naturally, this setup can’t match the resolution of top-quality film scanners. But if you ever need good, quick, easy scans, it’s a great way to go. For many applications, the camera’s 3264×2448 captures should be fine. In fact, a 2018 Photo Jottings article claims that a 3,000-pixel-width is optimum! Specifically, it says: “there is no additional resolution from scanning at a higher sample rate.” It’d be interesting to hear readers’ opinions about this.
If you want to digitize your own slides or negatives, and already own a C-8080 WZ, vintage Duplivar copiers (under either Accura or Spiratone brands) currently sell for from $1 to $35 on the ‘Bay. And if you don’t already own an 8080 WZ, they currently sell there for $60 to $90 (though I’ve seen asking prices up to $285).
Final Thoughts
The C-8080 WZ may be “just” an 8-megapixel camera, but it would be a mistake to think its scans are substandard. As mentioned in this 35mmc article, I once exhibited and sold 16×20 prints taken with a 0.8MP camera! So one can actually do a lot with the 8080 WZ’s 8MP files.
In fact, I bought the camera from a good friend who is an image-quality expert and obtained stunning 16×20 prints from its files. He still feels that no other digital camera he tested had a better lens. Today, with online asking prices close to $300 (and people paying nearly $100 for it), the C-8080 WZ still seems to command respect.
Share this post:


Comments
Safiyyah on For Quick Film Scans, Try an Olympus C-8080WZ!
Comment posted: 29/09/2022
Comment posted: 29/09/2022
Dana A Brigham on For Quick Film Scans, Try an Olympus C-8080WZ!
Comment posted: 29/09/2022
Comment posted: 29/09/2022
William on For Quick Film Scans, Try an Olympus C-8080WZ!
Comment posted: 29/09/2022
When "camera-scanning" first began to gain steam, we tried "scanning" 35mm B&W negatives on a light table using a Canon SD1100is P&S camera in macro mode atop a length of cardboard tube (spray-painted matte black on the inside), inverting and cleaning up the image with a quick edit in Photoshop Elements. Worked a treat!
Comment posted: 29/09/2022
Tom on For Quick Film Scans, Try an Olympus C-8080WZ!
Comment posted: 01/10/2022
Comment posted: 01/10/2022
Huss on For Quick Film Scans, Try an Olympus C-8080WZ!
Comment posted: 03/10/2022
As for that PhotoJotting claim about 3000 wide being optimal scanning resolution? Hard no.
I scan my film, first started w a D750 24mp, now use a z7 47mp I think, but it is about 8300 wide. I print big to sell, and the extra resolution is very noticeable.
Comment posted: 03/10/2022
Karen on For Quick Film Scans, Try an Olympus C-8080WZ!
Comment posted: 08/01/2023
Dave Powell on For Quick Film Scans, Try an Olympus C-8080WZ!
Comment posted: 08/01/2023
I inserted the foam blocks to reduce the light filtering in through the sides of the holder... and in the process, to maximize the contrast of the resulting scans. It seemed to work too, 'cause I didn't need to adjust the brightness or contrast of any results!
And as shown in my gear shots, the Duplivar's plastic diffuser is hinged at the bottom... and the holder has an aluminum locking latch at the top. So I could flip the diffuser down, center a slide in FRONT of the foam blocks, and then snap the diffuser back in place. It worked a treat.
Best of luck with your own scans!
Simon Cygielski on For Quick Film Scans, Try an Olympus C-8080WZ!
Comment posted: 18/04/2023
Comment posted: 18/04/2023