When you get right down to it, there are only three things a camera needs to do: form an image, record that image, and be otherwise light-tight. All the rest – focusing aids, light meters, talking cameras – are conveniences. Some photographers (not me, I hasten to add) look down on conveniences, such as Auto mode, or phone cameras. The phenomenon is not a new one. Fifty years ago, Henri Cartier-Bresson dismissed light meters: “And photo electric cells in a camera — I don’t see why it is done. It is a laziness.”
I don’t think using older or simpler tech makes you better in some way – but it can be fun. It can even be a learning experience, or open up new creative avenues. Then again, for some people (or under some circumstances), it can just be a pain.
A pinhole camera is the simplest camera ever devised. In Part 1 of this series I included a brief introduction to pinhole photography. I also wrote about how I fell into the pinhole rabbit-hole, and shared some amazing homemade cameras and photographs from around the world. It turns out that a camera which performs the three basic functions listed above can be made from a cardboard box, a soft-drink can, or even a pistachio nut. In this post, I’ll talk about building and using my own camera, made entirely with recycled household materials and basic stationery.
To give you a sense of what to expect, here’s a short video showing how I load photosensitive paper into the camera (I’m using exposed paper for the demo; otherwise I’d do this in a darkroom or dark bag).
Non-technical non-tutorial
This will be a non-technical, maths-free post. Pinhole cameras do have technical aspects: for example, the angle of view (i.e. whether it’s wide-angle, normal or telephoto) and the “optimum pinhole diameter” are both functions of the “focal length” (distance from the pinhole to the sensor). I will cover these in subsequent posts, but part of the fun of pinhole photography is that you can make a functioning camera by pure trial-and-error, even if you know little or nothing of the technical side. In fact, some would say that free-spirited experimentation is closer to the spirit of pinhole photography.
Personally, I love the technical stuff too, and I don’t think science and creativity are mutually exclusive. But equally, I don’t want to sabotage my series, two posts in, by launching into Fraunhofer diffraction and the Cosine-Fourth law. So, though I did use some maths and theory in building my camera, I won’t get into it in this post. If you have any questions about technical aspects, I can try to address it in the comments or in a subsequent post.
This is also not a tutorial on how to make a pinhole camera; there are enough and more of those around (the Resources section in my previous post is a good starting-point), so there would be little point in adding yet another one. And besides, I’m not qualified – I’ve built only two cameras so far, one of which didn’t work. Instead, I’ll mostly just describe the process of making and using my own camera, various challenges I faced, and how I tried to solve them – and of course, share some pictures. Focusing on a specific camera (and perhaps, later in the series, a couple of other cameras) will hopefully offer some direct, personal insight into the process, which general instructions can’t always provide.
If you’ve never built or used a pinhole camera, maybe this will inspire you to take the plunge. Your camera will almost certainly be different, depending on what materials you have at hand, the kind of photos you want to take, how you want your camera to look, and other such factors. But nearly all pinhole cameras share some common features, so some of my methods can probably be applied or adapted for your camera too. (I should add that if you’re not into DIY/crafts, there are various companies selling pre-made pinhole cameras, though I’ve never used one myself.)
If you have built a pinhole camera before, maybe you can still get some ideas, because everyone does things a little differently. Or even better (from my perspective), perhaps you can suggest improvements, or other experiments which I could try.
Overview
Supplies
This is a complete list of materials I used for my homemade pinhole camera:
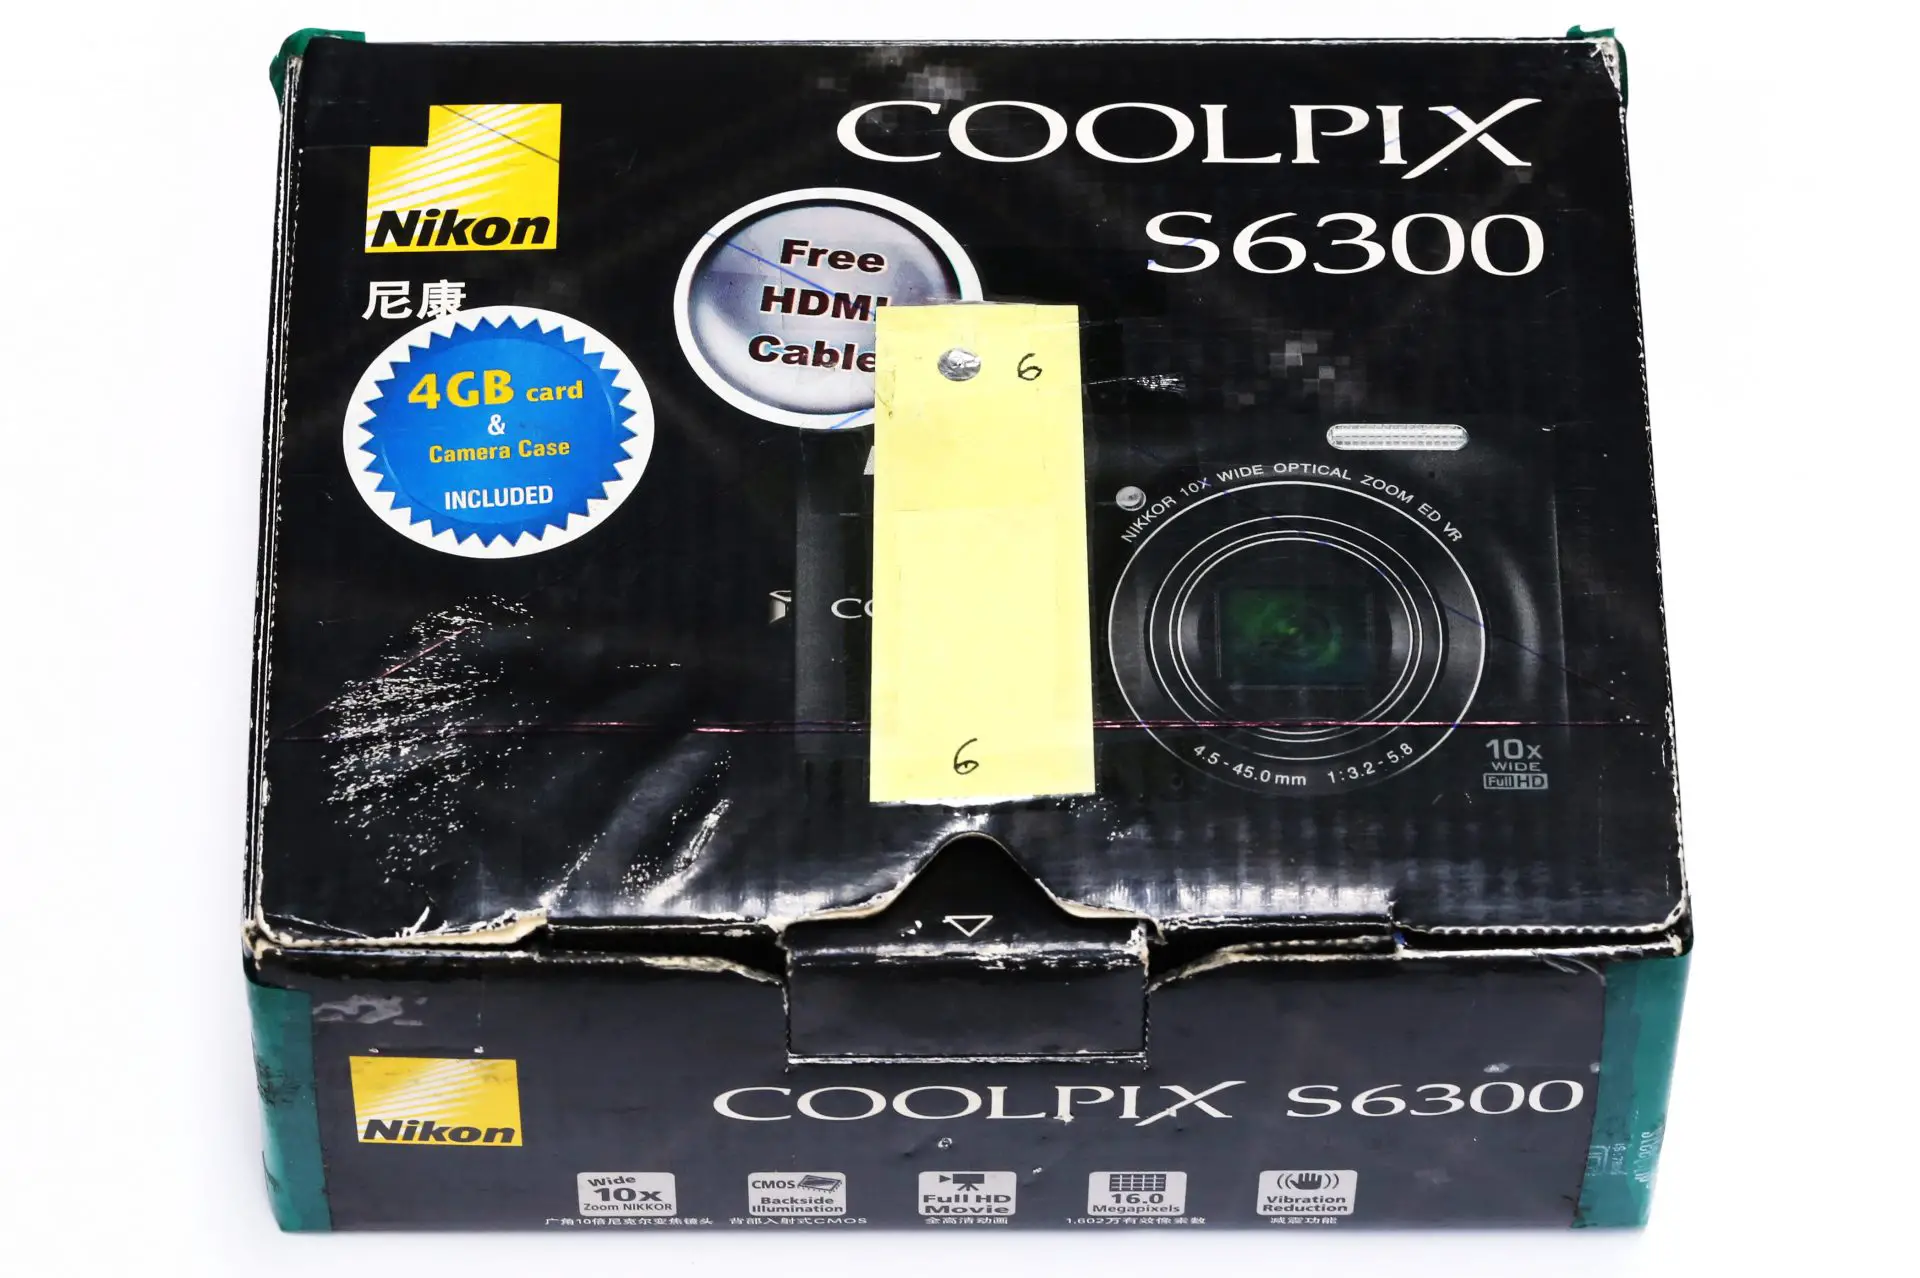
- A small cardboard box (ironically, it came with a digital compact camera)
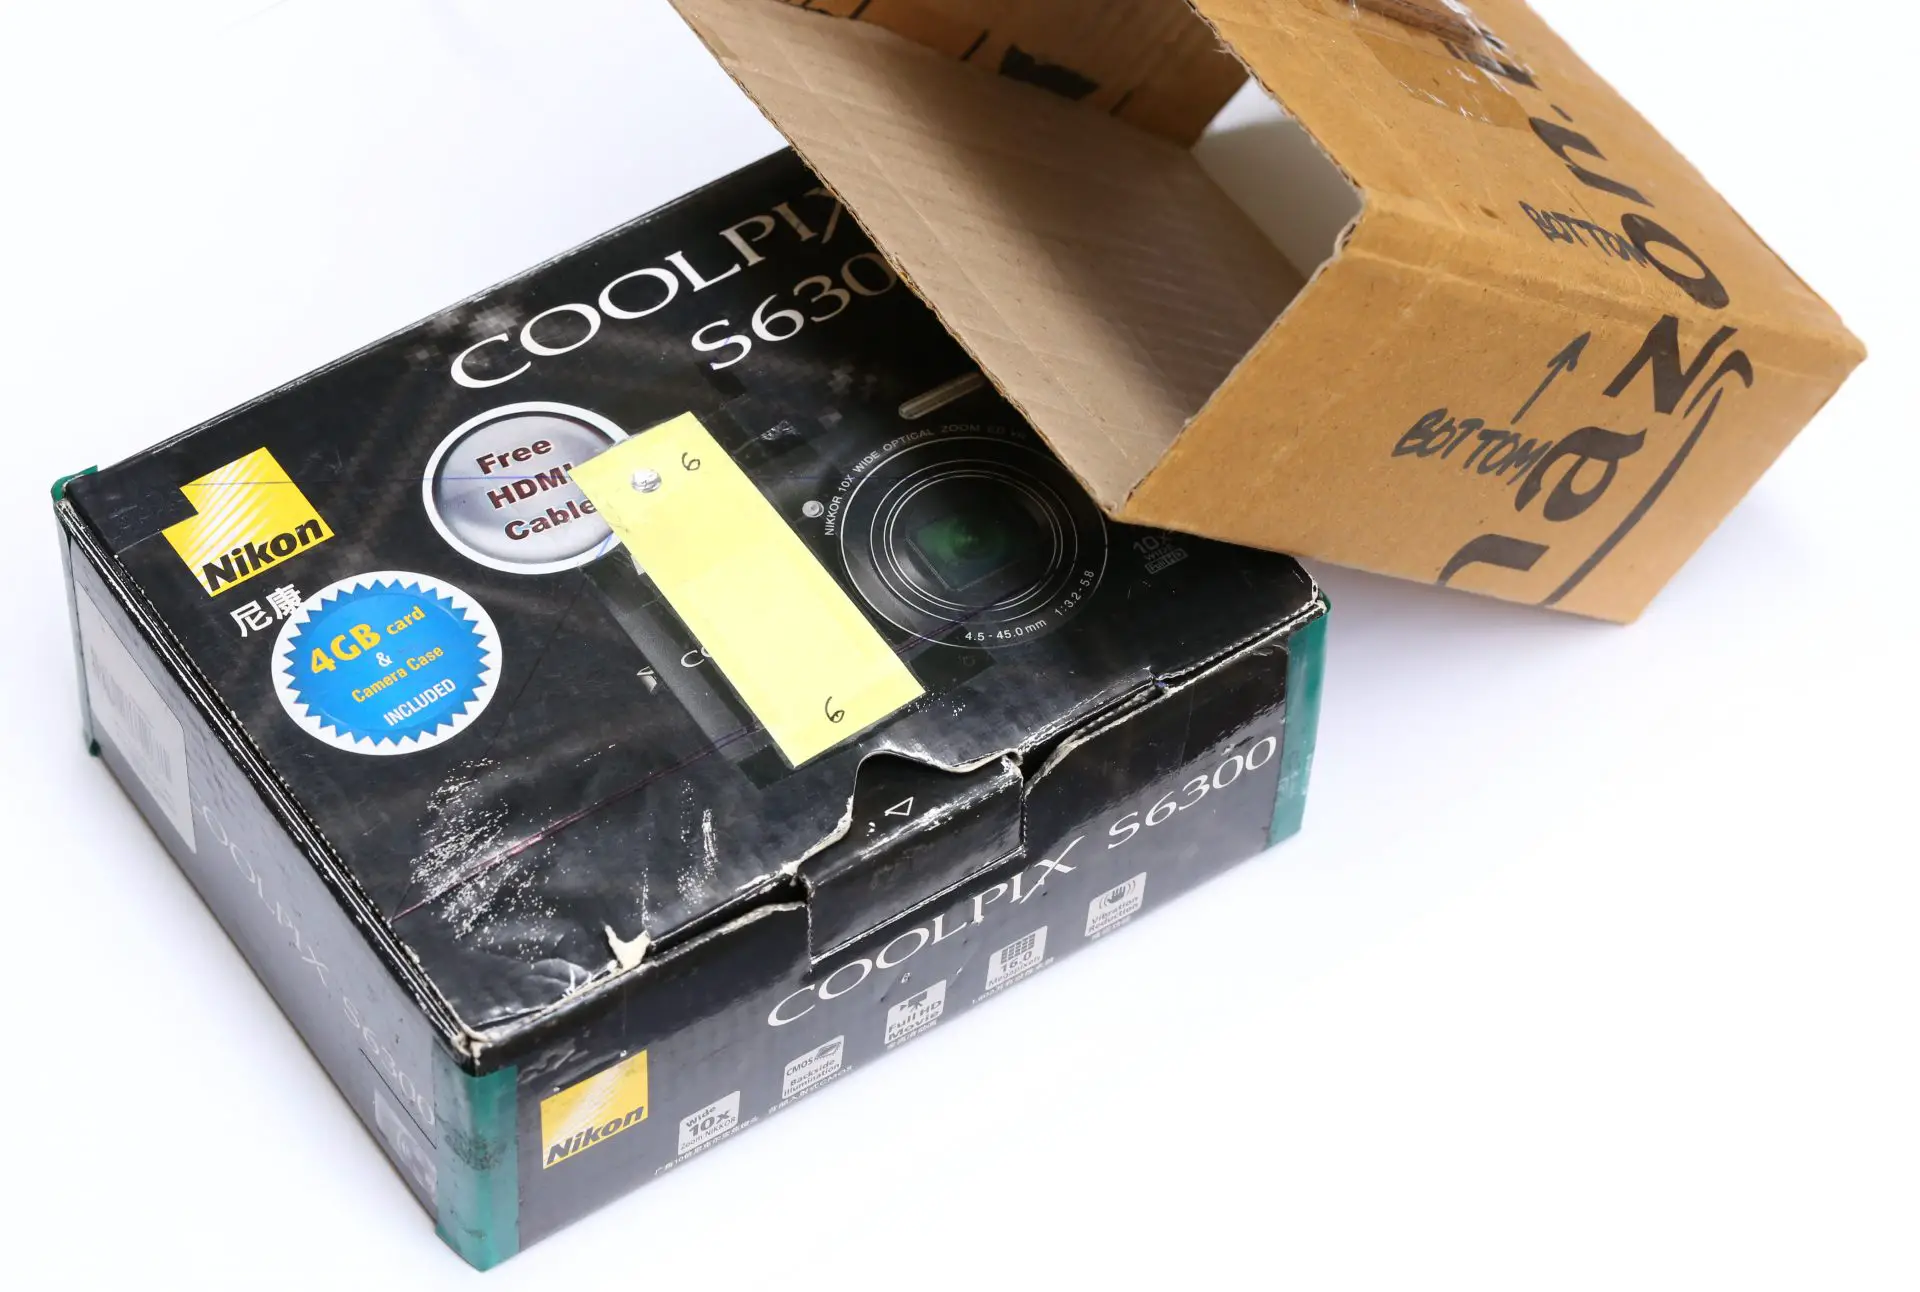
- Some more cardboard (Amazon packaging)
- Aluminium foil
- A sewing-needle
- Black watercolour paint (acrylic would be better) and a brush
- Basic stationery: post-it notes, ballpoint pen, permanent marker, eraser, ruler, scissors, craft knife, stapler, hole-punch, electrical tape, cellotape (some of these items are optional, or can be substituted)
Choice of sensor
Pinhole cameras – all cameras, for that matter – need some kind of light-sensitive sensor. This can be a digital sensor, film, or even photographic paper. A digital or film camera can be converted to a pinhole camera simply by replacing the lens with a pinhole (see previous posts about converting a Paxette and a digital Leica). Both these cameras have interchangeable lenses, so the conversions are not permanent – you’re just adding another “lens” to your arsenal.
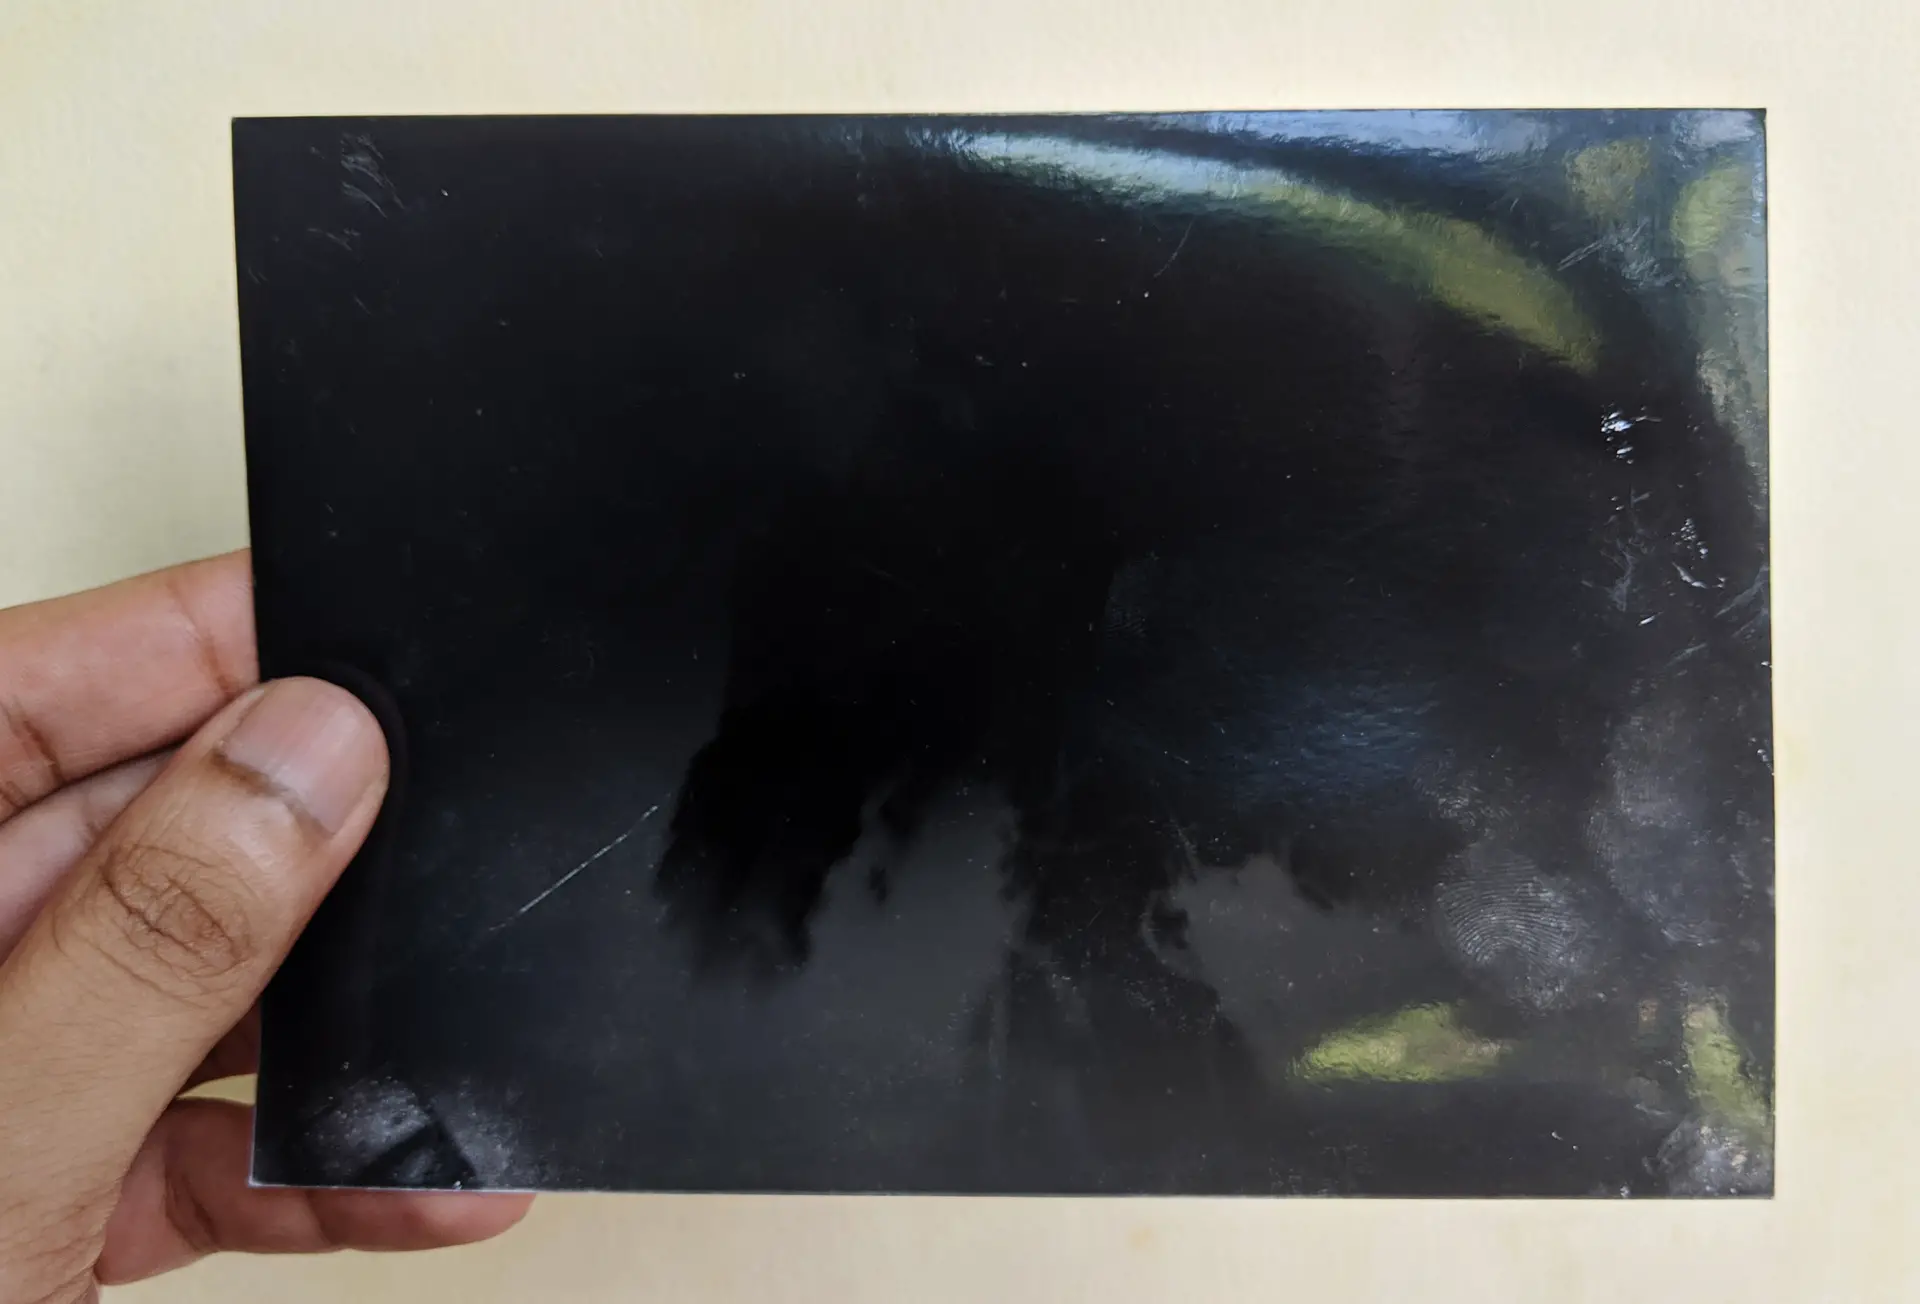
With a digital camera, you get instant results. Film can be sent to a lab, or developed at home. I’ve made a “pinhole lens” for my DSLR (to be featured in a subsequent post), and someday I plan to make a film pinhole camera. However, the one I describe here uses 6×4″ photo paper, which I develop in the darkroom. The resulting prints are “paper negatives” – light areas of the image show up as dark, because the paper turns darker where it is exposed to light. The paper negatives can be contact printed under an enlarger to get positive prints, or simply scanned and inverted in Photoshop. The comparison below shows a quick phone pic of a print right after developing (left), and inverted (right).


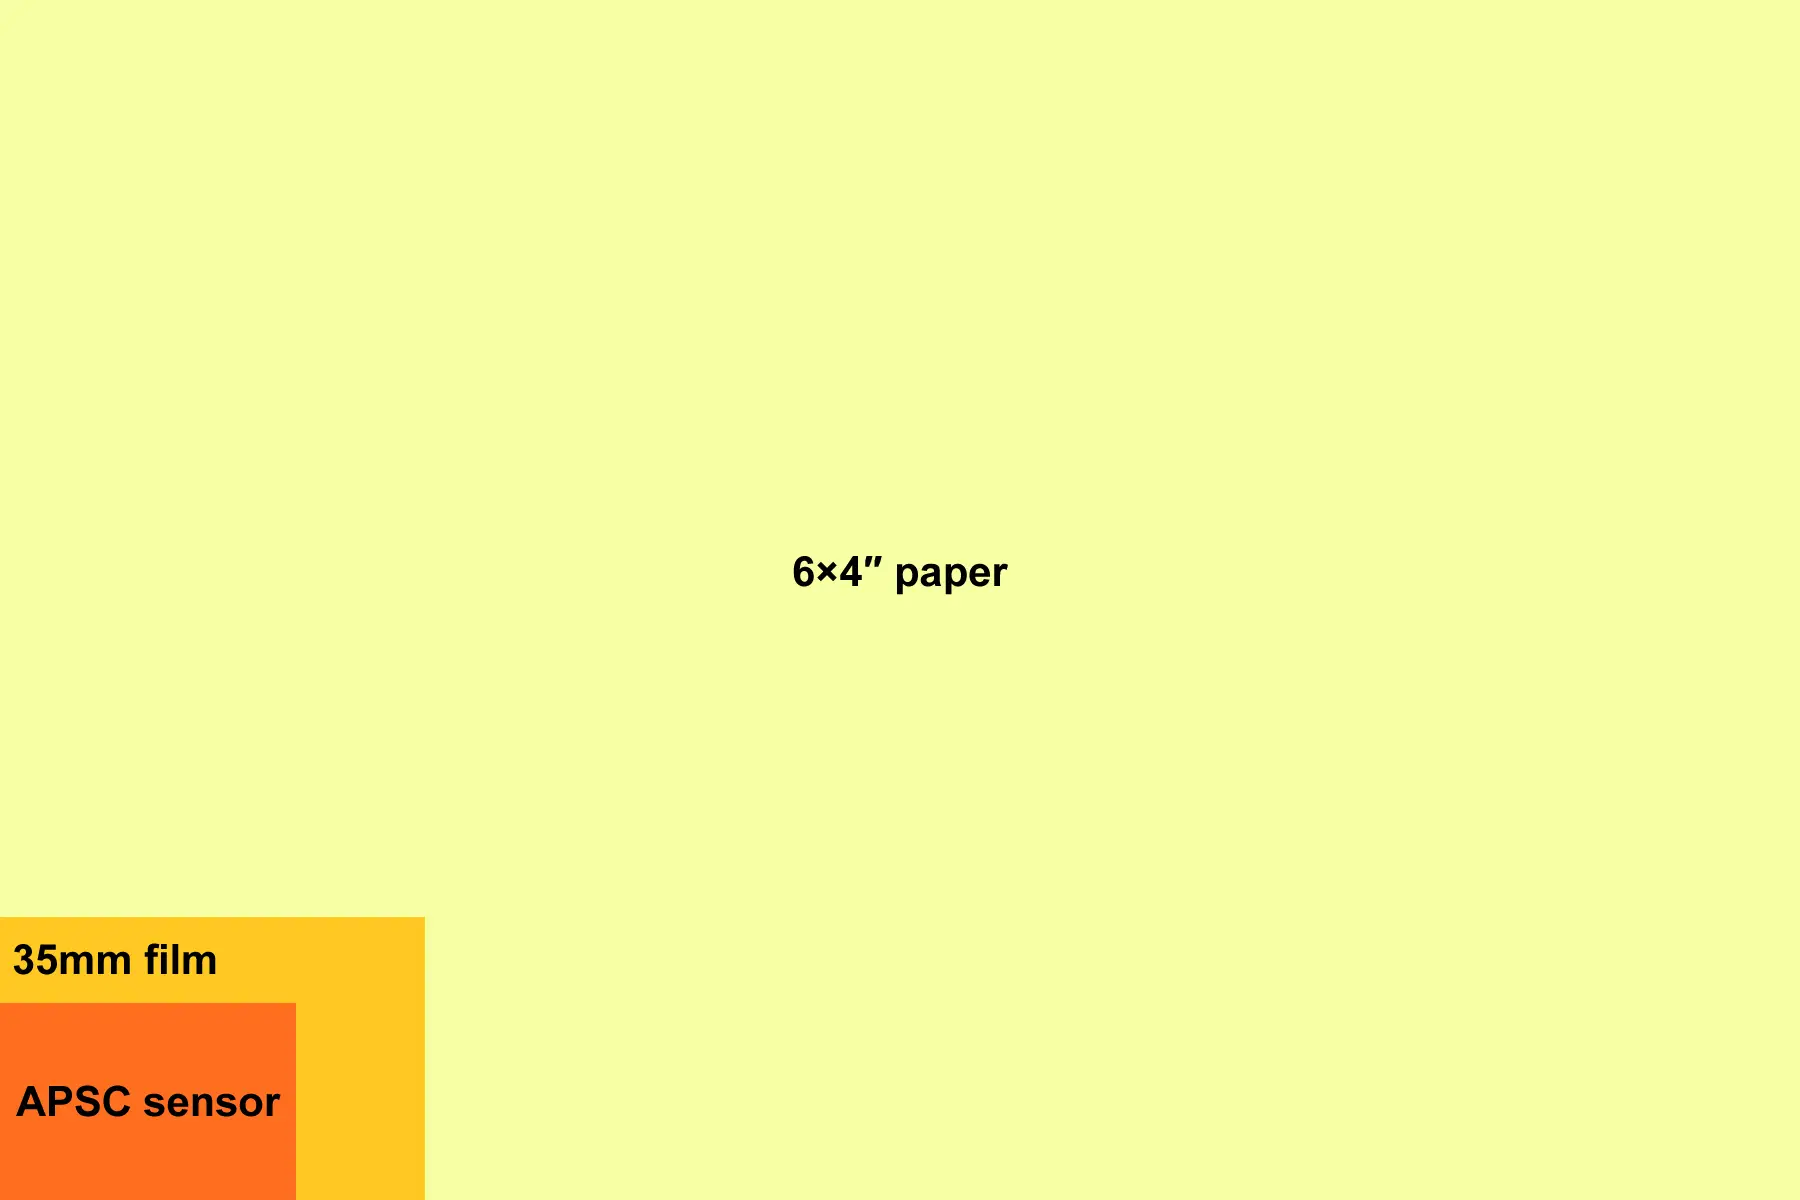
The main advantage of paper is the huge sensor, which translates to higher resolution – an order of magnitude greater than what I can get from my crop-sensor digital camera or 35mm film. 6×4″ paper is basically large-format, but at a fraction of the cost of large-format film. Unlike panchromatic film, it can also be loaded and developed under safelights. And of course, being paper, prints can be scanned with any old flatbed scanner.
The main disadvantage of paper is that it is slow, often in the ISO 2–6 range. Couple that with the tiny pinhole apertures (typically f/100-300), and you need some pretty long exposure times – sometimes several minutes, even in daylight. Personally, I don’t mind this; in fact, it’s kind of fun.
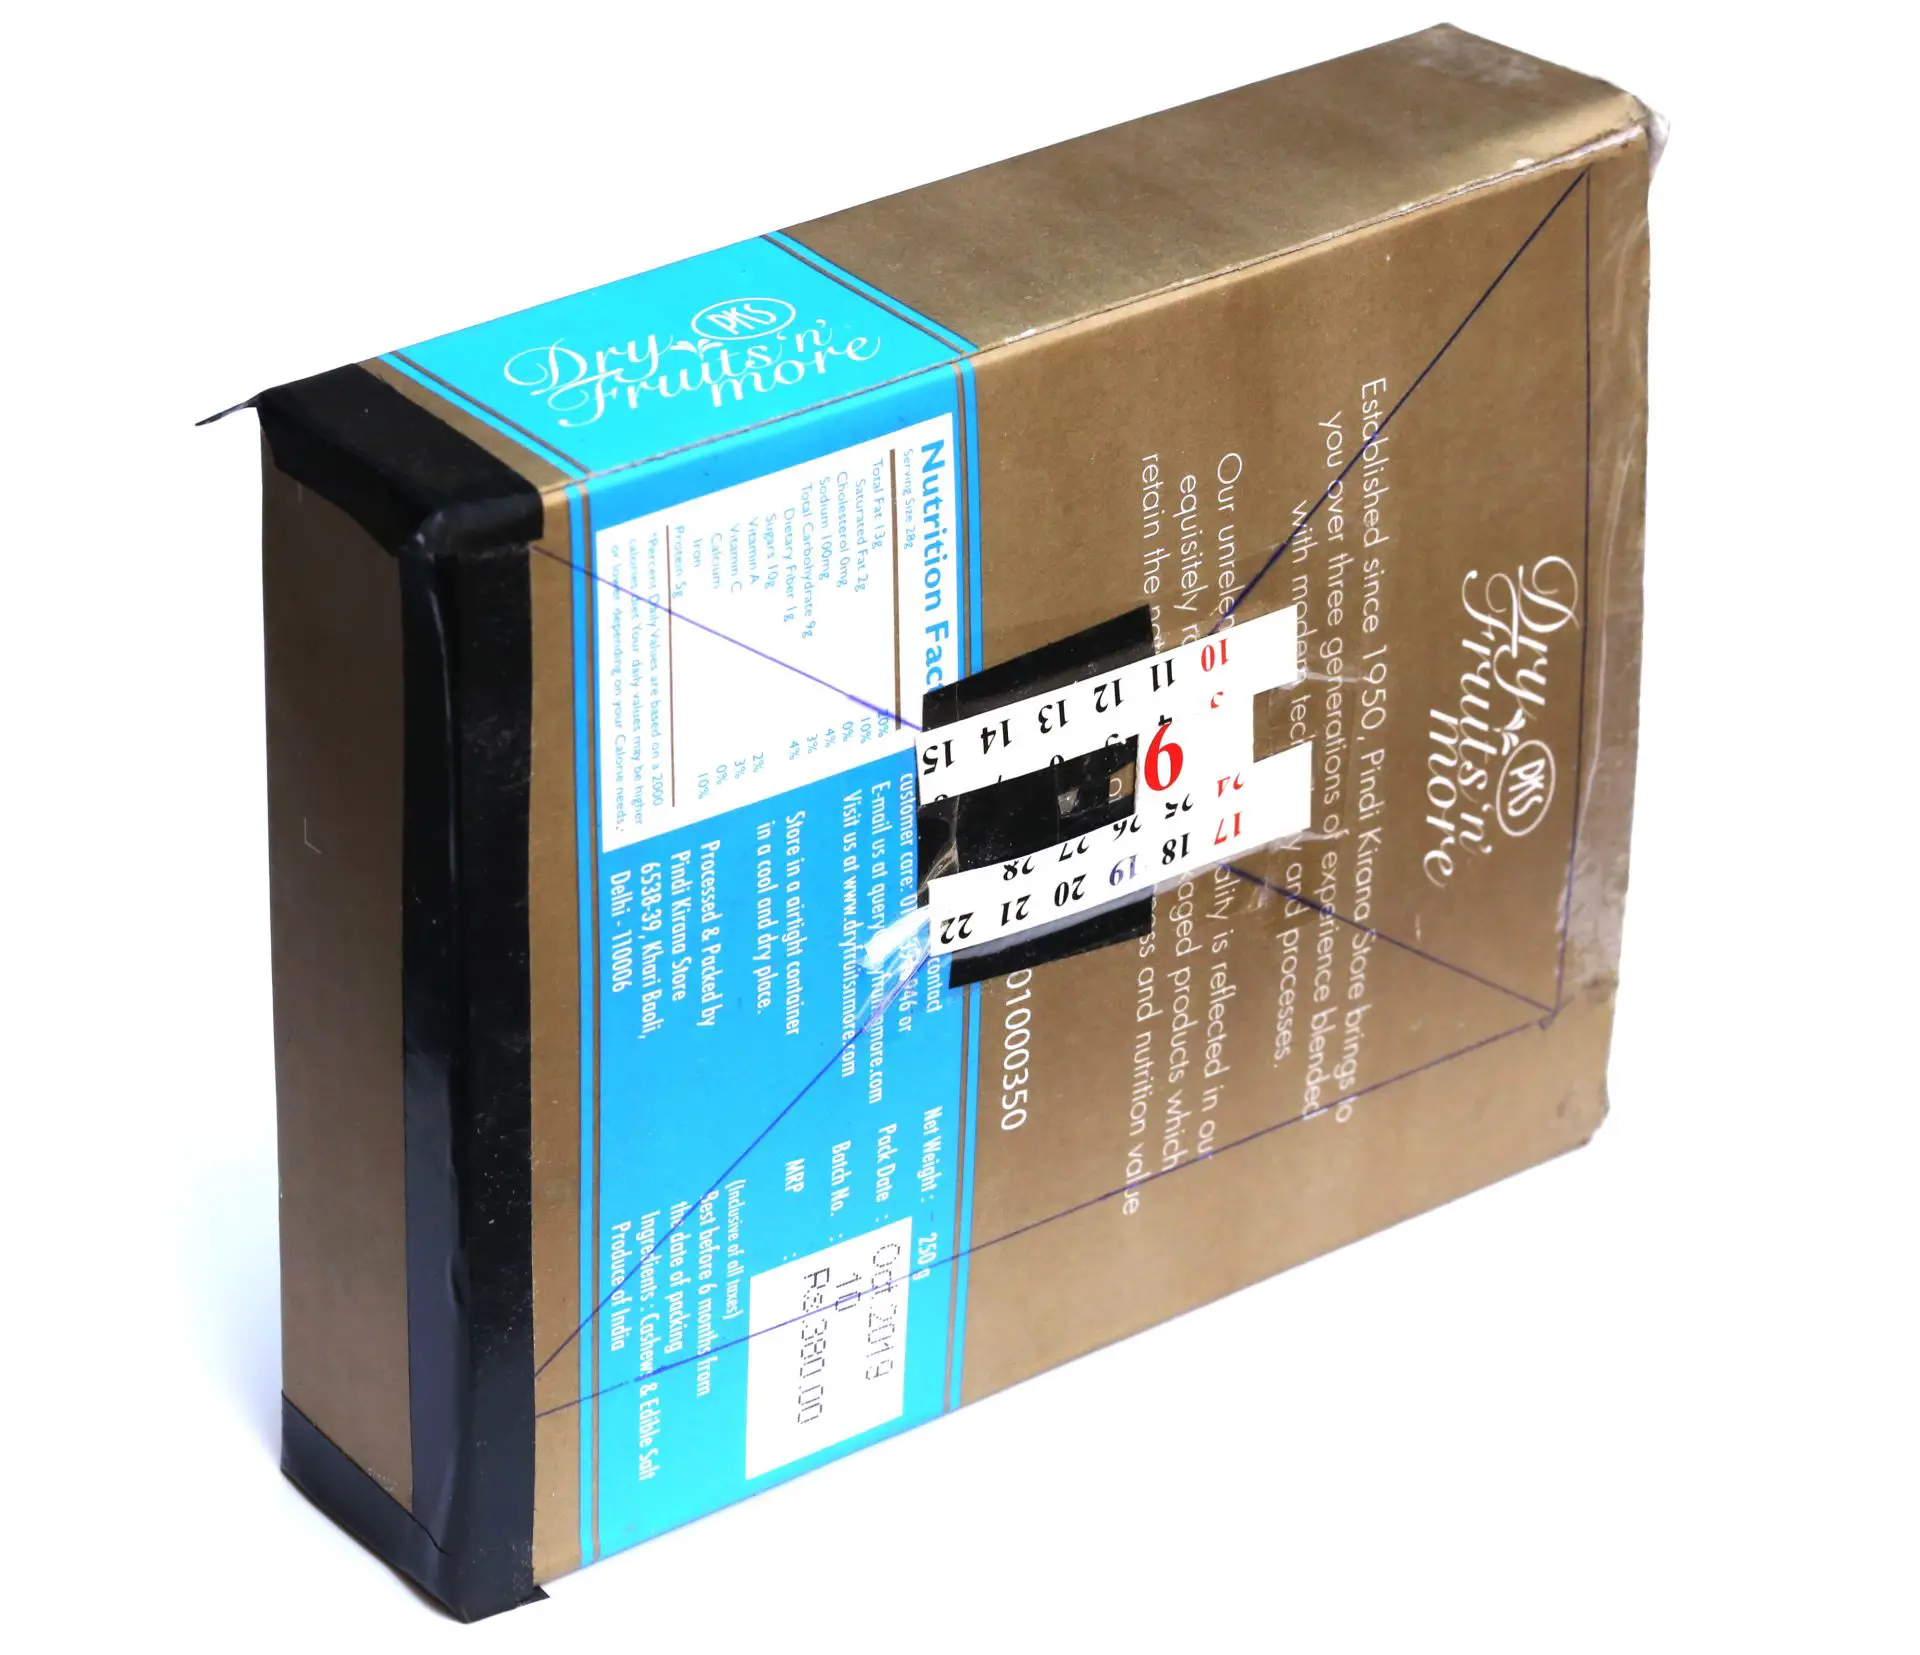
Kaju: my first camera
My first camera was Kaju (Bengali for cashewnut, because it was made from a cashewnut box).
Light leak
I won’t describe the build in detail, because poor Kaju didn’t work. I took just one photo with it, which showed me that there was a serious light leak problem.
This may have been for a few different reasons. I didn’t paint the inside black, so light was probably bouncing around. Also, while I taped the edges, the cardboard surface itself was somewhat flimsy, so it may have leaked light when the camera was sitting in the sun for a long exposure. Be that as it may, Kaju did not die in vain; it did teach me the importance of proper light-proofing.
Tape reliance
I also learned that for multi-use cameras, designs which involve removing and reapplying tape are best avoided. Kaju had nothing to hold the paper flat; each time I would tape a new sheet to the back of the camera. Also, after loading, the camera had to be sealed with electrical tape to avoid light leaks. This was doable in a darkroom, but it was a pain to do in a dark-bag. Everything turned sticky, and I got fingerprints on the paper which showed up in the print. When unloading the camera, all this tape had to be removed… and for reloading, I needed more tape, which was wasteful.
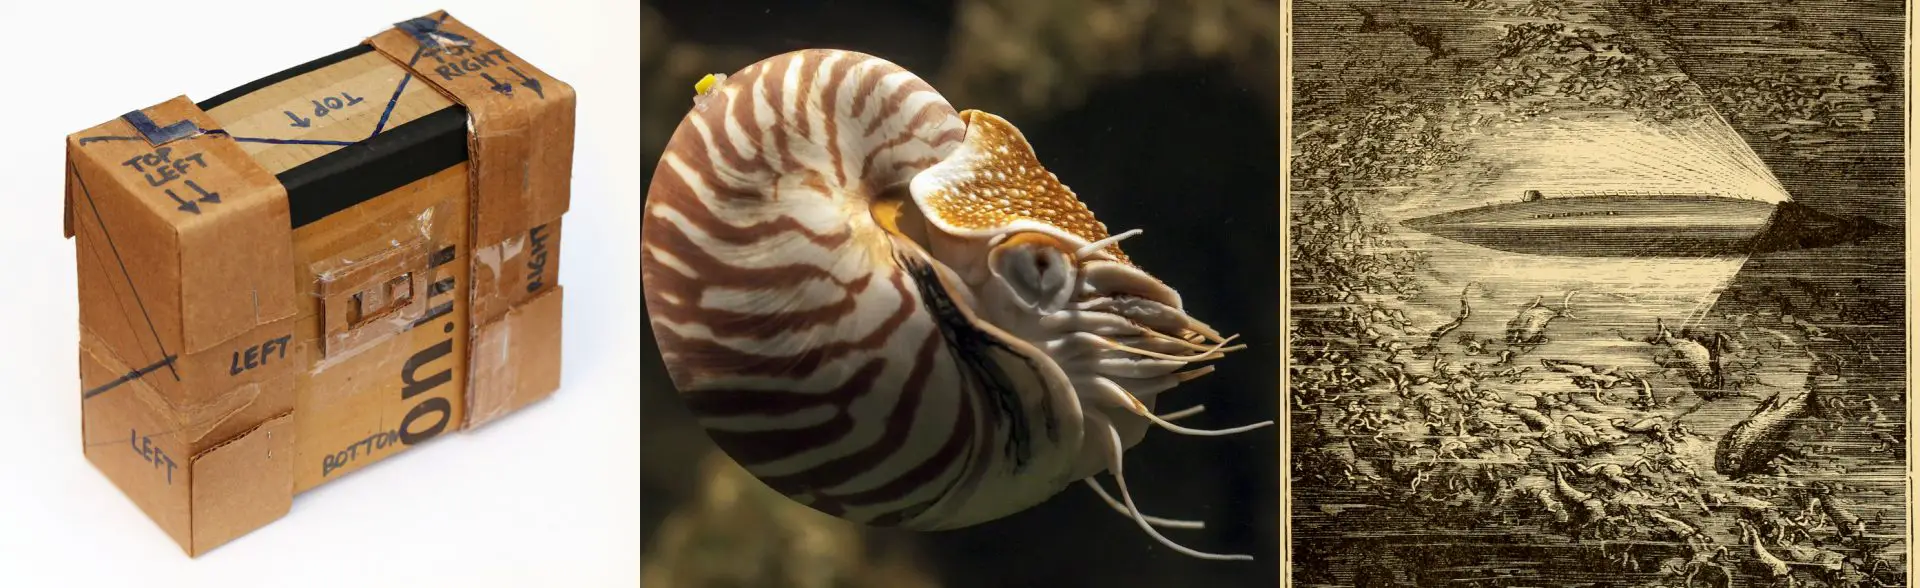
I realised that for my next camera, I needed to move away from tape reliance. My new camera, named Nautilus, uses a cardboard cover for light-sealing, and has a paper-holder for easy loading. These features make it much easier to use. Loading and unloading is a cinch, even in a dark-bag, which means I can take photos “in the field”.
Nautilus: my second camera
I named my second camera after the nautilus, a sea creature which has pinhole eyes with no lens – a great rarity in the animal kingdom. Nautilus was also the name of Captain Nemo’s submarine in Twenty Thousand Leagues Under the Sea; the sub, like my camera, was a vehicle for exploration.
Specs
Type: Analogue pinhole camera
Material: Cardboard
Lens: None (interchangeable pinholes)
Format: Paper or film up to 18×14cm
Shutter: Manual cardboard shutter
Dimensions: 18.5 × 14.5 × 8 cm (W×H×D)
Weight: 160 g
Light-proofing
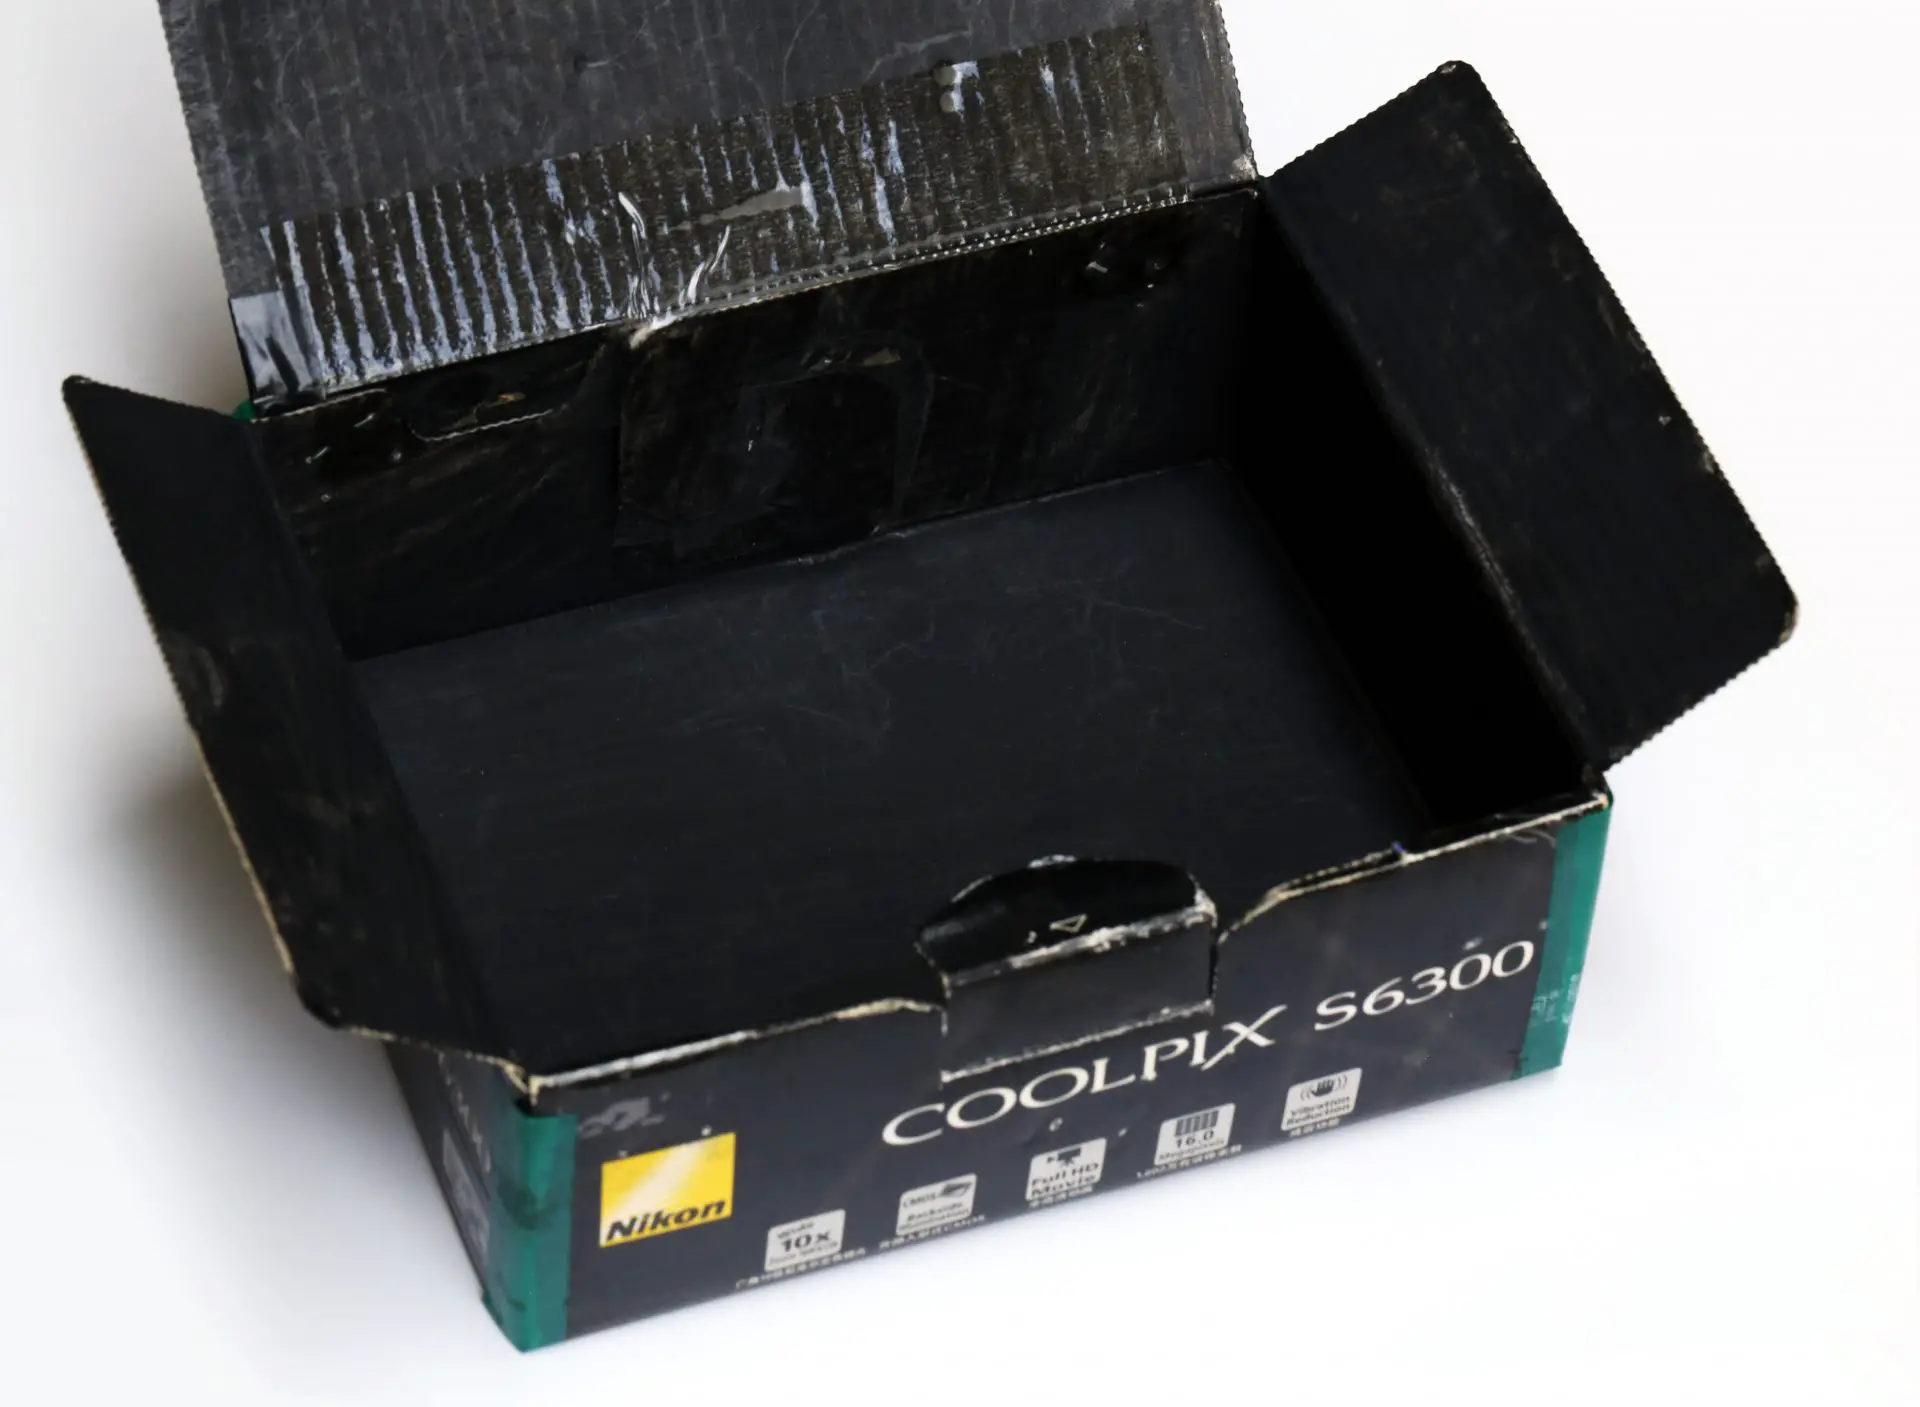
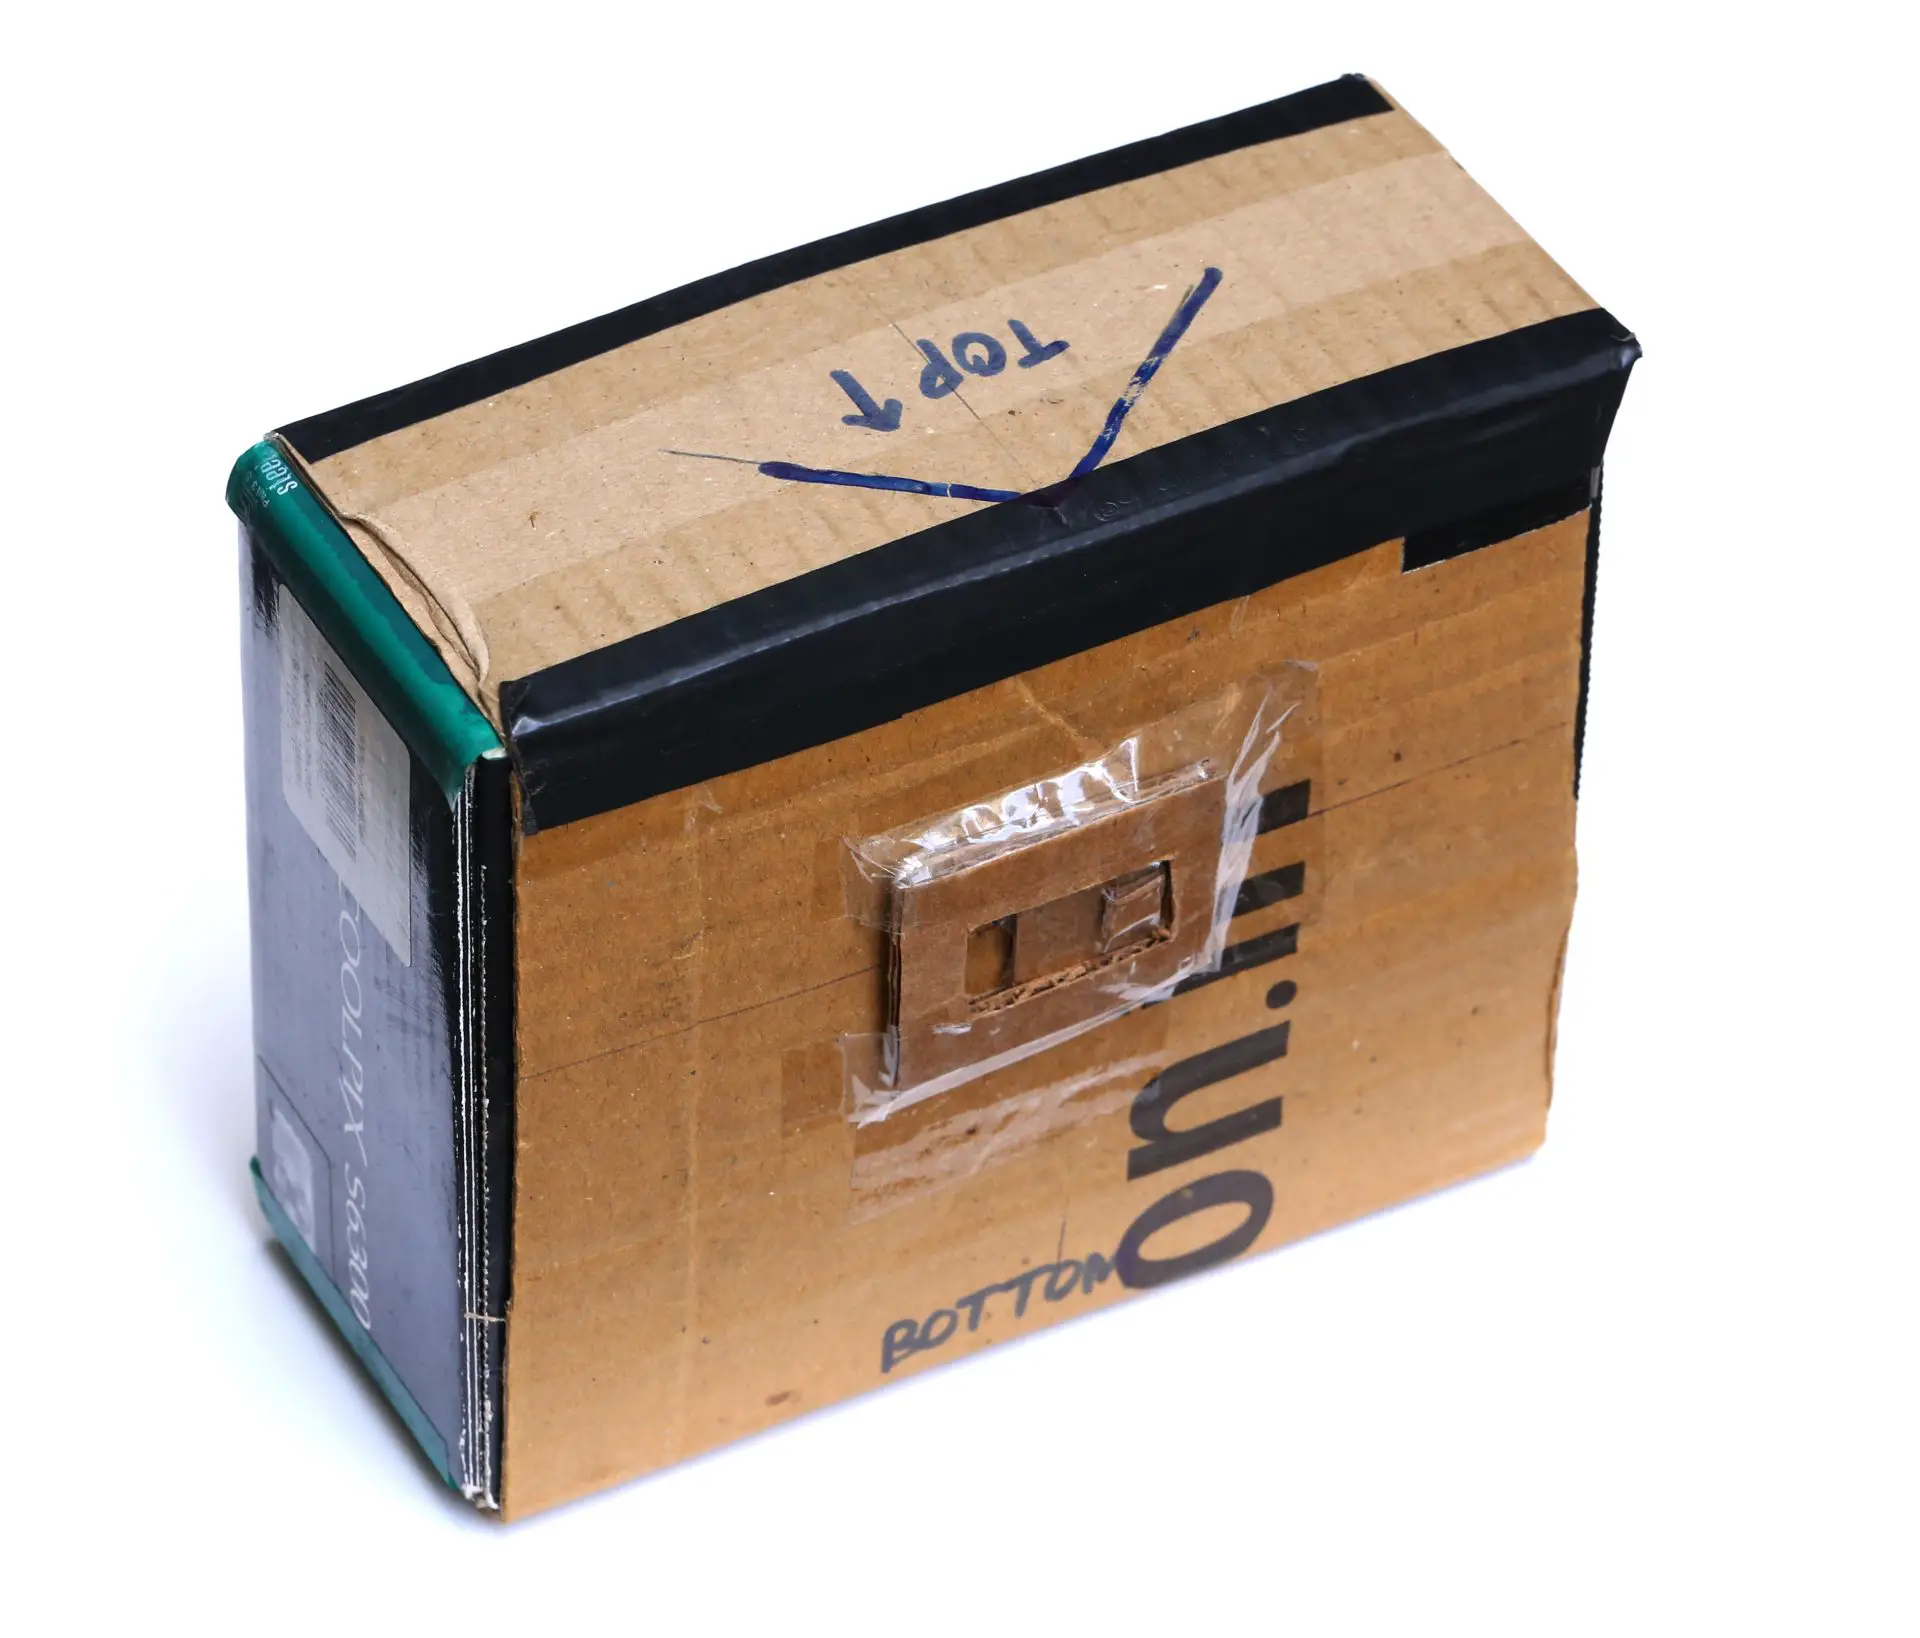
Learning from my earlier mistake, I prioritised light-proofing. First off, I chose a sturdier box. The paper goes on the bottom of the box, which is a little larger than the 6×4″ paper I use. The pinhole, as you can see from the photo above, is on the lid (later on, I describe how I made the pinhole). The height of the box is about 6 cm, which is also the “focal length” of the camera.
Paint and tape
I painted the inside black, using watercolour because that’s what I had (acrylic would be easier, needing fewer coats). For further light-proofing and structural integrity, I also applied electrical tape around the edges. But the lid is not taped, so it can be freely opened and closed.
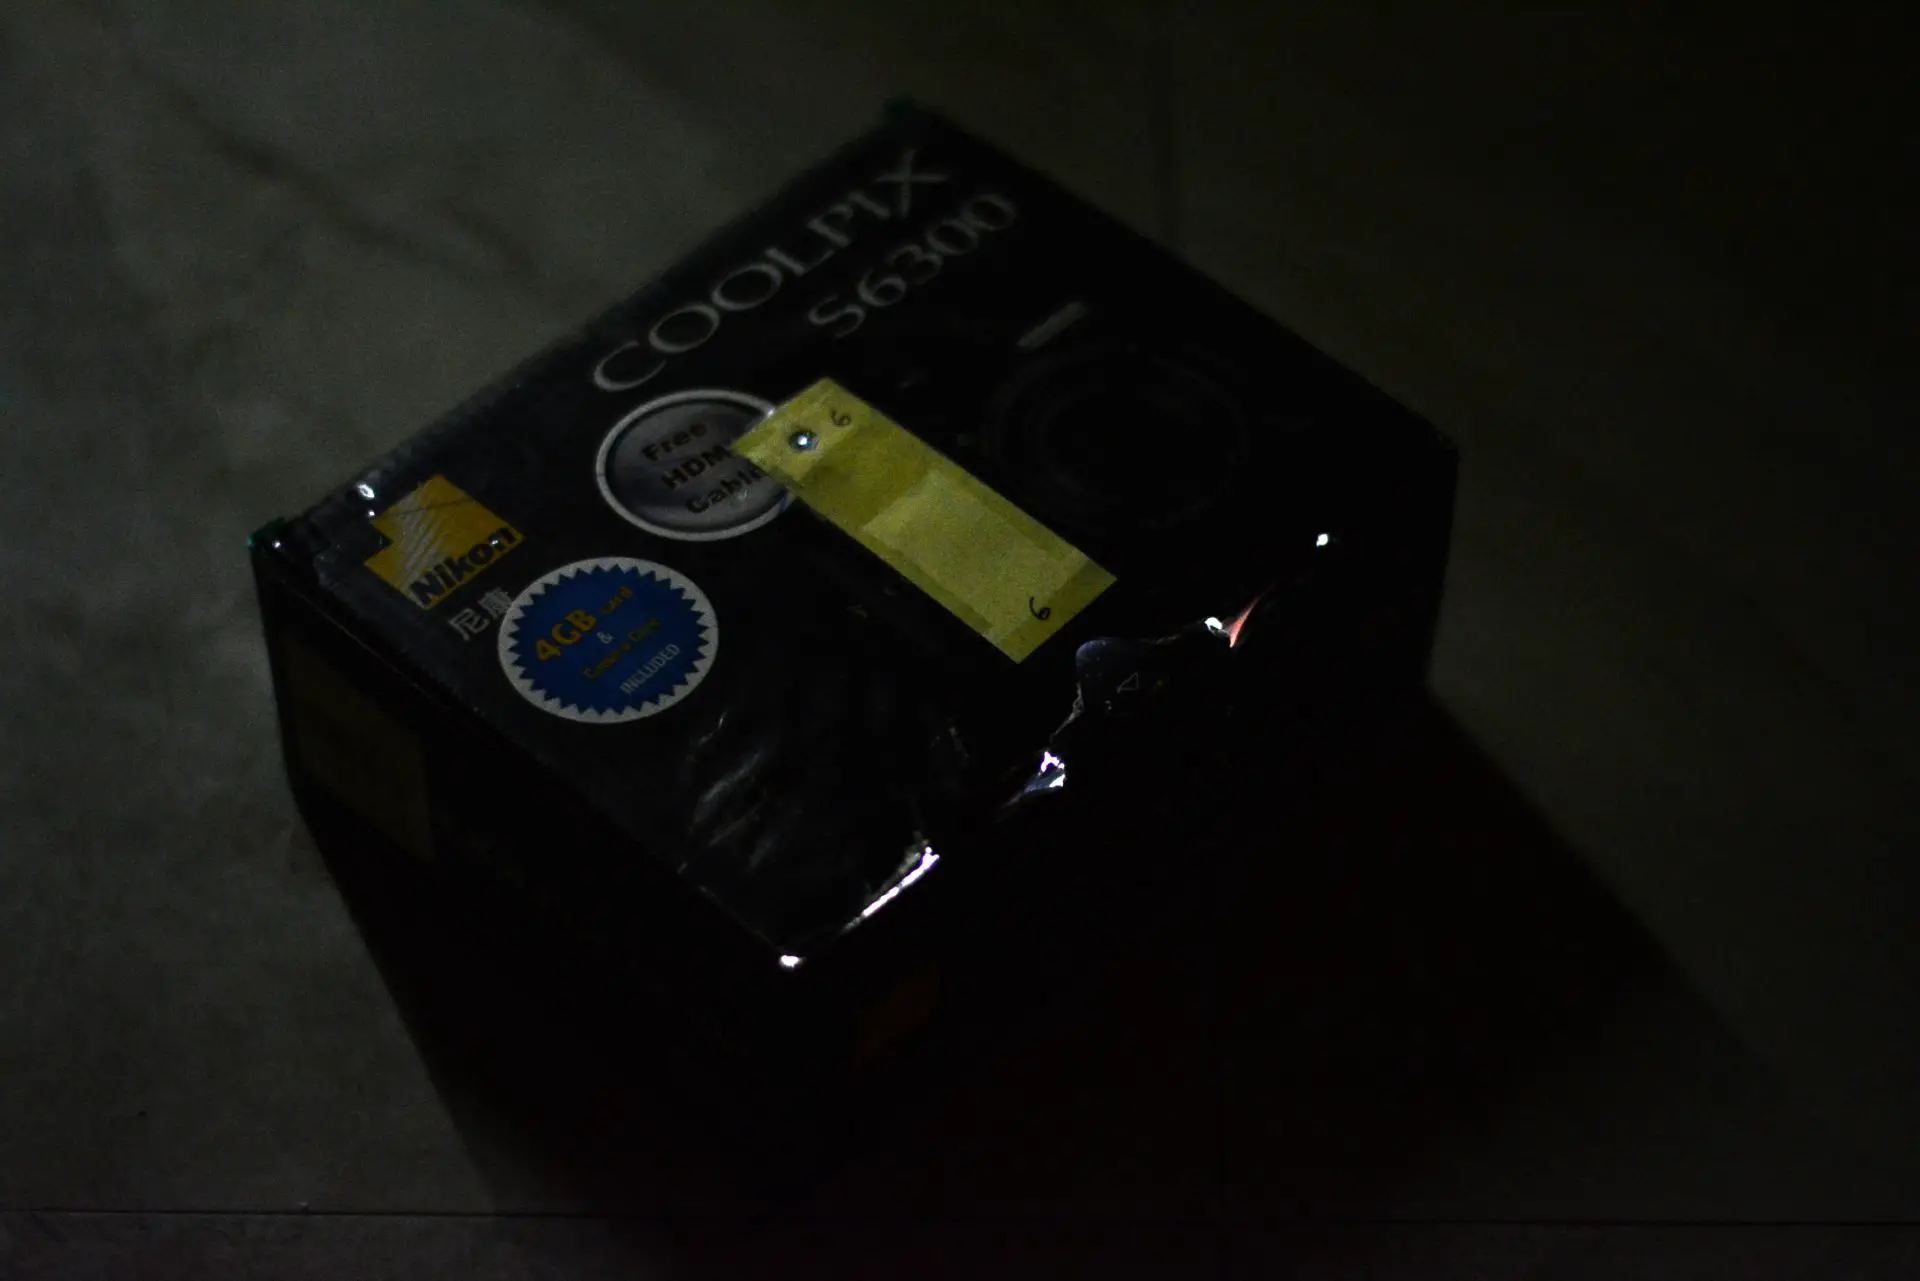
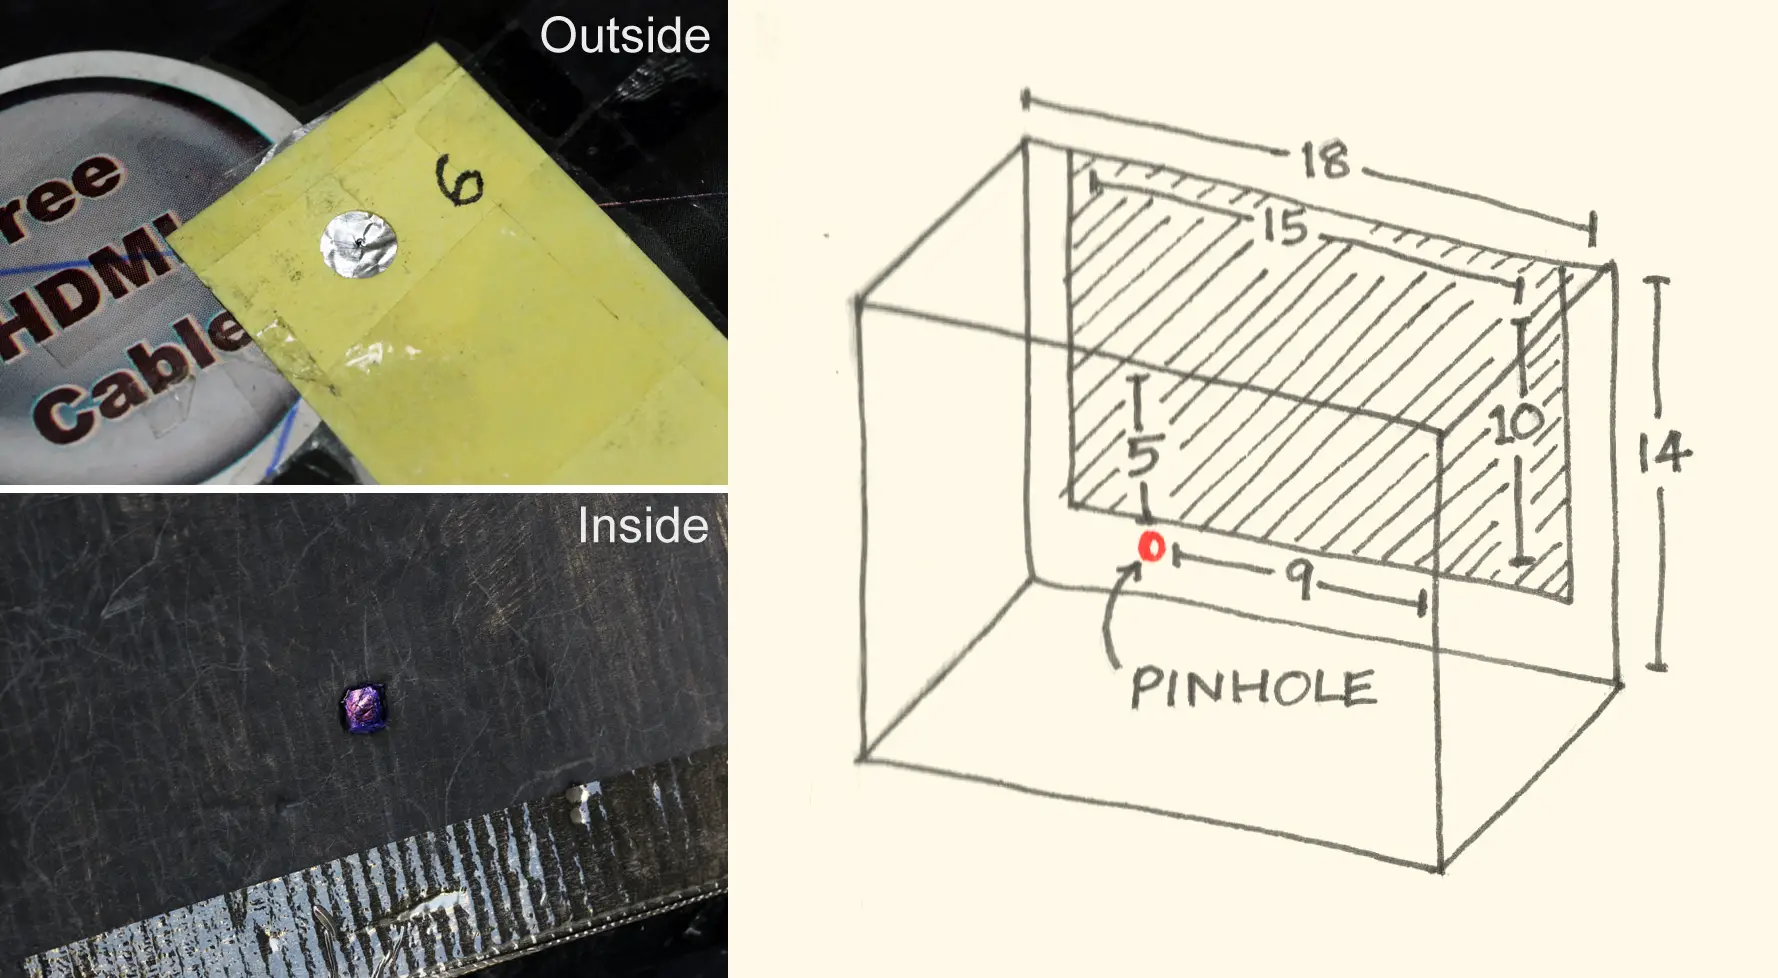
Despite the paint and tape, the box is not light-tight, as you can see from the photo below (I put my phone in the box, with the screen at maximum brightness). This is not a foolproof test, by the way; a camera can pass this test but still have light leaks.
Smartphone boxes make good pinhole cameras because they tend to have well-fitting lids, needing little or no additional light-proofing. But I didn’t have any such box big enough to hold 6×4″ paper. The Peyka template uses a similar (very clever) design, but I also didn’t have a big enough sheet of cardboard. So I had to do what I could with the Nikon box. One option was to tape the lid too, but I knew that would making it annoying to load and unload the camera. Accordingly, I made a simple cardboard cover.
Cardboard cover
The cover is in three parts: a main sleeve and two side-covers. The main sleeve is simply a long, flat piece of cardboard, cut to the same width as the Nikon box. I folded it around the Nikon box and taped the ends, making a removable sleeve.
The sleeve slides snugly over the box, and also houses the shutter – the rectangular thing in the middle (later on, I describe how I made the shutter).
 For the sides, I cut rectangular pieces of cardboard, a little bigger than the sides of the Nikon box, and folded and stapled them as shown.
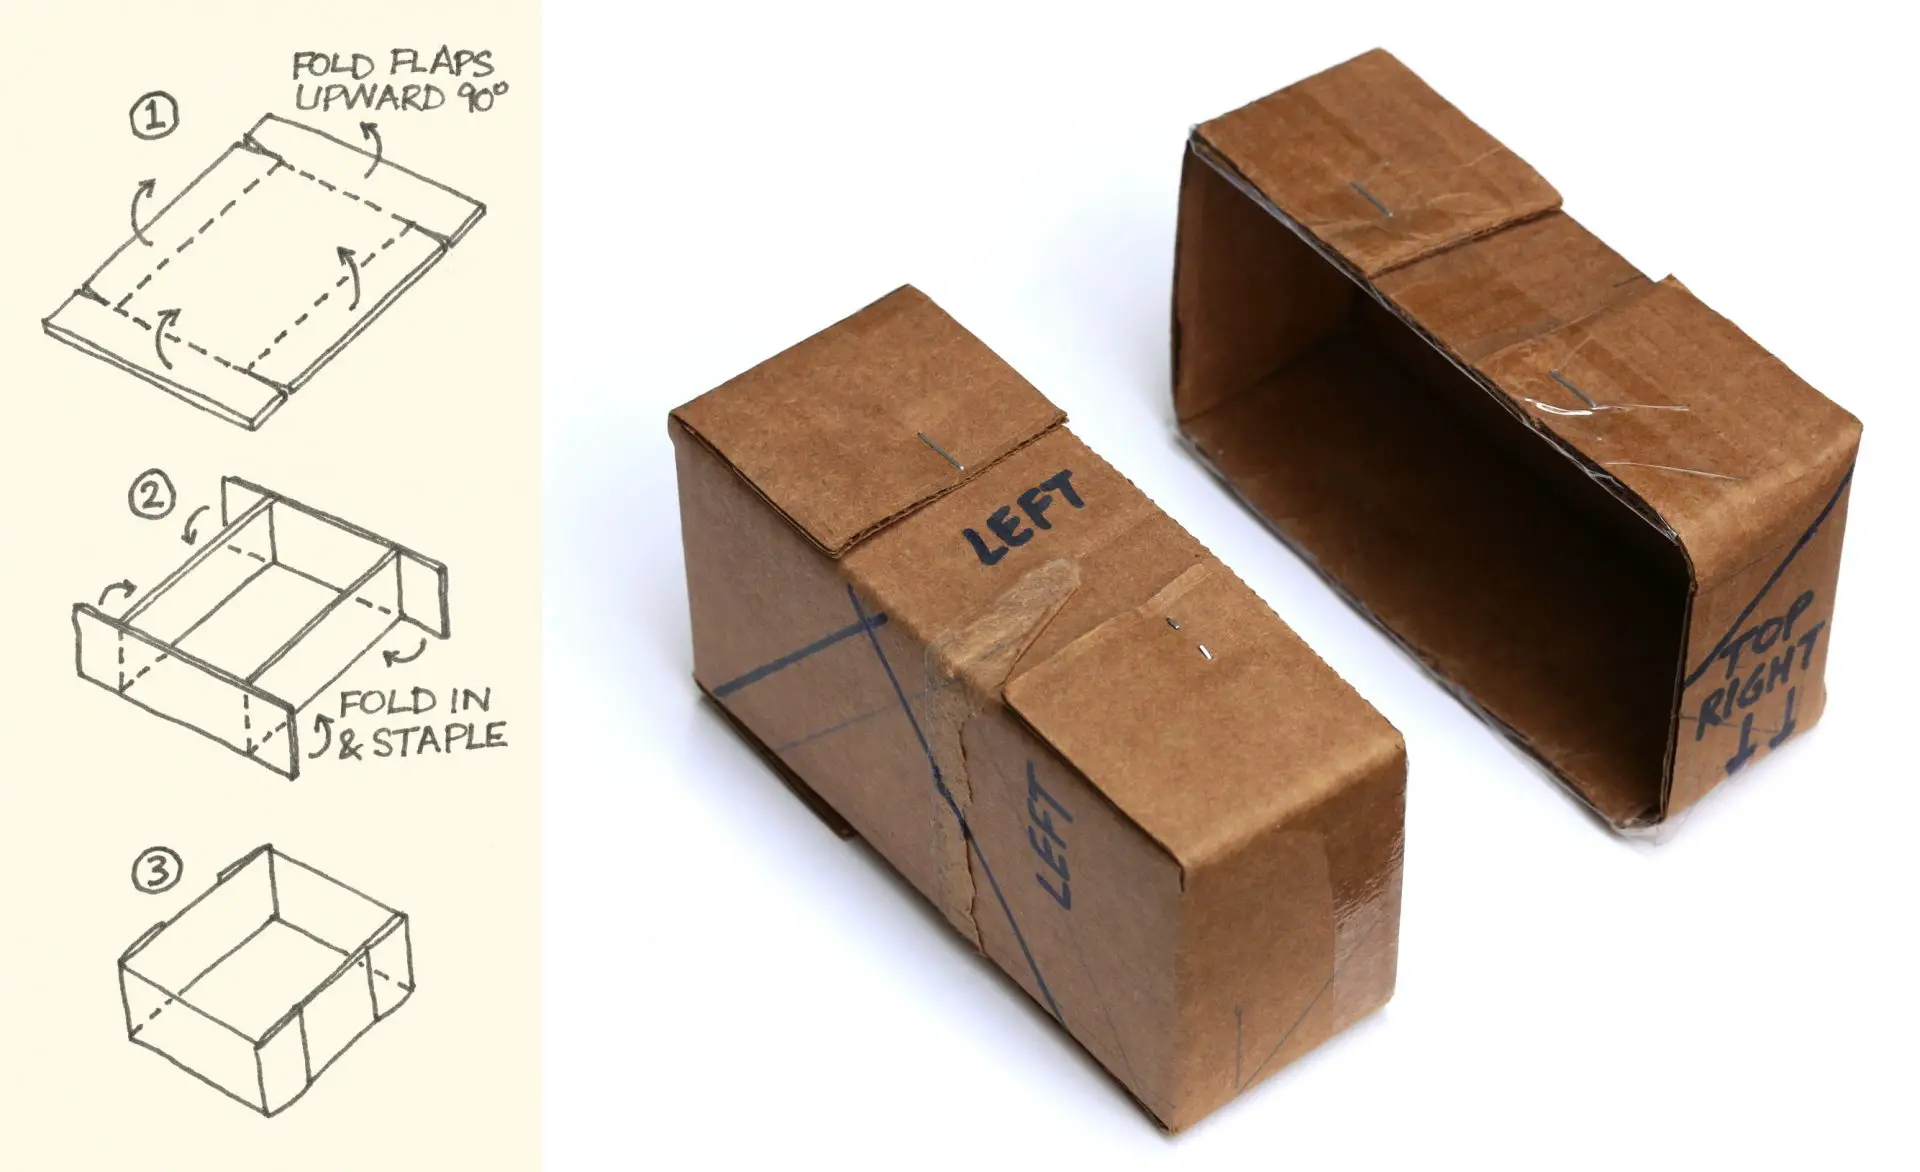
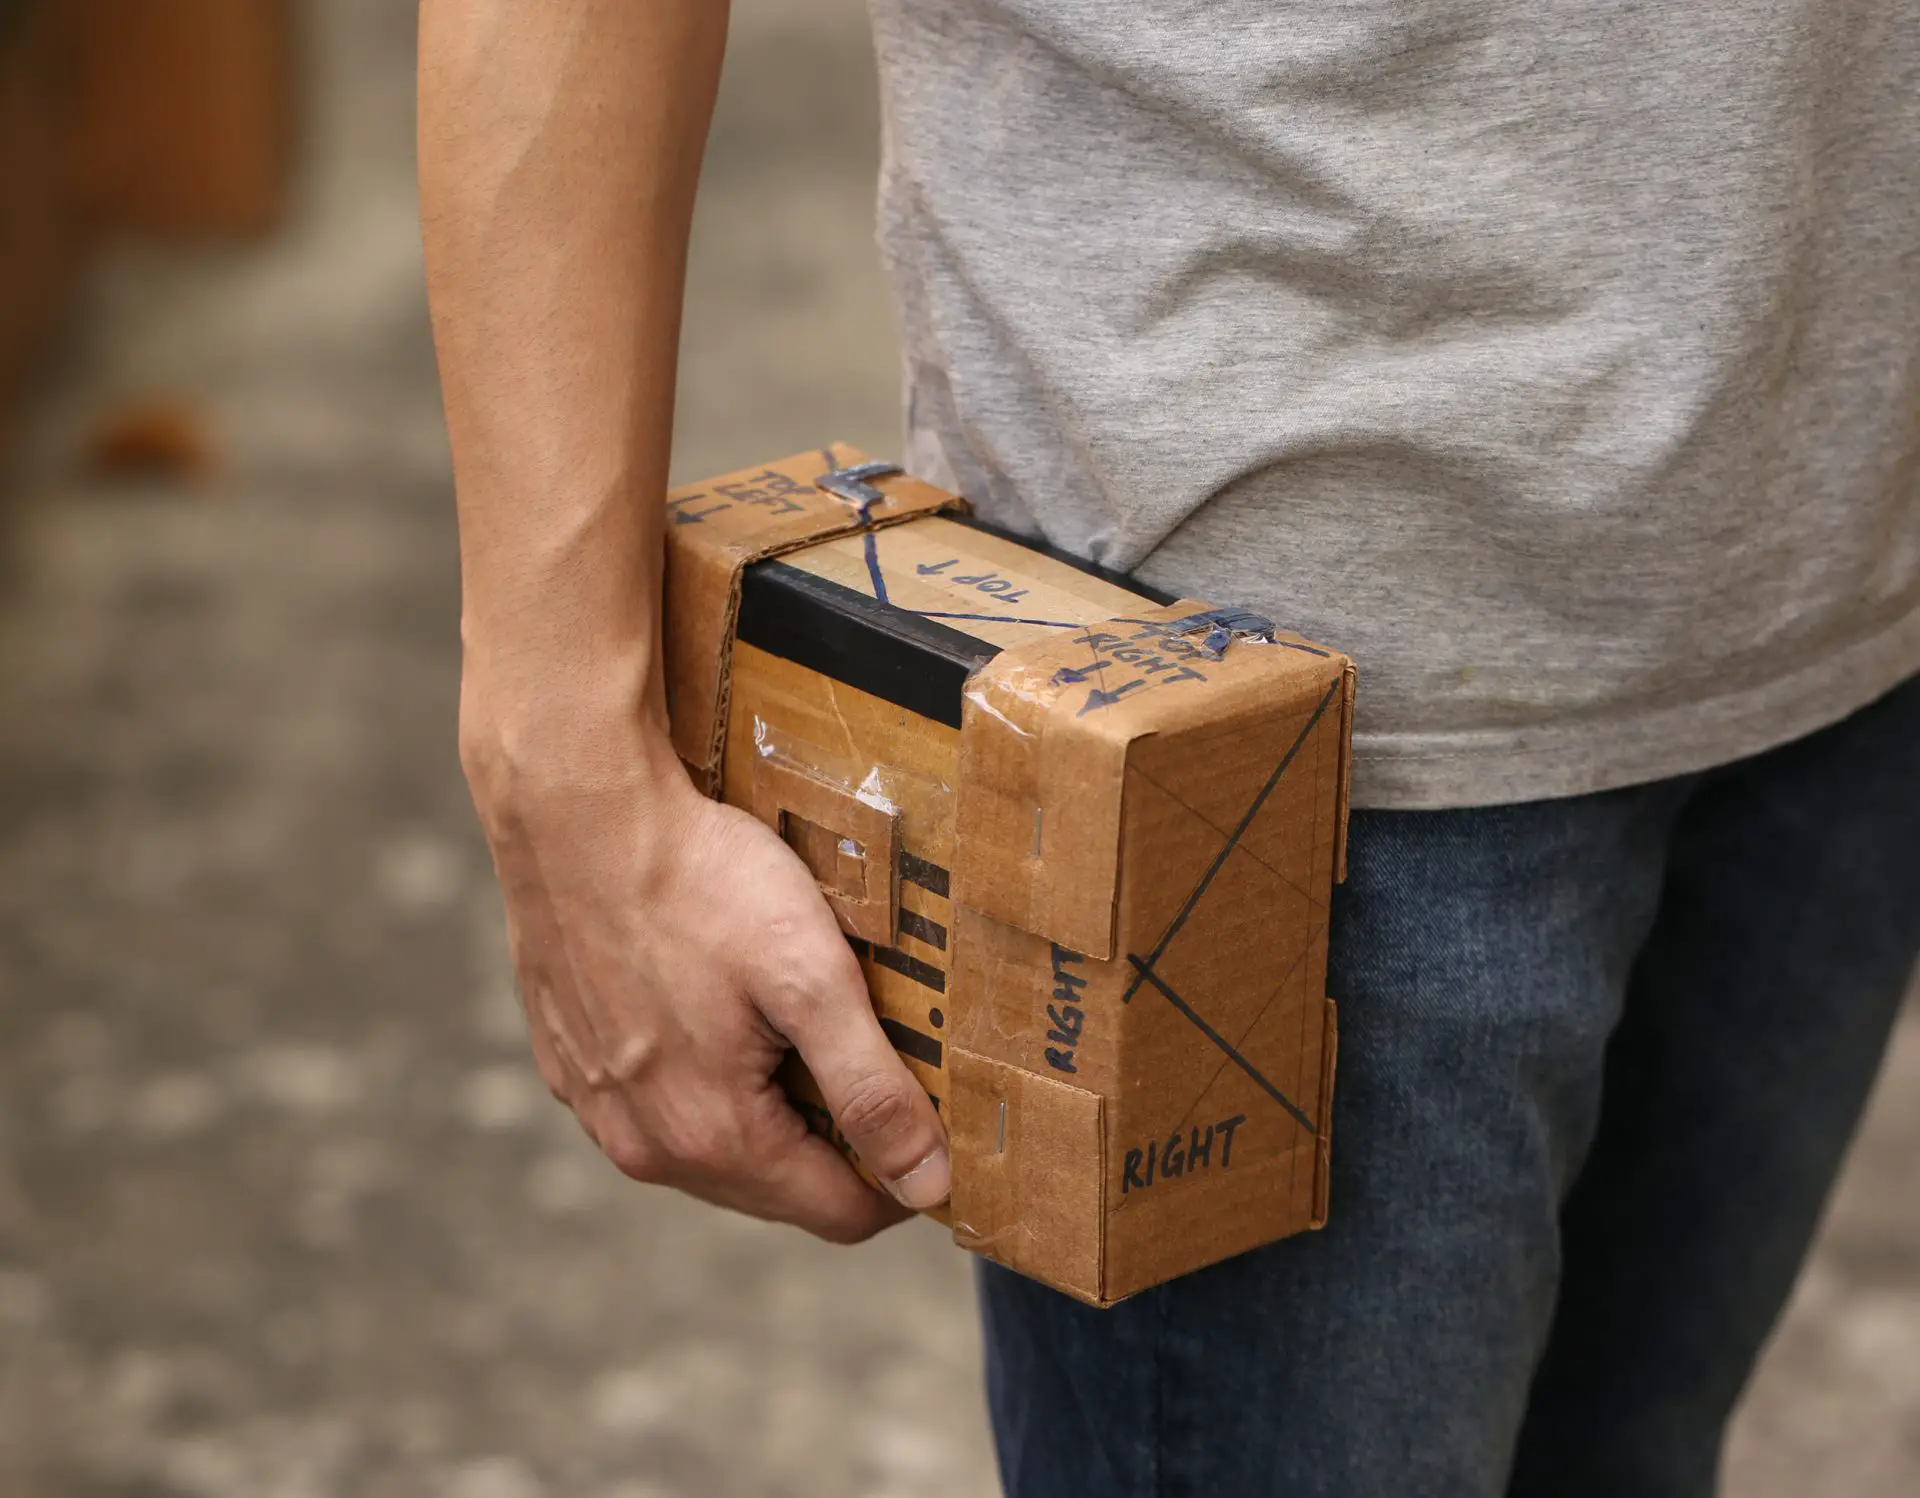
The covers fit snugly over the Nikon box and sleeve, as you can see in the video I posted at the start. The resulting box is light-tight, compact and portable – not much bigger than a 35mm SLR, but producing large-format paper negatives.
Pinhole
Shape
Round pinholes with clean edges produce the sharpest images, and thinner materials are better (a pinhole drilled into a thick material is more like a tunnel, and admits less light). The ideal pinhole is a perfectly round hole in an infinitesimally thin surface. Or at least, that’s the ideal if you want the sharpest possible image. You could argue that pinhole photography is not about sharpness – and who am I to disagree.
Size
How big should the pinhole be? I promised that this post would be maths-free, so I will cover this properly in a later post. The short (but possibly unhelpful) answer is that smaller pinholes produce sharper images… unless they are too small. For a given focal length, as the pinhole gets smaller, image quality first improves, and then deteriorates again. And of course, smaller pinholes also need longer exposure times.
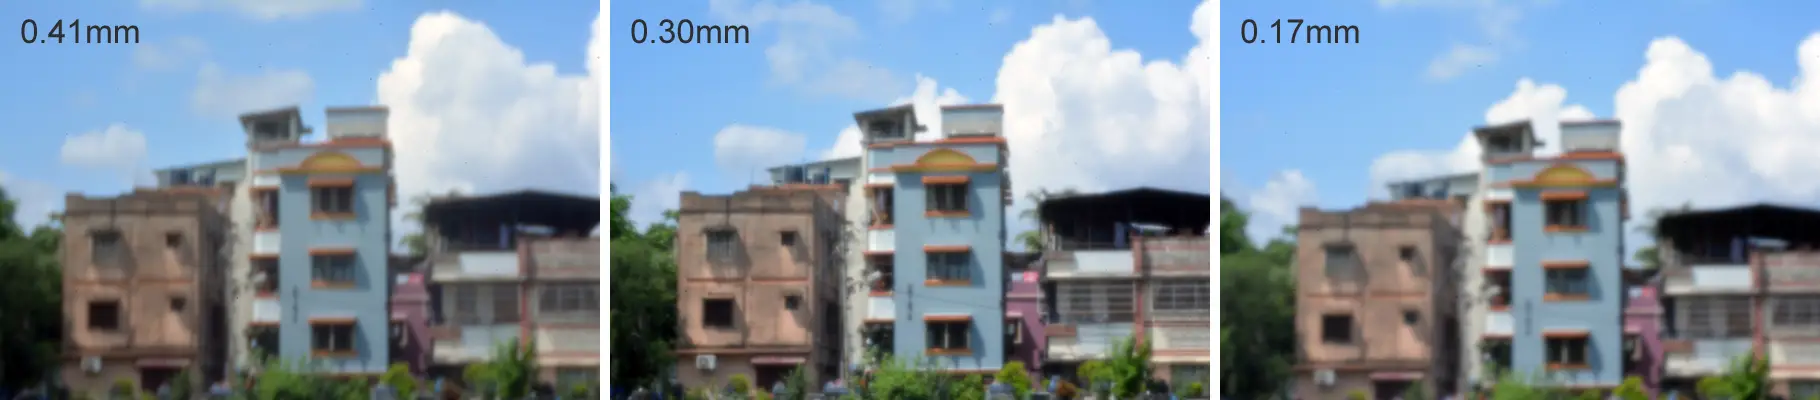
For the comparison above, I used homemade pinholes of three different sizes, attached to my DSLR body cap. The “optimal” pinhole diameter for this setup is 0.27mm, and as expected, the middle image (0.30mm) is sharper than the other two.
There are ways to measure pinholes which don’t need specialised equipment, which is useful if you want to determine the aperture or make the “optimum pinhole”. Different websites give different optimal-diameter values, depending on which formula they use; in a later post I will explain how I chose my preferred formula.
But now we are again flirting with maths. So for the purposes of this post, let’s assume that you’re using trial-and-error. In that case, using the method described below, you can make a few different pinholes, compare and pick the one you like, or simply make a random pinhole and run with it. If you’re using a pinhole camera, sharpness is probably not at the top of your priority list anyway. Embrace the blur.
Making pinholes
There are two classic types of homemade pinhole. The first is a “soft pinhole”, made from materials like aluminium foil or gaffer tape. The second is a “hard pinhole”, made from a piece of thin metal (for example, aluminium from a drink can). Hard pinholes are a little more work, but last longer and produce slightly sharper images (in a subsequent post I’ll show some comparisons). There is a third way, which is buying a laser-drilled pinhole. But for my camera, I wanted to try and keep everything in-house. It’s also an interesting challenge to see if I can get equally good results from home-brewed solutions.
My first pinhole for Nautilus was a soft pinhole, made with aluminium foil from a pack of medicine tablets (kitchen foil will also do, but I find it crinkles easily). I’ve now actually switched to hard pinholes, but the soft variety, being faster and easier to make, is a good choice for “starter pinholes” when testing a camera.
Larger pieces of foil are annoying to work with because they tear easily, while small pieces get lost. My solution is to punch a hole in a post-it note, and stick a small piece of foil on it. I then tape them together for good measure.
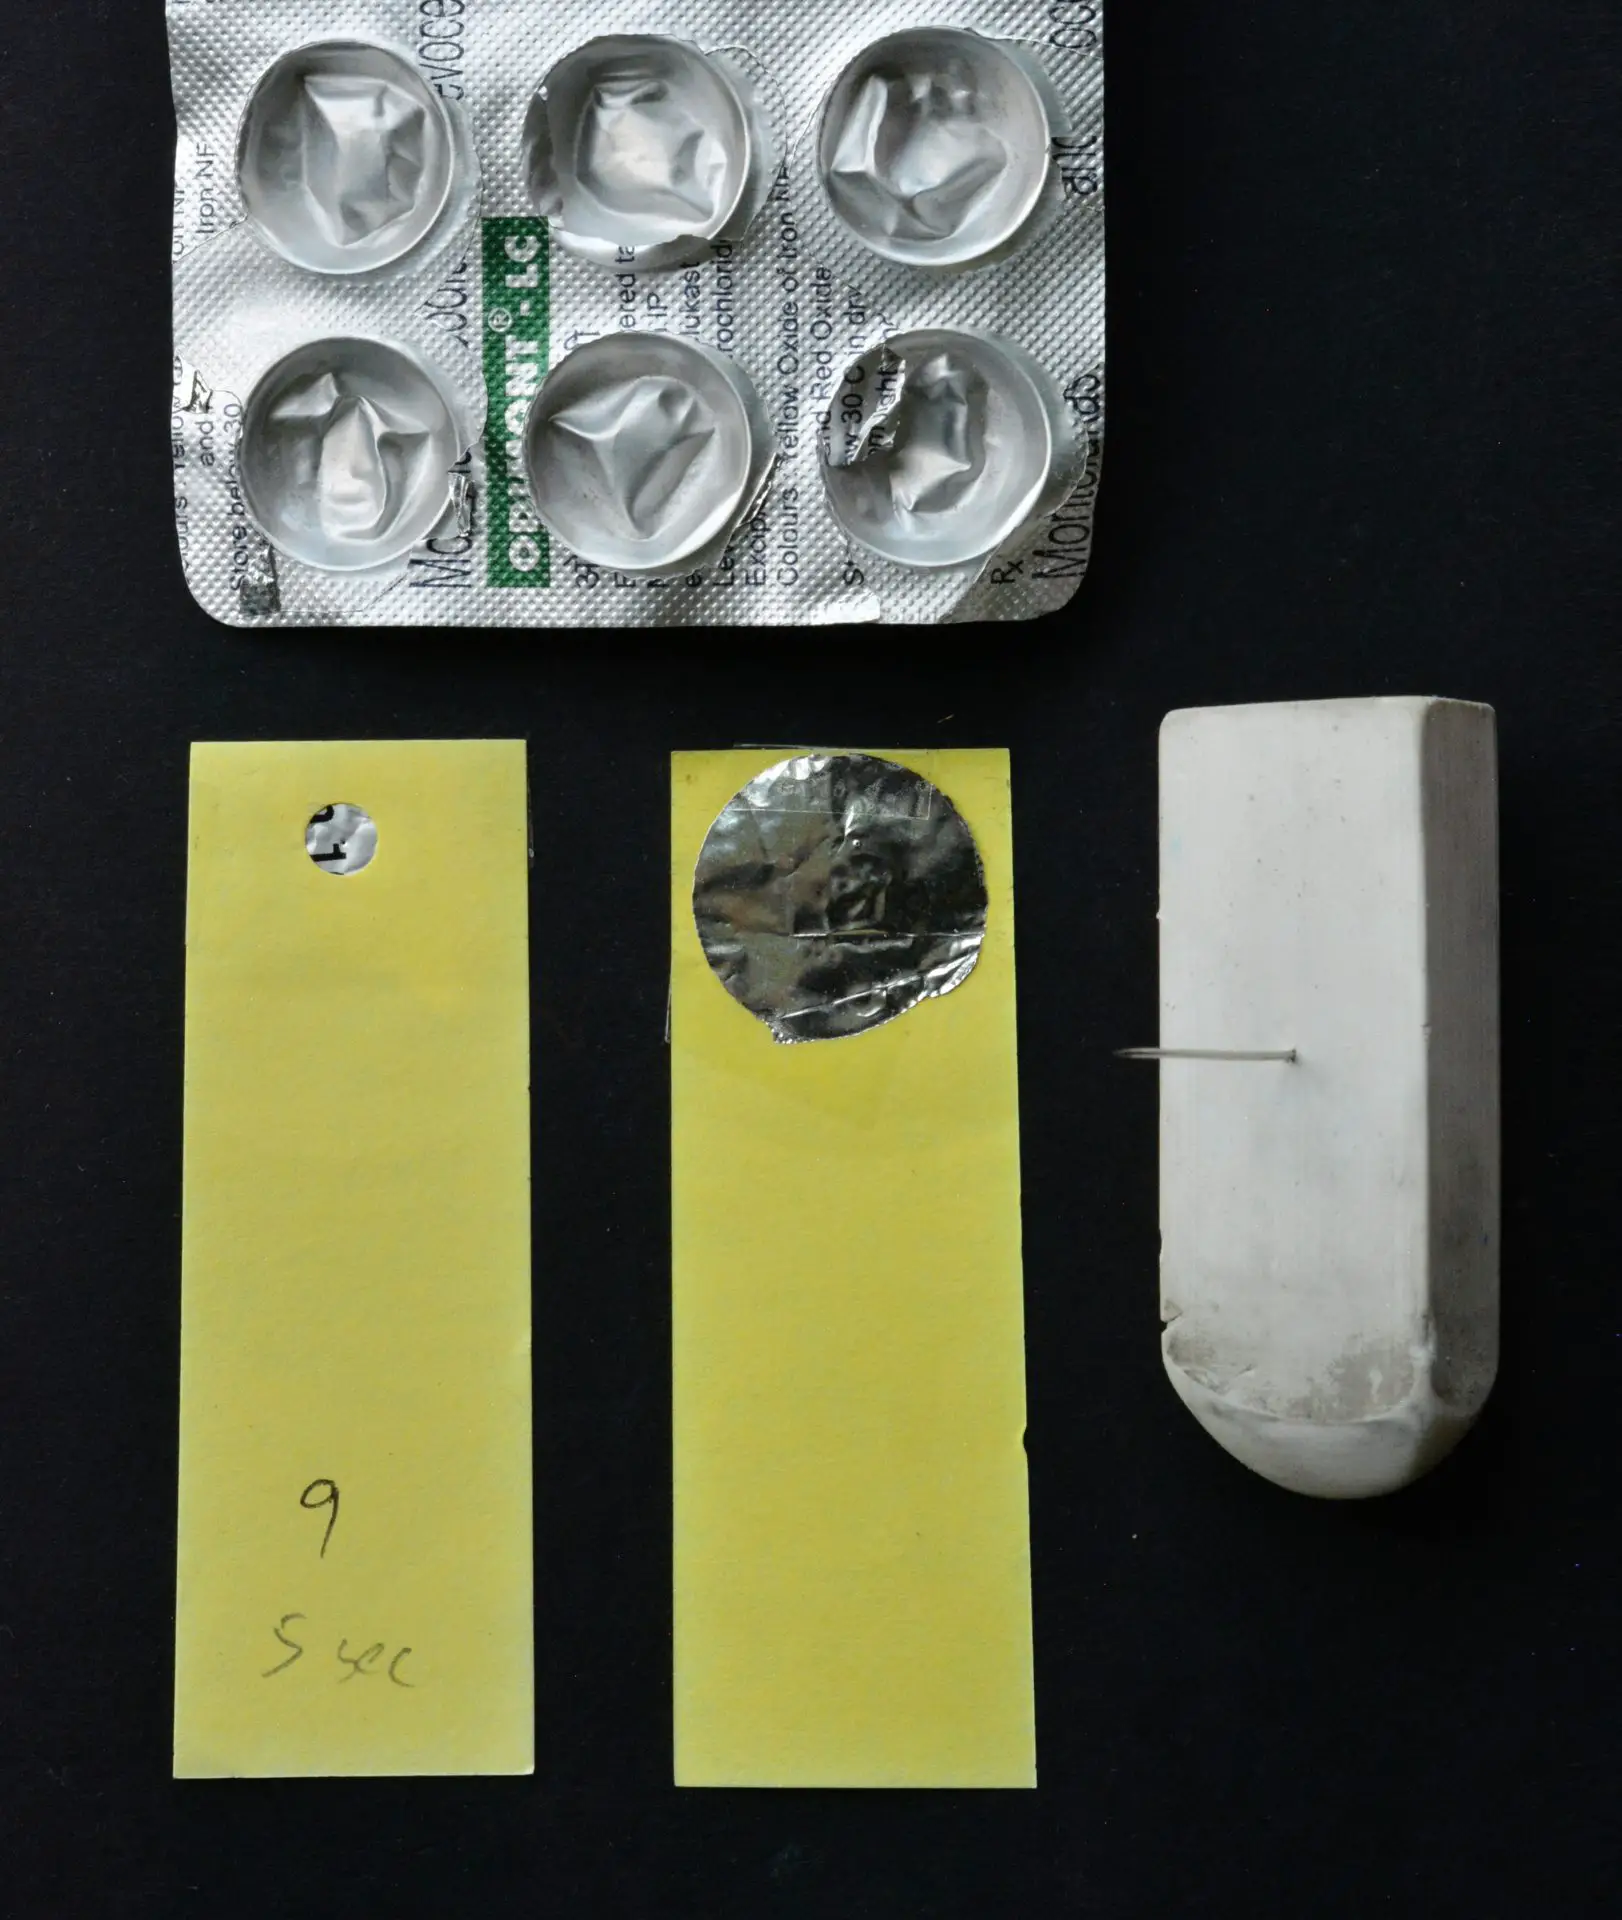
To make the hole, I place it on a semi-soft surface like cardboard, and lightly pierce it with a sewing-needle (I stick the back of the needle into an eraser for better grip, see the photo above). The needle should pierce the foil but not go all the way in – that generally makes the hole too big.
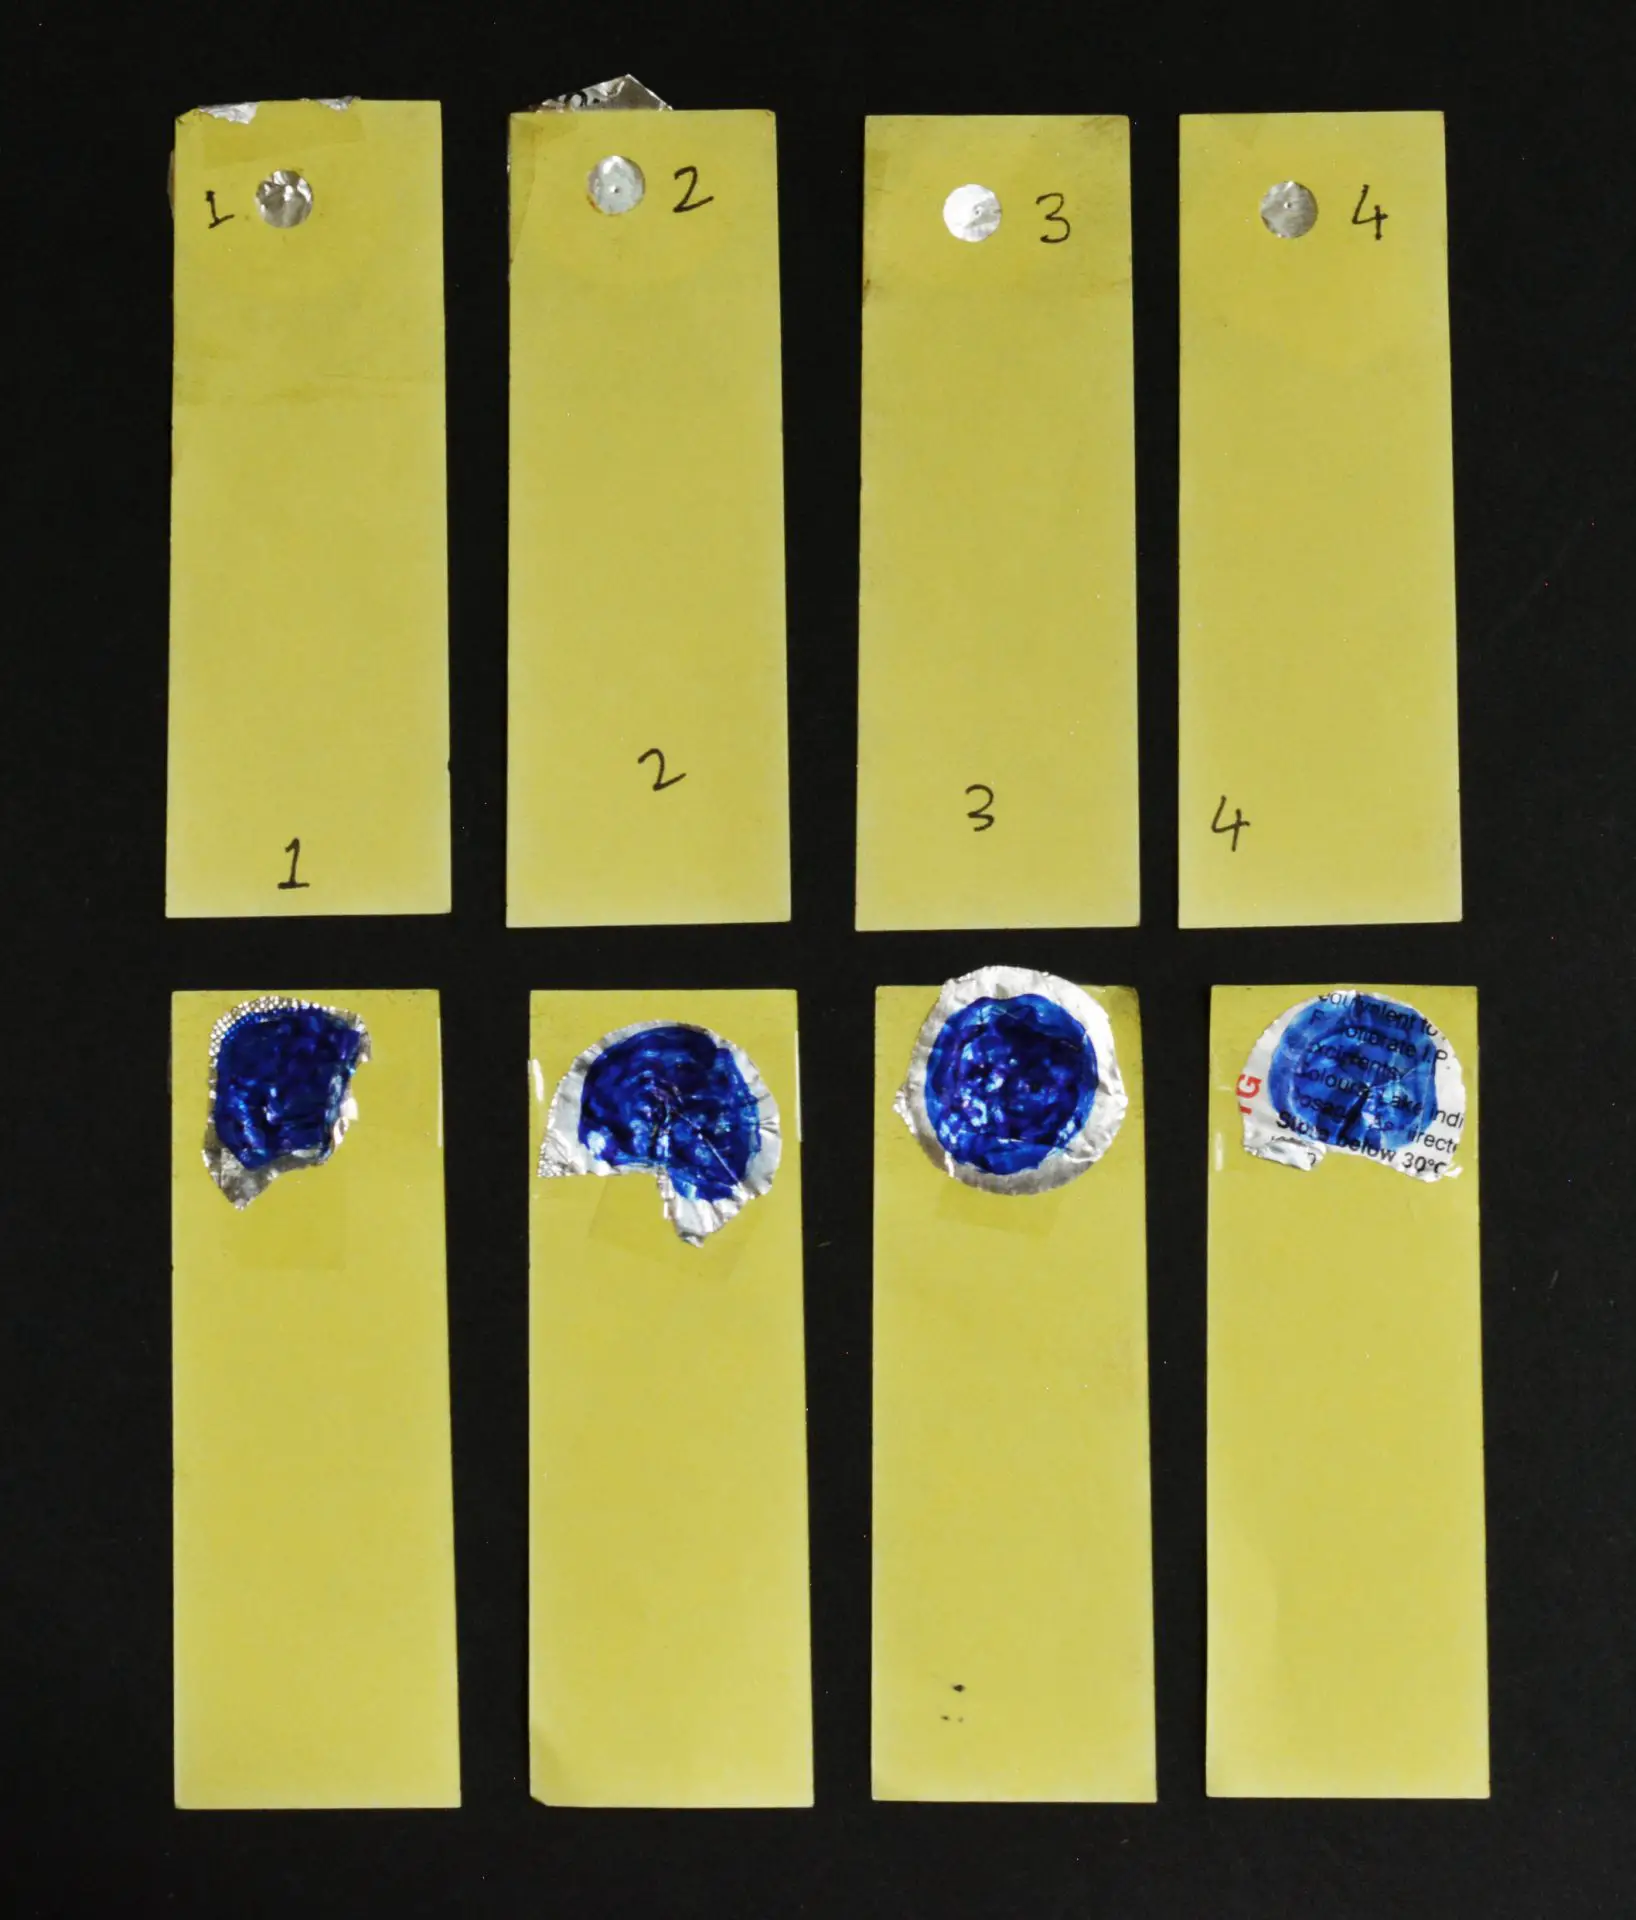
I then write a number on the post-it note, which helps with identification – particularly useful if I want to later measure the pinhole. I also colour the back of the pinhole with a permanent marker, so that it won’t reflect light.
Mounting
I used a craft knife to cut a small window (about 2×2cm) in the cardboard lid of the Nikon box, and simply taped the pinhole to it. If the window is too small, the image will be vignetted.
I originally stuck the pinhole to the outside of the lid (as the photos in this post show), but I’ve now switched to sticking it on the inside. That way it doesn’t get damaged when I slide the cardboard sleeve on and off. The pinhole is interchangeable; I can simply peel it off and attach a new one.
As I mentioned, the Nikon box is a little larger than the 6×4″ paper I use. My paper-holder is designed so that the paper is centred horizontally but flush to the top of the box (this has some advantages which I’ll talk about in a subsequent post). Accordingly, the pinhole is positioned slightly above centre, as shown in the diagram below.
Shutter
Corresponding to the window in the Nikon box, I cut a similar, slightly larger square in the main sleeve. On it, I attached a sliding shutter, made from two pieces of cardboard as shown below. (A simpler shutter can be made just from a piece of electrical tape, but I wanted something more reliable and long-lasting. John Grepstad’s webpage has a list of shutters, of varying degrees of complexity.)
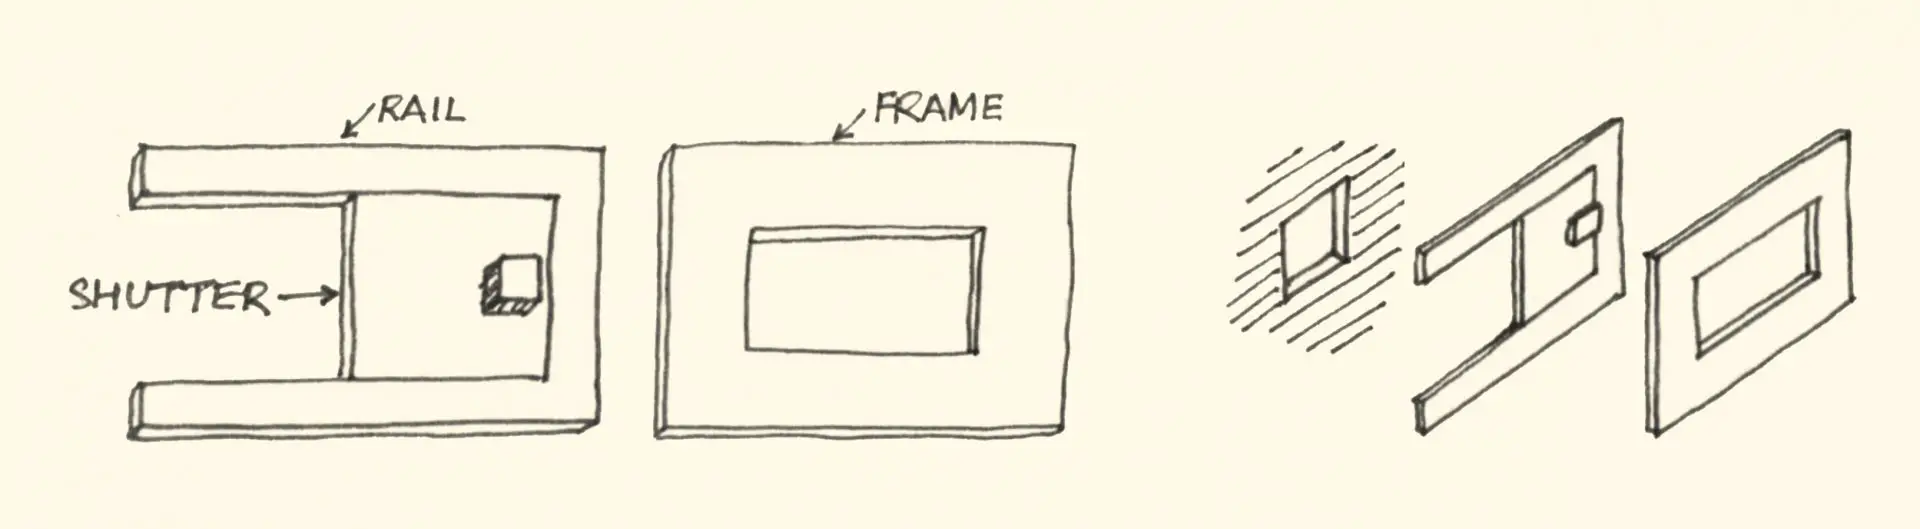
The rail and the movable shutter are cut from the same piece of cardboard; obviously, the shutter should be bigger than the window which it’s meant to cover. The frame is thicker than the rail, so it holds the shutter in place. A separate, small piece is needed for the shutter handle, which also prevents it from sliding out to the left. You can see how it all works in the photos below, and also in the video I posted at the start.
Paper-holder
The photo paper I use to record the image has to be held in place. It can simply be taped to the back of the camera as in my first camera, but I wanted something more convenient. So I made a simple paper-holder from two pieces of cardboard.
The lower (bigger) piece has the same dimensions as the bottom of the box. I just press it in, as you can see in the video I posted at the start, and it’s held firmly in place by simple friction. I also added a notch on the right for easy removal. The second piece is slightly smaller (6×4″, i.e. same size as the paper), and taped onto the first piece.
The second piece has four cellotape “corners” to hold the paper. The diagrams on the left show how to fold a piece of tape to make a corner – fold the sticky sides together, then fold the (now non-adhesive) piece at a 45° angle over a corner of the holder. Tuck the loose ends under, and tape them to the reverse side of the cardboard. With this arrangement, loading and unloading paper is fast and easy; I can literally do it with my eyes closed.
More features
I gave the camera an additional “feature” – framing guides. I simply drew lines with a marker on the top and sides of the camera, as shown below. Anything inside the (imaginary) dotted lines will appear in the frame. The method is not super precise, but pinhole photography is not really about precision anyway!

Of course, for the guides to work, the otherwise interchangeable side-covers must be correctly oriented, so I wrote “Left” and “Right” with a marker. I also added a cardboard L and R (which you can see in the photo above) as a tactile indication for when I’m loading in a dark bag.
In the photos below, I’ve tried to show how the framing guides work – though it is much easier in 3D. I’m checking the horizontal guides (first photo) and vertical guides (second photo) to check that the frame includes the white flowers and the guitar bridge respectively.

Another useful feature would be a tripod mount. I already have a tripod, so I guess I could buy a tripod adaptor for smartphones (the camera is just wider than my phone, so it would fit). Or I could buy a ¼” nut and somehow attach it to the bottom of the camera. But so far I haven’t had to buy anything at all for the build – a zero-cost camera – and I’m trying to see if I can keep it that way. If you have any suggestions, please let me know. Ideas for other features and modifications are also welcome.
Photos
These are some of the first photos I took with my pinhole camera (some of you might recognise the monkey from an earlier post).
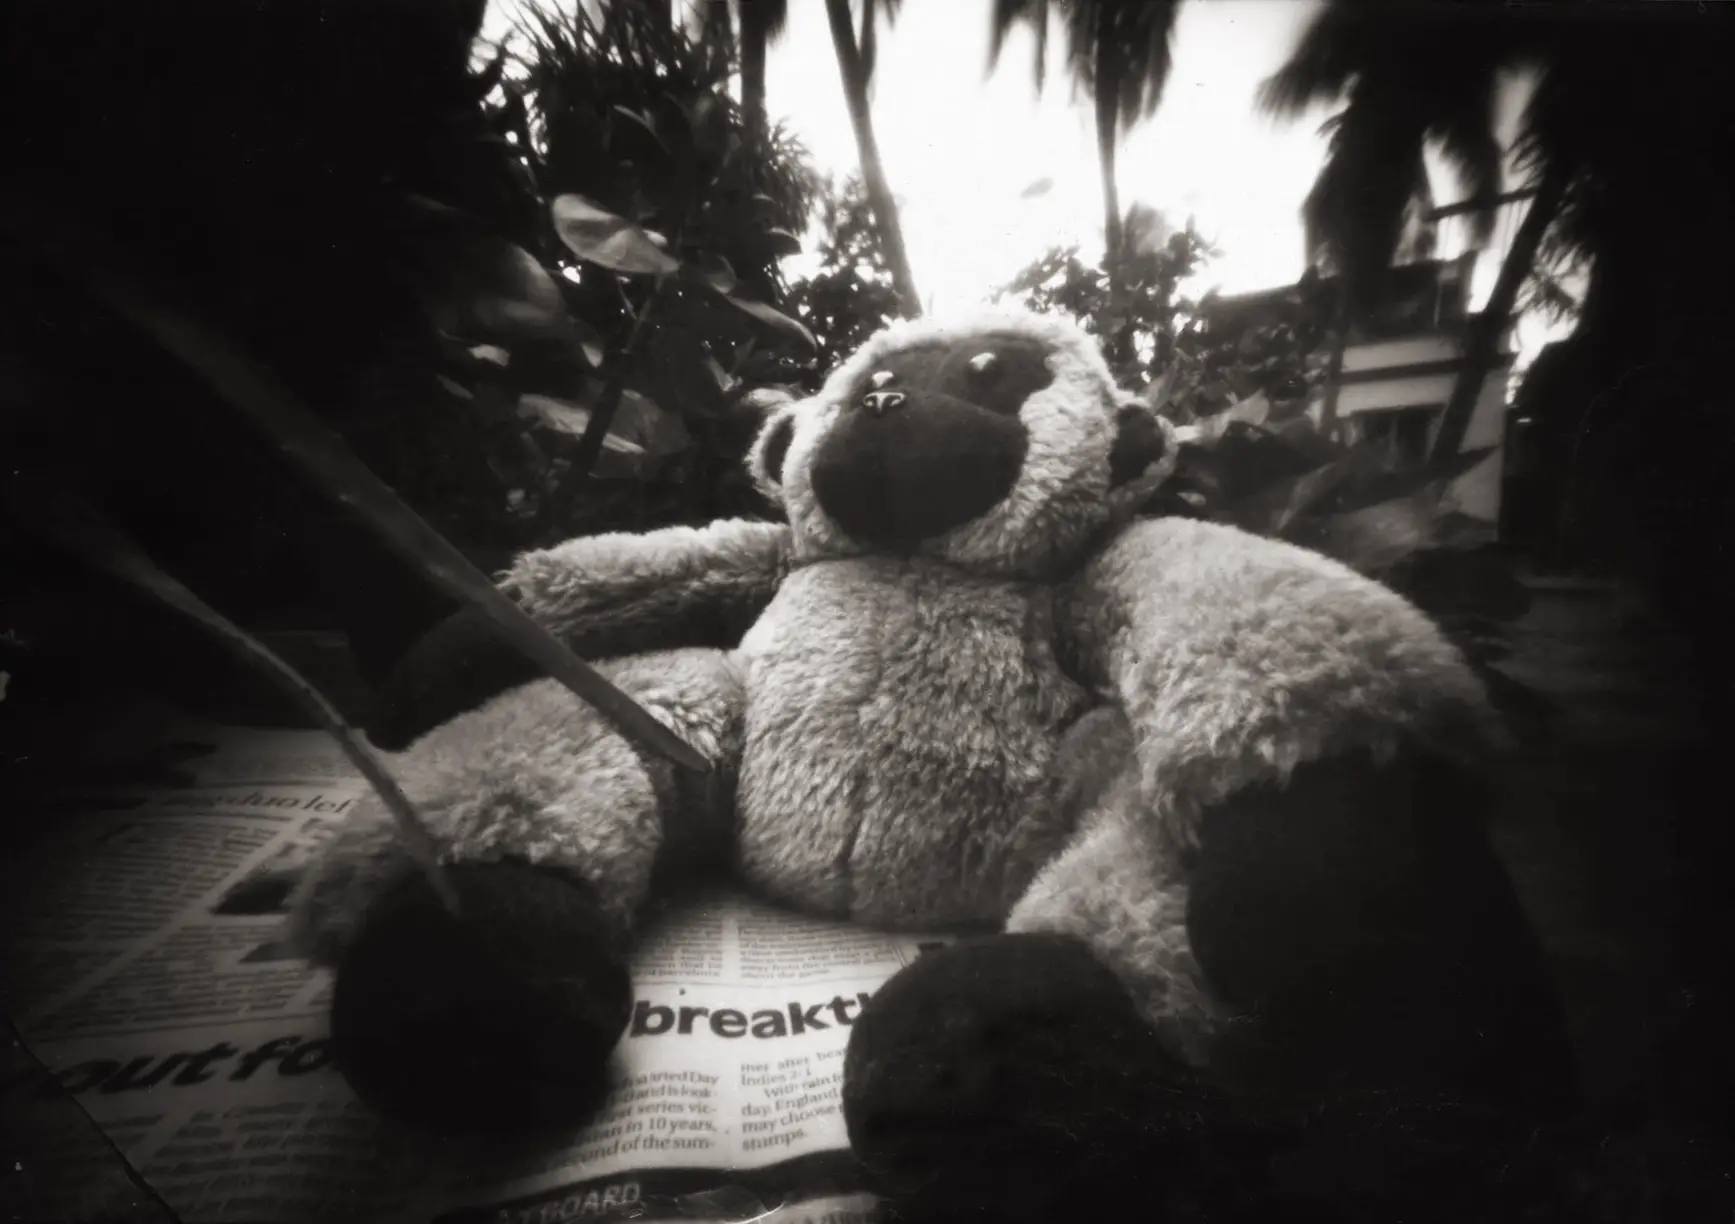
Diana Pankova, whose work was featured in Part 1, said in an interview that pinhole cameras “turn the most common scenes and objects into something magical, revealing aspects of reality which are hidden to the human eye or other optical instruments.” That quality, I feel, is on display in the monkey photo, where “pinhole vision” transforms a small, harmless-looking soft toy into a somewhat ominous figure – “King Kong in the Jungle”, my friend called it. The critic Viktor Shklovsky wrote that the purpose of art is “making things strange”. Though he was not talking specifically about pinhole photography, the whole passage is worth a read; a bit of Russian formalism never goes amiss:
And so, held accountable for nothing, life fades into nothingness. Automatization eats away at things, at clothes, at furniture, at our wives, and at our fear of war … in order to return sensation to our limbs, in order to make us feel objects, to make a stone feel stony, man has been given the tool of art. The purpose of art, then, is to lead us to a knowledge of a thing through the organ of sight instead of recognition.
Not merely to recognise, but to see – something to aspire for!
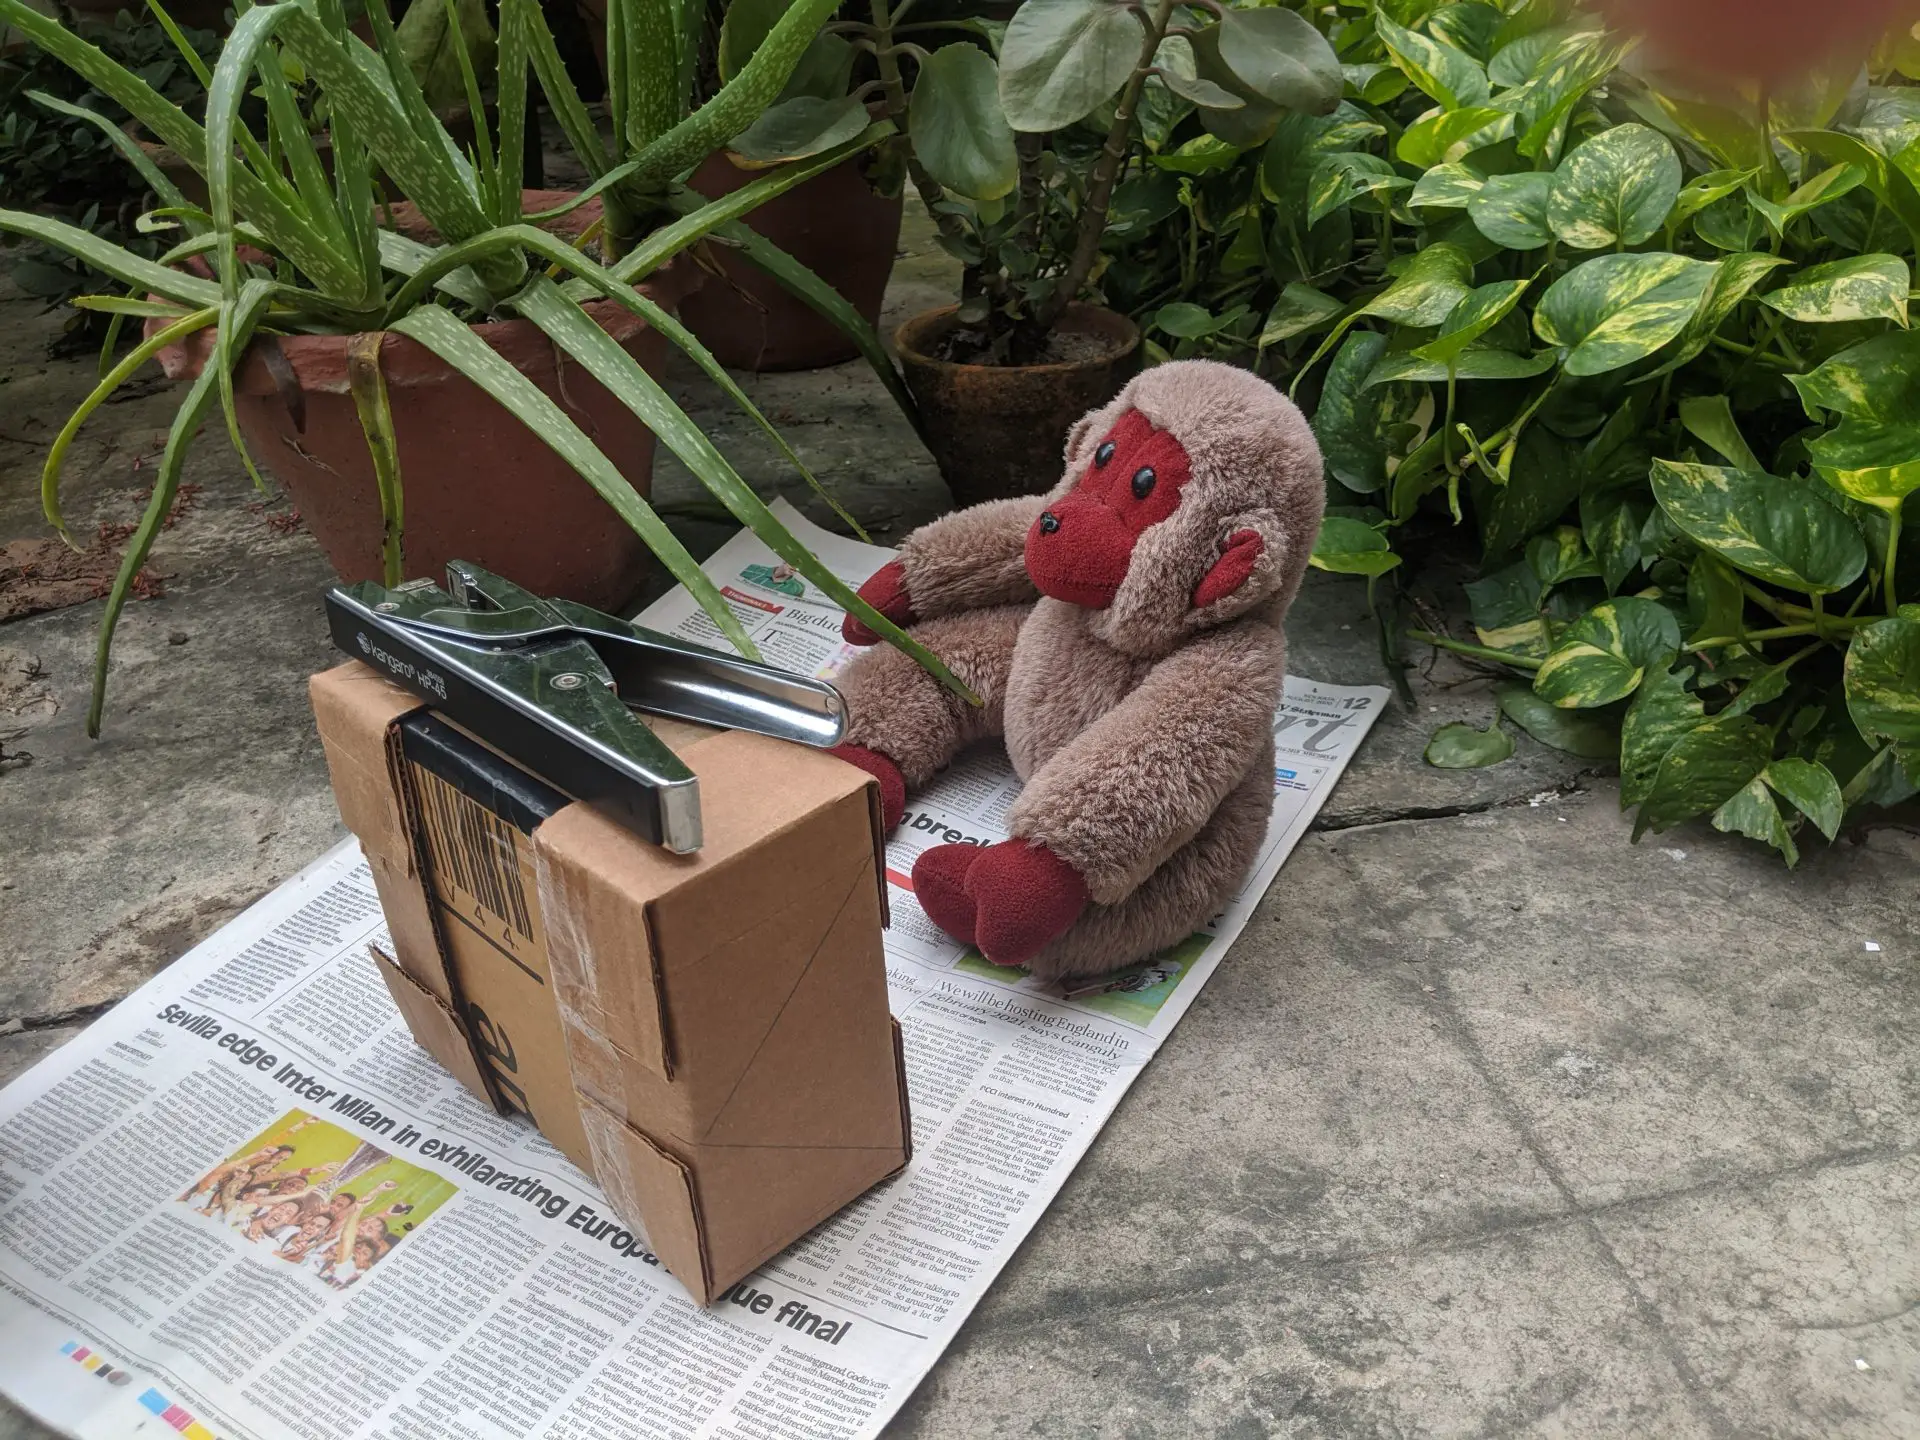
The monkey photo was a 9-minute exposure in open shade. I also took a “behind the scenes” pic with my phone; you can see how close the camera was. The stapler on top of the camera is just to weigh it down, as it was quite windy.
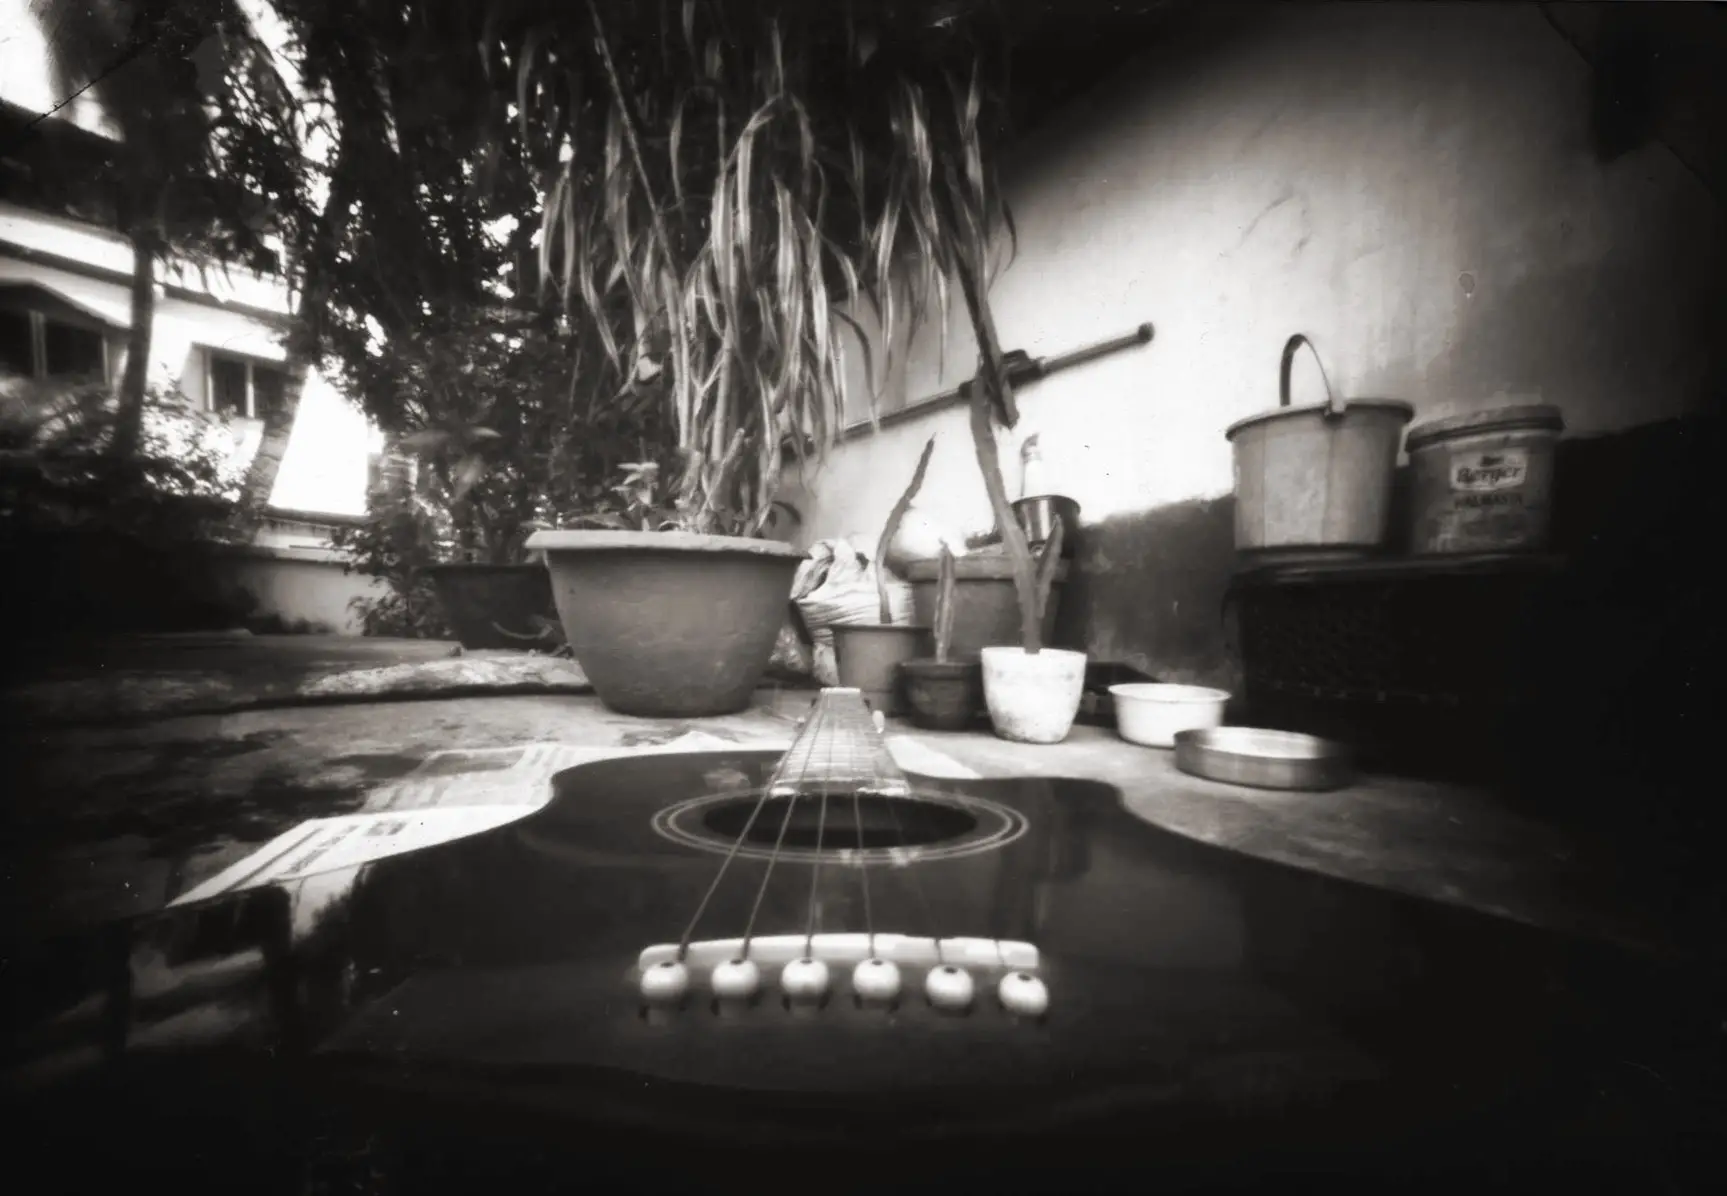
The next photo is an even better illustration of the wide-angle perspective. I literally placed the camera on the body of the guitar, and it still captured the bridge. The angle of view is similar to that of a 14mm lens on a 35mm camera. Such ultrawide lenses almost always have some barrel distortion, but pinhole cameras are theoretically distortion-free: straight lines remain straight. Of course, they have any number of other “flaws”…
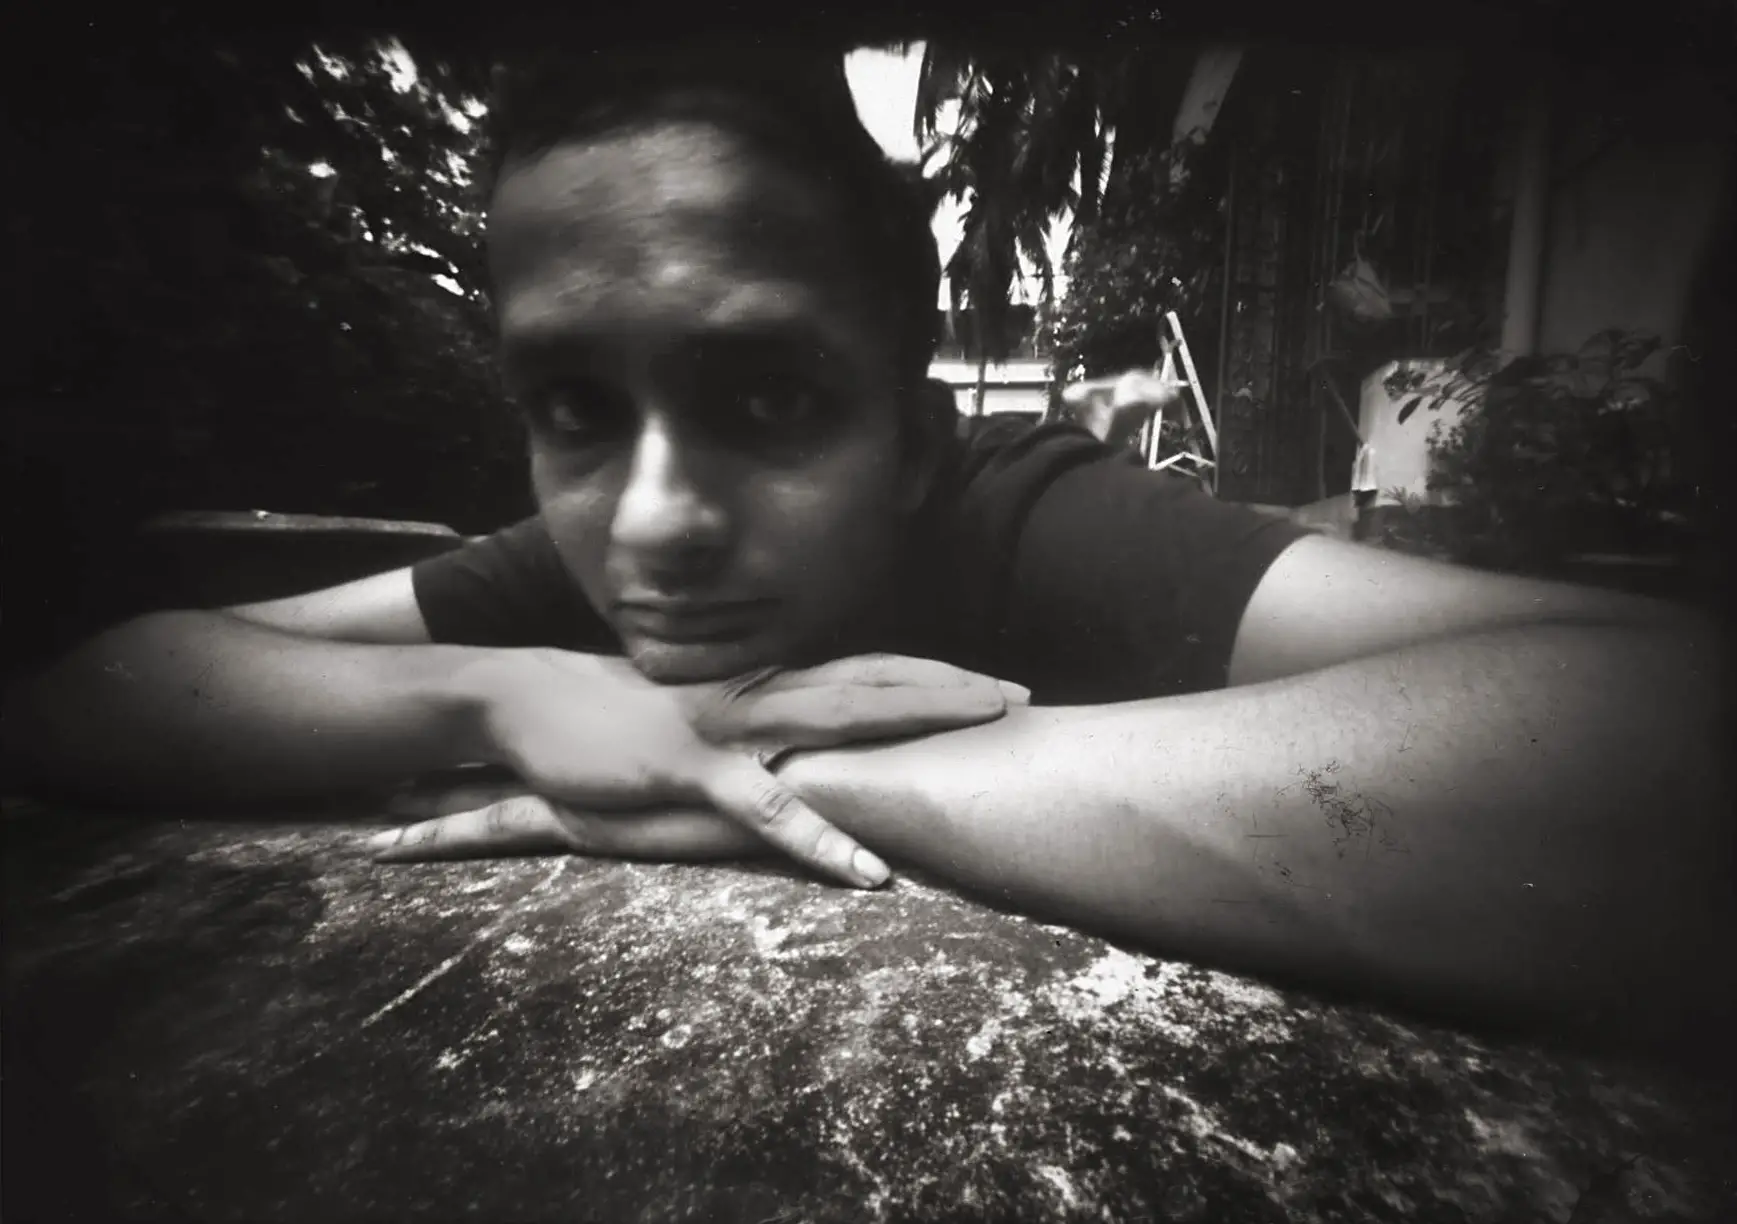
The final photo is a selfie: a 2-minute exposure in bright sunlight. The camera was only about 20cm from my face. I reached out to open and close the shutter, but none of this was recorded. Pinhole magic!
Part 3 and future plans
So much for building (and starting to use) my camera! The next part will be a technical (but hopefully interesting) post about pinhole size. How to calculate the “optimal” diameter? How to measure it? Does it matter? Do we care? All this and more, in two weeks’ time.
In subsequent parts of this series, I plan to try cameras with different angles of view (a “normal focal length”, for example), and also experiment with curved paper, panorama and tilt-shift functions. I also want to try using a yellow filter, pre-flashing and different developing techniques to tame the contrast (the photos I’m currently getting are quite contrasty), and contact-print some of my paper negatives with an enlarger. In addition to paper negatives, I’ll post some digital pinhole photos, and I might make (or convert) a pinhole camera for 35mm film.
In parallel – and this is perhaps the hardest part – I’m also trying to generally get better at pinhole photography. I can sometimes get a bit carried away by experimentation and techniques, so I’m trying to focus on the creative side too – making images which are not just “test shots” but hopefully something more. If all this sounds like pinhole overdose, rest easy – these posts will only appear at fortnightly (or if I’m busy, even longer) intervals; 35mmc is not about to become the Pinhole Photography Blog. On the other hand, if you’re somehow hungry for more pinhole content, you can check out my Instagram which is mostly “lens photography” (aka normal photography) and darkroom tinkering, but I am starting to post pinhole photos too.
I evidently have quite a long list of things to try, but I’m always looking to add to it, if you have any other suggestions or feedback, please let me know. It doesn’t matter if you’re a pinhole camera veteran, or have never used one before – all ideas are welcome. Thanks for reading.
Share this post:


#/media/File:Nautilus_Neuville.JPG)
Comments
Chris Pattison on Making and Using a Cardboard Camera: Pinhole Adventures Part 2 – by Sroyon
Comment posted: 05/10/2020
Comment posted: 05/10/2020
davesurrey on Making and Using a Cardboard Camera: Pinhole Adventures Part 2 – by Sroyon
Comment posted: 05/10/2020
In the past I've played around with a laser pinhole for my DSLR but your experimentation adds fun to the whole exercise.
I'm thinking to try something similar with my grandkids in a year or so when they are old enough to appreciate the magic.
Comment posted: 05/10/2020
Scott Gitlin on Making and Using a Cardboard Camera: Pinhole Adventures Part 2 – by Sroyon
Comment posted: 05/10/2020
Comment posted: 05/10/2020
Joe Van Cleave on Making and Using a Cardboard Camera: Pinhole Adventures Part 2 – by Sroyon
Comment posted: 06/10/2020
Comment posted: 06/10/2020
Khürt Louis Williams on Making and Using a Cardboard Camera: Pinhole Adventures Part 2 – by Sroyon
Comment posted: 06/10/2020
On the topic of camera conveniences. Not all of us have the best eyesight, or hearing, etc. Some of these conveniences are what allow photography to be enjoyed by all.
Comment posted: 06/10/2020
Gerard Exupery on Making and Using a Cardboard Camera: Pinhole Adventures Part 2 – by Sroyon
Comment posted: 07/10/2020
Comment posted: 07/10/2020
eric on Making and Using a Cardboard Camera: Pinhole Adventures Part 2 – by Sroyon
Comment posted: 12/10/2020
You give me the idea to try one day ;-)
Comment posted: 12/10/2020
Cuando lo importante es la caja: historias de "pinhole" | fotochismes.com on Making and Using a Cardboard Camera: Pinhole Adventures Part 2 – by Sroyon
Comment posted: 24/10/2020
grubernd on Making and Using a Cardboard Camera: Pinhole Adventures Part 2 – by Sroyon
Comment posted: 27/10/2020
I have used this method for years to mount objects on tripods as a stilllife studio assistent.
Enjoy. =)
Comment posted: 27/10/2020
18 DIY Pinhole Cameras - Easy DIY Crafts - Susie Harris on Making and Using a Cardboard Camera: Pinhole Adventures Part 2 – by Sroyon
Comment posted: 24/10/2022