

Part one of this article looked at how, after very humble beginnings, NASA realised the potential photography could bring to the Space Program – how the cameras used in space were selected, modified, and used, and the film stocks were chosen.
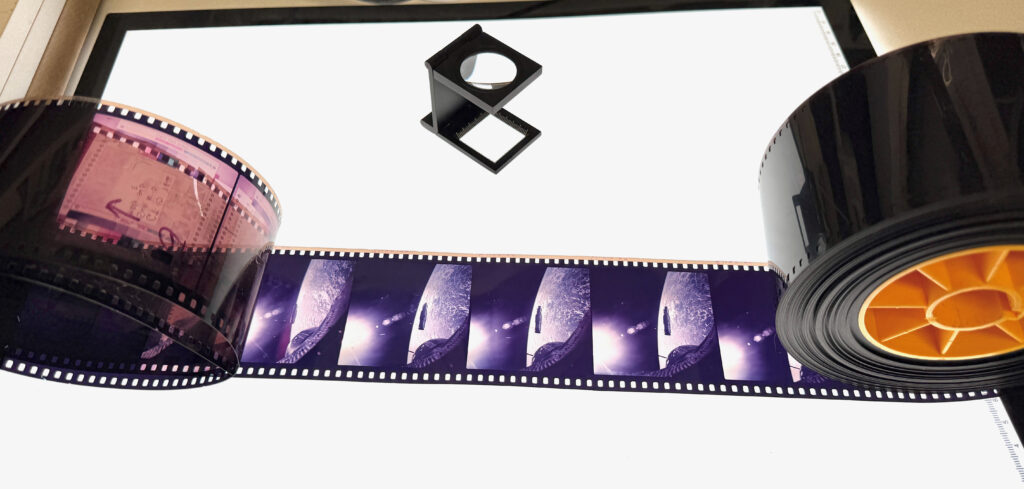
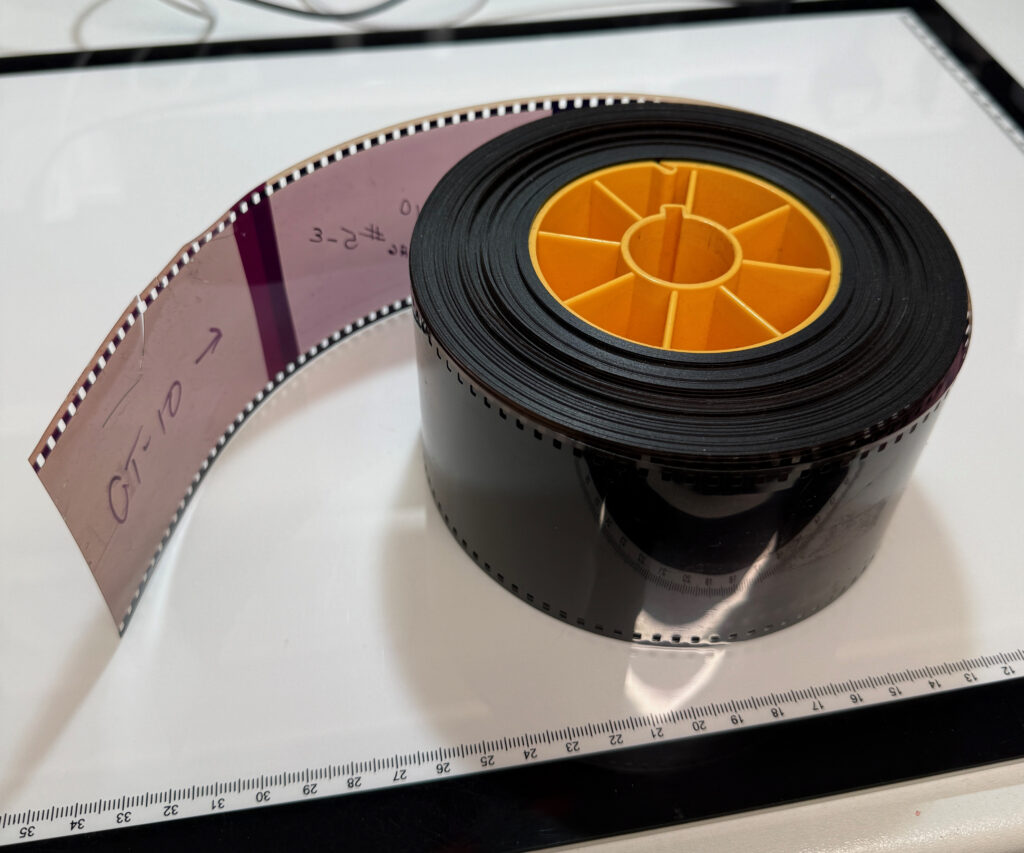
The motivation for this deep dive into space photography was a rather splendid gift I received for a recent birthday – a roll of 70mm transparencies from the Gemini space missions. The reel contained second (or possibly third) generation copies of 13 individual films from Gemini VIII, IX, and X from 1966, spliced together by the lab at NASA into one long compilation roll that could be duplicated and shared with the various departments at NASA and with their contractors. Although it is possible to download high resolution digital copies of these images from NASA (more about that below), I thought it would be an interesting project to try to scan the images myself at home, researching the missions and the role photography played in them. Part two of this article describes how I went about it, and weaves some of my scans into the stories of the three missions.
The Scanning
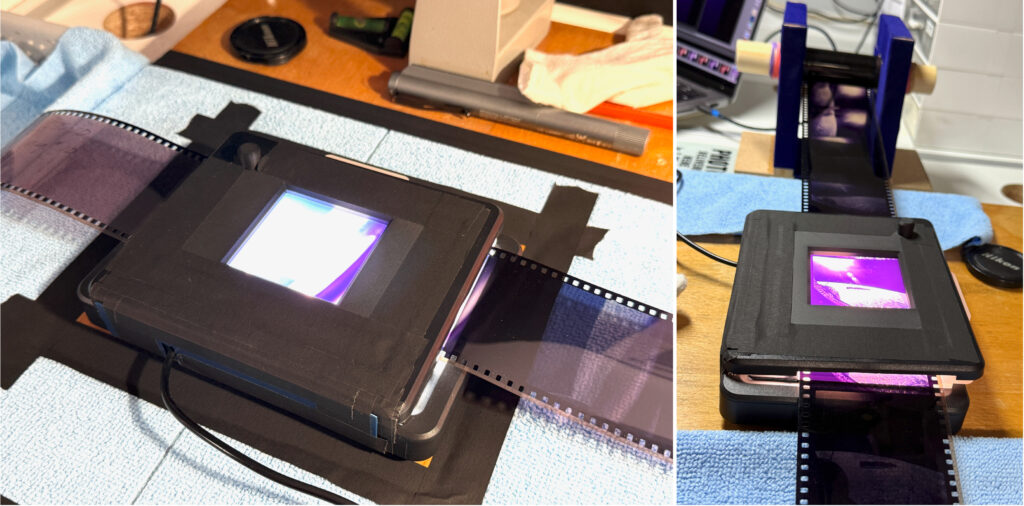
I use the easy35 v2 system from Valoi to ‘scan’ my 35mm negatives, effectively using a digital camera to take a ‘picture’ of the negative illuminated by a light source, but needed a solution to scan the larger negs as I began to explore medium-format. Hamish Gill’s pixl-latr gave me a very affordable solution, and I began to scan vertically using my Nikon D5600 DSLR with a Micro-Nikkor 55mm f/2.8 macro lens. The pixl-latr fits nicely on top of a CineStill CS-Lite light pad and comprises a light diffuser and a film holder, which takes various combinations of gates or inserts for different film formats – 35mm, 120 (up to 6×12), and, without any inserts, 5×4. The film holder holds the film strip flat and keeps it straight. Me being me, I’ve created a ‘hinge’ from bits of a plastic file and lots of black photographic gaffer tape to attach the film holder and inserts to the CS-Lite. This has much improved my medium-format workflow, and the acquisition of a foot-operated mouse clicker means I can wear white cotton gloves on both hands to feed the film through, lifting the hinged film holder up for each frame I’m scanning. A vintage Meopta copy-stand completes my set-up.
Hamish teamed up with Simon Forster of ForsterUK to provide off-the-shelf 3D printed inserts for the myriad of weird and wonderful film formats out there, including 127, APS, 110, and Minox. Simon also does pixl-latr adapters for 35mm mounted slides, special holders for glass plates, and a whole host of wonderful analogue camera accessories – these can all be found here (pixl-latr also required). Hamish also provides the digital files for 3D printing aficionados to have a go at designing their own gate inserts.
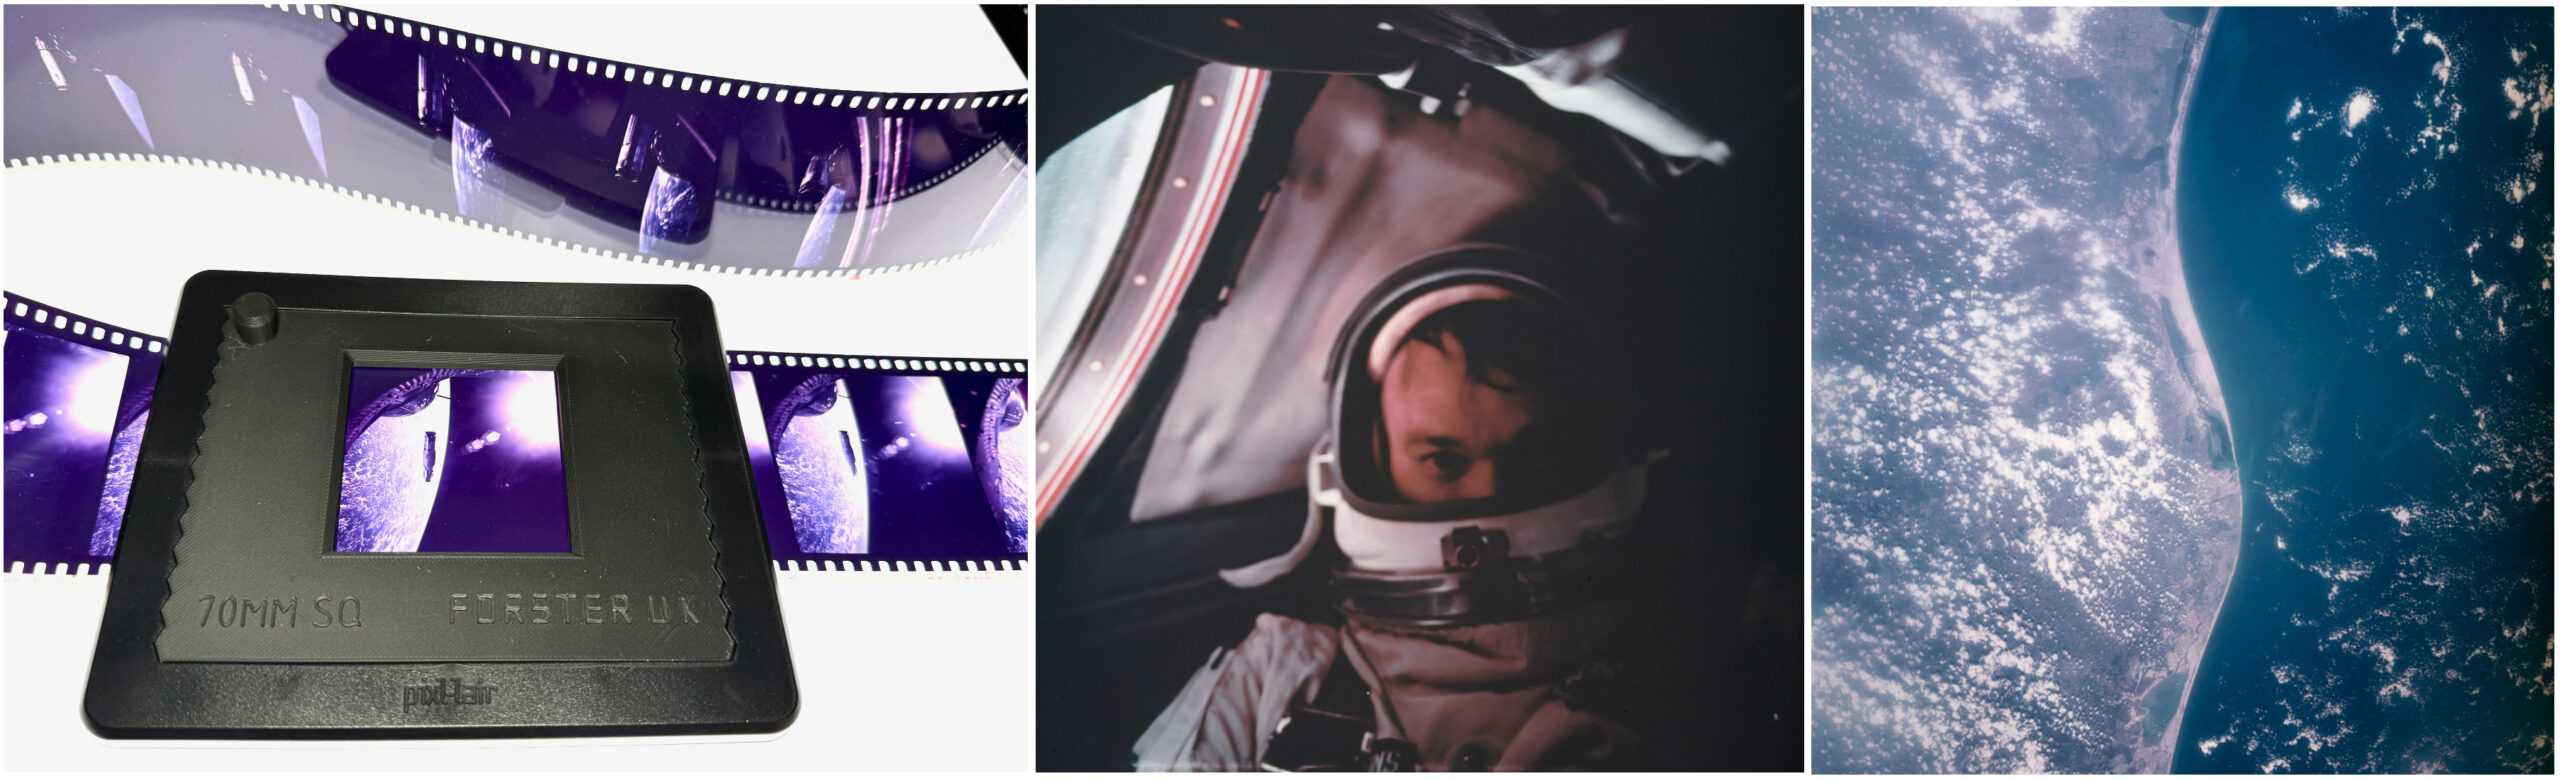
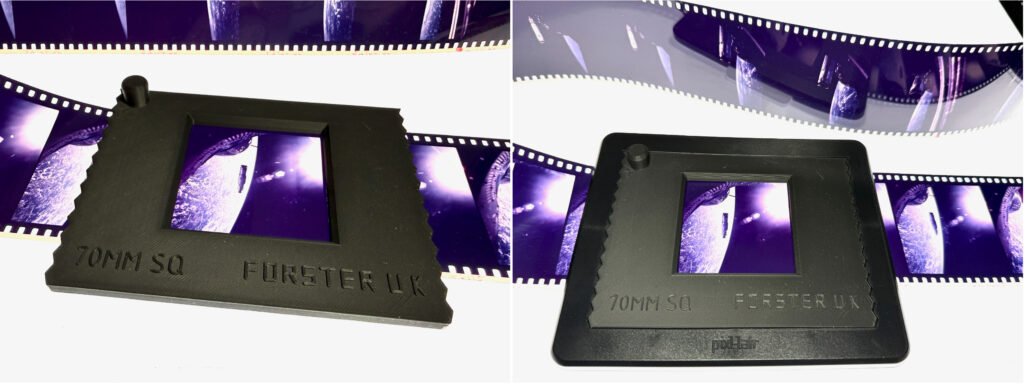
That’s all good and well, but these Gemini transparencies are on 70mm film, which gives an image size similar to 120 6×6 but with a row of perforations on each side … None of the existing pixl-latr or ForsterUK gates would work as the perforations pushes the image up from the bump-stops, which would mean the top of the image would be cropped.
A call was made to Hamish and Simon, and a few days after I sent the image dimensions over, a custom 70mm gate arrived in the post! It was perfect, and held the transparency perfectly flat against the diffuser, cropping out the perforations – the 70mm gate is now available at the pixl-latr shop here for those of you who have your own 70mm Space Program transparencies to scan … although there are some dedicated enthusiasts out there shooting 70mm, mostly repurposing motion picture film.
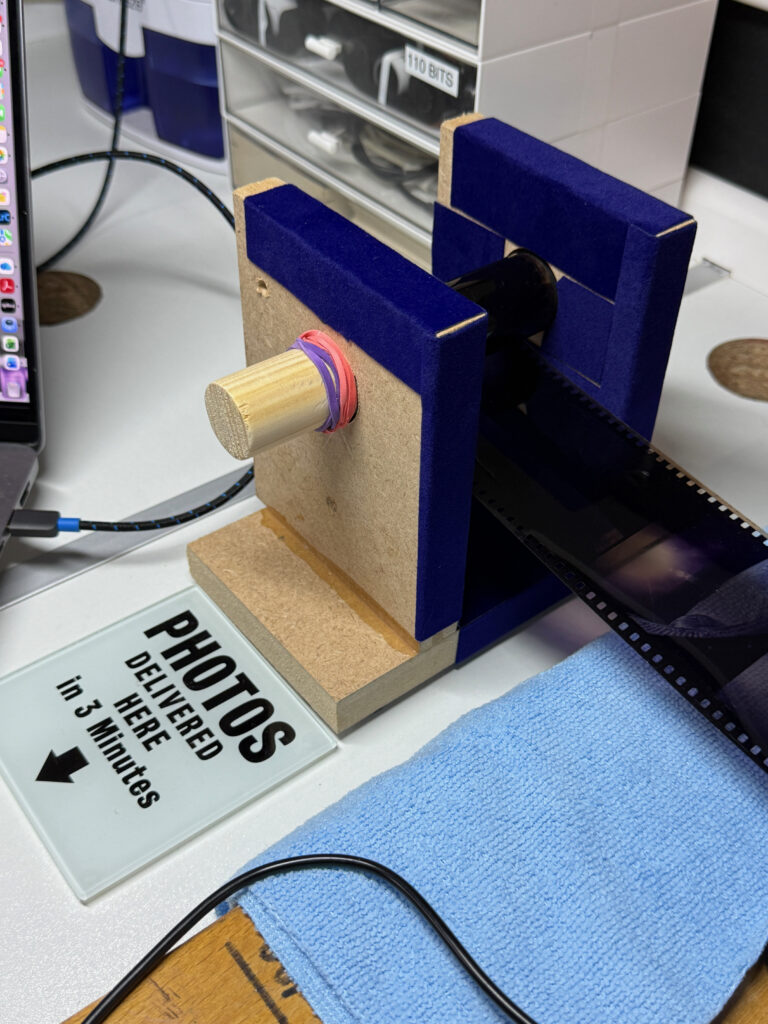
The next challenge was how to handle the roll itself. For ease of handling, I cut the first film (SWA #5, MAG SN 5 E from GT-10, Gemini X) off the roll and used the 40 or so frames as proof-of-concept – I left the remaining films on the roll, thus maintaining their sequence, although for the second set of scans I spliced the first film back onto the roll. To handle the roll safely, and to avoid 100s of metres of film snaking all over my bench, I made myself a simple reel holder from scraps of MDF with a spool from a cut-down walking stick (!), covering the surfaces that the film would touch with self-adhesive velour material. It did the job!
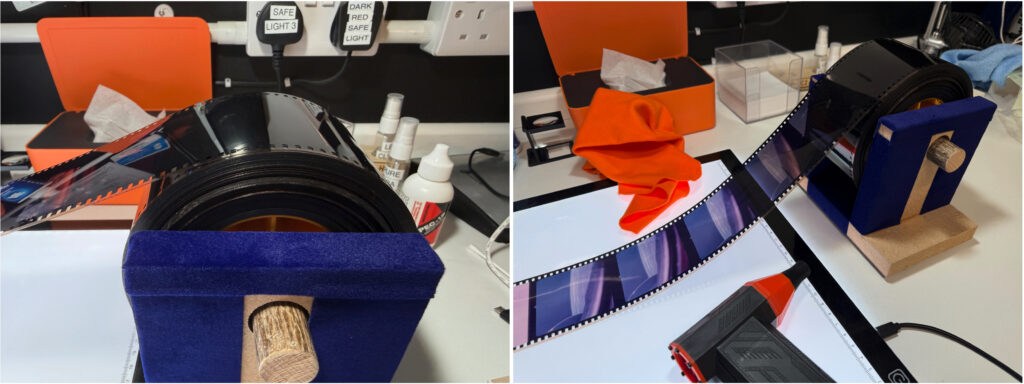
I tried to find another 70mm spool on-line but couldn’t, so I made a second reel holder, this time with a cut down curtain pole as the spindle – I taped the end of the film to it and wound the film trip across the pixl-latr. The workflow was surprisingly smooth, which was handy given the high number of scans I needed to make, although the end of the film came away from the end of the spindle when I was three quarters of the way through the roll, making it a bit of a wrestling match to finish.
I placed the ForsterUK 70mm film gate into the pixl-latr that was already hinged onto my CineStill CS-Lite. This was placed on the flat-bed of my copy stand, which I’d adapted to ensure it was level – I drilled holes at each corner and inserted screw bolts, which could be adjusted up or down with a ratchet spanner, checking it was level with a 2-way spirit level. The hinge on the pixl-latr allows me to lift the side of the film holder which has the notch for the diffuser to release the pressure on the film and move to the next frame – with the hinge securing one side you can easily lift and move in one smooth action. All surfaces where the film could touch were covered with micro-fibre cloths, just to be safe.
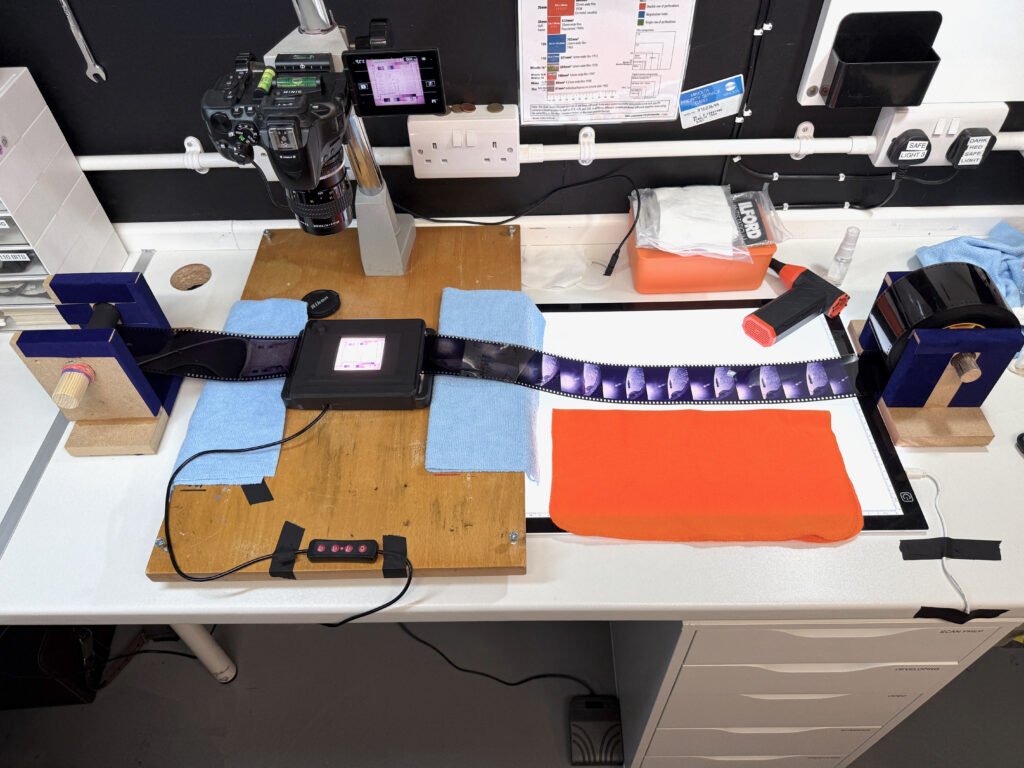
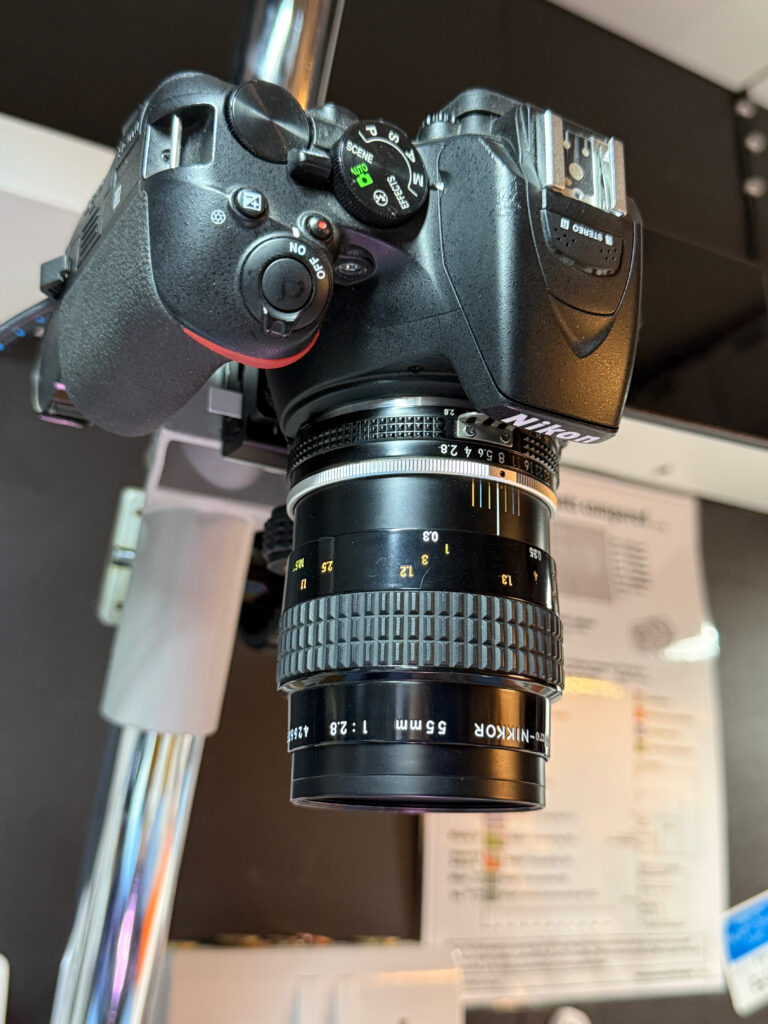
My Nikon D5600 DSLR with the Micro-Nikkor 55mm f/2.8 lens went onto the copy stand’s bracket, with the camera plugged into the mains via a battery adapter and ‘tethered’ to my MacBook with a USB cable. The D5600 is a mid-range consumer DSLR with a 24.2 MP APS-C CMOS sensor – I know very little about digital photography, but it does the job, and 24,000,000 pixels sounds like a lot to me! Shooting RAW, I get a 6000 x 4000px image, again, plenty good enough for my needs. The lens is manual focus, so you set the aperture on the lens, and the shutter speed on the camera, with the added advantage that I can use the lens as a macro-prime on my numerous (!) Nikon 35mm SLR bodies.
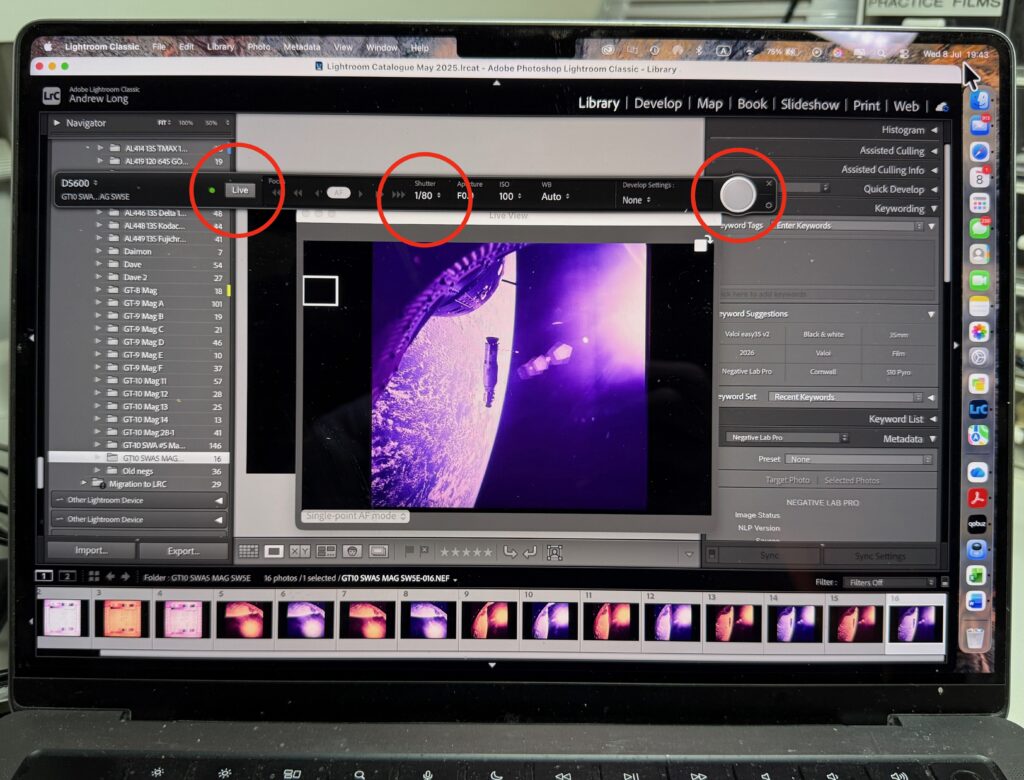
The ‘Tethered Capture’ feature in Adobe Lightroom Classic works really well with the Nikon and lets you view and compose the frame in the ‘Live’ view, change the shutter speed (the aperture is set on the lens), and trigger the shutter release, all on the Mac’s screen. If you position the mouse pointer over the big shutter grey ‘capture’ button, the foot-operated mouse-clicker lets you keep both (gloved) hands moving the film through the gate – once set up, the process is pretty swift, one frame every few seconds.
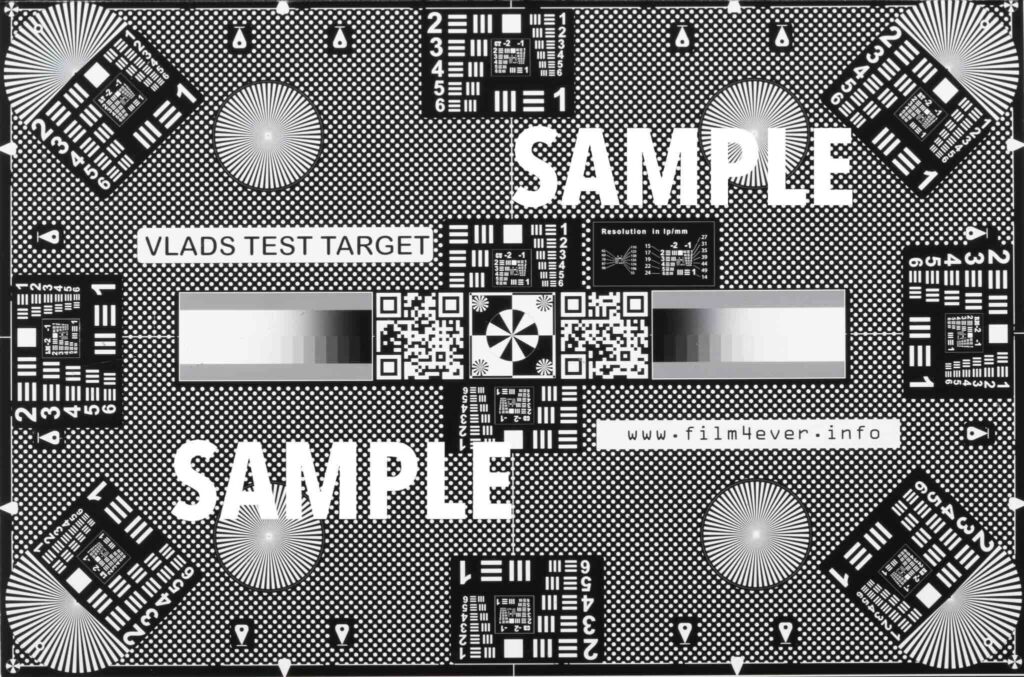
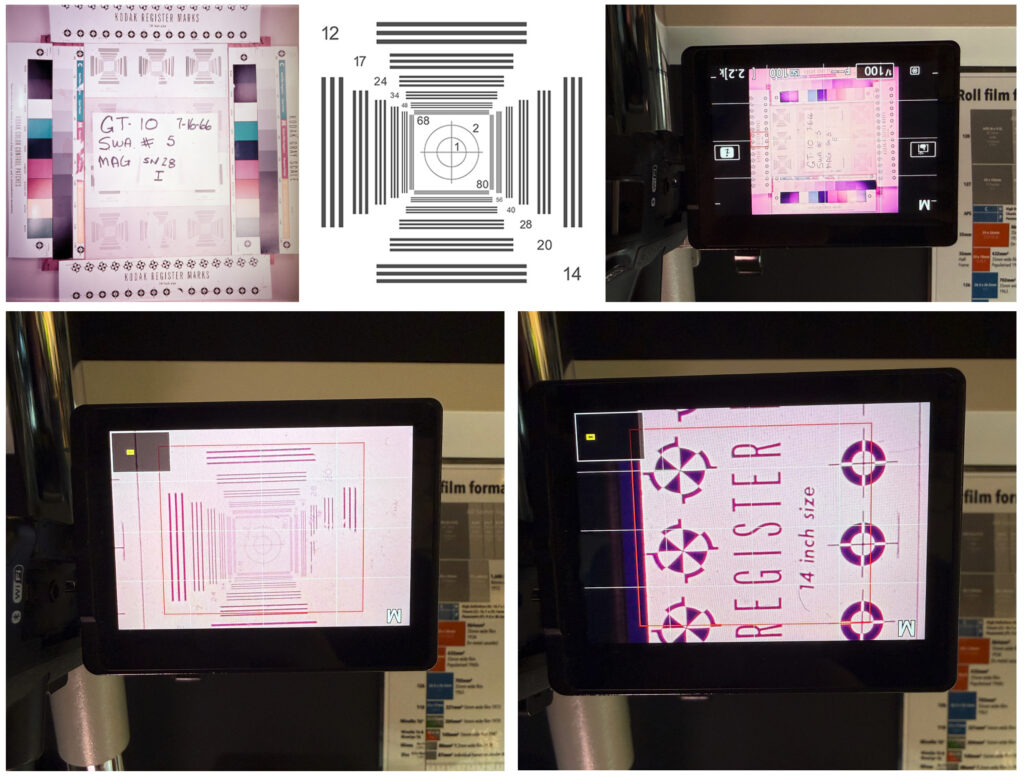
With the pixl-latr/CS-Lite in place, the next job was to focus the camera. For 35mm scanning I have the extremely useful Vlad’s Test Target, made by Vlad Serebryany from New York City and also available from pixl-latr. The VTT is based on 1950s US Air Force film registration patterns set into a 24 x 36mm ‘frame’ and is output on strips of 35mm film – you put the VTT in your film holder, adjust your scanning equipment to get the maximum image of the ‘frame’ in your digital camera’s display, and then zoom right in to focus on the tiny numbers and shapes on the target. It’s a lot more reliable than trying to focus on grain or find a straight line to go off and takes just a few seconds!
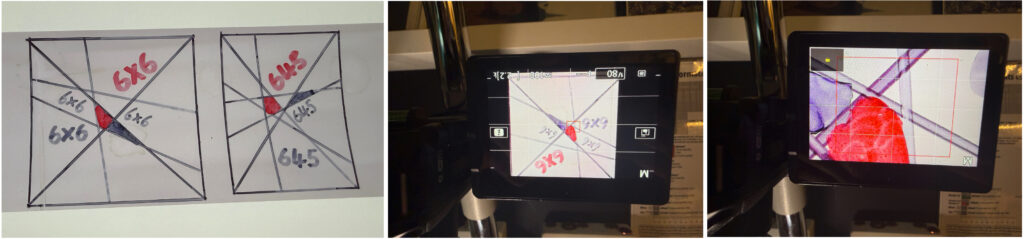
Vlad also makes them in 120 and 4×5” sizes, but as I don’t have those, I improvised … I traced 6×6 and 645 120 frames onto a bit of gash 120 film, which I’d dipped in fixer to clear. I then made a series of intersecting lines and shaded areas with various Sharpie pens – the ink formed bubbles and blobs which are great to focus on, but if Vlad or Hamish want to send me the real-deal, I’d be more than happy to use and review it!
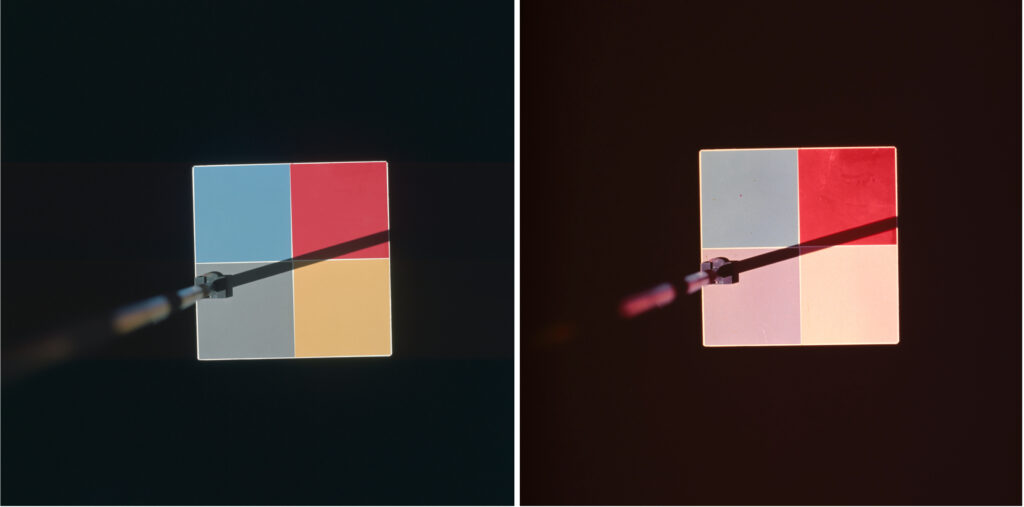
The NASA ‘test card’ was also useful as a framing and focusing tool. Pre-exposed at the start, and sometimes the end, of each magazine of film, it was a NASA-improvised ‘collage’ of off-the-shelf calibration tools designed to help in the ‘analogue’ post-production process once the cameras were returned to Earth and the films developed. Surrounding a hand-written note with details about the specific film were NBS Resolution Test Charts, 14-inch Kodak Register Marks, Kodak Color Control Patches, and Kodak Gray Scales, which provided a baseline against which the individual exposures could be judged.
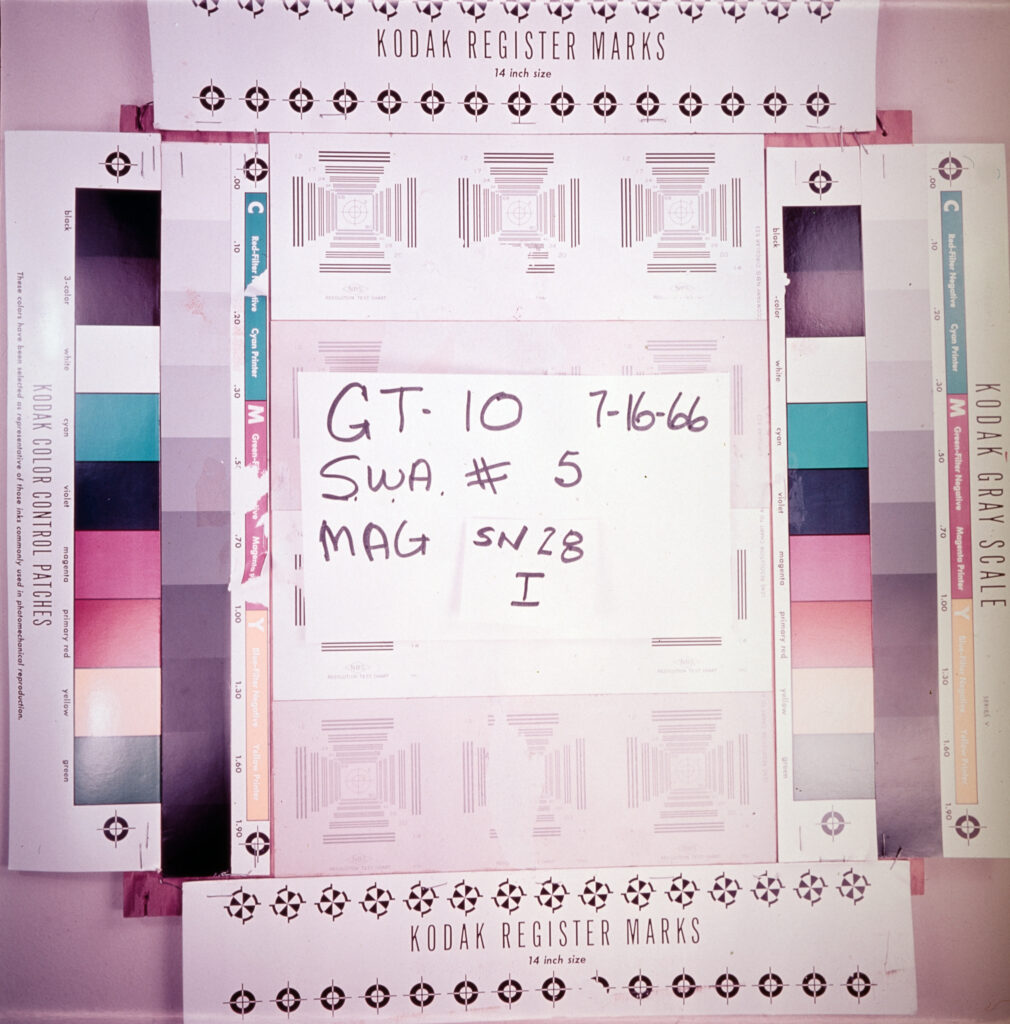
The National Bureau of Standards (NBS) Resolution Test Charts were optical targets created in 1952 as a way of calibrating the resolving power of lenses, microcopy systems, and cameras – groups of 3 parallel lines reduced in size towards a central target. The ‘Register Marks’ are commonly used in printing to allow the different colour plate ‘films’ to be accurately overlaid on each other. The ‘Color Control Patches’, which Kodak are still making, allow the technicians to compare an image against known standard printing colours, while the Gray Scales, also still in production, compare tonal values in an original image with its reproduction. When zoomed right in on the DSLR this ‘test card’ collage gives you plenty to focus on!
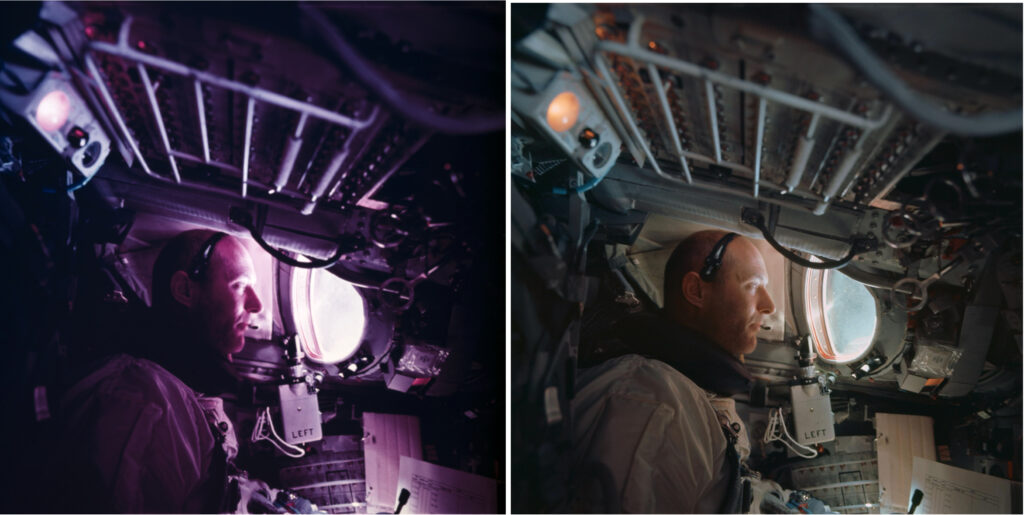
I use the Negative Lab Pro plug-in with Lightroom Classic to convert and edit my negatives, but there is also a selection of presets for positives, too, which I hadn’t used before. The CineStill CS-Lite has 3 colour temperature settings: Cool for colour negatives; White for black & white; and Warm for colour positives (slides). Initially, to hedge my bets, I scanned using all three settings, but for most frames the White setting gave the best results, probably to compensate for the age of the film. Using the NLP presets to ‘analyze’ the positive images gave much more authentic looking scans, although most frames had a distinct magenta colour cast.
For the analysis, I used the ‘Basic Color Model’ in NLP, with the ‘Pre-saturation’ set to ‘3-Default’, and used the ‘Slide Neutral’ preset and ‘Linear’ tone profile to save. I don’t claim to be an expert when it comes to colour post production (‘histogram’ sounds like an uncomfortable medical procedure to me) but for the purpose of this exercise I found the NLP presets to be more than sufficient. One day I might tinker with the settings to see what happens.
You have to remember that these transparencies are 60 years old and were used at NASA as ‘working’ copies of the originals, so I have no idea how they were handled or what conditions they were stored in, during their working life or in the decades following. When I took the roll out of the plastic bag it arrived in it had a wonderful ‘old film’ smell, but the outermost layers were clearly a bit worse for wear through handling, with scratches and other marks on most of the images. As you dug deeper into the roll the quality of the film varied a lot – some sections had stuck together but could be gently separated without any obvious damage; other sections looked as if the emulsion had begun to break up a bit with ‘oily’ patches that could not be removed even with isopropyl-alcohol or PEC-12 fluid (and that PEC-12 is strong stuff!); some of the emulsion on a few Gemini IX frames had stuck to the adjacent film base, leaving light brown striation marks on the film, again, impervious to solvents; while other frames were pristine!

Most of the images had a slightly magenta age-related hue to them, which I’ve struggled to correct in Lightroom or NLP. As I said, I’m no expert when it comes to post-production, so if anyone can suggest a fool-proof way of dialling it out, I’d be very pleased to hear about it – let me know in the comments. I am, however, reasonably good at retouching in Lightroom Classic, and as you can see from this image from Gemini X, my skills were much needed – each sticking-plaster icon is an individual piece of retouching, varying from a small dust mark to a substantial scratch or crease …
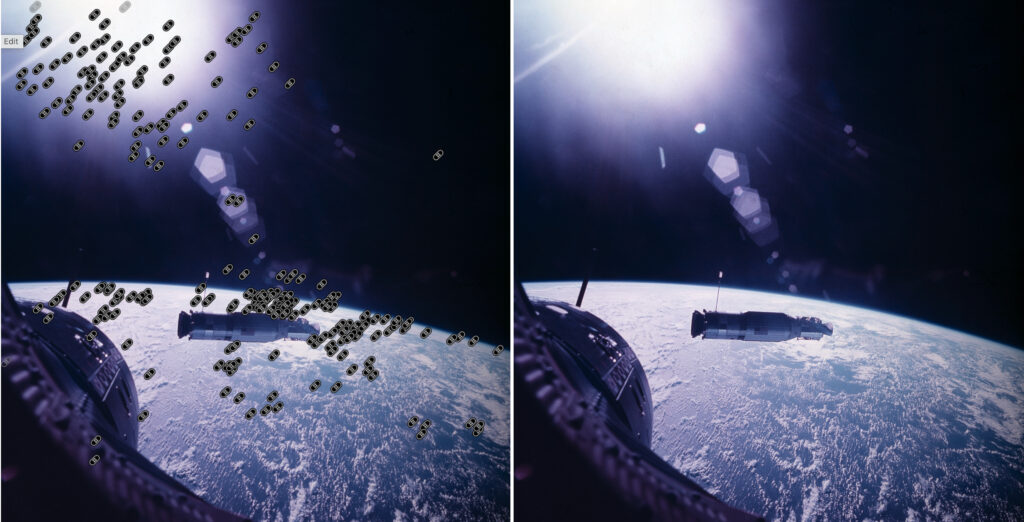
But on the whole, the vast majority of the frames were in remarkably good condition for their age. As I had a huge number of images to scan and then process, I didn’t approach each frame as a conservator or archivist would as it would have taken me weeks – all I did was wrap the strip in an Ilford orange anti-static cloth as it passed from reel to reel, and give the film a quick blast from the air duster every now and then – I use a USB rechargeable duster which avoids mucking around with the dubious propellants in canned-air or a puny puff from a rocket blower. I made a short video showing the work flow for this project.
In 2007, NASA’s Lyndon B. Johnson Space Centre (JSC) and the Arizona State University (ASU) School of Earth and Space Exploration began an epic project to digitise the original images taken on the Mercury, Gemini, and Apollo space mission, some 35,000 individual images. The resulting archive, called March to the Moon, went live in January 2012, and was the first time many of the images were available on the internet. They have subsequently been uploaded to NASA’s own website and their Flickr pages and are freely available. The original films were developed immediately after landing, and master duplicates were made (as used to compile my ‘working’ roll) with the originals being placed in archival storage in the Film Archive (Building 8) at JSC – in a freezer @ 0º F (-18ºc), which was inside a large fridge maintained at 55º F (13ºc). To remove the films from the cold-storage – they are not allowed to leave the building – there’s a painstaking equilibration procedure which must be followed, and then rigorous procedures to ensure the delicate emulsion is not damaged – the project team were dealing with priceless historical treasures, which is why they took 5 years to complete their task. Each film roll was gently, non-abrasively cleaned, removing only loose surface debris from the films (dust, lint, and in some cases, moon dust!) – any strongly adhered debris or staining was left on the film, and can be seen on certain frames. The scanners were high-end specialist pieces of kit designed for digitising movie films. For the Mercury & Gemini films (35 and 70mm) and Apollo 35mm they used an Oxberry system which was based around the legendary Kodak HR-500 film scanner. The resolution achieved was extraordinary. For Apollo 70mm they used a Leica DSW700 photogrammetric scanner, again producing scans of immense quality. More details and all the hi-res scans can be found on the March to the Moon website.
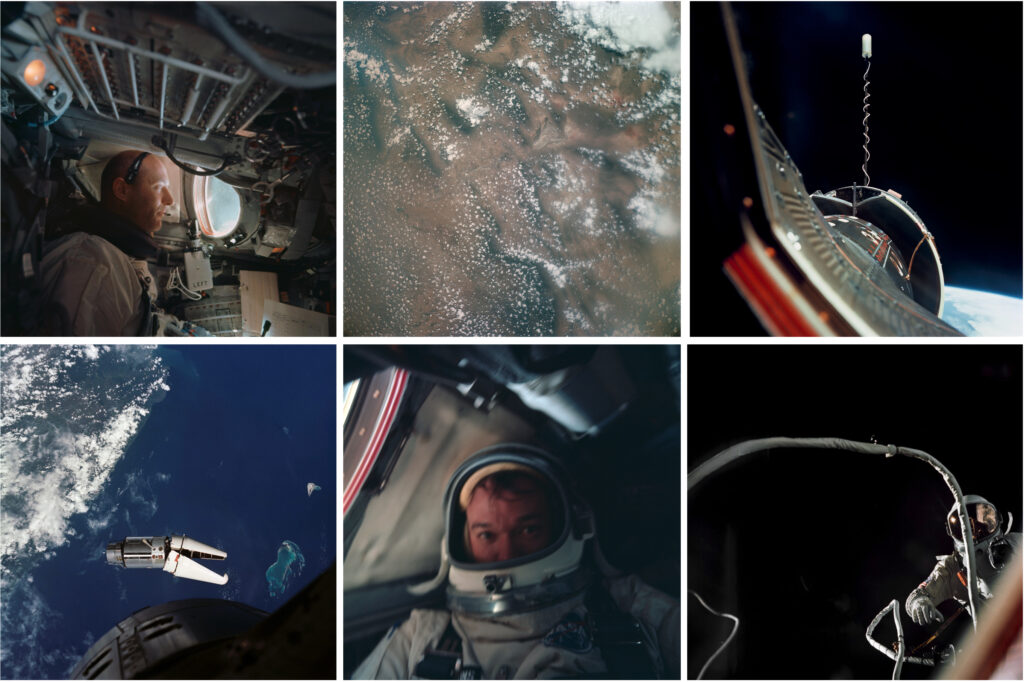
It’s therefore no surprise that my very amateur efforts are nowhere as impressive as those produced by the JSC/ASU, but I achieved my objective of turning the splendid birthday gift into a very enjoyable scanning journey, learning loads about digitisation, my own equipment and workflow, and the Space Program on the way. Mercury was notable as it was the project that put man (well, American men, as portrayed in the 1983 movie ‘The Right Stuff’) into space, and Apollo put man (definitely an American man) on the moon. Gemini, however, gets far less attention these days, but Apollo could never have happened without its many milestones, and it’s been fascinating learning about their achievements.
The Missions and the Scans
Project Gemini – 12 missions over 5 years – formed the essential building blocks for Apollo. Without the technological developments, the lessons learned, and the training/experience gained by the astronauts, man could never have reached the lunar surface – Gemini was Apollo’s training ground.
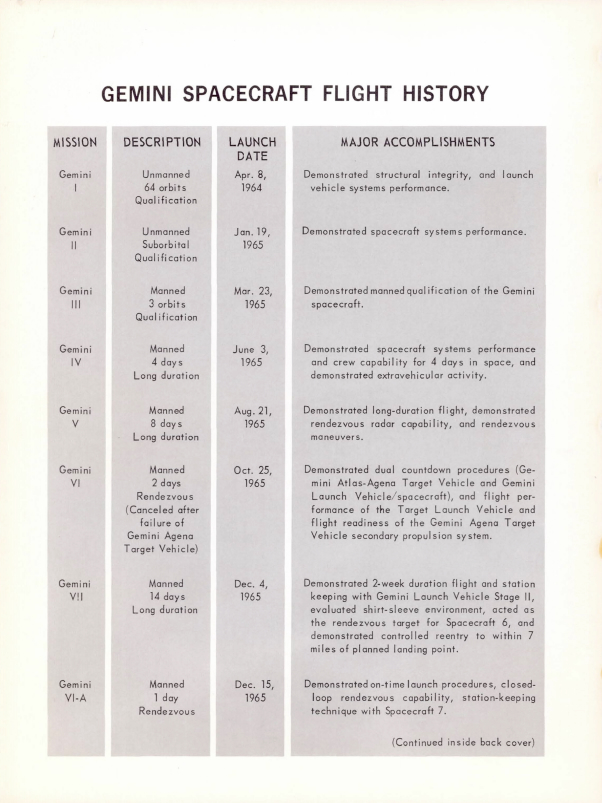
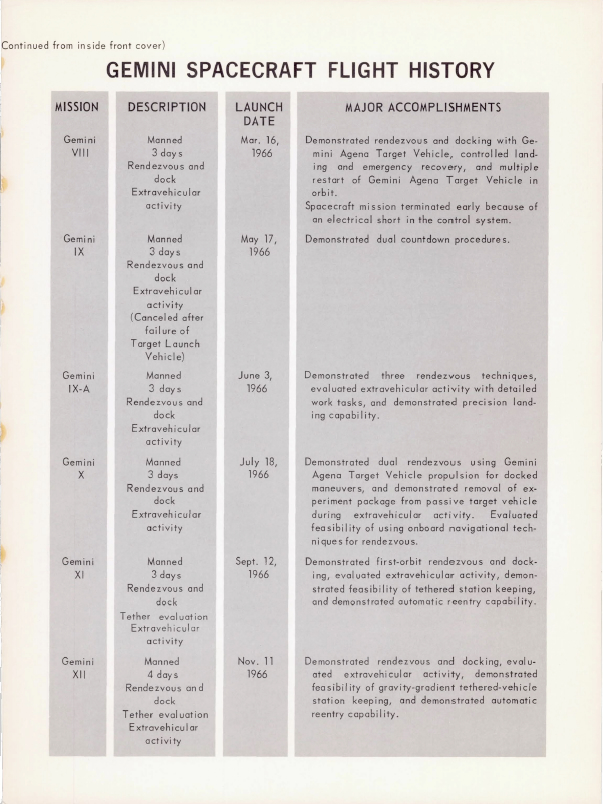
This article concentrates on Gemini VIII, IX, and X because those are the missions included in the reel of images I was given – a summary chart of the other nine missions, manned and unmanned, taken from the official NASA post-programme report, is included at the bottom of the article. Some pertinent highlights, though:
- Gemini pioneered coordinated launches with another spacecraft – the unmanned Gemini-Agena Target Vehicle (GATV) was developed for this very purpose, sent into orbit on the top of an Atlas ICBM booster an hour or two before the manned Titan II/Gemini rocket was launched.
- The first rendezvous with another spacecraft in orbit was planned for Gemini VI in October 1965 – the Gemini capsule would locate the GATV in orbit with radar and visually, and the Command-pilot would manoeuvre his capsule until it was alongside the GATV. However, after the Agena-Atlas target vehicle booster exploded after launch (!), the mission was rescheduled to December (renamed Gemini VI-A), with a planned rendezvous with Gemini VII in orbit – the two capsules, each with two astronauts, rendezvousing in orbit and practicing manoeuvring and stationkeeping, with the capsules coming as little as 30cm (1ft) apart!
- Gemini also trialled extended the flight envelope for up to two weeks (Gemini VII), the time a lunar mission was expected to take.
- The missions proved a ‘shirtsleeve’ environment was possible inside the capsule (i.e. not wearing their spacesuits), another capability essential for an extended lunar mission.
- They also proved the ability to conduct an extravehicular activity (EVA), both standing up in their seat with the hatch open and manoeuvring outside the capsule – Ed White’s ground-breaking EVA on Gemini IV started a rapid increase in EVA capability.
Gemini also showed that they could execute precision re-entry and landings.
Each mission pushed the envelope a little further, testing the technology, the systems, and the astronauts as they moved towards Apollo and the moon.
Gemini VIII
Gemini VIII, the sixth manned mission of the Gemini Program, launched on top of its Titan II rocket on 16 March 1966 with a rookie crew of Neil Armstrong as Command Pilot and David Scott as Pilot. The primary mission objectives were to rendezvous and perform four docking tests with the Agena target vehicle, execute a far more complex two-hour EVA than Ed White’s Gemini IV, reposition the docked Agena/Gemini spacecraft in a different orbit, and conduct a variety of scientific experiments.
After six hours of manoeuvring, they established radar contact with the GATV at a range of 206 miles (331km), and visual contact from 87 miles (140km), positioning their capsule just 45m (150ft) from the target vehicle. On the fifth revolution Armstrong closed to just 0.6m (2ft) and proceeded to dock with it – the first ever docking in space, an immense achievement in anyone’s estimation. However, after just 27 minutes, while they were over the Indian Ocean and out of communications range with Mission Control, it all began to unravel. The combined vehicle unexpectedly went into a violent yaw and tumble. Rookie command pilot Armstrong immediately disengaged from the GATV, but this had the reverse effect – the Gemini capsule began rolling, pitching, and yawing with increased violence, spinning around almost once every second, blurring the astronauts’ vision.
‘We have a serious problem here. We’re tumbling end over end. We’re disengaged from the Agena.’
David Scott to Mission Control in Houston
Armstrong had the presence of mind to deactivate the Orbit Attitude and Maneuver System (OAMS, the capsule’s flight computer) and used all sixteen of the Re-Entry Control System (RCS) thrusters to eventually stabilise the craft. It was later discovered that one of the OAMS thrusters had short circuited and stuck open during a previous manoeuvre. Using the thrusters to regain control of the capsule had used up 75% of the fuel needed for re-entry so Mission Control aborted the mission, with Armstrong and Scott landing only 10 hours and 41 minutes after take-off and after only making seven revolutions of the planet.
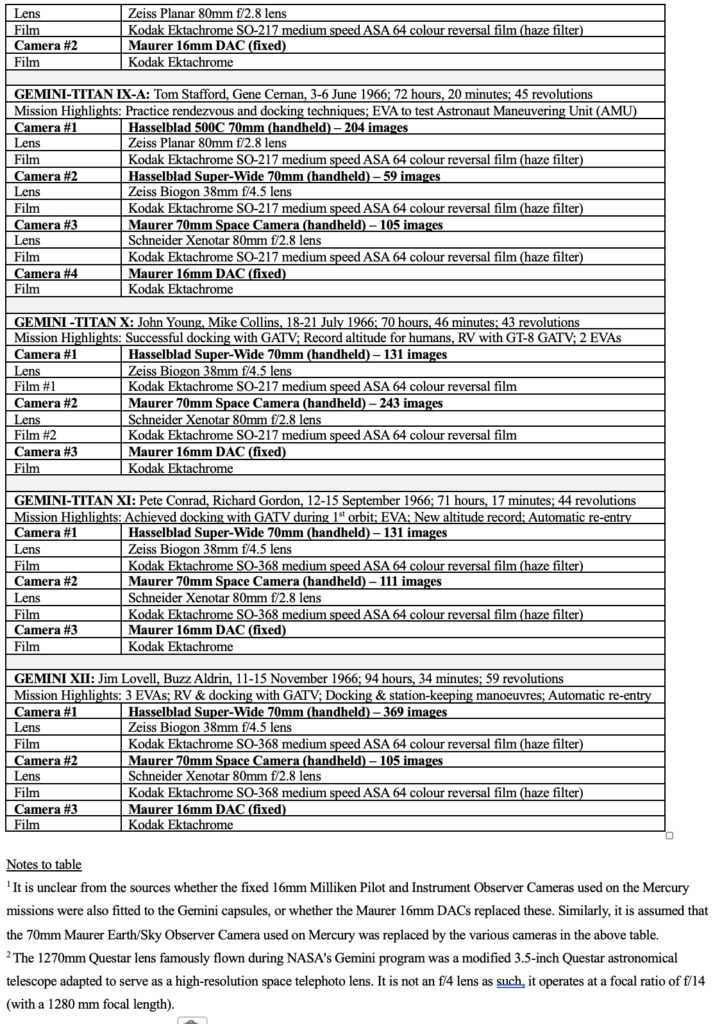
Unsurprisingly, photography was not their highest priority as they fought to control their spacecraft, and once stabilised, most of the mission objectives were cancelled as they planned for their early landing. Using the Hasselblad 500C with the Zeiss Planar 80mm f/2.8 lens loaded with Kodak Ektachrome SO-217 64 ASA colour reversal film, they only managed to take 21 images in their whole mission. However, they did manage to capture a sequence of stunning images as they located, rendezvous’d with, and docked with their GATV.
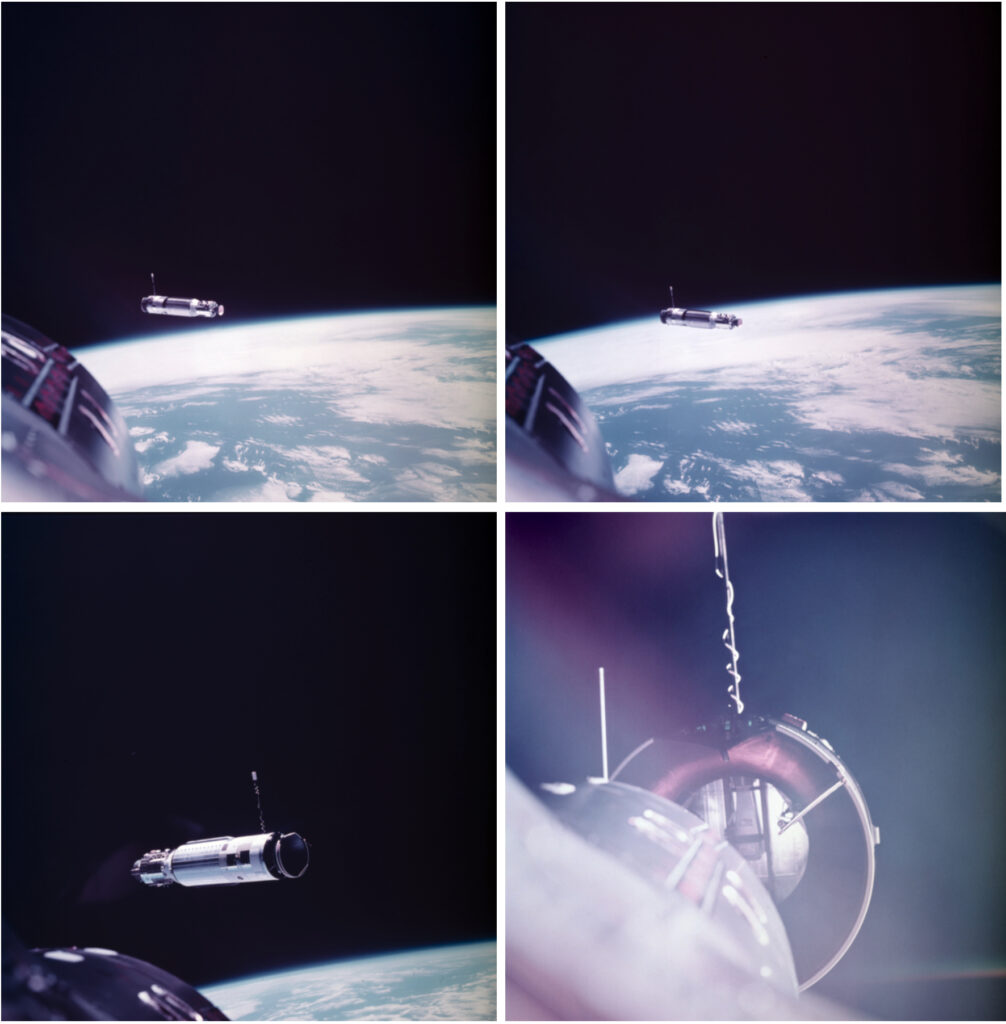
When you put my scans against the March to the Moon project images, the ‘professional’ scans win hands down – their images are spectacular, with bright colours, punchy detail, and just as the astronauts would have seen through the tiny window in their capsule or in the vacuum of space. The images on my roll of the March 1966 Gemini VIII are second, if not third, generation copies of those carefully archived originals, and the quality has suffered – the images are definitely softer, and the colours have deteriorated more than the images from the later missions. And being at the centre of the roll, there were more frames stuck together than there were with the later missions. I’m still pleased with what I could extract from them.
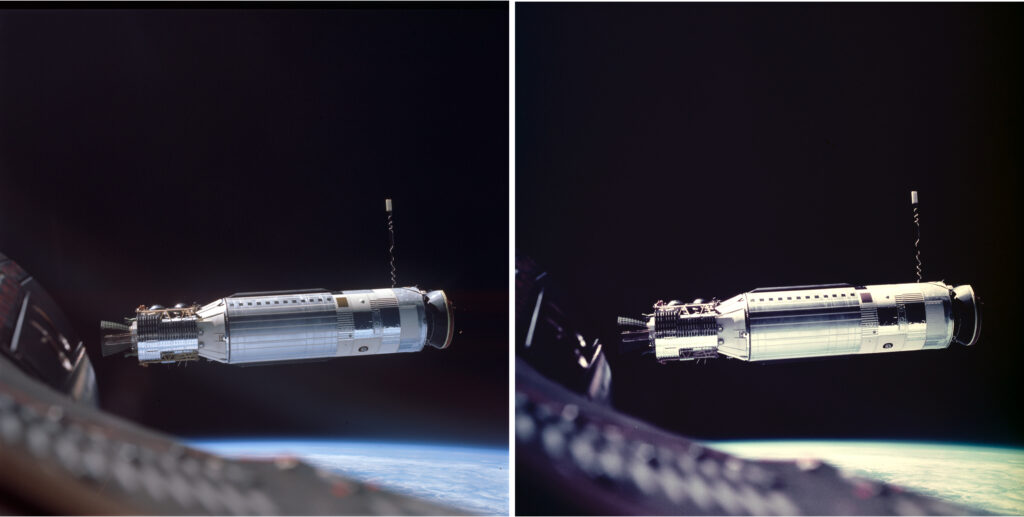
Despite the premature termination of the mission, the project could celebrate a successful docking, which was a key requirement for the Lunar Orbit Rendezvous method chosen by NASA for the lunar missions. It also demonstrated the incredible coolness under pressure of the crew, something that would stand Command Pilot Neil Armstrong in good stead for his later exploits. The capsules on subsequent missions were fitted with additional controls to override individual elements of a system if required – a useful safety lesson.
Both crew members of Gemini VII went on to have stellar careers with NASA. Armstrong went on to command Apollo 11 and become the first man to walk on the moon. Scott flew on Apollo 9 and Apollo 15, becoming the seventh man to walk on the moon and the first man to drive on the moon! They were the only Gemini crew to both walk on the moon. The Gemini VIII target vehicle was left in orbit and would still have a part to play in the programme – as a static target for Gemini X later that year.
Gemini IX/IX-A
The prime crew for Gemini IX were Elliot M. See Jr. and Charles A. Bassett. Their objectives were: to conduct further rendezvous and docking tests with a target vehicle: to conduct an EVA to test the Astronaut Maneuvering Unit (AMU); and to achieve a precision landing. There were also scientific, medical, technological, and photographic experiments to be conducted over a 3-day flight. However, on 28 February 1966, just over three months before launch, See and Bassett were killed when their T-38 Talon jet crashed in marginal weather on approach to St Louis’ Lambert International Airport, close to the McDonnell plant where their Gemini capsule was being built.
Explainer: Stating the bleedin’ obvious, space flight is dangerous. See and Bassett were the second and third fatalities of the Space Program, the first being Theodore C. Freeman in a similar plane crash in October 1964. Gus Grissom, Ed White, and Roger Chaffee were killed when a fault during a launch pad caused a fire in their Apollo capsule in January 1967, and Clifton C. Williams died in another T-38 crash in October that year. Robert henry Lawrence Jr., the first African American astronaut, was killed after ejecting from his F-104 Starfighter jet, a.k.a. the ‘Widowmaker’. Michael J. Adams and Michael Alsbury were killed in testing accidents, and NASA lost two Space Shuttle crews: STS-51-L in January 1986 when Space Shuttle Challenger disintegrated during launch, and Space Shuttle Challenger broke up on re-entry, with 7 astronauts perishing in each disaster.
NASA were forced to shuffle crew assignments, bumping rookies Thomas P. Stafford (Command Pilot) and Eugene ‘Gene’ Cernan (Pilot) up as prime crew for Gemini IX, now re-named Gemini IX-A. The mission was originally scheduled for 17 May 1966 but was postponed when their GATV failed to make it into orbit. The next GATV would not be available until September, so a replacement vehicle, the Augmented Target Docking Adapter (ATDA), was sent into orbit on an Atlas rocket on 1 June 1966 as the Gemini IX-A target vehicle.
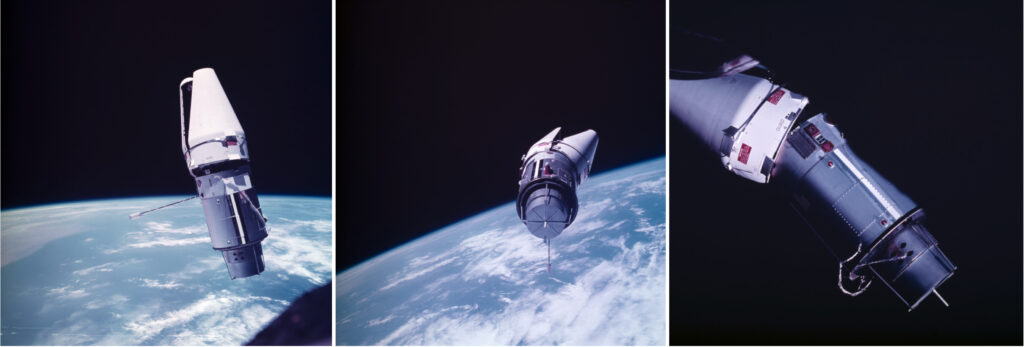
On 3 June 1966 IX-A made a successful launch and managed to catch up with the ATDA after only 3 revolutions of the Earth. Bringing the Gemini capsule within 8 metres of the target vehicle, it became clear that the conical launch shroud on the ATDA had failed to deploy and was therefore blocking the docking port.
That’s a weird looking machine. Would you believe that there’s a nose cone on that rascal. The shroud is half open. It looks like an angry alligator out there rotating around.
Tom Stafford to Mission Control
I think it looks more like a bull-nosed dolphin … The flight plan was amended to concentrate on passive rendezvous techniques, with and without the help of the on-board radar, and Cernan conducted an extended EVA, although he encountered problems with his suit and had to abandon his attempt to test the Astronaut Maneuvering Unit (AMU).
‘It’s my observation that even though we get more proficient, the flights don’t get any easier. The reason they don’t get any easier is because each time we try to do more.’
Robert R. Gilruth, Director of NASA’s Manned Spaceflight Centre
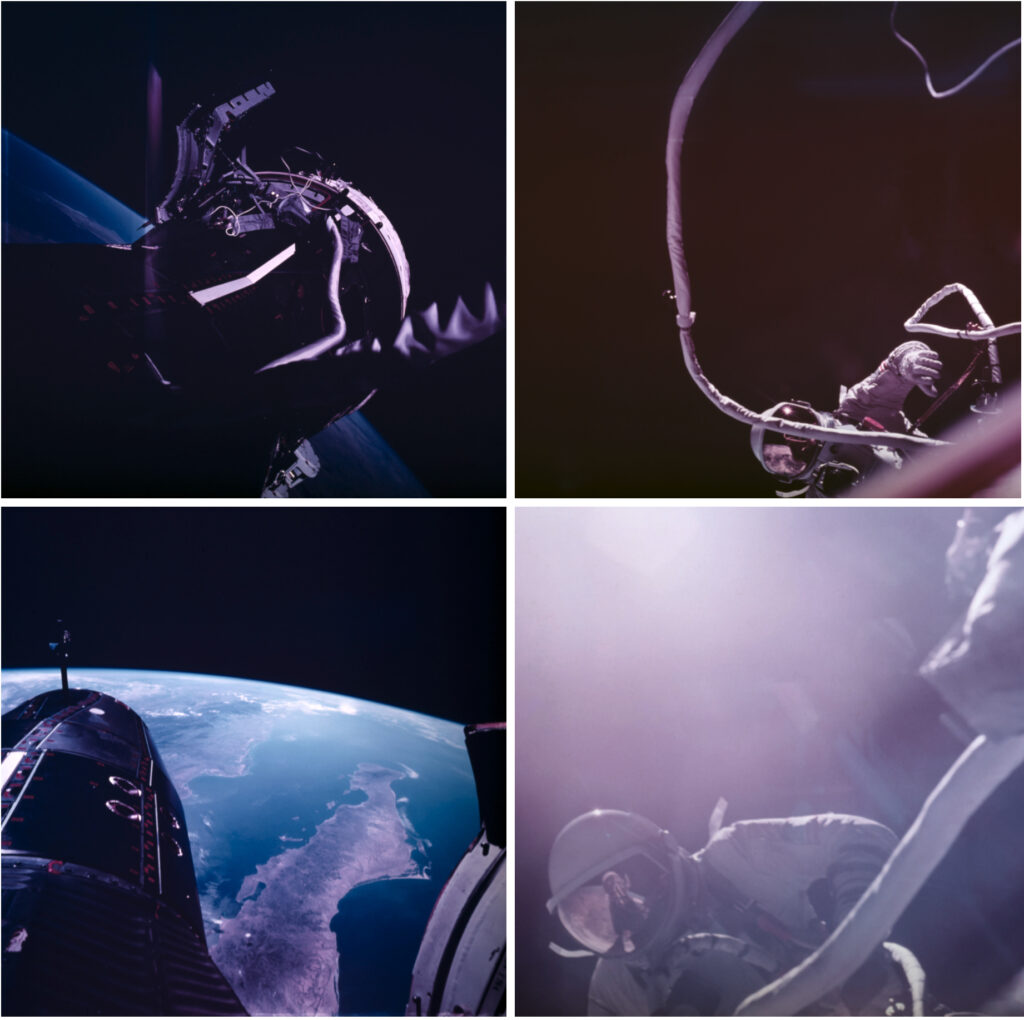
Stafford went into space four times. Cernan went to the moon twice: once for Apollo 10 which was a rehearsal for the Apollo 11 moon landing; and as commander of Apollo 17, becoming the last man to walk on the moon in December 1972.
Gemini X

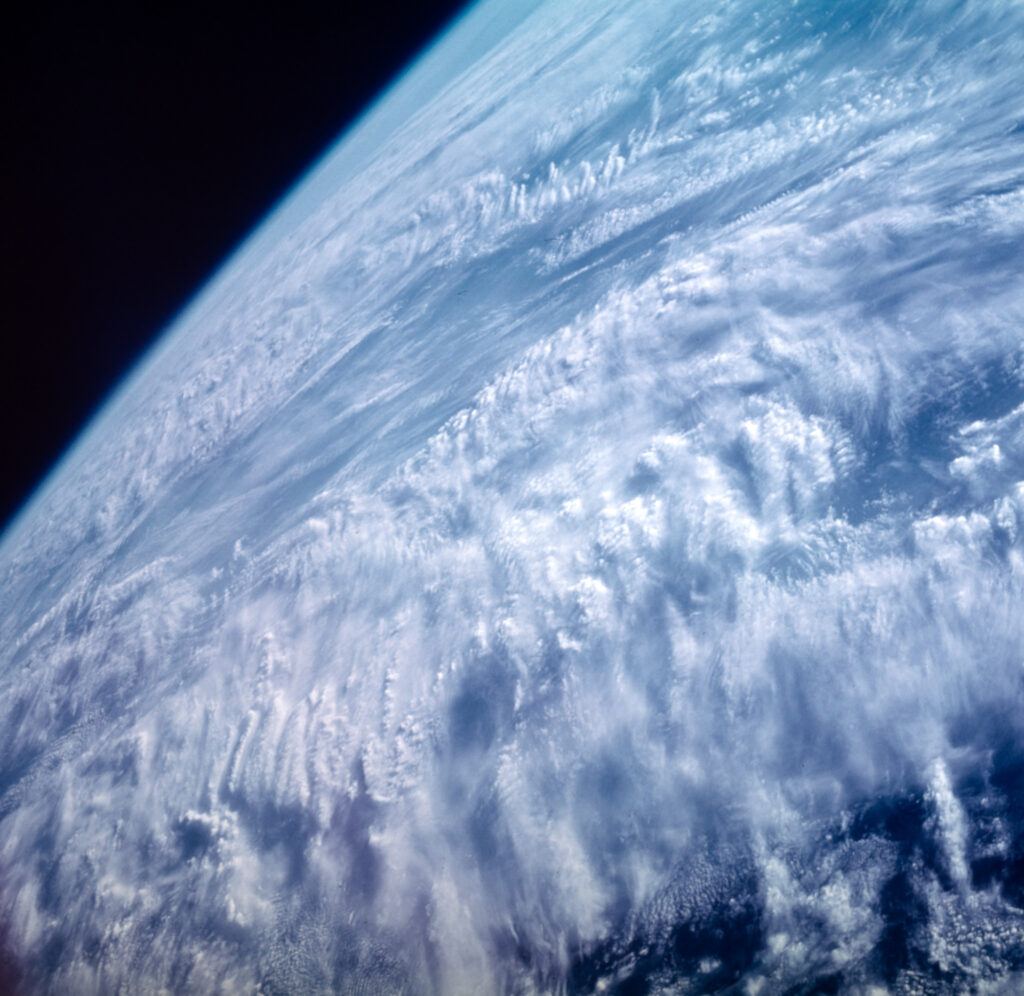
Gemini X took place in July 1966 and part one and two of this article have been published on the 60th anniversary of its launch (18 July) and the 60th anniversary of its successful splashdown (21 July). Its Command Pilot was John Young, with Mike Collins in the other seat. Its primary purpose was to conduct rendezvous and docking tests with the Agena target vehicle (GATV) but also to conduct two EVAs and perform 15 scientific, technological, photographic, and medical experiments. While docked to the GATV, they also achieved a new altitude record for manned spaceflight of 763.8km, using the GATV’s engine to reposition the combined craft into the higher orbit.
Collins’ first EVA was a ‘stand-up’, climbing up onto his seat and popping out of the capsule’s open hatch, where he conducted an experiment to take ultraviolet pictures of stars, something that was not possible in Earth’s atmosphere. A suit malfunction meant he had to stop the spacewalk early, sit back down in his seat, and close the hatch.
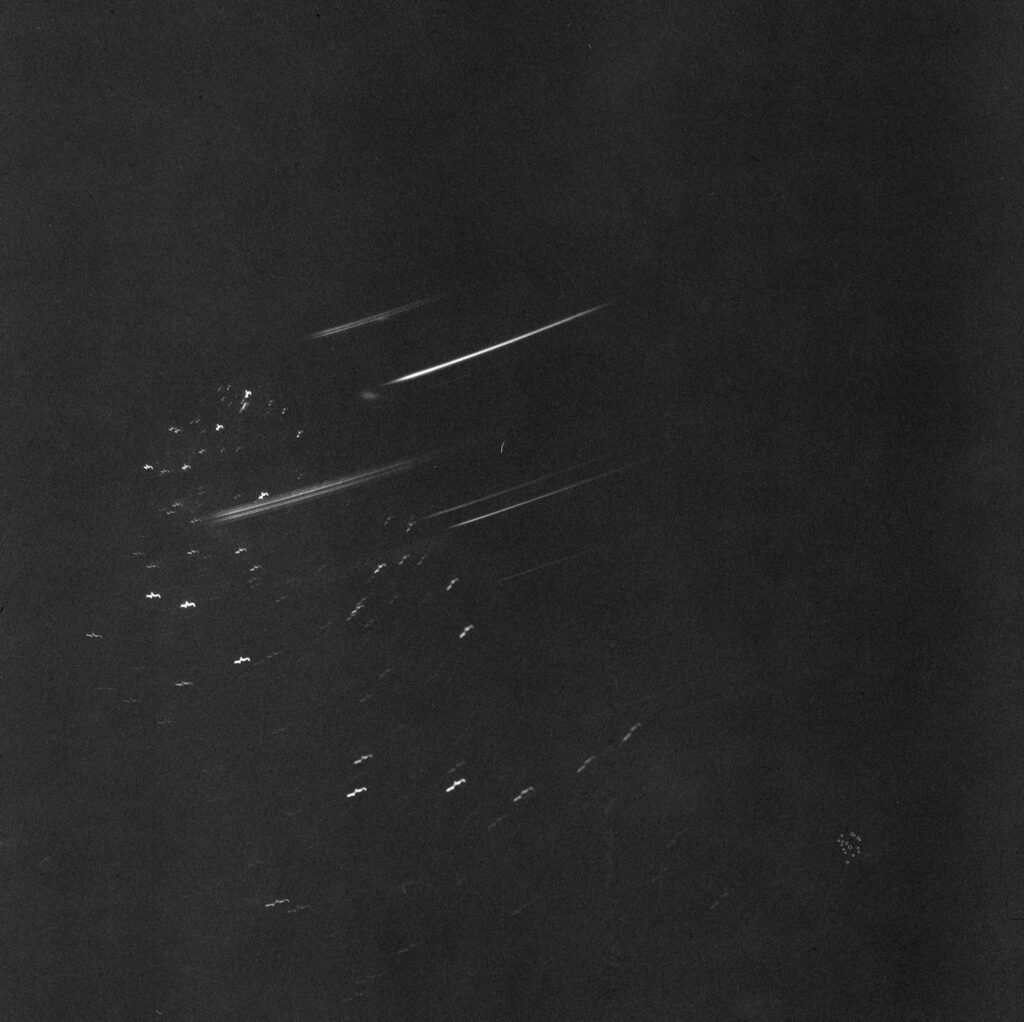
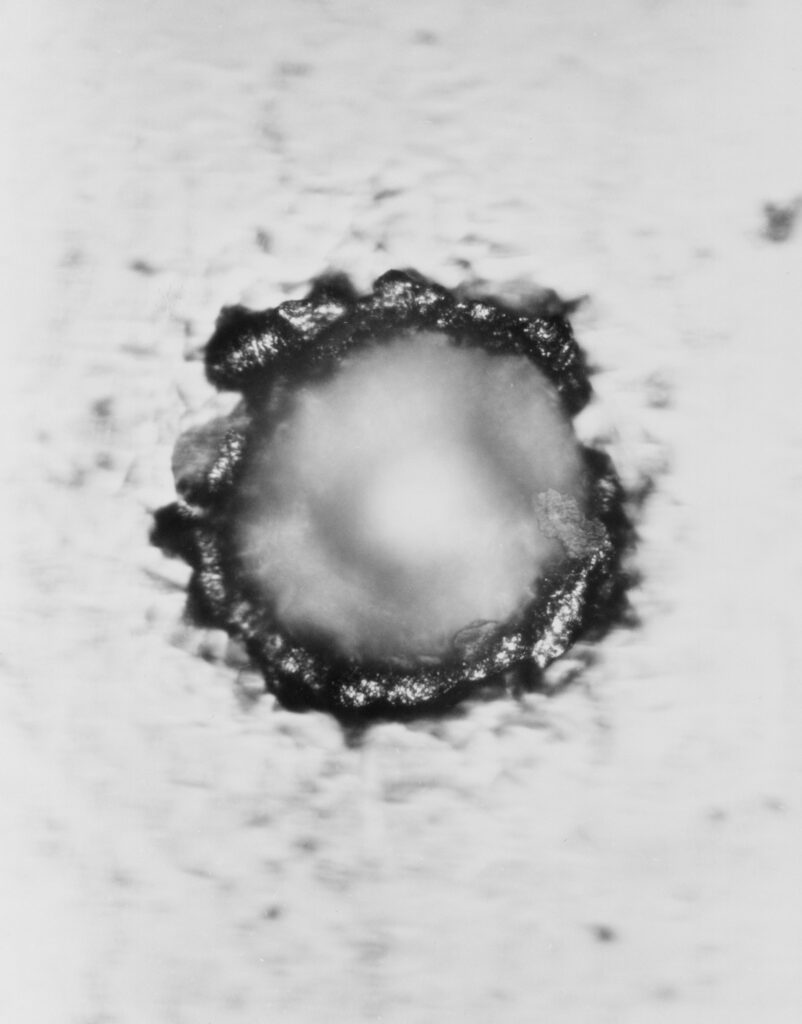
Mike’s second EVA was more involved and, while connected to the capsule’s oxygen supply with an umbilical cord, it had him moving along the docked GATV to remove a micrometeorite collection panel. He struggled to manoeuvre around because of a lack of handholds (something that was remedied in subsequent missions) and, while trying to collect another micrometeorite panel from the Gemini capsule, he managed to let go of his Hasselblad 500C, with it floating away in micro-gravity – this is why no photos exist of Mike’s excursion! Hasselblad later produced an advert with the headline ‘The Launch of the First Swedish Satellite’. For more on this see this Kosmofoto article.
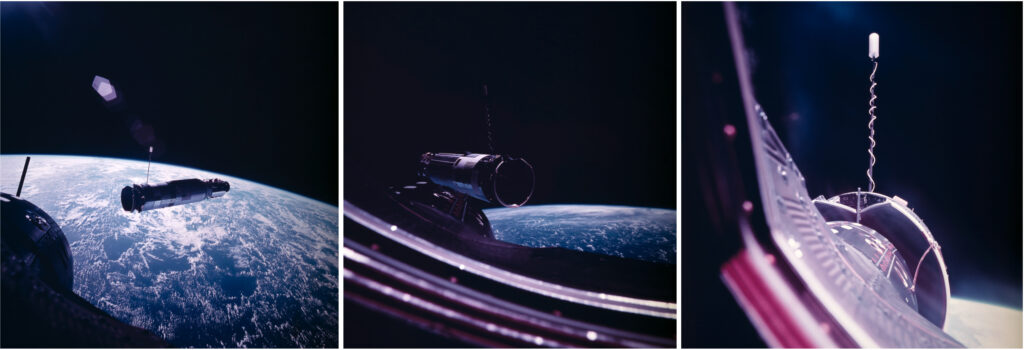
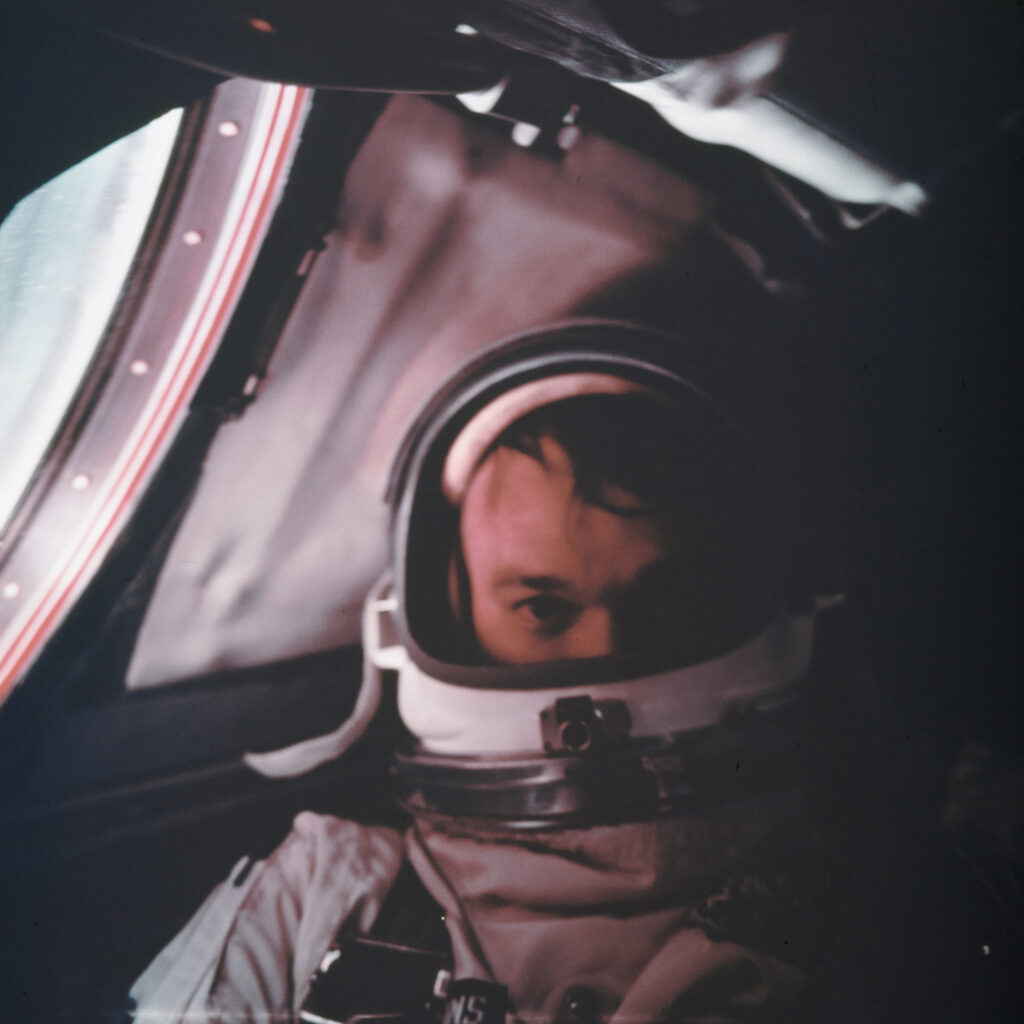
Young was the only NASA astronaut to fly in NASA’s Gemini, Apollo and Space Shuttle Programmes. He flew in Gemini III, in Gemini X, and as Command Module Pilot on Apollo 10, the ‘dress rehearsal’ for the first lunar landing mission two months later. He commanded Apollo 16 and walked on the moon, and also commanded STS-1, the first flight of the Space Shuttle Program, and flew again on STS-9. Gemini X was Collins’ first space flight, and he would later go on to be the command module pilot for the historic Apollo 11 Moon landing mission, where he managed to mislay another Hasselblad in the Command Module … luckily he found it after a tidy up!
Gemini XI in September 1966 and Gemini XII in December perfected the techniques and procedures needed for the Apollo missions – more rendezvous, more docking, more manoeuvring, more EVAs, and more photography! See NASA’s pages on Gemini XI and Gemini XII pages for more information.
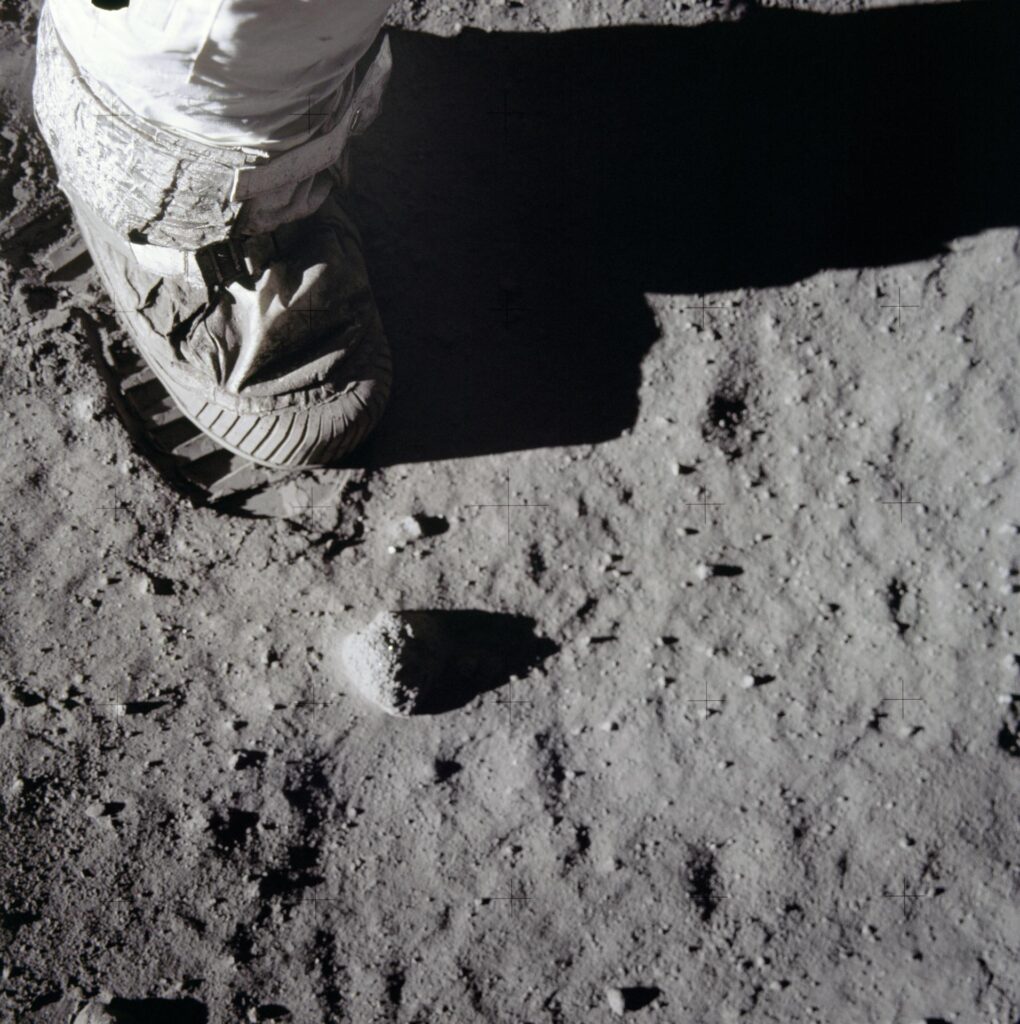
Just three years later, on 20 July 1969, Neil Armstrong took the ‘giant leap for man’ becoming the first to walk on the lunar surface. However, without the building blocks laid by the Mercury and Gemini programmes this extraordinary achievement would not have been possible. Photography played a growing part in the missions’ flight plans as NASA began to appreciate the true value it could add, capturing unique imagery and scientific material as well as producing some of the most famous photographs ever taken …
Conclusion
My mini voyage of discovery into space photography has been both fascinating and informative, and has created an insatiable desire to get my hands on a Hasselblad for the first time, and I might have to acquire an Ansco Autoset and/or a Contarex sometime, too – for details on the cameras used on the early space missions, see part one of this article. Having closely studied many of the images from the Mercury and Gemini missions I am blown away by the quality of the pictures given the extreme conditions they experienced inside and outside their spacecraft! I achieved what I set out to with a set of acceptable scans from the marvellous birthday present I received, and although they are not perfect (magenta colour cast – any suggestions?!) I will continue to tinker in Lightroom and Negative Lab Pro, re-scanning choice frames as needed … the voyage will continue!
Sources and further reading
NASA Mercury home page
NASA Gemini home page
Gemini Overview Flickr
Gemini X Flickr
Gemini IX Flickr
Gemini VIII Flickr
NASM, The National Air and Space Museum: Smithsonian Institution:
The March to the Moon Digital Image Archive, Lyndon B. Johnson Space Centre, Arizona State University School of Earth and Space Exploration
Through Astronaut Eyes, Photographing Early Human Spaceflight by Jennifer K. Levasseur (Purdue University Press, West Lafayette, IN, 2020)
Project Mercury and Gemini: Cameras, Lenses, and Films
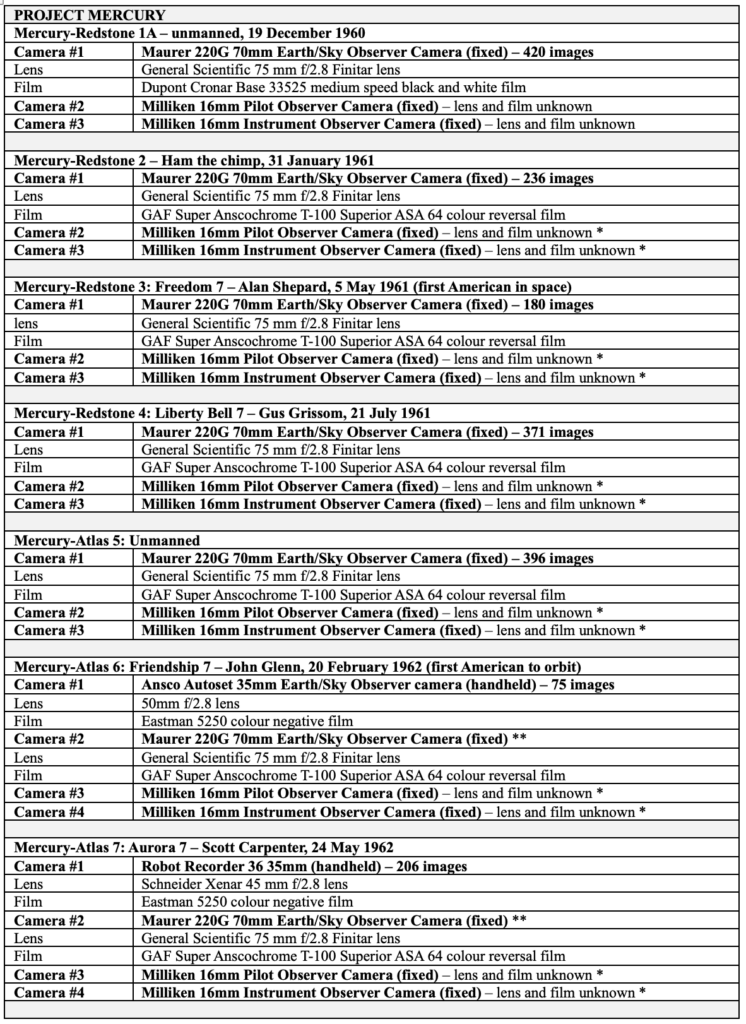
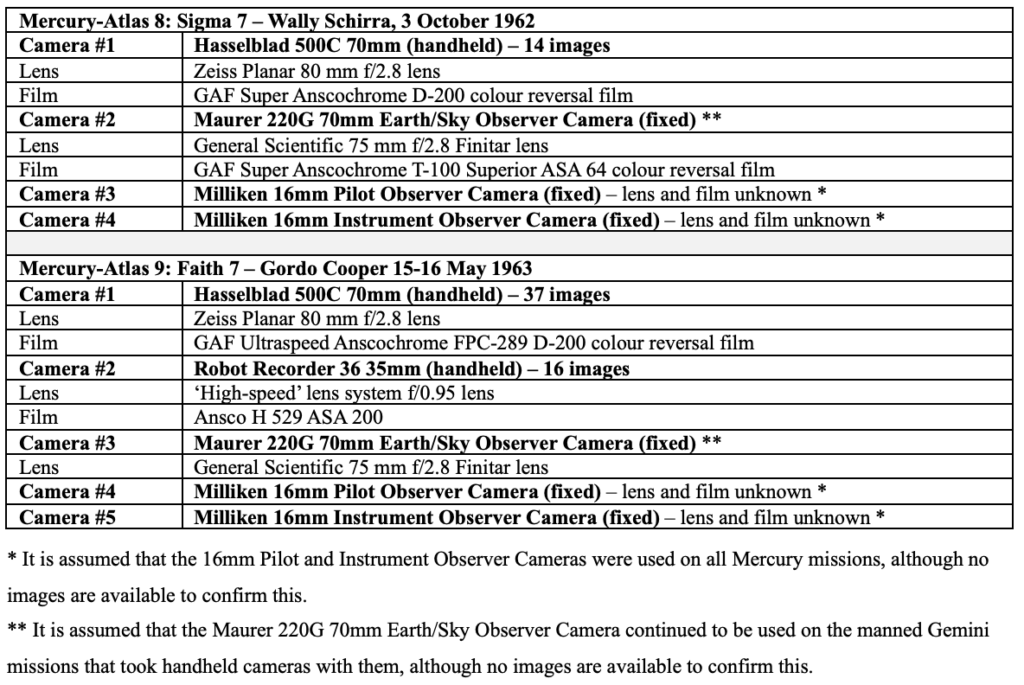
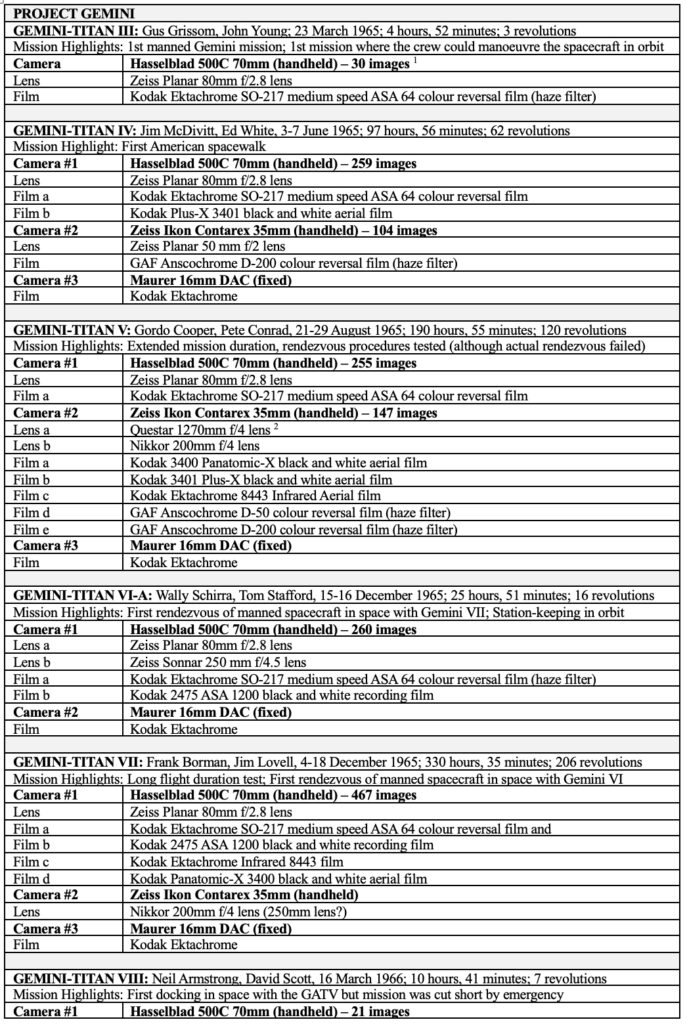
Gemini Missions Summary (NASA)
Share this post:



Comments
Neal Wellons on Gemini on Film – the Cameras and Films Used on the Gemini Space Missions – Pt2
Comment posted: 21/07/2026
Please note an error about the Space Shuttle disasters in this post.