This article seeks to inform about the basics of digitising of analogue film, it discusses the issues involved, different approaches available to do it for yourself, and some of the hardware and software available.
Digitising methods
Scanning
Scanners work by sampling an image via a row of photo sites which read an image one ‘row’ at a time. The row of photo sites move over, or relative to the target. Scanners are usually lit from the front for reflective material (prints/documents), but transparent materials such as negatives or slides need to be lit from behind to give them adequate illumination.
As it works one line at a time, scanning is relatively slow, but can give very high quality results: compared to a normal Bayer camera sensor there is no interpolation as scanners typically have a row of photosites for each colour, or alter the emitted light to get three separate samples. They may also do an Infrared pass, which helps identify dust and scratches on the slide or negative.
Copying
Compared to scanning, copying is a relatively instantaneous process which involves projecting an entire image on an imaging sensor. Copying can be achieved with a macro lens on a camera, a dedicated slide/negative copier for a camera, or via a unit which is effectively a small captive camera.
Scanning
Resolution and scanners
Scanner resolution is usually quoted in dpi (dots per inch) and is determined by the number of photosites across the row in one direction and the distance that they are capable of being moved accurately relative to the target in the other. This means that resolution is fixed in one direction (typically the width) but can be varied in the other. Often you will see two figures quoted for scanner resolution – note that the lower figure is likely to be the ‘true’ resolution. Also be wary of interpolation as this will get you bigger file sizes but not greater quality.
If you read tests on scanners, you will quickly find out that sometimes the quoted high resolutions may not result in scans that actually show that resolution – a 9600 dpi flatbed scanner may only achieve 1700 dpi and the optimum scan is not necessarily at full resolution. You need to experiment, and get to know your scanner to get the best performance.
Typical resolutions for film scanners are 2820, 3200, 4000, 4800 and 5400, although some older models may only be 1200dpi. Because the typical 35mm negative is 24x36mm, the sizes of the output files are as follows:
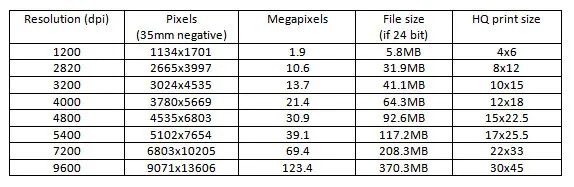
Note that the file size generated from scans can be quite large.
It used to be said that the detail in a film negative was roughly equivalent to a 14MP sensor, which would fit in with the old maxim that you could blow up a 35mm negative to 8×10 quite comfortably.
Types of connection
The type of connection affects speed of scanning.
- Parallel ports used to be available on PCs as a way of connecting peripherals like printers and scanners; no longer common and rather slow. A parallel connection may require the scanner to be connected at boot-up.
- SCSI connections are fast, but require a card to be fitted – the ones likely to be most compatible can also be quite expensive. A SCSI connection may also require the scanner to be connected at boot-up.
- USB 1 is plug and play, is compatible with most modern PCs/Macs, is easy to use, but slow in comparison to SCSI, Firewire and USB in higher versions.
- Firewire is also plug and play, is fairly widely available and a little bit faster than USB 2.
- USB 2 is plug and play, is available on most desktops and laptops and is pretty fast (so much so that you don’t see a lot of USB 3 scanners at time of writing).
Dynamic range
Dynamic range is an important consideration for any photographic device; for scanners this tends to be expressed as DMAX, although more properly we should be looking at DRANGE (DMAX minus DMIN). The higher the quoted figure for DMAX, the more shadow and highlight detail the scanner should be able to bring out from a single scan. Bear in mind that most negatives will be fine with a DRANGE of around 2.8, which is covered by most scanners. Even slide film should not need much more than 3.2, although some ‘difficult’ slides might need more. There is a lot of cynicism regarding manufacturers DMAX figures. DMAX has been used rather freely by marketing departments, in much the same way as resolution – the biggest quoted number will not necessarily give you better results.
Ways of increasing Dynamic range
Just as the dynamic range of a photograph can be increased by taking multiple exposures and merging them to produce an HDR picture, you can get a scanner to do multiple passes that will capture shadow and highlight details. In some cases the original controlling software allows you to perform these multiple exposures, but third-party applications such as VueScan and Silverfast may enable multiple exposures even if the original software does not support it. The key attribute of a scanner here is that it should be able to reposition and control the movement during the scan well enough to allow accurate registration.
Colour depth
RGB JPGs are typically 24 bit – 8 bits for each of the component colours (256 possible values apiece) giving over 16 million colours in all – more than can be perceived by the human eye. Scanners can gather far more information about colour transitions in 36 bit (12 bits per channel) or 48 bit (16 bits per channel). In converting to a printable or viewable format, a lot of this information will be discarded, but having more information available gives some choice about what information we discard – so more is good, but comes at a price (file size) and may not be able to be perceived in the final output.
Focusing
Many scanners, particularly flatbeds, rely on the fact that the target is flat and at a known distance from the sensor. Differing thicknesses of mounts for slides and even curl in film may affect critical focus and this may be a factor in high resolution scanners not producing scans that reflect their full resolution. This may be able to be overcome (to some extent) by use of a fluid mount.
Many, but not all, dedicated film scanners have an autofocus feature which will assess focus prior to a scan; by default, the autofocus target is usually the centre of the frame/negative (which is where any curl is likely to be most pronounced), but some scanners may allow choice of focus point or manual adjustment of focus via software (this is the sort of feature that may only be available using the original software).
Some top-flight flatbed scanners feature adjustments for focus via feet on the negative/slide holders. For scanners that do not offer this feature it may be possible to substitute third party holders that do, or to shim existing holder to get the desired levels of focus. Getting accurate manual focus in this way can be laborious.

Dust and scratch removal
Negatives and slides are small and tend to attract dust and scratches which are then magnified in the scanning/enlarging process; good practice in handling and preparing negatives (using a soft brush and a blower) is always a smart idea and will save you time and improve the quality of your scans, but any small scratches and dust can still show up in output images and may require extensive ‘spotting’ during post-processing.
Automatic scratch removal works on the principle of finding out what dust and scratches are present during one scanning pass and removing those from the eventual output through a subtraction process. This is done by scanning the film with an infra-red light source which will pass straight through the image dyes on a negative or slide as if they were transparent, but which is absorbed by scratches and dust. There are a number of variants on this technique one of the best regarded of which has been ‘Digital ICE’. If you do lots of colour work having a scanner which can do an infrared pass is likely to save you lots of time.
Unfortunately, while the dyes used in colour processes are invisible to IR light, the silver grain of most black and white films, and the cyan dye used in Kodachrome, are not – so scratch removal will not work on typical home process B&W films. Various manufacturers have managed to get their systems to work on Kodachrome, but there may still be issues. C41 process B&W films where the silver salts are replaced during processing by dyes, should be able to use digital ICE, but you are likely to have problems with most stuff that you develop at home.
Colour casts
The film base for colour negatives tends to be an orange-yellow which can make getting a good colour profile problematical. Software may allow you to specify the producer of the film, for which it will make a specific compensation.
Software
The software that was supplied with a scanner originally will function well, and may be available online if you don’t have the original install disks – but is effectively frozen in time; while some twenty year old film scanners are as good as anything produced today, the same cannot be said for their software, which may even have problems running on the latest versions of popular operating systems.
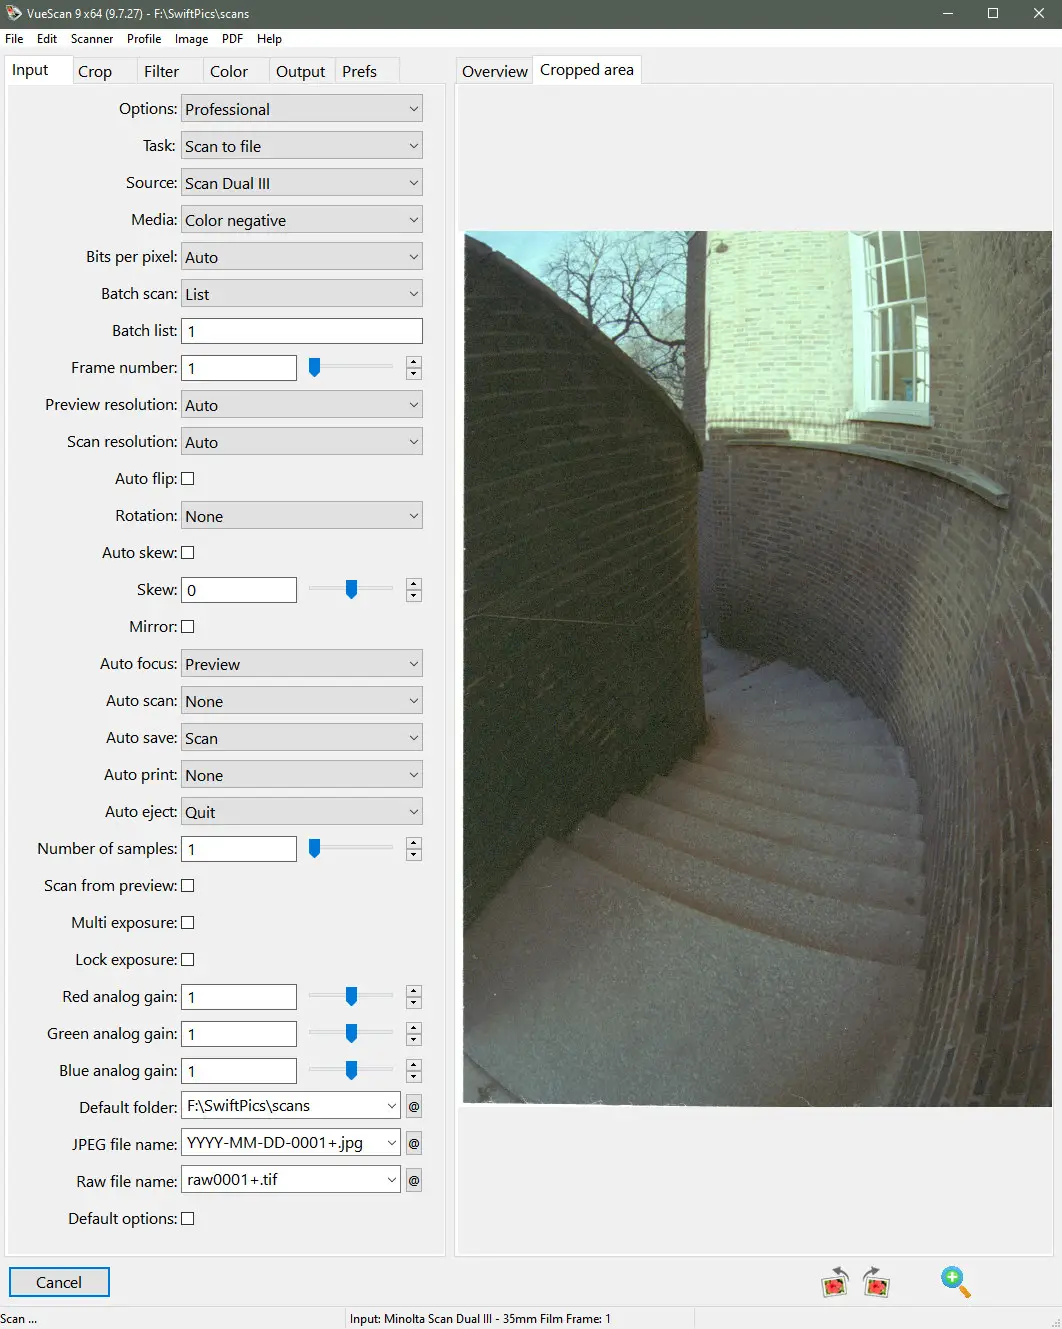
VueScan from Hamrick offers a common software interface for just about any scanner ever made, and it will generally overcome any problems with drivers not working on newer versions of operating systems. It gives multiple exposure features, even where these were not available in the original software. Three versions are available: a demo version which produces a scan spotted with dollar signs (which at least can confirm that the scanner works and gives an idea of quality available); a standard licence that gives free updates for up to a year and the ‘Pro’ version which gives you updates for life and enables you to take RAW scans. the Pro licence is relatively cheap, allows you to use the software on 4 different platforms and gets regular updates. With the Pro licence, Hamrick are the anti-Adobe – literal perpetual licences at a knockdown price – it is a business model that either attracts you, or frightens you away.
Silverfast also works on just about any scanner, and supports multi exposure and RAW. It is available as stand-alone software, but is also commonly bundled with modern film scanners. It has similar features and as good a reputation as VueScan.
RAW scans
In the same way as a RAW file gives a digital negative that gives the opportunity to bring out certain details at a later time, a RAW scan acts as a digital negative that can either produce a JPG without the need for a re-scan, or can be dealt with directly by RAW converters or PP software. Because of the lack of a bayer filter, the resulting RAW file is likely to be an uncompressed TIFF file.
Equipment
Film scanners
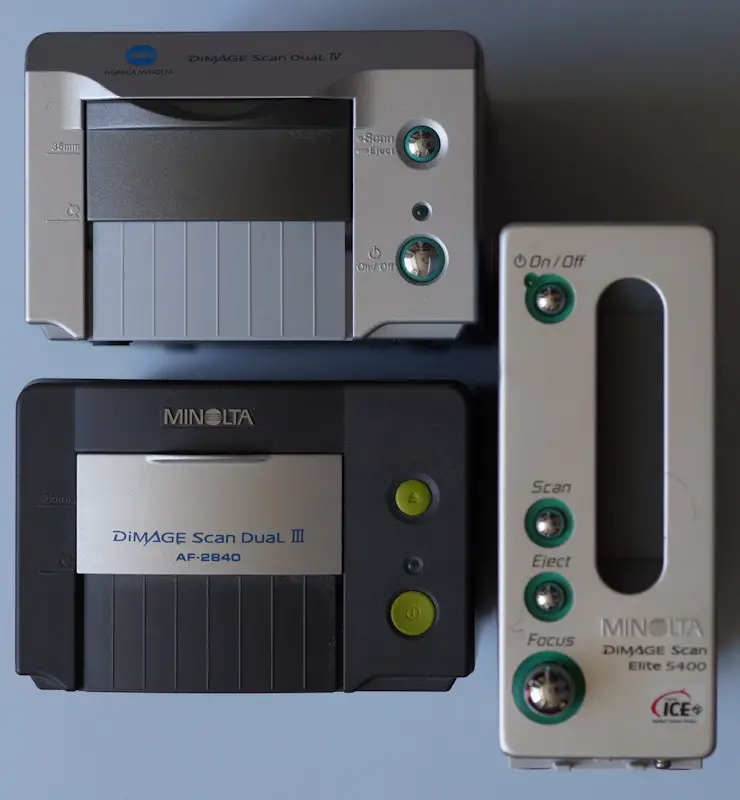
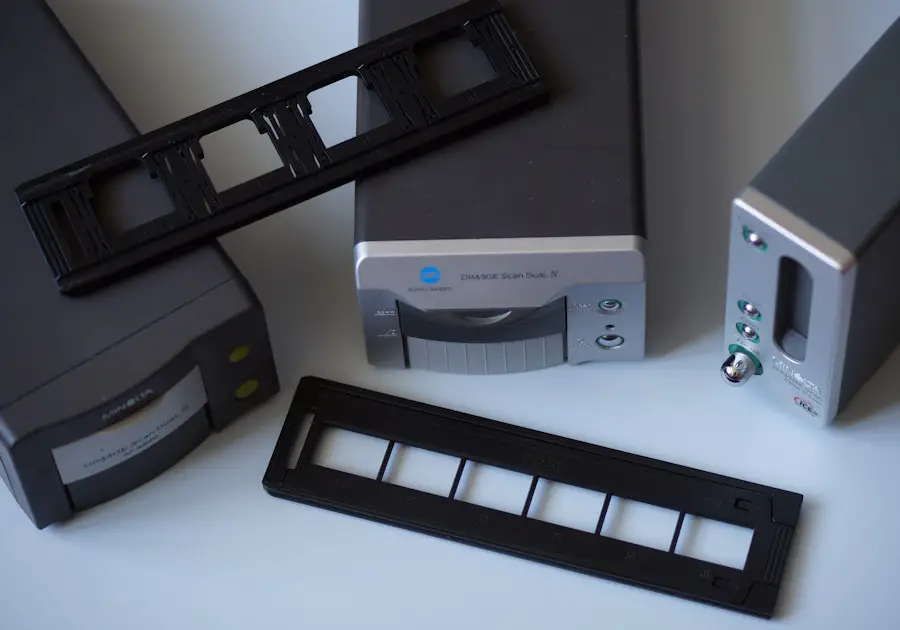
The golden age of the 35mm scanner covered that time when the possibilities of digitized photographs were opening up, but before film cameras stopped being produced en-masse. The advent of affordable digital SLRs killed off most of the breed. Canon, Nikon and Minolta all produced decent film scanners that still command good prices on auction sites.
Plustek have some options if buying new – their OpticFilm 8200i SE has IR scanning and phenomenal resolution, but will likely not take full advantage of that resolution because it does not AF – another option from them is the lower resolution Opticfilm 135, which has no IR capability, a lower resolution, but seems to be able to utilize that resolution despite not having AF. If you want something that would seem to be good at most stuff for 35mm, Reflecta’s RPS 10M does AF, IR scans, high resolution and appears to be able to cope with entire rolls of film.
Many 35mm film scanners offered optional APS attachments that allow you to pop in an APS cassette and then scan whatever negatives are on the processed roll; however these attachments are neither common nor cheap. An exception is the Canon dedicated film scanners which tended to be supplied with APS attachments as part of the original bundle. I’m not aware of any currently available film scanner that deals with APS cassettes.
Dedicated film scanners capable of handling medium format film are expensive. Plustek had a high end film scanner capable of handling 135 and 120 film (up to 6x12cm) with motorized film advance but no AF in recent times. The Nikon Coolscan 8000/9000 ED and Milolta Scan Multi Pro seem to be akin to legends – lovely if you have access to one, but otherwise you may have to compromise…
Commercial/Lab Scanners
Another option is to look at the scanners used in labs. In recent years, the Pakon F135, and the various Fuji Frontier and Notitsu (including the LS1100 which Hamish uses) scanners have become quite popular for home use. The prices have gone up dramatically, and they come with their own connectivity and ageing software issues. The advantage they have is they are designed for both speed of scanning and quality.
Flatbeds
Film scanning capable flatbeds can offer very high resolutions, but scope for focusing is limited. A flatbed may be able to cater for medium-format film, but this capability will depend on the size of the back-illuminated panel in the lid. High end flatbeds from Epson and Canon get good write-ups, with the high end Epson being capable of scanning twenty-four 35mm exposures at a time on its large film holder. Care needs to be taken that platen glass is clean and dust-free.
Fluid mounts on flatbeds
One method when scanning film using a flatbed is to wet-mount. This effectively does away with the supplied film holders and relies instead of sandwiching the negative between two layers of scanner fluid and some acetate – so the negative should be in the optimum place for the fixed focus of the scanner. The fluid has a similar refractive index to the film base, so it is likely to also help in dealing with scratches. Fluid mounting is an involved process – a demonstration is available in this Petapixel article. I’ve never gone through it, but the fact that people go to all that trouble suggests it is worth it where quality is paramount.
Copying
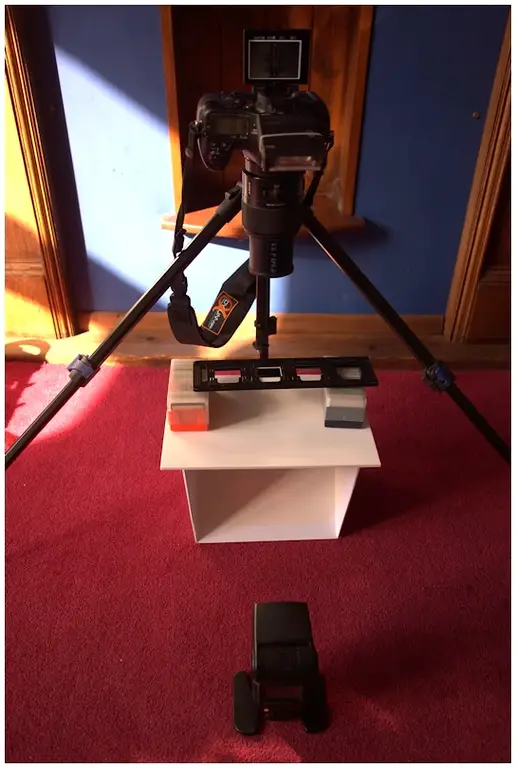
Camera mounting
There are many ways to mount a camera to photograph your film, but it is vitally important that the camera is held with the sensor perfectly parallel to the film. For this reason, copy stands which hold the camera as such make an ideal choice.
Light Source
Any negative or slide being copied needs to be illuminated from the back. The light needs to be diffused and, if you are copying colour slides or negatives, will need to be of a colour balance that your camera can deal with. I have tended to use remote flash, but other options with constant lights may be more practical (particularly where focus checking is required) – a light box or panel should work fine as long as the light source is enough beyond the plane of focus that individual pixels are not resolved.
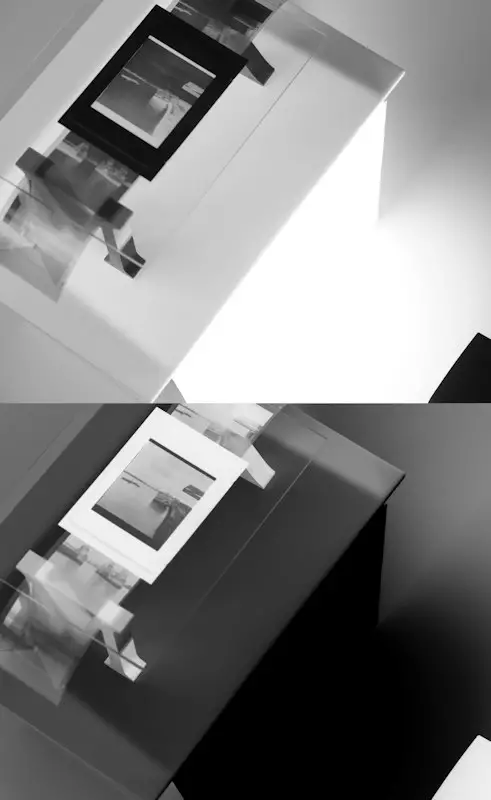
Reflections
The real problem here is with the stray light – the film may pick up stray reflections off anything in the room. For this reason I like to keep the light behind the subject, with the top-side of the negative being in darkness.
Going from negative to positive
Options that give a decent black and white negative/positive conversion are not uncommon in PP software, but conversion of colour negatives, allowing for the colour of the base is far more of an issue.
Software
There is software out there that you can try that helps a lot, and you might like to check out The Colourperfect plugins for Photoshop, or Negative Lab Pro plugin for Lightroom. The latter will also work with scans from dedicated scanners. DXO Optics Pro used to have a preset for colour negative conversion, but this seems to be missing from the latest versions of DXO PhotoLab – The Optics Pro preset can be impoted to PhotoLab.
If you are contemplating lots of colour negative copying with your camera setup, it might be an idea to check that you are happy with the conversion options open to you before spending too much money.
Apps
There are a few smartphone apps (such as FilmLabApp) that can be used to take an image of a negative but also are designed to do the negative to positive conversion.
Macro lens setups
Macro lenses and bellows may also be capable of accepting slide-copier attachments – the advantage here is that macro lenses are likely to be very good quality. Macro lenses may also be used on a copying stand to photograph negatives with back illumination supplied by a remote flashgun. Care needs to be taken to ensure that the target is parallel to the camera sensor, but reasonable quality results can be produced and large numbers of copies can be done in one session. Copying with a macro lens also offers a way of digitizing medium format negatives at a reasonable cost.
If you don’t already have a macro lens, it gives another excuse to get one!
Luminous Landscape published a very good article titled Scannerless Digital Capture and Processing of Negative Film Photographs by Mark Segal and Todd Shaner in November of 2014 (should download as a pdf from the link). It is quite lengthy, but is worth a read.
Holding the film flat
With macro lens setups you need to consider how you are going to hold the film flat – this is less of a problem with slides, but film tends to resist being flat, so ideally you need something that is going to hold it flat and in place, while not interfering with the lightpath to the camera. One method that I’m not so keen on is to flatten the negative under glass. This gives you an extra two surfaces to get dust on, complicates shifting the slide to the next image and brings in problems of Newton’s rings, flare and extra reflective surfaces.
Film holders
There are purpose built solutions out there – including items such as the extremely customisable pixl-latr, an item that caters for multiple formats and includes a diffuser in the base. Other good looking products to check out are the negative carriers from Negative Supply.
Repurposing can also work well here, with negative holders from defunct scanners or old enlargers coming into their own (some of these will incorporate glass, but if they do, are more likely to have coating to counter some of the problems).
Slide copier attachments
Slide copier attachments were available from the 1970s and often featured a zoom to allow you to crop in on part of a negative. Quality is very much reliant of the quality of the optics included and older designs may have been intended for use on full-frame cameras (so it might be difficult to get a capture of the whole of the 35mm frame with an APS-C camera).
Dedicated devices
Many devices are becoming available that resemble hand slide viewers, the idea being that you feed in a strip of negatives and record them onto a memory card or PC hard disk. Remember that the quality of the output from these devices is very much dependent on the quality (and size) of the sensor used in the device and the quality of the optics (which may be akin to a digital Point-and-shoot camera): they are often cheap for a reason and it might be advisable to test before purchase.
Since this article was originally published, one of the ‘Film Photography Talk’ forum moderators over at Digital Photography Review, Smaug01, reported on the capabilities of a “Kodak Slide ‘n Scan” device. After assessing the results, he stated “I plan to use the Slide ‘n Scan to do the initial scans of all my negatives, then, the real keepers will get scanned by my camera and adjusted individually”. His fuller thoughts can be read here.
A basic comparison

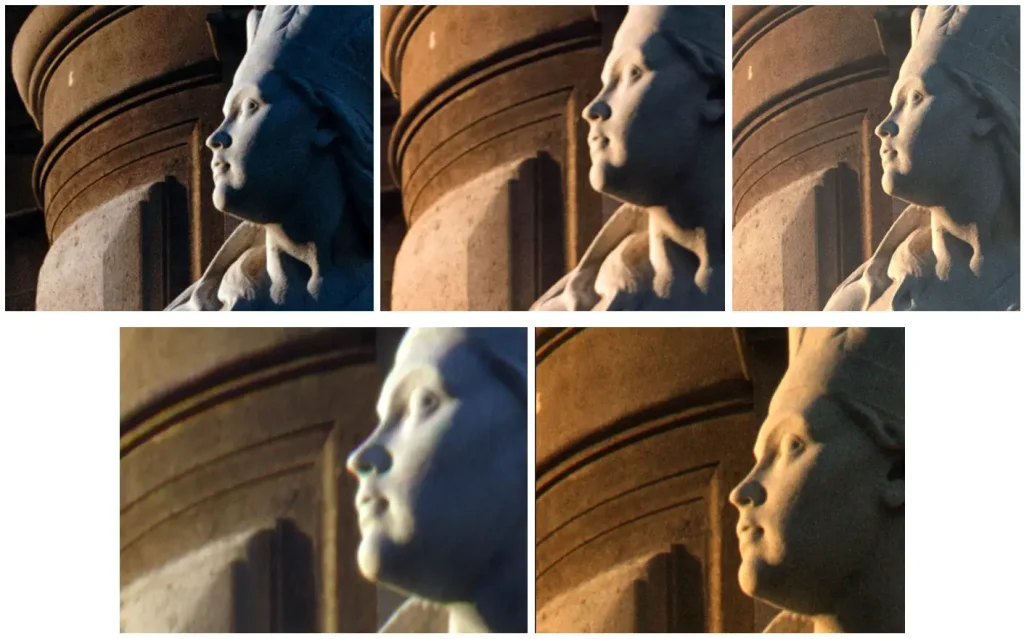
The cheapest of the dedicated film scanners gives quite a good result, but does not have an anti-dust mode. Despite having reasonably high resolution the flatbed shows less detail due to lack of focus (this is one of Epson’s cheaper film scanners). The copy of the slide taken with the camera stands up reasonably well, although it is a little noisy in the shadows (this shot was taken at 800 ISO – so maybe try to keep ISO down to base levels).
So where to go next?
If you have access to any of the kit mentioned, give it a go. If not, some of the scanners mentioned here can be had quite cheaply, or if you already have a digital camera, it’s very easy to start experimenting with as little as a flashgun and a homemade film holder. The good thing about experimentation is that you learn from the failures as well as the successes.
(This article is based on a thread of posts which originated on Dyxum.com (many thanks to those who contributed over there.)
Share this post:


Comments
Martin on Digitising Negatives and Slides – A Primer – By Bob Janes
Comment posted: 09/07/2020
Andrea on Digitising Negatives and Slides – A Primer – By Bob Janes
Comment posted: 09/07/2020
thanks for sharing this. Good post full of helpful info, it requires a good read.
I started a few months ago with analogue photography and with the scanning as well and I ended up buying an Epson V600.
I have to admit that the scanning process is the most boring part of the whole process to me.
Said that, I found that scanner a decent compromise for the in house use.
Is relatively quick, it produces decent scan (again, for an amateur use) and is not too expensive.
I am using Silverfast 8 (the free version) and I quite like it. Intuitive, free and quite quick as well.
For the post pro I am using Darktable, again free and capable of decent post pro process. Very similar to Lightroom I would say.
Some times ago, on youtube, I found this video https://youtu.be/-JUoVzedCRY.
I think is is a clever way of scanning the negatives with a DSLR avoiding of spending on expensive camera mounts.
I will give a good second read to your post.
Thanks,
Andrea
Chris Rusbridge on Digitising Negatives and Slides – A Primer – By Bob Janes
Comment posted: 09/07/2020
Comment posted: 09/07/2020
Daniel Sigg on Digitising Negatives and Slides – A Primer – By Bob Janes
Comment posted: 09/07/2020
Great article, I learned a lot including about interpolation! For my 35mm and 120 negatives (I don't shoot large format), I am using a "copy" method using a Nikon Z6 24mp with 105mm 2.8 Macro lens setup (raw capture, and Negative Lab Pro 2.0 Lightroom plug in). For negative holders, I use a custom setup with a Beseler Negatrans (a negative film transporter I got off eBay for 35mm) backlit with a LED lighttable, and for 120, a plastic 120 film holder. Neither solution is ideal, but I level both camera and surface. I decided to invest in the Negative Supply complete setup (35mm and 120) and am part of their 120 format kickstarter.
I have a question on the scan examples: to my eye it looks like of the Dimage Scan Dual II (2820dpi), Dimage Scan Dual IV (3200dpi), Dimage Scan Elite 5400 (5400dpi) scan examples, the quality / sharpness goes like this: Dual II > Elite 5400 > Dual IV. There seems to be more contrast / color contrast in the Dual II scan as well, but it looks like the sharpest. Do you agree, an do you have an explanation for that? I would have assumed higher res/dpi = higher quality/sharpness.
Cheers,
Daniel
Comment posted: 09/07/2020
Bill Mattocks on Digitising Negatives and Slides – A Primer – By Bob Janes
Comment posted: 09/07/2020
Thanks again for a great article.
Comment posted: 09/07/2020
Marco Andrés on Digitising Negatives and Slides – A Primer – By Bob Janes
Comment posted: 11/07/2020
Vic Mortelmans on Digitising Negatives and Slides – A Primer – By Bob Janes
Comment posted: 14/07/2020
Best regards,
Vic
rl1856 on Digitising Negatives and Slides – A Primer – By Bob Janes
Comment posted: 01/12/2020